(Part 2) Best fasteners according to redditors
We found 1,176 Reddit comments discussing the best fasteners. We ranked the 772 resulting products by number of redditors who mentioned them. Here are the products ranked 21-40. You can also go back to the previous section.


Flooring
Closet
(http://www.ikea.com/us/en/catalog/products/40275813/#/20275814)
(http://www.amazon.com/gp/product/B000H9JFR8/ref=oh_details_o01_s00_i00?ie=UTF8&psc=1)
(http://www.mcmaster.com/#9946k24/=rjcdgv)
Door
(http://www.menards.com/main/doors-windows/mastercraft-slab-doors/mastercraft-30-x-80-x-1-3-4-oak-solid-core-door-slab/p-1657282-c-12245.htm)
(http://www.homedepot.com/p/Everbilt-4-1-2-in-Satin-Chrome-Commercial-Grade-Door-Hinge-20442/204760762)
(http://www.amazon.com/gp/product/B0046ZRI7S/ref=oh_details_o06_s00_i00?ie=UTF8&psc=1)
Paint
Lighting
(http://www.1stoplighting.com/lighting/18-462-634-0-398776/Tech-Lighting_TL-90---Two-Light-Square-Small-Flush-Mount-700FM90S.htm)
(http://www.1stoplighting.com/lighting/18-462-634-0-308557/Tech-Lighting_TL-90---Two-Light-Square-Large-Flush-Mount-700FM90L.htm)
(http://www.1000bulbs.com/product/2798/FC13-2GX741OD.html)
(http://www.1000bulbs.com/product/5113/Q-JCD40120G9.html)
(http://www.menards.com/main/electrical/wall-plates/rocker-gfci/1-gang-screwless-wall-plate/p-1403968-c-6479.htm)
Desk
(http://www.ikea.com/us/en/catalog/products/10251352/#/20251356)
(http://www.ikea.com/us/en/catalog/products/10264302/)
Hammock
(http://www.amazon.com/gp/product/B002T44T7A/ref=oh_details_o06_s00_i00?ie=UTF8&psc=1)
(http://www.amazon.com/gp/product/B002T44T8O/ref=oh_details_o07_s00_i02?ie=UTF8&psc=1)
(http://www.amazon.com/gp/product/B00857I7KK/ref=oh_details_o07_s00_i00?ie=UTF8&psc=1)
(http://www.amazon.com/gp/product/B005VDZE2U/ref=oh_details_o07_s00_i01?ie=UTF8&psc=1)
(http://www.amazon.com/gp/product/B000LGJFYK/ref=oh_details_o07_s00_i03?ie=UTF8&psc=1)
Total cost was USD 2197.67.
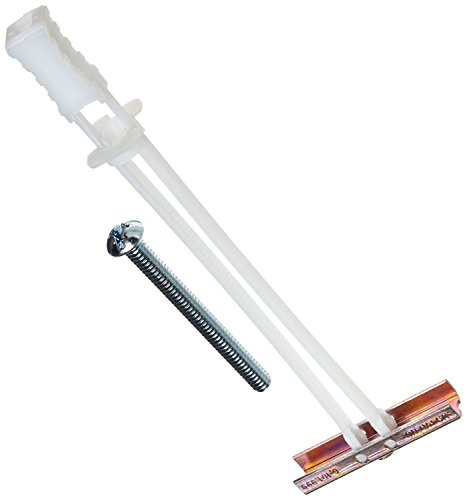
Spring loaded molly or toggle bolts
https://www.amazon.com/uxcell-16-inch-3-inch-Thread-Spring/dp/B072J8GLJV
Best $12 you'll ever spend
You back the wheel out and attach to port and then attach your hose. Then you screw in the thumb wheel which moves a plunger down to engage the schrader core.
I keep some backup clothing. Specifically wool socks, boots and extra gloves and hat. If I get stranded and have to trudge through the snow I wanna be prepared.
Recovery straps arent too expensive either. I think mine was like $30. Get a hitch shackle too if you're gonna do that.
Besides that I keep extra fluids and litter or salt in a box in the back. I got one of these cause I didnt want anything permanent, and just chain it in the bed. Also sand bags for weight - this year I'm planning to build a frame to hold them in place.
Over summer I also built this rail-mount shovel holder, mostly to keep it from bouncing around or getting easily lifted. Its not really secure but its better than just tossing it in there. I used these clamps and these t-slot nuts for the rail. Hardware came from lowes, 3/8"-16, i think they were 1 1/2 inch bolts, washers, and the aluminum bar.
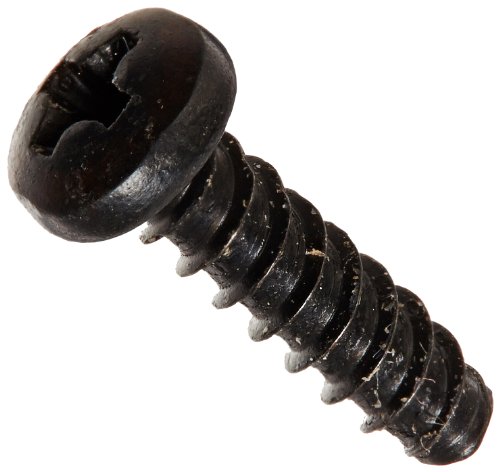
They’re M2 screws. You can use these as a direct replacement. Think Worker or Blastertech might sell replacement screws. You could also just thrift some blasters for the screws.
These are a direct replacement for most shell screws.
I use These
DSLRs are really front-heavy, which can exacerbate vibrations. I'd find a way to balance its center of gravity directly over the mount.
What kind of mount is it?
EDIT: ALSO: You need to secure the top of your camera as well. You can get a simple hotshoe mount like this and improvise some hardware. Basically you want to make a tripod that mounts to the top of the camera to either the base of your mount or additional suction cups.
https://www.amazon.com/gp/product/B01L06CUJG
Pretty sure they are spacers for circuit boards.
https://www.amazon.com/gp/aw/d/B01L06CUJG/ref=psdcmw_6909200011_t1_B00AQTWYUY
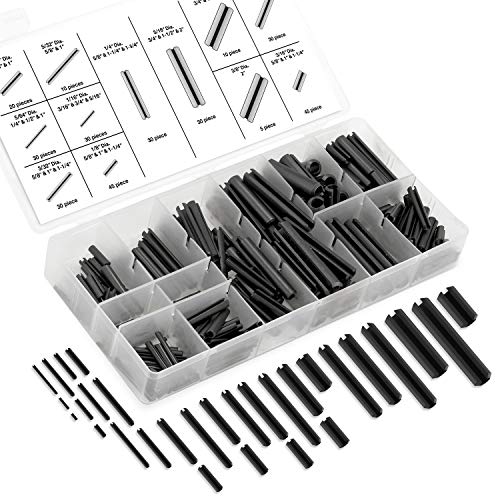
Neiko 50412A Roll Pin Assortment Set with Storage Case, 315 Pieces | Spring Steel https://www.amazon.com/dp/B076B4WT1V/ref=cm_sw_r_cp_api_i_Z99JDbBP8VY9R
Might be worth picking one of these up if you work on guns a lot
Standoff spacers
http://www.amazon.com/Coleman-Cable-3-Outlet-Extension-20-Feet/dp/B00004SQHS
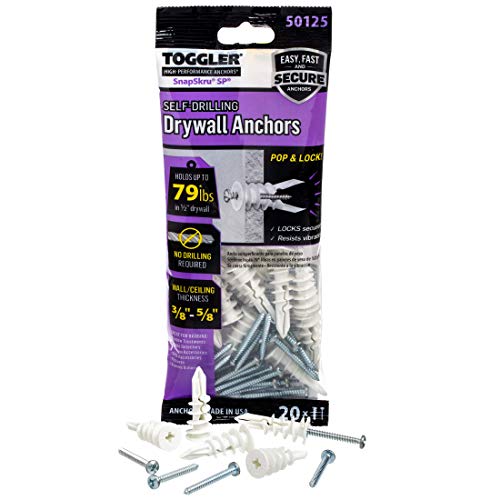
http://www.amazon.com/TOGGLER-SnapSkru-Self-Drilling-Drywall-Anchor/dp/B0051IB63Q
There, solved your problems for less than $20.
All you need is a cheap red dot sight (there's no recoil on a camera so your cheap sight isn't going to lose its zero), a short section of picatinny rail, and a hotshoe to 1/4" tripod adapter. You'll have to drill and tap the rail section to 1/4"x20 and once it's all put together and aligned superglue everything together so it doesn't move. I had the pic rail left over from another project so I saved ten bucks there. You obviously don't need 10" of picatinny rail so just cut off as much as you want. For extra cool points use an Eotech
The lens is a Rokinon 500mm mirror lens.
Go to the local hardware store and get a larger screw in anchor, like these: Drywall Anchor.
They come in different sizes, get one slightly larger than the hole.
Alternatively you can use a toggle bolt.
Why not put some low loss fittings on them? Or something like this
C&D CD5050 Small Thumb Screw Core Depressor / Flow Control Valve https://www.amazon.com/dp/B01HQG4OB6/ref=cm_sw_r_cp_apa_i_7Gb4DbFQF24S3
Homedone Drywall Anchor 50-Pack - 2 Different Sizes, Self-Drilling with Screws https://www.amazon.com/dp/B01KVU4Z68/ref=cm_sw_r_cp_api_8PrxzbGDEQ8MP
I've used these with good results only downside is the huge hole they leave if you remove them.
They make smaller ones but I can't find them on Amazon that are rated for the 50 lbs and take a 7/32" drill bit to install.
I'd recommend just going to the hardware store they have a huge selection typically.
I'm a huge fan of the Toggler brand anchors when I can't screw into a stud. You can find them at Home Depot as well.
http://www.amazon.com/gp/aw/d/B0051IBDKW/ref=pd_aw_sim_328_2?ie=UTF8&dpID=411M9VM3Z7L&dpSrc=sims&preST=_AC_UL100_SR100%2C100_&refRID=0FRF2AFFC415N447ZJGT
I bought that same card from Overclockers UK and it's terrific, it was the first one I've ever bought/used so didn't really what to expect for £150.
Also just bought Articlean set off Amazon for a £10, it comes with the 3.5g tube but the Hyper 212 Evo should come with thermal paste anyway.
Also maybe consider ditching the sound card and going with the Asus Maximus Hero/Ranger motherboard it has better on board audio, I would imagine at least as good as the sound card you were looking at.
Rest looks good!
There are sets on Amazon with M3-M5 hardware. Here's the one I started with, but note I'm not saying it's the best deal at this time. It's a good place to start. For long fasteners, or larger amounts of just one size, it's usually better to go to Aliexpress or Ebay.
In my own designs I also use a lot of 1/4"-20, although that's mostly because I already had a lot of fasteners that size, plus all three types of taps, plus dies.
motor screws are m3 screws, this is a good place to start but i can't tell how long the screw is so you may want to measure it's length in mm before buying. or if you need it sooner, a local hardware store should be able to match one up for you.
The stand is tripodal so you simply need something that can withstand the weight at those three points.
wickedpissa mentioned bedrisers which is the right idea - support the stand at it's three points with minimal equipment - but could be a little low on substantiality (not a word but best describes what I mean).
Because the stand will be much bulkier than, say, a bed riser, it will be prone to knocking the riser over. Something with more mass such as concrete block would not be prone to such a problem and would give you about 6 inches of rise.
Your next issue to overcome is that the rising of the stand will place the center of mass at a greater height than what the stand is designed for. When too high, the stand is liable to fall over. This can be resolved by either A) attaching to the wall (as seen in many tall pieces of furniture) or B) attaching the stand to the risers.
What I would do is take three concrete blocks from your local block and brick supplier and cover them in carpet (for aesthetics). Next, just plop the stand on top. Then use concrete or drywall anchors to bolt a wire to your wall. Then attach that wire to a point near the top of your stand to keep it from tipping.
I agree; you definitely want to make sure to go in to a beam.
I would suggest finding some like this instead, with the solid ring. Either way though, please don't count on it for a full suspension.
Yea, I mean 2 bucks isn’t that bad for a “gun part” but paying shipping and waiting a week for delivery is kind of stupid though when you can just get any ol’ 1/16th roll-pin from a hardware store and have it in your hands today. It’s not a specialized part, it’d be like buying “audi brand” screws and paying 500% markup
https://www.amazon.com/Neiko-50412A-Assortment-Storage-Pieces/dp/B076B4WT1V/ref=mp_s_a_1_3?crid=3B1E22MY0CRIG&keywords=roll+pin&qid=1555073136&s=gateway&sprefix=roll+pin&sr=8-3
315 roll pins for 15 bucks.
M1.4 x 5mm
Amazon 100x set
If you want the heads to be black, paint them or use a sharpie or nail polish AFTER screwing them in. The screw driver will strip anything you color them with.
If you buy regular climbing holds, the plywood you mount them on will need some separation for the end of the bolts to stick out.
Therefore, I'd say screw 2x4s into studs. Take a piece of 3/4" plywood and mount t-nuts into it (here). Screw that into the 2x4s. That gives you separation from the wall, letting the bolts screw in enough. Plus you get the added benefit that your forearms won't hit the door frame. I've gotten some really annoying bruises like that.
These are my favorite kind of snap toggles I've used so far: https://www.amazon.com/gp/product/B0051IBDKW/
I use these with my Foxfire builds. They are roughly the same size as the screws that come with the Stryfe (the head is slightly bigger) but they are a much harder steel. You won't easily strip them out with a screwdriver.
Nyloc nuts.
Absolutely not necessary (really), but I also bought new screws that are a little harder and the hex socket is less likely to deform.
Also not necessary, but nice to have is a miniature metric wrench set.
As I said, it's not hard, but does take a couple hours. Go slow, take a break if needed. There's a video somewhere on youtube of someone doing this which should alleviate any concerns about the difficulty. Remember, if you do this, you're obligated to post the before and after 7x7 bed level image from Octoprint.
There are shelving styles, and anchors that will hold 18 pounds. these anchors, for example Would definitely be strong enough, and there is a video on the product page if you scroll down, That will show you how to install.
I stripped one of my triwing screws while doing a joycon shell replacement and these fit perfectly as a replacement: https://www.amazon.com/dp/B01LZ2HVGM/ref=cm_sw_r_cp_apa_MNI0Ab1Q7RQVN
Easy! Bed rail nuts
I have a piece of mdf with holes drilled in it and T-nuts on the back side.
https://www.amazon.com/Hillman-Group-180297-Pronged-100-Pack/dp/B000H61YF2/ref=sr_1_1/180-7989447-8305100?s=industrial&ie=UTF8&qid=1468022702&sr=1-1
I printed a bunch of hold downs on my printer and use 1/4 20 bolts to hold my part.
I love junky server based stuff like this! I actually have a super basic server in my closset that I put together out of a free 3U case and a bunch of literally scrap hardware (and then some new HDDs) I have it set up as a 3D printer and Plex server.
You could totally make yours into something even more interesting. Go get a nice chunk of wood or something from homedepot and then a set of these as custom standoffs and mounting hardware and go to town :)
No worries if they are metal studs. Just find the center of the stud and go through it with a step bit, pop in some toggle bolts and secure the bracket to the wall with the provided screws
http://www.amazon.co.uk/Arctic-Silver-Paste-Articlean-Cleaner/dp/B003VRBPAI/ref=sr_1_2?ie=UTF8&qid=1411939168&sr=8-2&keywords=arctic+silver
http://www.amazon.co.uk/Am-Tech-1500W-Hot-Air-Gun/dp/B002VJO70W/ref=sr_1_4?ie=UTF8&qid=1411939212&sr=8-4&keywords=heatgun
http://digiex.net/attachments/guides-reviews/console-guides/playstation-3-guides/5344d1284624453-gilksys-playstation-3-ps3-yellow-light-death-ylod-fix-repair-guide-ylod-fix.pdf
That's all you need to fix the ylod
Assuming your camera has a cold shoe/hot shoe, you could use a Cold shoe to 1/4"-20 adapter and an iPhone tripod mount.
The PSU should be grounded & everything is connected to that so grounding isn't an issue. Technically, a metal case cuts down on radio interference being generated by the machine but it's not a huge deal. My biggest concern would be a lack of support for a large video card.
If you want to be really classy, keep an eye out at thrift stores, online classifieds or used parts vendors - you might find an old junker case for $10 or so. Alternately, you can order a pack of motherboard standoffs to make certain that the bottom of your case is clear.
Trencher Shovel:
Manufacturer's site for specs: https://www.crkt.com/trencher.html
Amazon link for a better price: https://www.amazon.ca/gp/product/B01M0G10O4/ref=ppx_yo_dt_b_asin_title_o02_s00?ie=UTF8&psc=1
Mounting Pieces:
Quickfists: https://www.amazon.ca/gp/product/B000CQPANY/ref=ppx_yo_dt_b_asin_title_o03_s00?ie=UTF8&psc=1
T-Slot Nuts: https://www.amazon.ca/gp/product/B009SWGLHW/ref=ppx_yo_dt_b_asin_title_o03_s00?ie=UTF8&psc=1
Screws: https://www.amazon.ca/gp/product/B00IZFS0VI/ref=ppx_yo_dt_b_asin_title_o03_s00?ie=UTF8&psc=1
You will need a Drill and a 3/8" or 1/2" drill bit. Drill out the stock hole in the bottom of the quickfist to make the hole larger, the screws will then fit through. Put the T-Nut in the bed-rail and slide it down to where you want it. Screw the Quickfist to the T-Nut and you get what you see above! Insert your tool of choice!
I bought these: https://www.amazon.com/gp/product/B075ZZW7VL/
These spring loaded bolt anchors might do the trick, might even be able to get em at Walmart. This is all an untested theory tho... lol https://www.amazon.com/dp/B072J8GLJV/ref=cm_sw_r_cp_apa_i_8AWzDb5DWHBVN
Use something like this bolt to attach to the shed. Predrill a small hole into a stud and screw it in. Attach a tensioner like this one to the lag bolt then attach the cable to the tensioner.
As someone said previous, drill a hole slightly bigger than the cable you plan to use thru the post of the basketball hoop. Thread the cable thru and use one of these cable clamps on the back side to secure the cable from slipping back out of the post.
Tighten the tensioner by turning the center section while keeping the two end hooks from turning. The two hooks are opposite threads so turning the center will draw the ends in.
not exactly cheap or all encompassing but i'd probably go with this assorment
T-nuts are also a lot easier than inserts. You just drill a 5/16 hole and press-fit them in. 100 of them should probably cover your needs.
http://www.amazon.com/gp/product/B000H61YF2
The whole printed extruder assembly, ABS print cooling shrouds, extra nozzles.
M3 screw kit.
M3 square nuts.
M3 lock nuts
Drywall screws, despite the name, are not for drywall. At least, not in that way. They're to go through drywall into the stud behind it. So either you need to use some sort of drywall anchor or fasteners into the metal studs.
As for the weight, that's not really that big a deal, not with something that large and relatively light for it's size. These little guys have a listed sheer strength of 105 pounds on 3/8" drywall. The working load (for safety) is gonna be roughly 1/4 that, so let's just round down and say 25 pounds. That's only 2-3 of these anchors to hold up your art. So say you mount the french cleat using one every 8 inches, that's 6 anchors (if the 4 foot dimension is width), and there you go. The art itself will be hanging really close to the wall, so leverage is minimal. The load is static, so you won't get any extra force from movement. Hanging it on drywall will be fine. Hell, you could go seriously overkill and put in an anchor every 4 inches, if you wanted (though that may damage the integrity of the drywall if they're too close together).
Yes it is, air bubbles will have formed and act as an insulator. This will make the entirety of the thermal paste useless and lead to sever CPU overheating. You will need to purchase some more.
Here is a link to some good quality thermal paste that will last you a while as while as a remover kit
Thermal Paste and Remover kit : https://www.amazon.co.uk/Arctic-Silver-Thermal-Paste-Arcticlean/dp/B003VRBPAI/ref=sr_1_6?s=computers&ie=UTF8&qid=1483407008&sr=1-6&keywords=Thermal+paste
So I've heard. I'm going to buy some new thermal paste as well, is this a good kit do buy do you think? Looks like a good deal to me.
I've been working on this table project for a little while now, and now just need to fasten the legs to the table tops. One issue that that these raw oak slabs were never planed more than the rough cut from the tree, so their fairly uneven, and even bow a little (don't think it shows in the pictures, though). For that reason, I need a way to level the legs so that the tables don't rock once their finished. Shimming the plates with washers should be easy enough to get the table level, but I'll need machined threads to run the fasteners into and out of (and then into and out of again) so that they'll still hold once it's all said and done. I've looked at a few different options for this problem, but aren't convinced any of them are ideal. T-nuts would work, but I think they might pull out since they won't be held in from the top of the table surface (not interested in that industrial look). These threaded inserts and these similar ones would seem to do the trick, but the reviews raise questions about the strength of the material in dealing with hardwood, as well as problems with the material stripping while trying to place them. Anyone have any suggestions/advice?
TLDR: Looking for fastener solutions to affix table legs to the underside of an oak slab that will allow adjusting to level the table.
Lots of cheap options on Amazon. If you don't want the bar you can get a couple of these t-nuts that fit inside the track and screw the fork mount into that for an out of the way semi permanent options.
Sunlite Fork Mount Bike Block https://www.amazon.com/dp/B000AO7GRG/ref=cm_sw_r_cp_apa_2dOwzbNNVRVQF
1018 Steel T-Slot Nut, Black Oxide Finish, Grade 5, Tapped Through, 3/8"-16 Threads, 5/8" Height, 9/16" Slot Depth, Made in US (Pack of 5) https://www.amazon.com/dp/B009SWGLHW/ref=cm_sw_r_cp_apa_IgOwzbJSKR2CC
It looks like a regular motherboard standoff. Not sure what size though. You can grab a kit with different types if you can't figure out what size it is.
https://smile.amazon.com/dp/B075K3QBMX/ref=cm_sw_em_r_mt_dp_U_QgqZCbPFFHY6V
This style anchor works wonders for hanging heavy shit in drywall. One will support the mirror, two will idiot proof it.
https://www.amazon.com/TOGGLER-SNAPTOGGLE-Zinc-Plated-Channel-Fastener/dp/B0051IBDKW/ref=pd_sim_60_5?_encoding=UTF8&pd_rd_i=B0051IBDKW&pd_rd_r=5R9HHHZNZADDRNMBB44B&pd_rd_w=fAiNu&pd_rd_wg=C3sSs&psc=1&refRID=5R9HHHZNZADDRNMBB44B
You drill a hole, stick the metal base into the wall, and pull a plastic tab tight to the wall. Then cut the plastic wings, and you have a reusable threaded piece of metal permanently hanging on the wall. When you move the mirror and want to patch it, hit it with a screwdriver and a hammer and it will fall into the wall cleanly.
It's nice because you can take the hardware out as much as you need and the anchor will remain in place and reusable.
VIGRUE M2 M3 M4 1080PCS Stainless Steel Screws and Nuts, 1080 Pcs Hex Socket Head Cap, Silver https://www.amazon.com/dp/B071KBVZVV/
I used these and they fit with a little filing (my printed holes anyways end up a bit too small)
I did the same and ended up finding replacement screws the same size but with a Phillips head
EDIT: I noticed I didn't answer your question but if you do get it out, I think these were the ones I got but it was awhile ago so def make sure you check the size before getting them: https://www.amazon.com/uxcell-Stainless-Phillips-Tapping-Screws/dp/B01LZ2HVGM
I bought these standoffs for a test bench I was working on at one point and they worked fine. Even comes with screws
Also got a tap and die to make new holes cause I was making it work with a laptop board (lasted a while until I fried it)
It's just standard 1/4"-20 threading, it says it in the description. Here is a $5 alternative: http://www.amazon.com/SMALLRIG-Hot-Shoe-Adapter-Monitor/dp/B006LB5YLM/ref=sr_1_1?s=electronics&ie=UTF8&qid=1413131523&sr=1-1&keywords=hotshoe+tripod+mount
Sutemribor M2.5 Male Female Hex Brass Spacer Standoff Screw Nut Assortment Kit (180Pcs) https://www.amazon.com/dp/B075K3QBMX/ref=cm_sw_r_cp_api_i_BxipDbRXZ1GXB
i guess i meant brass hahaha
they get loose and if you have a bad ground they can really fuck you up
Everything should be M3. Do your self a favor and replace all the Philips with socket caps.
https://www.amazon.com/dp/B01I74TTWU/ref=cm_sw_r_cp_apa_GptNyb4VWDM0K
You'll also want lock washers
I don't see why a simple lag eyebolt screwed into each 4x4 wouldn't work.
Hell, just a hole drilled through the 4x4 with some rope through it would probably be just fine. It's not like a shed is particularly heavy, unless you're making a reinforced concrete bunker-shed.
I agree with /u/niceflipflop that a couple of scale pics would be nice, but at a glance I'd definitely say you've got plaster walls. First thing's first, do you own or rent? That's going to make a big difference as to what advice I give as I've both owned and rented places with plaster walls.
If you rent, leave them the hell alone. Hell hath no fury like a rapidly deteriorating plaster wall and being a landlord myself who does all my own drywall/plaster you'll probably get charged a lot of money for those repairs. Stick to tape or 3M command strips and call it a day.
If you own the place, do yourself a favor and invest in a quality hammer drill. I bought a Dewalt because I knew I was going to abuse it, but for someone who is going to use it a few times a year, the model I linked will do fine. Some argue that you don't need a hammer drill to put a hole in masonry and they're wrong. Plus, it doubles as a standard, high power corded drill which is also an indispensable tool.
For interior (read: not masonry backed) walls, I've had good luck with these. They're low weight (~50 pounds or so) but great because you can avoid drilling and causing a mess like you have on your hands now. I never tried it, but I've heard putting a sturdy tape like duct tape can help prevent tear out as well. They also penetrate the slats and studs if you happen to hit one. This type of toggle fastener technically works, but I don't like them for plaster because of the size of hole you need to drill for them which generally causes more problems than it solves (1/2", if I remember). Definitely don't use anything like these as they'll just shred your plaster.
For exterior, structural, masonry walls, you need masonry screws and the 3/16" masonry bit to go with the 1/4" screws. If you have a hardware store near you, chances are they'll have them in packs far less than 100 and many stores sells Tapcons which often come with a bit included.
It seems daunting at first, drilling into a concrete/brick wall (I cut away an entire section to install a door. shudder) but once you get used to it it's just like mounting to any other wall surface. The thing you have to understand is just how thick your plaster is and subsequently how many threads you need to have inserted into the masonry to make it safe. Take this cross section for instance. If we look at the deepest your cabinet back is likely to be (.5") and add 1.5" for the plaster thickness that means the fastener has to penetrate 2" of material before it even hits the wall. The general rule is that for every length of fastener you have outside the functional threaded surface (the masonry wall), you need to have the same length of threads inside i.e. "A" has to equal "A". So, in this example, if you have 2" of material (.5" cabinet back and 1.5" plaster) you'd need ~4" masonry screws to safely hold your cabinet in place. For something as relatively light duty as a coat rack you could probably get away with 3.5" or so, but anything less and you're risking the fastener simply pulling out of the masonry walls, especially if your home is brick as the interior bricks are far softer than the exterior. Also I realize that not everyone is as tool hungry as I am, but an impact driver drives fasteners into masonry far better than a standard drill. You're more likely to strip them using a standard drill and frankly I use my impact more often than I do my drill, but we gutted our entire place so I understand not everyone wants a pile of tools.
No I used this. uxcell 5/16-inch X 3-inch Male Thread Spring Loaded Hollow Wall Round Head Toggle Bolt 5pcs https://www.amazon.com/dp/B072J8GLJV/ref=cm_sw_r_cp_api_i_853KDb36PB5NJ
They're just motherboard standoffs. I got a box of them of various sizes off Amazon.
https://smile.amazon.com/dp/B06XQ33Y9X/ref=cm_sw_r_tw_dp_U_x_tNnXCbD7GT090
Buy
($6)Wires:For the MOFSET mod
($1o)MOFSET
($6)Wire spades:For the MOFSET mod
($8)Assorted M3 Bolts:You need some for a few mods and for the bolts you will inevitably strip on this
cheapwonderful machine($13)Longer assorted M3 Bolts:For a few mods
($9)M4 Bolts:For one of the mods
($9)Metric allen wrench set:Had to order one of these since metric tools aren’t common round these parts
(~$20) PLA of preferred choice- You’ll run out of the sample bit quick so go ahead and order a roll or two to be prepared. You will note some upgrades require ABS so a small spool of that to your order will also help.
($6)M3 Lock nuts:Critically needed for a simple mod
($10)Threaded rod and nuts:Please note that this item seemed difficult to find online. I recommend going to your local hardware store and getting two 5/16” rods of at least 16” in length. They should have an assortment of threaded rod in various lengths available. Also note that the pitch of the threading matches the nuts you buy. Further instructions regarding this can be seen in Azza’s Z-Axis braces below.)
($6)9mm Wrench for the nozzle: Don’t wait for your first clog, go ahead and have this on hand to remove/change the nozzle. Note to only tighten/loosen the nozzle when heated.
Below is the order of printable upgrades I recommend but I suggest you mix in a few other prints along the way because this is a hobby after all and you should be having fun. It helps to have your quality as tuned in as much as possible for some of these so be patient and keep trying if you need to.
Print
Spool holder- temporary : Until you can mount your spool on top of the enclosure or any other personal preference.
Belt tensioner- print x2
Z-brace
Shielded stop button
Cable relocator : It’s a pain, but if you spend the time to do this and turn your extruder motor 90 degrees then you can get the full Z height without ruining your cables. It does involve opening all the cables to the PSU and feeding a few extra inches back through the cable chains.
Cable shroud : Looks nice if you do the cable relocator.
The following need to be printed in ABS:
M3 Bed Nut retainer: 10/10 upgrade. I know they look worse than the nice metal stock ones, but these help keep your bed level longer.
CiiCooler
Glass bed Holder
Now that the first major round of printed upgrades is done it’s time to shift to a few more supplies to pick up to really fine tune the machine.
Buy
($5)Radial fan: For CiiCooler
($5)Glue sticksThis and a glass bed is magic
($25)Borosilicate glass 8” x 8”
($26)Y-Carriage plate upgrade: This has been a nice upgrade as I now only need to relevel the bed every couple weeks instead of every print. Check out this guide for a ‘how to’ as well as a free upgrade by shifting your Y pulley over.
($15)rechargeable dehumidifier: For keeping in the bin with your opened filaments
($9)Extruder gears: Might be able to hold off on these, but will need eventually. If for some reason you have a Maker Select with metal X-axis blocks (V1 and V2, but not V2.1) then this is a must. You can follow this guide for a how to.
($28)Metal extruder plate and lever: Not needed, but nice.
($14)Noctua 40mm fan: Not needed, but makes the printer a lot quitter. A LOT quieter.
($50)MicroSwiss All Metal Hot End: The destruction of my PTFE tube by this point pushed me to doing this upgrade. If needed you can follow this guide for replacement. Remember to tighten/loosen when the nozzle its hot.
($6)Ceramic cotton: Tore off the stock one when replacing for the all metal hot end by accident. At least its thicker than stock
Now that the printer is in its final form, its time for the enclosure which is a stacked Ikea Lack hack.
Print
Spool holder
Pi Case
120mm fan cover
Fan grill
120mm fan PSU modification: I edited this to fit upside down since my PSU is mounted on the underside. This was nice since I blew the 40mm fan anyways so it made everything a lot quieter than before.
IKEA Lack filament guide
Webcam holder: This is one I designed specifically for the webcam I happen to have lying around. The camera mount piece can be changed out no problem though for what ever webcam you have or buy. The SketchUp file is included on Thingiverse for such purpose.
Buy
($20)2x Ikea Lack: Luckily there is one right down the street from me. I am located in North America though, so we do not have the STUVA, if you live literally anywhere else you may check in to this as an alternative.
($80)Plexi glass for enclosure: Could be cheaper alternatives, but it looks cool
($9)Foam pads for feet
($42)Raspberry Pi3: For OctoPrint. I also suggest using a different USB cable than the stock one provided by Monoprice or you will have issues.
($9)2x 120mm fans: Used for the power supply cooling and enclosure
($6)Rocker Switches so that the enclosure fan can be on for PLA, but off for ABS
($15)Dimmable LED lights
($10)8mm LED light connectors
Total:
$250 printer + $452 upgrades/parts + ~$80 PLA/ABS to date
315 roll pins here, gas block roll pin included, for $16 and prime shipping:
https://www.amazon.com/Neiko-50412A-Assortment-Storage-Pieces/dp/B076B4WT1V/ref=mp_s_a_1_2?adgrpid=54132711977&hvadid=274745269900&hvdev=m&hvlocphy=9026844&hvnetw=g&hvpos=1t1&hvqmt=e&hvrand=2460638406483223647&hvtargid=kwd-324011511759&keywords=gas+block+roll+pin&qid=1551243572&s=gateway&sr=8-2&tag=hydsma-20
Hey guys, making a post about finding replacement screws. I have looked up previous questions and only found some useful things from it. The basic thing is that for the 'regular' sized screws, I can use this. Not sure about it, because the answers to a question about Nerf on there basically cancel each out. From my measurements, the common screw sizes are 3/8", 5/16", and either 7/16" or 1/2". The only problem I have is the thread count, I don't know whether to use a coarse thread or a fine thread for the replacement screws. I can barely get a quarter of the screws off to tell if they're too rusted or if they've been stripped (leaning more towards rust). The recommended screw is #3-24, but it's likely that I'll be opening up my Longshot quite a few times in the future. So should I just use that thread count or opt for a coarser thread count to keep the blaster together?
TL;DR What the f%&* is thread count and what screws should I use for my Longshot?
P.S. If I read any comments about just thrifting some Mavericks or something for the screws, I'll label it as spam. I'm looking for help, not snark.
These are what I used.
Core depressors are the actual name for them.
https://www.amazon.com/Thumbscrew-Core-Depressor-Part-CD5050/dp/B01HQG4OB6/ref=sr_1_1?ie=UTF8&qid=1499473238&sr=8-1&keywords=CD5050
I have three, because sometimes an oil injector or something will have a valve that needs depressed.
This is how you used them as 'low-loss fittings'
https://www.youtube.com/watch?v=jvNbS8k1U-4
The first result I get is same day delivery /shrug
https://www.amazon.com/Honbay-100pcs-Stainless-Steel-Square/dp/B06XPFLNBS