(Part 2) Best interconnects according to redditors
We found 865 Reddit comments discussing the best interconnects. We ranked the 489 resulting products by number of redditors who mentioned them. Here are the products ranked 21-40. You can also go back to the previous section.


Having a set of these https://www.amazon.com/dp/B075TYSD26/ wire crimp connectors with shrink wrap is a great idea.
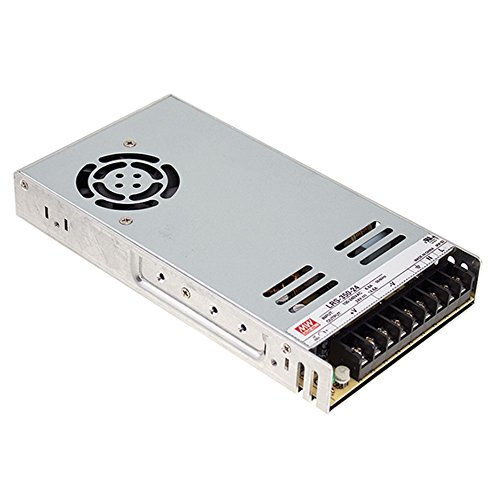
If its factory yes. They are cheap Chinese power supplies and will go bad. First the fan will start making noise usually, then things go bad from there. Go to amazon order you a meanwell. This one here MEAN WELL LRS-350-12 348W 12V 29 Amp Single Output Switchable Power Supply https://www.amazon.com/dp/B0109IMRPS/ref=cm_sw_r_cp_apa_i_tdO3DbC8JMAXM
They do make small female spade connectors that will fit on the end of them. But the spade on the end of those switches isn't technically long enough... but it'll work.
https://www.amazon.com/Shrink-Solder-Sleeve-Crimpless-Connectors/dp/B01M1032A7?th=1&psc=1
https://www.amazon.com/Connectors-Waterproof-Electrical-Terminals-Automotive/dp/B075TYSD26/ref=mp_s_a_1_3?ie=UTF8&qid=1542647519&sr=8-3&pi=AC_SX236_SY340_FMwebp_QL65&keywords=splices&dpPl=1&dpID=512rF%2BLN5JL&ref=plSrch
Wire:https://www.amazon.com/gp/product/B01J639G74/ref=oh_aui_detailpage_o01_s00?ie=UTF8&psc=1
Cotton:https://www.amazon.com/gp/product/B00X6PQJ2Y/ref=oh_aui_detailpage_o04_s00?ie=UTF8&th=1
battery wraps for custom designs: https://www.amazon.com/gp/product/B018I08UKU/ref=oh_aui_detailpage_o01_s00?ie=UTF8&psc=1
Coil wrapping kit: https://www.amazon.com/Coil-Master-Authentic-Tweezers-Resistant/dp/B01GWD5GCK/ref=sr_1_1?ie=UTF8&qid=1486692532&sr=8-1&keywords=vape+tool+kit
These are all items i have bought and use. some other things i didnt list because it doesnt seem like they are sold anymore for whatever reason. I didnt list other things since they are vape related but not exclusivly for vaping like a vice or drill.
edit added the coil kit. i didnt buy this from amazon but i won it in a giveaway here on ECR a few months back. its the exact same kit and i love it. carry it everywhere.
The kit is also perfect if you need one or were looking to get a new one since its sitting right at that 50 dollar mark
A lot more supplies these days are switching. The cost and efficiency are too good to ignore, and most hams are starting to get over their fear of them now that technology has improved.
I cannot speak to the quality of the $20 one on amazon, but it is a direct knockoff of a MeanWell supply (whose prices are also VERY competitive) The company I work for now uses MeanWell supplies for some of our products.
If you can, try to find the spec on the switching frequency, the higher it is the better off you will be (the easier it is to filter).
See my submission of using a Meanwell LRS-350-12 for a go-box: http://imgur.com/a/Wzn1g
You'll see I did have to make a small filter to make the supply totally quiet on 160 and 80 meters, you can also just use a long thick cable as a quick filter but that's not recommended due to the losses.
LRS-350-12 on amazon: https://www.amazon.com/Mean-LRS-350-12-Switching-Power-Supply/dp/B0109IMRPS
Do consider paying a few more bucks for an on brand supply, there are things you can cheap out on, but the thing that sits between your mains voltage and your LVDC powering our expensive rigs should NOT be one of them.
jumper cap.
Here you are, my friend: Amazon
What's the problem with splicing? It's not permanent. You just remove it when you don't want it anymore. Get these.
As far as finding switched power, get a wire tester and poke some wires with it while turning the key on and off. When you find a wire that's hot when the key is on and dead when they key is off, use that wire.
I forgot to factor in shipping for the cable in the total in the title.
Edit: I want to share this cost savings with people and thought this would be the best subreddit to do so. If it isn't, please let me know.
I got you fam
https://www.amazon.com/Install-Bay-Heat-Shrink-Tubing/dp/B0053PYF62/
https://www.amazon.com/Professional-Equipment-Overlap-Welding-Voltage/dp/B01DDXLNVU/
Heat shrink tubing and a hot air gun, this way you can spend a few hundred bucks on something you are going to use for a few seconds and then throw away.
Or you could just buy some new spade connectors
Edit: one of these sizes should work.
I used a POSI-TAP and would highly recommend it. Seriously takes a couple minutes.
https://www.amazon.com/gp/product/B001MPW54G/ref=oh_aui_detailpage_o02_s00?ie=UTF8&psc=1
I use a 1500W heatstick on my apartment stove and it does a fine job.
Your kitchen really ought to have GFCI outlets to be up to code. But assuming that your landlord/super won't replace them, running an extension cord is probably safer than going without, as long as you keep it routed out of traffic.
The better (and safest) option is probably to get a GFCI pigtail and plug your heatstick in through that.
The original power supply is junk. Here's what I replaced mine with: https://www.amazon.com/gp/product/B0109IMRPS/ref=ppx_yo_dt_b_asin_title_o04_s00?ie=UTF8&psc=1
​
When I hit "preheat PLA", you don't even hear the fan change speeds. Works good!
I like how you think. True, the NEC would say "with listed parts per manufacturer specification" unless there is something I haven't seen, what others are mentioning here is for small wire that cuts into the sheathing and makes contact with the wire for teenagers shitty car audio systems.
I would think using a decent sized screw and lugs you could realistically get 70 amps worth of contact area. Have to do some testing to make sure it's not breaking strands, but going between them
depending on whats used to power this thing, but a pump at the lake sonds bigger than coffee mashine or computer. if you're in the comfort of your own home, i have some 933mhz wifi relays to plug between your wall and your appliance. they stay off after i cut the power from the wall side. sorry for the crap language, to lazy to google the acctual terms
edit: https://www.amazon.de/Brennenstuhl-Funkschalt-Set-Funksteckdosen-Handsender-Kindersicherung/dp/B001AX8QUM/ref=sr_1_4?s=diy&ie=UTF8&qid=1487880350&sr=1-4&keywords=funksteckdosen that kind of wifi relays
The pid:
https://www.amazon.com/Digital-REX-C100-Temperature-Controller-Thermocouple/dp/B07QS2W736?th=1&psc=1
It’s Celsius but it’s only $19
These heaters $10
https://www.amazon.com/YXQ-Cartridge-Electric-Heating-Fittings/dp/B06XWB86GF
These connectors are good 10 pack $8.45
https://www.amazon.com/Wago-221-413-LEVER-NUTS-Conductor-Connectors/dp/B06XGYXVXR/ref=mp_s_a_1_3?keywords=wago+connector+3+ten+pack&qid=1570302206&sr=8-3
These cable glands. $2.54
https://www.amazon.com/uxcell-Plastic-Waterproof-Cable-Connector/dp/B00EZ76W74/ref=mp_s_a_1_2?keywords=pg11+cable+gland+2+pack&qid=1570302379&sr=8-2
Power cable and switch if you want one just take out the switch and rewire it in your box. (Soldering required for switch) $5.49
https://www.harborfreight.com/6-outlet-power-strip-64144.html
You will need 1 foot lengths of the following 16 gage braided wire
6-black
5-white
2-green
Put it all in a DIY box (budget)or you can get one of these: $9.61
https://www.amazon.com/BUD-Industries-CU-3283-Plastic-Utility/dp/B005T5A0W4/ref=mp_s_a_1_1?keywords=hobby+box+bud+industries&qid=1570303560&sr=8-1
These work well but I’m starting to like my wood box made from old growth plywood salvaged from an old house. Plus it takes the build cost down $9 if you build your own.
Total cost $46
$55 if you buy the box
The first one you linked to is listed and rated as Class A which is what you want since this class will not tolerate more than 6mA. I wasn't able to find the other two very quickly, however sometimes they are listed under obscure model numbers. Tower and Southwire are both reputable.
Only based on lack of info, I would go with for this:
https://www.amazon.ca/dp/B00SJ7Z7DQ
Braided sleeve:
http://www.amazon.com/gp/product/B00H2RG20G/ref=oh_aui_detailpage_o02_s00?ie=UTF8&psc=1
Heatshrink:
http://www.amazon.com/Vktech-150Pcs-Polyolefin-Halogen-Free-Shrink/dp/B00EXLLXK8/ref=sr_1_5?s=hi&ie=UTF8&qid=1420770599&sr=1-5&keywords=heatshrink
Some people have PMed asking for more info, so I may as well put it here.
I used the following:
Monoprice
8inch 28AWG High Speed Male to Female HDMI® Port Saver - Black
For the hdmi port. I also bought another hdmi piece, like a corner basically, it's in some of the early pics, but I didn't use it in the final build.
Tiesto USB Hub 2.0 4-port/4 port hub USB 2.0 Speed Cute Octopus Design - BLACK
I removed the black case on this as well as the black rubber around the usb ports. Then basically hot glued the ports in place against painters tape to make it even and smooth.
Your Cable Store
6 inch USB Micro male to female OTG extension cable
I cut these in half and spliced it into the original Gamecube power switch/button. That way I can leave my pi plugged in and switch it on like a normal console.
Evercool 60x60X10mm 5v Ball Bearing Fan, 3 Pin EC6010M05CA
I set up these fans to run off the main power, so they turn off and on with the pi.
To take apart each Gamecube, i bought this screwdriver.
Also got each person a Buffalo Classic USB Gamepad for PC
And a Retrolink N64 Style Classic Controller For PC
I forgot to mention, I took apart and weighted the buffalo classic usb controllers to be closer to the weight and feel of the original snes controller.
The exact increase in weight is about 10 pennies, but I used 8, 4 on each side, inside the controller, in stacks, glued in, because 8 fit better than 10.
It's a really tiny thing, but if you weight one controller and then hold an unweighted and a weighted one to compare, the unweighted one feels like a toy.
The N64 controller felt decently heavy on it's own. (Plus the rumble pack used to make them super heavy and I wasn't going to try and match that weight.)
Other things, these have in them the pi2 with 1gb of ram. I bought the 2 amp power supplies that are recommended for the pi.
I also bought some other odds and ends: ethernet couplers, each pi has a 16gb sd card in it.
I also replaced the power switch in my final one (the silver one) because I damaged the original switch. I used these switches.
I bought Rust-Oleum metalic base and Dupli-color spray paints.
Tools/materials used:
Bought a dremel, didn't need it.
Used my soldering iron and clamps constantly.
Used a lot of hot glue and gorilla glue.
Mod podge for applying the logos to the top of the cases. I also had some spray sealant from another project I put on the logos, before I applied them to the cases, so the ink wouldn't smear.
I used a fair bit of heat shrink and electrical tape. Also wires with couplers so the entire bottom of the console can unplug from the top if I need to repair something. Basically these though not the same brand.
Much of my job is working with electronics and soldering so this was all fairly easy for me. If you're new to building and soldering, please be careful. I've cut myself and burnt myself quite a few times. Be more careful than me.
No problem. 60 feet is 18.3 meters. At 18 watts per meter, you will need to drive approximately 330 watts. Divide the watts by volts and you get about 27 amps. That is not something you will get out of plug in wall adapter. Something like this will work. If you worry about fan noise, then this. I would lean towards the fan however.
You will need 4 rolls of LED tape and I would stick the repeater output in the middle somewhere. Where you place the components is up to you but just be conscious of voltage drop if they are far away. You may need to use the voltage adjustment screw on the power supply to bump it slightly so you get a solid 12volts at the connection points.
Here you go: https://youtu.be/RWo3EtRsleI
The wire I used was 22 AWG. You'll need some spade connectors and a Molex kit. I used my wire strippers to crimp the spade connectors and Molex pins (I bought a crimper tool, but it unfortunately didn't work for these).
I just have one of these connected to the SDR's.
https://www.amazon.com/female-right-Spliter-Combiner-pigtail/dp/B015ASUJ48/
Then an SMA-BNC cable to the antenna. Stratux is attached to a window with a suction mount and is powered by a long USB cable to a lighter adaptor.
https://www.google.com/amp/s/amp.reddit.com/r/electronic_cigarette/comments/46c99s/a_guide_to_making_custom_battery_wraps_for_idiots/
20pcs 29.5mm 18.5mm PVC Heat Shrink Tubing for 1 x 18650/18500 Battery https://www.amazon.com/dp/B018I08UKU/ref=cm_sw_r_cp_api_9cXpzbQDYWTBP
Here's the process I used 😁 Super easy
I was in same situation with plenty of paracord. I ordered this and it has worked well: https://www.amazon.com/gp/product/B0053PYF62/ref=oh_aui_search_detailpage?ie=UTF8&psc=1
However, it feels just a bit thinner than the stock stuff that comes on the bag. It really is not a big deal. You can also search for "glue lined" to get the stuff that /u/Dewy93 mentioned. The key is 1/4" thickness.
should try some clear shrink tubing instead of the gloss.
Check this out at Amazon.com
Wago 221-413 LEVER-NUTS 3... https://www.amazon.com/dp/B06XGYXVXR?ref=ppx_pop_mob_ap_share
I got red and black...
Check this out at Amazon.com
Remington Industries... https://www.amazon.com/dp/B010T5Y6PU?ref=ppx_pop_mob_ap_share
Check this out at Amazon.com
Cable Matters 2-Pack 16 AWG Heavy... https://www.amazon.com/dp/B00WA0W62S?ref=ppx_pop_mob_ap_share
Check this out at Amazon.com
ATPWONZ IP68 Waterproof... https://www.amazon.com/dp/B01NALYPFT?ref=ppx_pop_mob_ap_share
So you'd have to solder on a new connector. You can use a 5 pin harness, just splice both ends and combine with your current one that just has the bare wires exposed. Another option, if your encoder has the 2 pin connectors for UP, DN, RT, LT, then you could take four 2pin connector cables and solder those onto the exposed wire. 4 of the 2pin connectors need to connect to the black exposed wire (ground) and then the remaining 4 match up with the other 4 depending on color and direction which you can find out here.
If you can't solder, you can use Lever Nuts(they have 2, 3 and 5 sized connectors) or connectors like these or terminal blocks like these.
EDIT: Sorry for not giving credit where credit is due. This was mostly taken from this post here. It has a lot of pictures to refer to as well. Good luck!
I'd recommend wire similar to https://www.amazon.com/dp/B008AGUDEY/ref=cm_sw_r_cp_apa_i_VX5iDbJNER0SS. It's what I use for handwiring keyboards, and one spool lasts forever. I'm not sure about how to wire it to another switch, it depends on if there is a diode.
This ones: https://www.amazon.de/Brennenstuhl-Funkschalt-Set-Funksteckdosen-Innenbereich-Kindersicherung/dp/B001AX8QUM/ref=sr_1_49?__mk_de_DE=%C3%85M%C3%85%C5%BD%C3%95%C3%91&keywords=brennstuhl+funk+steckdosen&qid=1570029553&sr=8-49
They are pretty easy to work with
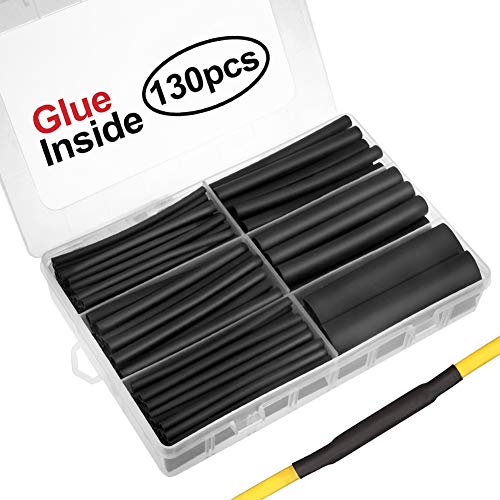
130pcs 3:1 Dual Wall Adhesive Heat Shrink Tubing Kit, 6 Sizes (Diameter): 1/2, 3/8, 1/4, 3/16, 1/8, 3/32 inch, Premium Wire Cable Sleeve Tube Assortment with Storage Case for DIY by MILAPEAK (Black) https://www.amazon.com/dp/B071H5XC7C/ref=cm_sw_r_cp_api_i_LuUUDb724D9GV
Wasn’t sure what size I would need before ordering but I ended up needing the 1/8 inch for this.
You want the one labeled car radio accessory switched on the list on this page.
http://www.modifiedlife.com/2003-jeep-grand-cherokee-car-stereo-wiring-diagram/
You want to use something like this to add the wire for the power to the module.
Ginsco 67pcs 24-10 AWG Quick Splice Solderless Wire and T-Tap Electrical Connector Assortment Kit with Case https://www.amazon.com/dp/B01L74LNCG/ref=cm_sw_r_cp_apa_N48aAbKZWEH7C
It squeezes over the wires and punctures the insulation. Very handy to have around for all sorts of stuff.
I would mount something like this in the dash somewhere and connect the headphone jack from the module to the back. Use another cable to connect to your phone. This way the replaceable cable from the dash to your phone takes the abuse and can be replaced when it breaks instead of having to replace the module and tear apart the dash again.
Philmore 3.5mm 4-Conductor Panel Mount Stereo Jack with Nickel Plated Metal Housing : 45-396 https://www.amazon.com/dp/B073MSCPPR/ref=cm_sw_r_cp_apa_178aAbDEFDM4N
It would have been easier and probably better sound quality to just get an aftermarket radio.
Wow, that's terrible! I'm hoping that mine doesn't have the same DoA problem.
I think that mine isn't working because I lost the stupid CMOS jumper cap. I ordered 100-pack replacement off of Amazon that should be arriving tomorrow. My next step would be to try and return mine to ASUS, but I ended up getting a little "rough" with my mobo when one of the hard-to-reach screws got stripped and refused to come out of the case. I suppose if that doesn't work I'll be forced into buying another damn mobo off of Newegg, since there is the chance that I just damaged the thing out of my own stupidity.
I'll post an update on my solution, so any future googlers who end up stumbling across this conversation know what I did to fix mine as well. Hope you don't mind the extra messages, LegendaryOne.
Also, would you mind posting a link/email address to how you got in contact with ASUS to start the replacement process? It'd be nice to have, in case my future board is DoA.
I've had success with this:
https://www.amazon.com/gp/product/B015ASUJ48
BNC connector on the cable that goes to the external antenna connects to this splitter, then the two other ends each plug into an SDR. (I have the "old"-style SDRs - the big blue ones that folks were using before the nanos became more popular...)
I have absolutely no complaints. I pickup a little 1090 traffic on the ground and start picking up 978 wx & rebroadcast traffic within 100 to 200 feet agl. I stash the stratux under my seat so it's out of the way - wired to ship power, and the mouse-style gps sits out of the way too near a window - don't have to do anything except fire up my tablet!
Before using those TPLink things, which are $35 per outlet, if you have HomeAssistant installed on a Raspberry Pi you can use the cheaper 433mhz remote controlled plugs + a radio for the Pi.
Here's a set of 3 plugs that I bought.
(Here is similar on amazon.ca, which probably will work)
and here's a radio (I've heard that the cheaper ones work less well, and you should find a "superheterodyne" one, which I can't find on amazon.ca -- maybe aliexpress or ebay if you can wait?)
and the rpi-rf home assistant configuration:
https://home-assistant.io/components/switch.rpi_rf/
Your suggested more expensive switch can probably be polled to see if they're on or off, and probably confirms a state change. This solution the communication is one way and hope-it-works. My experience is it is working most of the time - there is the occasional missed command.
> Well shit didn't think about that with the controller. Here is exactly what I ordered.http://www.hobbypartz.com/79p-th9x-r9b-9channel-radio.html
According to the description it comes with a receiver.
> Just bought 2 of the 3S 5500mAh 30-40C
That should do you nicely.
> Any other random things you think we will need
Using amazon links and favoring prime options even if a few $$ more. The most cost effective way to get any of the below would be ebay and slow free shipping.
Nice van!
Don't be too intimidated with adding a house battery. You can do it.
Very in-depth guide for adding a house battery with solenoid: https://www.youtube.com/watch?v=1zrwHyy4qyY
This is the battery I used, it ROCKS. (smaller and cheaper options from same company available)
Other items I used...
Hi everyone! If you liked the electronics enclosure you can download the design files here -
And here's the part list!
QUANTITY | COMPONENT NAME | LINK / COMMENT
:---------:|----------|----------
1 | 7I76-5I25 PLUG-N-GO KIT | http://store.mesanet.com/index.php?route=product/product&product_id=215
1 | DROK LM2596 Analog Control Step-down Regulator Module | www.amazon.com/gp/product/B019RKVMKU
1 | DC Fan (120mm x 120mm x 25mm 24V) | www.amazon.com/gp/product/B01FBPQMXW
1 | Mesh Dust Filter for 120mm Fan | www.amazon.com/gp/product/B01M0A2UH0
3 | DIN Rail | www.amazon.com/gp/product/B015E4EIOK
1 | IEC320 Inlet Power Socket | www.amazon.com/gp/product/B00ME5YAPK/
4 | KL-5056 Stepper Motor Driver - 32 bit DSP Based | www.amazon.com/gp/product/B00O6DC8PW
1 | Emergency Stop Button Switch | www.amazon.com/gp/product/B0094GM004
25ft | 4 Pin Cable | www.ebay.com/itm/20M-4-Pin-5050-3528-RGB-LED-Strip-Light-Wire-Extension-Connector-Cable-Cord-Line-/282110056592?hash=item41af11d890
1 | Antek Linear Power Supply - 500W 30V 16A Peak 25A With Passive Filters / EMI-RFI Filters and Suppressors | https://www.ebay.com/itm/PS-5N30-500W-30V-16A-Peak-25A-Stepper-Motor-Antek-Linear-Power-Supply-/371664502398?hash=item5688ee3e7e
3 | Wall Outlets from Home Depot | Find ones you like / feel are safe enough using
16ft | Led Strip Lights | www.amazon.com/gp/product/B01GJ3O0J8/
1 | Misc. Hardware | Nuts, Bolts, Standoffs, Crimp Connectors, Spare Fuses, 2 Extra Limit Switches
2 | Ogrmar SSR-25 DA Solid State Relay with Heat Sink | www.amazon.com/gp/product/B074FT4VXB/
1 | 18 AWG Gauge Stranded Hook-Up Wire Kit | www.amazon.com/gp/product/B00N51OO7Q
~30pc | Heat Shrink Tubing | www.amazon.com/gp/product/B00OZSL8UE
1 | Shop-Vac | www.amazon.com/gp/product/B00EPH63K0
7 | Uxcel 16mm Thread 4-Pin Panel Mount Wire Connector | www.amazon.com/gp/product/B016FCZ5SS
2 | 8 Circuit 20A Terminal Block | www.amazon.com/gp/product/B000S5Q2VS
Best of luck! Feel free to PM me or comment with any questions or feedback!
Some of these parts may be purchased at your local hardware store for a cheaper price.....
• Dual Digital Display PID Temperature Controller: http://amzn.com/B002PIM3R8
• Solid State Relay w/ Heatsink: http://amzn.com/B005K2IXHU
• PT100 Thermocouple Sensor: http://amzn.com/B008MU0VFY
• Aluminum Project Enclosure Box, Econobox: http://amzn.com/B005T7RPFC
• 3 Pin IEC320 Male Power Socket w/ Switch: http://amzn.com/B00F4MGRRE . TIP - Replace Fuse With F15AL250V.
• GX16-3 Aviation Connector:http://amzn.com/B00FB56T04
• Black - Tamper Resistant Power Receptacle: http://amzn.com/B002L6H414
• Gray - Tamper Resistant Power Receptacle: http://amzn.com/B002L6H428
• IEC320-C13 Power Cord: http://amzn.com/B0012EI6KE
• Rubber Feet: http://ebay.com/itm/351131287090
• Heat Shrink: http://amzn.com/B00EXLLXK8
• Fork Terminal Wire Connectors - Non Insulated ~ 16-14 AWG: http://amzn.com/B00LUUAB94
• Female Disconnect - Non Insulated: http://amzn.com/B0071OXJ5Q
• Insulated Copper Wire ~ 18-14 AWG
• Nuts & Bolts
Hey man, I'm about to jump into this project. I recently did DrZzs's garage door with Sonoff SV, so I'm comfortable working on this with a Nodemcu (ESPHome flashing and all)
One question that popped up when finishing that up, though - what wires do you use for just "general" wiring? For example I snipped the connectors off some small jumper wires to connect the Sonoff to DC, but they feel so small and fragile?
I also have this wire (even smaller gauge...) that I used to connect my reed switch https://www.amazon.com/gp/product/B008AGUDEY/ref=ppx_yo_dt_b_search_asin_title?ie=UTF8&psc=1
Basically, is there a concern for the current running through these cables, like melting or eventually not standing up properly or what? Have any recommendations for maybe multi-strand small gauge wire for projects like this, other than just hacking at a jumper wire? :)
These precut heat shrink tubing off Amazon. First time trying this, so I have nothing to compare them against, probably something better out there, but they worked just fine.
Underneath is just cheap printer paper through a color laser printer. All the shine is coming from the clear tubing. Could probably improve the quality further by using better/shinier paper but that stuff is also thicker and I don't know how close these tolerances are before it will no longer fit in a mod box. With just the paper added its already a noticeable tighter fit. Higher quality paper might put it over the edge into not fitting.
u/helno : any thoughts on how one might use the new UAT with an external antenna? I've used the dual MCX to single SMA splitter (https://www.amazon.com/gp/product/B015ASUJ48/) as suggested in a previous post. With the u.FL-to-SMA pigtail, have you come across a splitter with the different connectors?
https://www.amazon.com/gp/product/B009IILEVY/ref=ox_sc_mini_detail?ie=UTF8&psc=1&smid=A1THAZDOWP300U I found this. 25mm heatshrink is supposed to be good (approximately 1 inch).
Looks like these. https://www.amazon.com/gp/product/B00MJVKKKI/
One of my 3d printers use them for fan connectors and took me a while to find replacements.
Thanks! I will have a look at them in case my current plan fails.
I now bought Brennenstuhl RCS 1000 N plugs, you get 3 plugs for less than 20 EUR:
https://www.amazon.de/gp/product/B001AX8QUM/ref=oh_aui_detailpage_o01_s00?ie=UTF8&psc=1
They are not controllable with WiFi or an app but with a 433Mhz transmitter on an Arduino or Raspberry. I use it together with a NodeMCU ESP8266 module which acts as my controlserver using the ESPiLight (https://github.com/puuu/ESPiLight) library. The library is based on PiLight.
The webserver on the NodeMCU accepts certain URL's and sends the 433Mhz signal to turn them ON or OFF.
e.g. a call to http://192.168.0.115/control?device=Outlet01&state=off turns Outlet #1 off
Range of my cheap transmitter is about 10m and it works through walls, there are also some with more range.
Total cost of this setup was about 25 EUR:
You can hook up your trailer wiring to the 12v output under the rear seat (many threads in Tesla forums about connecting to this for aftermarket sound systems). I used POSI-TAP connectors to tap into the tail light wiring (see https://smile.amazon.com/gp/product/B001MPW54G ). The tail light wire colors are as follows:
Passenger side: red=turn, yellow=lights, grey=brakes
Driver side: purple=turn, pink=lights, grey=brakes
This is the specific wiring kit that I used for my car https://www.etrailer.com/Wiring/Tekonsha/119190KIT.html
Tool wise, you'll need the BBS Luna wrench, allen keys, lots of zip ties, and something to do the wiring.
Two choices for the wiring: Crimping or Soldering.
For crimping, you'll need heat shrink insulated crimping connectors (I got these: https://www.amazon.com/gp/product/B075TYSD26/ref=oh_aui_detailpage_o02_s00?ie=UTF8&psc=1) and a crimping tool that works with insulated crimps.
FOr soldering, you'll need heatshrink tubing, a soldering iron, lead solder (don't get that unleaded stuff).
For both a heatgun would be good to have.
Of course you'll need a wire cutter and wire stripper as well.
Depending on chainring, you'll likely need a new (longer) chain than is on the bike, as well as a chain tool to remove the old one.
You'll also want a Thudbuster or Suntour NCX seatpost suspension and a more comfy seat I think.
Possibly there are a few different types.
Scotchlock - basically one piece that provides connections for both wires.
[Scotchlock]
https://www.amazon.com/3M-Scotchlok-Double-Electrical-Connector/dp/B06X6MPH1K
or a standard T-tap
[T-Tap]
https://www.amazon.com/Install-Bay-3MBTT-T-Tap-Connector/dp/B001JT72D4
The t-tap only provides the splice connection, you would put a male spade on the new wire and connect it to the T-tap.
[Male Spade]
https://www.amazon.com/Insulated-Connector-Electrical-Terminal-14-16AWG/dp/B00G9WTOOG
These are just examples to give you an idea, make sure you have the right size for the guage wire you are using. I believe it was 14awg wire for the CR-10x
I was actually planning to get 144/m.
This is what I was originally thinking
>So from a full day of research here's what I'm thinking:
>2M of RBGW SK6812
>Splitting them into 12 - 6 inch long strips. (Probably only use 6-8 but figured better to have more than not enough)
>Battery power through 7.5A fuse (the strip is rated at 43W/m at 5V the next fuse is 10A so figured go lower to be safer?) and relay/switch tapped to ACC line run through 12v step down to 5v through ALITOVE bluetooth controller into wago connectors with diodes going to each strip
>https://www.amazon.com/BTF-LIGHTING-Individually-Addressable-Flexible-Non-waterproof/dp/B079ZX7LY3/ref=sr_1_2?ie=UTF8&qid=1539729680&sr=8-2&keywords=rgbw%2Bsk6812&th=1
>https://www.amazon.com/ALITOVE-Female-Connector-WS2812B-SK6812-RGBW/dp/B071H5XCN5/ref=sr_1_3?ie=UTF8&qid=1539737420&sr=8-3&keywords=LED+connector+3+pin
>https://www.amazon.com/SMAKN-Converter-Power-Supply-Module/dp/B00CXKBJI2/ref=sr_1_3?ie=UTF8&qid=1539736197&sr=8-3&keywords=12v+step+down+to+5v
>https://www.amazon.com/ALITOVE-Addressable-Controller-SK6812-RGBW-Programmable/dp/B07G77YD9L/ref=sr_1_1?ie=UTF8&qid=1539734109&sr=8-1&keywords=12v++SK6812
>https://www.amazon.com/gp/product/B0107SYYGU/ref=oh_aui_detailpage_o01_s00?ie=UTF8&psc=1
But dumb LEDs sounds a lot more enticing in regards to DIY, since I really only want them to be solid white (only thing legal in my state) as long as they would be as bright as the smart ones.
Any recommendations on brands or codes I should be looking for - for dumb LEDs? I've only been researching WS2812 & SK6812 as suggested by other redditors here
That's totally fine, the slick way is to use a tap connector.
Lol try these any radio shack will have them or something like them. Wire tap connecter aka banana splice
https://www.amazon.com/Install-Bay-3MBTT-T-Tap-Connector/dp/B001JT72D4
> No Way! I also have a 2011 Honda CRZ EX. I'm installing a Kenwood DDX0703S next week so maybe you can help me avoid some headaches with the install.
Happy to help however I can. crzforum.com is also an AMAZING resource; about the best on the internet for CRZ info.
> The Metra 70-1730 Wire Harness I bought seems to have a subwoffer RCA but the instructions say not to use it even though my CRZ has a factory sub. Do I really not need to hook up the sub RCA?
Correct. The CRZ's sub is wired into the rear channel. The front channel is two speakers and two tweeters, the rear is two speakers and the sub.
> I bought a Maestro ADS-MSW for my steering wheel controls. What does the RR give you over the ADS-MSW? Just gauge information?
Just gauges AFAIK.
> The Maestro instructions say I need to splice into a green wire connected to the bluetooth HFL module behind my glovebox in order to use my steering wheel call and end call buttons. Did you do that? If so how difficult was it?
Yes. Very easy. You need to remove the panel under the glove box. It has clips at the top and tabs sit in slots at the back. Disconnect the floor light and put it aside. The HFL is between the passenger footwell and the outer shell of the car, toward the glove box. Disconnect the harness and tap the green wire. I'm using these for all the taps I did in the car. They are VERY easy, solderless and making great connections. Can't recommend them enough.
Also, make sure you have a dumb little grabber tool, like this. I bought mine at Home Depot for $2 while getting butt connectors and it made routing the wire for the HFL a breeze.
>Where did you place the Kenwood microphone in your CRZ?
If you look at the picture, you can see the Kenwood mic below my radio. The factory mic cannot be reused without great effort, and if you do wire it up it has no noise cancelling and sounds like shit. So don't.
You'll also notice a USB plug dangling down at the factory location. The factory USB can't be reused, and I didn't want to have the Kenwood USB line that is hard wired to the unit fished through anything, so here's what I did: I pulled the factory USB cable and its little grommet into the dash and zip tied it off so it doesn't bang around. Then, I ran a 3' Monoprice USB male/female extender cable through the hole the factory USB goes through and zip tied it secure inside the dash. This way, if it ever wears out I replace a $2 cable and not my $500 radio. This also has the benefit of making installation/removal of the radio really easy, which is already coming in handy as I prep to install a backup camera.
>How did you do the wiring? I've never soldered anything before and am thinking about buying some Posi-Twists and Posi-Taps to do all of this.
Positwists and taps are AWESOME, but they're also expensive. I'd recommend you pick up some 20 awg butt connectors or crimp caps (whichever) and a wire stripper/crimper tool just because they're cheap.
Here's what I did: I wired up my radio harness and anything else that was fairly mobile with butt connectors at my desk, making sure to tape off any wires I wasn't using so they were out of my way. Then, I saved my Posi connectors for the connections that HAVE to be made in the car (OBD2, the HFL cable, the ground wires)
>About the DDX9702S: How responsive is the touchscreen? I'm weary about the resistive screen but couldn't justify the $200+ to upgrade to the DDX9903S with capacitive screen.
It's great. It's obviously not a cap touch screen, but it's also not a Palm Pilot. It's responsive enough, precise enough, and all around "good enough" that I wouldn't spend the extra $200 either.
One more tip: When you're wiring this up, wire the parking brake sensor wire into your grounds. Do that and you can watch video while driving.
http://www.amazon.com/10Pairs-13cm-2Pins-Female-Connector/dp/B00MJVKKKI?ie=UTF8&psc=1&redirect=true&ref_=oh_aui_detailpage_o08_s00
Not 100% certain that they're the same, but they look like it.
Reddit deleted my last comment, because I use a link shortener, so here I am trying it again.
This is a jumper cap. You could buy one, but it will probably take longer than removing your GPU.
Lockitt POSI-TAP 6 pack wire connectors 20-22 awg https://www.amazon.com/dp/B001MPW54G/ref=cm_sw_r_cp_api_NrBExbRF1T086
If that's too invasive you could put a Hall effect sensor around a wire and a microcontroller to monitor a change in current draw. Seems like more work than needed though.
I started out with something like this. I used Z-line instead of braided cord, but it's really personal preference. Nylon is nice because it's soft and comfy, though it may slip easier than other ropes because it's got less tooth (so some kinds of knots work better than others). The advantage of having a long length to begin with is that you can choose what lengths you'd like to cut from it. 6' and 12' lengths work well for most limb ties, depending upon what you're doing, but you'll probably need 20, 30, even 50 foot lengths if doing more intricate body harnesses. If you're not sure what you're interested in just yet, do a few shorter lengths and then one or two longer ones. Once you cut the lengths to your liking, you can slip some heat shrink tubing over the ends and run a lighter over them a few times to seal the ends and keep the rope from fraying.
I also recommend Jay Wiseman's "Erotic Bondage Handbook" as it not only gives a great overview of a lot of different ties, but also focuses the first 1/3 of the book on things you'll need to keep in mind for safety and comfort. There are things that can go wrong, but it's not much to worry about as long as you learn from the experience and mistakes of people who've been in the scene a while.
I used TechFlex 1/8" 25 feet from Amazon.
I used VKTech heatshrink.
I could have done a much better job on the heatshrink on both ends of the cable, however I didn't have time to use my heat gun so I used my Zippo with a Thunderbird butane insert.
It turned out pretty good in my opinion, however like I said, I could have done a much better job.
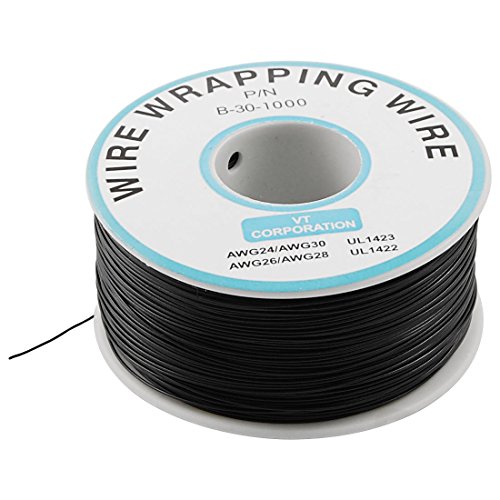
I used 30 gauge wire wrap (like this: https://www.amazon.com/B-30-1000-30AWG-Plated-Copper-Wrepping/dp/B008AGUDEY/ref=sr_1_1?s=lamps-light&ie=UTF8&qid=1494604977&sr=1-1&refinements=p_n_feature_two_browse-bin%3A6426179011)
As for soldering irons, I only use a Weller WLC100 which isn't anything special, not temperature controlled but can adjust wattage between 5-40 watts, what kind of iron are you using?
Fadecandy is a USB board about 2 inches long and maybe 1.5 inches wide. Because it's USB, the 3v3 and 5v logic are no longer something you need to be concerned with.
You run a server app on the Pi which interfaces with the fadecandy board and then you just code for the LEDs like normal.
Yes, the Pi is awful at WS2812 LEDs because of the timing. A kernel module was written to let the Pi use the kernel timing clock, but I was less than successful in implementing it, so I just swapped to Fadecandy and never looked back.
Yeah, it's a tad expensive at around $25, but it controls almost 500 LEDs without issue and you can run more than 1 board. I bought a bunch of these to make connecting to the boards simple and changeable. I attach a female connector to all of my WS2812 strings and I can swap them to any fadecandy board in seconds.
The problem using Arduino (which you can work around with some effort) is that you don't get very interactive with the LEDs. I like big programming projects where they can be triggered externally and the Pi is just better suited for the task.
Edit: The only thing I HATE about Fadecandy is that it has no usable mounting points, so if you want to mount it somewhere, you almost have to hot glue it. If they built a Fadecandy board that had the mount holes to match a Pi so I could stack it with the Pi, I'd pay double.
Wago lever nuts are by far the cleanest solution. I'm using the older version, but it may be tricky to find smaller packs of them. The 221s go down to 24 AWG, the 222s also take 28 AWG.
is your face worth more than $0.30 to you?
You guys are awesome!!! This is exactly what I need!!
Do I need to buy a heat gun or could I get away with a hair drier? lol
Link to video - process
Link to heat gun on amazon
Link to Heat Shrink Tubing Sleeve - prob should order the correct dimensions or cable
Grab some quick connect clips
https://www.amazon.com/dp/B01L74LNCG/ref=cm_sw_r_cp_apa_i-k8BbBM5JN9F
They aren't permanent when you undo them it leaves a tiny splice in the wiring ... won't interfere with the function. Even after its removed.
I grabbed the hot and ground from the 12v round socket. Right in the center console. Next to the shifter. (Accessory hot only... only works when the key is on)
If you use a cheap 12v indicator it makes it easy to find a hot.
https://shop.advanceautoparts.com/p/project-pro-automotive-circuit-tester-tw1486-1486/25989105-p?c3ch=PLA&c3nid=25989105-P&adtype=pla&gclsrc=aw.ds&&gclid=CjwKCAiAlb_fBRBHEiwAzMeEdhcZcEoliWNoycOy6evFUQY5FACscUi3Myyt4Q3TqBG8oiMF-iTovBoCFQUQAvD_BwE
If you want a constant hot... grab the top left lead on your OBD2 port (even with your keys off you should have 12v power) I did it on my wife's prius so you can leave your device charging while the car is off.
Any ground will do.
If you need more help with the specifics just ask.
Note I am assuming that you have a general understanding of 12v DC (car electronics)
Buy a couple of Wago connectors instead of wire nuts. They are much easier to work with and they don’t mess up the tip of your wires in case you have to modify anything inside there in the future.
https://www.amazon.com/Wago-221-415-LEVER-NUTS-Conductor-Connectors/dp/B06XH47DC2/ref=pd_aw_sbs_328_3/134-9665181-4117155?_encoding=UTF8&pd_rd_i=B06XH47DC2&pd_rd_r=8b3b9b4d-824e-11e9-b4c5-ef907af3647f&pd_rd_w=jREPn&pd_rd_wg=tI4UX&pf_rd_p=aae79475-6dc9-4a12-80e8-27b63108fa72&pf_rd_r=ZE23ZBS22K5W4JR9HFWN&psc=1&refRID=ZE23ZBS22K5W4JR9HFWN
Or
https://www.amazon.com/Wago-221-413-LEVER-NUTS-Conductor-Connectors/dp/B06XGYXVXR/ref=mp_s_a_1_fkmr2_1?keywords=wago+413+10+pk&qid=1559161061&s=gateway&sr=8-1-fkmr2
I prefer the 414 ones but couldn’t find them right now. They’re optimal in my view.
I cut the wire, soldered the individual wires,heat shrink tubing on each side, then a larger one to seal the whole splice, used a heat gun to shrink it, which also sets the glue in place.
I don’t see why more amps on your 600W ps should matter. As long as you’re providing exactly 24v, you should be fine.
I don’t know how long your run is, but you might end up w voltage drop towards the end of a very long run.
Just get a set of wire taps. They are safer than wrapping a wire around a fuse
https://www.amazon.com/Install-Bay-3MBTT-T-Tap-Connector/dp/B001JT72D4
Oh, I didn't realize. Hmm any of these is certified?
https://www.amazon.ca/dp/B00SJ7Z7DQ
https://www.amazon.ca/TRC-90033-Shockshield-Portable-Protection/dp/B000XVG72G/
https://www.amazon.ca/Tower-Manufacturing-30439005-Commercial-Auto-Reset-Grounded/dp/B00UOU6OVU/
https://www.amazon.ca/dp/B000MM3Z6C
They have rolls on Amazon
Uxcell a12080700ux0466 Polyolefin 2:1 Halogen-Free Heat Shrink Tubing, 2 m, 6.5', 25 mm Diameter, Clear https://www.amazon.com/dp/B009IILEVY/ref=cm_sw_r_cp_api_UOX4ybZ4QD60D
It looks like regular clear heat shrink, though now that I think of it, my clear tube is a bit more flexible (and more prone to tearing when shrinking sometimes) than the regular stuff. This is what I bought, I don't know if it's exactly what you're looking for but it does seem close to what those battery buzzers come with.
They're called jumper caps, they exist in various sizes, but probably you need 2.54mm ones. Ex.
Interesting. I'll give the laptop test a shot, that's a great idea that I hadn't considered.
I should have clarified - this isn't using any of the stock SDR parts aside from the SDRs themselves. The splitter is this guy.
On the off chance the Y pigtail is bad I also ordered a hardware T combiner for the two pigtails I got with /u/dmurray's antennas.
https://www.amazon.com/StarTech-2-54mm-Standard-Computer-Jumper/dp/B00008VF46
Those are what jumpers look like, there's no cable.
I use this:
https://www.amazon.com/gp/product/B008AGUDEY/ref=ox_sc_act_title_1?smid=AQMXZMVD5PL9J&psc=1
Solid core is what you want. Stranded wire is The Devil.
https://www.amazon.com/130-pcs-Adhesive-Assortment-MILAPEAK/dp/B071H5XC7C/ref=as_li_ss_tl?ie=UTF8&qid=1522203192&sr=8-13&keywords=1/2%22+heat+shrink+tubing&linkCode=ll1&tag=shareyourrepair-20&linkId=334b0112d9034822b95e7eaaec202904
this will do.
Op can put a normal cord end on it plus one like this or simply replace the plug with a GFI