(Part 3) Best hobbies according to redditors
We found 6,915 Reddit comments discussing the best hobbies. We ranked the 3,169 resulting products by number of redditors who mentioned them. Here are the products ranked 41-60. You can also go back to the previous section.


A few particular items of interest from Amazon :
A few items & vendors from Etsy :
First comment:
Please upvote this by default so it stays towards the top. I'm still learning how2reddit
So I am NOT an artistic person so this is especially anxious for me. But, I needed something to keep my hands busy that wasn't masturbating, so here we are.
I have probably over studied techniques and materials, and I want this post to be a "documentary" if you will. Where someone who has no business painting is going to be doing just that.
So, I'll be documenting my pitfalls and approaches to everything here. With all of you lovely people, it'll also hopefully be a central location for someone like me or just wants to get into 40k can refer to.
Disclaimer: I'll be at work until 5pm EST. But my job is pretty cushy so I'll be adding planning details throughout the day
Tools and Such
Well, I probably overspent here. Only because I'm lazy and didn't want to make the drive to harbor freights. But then again, paying the premium to help support my local game shop is going to give me some karma in the long run. Here's the list of things that I ended up picking up:
Theory is Great and All (11.13.19)
So here are my updates from actually painting.
Life Sucks and I haven't gotten much done (11/15/19)
So I was only able to apply a second coat of to what I've already done. But honestly, not too shabby! Apparently I didn't water down the paint too much.
https://imgur.com/gallery/lA9LV1N
Also, I recently switched to a different cell phone carrier, and got a $200 prepaid card.... So I'm getting these.
https://www.amazon.com/gp/product/B004INERK4/ref=ox_sc_act_title_1?smid=A3TMLEXVMVIW94&psc=1
https://www.amazon.com/gp/product/B002JLVM5U/ref=ox_sc_act_title_3?smid=A1Y3PCPH3CY53X&psc=1
There's a blog that I found (will have to find it again later) that recommended these.
From someone who has never put together a miniature model before KDM, it wasn't that bad actually. Some models are a pain in the ass due to how small the pieces are, and fitting into your fingers.
Most of the models are pretty straightforward. You can use vibrant lantern (http://vibrantlantern.com/) to find how to put together any models that the official KDM website doesn't have.
The armor kits take a little bit more in figuring out how they are supposed to go. Armor kits can make up to 4 survivors, and you can mix and match gear so it's really up to you how to decide to build them.
Also, if you aren't painting them, the stuff below is all you'll need:
Pacer Technology (Zap) Brush on Zap a Gap Adhesives, 1/4 oz
https://www.amazon.com/gp/product/B00GB0SE60/ref=ppx_yo_dt_b_asin_title_o08_s00?ie=UTF8&psc=1
Pacer Technology (Zap) Zap-A-Gap Adhesives, 1/2 oz
https://www.amazon.com/gp/product/B00SXJJ2OU/ref=ppx_yo_dt_b_asin_title_o07_s00?ie=UTF8&psc=1
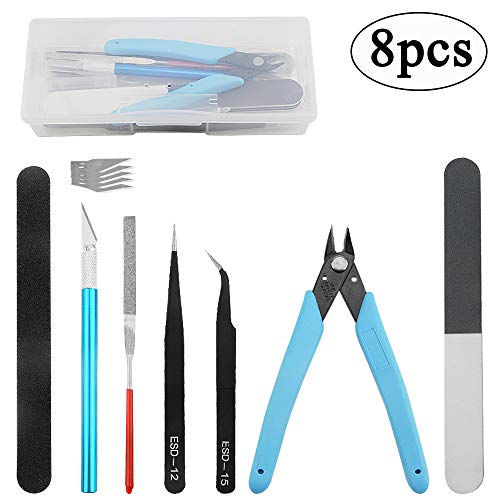
Professional 8 PCS Gundam Model Tools Kit
https://www.amazon.com/gp/product/B01GH6B3Z6/ref=ppx_yo_dt_b_asin_title_o06_s00?ie=UTF8&psc=1
Alvin Deluxe Professional Self-Healing Cutting Mat
https://www.amazon.com/gp/product/B0015AOIYI/ref=ppx_yo_dt_b_asin_title_o06_s00?ie=UTF8&psc=1
Here ya go: https://amzn.com/B006H4JEQO
Also here's the V8 one: https://amzn.com/B00GJYE0S4
https://www.amazon.com/Traxxas-1666-Silicone-Shock-Oil/dp/B0006O5GKY/
Looking at the Amazon listing, you’d need the following:
Frankly, though, if I were you I’d start off with a lower end starter pack. The Eachine E013 is in roughly the same size class but comes with a simple transmitter and a simple pair of goggles for ~$100. You’ll still have to get more batteries and a better charger, but it would be easier on your wallet and more forgiving as a new pilot.
Which ones in particular? Here is 20 props for $8.99... Amazon
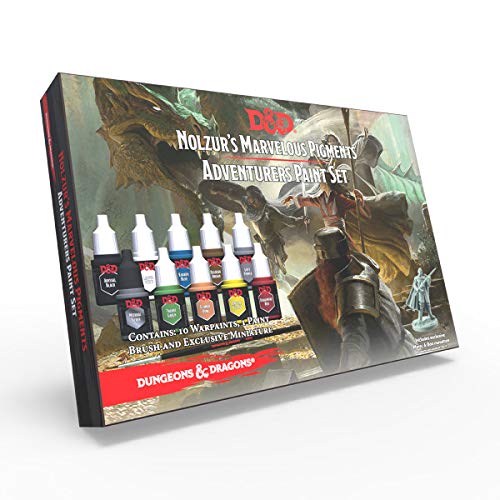
The model is of Minsc and Boo, and it comes with the Nolzur's Marvelous Pigments Adventurer's Set. It's like a D&D/Army Painter colab for newbies (like me!).
The model is pretty cool tho.
Shock oil for RC cars does the trick.
I shit you not I bought a Craftsman see thru plastic engine kit made for children when I was 20 to better understand how everything works. Honestly it really helped me understand the inner workings.
Edit edit: I know it's not Craftsman but this may have been it: http://www.amazon.com/gp/aw/d/B006H4JEQO/ref=redir_mdp_mobile
I started recently and did a lot of research.
I like Vallejo paints. Something like a set from Amazon is $40 and you get 16 colors. Depending on your paint color needs you can get game colors or a normal set.
Game Color Intro Set (16) https://smile.amazon.com/dp/B000PHCTRK/ref=cm_sw_r_cp_apa_i_k97VCbDME38CK
Vallejo Basic USA Colors Paint Set, 17ml https://smile.amazon.com/dp/B009162PWU/ref=cm_sw_r_cp_apa_i_I-7VCbD1ETA5H
That is unless you're painting terrain. Use craft store paint on terrain. You can paint with craft store paints if your on a real tight budget. But I think it's significantly more challenging.
Also I recommend getting a nul shade from citidel. Don't get any of their paint pots, they are a pain.
I got this set and found it very handy to have all s
The washes I could want. Used some odd colors on my dragon and fire fox.
Games Workshop Citadel Shade Paint Set https://smile.amazon.com/dp/B00KOD3FM8/ref=cm_sw_r_cp_apa_i_lc8VCbEMS1X69
Hope that helps!
Below are links to everything on Amazon:
Crazy Ants Reel Rolling Tool Bag Pouch Professional Electricians Organizer https://www.amazon.com/dp/B00O0FN832/ref=cm_sw_r_cp_api_OtgGzb838Y9H5
BXQINLENX 8 PCS Gundam Modeler Basic Tools Craft Set For Car Model Assemble Building(A) https://www.amazon.com/dp/B01GH6B3Z6/ref=cm_sw_r_cp_api_grgGzbFBB475F
Stanley 84-096 5-Inch Needle Nose Plier https://www.amazon.com/dp/B0001IW50Y/ref=cm_sw_r_cp_api_gtgGzb2XFXKT9
StarTech.com 7-Piece Precision Screwdriver Computer Tool Kit (CTK100P) https://www.amazon.com/dp/B0001NYK16/ref=cm_sw_r_cp_api_0ugGzbMGHA2NQ
Dynamite 5 pc Metric Nut Driver Assortment https://www.amazon.com/dp/B000BQ4XPQ/ref=cm_sw_r_cp_api_rvgGzb3V9N7CK
NEEWER® Titanium Nitride TiNi Hex Driver Wrench 4 Piece Set 1.5mm/2mm/2.5mm/3.0mm https://www.amazon.com/dp/B00CP2GGBI/ref=cm_sw_r_cp_api_7WgGzb3WEWHC0
Bondhus 12592 GorillaGrip Hex Tip Fold Up Tool with ProGuard Finish, 7 Piece https://www.amazon.com/dp/B00269YAIQ/ref=cm_sw_r_cp_api_zXgGzbJZRSBR6
There are also a few assorted items in there as well, standard scissors, small little brush(for getting dirt out of the quad in a crash), extra 12v power chord for my balance charger, small wrench(for propeller nuts), a couple extra small screw drivers. In the pouches: micro fiber cloth for fpv camera lens, zip ties and Velcro tape.
No, WD40 is not lubricant. You can get small bottle from amazon https://www.amazon.com/Traxxas-1666-Silicone-Shock-Oil/dp/B0006O5GKY/ref=sr_1_4?ie=UTF8&qid=1511143109&sr=8-4&keywords=silicone+oil&dpID=316QprPDMpL&preST=_SY445_QL70_&dpSrc=srch
Or you can take some from the pump gauge. It needs it only for shipping purpose.
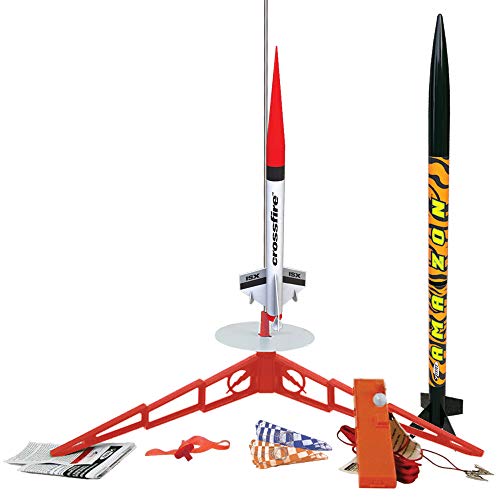
I got started with friends, just going out and launching some kits a friend had built. Then I thought I should get my own to have some time, in case we did it again. I meant to just get a few pre-made rockets so I wouldn't have to do any building or mess anything up.
I went on Amazon, and saw a rocket called Der Red Max by Estes - it's in this video several times. It's a classic Estes rocket that's red and black and styled a bit like the Red Baron's airplane. It was so cool looking, and was only 17 bucks, but it required assembly - something I was nervous about. But they only had one left, so I bought it, carefully read the instructions, and put it together, and it turned out looking beautiful. Once I launched it, and it worked and flew so well, I was hooked.
From there, I started reading stuff online. There is a TON of information and resources out there. A good website to ask questions is The Rocketry Forum (TRF) - especially the beginner's section. There are a lot of experts there who will help you out.
There are lots of ways to start, but I recommend starting by getting something called a launch set or launch kit. With this, you get a rocket (or two), plus a launch pad and launch controller for less than you'd pay buying these things separately. I didn't have one right away, since I was using a friend's equipment, but I wanted my own, so I got one. I gave the rocket away to a kid who came to a launch, but I still have the pad and controller.
Several rocket companies, particularly Estes and Quest Aerospace, have these. My own recommendation is to start with Estes, as it's the most prevalent company, and you can get everything you need through them.
You can get an Easy To Assemble ("E2X) or Ready-to-Fly kit, or if you want to do some assembly, you can get what's called a Skill Level 1 kit. These are not difficult, but require a bit of cutting, sanding and gluing, and the ability to read and follow directions.
The Launch Kit gives you everything you need to get started except motors - sometimes called "engines" (doesn't matter - they make the rocket go up) - and recovery wadding. You'll need some of that (there's other stuff you can use - cheaper stuff, too, but when you're just getting started, it's the easiest).
Get the kit, follow the instructions, and buy the motors recommended on the package. Read and follow the National Association of Rocketry (NAR) Model Rocket Safety Code. This will help you avoid hurting yourself or someone else, which could put you off the whole thing.
Go out and launch your rockets. Then, when you've inevitably decided you want to do more and know more, check out TRF, and get yourself a copy of The Handbook of Model Rocketry by G. Harry Stine and Bill Stine. It's required reading. Won't tell you much about how to assemble kits - they all come with instructions anyway - but it will help you understand the important basics of the hows and whys of model rockets.
I've got a blog in which I've been detailing my learning process of building and launching rockets over the last six months, and I also try to pass on information to people just getting started - rocketry for beginners by a beginner - so that they can maybe learn from my mistakes. Check it out, if you want to, and send me an email, and I can send you some more information if you'd like.
This is a really fascinating, fun hobby, and there's so much to learn. It can get really sophisticated and amazing - I like to tell my friends "it's not just for Webelos any more."
Edit: Oh, and if you're already past the part of building and launching a couple rockets, then I'd get that book and head straight for TRF - those are the next logical steps, I think.
Edit #2: Here's a more detailed post on launching your first rockets.
OK, I'm in socal, there is a ton of gunpla shops near me. I believe there are some around the Bay Area but don't know about Sac.
Here is the MG Heavy Arms at a store I frequent, I never had to have them ship to me because they are local but I like them.
MG Heavy Arms EW
This was released I believe in 2011, they did a re-release of all the Gundam Wing kits which Heavy Arms is from.
Here it is again on Amazon
If you have Prime you can get it shipped for free and its pretty much identical price
I've done business with Plaza Japan in the past, they have a good selection and low prices; you'll pay for shipping so best or order more than just one product to take advantage of that.
​
Amazon isn't bad, just check the prices compared to other stores. I've gotten great deals, and I've seen items posted at silly prices too. If you got prime then shipping is covered, although keep in mind that lots of the low price ship kits are shipped from Japan so the free shipping takes a while. Also read the reviews, I've had a couple of sellers not ship but Amazon had my back every time.
​
As for tips for a beginner, get the right tools right off the bat, this tool kit is a good start, I like these brushes (although you might want to get an additional bigger one as well), and I use this brush cleaner. Get a paint pallet for mixing, remember some paints like Tamiya need thinner while ones like AK don't. For more on brushes watch this quick video. You'll likely want some modeling masking tape. If you'll be doing something with lots of decals like a Carrier get some Microset & Microsol plus decal/hobby scissors. You'll need some kind of filler putty, I like miliput. Later on you'll want to mess with things like washes (vallejo makes a great out of the bottle wash) simple washes can make you stuff suddenly look pro because of what it does to small details, if you're going to be doing ships with specific paint schemes look in to the AK sets they'll be 5-6 colors all as part of a theme (like Royal Navy ships).
​
Most importantly you should start with something cheap. Your first few models will be learning experiences, so play around with those cheap $10 IJN destroyer kits till you get comfortable, use it to test painting techniques, then build that $50 HMS Ark Royal kit.
I'm by no means an expert but so far I've been using Tamiya Extra Thin Cement and As a starter kit for tools I've used: https://www.amazon.com/dp/B01GH6B3Z6/ref=sr_ph_1?ie=UTF8&qid=1493146419
Its only 16 bucks for the kit.
There's this stuff called Tamiya panel line accent color that's great for this. It naturally flows into casting lines. It's also less dark even in black and also pretty forgiving. If it goes wrong you can wipe it away.
The other option is the super fine Gundam markers. You can use them to draw in the lines but unlike the stuff above they're really unforgiving. If you go outside the lines you can't really correct it.
TAMIYA 87131 Panel Line Accent Color Black For Plastic Model Kit https://www.amazon.com/dp/B01HDJ7BR0/ref=cm_sw_r_cp_api_i_HAokDb9EX3F7Z
Not necessarily CC, but this product may help you get the crispest lines possible, for a bit of effort:
https://www.amazon.com/Tamiya-300087030-Masking-Tape-6mm/dp/B0000WRZZQ
Looks great! If you want to get those straight, freehand lines nice and crisp, I would suggest this product. I use it on my Iron Warriors to give those perfect, straight hazard lines. It also won't peel up any paint when you remove it like other tapes are reported to do.
It's is really great. Careful with the hip joints. Hit em with some heat and then put a drop of this in there. Keeps them from catching but doesn't make them loose. Love these figures.
Traxxas 1666 Silicone Shock Oil https://www.amazon.com/dp/B0006O5GKY/ref=cm_sw_r_cp_apip_UYkzY6hPAziXJ
So this guy was the subject of lots of experimentation.
Overall, super fun, solid build. I learned a lot working on this one.
Patience and practice. Scribe the back of plastic spoons for practice, or any other round plastic objects.
But I do recommend using proper modeling scribing tape like this one instead of Dymo tape. Dymo tape works fine for flat surfaces, but this scribing tape is a lot more flexible and will conform to curved surfaces better. They last quite a while depending on how much you scribe. I bought a roll last year and still haven't run out after 3 MG builds I scribed heavily.
Secondly, if you're using this Tamiya scriber, you might want to change it to something like the Tamiya engraver or something similar. They're much easier to control over a tool like the Tamiya scriber and you can change the blades to suit the thickness you want or need for your kit. Mr. Hobby makes a similar tool that's a bit cheaper I think, and obviously there are BMC chisels which are the top of the line. But there are cheap alternatives out there.
Honestly though, when it comes to precision tools like scribers it might be best to go out and buy the highest quality scribers/chisels you can afford. Buying lower quality tools can actually get you bad panel lines.
The two rockets we got came in this set. One rocket is supposed to go up about 600 feet, and the other should reach about twice that. The big rocket is about 3 feet tall, and the small one is about 16 inches.
Not gonna lie I don't know the model number. I am not the biggest Gundam guy, I just like the way this one looked and it was fun to build. I will link the amazon page for it though :)
https://www.amazon.ca/Bandai-Gundam-Astray-Customize-MBF-PO2KAI/dp/B0042VJ018/ref=sr_1_1?ie=UTF8&qid=1487129988&sr=8-1&keywords=gundam+red
Here's the Amazon price tracker page for proof. I can't get this myself due to no money syndrome, but I hope you guys get this if you haven't already!
It should be fine asking here, most of us in /r/Gunpla are subbed here too anyway.
Anyway, if your Bf has never built a gundam model before he should probably start with a cheaper High Grade (or HG) model first, they are very simple and won't look that amazing but it works as an introduction.
If your Bf has built a gundam model before then you should probably get him a Master Grade (or MG) model, they tend to be leaps and bounds better than the HG models but they do require some discipline and a modest amount of experience to put together.
I should note that gundam model kits don't have english instructions, but the illustrations used in the instructions are excellent and don't really need additional text for you to follow them. It's not anything major but it might cause confusion if you don't know about it before hand.
Amazon is probably your best bet for where to buy from, you're just more certain of the support you'll get if there is a problem and the savings you might get from ebay would be marginal at best. You could potentially buy from Hobby Link Japan which will feature better base prices and has a good reputation, but they ship from Japan so the shipping cost might not be worth it sometimes.
And finally I went looking for Heavy Arms kit on Amazon already and found a HG version and a MG version which is currently on sale. You could get them both for just about $50 before shipping. This is great if your Bf has never put together a kit before, he could get used to how things are done with the HG kit, then used what he's learned on the more difficult MG kit.
I wanted one of these when I was a kid. Might be a little above the ability of an 8 year old, most reviews say their 11/12 year old children built it without any help.
This would be interesting, though I wonder what the best way of reducing the scope would be.
One thought might be to explain the internal combustion engine itself. For example, an animation like this can give you a pretty good intuitive understanding of how they work. Taking it a step further, you can just buy a $40 kit on Amazon to go and actually build your own.
Stuff like that will go a long way toward taking the magic out of "gas goes in, car goes forward" but it won't do much to help you understand the mysterious language spoken by the people who work in a real auto repair shop. I'm a very far cry from a car expert, but I do have some friends that know quite a bit, and I've done some medium-sized repair tasks with their help. In my opinion, if you compare an engine to everything in the car except the engine, it's the "everything else" that is so much more opaque and difficult to understand.
What's even more interesting to me is the advent of the electric car. Compared to traditional gasoline or diesel engines, an electric motor is stupidly simple. I built my first electric motor in elementary school science class, and all the students needed was a length of copper wire, a fridge magnet, a plastic cup, and a small battery.
But if you take a car mechanic who's worked on gasoline-powered cars for decades and put them in front of a Tesla, they're not going to see a lot of familiar systems. No engine means no transmission, exhaust, or (traditional) coolant systems, and I'm sure many other things would be "missing" or completely redesigned to accommodate for and take advantage of the giant battery and electric motor.
So what's the equivalent of this video series for cars? It could be something like those animations or that DIY kit for the gasoline engine, but maybe the most helpful thing would be tutorial videos made by remote-controlled car enthusiasts who build miniaturized but fully-functional cars, both electric and gasoline. Then again, those might not be super helpful if those tiny cars use designs that only work for tiny cars which don't carry people or generate massive quantities of heat.
Comparing cars to computers is difficult though. The "magic" of a car might be the engine itself, or maybe all of that impenetrable jargon, but at some point you're just talking about "things you don't deeply understand" and not magic.
Computers, on the other hand, are just so much more complicated than cars. And when you combine computer hardware with software and the internet, it just becomes too much for any one person to understand.
Imagine a challenge where you have access to whatever heavy manufacturing equipment, tools, raw materials, and helping hands you need, but no reference books or internet. I bet there are people out there who could create a completely functional and mostly modern car within a day or two, because they understand the entire system from one end to the other, and the only thing that stops them from doing it is the physical and monetary hurdles. But if the goal was to build a computer from scratch that a random person can use to browse memes and post on Reddit, there's not a person in the world who could do it.
Any car built in the last 30 years has a computer in it that controls the engine and probably other stuff, so that's a catch. But fully functional cars existed long before computers, so in my mind it would't be mandatory to build that component.
Get a Haynes Build Your Own Internal Combustion Engine and put it together. Then buy an old Honda Civic, get the Haynes manual for it, a good set of cheap tools (subscribe to their mailing list, they go on sale for $159 just about every holiday weekend) and go to town. By the time your ready to drive you'll know your Civic (and, by extension, all cars) inside and out.
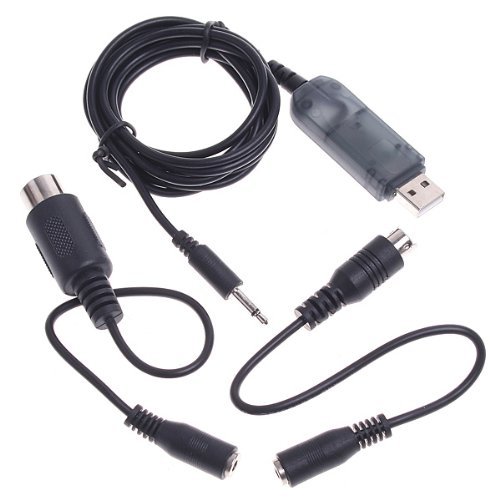
That cable is used to update the firmware on the transmitter. You'll need a simulator cable, like this, to play on FPVFreerider.
https://www.amazon.com/Hitec-RCD-Micro-1-Cell-Charger/dp/B00FYL2INM/ref=sr_1_3?s=toys-and-games&ie=UTF8&qid=1467398087&sr=1-3&keywords=hitech+charger
Try this lot's of people seem to use this or have a balance board that can charge a lot of different batteries.
Those hubsan multi-chargers are hit and miss. Some are great, some aren't. It's nearly impossible to tell which brand is good or not. If you're willing to spend a some more money on a solid charger, get the Hitec X4 micro ac/dc charger.
Sure, I ran into some issues with a few lemme grab you a list
List:
[Makerfire 4pcs] (https://www.amazon.com/dp/B06XRJMVCC?ref=yo_pop_ma_swf)
4PCS ML2206S 2400KV 2CW 2CCW Brushless Motor 3S-4S For RC FPV Drones QAV 210 250 300 Mini Quadcopter Multicopter
RAYCORP 5040 3-Blades 5x4x3 Propellers. 16 Pieces (8CW, 8CCW) Black & Green 5-inch Tri Blades Quadcopter & Multirotor Props + Battery Strap
[Uxcell a14120500ux0277 30Pcs M3 6Mm+40 mm Male-Female Nylon Hex Stand-Off Pcb Spacer Pillar[(https://www.amazon.com/dp/B00YM3SNAU?ref=yo_pop_ma_swf)
Wolfwhoop WT05 Micro AIO 600TVL Camera Only 3.4g 5.8GHz 48CH 25mW FPV Transmitter with Dipole Brass Antenna Combo for FPV Quadcopter Drone
FlySky FS-i6-M2 2.4GHz 6-Channel Transmitter
Makerfire FPV Goggles with DVR 5.8G 40CH Raceband Build-in 2000mAh Battery for FPV Racing Drone RC Quadcopter
Not only are these more durable, they also seem to stay really well on the motor shaft for my QX90 and QX95. https://www.amazon.com/gp/aw/d/B00RE5US38/
These are quite...meh, better than wire cutters and normal side cutters, but not as good as good side cutters. That's because these are meant for children, who usually don't have high allowances, and don't do much besides cut straight off the runner. The godhand nippers that everyone uses and refer to universally as "Godhands" is the Ultimate Nipper 5.0.
Other good nippers include the Gundam Planet Nippers and Tamiya Sharp Pointed Side Cutters.
I got a question for you.
How much do you want to spend on cutters?
Some notable brands for cutters are (listed from price ascending) Xuron($10-$20), Tamiya($25-$30), Gundam Planet($35), and then Godhand($55-$??). (There might be others, but I have found these to be the most popular.)
Right now I have Gundam Planet nippers. They are the best nippers I have had so far, but I have only owned one other pair so dont take my word to heart. What ever you do don't go for a $5 pair not worth it at all. I did that and I spent more time fixing the mistakes those clippers did to my model.
Personal opinion get a pair of Tamiya Sharp Pointed Side Cutters or Gundam Planet Nippers. Here is a [comparison] (https://panzercraft.com/articles/2016-01-31-tamiya-side-cutters-vs-gundam-planet-nippers/) between the two. In all honesty though I have no been able to replicate that slow cut with my GP nippers. Another point is I have been able to get pretty close if you scratch the white part with your finger nail it almost looks like the slow cut photo.
P.S. Really though all of your clean up with the nubs is going to be with sand paper and a razor blade of some sort. I just ordered myself a OLFA Rubber Grip Utility Knife, but you can also get a OLFA Cushion Grip Knife if you want one of them.
Oh haha nope... tbh I lost his hammer launcher thing in a pile of parts somewhere.
Ol’ Ironhide has...
New weapons
New gap fillers
New stompy boots
Whole lot of this... ... and some of this
I should also mention nuln oil, also called "liquid talent," though I've never tried it myself.
Citadel makes a good producut. This is what I use for my Gunpla and bases for mini's.
https://www.amazon.com/Citadel-Paint-Shade-Nuln-Oil/dp/B0189BIERC
But really, just run a search for "black wash acrylic paint".
Without knowing your boyfriend's taste in gunpla, this newly released MG 1/100 Freedom Gundam 2.0 kit is pretty popular. It has also been praised by gunpla reviewers for its quality and poseability.
This forum is great and has talented people.
Keep in mind two things about this forums popular suggestions:
1.) They love grunt suits. So don't let them bully you into a grunt suit unless that is what you want.
2.) MG Ball Ver Ka seems to be a favorite on here, don't let that influence you unless you like the ball.
My personal recommendation is the new MG Freedom Gundam 2.0
Build the suit you like!
I will be getting the 1/100th grimgerde
Chill, anti-social, likes moderate mind-fucking (but not deep into mind-fucking), and is loving, especially whenever they make a bond with someone.
MG Freedom 2.0 or the MG Wing Fenice Rinascita
Bandai Hobby MG Freedom Gundam (Ver. 2.0) "Gundam Seed 1/100 https://www.amazon.com/dp/B01BD3NJ8C/ref=cm_sw_r_cp_apa_i_BhIQCbZ8XC978
This one?
Gundams are all snap-together models, so no glue/paint is explicitly required. The instructions are all in the form of pictures, so you should be able to understand them just by looking at them and matching the parts on the plastic runners and piecing the parts together.
You'll want a hobby knife and a pair of sprue cutters to free the parts from their runners; Something like This should be fine for a beginner. You just use the cutters to cut the parts off where they attach to the runners and then sand or file down the excess.
There is another sub called /r/Gunpla which is dedicated specifically to Gundam models, and they might be able to help out more.
I recommend any of these 2 alternatives, very cheap and you will enjoy the quick and effective results:
Gundam marker:
Gundam Marker
Accent Color
The 3-pack of markers for bold lines:
https://www.amazon.com/GSI-Creos-Gundam-Marker-Value/dp/B00HY93GHY/ref=sxts_sxwds-bia?crid=3GTR0RXGUXX4H&keywords=gundam+marker+set&pd_rd_i=B00HY93GHY&pd_rd_r=3b3b062e-d90d-495a-8e52-176ed31b8ba1&pd_rd_w=RRUZa&pd_rd_wg=sdCxW&pf_rd_p=a5491838-6a74-484e-8787-eb44c8f3b7ff&pf_rd_r=9A24ZX8C18EJZBXABCXP&psc=1&qid=1571687311&sprefix=gundam+marker%2Caps%2C152
Tamiya ink works differently, it will spread down the lines: (Comes in a variety of colors)
https://www.amazon.com/TAMIYA-87131-Panel-Accent-Plastic/dp/B01HDJ7BR0/ref=sr_1_1?keywords=tamiya+ink&qid=1571687349&s=toys-and-games&sr=1-1
​
And I like to use this for fine details, it is thinner than the Gundam markers:
https://www.amazon.com/gp/product/B002UCSNQY/ref=ppx_yo_dt_b_search_asin_title?ie=UTF8&psc=1
​
These I use for cleaning, the middle grit will take off ink, then the fine will buff the marks:
https://www.amazon.com/gp/product/B00R34AE66/ref=ppx_yo_dt_b_search_asin_title?ie=UTF8&psc=1
​
Hope this is helpful, good luck!
There are a few different ways to fill seamlines, with my preference being Tamiya Thin Plastic Cement. Filling seams should only be done if you want to paint, as you get to paint over the filled seam. As for masking, any small measuring tool is helpful. In addition, good Masking Tape can also help.
Haha, that makes much more sense.
It's not hard at all, just takes a little more patience. You put masking tape over the parts you don't want colored, paint, then remove the tape. Repeat for each color. Just be sure whatever you are taping is completely cured or you might peel it up.
Regular old masking tape (The paper-like brown stuff) works fine, but I recommend stuff specifically made for modeling/painting like this: https://www.amazon.com/Tamiya-300087030-Masking-Tape-6mm/dp/B0000WRZZQ. It's smaller to begin with and has a smaller risk of ruining the paint job.
Silicone shock oil. Just a little bit in the area you're wanting to loosen. Have used this stuff on my Articulated Icons ninjas.
Traxxas 1666 Silicone Shock Oil https://www.amazon.com/dp/B0006O5GKY/ref=cm_sw_r_cp_api_F-iUzbASJ6VPY
Just today I bought this 30k oil. Really cheap, 100% silicone, and on Amazon Prime.
https://www.amazon.com/gp/product/B0006O5GKY/ref=oh_aui_detailpage_o00_s00?ie=UTF8&psc=1
Actually there already is an MG. It's an older kit though.
https://www.amazon.com/Bandai-Hobby-Action-Display-Stand/dp/B000KG499M
The action base 2 are for 144th models. You need the larger action base 1 designed for 1/100th MG models
http://www.amazon.com/Bandai-Hobby-Action-Display-Stand/dp/B000KG499M/ref=sr_1_3?ie=UTF8&qid=1405893297&sr=8-3&keywords=gundam+action+base
The HG IBO line looks great for that grade, especially kits like Bael, FLauros, Barbatos Lupus / Lupus Rex, Kimaris Vidar, Astaroth... on and on, and the non-gundam frame also look good (Grimgerde, Graze Ein, etc.) Pick the kit that appeals to you and go with it.
I do not own any of the small option set, but they do give you extra weapons and the mobile weapons (like the tanks and such) for further options when it comes to creating diodrama.
For base, MG kits are sized 1/100, so get the 1/100 Base, and for the HG / RG, MOST are sized 1/144 so get the 1/144 Base
Your english is plenty good, so do not worry.
FYI, System base will only allow you pose the kit in a static, standing pose. It does not have any arm attachment for aerial poses.
Dragon Momoko stand is fine, but the catapult one is designed for 1/100 scale. While the attachment will accept 1/144, the scale will be different.
As for general displaying, Action Base 1 is perfect for 1/100 kits and Action Base 2 for 1/144 kits.
Here: https://www.amazon.com/gp/aw/d/B000KG499M/ref=mp_s_a_1_1?ie=UTF8&qid=1486423580&sr=8-1&pi=AC_SX236_SY340_QL65&keywords=action+base+1&dpPl=1&dpID=41hJjtAHGKL&ref=plSrch
Estes Tandem-X Flying Model Rocket Launch Set https://www.amazon.com/dp/B002VLP67S/ref=cm_sw_r_cp_api_i_4Sl8Cb8Y0K0TX
That’s what I have found
Estes is a pretty good company for model rockets but don’t count on me do some more research but this is a basic set ( I think)
Yeah like I said don’t count on me you need engines which are like five bucks for three and a parachute which usually comes and a piece of paper which is used to block the flame from burning up the fairing with the parachute inside
Just do your research it’s a really easy hobby and fun if you attach an altimeter and speedometer with a camera its pretty cool to rewatch your videos and see what you could’ve have done better.
Have fun and great job on quitting weed
Estes Tandem-X Flying Model Rocket Launch Set https://www.amazon.com/dp/B002VLP67S/ref=cm_sw_r_cp_api_i_jU5XCb93BAZG0
I’m more about practical learning.. get ur parents to grab something like this and see it for yourself!
Be safe and have fun!
If your son likes rockets (it looks like he does!), may I recommend you consider doing some actual rocket building together?
Something like this Is a really awesome starter set for an aspiring model rocket builder. You get the launch pad, the launch controller, and two rockets. You'd need a few engines, igniters (usually come with engines) and fireproof wadding, but you can also get those on amazon or at a hobby store, or even a toystore or walmart usually. One of the rockets is a pretty simple one that is more or less snap together, and then the other is a slightly more complicated one that needs a touch more skill.
The only caveat is you need a pretty big open field to do launching so they don't end up stuck in the tops of trees. I used to go launch mine at the local soccer field complex on days when there were no games.
I think getting a couple master grades would be better than a single perfect grade.
The "HG Sengoku Astray" is based on the Astray Red Frame, which you can get in MG here: http://www.amazon.com/Bandai-Hobby-Gundam-Model-Astray/dp/B0042VJ018/ref=sr_1_1?s=toys-and-games&ie=UTF8&qid=1411528820&sr=1-1&keywords=mg+red+frame
the BF hasn't posted here in a while so maybe you can get him non-gundam related items with the leftover money, unless you know he wants to really get into the hobby
I'm just confused because I was also looking to purchase this Heavy Arms model https://www.amazon.ca/Bandai-Gundam-Heavyarms-Master-Grade/dp/B006F9CFWQ/ref=pd_sbs_21_7?_encoding=UTF8&pd_rd_i=B006F9CFWQ&pd_rd_r=19feedf4-ce90-11e8-8978-638753c50467&pd_rd_w=LulPe&pd_rd_wg=tTOYe&pf_rd_i=desktop-dp-sims&pf_rd_m=A3DWYIK6Y9EEQB&pf_rd_p=d4c8ffae-b082-4374-b96d-0608daba52bb&pf_rd_r=VK8E9WC0E8R39FN9P253&pf_rd_s=desktop-dp-sims&pf_rd_t=40701&psc=1&refRID=VK8E9WC0E8R39FN9P253
and they are only charging $60 CAD for it.
The biggest/best detailed version of the HeavyArms is simply the 1/100 MG EW version. It's actually on discount now for 39.50:
http://www.amazon.com/Bandai-Gundam-Heavyarms-Master-Grade/dp/B006F9CFWQ/ref=sr_1_2?ie=UTF8&qid=1381729999&sr=8-2&keywords=heavy+arms
This works for me on the dx6i and Taranis.
http://www.amazon.com/Universal-Flight-Simulator-Cable-Futaba/dp/B00DR4I4O0
Something like that should work in theory, but you should probably look for some reviews for what looks like really cheap Chinese electronics. I've got the Hitec x4 Micro, which is twice the price, but really nice.
http://www.amazon.com/X4-Micro-AC-LiPo-Charger/dp/B00FYL2INM
http://www.amazon.com/gp/product/B00FYL2INM?psc=1&redirect=true&ref_=oh_aui_detailpage_o05_s00
This thing is awesome!
>black is fine I use citadels shade "nuln oil" this can make any paint job look 2x better
Can a black wash be used on any color? How do you use a black wash on a light-colored figure?
I see that the Citadel Shade Nuln Oil is $8.60, but I could get a batch of 8 Citadel washes for $34.50. Would you recommend the batch of washes, or is the black all I need for a beginner.
I also have the Army Painter Strong Tone Quick Shade that I have been using, but it is a pretty dirty shader, only good for all my zombies I think.
Yeah. Here's an Amazon link to the basic games workshop set.
Amazon
Essentially the paint is super watery and will suck itself down into the crevices of a model. It's nicknamed liquid talent because it just instantly and drastically improves your model.
I've used shades on a 0.1mm layer height print before. It's usually fine, any bigger layer height and it starts getting wonky because if the nature of 3d printing. It makes rings around the model. It looks like you should be fine though.
I don't have a lot of experience with 2 stick controllers, I found the FlySky FS-i6 for $50:
https://www.amazon.com/FlySky-FS-i6-M2-2-4GHz-6-Channel-Transmitter/dp/B00PF160IK/ref=sr_1_30?keywords=2+stick+rc+controller&qid=1568313826&sr=8-30
This is way over kill for what you need, but my quick search did not find any cheap 2 channel stick controllers. If the Vaporizr has a separate receiver, you can replace it, otherwise, if you get a different controller, you will need to get 2 small ESC's as well. That's why I recommended modding the existing controller. You MIGHT be able to find another controller that works on the same radio channel/frequency that uses the same control scheme that is physically larger, but that will involve a lot of searching and trial and error.
I would recommend this radio to start, I have had it for over a year, and I’m not close to outgrowing it yet. FlySky FS-i6-M2 2.4GHz 6-Channel Transmitter https://www.amazon.com/dp/B00PF160IK/ref=cm_sw_r_cp_api_uMcLzbNJZVAWH
As far as servos are concerned, you can use the super cheap blue 9 gram servos, as they are almost disposable, but I would recommend the metal gear mg90s servos. Nothing more frustrating than landing wrong and accidentally stripping a Servo.
Here are the blue servos: http://r.ebay.com/s0XKOt
And here are The mg90s: http://r.ebay.com/d8mu3D
Both of those are great. I've heard the Gundam Planet nippers are a bit better, but I don't think it's a huge difference.
Certainly.
Tamiya side cutters: http://www.amazon.com/dp/B000J47Z4G/ref=sr_ph?ie=UTF8&qid=1454130412&sr=1&keywords=tamiya+side+cutter
Gundam Planet Nippers: http://www.amazon.com/Gundam-Planet-Premium-Nipper-Plastic/dp/B012TMXDAU/ref=sr_1_1?s=toys-and-games&ie=UTF8&qid=1454130468&sr=1-1&keywords=gundam+planet+nipper
I think there's only one FPV kit specifically for the X5, but it's a drop-in replacement for the stock camera, which is nice. It's heavier, and the quad is a bit of a pig with it mounted, but it still flies pretty well; you just can't fly as fast, and definitely can't come in as hot when you land. Also note that it didn't really say the exact tx power, but it's almost certainly over 25 mW, so expect to get your ham ticket if you want to be law-abiding and/or want to join the cool kids over at /r/amateurradio.
This is what I bought, though you might find it a little cheaper elsewhere.
I would go with the X8C with this camera http://www.amazon.com/GoolRC-Real-time-Transmission-Display-Quadcopter/dp/B013HQCK88
You can get a 5.8GHz FPV system for the Syma x5c.
http://www.amazon.com/gp/product/B013HQCK88?psc=1&redirect=true&ref_=oh_aui_detailpage_o04_s01
I purchased this last month for mine. The screen is very bright, even outdoors. Camera is about the same quality as the 2.0MP/720p that comes with the x5c (slower exposure compensation, slightly sharper image).
Here's footage I took the other day
[from the camera]*(Removed link since it's from my own YouTube channel. PM me if you want the link).I highly recommend it for a beginner/trainer quad. Under $130 all in for the quad, FPV and extra batteries.
Not going to be the best but very available - Syma X5C-1 - Banggood/Gearbest/Amazon/Aliexpress.
You can get a very basic 5.8ghz FPV setup going with http://amzn.com/B00MNG37C2 and http://amzn.com/B013HQCK88 - Its Toy grade but can get you started on an expensive hobby.
https://www.amazon.com/dp/B0189BIERC?ref=yo_pop_ma_swf
The gold standard.
Citadel Paint, Shade: Nuln Oil https://www.amazon.com/dp/B0189BIERC/ref=cm_sw_r_cp_api_i_5IbHDbN67N50H
I also have a wide selection of Army Painter washes that came with the complete set of paints.
Just use sparingly and have a dry brush handy to soak up any excess. You can always layer up!
That thing needs a wash to darken it up and increase the grit.
​
https://www.amazon.com/Citadel-Paint-Shade-Nuln-Oil/dp/B0189BIERC
That was easy.
Actually i was just looking at kits and saw this kit can you tell me the quality of one vs the other?
I got this kit https://www.amazon.com/dp/B01GH6B3Z6/ref=cm_sw_r_cp_apa_eRFNzb7YRA72P
getting a lot of mixed answers about this, but if I'm not painting my kit and want to panel line, should I bother with a clear coat beforehand? I'm planning on using a fine tip Gundam Marker and some Tamiya panel line accent color (this one). from what I've read, I don't need to bother with a base clear coat if I'm not painting.
and if I do need a base clear coat, is this the right one?
Hahaha. No problem
(Hobby Link Japan Marker Black)
https://hlj.com/gundam-marker-black-fine-tip-for-panel-lines-gnzgm01
(Hobby Link Japan marker Grey)
https://hlj.com/gundam-marker-gray-fine-tip-for-panel-lines-gnzgm02
(Amazon set of 3) https://www.amazon.com/GSI-Creos-Gundam-Marker-Value/dp/B00HY93GHY/ref=mp_s_a_1_2?keywords=panel+line&qid=1569935250&sr=8-2
(Amazon Tamiya Panel Wash Black)
https://www.amazon.com/TAMIYA-87131-Panel-Accent-Plastic/dp/B01HDJ7BR0/ref=mp_s_a_1_4?keywords=panel+line&qid=1569935250&sr=8-4
(Amazon Tamiya Panel Wash Grey)
https://www.amazon.com/Panel-Line-Accent-Color-Light/dp/B07CMSBDCB/ref=mp_s_a_1_8?keywords=panel+line&qid=1569935250&sr=8-8
I put links from Hobby link Japan because thats what people here recommend using, bit I also put Amazon because it might be easier for you. Unfortunately I couldn't find the wash on Hobby link. Happy Building 😁
I think so? Here:
https://www.amazon.com/TAMIYA-87131-Panel-Accent-Plastic/dp/B01HDJ7BR0
I got the paint set on amazon for 25-30 ish USD. It’s army paint brand, which I think is the same brand as the upcoming legion paints.
https://www.amazon.com/Army-Painter-Dungeons-Official-Adventurers/dp/B07DWMTNDJ/ref=mp_s_a_1_4?keywords=miniature+painting+kit&qid=1562575883&s=gateway&sprefix=miniature&sr=8-4
Here you go!
Hey there! I got into painting based on the board games I was picking up that came with plastic miniatures. This was a good starting place as the figures aren't super detailed and adding any paint to them seemed to make them better than standard board game pieces.
If the art side if things is more of the draw then I would suggest checking out a starter kit. There are a few "starter kits" out there that are good because they give you the basic necessities to jump into painting without spending tons of money.
I saw a couple good looking kits on Amazon. Here is a DND specific one:
The Army Painter Dungeons and Dragons Official Paint Line Adventurer's Paint Set https://www.amazon.com/dp/B07DWMTNDJ/ref=cm_sw_r_cp_apa_i_-QBDDbAFWJSHE
Or here is a generic fantasy one:
Reaper Miniatures 08906 Learn To Paint Bones Kit https://www.amazon.com/dp/B00NTMC49G/ref=cm_sw_r_cp_apa_i_z1BDDbC1DSWE1
I think I'd recommend the second one as it comes with a couple different figures and seems like it's ready to go right out of the box.
One cool thing about painting miniatures is that it is as complicated or as simple as you'd like. There are some great tutorial videos on YouTube to teach the basics. I learned from Sorastros painting tutorials. He does a good job of showing you the basics to get a decent looking figure and then gives you extra steps if you are extremely detailed or want to go to the next level.
As others have mentioned you can get sets of figures to paint from reapers miniatures website. Or if there is a board game out there with a theme your son likes, it may be a good place to start as most games come with 15-30 miniatures with different sizes. Including bigger monsters which can be really fun to paint. Plus you then have a fun game in which to use your art project.
Mice and mystics is a fun family cooperative game with tiny anthropomorphic mice fighting fantasy battles similar to the redwall books. I painted the figures from those and had a great time with the painting and the game.
Some other good ones are Descent 2nd edition and Starwars Imperial assault. Both come with great miniatures but are a little complex on rules and need one player to be the big bad overlord playing against the heroes.
There is also a series of dungeons and dragons board games that are cooperative and come with lots of miniatures. The quality of these isn't very high but those were my first figures.
If you want to go "whole hog" you could purchase one of the "Warhammer age of sigmar" starter boxes. These miniatures are extremely detailed and actually require you to assemble them from several pieces. They don't come with paint inused but there are entire paint kits to go along with them. Some folks really enjoy putting the GW models together, then priming and painting them. These aren't cheap so it might be best to start elsewhere but you get a lot of figures in the box. I will warn you the theme is fairly dark. Lots of blood and skulls.
Best of luck and I hope you guys enjoy!
If you're looking to get started in painting for D&D, get the offical D&D paint sets from Army Painter. They come with brushes, and each set also comes with a mini.
Basic colors and a Minsc mini
Second set, more colors and an owlbear mini
​
And the number one piece of advice for new painters is thin your paints. Always thin your paints and keep them thin.
Ok. Gonna throw out a couple of suggestions to get you started.
First get a starter paint set.
You can get them from the local hobby shops
A few of them come with the basic supplies you need to get started.
The following ones come with a small set of paints, a brush and a miniature to paint. Often they also come with step by step instructions or online videos to watch
Dungeons and Dragons Official Paint Line Adventurer's Paint Set https://www.amazon.com/dp/B07DWMTNDJ/ref=cm_sw_r_cp_api_i_kTC0Db25P03XH
Dungeons and Dragons Official Paint Line Monsters Paint Set https://www.amazon.com/dp/B07DWL5JZZ/ref=cm_sw_r_cp_api_i_VVC0Db4FCQTAM
Reaper Miniatures 08906 Learn To Paint Bones Kit https://www.amazon.com/dp/B00NTMC49G/ref=cm_sw_r_cp_api_i_vWC0DbVBYBCNP
Reaper Miniatures Master Series Paints #09970 Starter Set for Mini Figures https://www.amazon.com/dp/B07664WJ3H/ref=cm_sw_r_cp_api_i_RXC0DbPXRB07Z
The Army Painter Kings of War Undead Miniatures Paint Set - Highly Pigmented Acrylic Model Paint Set - 10 Miniature Paints in 18ml Dropper Bottles https://www.amazon.com/dp/B01MRYAY5R/ref=cm_sw_r_cp_api_i_FYC0Db3QD8HJT
The above links are only there to show you what to look for.
Citadel also has a great range of paints but they are generally more expensive and don’t come with brushes or models to paint
Please. Buy local and support our FLGS (Friendly Local Game Stores) They are the reason why so many people are into these hobby’s.
Take a little while and find a couple of Nolzurs or Reaper miniatures you like to paint. They are inexpensive and will be great pieces to start with.
However if your gonna look online Miniature Market currently is having their Black Friday sale
https://www.miniaturemarket.com/searchresults?q=black+friday+sale#/?_=1&sort.ga_unique_purchases=desc&page=1&filter.product_tag=Black%20Friday&filter.manufacturer=Army%20Painter
What ever route you’re choose let us know what you did and show us your completed work. There are a lot of super helpful people here
Hey, I’m also pretty new to the hobby. I picked up one of these https://www.amazon.com/gp/aw/d/B07DWMTNDJ/ref=sspa_mw_detail_0?ie=UTF8&psc=1&smid=AU2FNATHSFHNB. And I have been pretty happy with it. For some reason my local hobby shop had it a little cheaper than amazon so if you have a store around you that might sell this stuff I would check it out. It comes with a decent selection of good paint, #1 brush and a miniature for you to get started.
> So it can be easier to work with but it's not a huge difference as the idea is still the same.
Completely disagree
Painters tape and modeling tape are WORLDS apart. Modeling tape is thinner, has less tack, leaves a sharper edge and is also slightly flexible.
I highly recommend Tamiya Masking tape
http://www.amazon.com/Tamiya-87030-000-Masking-Tape-6mm/dp/B0000WRZZQ
Use it on the edges and then you can use regular masking tape to mask the rest of the part
Get one of these:
https://hlj.com/1-144-scale-rx-78-2-gundam-first-grade-ban72385
Prime it with this:
https://www.tamiyausa.com/shop/finishing/fine-surface-primer-l/
Mask with this:
https://www.amazon.com/Tamiya-USA-TAM87030-Masking-Tape/dp/B0000WRZZQ
Hand paint with these:
http://www.mr-hobby.com/en/itemDetail.php?iId=400
or
https://acrylicosvallejo.com/en/categoria/hobby/mecha-color-en/
Or spray with these:
https://www.tamiya.com/english/products/list/tamiya_spray/kit85001.htm
http://www.mr-hobby.com/en/itemDetail.php?iId=169
And top coat with either this:
https://www.tamiya.com/english/products/85080/index.htm
or
http://www.mr-hobby.com/en/itemDetail.php?iId=268
Once you're comfortable painting, get a cheap compressor & airbrush and experiment with various acrylics, lacquers, etc.
Looking good so far! As the other chap said, i can't see any seams or nasty bits so well built!
This is where i'd go from here:
Painting wise, I'd go with thinning paints and doing several thin coats, watch this vid, i link it often. It shows how not to be down heartened with thin patchy paint on the first coat.
Get some thin tamiya masking tape to mask the edges between colours, mainly between the bottom grey and the camo upper. You can burnish it down well using a qtip or a tooth pick.
Once painted, spray it with a coat of gloss, I generally use Mr Topcoat gloss, but there are others. Make sure you mask the canopy when you spray it, else it'll fog. Then add the decals, possibly using some decal solutions like micro sol/set which really melts the decals down to the surface. Then spray again with gloss.
Once the gloss has cured, you can have a go at doing things like adding a wash, pigments, so you could make some exhaust and gun soot, streaks along the wings etc. Flory make some nice cheap water based washes that are quite forgiving for a beginner, as per their video here.
You can do some nice tricks with just using a pencil which gives the illusion of preshading, have a watch of this, it's a great video, the guy has a lovely finished model with hand painting!
When you're done, add a matte coat to it to flatten it all down, once again i use mr topcoat matte.
Most people swear by Tamiya masking tape (in various sizes), I picked some up from my local hobby store and it works pretty well.
https://www.amazon.com/Tamiya-300087030-Masking-Tape-6mm/dp/B0000WRZZQ/ref=sr_1_7?ie=UTF8&qid=1479390004&sr=8-7&keywords=tamiya+masking+tape
Use this / they also have a tape for curves. It helps a ton and has low adherence so you don't have to worry about pulling paint up. I really enjoy the profile and the model itself looks cool to me but it's all preference. I do have to say it was the easiest tag to put together that I've done.
I think the stuff i use is 2 or 3 mm, but i cut it to be thinner for stuff this small.
Edit: It's 6mm. I use this stuff. https://www.amazon.com/gp/product/B0000WRZZQ/ref=oh_aui_search_detailpage?ie=UTF8&psc=1
I cut it into thirds for this one, but i may only cut them in half on the next one to get slightly wider stripes.
https://www.amazon.com/Traxxas-1666-Silicone-Dampener-Oil/dp/B0006O5GKY/ Would this work?
Could try getting some rc silicone oil for the wheels to keep them from falling apart
This is one I use a bit for wheels and where belts ride
Traxxas 1666 Silicone Shock Oil https://www.amazon.com/dp/B0006O5GKY/
I recommend 30k or 50k and some of this (350 cst which is the equivalent of 0.35k)
Hi, I found this thing called Traxxas Shock Oil. Can it be used as lube for a cube? https://www.amazon.com/Traxxas-1666-Silicone-Shock-Oil/dp/B0006O5GKY/ref=sr_1_1?ie=UTF8&qid=1499389311&sr=8-1&keywords=traxxas+oil
I'm new to lubing cubes, and so I got my feet wet by buying the cheapest all-silicone oil on Amazon I could find, this 1666 Traxxas oil.
How would this stuff compare to other brands? My cubes feel smoother with it, but they also are a little sluggish.
I have a DaYan Zanchi and a FangShi shuanren that I'd like to relube. My times are 60-90 seconds, usually. What would y'all recommend? EDIT: I meant to ask... what lube should I get instead of this stuff?
Thanks!
Nope, but he works with any gundam stand. You could buy one for like $8 on amazon or something I think.
EDIT: here’s one for $7
TRADING
I have two (2) unopened clear Action Base 1 I wish to exchange for any two black and/or grey bases.
I also have a NIB RG Skygrasper I would like to exchange for RG Justice,
Destiny, or Char's Zaku II. If none of these, let me know what you have and we'll go from there.EDIT: removed RG Desitny from list. I forgot I had pre-ordered it.
Hi there!
Many years ago when I was a kid, I had a lot of fun putting together Gundam models. They were really cheap little ones though, since I was like 12. I had a little Deathscythe model in a box until I moved out of my first apartment lol.
Anyway, I decided I wanted to pick it up again as a nice hobby to do with my hands.
I ordered THIS and THIS along with a stand for the first one and for the 2nd one.
I was wondering if you all had any tips for success for someone new to the craft. I don't expect mine to look SuperPro right off the bat, but tips on avoiding common mistakes would be super appreciated!
This one right here is prime.
Not sure where your are looking to find them 'too expensive'.
Pin Vise
Tamiya Basic File Set
Tamiya Plastic Scriber II
Those are cheap and or par the course for finding them elsewhere. I don't think going with used tools is a good idea when you can get them new for very reasonable prices on amazon.
I got this guy: http://www.amazon.co.uk/Plastic-Scriber-II-Tools-Tamiya/dp/B002KKBVTC/ref=sr_1_1?ie=UTF8&qid=1398719674&sr=8-1&keywords=tamiya+scriber+ii
I scribed the first couple of pieces today, definitely a skill to be learned! But I'll keep the WIPs coming! :D
I just searched on youtube for guides on eliminating seam lines, not sure who exactly but all the big youtube personalities pretty much have tutorials I believe.
Hey guys! Just found this sub, but I've been wanting to get into this hobby for a while. Planning on going with this one to get my feet wet.
Before I buy it, I'm also planning on getting these markers and these wash's (both from the wiki). Can someone show me to a video tutorial that explains exactly how to use them please? I've got no idea what the wash's are for...
I might also pick up this scriber to try and do some battle damage, but I can't find any tutorials on that? I'd also need some paint...
Is there anything else that I'm missing? I've already got decent angle cutters and an Xacto knife.
Thanks!
U. Just found the tutorials link that covers lining, but I could still use some info on adding battle damage!
Tools like this or this are used for scribing custom panel lines. Just sand the lines after scribing to flatten the raised plastic that resulted from the scribing.
If you check out the Repository of useful links and threads on the sidebar, you'll find almost all the answers to questions you'll have.
EDIT: There's also this Big List of Gunpla Tutorials & Resources with tutorials to everything. It used to be in the repository, I think, but may have been removed. Anyway, good thing I bookmarked it before. Enjoy!
You can get a scriber to make panel lines. It takes patience and a steady hand, but very doable. People use label tape to help provide solid lines to follow.
You can use the back of your razor blade but you'll have to be careful not to go out of the line.
I think most people use something like the following link to scribe lines. The principle is the same regardless of rather it's new lines or bringing out buried ones. This is is essentially just an angled razor. There are also picks that look like what a dentist would use that you can scrape the lines with.
https://www.amazon.com/dp/B002KKBVTC/ref=cm_sw_r_cp_awd_nOozwb7DT24F1
Here you go! :) Check this out on AMZN:
http://amzn.com/B002KKBVTC
Yeah, that may be difficult. I think the smallest kit I've seen for the Saturn V is the Revel 1/144 one. The "problem" with the Saturn V kits is they are too big because the actual real life Saturn Vs were MASSIVE.
With that being said, have you considered getting your bf an actual model rockets? Something like this: http://smile.amazon.com/Estes-1469-Tandem-X-Launch-Set/dp/B002VLP67S/
edit:
Get a few motors and you should be set. You can probably leave the motors up to your bf though. Also, /r/rocketry can probably help you pick a good kit or two.
I think the entire world needs to send this to the glorious leader.
Is this too much rocket for beginners?
https://www.amazon.com/Estes-Tandem-X-Flying-Rocket-Launch/dp/B002VLP67S/ref=sr_1_1?s=toys-and-games&ie=UTF8&qid=1543033901&sr=1-1&keywords=estes+rocket+starter+kit
>North Korea launches a satellite into space.
NK media reports: http://imgur.com/UB2XK7h
Actual : https://www.amazon.com/dp/B002VLP67S/ref=cm_sw_r_cp_awd_RG13wbGG80QV0
I would love all of this.
The Astray is $51.49 right now if you have prime- ordinarily it's $65. I haven't built one myself, but I've never heard anything bad about it. People generally rave about its flexibility, if anything.
http://www.amazon.com/Bandai-Hobby-Gundam-Model-Astray/dp/B0042VJ018/ref=sr_1_1?ie=UTF8&qid=1397012446&sr=8-1&keywords=mg+astray
Should be this one!
https://www.amazon.com/Bandai-Hobby-Gundam-Model-Astray/dp/B0042VJ018
Besides the price is there any difference between this and this? One of them says Kai and the other one says Revise.
Bandai Hobby MG Gundam Kai Model Kit (1/100 Scale), Astray Red Frame https://www.amazon.com/dp/B0042VJ018
Hey folks, I just recently found out about these amazing looking mecha's.
I've never built anything like this before, but I'd really like to get into it.
Also would prefer to paint my own,
been looking at this
http://www.1999.co.jp/eng/10319728
or this
http://www.amazon.com/Bandai-Hobby-Gundam-Model-Astray/dp/B0042VJ018/ref=pd_sim_21_3?ie=UTF8&dpID=51BH3GVlTfL&dpSrc=sims&preST=_AC_UL160_SR108%2C160_&refRID=0YS2GXRZNKXKJW85BV0Q
What would I have to do to paint on top of the factory paint?
The unboxing videoes I've seen online make it look really complicated, tons of small parts etc. Is this just something I need to learn through trial and error or?
Tools ?
Sorry about all the questions lol
I think these might be more of a challenge. Hope the links work. http://www.amazon.com/Bandai-Hobby-Sazabi-Version-Model/dp/B00EOEBG2Y/ref=sr_1_1?ie=UTF8&qid=1449005374&sr=8-1&keywords=sazabi+ver+ka http://www.amazon.com/Bandai-Unicorn-Gundam-Ver-Ka-Master/dp/B005QKF860/ref=sr_1_9?ie=UTF8&qid=1449005374&sr=8-9&keywords=sazabi+ver+ka http://www.amazon.com/Bandai-Hobby-Sengoku-Astray-Gundam/dp/B00HD4ILWK/ref=sr_1_2?ie=UTF8&qid=1449005701&sr=8-2&keywords=Sengoku+Astray+Gundamhttp://www.amazon.com/Bandai-Hobby-Gundam-Model-Astray/dp/B0042VJ018/ref=sr_1_12?ie=UTF8&qid=1449005374&sr=8-12&keywords=sazabi+ver+ka
http://camelcamelcamel.com/Bandai-Hobby-Gundam-Model-Astray/product/B0042VJ018
I bought the used one on Amazon warehouse for $41, but I figured I'd share the rest with anyone else looking to pick up a Gundam with a greatsword / bow (anyone else play Monster Hunter? :p)
Hi,
I am new to gunpla and was looking to get the heavyarms MG kit and found 2 that I think are the same but with very different prices.
https://www.usagundamstore.com/products/mg-1-100-gundam-heavyarms-ew-ver
and
https://www.amazon.com/Bandai-Gundam-Heavyarms-Master-Grade/dp/B006F9CFWQ/ref=sr_1_1?keywords=gundam+heavyarms+mg&qid=1567495174&s=toys-and-games&sr=1-1
Is it normal that there are such big price differences between the same set? or are they not the same set? usagundamstore seems a legit store ( even the reddit has it listed as a place to buy ).
This one, I'm guessing.
Yeah I have the MG EW of that same kit and my god is it totally different. Here is the Amazon page for it. I didn't pay $40 for it though, but its worth that price.
I am hoping someone can help me here, as it has been a long time since I have watched Gundam Wing. I am looking to build all the main Gundams from Wing. I found [this] (https://www.amazon.com/Bandai-Gundam-Heavyarms-Master-Grade/dp/B006F9CFWQ/ref=sr_1_1?ie=UTF8&qid=1501597334&sr=8-1&keywords=gundam+wing+heavyarms), I am assuming that the EW means Endless Waltz, but I always remember the EW version looking like this. Am I just remembering things wrong?
Finally got a useful "spam" email from Amazon, here are some of the kits that appear to be on sale.
MG Sandrock - $42.64
MG Heavyarms - $42.40
MG Deathscythe Hell - $48.90
MG Wing Zero Custom - $43.66
MG Shenlong - $41.49
MG Deathscythe - $41.79
MG Wing Ver.Ka - $47.95
MG Wing - $44.29
MG Buster - $47.50
MG Nu Ver.Ka - $72.07
My little guy loved this:
http://www.amazon.com/Haynes-Build-Internal-Combustion-Engine/dp/B006H4JEQO/
Same age as yours. Most of it I had to assemble, which was sometimes difficult for him to understand. He loved the crank shaft/ piston assembly and the end result.
I use it in combination with some youtube videos that show the animated assembly of a standard inline 4.
Although it says ages 12 and up, this could be fun project!
http://www.amazon.com/Haynes-Build-Internal-Combustion-Engine/dp/B006H4JEQO/ref=sr_1_4?ie=UTF8&qid=1416151280&sr=8-4&keywords=engine+v8
You could also go with a model engine just ti get the idea of how things work. Saves space and is quite cheap. Haynes Build Your Own Internal Combustion Engine https://www.amazon.com/dp/B006H4JEQO/ref=cm_sw_r_cp_apa_i_8hVVDbSHC4PQ3
Legos are great for fostering creativity. You can never have enough. If you're looking for different ideas, though, you can get small working combustion engines to assemble yourself. Although I guess that might be a little advanced for a 3 year-old, but you can go through it with him slowly as his attention span allows. There's a v8 one too.
Got it!
I used to do all my own repairs.
Now my six year old handles most of it. Takes ten times as long, but so worth it.
Your oldest boy is four. That is the age when my little guy help with replacing light fixtures, replacing light switches and assembling a ceiling fan for his room.
For my guy, it started off with a fascination of all things rotational, which transmogrified into an obsession with ceiling fan assembly and a model engine (It has tons of screws that required lots of screwing and unscrewing in a rotational manner.)
https://www.amazon.com/GoolRC-Helicopter-Airplane-Simulator-Controller/dp/B00DR4I4O0
I've been trying to get my 9x set up with a simulator for like 6 months. I have this USB adapter. But the computer doesn't appear to recognize it when I plug in.
I've also tried the mono cable approach, but I can't get the software to install correctly. Are you only using Smartpropoplus? Any other software? And do you have to remove the module for it to work? Are you still using the stock module? I've got a FrSky DHT installed in mine.
I'd appreciate any guidance you might be able to offer. I want to get into these sims, but it seems kinda pointless with an Xbox controller. :/
Yes you'd use the transmitter with the computer. The cable loosks something like this https://www.amazon.com/GoolRC-Universal-Flight-Simulator-Futaba/dp/B00DR4I4O0
Where did you get that cable? It looks like it doesnt have any hardware to convert the 9xr signal to something your computer can use. Like this: http://www.amazon.com/Universal-Flight-Simulator-Cable-Futaba/dp/B00DR4I4O0
If you have the proper adapter these steps should get you up and running:
Hopefully this can help!
"It works, after a bit of work. It seems that my Turnigy 9x, my Mac and FPV-Freerider are a bit sensitive to this whole operation and it took me a week to find the trick, thanks to reddit user /u/flayzeraynx. No driver installs or anything, here's what I had to do: "Connect the USB adapter to your Mac. No need to install any driver. Remove your tx module from the back. Plug the stereo audio cable to the simulator cable slot (its at the back, below the module).. do NOT turn on the Transmitter, the TX will get enough power from the audio cable. Now create and select a new model on your tx(if you have this capability), select acro plane, and mode 2, reverse the elevator channel. Now open freerider on the MAC and select usb controller from the input and select"
Then I also have to calibrate the controller every time I start the app, it's a little annoying, but FPV-freerider is free for one map and cheap to buy the rest. If I bump the USB or the trainer port when I'm in the app, I lose it and have to close the program and start from the beginning. Hope this helps someone else!"
No need for trainer mode or anything like that. The 9xr should power up on its own when you plug in the adapter.
Thank you! I spent 20 minutes earlier this evening trying to figure out which dongle to get for my new Turnigy (For $21 how can you not get one?! :) 9x on osx.
I can't wait to try it on aerofly and fpv free rider.
BTW, has anyone tried the copters on aerofly? Are the physics are pathetic? or is my setup?
Edit: This dongle is only available in the international warehouse w/ $20+ shipping. It appears this one on amazon has free shipping with reasonable estimates on timing http://www.amazon.com/Universal-Flight-Simulator-Cable-Futaba/dp/B00DR4I4O0/ for $10 USD
Oh I see it has a trainer port but its not a 3.5mm cable like on spektrum the best way to hook it up would buy a cable for it something like this https://www.amazon.com/GoolRC-Universal-Flight-Simulator-Futaba/dp/B00DR4I4O0
Also a vid if u just want to solder up the cable yourself https://www.youtube.com/watch?v=mF2BIekw2tw
I used Liftoff, but it worked for FPV Air 2 as well.
Alternatively you can buy this cable.
https://www.amazon.com/gp/aw/d/B00DR4I4O0/ref=yo_ii_img?ie=UTF8&psc=1
This is what I use on my flysky FS-i6.
I use the "Newbie Drone" parallel charger. It gives you 12 ports to parallel charge on. It is designed for the smaller connectors, but you could easily make a cable. $20, maybe another $5-$10 to make adapters. I use an iMax b6 charger with this board (about $30-$40) and it works pretty well.
For a lot less ($4) you can get a 6 port parallel charger from RMRC. This would also need an adapter cable similar to above.
Other non-parallel options:
4 port Hitec Serial Charger. Works well, lets you charge up to 1A, and has the connector you need.
RMRC also just announced a 6 port, individual charging, for $19. It requires an XT60 cable to power it, which you could use a 3S or 4S battery, or plug in a 12v DC charger. You'd also need to make a cable for this one.
Hey, I purchased a Taranis X9D today with the intent of buying a micro as my first decent quad (I've trashed a few cheap ones learning how to fly). Once the radio arrives I plan on practicing with a sim while the (unpurchased yet) quad is in the mail.
I realise it's expensive, but the MOSKITO 70 is the frontrunner on my my micro shopping list right now. If my understanding is correct, the brushed motors on the three linked quads will wear out after a while, unlike the MOSKITO, correct?
On the Multicopter sidebar, the sidebars Batteries and Charging has some great info, however I'm still a little unclear on:
You can easily make a harness if you have several charging leads. When connecting source to output, it's a simple one-to-many connection. All the positives go together, and all the negatives go together.
HOWEVER
If you do lots of 1S stuff, save yourself a lot of hassle and invest in one of these Hitech chargers. It's worth every penny!! Let's you do 4 batteries at once, at independent charge rates, and tells you exactly what's going on with each. Only downside is if you're using JST, you'll have to build or buy a few more adapters. Again, well worth it.
Hitech make a charger but its a little expensive. Probably pretty high quality though.
http://www.amazon.com/X4-Micro-AC-LiPo-Charger/dp/B00FYL2INM
Thanks for replying :) I was thinking / hoping for something a lot cheaper actually, but I've seen that product name tossed around before. Which one of these should I buy?
http://www.ebay.com/itm/Hitec-X4-Micro-Ac-Dc-1-Cell-Lipo-Charger-44212/351576886028?_trksid=p2047675.c100011.m1850&_trkparms=aid%3D222007%26algo%3DSIC.MBE%26ao%3D1%26asc%3D20140602152332%26meid%3D06b9f86079364a21be29e7518acc96d0%26pid%3D100011%26rk%3D4%26rkt%3D10%26sd%3D171987244306
or
http://www.amazon.com/Hitec-RCD-Micro-1-Cell-Charger/dp/B00FYL2INM
Do you know if there any notable difference bwtween them?
Some seller on amazon has them for $70 shipped, a bit too much.
http://www.amazon.com/X4-Micro-AC-LiPo-Charger/dp/B00FYL2INM/ref=sr_1_1?s=toys-and-games&ie=UTF8&qid=1426032661&sr=1-1&keywords=Hitec+X4+Micro
So this:
https://smile.amazon.com/Citadel-Shade-Paint-Games-Workshop/dp/B00KOD3FM8/ref=sr_1_4?ie=UTF8&qid=1519681521&sr=8-4&keywords=paint+wash
or this?:
https://smile.amazon.com/Nontoxic-Miniature-Washes-Dropper-Bottles/dp/B0714QL55V/ref=sr_1_1_sspa?ie=UTF8&qid=1519681988&sr=8-1-spons&keywords=army+painter+wash&psc=1
For primer is there a benefit to using paint on, vs spray? I think the bases will be separate from my pieces. So I would think a spray can of like, white, grey, and black would be my best bet?
This set of shaders right here is the most important thing you can buy. If you don't want to invest that much you can just buy Nuln Oil and Agrax Earthshade individually and be fine.
If you already have acrylic paints you can just use what you have - just make sure to thin them until they are almost as thin as milk. Thick paint will cover up detail.
You will also want Krylon Matte finish or Testor's Dullcote matte finish to seal the mini.
I recommend watching Sorastro's painting guides, his Zombicide series starts from the most basic techniques.
I like these. http://www.amazon.com/Games-Workshop-Citadel-Shade-Paint/dp/B00KOD3FM8 but always with the knowledge that I can make my own with about a 1:8 ratio of any paints that I have. Use the color wheel as your guide. Cool colors recede while warm colors pop out. Try experimenting with different colors and see what effects you get, and what makes you happy. On faces I use a bit of blue in the shadows to help them recess, while using red in other places to help it come out.
Also, I typically repeat 3 and 4 multiple times.
Shade set
Having little pots of most is fine --- I mostly use nuln and agrax.
Yeah... mini paint is expensive... but it's also generally worth it. I'd recommend picking up one of the variety packs (I got a lot of mileage out of the Vallejo Basic USA Colors Kit, although the yellow and the orange weren't strong enough in my opinion). While the paints are certainly expensive, they last quite a long time. I've painted over a hundred minis (and a fair amount of terrain) and I still have at least half of every bottle. After I bought the basic set, I then bought a few individual bottles for colors that I felt were lacking. I specifically got a new orange, a new yellow, a couple of greys and a couple of additional browns. That set of colors has worked really well for me!
Something else to consider is washes. A friend got me a Games Workshop set for my birthday and it's been really nice. Once again, it's got a steep upfront cost, but the supplies will last a good long time.
i put a small amount of gold from Game color polished gold on a paper plate. Take an eye dropper and get some water and add 1-2 water drops on top. take a brush and mix together and whip the excess off on the paper plate while twisting to get a point(ish) on the brush. Then apply to model.
I'm still working on this model in several places. I got tired when i got to the current point last night. still need to go over the cape and some details again for additional layers.
paints i'm using
Shade paints (citadel)
and a few random citadel base and layer paints, 2 reds and 2 flesh tones.
all advice welcome. I still don't like the lack of smoothness i see in some spots on my models.
Ooooh thanks! I'll have to watch that video! I just ordered the Citadel set as well. I'll do a couple of side-by-sides and post the results. Hopefully this weekend, since I'm still waiting for them to come in the mail.
Thanks for giving me the motivation!
So far this is what im thinking of getting
Quad kit http://www.miniquadbros.com/collections/mini-quad-kits/products/nighthawk-170-kit-for-fpv-racing
Transmitter
http://www.banggood.com/Flysky-X6B-2_4G-6CH-i-BUS-PPM-PWM-Receiver-for-AFHDS-i6s-i6-i6x-Transmitter-p-1101513.html?rmmds=search
Controller https://www.amazon.com/gp/product/B00PF160IK/ref=crt_ewc_title_huc_1?ie=UTF8&psc=1&smid=A1PJ0S5YOZYEO4
Battery charger
https://www.amazon.com/gp/product/B01E8MOG1O/ref=crt_ewc_title_huc_2?ie=UTF8&psc=1&smid=A2YGVOB7APVMLY
Fpv Goggles
https://www.amazon.com/dp/B016I9KZ74/ref=wl_it_dp_o_pC_nS_ttl?_encoding=UTF8&colid=2L04UHZDHUT54&coliid=IZ1DGBYR0X676
Is that all i would need?
The FlySky, FlySky FS-i6-M2 2.4GHz 6-Channel Transmitter https://www.amazon.com/dp/B00PF160IK/ref=cm_sw_r_cp_api_i_Z.DmDbXGHABR2 , heck of a lot cheaper and will get you started, and you can get the FS-ia6b which has I-bus for the serial connection. About $100 all together
So, just arrived, it also didn't come with a controller, because I'm not so great at fully reading descriptions lol any reason to not go with a FlySky FS-i6-M2 2.4GHz 6-Channel Transmitter https://www.amazon.com/dp/B00PF160IK/ref=cm_sw_r_cp_apa_e4VLAbY579SZE ?
Try this one. The white controller for $71 is the same controller.
https://www.amazon.com/FlySky-FS-i6-M2-2-4GHz-6-Channel-Transmitter/dp/B00PF160IK/ref=sr_1_1?ie=UTF8&qid=1501198822&sr=8-1&keywords=remote+controller+flysky
You might be cutting it close. Here's a 6 channel tx and rx for 52$: flysky i6 Then a motor and ESC will probably run you another 30-40$. But youll also need servos (~10$) , battery connectors, batteries, charger, etc. If you already have any of those you very well might be ok.
I had a close call during one of my first flights. Have yet to actually make contact with a bird though, fortunately.
Also, this is a great chance to replace those props if they're stock. Stock ones tend to fly off. These are my favorite so far.
These? https://www.amazon.com/AFUNTA-Transparent-Propellers-Quadcopter-Helicopter/dp/B00RE5US38
I've been pretty happy with these clear props:
http://www.amazon.com/AFUNTA-Transparent-Propellers-Quadcopter-Helicopter/dp/B00RE5US38/ref=sr_1_1?ie=UTF8&qid=1451986117&sr=8-1&keywords=hubsan+clear+props
They seem more bendable/durable than the stock ones.
Thanks, I have heard of the ladybirds now that you mention it. I picked up this set from Amazon:
Instead of the crash pack i'd suggest buying parts separately. Crash packs have some stuff youll probably never need. The only things you have to worry about replacing are props, motors, and propguard if your X4 didn't come with one (check underneath the plastic box insert, on some units it's taped there).
Great props: http://www.amazon.com/gp/product/B00RE5US38?psc=1&redirect=true&ref_=oh_aui_detailpage_o04_s02
also sold as combo with propguards, although i've only tried clear ones that are only sold separately
Motors (for H107L): http://www.amazon.com/gp/product/B00SKVZMU4?psc=1&redirect=true&ref_=oh_aui_detailpage_o09_s00
You will lose a little bit of flight time with the stock battery and motors. The carbon frame is a tad bit heavier than the plastic.
I recommend these batteries now that you have the room and these props... I get around 12-13 minutes of actual flight time with that setup. No, not hover time... moderately aggressive flight time.
Be aware that your lift to weight ratio is now a bit smaller, and if you use the stock flight controller the craft will want to "dig" when you tilt forward to pick up speed quickly. With higher power motors this will likely not be as big an issue. Don't get me wrong though, it still flies like a beast, but it requires more attention than the original symmetrical layout.
Also, the LEDs are now extremely difficult to use for orientation. Consider purchasing some bigger ones to mount on the corners.
Good luck!
Edit: Here's mine with only new frame, battery, and props: http://imgur.com/bx9QRQg
Edit 2: The foil tape is a temporary measure to protect the original motor wires, which were too short to be secured to the body/arms. The new motors have much longer wires and will be secured properly while soldering in.
I recently upgraded to the Gundam Planet Nippers side cutters and highly recommend them. These really cut and not just pinch the plastic to give that clean cut. The result is less cleanup with the Xacto blade.
https://www.amazon.com/Gundam-Planet-Premium-Nipper-Plastic/dp/B012TMXDAU/ref=sr_1_1?ie=UTF8&qid=1469408203&sr=8-1&keywords=gundam+planet+nippers
I would get the GundamPlanet Nippers over the Tamiya Nippers
https://www.amazon.com/gp/aw/d/B012TMXDAU?pc_redir=T1
And I personally use this cutter which has seriously reduced how ofter i cut myself with the #11 blades
https://www.amazon.com/gp/aw/d/B002LE7L9G/ref=mp_s_a_1_1?qid=1465632967&sr=8-1&pi=SX200_QL40&keywords=tamiya+design+knife&dpPl=1&dpID=31RdPzv20SL&ref=plSrch
I have been using these, and have only used them a couple of times
https://www.amazon.com/gp/product/B012TMXDAU/ref=oh_aui_detailpage_o00_s00?ie=UTF8&psc=1
https://www.amazon.com/dp/B013HQCK88/ref=cm_sw_r_apa_ncPoxbEN0SCGV
I am thinking about getting the following Syma FPV kit:
http://www.amazon.com/GoolRC-Real-time-Transmission-Display-Quadcopter/dp/B013HQCK88/ref=sr_1_3?ie=UTF8&qid=1457369103&sr=8-3&keywords=syma+fpv
and fitting it on a standard, DJI 450 knockoff quadcopter that I built. Would this work? What battery would I need to power the camera on the quad? I have spare batteries from an old Hubsan X4, would those work?
I understand this is cheapo, but any feedback or input would be great! Anyone with experience with this kit, please chime in.
I was looking at this one. http://www.amazon.com/gp/aw/d/B013HQCK88/ref=mp_s_a_1_1?qid=1458673210&sr=8-1&pi=SY200_QL40&keywords=syma+x5c+fpv+kit&dpPl=1&dpID=41to6J6rd4L&ref=plSrch (sorry about the huge link) it seems to have good overall reviews. Ill look at the onenyou suggested though!
The camera is kinda crappy. Like novelty crappy. It's pretty much unwatchable because there is no gimbal to stabilize the shot.
Have you seen this? It's pretty clever. The resolution is better and you get the advantage of flying with FPV. The price is right. Quality of recordings is so-so because again, no gimbal but otherwise it's not bad.
http://www.amazon.com/gp/product/B013HQCK88?psc=1&redirect=true&ref_=oh_aui_detailpage_o05_s01
This same kit is on banggood, gearbest, and a few others. I spent 56 on an experiment. I am trying to mount it internally to lose the 8g shell
Try to get some of those https://www.amazon.com/dp/B07H5SB4HB to fix the miniature on a champagne cork. Works perfect. Then use some grounding like https://www.amazon.com/dp/B07T2H1SBR.
Then paint the miniature and finish with some Nuln Oil like https://www.amazon.com/dp/B0189BIERC
That should help. Have fun!
I got back into painting after about a 25 year hiatus, and got the following:
this primer,
https://www.amazon.com/gp/product/B002BWORRW/ref=ppx_yo_dt_b_asin_title_o08_s00?ie=UTF8&psc=1
this paint kit
https://www.amazon.com/gp/product/B07DWMTNDJ/ref=ppx_yo_dt_b_asin_title_o01_s00?ie=UTF8&psc=1
And this wash:
https://www.amazon.com/gp/product/B0189BIERC/ref=ppx_yo_dt_b_asin_title_o00_s00?ie=UTF8&psc=1
Really happy with all these products.
http://www.amazon.com/Bandai-Hobby-Version-Sinanju-Animation/dp/B00B596V26?ie=UTF8&keywords=sinanju&qid=1465330289&ref_=sr_1_1&sr=8-1
http://www.amazon.com/Bandai-Hobby-Freedom-Version-Building/dp/B01BD3NJ8C?ie=UTF8&fpl=fresh&redirect=true&ref_=s9_simh_gw_g21_i1_r
http://www.amazon.com/Bandai-Hobby-RX-93-2-Gundam-Counterattack/dp/B00KRVJBFW?ie=UTF8&keywords=hi%20nu%20ver%20ka&qid=1465330281&ref_=sr_1_1&sr=8-1
there is 3 suggestions. 2nd comes out Friday. Price range is about 50 - 75 dollars.
or hell, if you can sneak a few pictures of kits he already has (to give us an idea on what type of kits he might like). if that is above your desired price range lemme know, I can go into the lower price tier of model kit.
Here is the MG Freedom 2.0- Bandai Hobby MG Freedom Gundam Version 2.0 "Gundam Seed" Building Kit (1/100 Scale) https://www.amazon.com/dp/B01BD3NJ8C/ref=cm_sw_r_cp_apa_E9lAzbHWFDMMV
Here is the MG Strike Freedom kit in the photo- Bandai Hobby Strike Freedom Gundam Seed Destiny Mobile Suit Model Kit (1/100 Scale) https://www.amazon.com/dp/B000JCES5W/ref=cm_sw_r_cp_apa_.-lAzb6Q0GKQJ
I don't know anything about these models- can they be played with at all, or are they only for display? Thinking as a gift for my 9 year old, who will want to play with it.
Referring to models like: https://www.amazon.com/Bandai-Hobby-Freedom-Version-Building/dp/B01BD3NJ8C/ref=sr_1_23?keywords=gunpla+kit&link_code=qs&qid=1570492231&sourceid=Mozilla-search&sr=8-23
Total noob here about to dive in scared on my first-ever build with a Master Grade kit. Just had to have this love at first sight.
Is a tool set like this a smart buy over getting the main essential ones separately?
If not, could you guys kindly recommend a list of half-decent quality tools that would fit a budget of $20-30 (or possibly for a bit more if absolutely necessary for a quality build)?
Thanks guys.
how do yall feel about beginner kits such as https://www.amazon.com/BXQINLENX-Gundam-Modeler-Assemble-Building/dp/B01GH6B3Z6/ref=pd_sbs_21_2?_encoding=UTF8&pd_rd_i=B01GH6B3Z6&pd_rd_r=2KSC5ZDH88QYZT19QKQY&pd_rd_w=Y7aiQ&pd_rd_wg=Pjz33&psc=1&refRID=2KSC5ZDH88QYZT19QKQY
also how big is the difference when panel lining red pieces with black or gray markers, those seem to be the easiest to get a hold of?
Hi folks,
Does anyone know what the finishing sticks are from the Amazon Gunpla Tool Kits?
https://www.amazon.com/BXQINLENX-Gundam-Modeler-Assemble-Building/dp/B01GH6B3Z6?ref_=bl_dp_s_web_16153897011
I bought this kit a little while ago, and while the rest of the tools aren't that great, I actually really, really like that combo finishing stick, but it has worn out after 2-3 kits.
Anyone know where I can get JUST that stick?
I just got this stuff for my brother:
tools
glue
mold line scraper
I'd suggest getting some well reviewed mini brushes from Amazon as well. Make sure you clean them. Enjoy!
Hey man! I used Tamiya X 20! Here's the link
TAMIYA 87131 Panel Line Accent Color Black For Plastic Model Kit https://www.amazon.com/dp/B01HDJ7BR0/ref=cm_sw_r_cp_apa_x6H0Bb17EBM7K
not sure if there are special considerations for a zaku, but a huge step up from markers are these tamiya panel line accent colors. These look like other paint bottles, but actually they're much easier to use. They come with a sort of brush tip on the other side of the lid, and all you need to do is just to 'touch' the wet tip into a panel line, and the paint will just 'fill' the gaps in the panel through gravity. Look up videos if you're not familiar with panel washing.
You can see it comes in a variety of different colours, you should get 2 different ones and see which one works better, but 1 of them should be the black as it works quite well on most panel lines
Looks pretty good! This gives me hope, that I can do something similar. I have this startet-painting set, but did not find the courage to give it a try yet.
This is kind of unrelated to the game, but if I decided to paint the miniatures, is this a good starter kit?
https://www.amazon.com/Army-Painter-Dungeons-Official-Adventurers/dp/B07DWMTNDJ/ref=sr_1_2_sspa?keywords=miniature+paint+set&qid=1571930710&sr=8-2-spons&psc=1&smid=AU2FNATHSFHNB&spLa=ZW5jcnlwdGVkUXVhbGlmaWVyPUExWThVTTVKTTBZQjRVJmVuY3J5cHRlZElkPUEwODQ0NzgzM05MUjJKRjZGTVEzMyZlbmNyeXB0ZWRBZElkPUEwMjYzNzQxM0wxUEU0TEVFQkhVSSZ3aWRnZXROYW1lPXNwX2F0ZiZhY3Rpb249Y2xpY2tSZWRpcmVjdCZkb05vdExvZ0NsaWNrPXRydWU=
https://www.amazon.com/gp/product/B006F9CFWQ/ref=oh_aui_detailpage_o02_s00?ie=UTF8&psc=1