(Part 2) Best additive manufacturing products according to redditors
We found 4,727 Reddit comments discussing the best additive manufacturing products. We ranked the 1,418 resulting products by number of redditors who mentioned them. Here are the products ranked 21-40. You can also go back to the previous section.

![[Gulfcoast Robotics] Y Carriage Plate Upgrade for Maker Select and Wanhao Duplicator i3 3D Printers](https://m.media-amazon.com/images/I/41LSqGT+KzL.jpg)


That is underextrusion.
you need to do one (or more) of the following:
the hot end hotter. ^1
to print slower. ^1
more tension in the feeder assembly. ^2
to sort out a clog (either full or partial.) ^3
calibrate the E steps and flow rate. ^4
----------------------------------------------------------------------------------------------------------------------------
^1
Not all filaments are made equal, I've had rolls of PLA that print fine fast at 210, then others that will gum up the hot end at speed. The printer takes time getting up to speed so some filaments look fine when printing slow or small models. Long paths show this failure I've had filament refuse to print cleanly unless the hot end is set somewhere on the upper side of 225-235 - going to extremes with temp should only be considered after ruling out a clog e.g. a/b the misbehaving filament with another brand and have the other brand work fine at the lower temps/same speed.
^2
Check that the the screw that holds the extruder arm in place has not been over tightened. (if the extruder arm is hard to move or squeaks when you do move it, it's too tight.) https://i.imgur.com/QcUzo5D.jpg
Take a permanent marker and add some ticks onto the tensioner pulley so you can easily see it as it goes around https://i.imgur.com/RplZsN5.png (keep an eye out for small movements where there is not as much inertia acting on it, if you are not getting movements on those there is an issue.) There are spacers you can print to sort this out https://www.thingiverse.com/thing:3464217 (shim the spring with anything you can stuff in there, some folded paper or a thin bit of a failed print will work as a stopgap so you can get the spacers printed)
(this can also be fixed by getting a metal extruder)
^3
(make sure to replace the stock bowden couplers they are crap allow the tube to back out and will cause no end of clogs, something like https://www.amazon.co.uk/dp/B07DC594D6/)
Follow this video on how to replace the nozzle paying close attention to the temperature everything is done at and the procedure to make sure the tube is snug with the nozzle. (too loose and you get goo, too tight and you'll squish the bowden tube and get clogs) https://www.youtube.com/watch?v=FRzsGttNMyk
If you need to clean your nozzle (a big bag of 0.4 nozzles is a worthwhile investment and you can find them cheap on amazon) hold the nozzle in pliers and cooking off everything over a gas burner, use cocktail sticks to remove the majority of the gunk, get the rest out with the acupuncture needle the printer came with. - Needless to say this is all very hot and the plastic can catch fire and drip, so do it somewhere or over something non flammable and easy to clean, I do it over a ceramic stove top with gas burners.
^4
https://mattshub.com/2017/04/19/extruder-calibration/
I'd make an addendum to the above instructions, ideally E-steps should be calibrated without filament running to the hot end, and the altered steps would look something like:
hot end at temp
remove filament completely
undo the bowden coupler
insert filament slightly into feeder,
cut filament flush at the hole the bowden coupler was in
extrude, measure, math, set e-steps,
cut filament flush
extrude, measure, math, set e-steps, save settings.
This way completely removes any sort of partial clog, variance in filament diameter size or issues downstream from the feeder assembly.
Yep, get a silicone sock.
Do you mean the little blue clips? They've been coming with those for a number of months, but yeah, do yourself a favor and just get some better quality pieces to begin with. This is what I'm using, as an example.
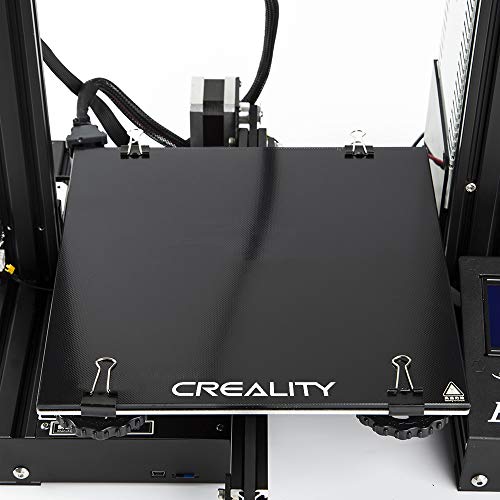
Creality 3D Printer Platform Heated Bed Build Surface Tempered Glass Plate for Ender 3/Ender 3 Pro 3D Printer 235x235x3mm https://www.amazon.com/dp/B07FSM8DK9/ref=cm_sw_r_cp_apa_i_Z0KGDbQPPRZFX
16.99 dollhairs to be exact.
First of all, you're going to want to update the firmware in the controller board. Creality has a history of shipping printers with older versions of Marlin that lack thermal runaway protection, which is kind of important if you value your home being not on fire. They may have already fixed this, but it's certainly something you'll want to check.
Here's a tutorial:
And here's the cheap programming adapter I used to complete the update:
https://www.amazon.com/gp/aw/d/B01IBFMJEA?psc=1&ref=ppx_pop_mob_b_asin_title
Beyond that, I printed a few upgrades for the printer itself.
A fan guard to keep scrap filament from the bed from falling into the controller fan. https://www.thingiverse.com/thing:2935204
A surprisingly useful tool tray to keep the various tools neat and contained https://www.thingiverse.com/thing:2883898
Some cable chains mostly for cable management aesthetics but also to prevent damage to cabling during use https://www.thingiverse.com/thing:2920060
A filament guide https://www.thingiverse.com/thing:2917932
Some retaining clips to keep the Teflon tube from moving around during retractions: https://www.thingiverse.com/thing:2845931
There are also tons of part cooling fan ducts to play with in order to get cleaner overhangs at various angles.
It's also commonly advised to upgrade to stiffer bed springs to avoid having to relevel the bed as often, but I haven't had an issue on this front yet.
Another common idea is to print on glass. But my bed came flat from the factory and I've been enjoying printing on the flexible removable build surface. And a pane of glass is more mass to sling around which may potentially cause ghosting. But if your bed does come warped, you'll want to run to the hardware store and get a few cut.
I upgraded the Teflon tube to one made by Capricorn. I haven't noticed any difference in print quality, but they advertise that their special Teflon blend has better temperature Resistance which, in the absence of the all metal hotend, adds a wider safety margin for higher printing temperatures.
But by far, the best upgrade was to put some cardboard shims underneath the feet of the printer. This dramatically reduced the amount of noise made by the printer.
Also, if you want to upgrade to printing Zytel, you'll need an all metal hotend like this one: https://www.amazon.com/Micro-Hotend-Creality-Printers-TronXY/dp/B0789V2D7C/ref=mp_s_a_1_1_sspa?crid=D0IRZSZQ80PZ&keywords=ender+3+micro+swiss+hotend&qid=1556175003&s=gateway&sprefix=Ender+3+micr&sr=8-1-spons&psc=1
Hope this helps!
I've owned the Ender 3 for a few months now and have made a number of upgrades, both purchased and printed. Here's a list of what I have purchased and printed, sorted by importance/usefulness.
 
Purchased Parts:
 
Printed Parts:
 
Future Upgrades:
Spool Roller - One issue I've found is that the stock spool holder requires excessive force from the extruder to unwind filament. A replacement spool roller with bearings should reduce the friction significantly and produce more even extrusion.
Metal Extruder - A common problem with the Ender 3 is that it fails to maintain proper tension on the extruder gear, which leads to failure to feed and poor extrusion. An all-metal extruder has been known to fix the issue.
The software is clunky and limited, the materials cost about twice as much per weight as their counterparts, it's not particularly reliable, and nearly impossible to maintain should something actually break.
As far as printers under $500, if you've not seen any, I'm willing to bet you've not looked around much, as there's plenty.
My wife and I had this same discussion we ended up buying a 3D printer, I cannot strongly enough recommend this, need a giant toad for next session boom just print one.
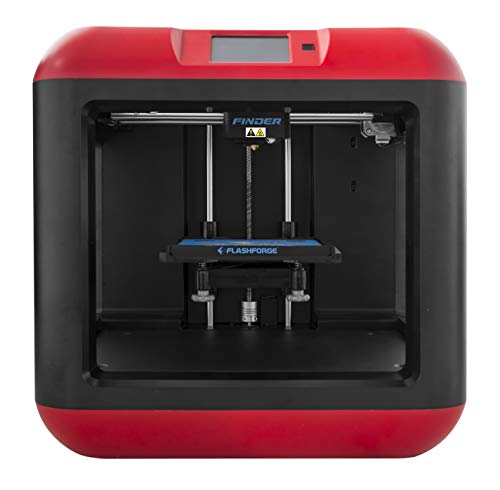
Personally we bought a Flash Forge finder 3D
https://www.amazon.com/FlashForge-Finder-Printers-Cloud-connectivity/dp/B016R9E7J2
Check out this guy, he's made most of the monster manual.
https://www.shapeways.com/designer/mz4250
If you Patreon him you get access to the google drive of all his models well worth it imo.
I'm assuming that you are not using a silicone sock. If you are not, stop trying to print in PETG until you install one. It's just not worth the headache until you have the right setup.
Get this version of the sock, not this version. The sock prevents the material from blobbing around the nozzle. Blobs around the nozzle inevitably cause problems. The material hardens and then chars, and then is likely to collide with layers below. Or the blob will peel up one of the first layers, so that your print is ruined before it even starts.
Using the sock also helps stabilize the hotend temperature when using the fan, and so may solve the problem you are having using the default fan speed. You should do a PID tuning of the extruder heater after installing a silicone sock.
There's a couple of tricks I use to get a PETG print started: For the skirt (not brim), I use Slicer to change the skirt in three ways: First, I make the skirt only 1 layer high. Second, I make the skirt 3 or 4 perimeters wide. Finally, I keep the skirt at least 20 mm away from the print itself. Making the skirt wider on the first layer gets the nozzle into a steady-state where it tends not to blob as much. I make the skirt only 1 layer high because if there is a blob on the first layer, it can catch on the nozzle when the second layer is printing and get pulled up, ruining the print. Finally, I print it far away from the print itself because if the skirts lifts or strings, there's still a chance that the print itself will be OK. This has improved my success rate with PETG a lot, to the point where I almost never have a failed print.
There's one more thing you can do if you print with PETG a lot. I stole this from another Redditor and don't remember who. It's a change to the Slicer gcode that keeps the hot end at 160 C until after the bed leveling, and then heats up the nozzle just prior to the purge. That greatly reduces blobbing as well. But for it to work well you should still use a sock.
Here's the start gcode I use with PrusaSlicer:
G90 ; use absolute coordinates
M83 ; extruder relative mode
M140 S[first_layer_bed_temperature] ; set bed temp
M109 S160 ; Set extruder temp before bed level
M190 S[first_layer_bed_temperature] ; wait for bed temp
G28 W ; home all without mesh bed level
G80 ; mesh bed leveling
M109 S[first_layer_temperature] ; wait for extruder temp
G1 Y-3.0 F1000.0 ; go outside print area
G92 E0.0
G1 E8 ; Purge Bubble
You should try to find service manuals for the units. It's possible both units will have stepper motors.
On the other hand, those were both fairly high-end products when new. If they're still in decent working condition, you may consider simply selling them and using the proceeds to purchase a $500 3D printer.
I'm at 2,000 meters of filament printed with my Maker Select, very happy with it, some tips:
-The Maker Select V2.1 is simply a re-brand and upgrade of the Wanhao Duplicator i3. You'll see that name "i3" thrown around more than Maker select, so just be aware they are nearly synonymous
-First, definitely get the blower fan upgrade: https://www.amazon.com/gp/product/B00MJU6JR2/ref=oh_aui_detailpage_o03_s00?ie=UTF8&psc=1
Buy two of them to have an extra in case of death
-Print out a blower fan housing for that fan: http://www.thingiverse.com/thing:1025471
The fan upgrade provides a huge improvement in print quality
-Get the all metal hot end from micro swiss: https://www.amazon.com/Hotend-Nozzle-WANHAO-FlashForge-Builder/dp/B01C3HEQZC
-THe "Z-Brace" mod reduces vibrations from the machines movements: http://www.thingiverse.com/thing:921948
Some people swear by it, but the print time for those parts is roughly 20-24 hours total. In my 2,000+ meters of print, I haven't bothered because of the print time, but still bought the extra pieces in case I decide to do it.
-I've been mass printing tiles for d&d too, I looked at openforge and decided against that line, but went with TrueTiles instead. https://www.youtube.com/watch?v=JUecWG1W-ss
Highly recommend truetiles over the other tile lines out there - the creator is a crafting genius (look him up on youtube - "wyloch"). They take less plastic, are more versatile, faster print time.
I found that Cura 15.04.x was much better than the recommended Cura 2.5.x. My setting for churning out tiles is something like 210C nozzle, 70 mm/s, 55C bed, 0.25 resolution, 0.8 shell, 10% fill, 2mm retraction, 20mm/s retract speed, 60mm/s travel speed, no brim/raft, no supports. You should print at resolution multiples of 0.04 (because of the way the filament feed gear works), ie. 0.08, 0.12, 0.16, 0.2, etc. I'm going to switch to 0.24 resolution for tiles. I do 0.12 for small figures. The printer can reliably print resolution 0.08 right out of the box (lower the speed to ~35 mm/s) but takes a long time to print.
-The black material on the heated bed is call Buildtak - be careful not to puncture it with the supplied putty knife. Get some blunt tools such as https://www.amazon.com/gp/product/B01A81FXMK/ref=oh_aui_detailpage_o06_s00?ie=UTF8&psc=1
-you don't need any tape, glue stick, hair spray, for buildtak
-Be sure not to use any acetone or alcohol on Buildtak - both will ruin it.
-Apparently you don't really even need to heat the bed with buildtak, the stuff is super effect with first layer adhesion running at room temp. I ruined my original buildtak by using the supplied putty knife to remove a print that was so super stuck to the bed because I kept it heated. Doesn't hurt to keep it heated though, but be aware heat + buildtak = much adhesion
-That slight lip on the butterfly's bottom layer is due to the settings of first layers being laid down slightly thicker than the others. Sometimes called "elephant's foot" it can also be caused by the nozzle being too close to the bed, which will smush those initial layers more than needed. Closer nozzle = more smushed first layer = better adhesion, but with buildtak you can get away with keeping the nozzle further away, and adjusting your cura settings for a first layer thickness equal to the rest of the print
FYI there is a PEI sheet with 3M already on it for much cheaper
$200 will get you a decent 3d printer these days. Then you could sell people your whole stock
They are fun and relatively cheap! You can find a smaller one for around $250 that would work great! Come visit us over at /r/3Dprinting for a ton more info.
Install a sheet of PEI on top of the glass. No messing with glue or hair spray nonsense.
https://www.amazon.com/dp/B07GSJSDWR/ref=nav_timeline_asin?_encoding=UTF8&psc=1
Found it: https://www.amazon.com/ADIMLab-Assembled-Printing-310X310X410-Available/dp/B07CPQQ57D
Very similar to the creality, but even cheaper.
All the parts listed above can be sourced cheaper, but that were the links I had at hand.
Here is my CR-10S.
I added the Petsfang fan fang. Added this fan to the fang.
I added these Z-Axis braces. Added these LEDs to the Z-Braces.
I'm printing on a mirror tile with a sheet of PEI bonded to it.
Last week I added the TH3D EZABL and have been encouraged by the results. It creates a Z-offset map of the build plate before every print. I can see the Z-steppers move during X-Y moves so I can tell it's working. Manual bed-leveling was working OK for smaller prints, but I could never get all 4 corners to agree with the center height. I suspect my aluminum bed plate is shaped like a Pringles chip.
I really like the Marlin Firmware over the OEM version. I don't mind not having auto-resume since I plugged my printer into a UPS system.
Right now my printer is about 20 hours into a 60-hour print of a T-Rex skull. I've been really happy with this printer! It was my first and I've been having a ball with it.
Don't buy knockoff, buy genuine. I got a knockoff for my Wanhao i3, terrible milling, fake metal. Bough a genuine and had no issue.
Genuine one on Amazon
Micro Swiss All Metal Hotend Kit for Creality CR-10 / CR10 / CR10S / Ender 2 / Ender 3 Printers .4mm https://smile.amazon.com/dp/B0789V2D7C/ref=cm_sw_r_cp_apa_i_XJ9xCbBDQJ77A
Batter to be safe than sorry . Got one of these and not disappointed
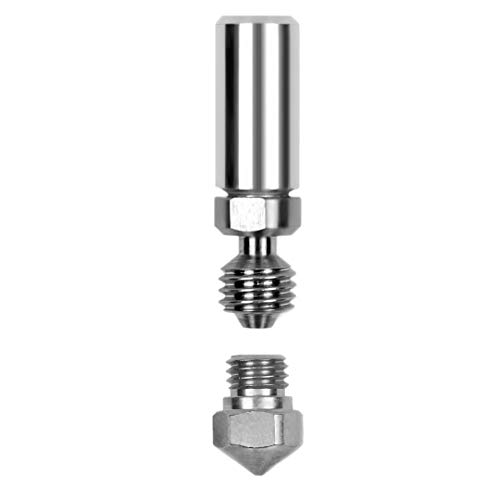
The carriage plate needs to be replaced (assuming you have the stock one) it's very thin and bends easily.
https://www.amazon.com/Gulfcoast-Robotics-Carriage-Duplicatior-Printers/dp/B07B251KBS/ref=sr_1_3?ie=UTF8&qid=1537520960&sr=8-3&keywords=i3+carriage+plate&dpID=41LSqGT%252BKzL&preST=_SX342_QL70_&dpSrc=srch
had the same problem you did with my i3 plus, installed that a few years ago, and it's been rock solid ever since.
Heard good things about this one. ~NZ$400 after shipping and whatnot. Monoprice have a newer cheaper one, the Mini Delta, about to be released, but it's not on Amazon yet and their own shipping charges are significantly higher. The good thing is that both of these ship already assembled, unlike some 3D printers.
https://github.com/PrusaOwners/prusaowners/wiki/Bed_Leveling_without_Wave_Springs
https://www.amazon.com/Genuine-E3D-Socks-Pack-V6-SOCK-PRO-3PACK-x/dp/B07779TP4S
Extruder: get a microswiss hotend for it will be able to print flexible and other materials.
Parts cooling: Upgrade to the petsfang 5015 mod for better print cooling.
Auto bed leveling: Get the TH3D ezabl sensor for great bed leveling.
Other mods: motor dampers to reduce noise and vibration
To smoothers to smooth prints
Raspberry pi for octoprint
All metal extruder
Capricorn tubing
Hope I could help 😀
Links:
micro swiss hotend
petsfang part
ezabl sensor
motor dampers
tl smoothers
octoprint link
all metal extuder
capricorn tubing
Also this is what my petsfang with sensor looks like. https://i.imgur.com/sQahB69.jpg
I use this ADIMlab printer, with Hatchbox PLA. It works fine for what I need it for, but I don't ever get the consistent even layers you have in your pic. I'm still really new to this, though, and so I'm constantly tinkering with slicer settings and hardware adjustments, so maybe I just haven't found the sweet spot yet.
My beautiful wife wants to buy me a kit for my bday, I live on a acreage in Canada so I pretty much am narrowed down to Amazon. I found three kits I like , just wondering if any one could give me some input on which would be the most bang for the buck. I currently own a Anet A8 and in the process of slowly building a Hypercube from scratch, my first build so it's taking a while,. Thanks for the input.
1 - FLSUN Large Size Cube 3D Printers with 260 * 260 * 350mm Large Printing Size,Auto-Leveling System, Heated Bed,Full Gifts,One Roll PLA Filament 1.75mm, Metal Frame CA Stock https://www.amazon.ca/dp/B07J65MM6B/ref=cm_sw_r_other_apa_i_F23CCb114XN6Z
2 - Tevo Tornado 3D Printer Gold Color. Large Printing Size Support Off-line Print. SD Card Reader +Tool Kits + Hotbed + Factory Original Supply and Canadian After-Sale Service (300 * 300 * 400mm) https://www.amazon.ca/dp/B07DFNLRC6/ref=cm_sw_r_cp_apa_i_p33CCbP0VSVXQ
3- ADIMLab 3D Printer Assembled 24V Prusa I3 3D Printing Size 310X310X410 with Heat Bed, Glass, Control Box, MK10 DirectDrive Extruder, PLA, Auto Leveling Upgrade Available https://www.amazon.ca/dp/B07CPQQ57D/ref=cm_sw_r_cp_apa_i_-33CCb371TENB
The Creality Ender 3 ($230 about) is a GREAT little printer, if you can build it yourself (it's pretty simple!) and produces amazing results for such a low-cost printer. I have one myself and it prints just as well as my over $1000 Lulzbot Mini.
https://www.amazon.com/Official-Creality-3D-Printer-Source/dp/B07D218NX3/ref=sr_1_2_sspa?gclid=EAIaIQobChMIwbmiqdj75AIVeR-tBh3HrQKtEAAYAyAAEgITWfD_BwE&hvadid=295831533020&hvdev=c&hvlocphy=9060440&hvnetw=g&hvpos=1t3&hvqmt=e&hvrand=5423867397037548362&hvtargid=kwd-431075118707&hydadcr=8271_9755811&keywords=creality+ender+3&qid=1569954532&s=industrial&sr=1-2-spons&psc=1&spLa=ZW5jcnlwdGVkUXVhbGlmaWVyPUEySFdJV01BUUlOVDFNJmVuY3J5cHRlZElkPUEwNzMxNjc2MzFHMExXOVdJN1RQUiZlbmNyeXB0ZWRBZElkPUEwODA4ODAzMldSNTRQMDZOTzBXQyZ3aWRnZXROYW1lPXNwX2F0ZiZhY3Rpb249Y2xpY2tSZWRpcmVjdCZkb05vdExvZ0NsaWNrPXRydWU=
Yellow springs are stiffer replacements for the bed levelling springs that are stock. They should help keep the bed level meaning you don't need to adjust it as regularly.
The stock Bowden couplers have a habit of coming disconnected, though I believe in newer machines a clip has been included to alleviate this. It's good to have spares anyway.
A glass bed gives you a nice flat print surface and I don't know what I did before I got mine. Many stock beds are warped making this a necessity.
Comgrow Heat Bed Glass Plate 235... https://www.amazon.co.uk/dp/B07DSC9TJQ?ref=ppx_pop_mob_ap_share
SIQUK 2 Pieces PTFE Teflon Tube... https://www.amazon.co.uk/dp/B07DC594D6?ref=ppx_pop_mob_ap_share
I can't find the link for the springs at the moment, will update when I find them.
i have an ender 3 pro and after saying no to any upgrades I finally started to see what everyone is talking about 6 months down the road. here is a list of things that you will see a lot of you tubers tell you to replace. the YouTube channel Tomb of 3D Printed Horrors is a great resource for everything about the ender 3.
the YouTube Chanel Tomb of 3D Printed Horrors has a step by step build guide for your ender 3 ( i used it for mine) he will recommend most of this list as well. He also has other videos on the slicer settings you will use for Cura. for D&D models you can use this google doc list https://docs.google.com/spreadsheets/d/1PemvBH7LC-hm4KoeA8OXVu5_k963Vpmw7kOEA_1tzWs/edit?pli=1#gid=0
It's this one. Got it myself.
https://www.amazon.com/Official-Creality-3D-Tempered-235x235x3mm/dp/B07F16WPR5
I had to print at 13mm's for the first layer (or 2-3 layers depending on size) to get prints to stick.
What you absolutely MUSTTTTTTT!!!! order? Nothing. The printer works as is. But if you want to do yourself a favour, here's a list of what I consider essentials:
- New springs, both bed and extruder. I don't have a link for an extruder one as I upgraded my entire extruder drive frame and that came with a better spring
- A new removable bed. Creality glass bed or glass with a PEI sheet is my bed of choice
- Thermal pad to avoid the annoying bed clamps. Cut squares out of it, lay them in a checkered pattern alternating between thermal pad and nothing and place your bed on top. They will hold the bed in place and help with heating
- Stepper dampers if your printer is anywhere near where you spend your time, it sounds like a bloody jackhammer right out of the box
- New tube fittings, the stock ones are terrible and will give out in a matter of weeks at best. They also barely hold onto the tube
There are a ton of other great upgrades, but I think a good idea is to get a feel for it yourself.
What you can do, however, is check out some printable upgrades. I have this thread where people contributed with their choice of printable upgrades. It's a great list you can refer to later. Essentials on that are the fan guard and LCD back cover simply because the Ender 3 as is has the fan and back of the LCD exposed and that makes it crazy vulnerable to dust and gook damage
I just ordered this one - should arrive tomorrow. I’ve read reviews saying it’s so much better than the stock one that this should ship with the Ender 3
https://www.amazon.com/gp/aw/d/B07FSM8DK9
i wish to share my experience with this advice.
I did this. went to lowe's, paid $4 for 2 pieces of 3mm mirror cut to size.
and proceeded to literally fail almost every cheap adhesion technique out there. so if that happens to you, dont be discouraged.
i failed clean glass (no adhesives), failed glue stick, failed hair spray, and finally failed sugar water. cleaned each religiously with 99% isoproyl, everything was fine. 5 point layer test showed perfect layers (https://imgur.com/a/JPZqbks#ueqqWi7 - im talking perfect,), but during an actual print, it would fail due to bed adhesion unless i had an obscene amount of brim/raft to secure things.
decided to head to amazon and pick up a piece of PEI sheet and have never looked back. put it on the mirror tile i was using and boom out of the last 40 or so prints ive not had 1 failed adhesion yet. i picked up the one from gizmo dorks as it already had the adhesive attached to the PEI and install was easy enough (this is the one i chose https://www.amazon.com/Gizmo-Dorks-Preapplied-Laminated-Adhesive/dp/B07GSJSDWR/ref=sr_1_3?keywords=pei+sheet&qid=1558833899&s=gateway&sr=8-3 )
so OP, take this story as you will, some people get away with no adhesives, but I could not for the life of me find out why nothing would stick to my cut mirror.
If I am understanding correctly, the prints stick everywhere else except the middle. This could be from the heated bed not being completely flat, from either a manufacturer defect, heating the bed can cause it to flex slightly, and also the act of leveling with 4 points will cause stress to the bed and cause it to not be flat.
If you want to resolve the issue there are a few thing you can do. First I recommend getting a glass bed of some kind. I use this: https://www.amazon.com/Glass-Print-Borosilicate-Printer-235x235x3-7mm/dp/B07JKGNB6W/ref=pd_bxgy_328_2/146-3360479-3249561?_encoding=UTF8&pd_rd_i=B07JKGNB6W&pd_rd_r=1be203f4-8159-11e9-8887-9b31b6cb4217&pd_rd_w=QkaU5&pd_rd_wg=lhVMV&pf_rd_p=a2006322-0bc0-4db9-a08e-d168c18ce6f0&pf_rd_r=MJKHHJRB1R0V6D2Q2C61&psc=1&refRID=MJKHHJRB1R0V6D2Q2C61
with this PEI sheet: https://www.amazon.com/gp/product/B07GSJSDWR/ref=ppx_yo_dt_b_asin_title_o07_s01?ie=UTF8&psc=1
​
Second you can do a bed conversion from 4 corners to 3-point leveling. Check this guide by Makeitmakeitmakeit for more info: https://www.thingiverse.com/thing:3415460
you will need this, made by rrwrex, if you do the conversion: https://www.thingiverse.com/thing:3193722
​
This is a make of my conversion which I have done on 2 Ender 3s and no longer have to level unless I mess with the bed: https://www.thingiverse.com/make:636770
​
Also check this guide out here tons of good info: https://www.thingiverse.com/thing:3574369
Yes my friend
Gizmo Dorks PEI Sheet 3D Printer Build Surface 235mm x 235mm (9.3" x 9.3") with Preapplied Laminated 3M 468MP Adhesive for Creality Ender 3 or CR 20 | Made in The USA
https://www.amazon.com/dp/B07GSJSDWR/ref=cm_sw_r_cp_apa_i_gbsPDbPNKDNM9
Glass Print Bed Borosilicate Glass 3D Printer Glass Print Bed 235x235x3.7mm for Ender 3 DC-01 Glass Print Bed Borosilicate Glass https://www.amazon.com/dp/B07JKGNB6W/ref=cm_sw_r_cp_apa_i_T-sPDbX4FQ8EG
> XYZPrinters Da Vinci 1.0
http://www.amazon.com/XYZprinting-Da-Vinci-1-0-Printer/dp/B00H7VEU0G
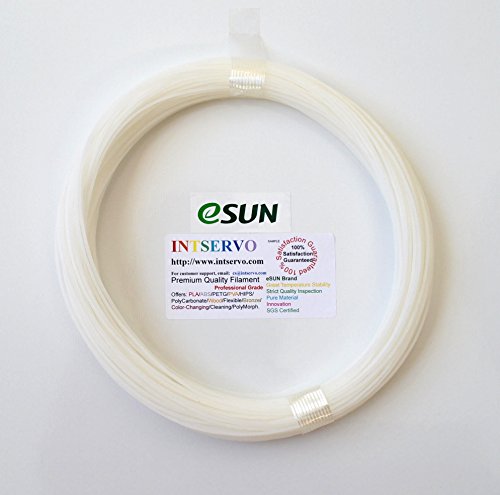
I use a hotend cleaner when I switch filaments, it works very well with removing old particles.
eSUN 3D Printer CLEANING Filament... https://www.amazon.com/dp/B00MVIYNFW?ref=ppx_pop_mob_ap_share
I highly doubt it's the SD card. If it was the SD card the printer would likely just simply stop instead of continuing to move without extruding. It could be a settings issue, something you changed and forgot to set back though.
Is the extruder motor still moving, or in your case likely grinding away bits of the filament? That's an important question.
Did you make sure to get all the PLA out before going to PET-G and vice versa? If you plan to do filament type changes on a regular basis you should pick up something like eSUN's cleaning filament. It has a really wide temperature range (150C to 260C) which means it's good for making sure you've got all your previous filament type out.
So here is what you can do.
​
ya so experience has now taught me that:
https://www.amazon.com/gp/product/B00THZK97I/ref=oh_aui_detailpage_o07_s00?ie=UTF8&psc=1
is crap.
and https://www.amazon.com/gp/product/B00ZZRI0DC/ref=oh_aui_detailpage_o00_s00?ie=UTF8&psc=1
work really well.
I'm pretty sure companies would love the idea of giving out free copies of CAD software, they can get CSR credits and can get future designers hooked while they are in the cradle. 3d printers are not that expensive anymore. I have seen cheap models for around a 1000 $.
Edit: I would recommend getting in touch with AutoDesk or Dassault (solidworks) directly. If they seem to be dragging their feet. There is a cloud based CAD system called OnShape, all you need their is an account, which if you register as a student they let you do it for free afaik.
Edit 2: Here are the three options I mentioned. Solidworks in my experience is clearly more advanced and can do a whole lot more, but their student registration process seems to be more opaque (at a glance). OnShape would need internet but they seem to be more welcoming of students.
Edit 3 : Here is a cheap 3d printer I found on Amazon US, it seems there are plenty more in this price range.
https://www.amazon.com/FlashForge-3D-Printers-New-Model/dp/B016R9E7J2/ref=sr_1_3?ie=UTF8&qid=1521359741&sr=8-3&keywords=3d+printer
The file costs would be cheaper that a full set of the minis since there are hundreds of them, but you'd also have to buy a printer which even hobbyist quality would be [~$300](https://www.amazon.com/FlashForge-Finder-Printers-Cloud-connectivity/dp/B016R9E7J2/ref=sr_1_1?keywords=FlashForge+Finder+3D+Printers+with+Cloud%2C+Wi-Fi%2C+USB+cable+and+Flash+drive+connectivity&qid=1555526199&s=industrial&sr=1-1
) plus all the filament, so... if you don't have access to a 3d printer and you aren't planning to print a few hundred of these, it's probably not worth it due to that cost.
https://www.amazon.com/gp/product/B01MUAMRN7/ref=oh_aui_search_detailpage?ie=UTF8&psc=1
upgraded carriage plate, should be one of the first things you do, the stock one is flimsy and prone to warping, making the print bed extremely hard to level reliably.
https://www.amazon.com/Micro-Hotend-SLOTTED-Cooling-Wanhao/dp/B01E1HANLS/ref=sr_1_fkmr3_1?ie=UTF8&qid=1497736485&sr=8-1-fkmr3&keywords=i3+plus+all+metal+hotend
all metal hotend will enable you to print at much higher temp, and increase reliability of the print head. not strictly needed, but a great upgrade if you want to print abs, petg, or other higher temp filaments.
https://www.amazon.com/dp/B01HCVJ3K2/ref=sxr_rr_xsim_1?pf_rd_m=ATVPDKIKX0DER&pf_rd_p=3008523062&pd_rd_wg=sUxZ5&pf_rd_r=W5Q7RV181EJYGTBW4YDJ&pf_rd_s=desktop-rhs-carousels&pf_rd_t=301&pd_rd_i=B01HCVJ3K2&pd_rd_w=ZPXZq&pf_rd_i=tri+gorilla&pd_rd_r=F2X8G4XDPCVTNXX6J560&ie=UTF8&qid=1497736655&sr=1
heater bed mosfet upgrade. again, not strictly needed, but also useful for high temp filaments like abs, as you can run the heated bed at higher temps. also solves (small possibility, i3 plus supposedly fixed issue) of stock mosfet burning out and catching fire.
https://www.thingiverse.com/search?q=i3+plus+cooler&sa=&dwh=295945a7ab3d0cd
print a cooling fan shroud, i use the ciiicooler, the diiicooler is great as well. preferably in abs. BIG quality improvement, the stock fan is useless.
these are some of the ones i use, and there's a lot of other things you can do, extruder gear, improved bearings, too many to count really, just a matter of how far you want to go for incremental gains. the carriage plate and the cooling fan shroud are the only strictly necessary ones though.
oh and i made my own version of this z-brace, don't have the files anymore unfortunately, but this one is fine:
https://www.thingiverse.com/thing:1653631
that's also something you should do asap.
I want to clarify that when this person is saying "PEI over glass" that this person is saying to put PEI [on top of] borosilicate glass, not in place of glass.
A sheet of PEI with 3M 468MP adhesive tape to borosilicate glass is a game changer. Use simple binder clips to keep it on the bed.
------
Edit: I stand corrected. OP was genuinely saying to use PEI instead of glass. I don't suggest adhering PEI directly to your plate because you're not always going to want to print on PEI depending on your material, and PEI will eventually get bubbles and warp and you'll want to be able to replace it.
Source: Have used PEI for over a year now.
So far working with the Anet A8 has been an extreme lesson in patience. It's honestly a bad printer but if you're willing to spend time and a little money, you can make it decent. First up should be fire safety. Immediately upgrade to the latest version of Marlin and install a mosfet for at least the bed, if not both the bed and hot end.
I would also recommend ordering new bearings before assembling the printer. The ones it comes with are pure garbage and for $10 it's an easy purchase. Another thing that might be worth investing in immediately is better belts.
After it's assembled and you can print well enough print an X belt tensioner and a Y belt tensioner. After that it might not hurt to print some braces for the weak acrylic frame. If you're hardcore about the frame check out the Anet AM8 upgrade which replaces the acrylic one with metal for about $60.
Good luck!
https://www.amazon.com/dp/B06XPRCMJS?ref=ppx_pop_mob_ap_share
Paying someone to do the full set will definitely run you more than the cost of this printer. It's the printer I have. It's a bit finnicky, but the price is right, and it prints well enough for me! I'd also highly recommend getting a glass bed for it. It's stupid easy to install the glass bed (you just lower the normal bed and clip the glass to it with binder clips), and it makes the prints come loose soooo much easier. You can also have a hardware store cut the glass for you and it will be a bit cheaper than that Amazon link.
I will say, though: I only recommend buying a 3D printer if you're willing to devote some time to it. It's not like an InkJet where you plug it in and it just works. It takes calibration, and learning which settings work best. You'll have to do some research to get the best quality for your prints.
Seriously love this guy, and it wont break the bank.
I sprung for a sheet of PEI and it's been great, buffed it with ultrafine steel wool and wipe the bed with isopropyl alcohol before each print. no tape, glue or hairspray needed.
I replaced the stock glass with mirrored tiles from Home Depot. I used to use tape and glue sticks but read a comment on how much better PEI sheets were to print on. No more glue or tape, just rub it down with rubbing alcohol between prints.
It sticks very well when heated up, and comes off almost effortlessly when cooled down. You also get a shiny surface on the part touching the PEI sheet which is nice. Well worth $21 from Amazon.
Sure. I heard of them through a redditor as well. This should be the ones I buy, maybe a different posting. I’m only on my second cause of a blob at that(still cheaper than the replacement hotend, but it comes with 3 sleeves so, it’s cheaper with the sleeve.) you might find them as socks is what might be the confusion https://www.amazon.com/Genuine-E3D-Socks-Pack-V6-SOCK-PRO-3PACK/dp/B07779TP4S
I have this Micro Swiss hotend on my Ender 3 and it prints like a champ, even with nylon. I reused the nozzle from my stock hot end though as I wasn't a fan of the one that came with the Micro Swiss one. Voltage doesn't matter as you will be reusing the heater from the stock hot end.
https://www.amazon.com/Gulfcoast-Robotics-Carriage-Duplicatior-Printers/dp/B07B251KBS
This is what I use. After replacing the carriage plate and adjusting my Z-brace/lead screws a bit to level my bed once, I no longer bother to re-level it and it prints perfect every time after.
Have a look at the Da Vinci 1.0, preordering open on Amazon now, for a suggested price of $499.
It's also in stock and shipping via Amazon Prime right now - there's a few reviews already.
Awaiting to see if you can bypass the cartridge or not. 7.8" x 7.8" x 7.8", heated bed, auto leveling, nice enclosure, etc is a pretty good deal for $499. Too bad they had to implement the filament cartridge. I'd otherwise be ordering one in a heartbeat I think.
not with that attutude
Since TPU is so soft, it's possible that the effective diameter of the feed gear is reduced. From your comment, you seem to have already bumped up the flow but maybe more is necessary.
When you changed over from your regular filament (PLA?) did you run some cleaning filament through the nozzle? Another side effect of TPU being so soft is that it tends to flow around remaining bits of filament rather than pushing them out the nozzle. Cleaning filament (one example) has a wide temperature range, is soft and sticky, and has a large die swell.
If your prints have become crap but no real changes in settings, you might have a clogged nozzle or a slipping PTFE tube.
Grab some nozzle cleaning filament and shove a few inches of that through your nozzle (while it's hot if course) and see if that improves anything. If you still have issues, you may need to disassemble your hotend and look for issues. If the PTFE tube has started slipping, you'll have a large pool of melted filament just above the nozzle and below the tube you'll have to clear out
Before you buy a new nozzle, have you tried cleaning filament yet?
eSUN 3D Printer CLEANING Filament 1.75mm Natural 0.1kg for all 1.75mm FDM 3D Printers, 1.75mm Cleaning https://www.amazon.com/dp/B00MVIYNFW/ref=cm_sw_r_cp_api_NetQBbX0VWR7E
This may help you get the gunk out of that nozzle. Run that thru it and do some cold pulls with it. It may revitalize your nozzle for a lot cheaper and you wouldn’t have to take apart your extruder to do it.
You might have partially cleared the jam, but left a layer of plastic still inside the nozzle. I know I was surprised at just how much plastic stayed in the nozzle even after repeated cleaning in acetone.
If you're really adverse to taking it apart, there are also these cleaning tools:
I haven't tried them, but they are an option.
Cleaning Bits
https://www.amazon.com/JOYSA-MakerBot-Printer-Cleaning-Registered/dp/B01CCF46EQ/
Cleaning filament
https://www.amazon.com/dp/B00MVIYNFW/
I use the plastic from monoprice and it's reasonably good, I wouldn't be able to speak about the quality of the stuff you have.
http://www.monoprice.com/product?c_id=107&cp_id=10724&cs_id=1072402&p_id=10552&seq=1&format=2
Another way I can tell mine is flowing properly is by heating it up to 200 and using the manual extrude option on the move menu. Clogged nozzles will look stringy and/or the filament will curl up. When it's extruding properly, the plastic will drop straight down and have an even consistency. When you forced the filament through, it will melt and pass through, but won't necessarily clean off the old crud stuck to the walls of the nozzle.
You're very welcome for the limited insight I have on this topic. I saw your post and said, that was me a couple weeks ago, and it was a lot of trial and error to figure out how to solve this issue of just getting it to print consistently.
Hello all,
I'm trying to solve a persistent clicking / extrusion / constant print failure problem with my Qidi X-One 2.
I own a Qidi X-One 2, and for the last few weeks I am experiencing a clicking, extrusion problem that I cannot seem to fix. The filament twists and turns coming out of nozzle.
I changed the nozzle and tube a few weeks back, and printed ok for a few prints, but now the same problems are back. I only use PLA.
I recently placed this order through Amazon:
https://www.amazon.com/gp/product/B00MVIYNFW/ref=oh_aui_detailpage_o04_s00?ie=UTF8&psc=1
I used the cleaning filament last night, following the instructions on the package. I ran about one to two feet. I tried cold pull but the filament broke both times and did not pull all the material from the nozzle.
I ran some more cleaning filament, and then switched to my Solutech white PLA. I started to run the PLA to flush out the cleaning filament, and as this happened, clicking is back, and the filament twists and turns coming out of the nozzle.
Its like it did nothing!
I have also ordered some needles for nozzle cleaning, but these haven't arrived yet. I have also ordered some more nozzles and tubes, and will exchange for new ones when they arrive. But ultimately I would like to prevent the problem from happening in the first please.
Please let me know what else to try. Any help is greatly appreciated as I am fairly new to 3d printing.
Thank you!
A lot of people swear by plain white (so you can see any stuck crud) ABS. I personally never print ABS and don't want to buy a spool just for cleaning, so I was happy to find eSun cleaning filament. It looks expensive, but you only use 6 inches/150mm at a time. The big pluses for the cleaning filament are that they are "sticky", so should do a good job pulling crud out of the hotend, plus they melt over a very wide range, so if a bit gets left behind, it'll melt right out even if you print PLA next.
What both /u/NoVTekku and /u/Wiggles69 said. Definitely underextrusion.
I found with printing NinjaFlex that it was unusually hard to clear the PLA from the nozzle. Usually I heat a bit above the previous plastics print temp and push HARD then pull back a bit and push HARD, etc a couple times.
It creates a push then suction effect that usually clears the old plastic fast.
Won't work for flexibles. You can't push hard, it just absorbs the pressure, so the old plastic sticks in there, lurks around then clogs.
I bought some cleaning filament and use it when changing to flex.
This: https://smile.amazon.com/gp/product/B00MVIYNFW
Also, my method for clearing clogs on the CR-10 series (look for my comments):
https://www.reddit.com/r/CR10/comments/7qs7nf/soooo_uhhhh_that_happened_the_first_1015_layers/
Works to get clogs that get missed by other methods...
PuterPro
Link
They work great, MUCH more reliable than the stock one. I replaced the extruder gear and got a new nozzle at the same time so I don't know which one helped, but it ended ALL clogs.
You might want to switch out the extruder gear as well. Switching the stock one out and calibrating my e-steps helped a lot. This is the one I got.
https://www.amazon.com/gp/product/B00ZZRI0DC/ref=oh_aui_detailpage_o08_s00?ie=UTF8&psc=1
I have the same machine/hot end it was working great for around a year then I started having intermittent under extrusion issues and they it kept getting worse.
I finally fixed the problem by changing out the extruder gear for one of these https://smile.amazon.com/gp/product/B00ZZRI0DC/ref=oh_aui_search_detailpage?ie=UTF8&psc=1 and replacing the extruder motor as well.
I don't think the extruder gear was the root cause, but all other things being equal the finer tooth gear definitely performs better for me.
I suspect the root cause was either the extruder motor wearing out, or maybe some material building up inside the hot end, creating more friction and making things harder for the extruder.
I have a Flashforge Finder and I highly recommend it. It's right at $500. It's incredibly user friendly compared to a kit. There's almost no setup and fiddling, it prints well out of the box. The software is good, the touch screen interface is cool, and it's been reliable.
https://www.amazon.com/FlashForge-3D-Printers-New-Model/dp/B016R9E7J2
I'm looking at this model as a first machine: https://www.amazon.com/FlashForge-3D-Printers-New-Model/dp/B016R9E7J2/ref=sr_1_4?ie=UTF8&qid=1475269581&sr=8-4&keywords=flash+forge
Still need to do more research and raise funds, but I think this may be my starting point. I work business and residential IT work and I'm getting questions about 3D printing more and more. I can see where things are going, might as well get my feet wet!
Thanks for the great question! I'll answer the way my mother always answer my long emails...
Country: USA
Budget: $400-$500
ok so I had the Monoprice Maker Select and it just conked out on me. So I'm looking to get a replacement but my budget is limited as I didn't expect to have to replace it. I know for a fact I want something easier to level. I hated leveling the bed. SO far I have it narrowed down to a few choices:
Flashforge Finder - Pros: Guided Leveling. Cons: Small build area.
Da Vinci Mini - Pros: Super cheap, Auto-Leveling. Cons: SMall build area (though slightly larger than the flashforge.)
Da Vinci Pro - Pros: Guided Leveling, Large build area, can use multiple different types of filaments. Cons: None that I can see.
PowerSpec 3D Pro 2 - Pros: Dual extrusion, Fully enclosed, medium sized build area, good with flexible filament. Cons: Manual Leveling. I don't know anything about this one, only that it is a rebranded Flashforge Creator Pro.
Before I make the purchase I would like to get some opinions from some people that have or had these printers. If you know of a better suggestion feel free to post it. If you have reasons why these are crap, etc.
Fortunately, you don't have to spend much nowadays for a really good 3D printer. The first one I bought was $2200 a few years ago. Now you can get that same quality for about $300. I highly recommend something like the Flashforge Finder, but there are several options that are very similar in quality and price.
https://www.amazon.com/gp/product/B016R9E7J2/
Micro Swiss MK10 All Metal Hotend Kit .4mm Nozzle WANHAO, FlashForge, Dremel Idea Builder https://www.amazon.com/dp/B01C3HEQZC/ref=cm_sw_r_cp_apa_Xj7Dzb5FTEP7R this is the one I bought from amazon
Nozzles are all generally brass. Those should be expected to be replaced from time to time. They are relatively cheap. The Microswiss upgrade is more than just a nozzle. It replaces the stock hotend with all metal. In your stock hotend is a PTFE tube that can cause jams, will deform if heated too high, and prevents you from using certain materials. The microswiss is a relatively inexpensive and easy way to fix this.
I recommend the block too: https://www.amazon.com/Micro-Hotend-SLOTTED-Cooling-Wanhao/dp/B01E1HANLS/ref=sr_1_1?ie=UTF8&qid=1503589251&sr=8-1&keywords=microswiss
However you can save a little money:
https://www.amazon.com/Hotend-Nozzle-WANHAO-FlashForge-Builder/dp/B01C3HEQZC/ref=sr_1_3?ie=UTF8&qid=1503589251&sr=8-3&keywords=microswiss
This will work for your printer
Micro Swiss MK10 All Metal Hotend Kit .4mm Nozzle WANHAO, FlashForge, Dremel Idea Builder https://www.amazon.com/dp/B01C3HEQZC/ref=cm_sw_r_cp_api_i_88i.AbP0QGBHZ
If you can't get the piece of metal out all you really need is a new hotend, possibly just the nozzle but might as well upgrade. A common all metal hotend upgrade is the microswiss > https://www.amazon.com/gp/product/B01C3HEQZC/
How quickly were you printing your pieces? Some of the parts I saw in your album looked a bit on the rough side (overhangs, perhaps?). Meaning no disrespect of course, I think your projects are awesome! I have a Maker Select and I can get some really nice quality prints without going excruciatingly slow, so I was just curious.
Can I ask what mods you have on your printers? I saw one of them has the support braces, but have you experimented at all with other things? If so, how did they effect your prints?
The only mods I have done are installing an all metal hotend and printing off a new vent for the front fan. I used this one in particular (with a 40mm fan). The hotend mod on it's own significantly improved my print quality, and the vent made printing more intense overhangs a lot less messy.
Either way, those are some great builds! I love the look of the laser rifle. :)
Flash Forge Creator Pro. I had a lot of problems with it out of the box with clogging in the nozzles and things sticking to the build plate. After adding a metal hotend and magnetic build plate it has worked amazingly with no issues. I see the magnetic build plate is out of stock, so not sure where you can get those now, but being able to just flex the plate and have pieces pop right off is great.
"v2.1" is a label that means nothing anymore, since there have been four revisions of v2.1 and the most current model is still called v2.1
Wanhao has never done a "mosfet change" in the board,they upgraded under-rated connectors to properly handle the amount of power needed to pass through them; they didn't add anything.If you want to be sure, open the box and look at things for yourself.
Edit: Apparently Wanhao did update a mosfet. But I haven't seen any reports of someone who had something like this in their printer. It's likely the updated mosfet is visually identical to what they replaced.
There are a couple ones I've seen in tutorials: I used this, but seen some youtubers use this.
Would it be worth the extra $10 to get this board instead?
TriGorilla Mosfet Board?
save yourself some headache and get one of these:
https://www.amazon.com/Gizmo-Dorks-Printing-Surface-Adhesive/dp/B01KGDTPQK/ref=sr_1_2?ie=UTF8&qid=1484844933&sr=8-2&keywords=PEI
Here you go. Just buy the appropriate size for your printer!
for your size, this would be the easiest solution.
You just wouldn't be able to sand it. But it can still last a long time if you're careful with it.
Everything he said is spot on. I have 4 cheap Chinese printers and those are all the recommended upgrades regardless of the brand.
I recommend this power supply. It can provide 50% more power and has a cooling fan.
These mosfets have worked very well for me and lowered bed heating times significantly as well as make your printer a lot safer.
Personally I haven't had any issues with the bed connector, but maybe some epoxy or hot glue would keep the wires from moving around too much.
One of the best upgrades I did was to flash Marlin onto the board as the stock firmware is kind of crappy.
This also allows the use of a Inductive proximity sensor which makes leveling the bed significantly easier.
The bearings he recommended, the Drylin ones, will make the movements of your printer a little smoother and a lot quieter.
The belts stretch. The ones from China are rarely reinforced. I'm lazy so i just tighten them every so often. But it would be worthwhile to just start with the higher end reinforced belts.
That aside, once your printer is up and running and somewhat calibrated, head over to thingiverse and search for your printer. There are thousands of upgrades available.
Good luck!
I believe these are what you are looking for?
Igus 8 linear bearings. They were the suggested replacement when I got my A8 many moons ago.
https://www.amazon.com/dp/B06XPRCMJS/ref=cm_sw_em_r_mt_awdb_S8joDbFR7WG1C
I think that the bearing failure might be cause by over-tightening the u-bracket holding it one. I also had this failure and I ended up replacing the bearings with solid polymer ones that seem to work pretty well so far.
https://www.amazon.com/Printer-Solid-Polymer-LM8UU-Bearing/dp/B06XPRCMJS
I've had zero issues with mine, and do not use ANY lubrication... I over tightened my bearings which caused a lot of noise, so when I went to replace them with the drylins, I also completely cleaned the rods they went onto, so that may be why I am not having issues. Been running them for about two months now. These are the ones I ordered, if it matters
This will print it and can be bought for less than $200
$60 even here!
Ender 3 is fantastic and relatively cheap but if you’re on a really tight budget you could go with the Monoprice Select Mini v2 but you’ll have to use a version of the files modified to fit.
This one is close. $220 and should be pretty familiar.
Monoprice Select Mini
https://www.amazon.com/Monoprice-Select-Printer-Heated-Filament/dp/B073ZLSMFT/ref=sr_1_1_sspa?ie=UTF8&qid=1527629374&sr=8-1-spons&keywords=monoprice+3d+printer&psc=1
It seems that your comment contains 1 or more links that are hard to tap for mobile users.
I will extend those so they're easier for our sausage fingers to click!
Here is link number 1 - Previous text "PEI"
----
^Please ^PM ^/u/eganwall ^with ^issues ^or ^feedback! ^| ^Delete
Gizmo Dorks PEI Sheet 12" x 12" 1 mm 3D Printer Build Surface with 3M 468MP Adhesive Tape
https://www.amazon.com/dp/B074XLD5QH
I bought this one and it's been working great. It's thick enough that it can take some prying and if it starts to lose adhesion you can lightly sand it with some 1000 grit to restore it.
Genuine E3D V6 Socks Pro (Pack of 3) (V6-SOCK-PRO-3PACK) https://www.amazon.com/dp/B07779TP4S/ref=cm_sw_r_cp_apa_HkIRBbMK27K4Q
Buy some extruder socks to avoid this problem next time.
https://www.amazon.com/Genuine-E3D-Socks-Pack-V6-SOCK-PRO-3PACK/dp/B07779TP4S
Nozzle sock
I didn't get one at first and my nozzle/hot end got covered in all kinds of scrap that melted on and then burned on, and I started to get little dark blobs in my prints. Keeping it clean also makes it easier to change the nozzle.
>If it were me I'd probably switch back to my standard filament just to make sure my printer is still working like I'm used to. It's way better to troubleshoot a known-known.
This is actually exactly what I just did! And to my surprise, I had the same problem with the previous filament.
I actually found the issue now! At the same time I put in place the new nozzle, I also put in place one of these E3d silicon socks. And it seems this silicon sock is preventing the print to be properly cooled by my fan shroud!
I just removed it and tried again and now the print looks fine. Now I just have to try again with the glow in the dark filament but my guess is that it's gonna work!
I've modified the hell out of my ender 3, but the only mods critical to running that cf nylon were to install an all-metal hotend (e3D V6) with a titanium heat break and hardened steel nozzle, then put the whole thing in an enclosure. If you've got an ender 3, this Micro-swiss hotend is the cheapest and easiest way to get the same capability. Just bear in mind that PLA can be problematic in all-metal hot ends. You can either switch back to the OEM hotend when you want to run it, or use an oiler to get PLA working again. And I made an enclosure out of a couple IKEA LACK tables, but a garbage bag works too. If running the stock hot-end fan, be sure to cover the opening on the bottom with foil tape when running nylon or ABS to prevent a draft from blowing on the part.
I actually replaced my whole extrusion path.
First, I found that the spring in the stock extruder assembly would fatigue resulting in under extrusion and jams. The BMG is a little pricey but worth it IMO. Comes with pretty good instructions.
Second, I switched to a Micro-swiss all metal hot-end. I probably didn't need to do this - given I almost never print high-temp materials but did it anyway.
Last, cheapest, and not least, Capricorn Tubing. Do not underestimate the difference this can make.
If you're up to the challenge, I highly recommend a BLTouch. It completely solved my first layer woes (warped bed on my CR-10s).
I ordered all of it on amazon. I got the dotbit bmg clone, although the triangle labs was recommended more, and the pancake stepper from stepper online via amazon. The direct drive kit I got was the basaraba dd upgrade kit. To attach a bmg style extruder to this kit, you’ll need a printed or machined adapter. I managed to have a connection and got someone to machine a mount for mine specifically
Stepper: STEPPERONLINE Nema 17 Bipolar Stepper Motor 0.7A 13Ncm (18.4oz.in) 17HS10-0704S https://www.amazon.com/dp/B01LESPDCQ/ref=cm_sw_r_cp_api_i_aeAWDbHDJ8A49
Bmg clone:
3D Printer Bowden Extruder,... https://www.amazon.com/dp/B07P6X7DKL?ref=ppx_pop_mob_ap_share
Ender 3 Direct Drive Upgrade Kit, Compatible with Creality Ender 3 & Ender 3 Pro, no firmware Modification Needed https://www.amazon.com/dp/B07P9S9KNC/ref=cm_sw_r_cp_api_i_rfAWDbZQWTYK1
It’s important to put the spacer in this dd kit in between the motor and bmg clone as the motor shaft will push against the outer shell of the extruder, and cause a lot of issues.
I also am using a microswiss hotend
Micro Swiss All Metal Hotend Kit... https://www.amazon.com/dp/B0789V2D7C?ref=ppx_pop_mob_ap_share
https://www.amazon.com/Gulfcoast-Robotics-Carriage-Duplicatior-Printers/dp/B07B251KBS/
My advice (first of all) is to install ADVi3++ if you haven't, the bed-leveing function (under the Tuning menu I think) is pretty good.
Some general advice for the actual leveling process:
If things still aren't leveling:
Once you can actually get things level, I highly recommend getting some M3 nyloc nuts and replacing the default bed leveling knobs with these. They don't look as nice as the metal/stock ones, but it will prevent vibration/movement from de-leveling your bed as quickly.
Good luck!
Its the carriage plate I am talking about not the build plate.
The plate that warps is that thin sheet metal under the build plate. Its what is connected to the bearings on the y axis.
You don't need to test it. I can already tell you it is fucked.
Here is a much better one.
This one. https://www.amazon.com/gp/aw/cr/B07B251KBS/ref=mw_dp_cr
I was going to link you the one I bought for my maker select v2 but it seems they're out of stock.
There is another seller though that has a few but it's a few dollars more than what I paid.
https://www.amazon.com/gp/aw/d/B07B251KBS
I ordered this one, and it got to me in Canada pretty quick for a decent price: https://www.amazon.com/gp/product/B07B251KBS/ref=oh_aui_detailpage_o01_s00?ie=UTF8&psc=1
I've literally only done two prints since I got it installed though, so I can't say how big an improvement it is on the original yet.
+1 for putting a glass bed on the printer. Also the stock extruder gear setup SUCKS! Go ahead and get an all-metal one because that plastic arm will break eventually. The debate rages on about putting sound dampeners on because some folks advocate just replacing the drive controllers (more $$$). Personally I put the dampers on and am really happy with the noise reduction, Also, the fans used stock are all sleeve bearing type. Not a good choice for the hotend which is constantly moving. I say run them until they get noisy/fail and then replace them with some good ball bearing fans (remember if you order replacements that they are 24v, not 12v). Oh and I also put stiffer springs under the bed as well. (See links below)
Links are what I used, there are many options out there....
Glass bed
Creality 3D Printer Platform Heated Bed Build Surface Tempered Glass Plate for Ender 3/Ender 3 Pro 3D Printer 235x235x3mm https://www.amazon.com/dp/B07FSM8DK9/ref=cm_sw_r_cp_tai_CvzBCbDCS9RHE
All Metal Extruder Gear
Luxnwatts Creality Aluminum MK8 Extruder Drive Feed Upgraded Replacement for CR-10 CR-10S S4 S5 3D Printer Part https://www.amazon.com/dp/B076PFHM1F/ref=cm_sw_r_cp_tai_gwzBCb17T787N
Noise dampers
CCTREE NEMA 17 Stepper Steel and Rubber Vibration Dampers with M3 Screw for Creality CR-10,10S 3D Printer,CNC (Pack of 3) https://www.amazon.com/dp/B07C7FRLNX/ref=cm_sw_r_cp_tai_.wzBCb0ANF2QJ
Stiffer bed springs
uxcell 8mm OD 20mm Long Light Load Compression Mould Die Spring Yellow 10pcs https://www.amazon.com/dp/B013G5I4US/ref=cm_sw_r_cp_tai_ZxzBCbGVJ10CA
These are the ones I bought, and they seem to work fine.
I replaced the spring belt tensioner and just zip tied the belts to stay tightened and it works great. On the Y axis I have an adjustable tensioner I printed. Planning on making one for the X axis soon.
Second - some Amazon links for the upgrade pieces I mention:
Springs - https://smile.amazon.com/gp/product/B07SDDHYN4/ref=ppx_yo_dt_b_search_asin_title?ie=UTF8&psc=1
Bowden Tube - https://smile.amazon.com/gp/product/B079P92HN9/ref=ppx_yo_dt_b_asin_title_o00_s01?ie=UTF8&psc=1
Couplings - https://smile.amazon.com/Dorhea-Straight-Pneumatic-Fittings-Accessories/dp/B07NSRCH2W/ref=sr_1_15?keywords=3d+printer+fitting&qid=1574436375&sr=8-15
Extruder - https://smile.amazon.com/gp/product/B079JZ374W/ref=ppx_yo_dt_b_asin_title_o00_s02?ie=UTF8&psc=1
PEI Sheet - https://smile.amazon.com/gp/product/B07GSJSDWR/ref=ppx_yo_dt_b_asin_title_o00_s02?ie=UTF8&psc=1
Stepper Motor Dampeners - https://smile.amazon.com/gp/product/B07C7FRLNX/ref=ppx_yo_dt_b_asin_title_o00_s02?ie=UTF8&psc=1
Bootloader Flashing Kit - https://smile.amazon.com/Gulfcoast-Robotics-Bootloader-Flashing-Duplicator/dp/B07S5BBLKM/ref=sr_1_3?keywords=arduino+uno+ender+3+kit&qid=1574436535&s=industrial&sr=1-3
Note that I didn't buy this flashing kit, but this one seems to have everything you need to get a bootloader onboard the Ender. What happens is you go through a bunch of steps to attach this so the printer and then put a bootloader onto the Ender 3 board. You only have to do that one time, then you can update the firmware as often as you want - typically via a USB cable. I have Octoprint installed, so I can flash my firmware on my basement printers from my upstairs computer using wifi. Super easy and handy.
Dampers installed pretty easy on the X axis, same as the 3 I used to have. The Y axis is a bit more work which I posted above. I used this exact kind.
https://smile.amazon.com/gp/product/B07C7FRLNX/ref=ppx_yo_dt_b_asin_title_o00__o00_s01?ie=UTF8&psc=1
Nozzles
PTFE. This is the cadillac option. Cheaper tubing is very cheap, like $5 for 5 feet or something.
I didn't mention these as I haven't installed them, but stepper dampeners. Please see the stickied thread on /r/ender3 about these, if you want to order them!
The springs I ordered. Note: I couldn't quite replace the one where the wires attach to the bed. I didn't play around too much, I just left that one on there. The other three have held solid, and the next time I'm adjusting my bed, I'll try to put that one on there as well.
Hope that helps!
Edit: Reddit markdown not liking my links, I'll try to fix them
Nice ! I can see you've done your homework lol, all good choices. I'll just give you a few suggestions then since you've pretty much got it covered. The springs I used on my enders were these: https://www.amazon.com/gp/product/B07FY47BX7/ref=ppx_yo_dt_b_asin_title_o02_s00?ie=UTF8&psc=1 You might need longer screws, not sure about that, but you can get those at any hardware store, probably around 35mm m3 screws should do the trick. And the motor vibration dampers i used were these: https://www.amazon.com/gp/product/B07C7FRLNX/ref=oh_aui_search_asin_title?ie=UTF8&psc=1 you don't need them on the z-axis, just the x and y. As far as smoothers go, I think the creality boards currently use a4988 stepper drivers, so you'd probably not see any benefit from tl smoothers. I'd definitely recommend the glass bed, since ender 3 print beds are almost always warped to some extent which can make leveling the bed a real pain in the ass. The hardened steel nozzle is cool, just be aware it's not as good at transferring heat to the filament as a brass nozzle, so it prints slower, and it's only useful if you're planning on using abrasive filament like carbon fiber or glow in the dark filament. Pla, petg, wood pla, and abs don't need it. You can actually print anything you want with a brass nozzle, you'd just replace it more often depending on how much abrasive filament you use. Also, don't know which fan shroud you're planning on, but the bullseye is very good and it uses the stock fan : https://www.thingiverse.com/thing:2759439
Sorry about the wall of text lol.
Are they pretty easy for a beginner to get setup and printing? I've seen a lot require a bunch of assembly and aligning
Something like this? https://www.amazon.com/ADIMLab-Assembled-Printing-310X310X410-Available/dp/B07CPQQ57D/ref=sr_1_3?ie=UTF8&qid=1550801743&sr=8-3&keywords=prusa+3d+printer
It was. All were claimed.
Official Creality 3D Ender 3 Printer Fully Open Source https://www.amazon.com/dp/B07D218NX3/ref=cm_sw_r_cp_apa_i_D3jaCb01W6WE7
In theory, they are. The Ender 3 Pro is slightly different, since it uses a wider extrusion for the bed rail, making it more stable (in theory). If you're looking to buy on Amazon, I believe this is sold by Creality themselves and fulfilled by Amazon (which might make any warranty replacements easier):
https://www.amazon.com/Official-Creality-3D-Printer-Source/dp/B07D218NX3
Mine was purchased through Amazon:
https://smile.amazon.com/gp/product/B07D218NX3/ref=oh_aui_search_asin_title?ie=UTF8&psc=1
​
Some of this is standard stuff you probably already have, but:
​
Some people choose to get an SD card extension cable, I haven't seen a need for it myself but thought it worth mentioning.
Thanks for the reply. So far I haven't touched the extruder arm screws so the should be ok but I will check them later tonight.
I have watched the gear and it looks pretty good to my untrained eye. It doesn't appear to be slipping and also doesn't look like its digging in too much. I have had the chance to check out the tube when I was cleaning out the nozzle and hot end and it looks free from any particles.
​
I have purchased https://www.amazon.co.uk/dp/B07DC594D6/ref=cm_sw_em_r_mt_dp_U_1NwwCb51ACY2Q and it should be arriving today. So I will try to use https://www.thingiverse.com/thing:3203831 to stop any future issues.
​
I will go through the the procedure shown in the video you link and hopefully, this will help.
​
All of this as well as Kamilon's should hopefully resolve my issues.
While you're at it, you might as well go for an upgrade. I just upgraded mine and my boden tube no longer slides, which means my retraction works a hell of a lot better.
​
https://www.amazon.com/SIQUK-Fitting-Straight-Pneumatic-Filament/dp/B07DC594D6
This is the only upgrade I would recommend to get right away, everything else should be on a as needed basis.
https://www.amazon.com/gp/aw/d/B07DC594D6?psc=1&ref=yo_pop_mb_pd_title
Official Creality 3D Ender 3... https://www.amazon.com/dp/B07F16WPR5?ref=ppx_pop_mob_ap_share
I'm pretty new to this too, I bought my Ender 3 Pro around the same time as you. Quiet printing is pretty high on my list as well as being able to print high-temp exotic filaments in the long term while maintaining reliability.
First upgrades I purchased were stiffer bed springs so I would be less likely to throw the bed out of level while removing prints or working around the printer and Capricorn XS tube since it has a more consistent internal diameter, fits closer to the filament, and can work with slightly higher temps. I also picked up a pack of bowden couplers recently as I noticed the end nearest the extruder is sliding past the coupler jaws on de/retraction; don't worry about that unless it's an issue for you. That's about $30 alone since I don't have a supply shop locally and have to order those parts in bulk. I had a Pi 3B laying around unused and flashed Octoprint onto it. Highly recommended. I have a replacement Noctua hotend fan, buck converters, and 5015 blower on order to quiet the fan noise; about $32. Just replaced the Meanwell psu fan with a 60x25mm Noctua I had lying around (Note: there may be better options in the 92-120mm range to replace part of the PSU housing, but that's what I had laying around). Next upgrade coming is the SKR Mini E3 with TMC 2209 drivers ($28) to eliminate almost all of the stepper noise. Also looking into a replacement for the control board fan and some vibration isolating feet for the frame. As far as higher temp printing I haven't made a lot of progress aside from buying a titanium all-metal heat brake ($11) winch I have yet to install or inspect, and looking into enclosure and electronics relocation avenues.
Either way the mods I purchased came in at around $100 US which should quiet the printer and help with reliability. Also looking into picking up a good M3-M4 bolt kit if any exist in the US.
Here are some links to the things I picked up and will, which may be helpful if you're in the US. Mostly from Amazon.
Type | Name | Link | Price
---|---|----|----
Reliability | 8mm x 20mm yellow springs | Link | $6.98
Reliability | Capricorn XS Tubing | Link | $11.49
Reliability | PC4-M6 / PC4-M10 Pneumatic Bowden Fittings | Link | $11.99
Silence | Noctua 40mm x 10mm 3-pin fan | Link | $13.95
Silence/Various | LM2596 Adjustable Buck Converters | Link | $10.95
Silence | 24v 5015 Radial Ball Bearing Fans | Link | $7.19
Silence/Various | SKR Mini E3 w/ TMC 2209 drivers | Link | $28.81
High Temp | Titanium All-Metal Heat Brake | Link | $11.52
TOTAL: $102.88 US + Tax
Parts already purchased/ bought with printer
Type | Name | Link | Price
---|---|----|----
Reliability/High Temp | OEM Ender 3 Glass Bed | Link | $20
Reliability | Feeler Guage Set | Link | $5
Reliability | 608zz Bearings, using with this(My Remix), this, and this, though I like this design a bit better | Link | $5.98
QoL Improvement | Raspberry Pi 3B w/ Octoprint | Link | $34.46
Silence | Noctua 60mm x 25mm 3-pin fan, goes with this mod | Link | $14.95
TOTAL: $80.39 US + Tax
Future planned upgrades
Just to be clear, we're talking about this one, no?
Damn, then I definitely got the wrong bed -I bought a borosilicate glass plate and some glue sticks. I saw that bed on Amazon, but the description implied it only worked on ABS. Too bad, I liked the idea of the Build Tak, and now I'm not really in the mood to buy yet another bed and re-level it again.
But my laziness may win out in a week or so, so who knows.
I got this one. I started with a glue stick but found out just washing soap and warm water provides great adhesion. I did increase bed temp to 70 from 60 also.
https://www.amazon.com/Official-Creality-3D-Tempered-235x235x3mm/dp/B07F16WPR5?ref_=bl_dp_s_mw_17936569011
There is This glass bed with a coating on to that helps stuff to stick. I have it worked for a bit but after about a month stuff would not stick and I started to use hairspray to keep stuff stuck and its working great now. Here it is on amazon as well
Link: Official Creality 3D Ender 3... https://www.amazon.com/dp/B07F16WPR5
Hi, I have the tempered glass one with ridges, they don't say it needs anything. I think If you use a glue-stick on it would stick forever. When I had it placed good it worked without anything, but something happend and it unleveled itself.
https://www.amazon.com/Creality-3D-Platform-Tempered-235x235x3mm/dp/B07FSM8DK9/ref=sr_1_4?keywords=ender+3+glass+bed&qid=1566487149&s=industrial&sr=1-4
The idea on using the glass to space it is great! I will try it!
Thankyou for respoding :)
I went with the Crealitty Glass Bed Upgrade
There are mixed feelings on what to go with. A lot of people just use a mirror or similar, but to me it was worth $20 to know it wasn’t going to shatter on me at any point.
I just have the Creality glass bed from amazon https://www.amazon.com/gp/product/B07FSM8DK9/
It's been fantastic. Assuming your bed is properly leveled you don't even need to use adhesive, just make sure to clean it every once in awhile.
What I did was I got a nice thick borosilicate glass plate from amazon, the one with the corners cut off so it fits the bed perfectly without the heated bed bolts interfering. Then I got a sheet of PEI with 3M adhesive on the back. I cleaned the glass with alcohol and then carefully applied the PEI so there weren't any air bubbles.
​
This is the glass:
https://smile.amazon.com/Gulfcoast-Robotics-Borosilicate-Duplicator-Printers/dp/B07B2YLWF9/ref=sr_1_5?crid=2640M0KDOPOV&keywords=borosilicate+glass+plate&qid=1555903635&s=gateway&sprefix=borosilicate+glass+pl%2Caps%2C153&sr=8-5
​
And this is the kind of PEI:
https://smile.amazon.com/Gizmo-Dorks-Preapplied-Laminated-Adhesive/dp/B07GSJSDWR/ref=sr_1_4?keywords=PEI+sheet&qid=1555903728&s=gateway&sr=8-4
​
I have gone through a handful of these borosilicate sheets, and have had one or two that were warped. All of them were thinner than the Gulf Coast Robotics one. Theirs is bang on flat and way tougher, hands down the best. When you apply the PEI, make sure you do it very carefully as to not create any bubbles underneath. I started on the center of one edge and slowly applied from one side to the other, peeling the backing off as I went. Press it down from the center out as you lay it down and you shouldn't get any bubbles. Lots of very tiny bubbles are to be expected and work their way out after a while (Im talking really tiny). As for attaching the glass to the bed, a set of four binder clips are perfect. Don't bother with the thermal pads some people suggest, they make it a pain to remove the glass in between prints and don't really do anything.
​
This is a great way to have a removable build surface that everything sticks to. I have since moved up to a Prusa MK3, so I get to enjoy the luxury of the magnetic PEI build plate. You could get a similar thing going, BuildTak sells a magnetic build surface that you apply to the heated bed. The drawback of this is that if your bed is warped at all, the magnetic sheet does nothing to correct it. The thick glass on the other hand makes everything nice and flat.
​
I should add that to put the glass sheet on, you will have to move your z endstop switch down. There are several mounting holes on the printer to do this already so its really not that hard, you just have to experiment. The glass is about 4mm thick so you have to adjust for it.
go to lowes and have a piece of glass cut for about 3 bucks, buy a sheet of PEI (like this one) slap it on the glass and never worry about bed adhesion problems, glue sticks, painters tape or any other stupid bed problems again. You hit print, it prints and sticks, it cools and you pop it off easily with the result of a butter-smooth first layer.
I ended up ordering a generic borosilicate glass bed and applied some GizmoDorks PEI to the top of it. Works excellent and I don't need to use any painters tape or glue stick with it. It was a great upgrade from stock and much easier to level. Haven't decided yet if I want to dump my dial indicator leveling for a BLTouch or equivalent. I might end up doing that though.
Specifically I'm talking about these dampers:
https://www.amazon.com/CCTREE-Stepper-Vibration-Dampers-Creality/dp/B07C7FRLNX/ref=pd_ybh_a_52?_encoding=UTF8&psc=1&refRID=JG0WKDDM0VJE0BSHN7EF
I see instructions online about adding these to the stepper motors in order to make them a bit more quiet. The problem though is that my gears don't have the set screw shown in the screenshot there. So therefore I can't move the gear along the shaft. The result is that my gear is not aligned with the belt anymore once the damper is installed.
How do I fix this? I can't seem to pull the gear off by hand. I dunno if it's glued on or what.
https://www.amazon.com/dp/B07C7FRLNX/ref=cm_sw_r_cp_api_6zfOBbMX9DT8P
This is the one I bought and then watched a vid on YouTube and installed them. They worked for me so I don’t know if there’s better quality ones out there or not
Did you install dampers on the steppers (https://www.amazon.com/gp/product/B07C7FRLNX/ref=oh_aui_detailpage_o00_s01?ie=UTF8&psc=1)? I started having that problem after doing that upgrade. I don't understand why it has the effect, but if you build up the "finger" on the switch with several layers of tape you should be able to get it working well enough again to print out a real bumper (https://www.thingiverse.com/thing:3003918)
I just installed these cheap dampers, like the ones you linked.
https://www.amazon.com/gp/product/B07C7FRLNX
The instructions I followed were here, and include good instructions for the extruder damper installation as well, if you choose to go that route:
https://letsprint3d.net/2018/07/07/how-to-install-stepper-motor-dampers-ender-3/
I did not bother with heatsinks, as the temp increase has been nominal, around 3-4c which is only 5-7 degrees F. This will still shorten the life of the stepper a bit, I am sure, but I doubt it will be terribly significant and for me the trade off is well worth it.
Additionally, I have noticed zero issues with my prints. I typically print at 0.2mm, but occasionally at 0.1 and my prints are still silky smooth at either res, enough that the tiny seam zits are the only defects I'm seeing. It did not effect precision either. My calibration items are usually within .00-.02mm in any direction, which is well within margin. That said, I calibrate regularly and at every filament change to keep things working as well as I can.
Wow, thanks for going though that!
Though I'm going with the advice that almost everyone is saying on this post and wait for the printer to arrive.
That said, I'm going to buy the dampeners anyway because I'm in an apartment that the walls are thinner than most apartments in my area. I know that it's a 3-5 db difference based on what I read, but the lower the sound, the better.
I'm going with these dampeners
​
I'm also going to get the M3 Scews anyway as well just to have spares.
> My glass was warped. I used the tape it came with to flatten it but then got the mirror.
if the glass bed is warped when it arrives, I'll get a mirror tile after making sure that the printer is working fine.
> Mine came with large knobs already. And the print bed strain relief for the wires.
I've been told now that this is the case. Though I did buy this from the GearBest US Warehouse so I don't know if what they have is the latest. though I guess I'll find out on Thursday.
> I'm still using the stock clips. Or you could print new ones.
I wasn't aware that stock came with clips! So I'm going to skip getting clips until the printer arrives.
> Maybe. I've been using a mirror from Home Depot and it's been ok. I saw the creality magnetic mounted surface was only $22 on amazon so I actually ordered that today.
Can you let me know how that goes? I was wondering about those too.
> Mine came with the upgraded extruder that works better with TPU and such. The holes already started wearing larger though where the filament fed so I got a $20 aluminum setup.
did you order those upgrades or are they on the printer?
> I'm using this new hot end vent ring too this week and been liking it. https://www.thingiverse.com/thing:2912394
Dumb question but are you using PLA or ABS for that vent ring? Just curious.
​
Thank you so much for the advice!
Yep - right off of Amazon.
​
Stepper Dampers and TL-Smoothers.
Comgrow Creality Ender 3 Pro 3D Printer with Removable Build Surface Plate and UL Certified Power Supply 220x220x250mm https://www.amazon.com/dp/B07GYRQVYV/ref=cm_sw_r_cp_api_i_T4WxDbRVFW44B
I have this one too
Official Creality Open Source CR-10 3D Printer All Metal Frame 12x12x15.5 Inch Build Volume and Heated Bed Includes Glass Bed https://www.amazon.com/dp/B07LG2K55Q/ref=cm_sw_r_cp_api_i_w5WxDbQ11Q2XH
Or cheaper
ADIMLab Gantry 3D Printer 90% Assembled 310X310X410 3D Printing Size with 24V15A Power Heat Bed Glass Control Box Filament Detector, Nozzle Light, Modifiable to Upgrade to Auto Leveling https://www.amazon.com/dp/B07CPQQ57D/ref=cm_sw_r_cp_api_i_r6WxDbR5B2PCQ
All pretty good units
Note that I'm completely new to 3d printing.
These little blocks are 20x20x5 millimeters. The grey was printed with the shown settings, and the white was similar settings, but all travel speeds were set to 30mm/sec.
Things I've tried
https://www.amazon.com/ADIMLab-Assembled-Printing-310X310X410-Available/dp/B07CPQQ57D/ref=mp_s_a_1_3?ie=UTF8&qid=1542915406&sr=8-3&pi=AC_SX236_SY340_QL65&keywords=adimlab+3d+printer&dpPl=1&dpID=41CUcYPkqPL&ref=plSrch
Worth the money?
Anyone know anything about the ADIMLab Gantry i3 Plus, and how it compares to the Creality CR10S? I'm looking to get a second printer next to my Monoprice Maker Select Plus. The ADIMLab looks very comparable to the CR10, with a slightly bigger build volume, and a couple small features that seem nice, but with a price of $380 compared to the CR10S at $520, I'm nervous that it's going to be unreliable or have problems down the road. I'm having trouble finding any reviews of it.
Hello I'm completely new to 3d printing. What wanting to grey a print that will be relatively versatile. I'm pretty decent with electronics but by no means a master. I am familiar with autocar and Autodesk inventor. I'm not sure I'd either program cam print directly yipp a3d printer though. I am looking at this ADIMLab 3D Printer Assembled 24V Prusa I3 3D Printing Size 310X310X410 with Heat Bed, Glass, Control Box, PLA, Auto leveling Upgrade Available https://smile.amazon.com/dp/B07CPQQ57D/ref=cm_sw_r_cp_apa_i_gEvDCbAG5MNYS printer. Is this a good price on this printer? Can I use the wood type filiment in it? What other types of filiment can be used in it?
https://www.amazon.com/ADIMLab-Assembled-Printing-310X310X410-Available/dp/B07CPQQ57D/ref=sr_1_fkmrnull_1_sspa?crid=1YE95FUI0YS8L&keywords=adimlab+3d+printer+assembled+24v+prusa+i3+3d&qid=1555684836&s=gateway&sprefix=adimlab+%2Caps%2C136&sr=8-1-fkmrnull-spons&psc=1
Couple of questions. First, I will be getting my first printer and wondering if certain printers use certain programs better?
Second, I want to use the printer to make my own custom board games, (Catan and D&D pieces) do any one printer do a better job with this?
I have no knowledge of how the programming works yet and just want to know what I am getting into before I jump right in.
Edit: The first printer I was looking at was ADIMLab
https://www.amazon.com/dp/B07CPQQ57D/?coliid=I1C3MXODC8HJYO&colid=2YI1JED33NYNA&psc=0&ref_=lv_ov_lig_dp_it
Edit 2: My price range is $300-$850. US Resident, I have a friend who will help me set up if needed.
It was an Amazon prime day deal yesterday. Today this is the best deal I could find on this particular printer. There might be better deals on this or other printers later, sorry.
https://www.amazon.com/Official-Creality-3D-Printer-Source/dp/B07D218NX3/ref=mp_s_a_1_3?keywords=creality+3d+printer&psr=PDAY&qid=1563285900&s=prime-day&sr=1-3-catcorr
I have been looking into 3d printing and decided the best place to start would be with an ender3 so that I would be able to have quality prints, for a reasonable price. However, looking on several websites there are different prices and I am just not sure which one would be best to go for.
Amazon has the ender-3 from Comgrow for $230 here: https://www.amazon.com/gp/product/B07BR3F9N6/ref=ox_sc_act_title_1?smid=A2ALB3RMNIRLH8&psc=1
However, it says the official one, again for $230 is here: https://www.amazon.com/Official-Creality-3D-Printer-Source/dp/B07D218NX3/ref=sr_1_3_sspa?keywords=creality&qid=1569107314&s=gateway&sr=8-3-spons&psc=1&spLa=ZW5jcnlwdGVkUXVhbGlmaWVyPUExWjJVQlE0MjhKMEQ2JmVuY3J5cHRlZElkPUEwODU2MjU2MzNSMTQ2SlFGUjg1OCZlbmNyeXB0ZWRBZElkPUEwODA4ODAzMldSNTRQMDZOTzBXQyZ3aWRnZXROYW1lPXNwX2F0ZiZhY3Rpb249Y2xpY2tSZWRpcmVjdCZkb05vdExvZ0NsaWNrPXRydWU=
I also found a website listing it on sale for $189 here: https://www.gearbest.com/3d-printers-3d-printer-kits/pp_1845898.html?
I got the last link from Maker's Muse video and I am just very confused. I do not want to spend more money than I need to as filament is also rather expensive.
Any help would be appreciated, I really want to get it for the cheapest price without it coming in damaged or in a month.
So I want to get the Ender 3, and unfortunately I’m locked into using Amazon (gift cards). There’s a litany of different listings for the Ender 3 and Ender 3 Pro; I’m not sure which listing is best, or if there’s a real difference. The prices are within a reasonable range of each other (230-250 for the regular, 270-300 for the Pro), but I know that QC can vary widely by machine. Does anyone know of/have any suggestions for which listings are the most reliable? I’m leaning towards the regular since the Pro features aren’t something I’m interested in as much.
Various Listings:
Creality Ender 3 3D Printer with Resume Printing Function for Home & School Use 220x220x250mm https://www.amazon.com/dp/B07FFTHMMN/ref=cm_sw_r_cp_api_i_1QfxCb1NEWRV0
Official Creality 3D Ender 3 Printer Fully Open Source https://www.amazon.com/dp/B07D218NX3/ref=cm_sw_r_cp_api_i_sRfxCbNXRZ5AW
Official Creality 3D Ender 3 Pro Upgraded 3D Printer with Removable Magnetic Bed https://www.amazon.com/dp/B07K3SZBHJ/ref=cm_sw_r_cp_api_i_XRfxCbH8D4B7B
Official Creality 3D Ender 3 Pro Upgraded 3D Printer with Removable Magnetic Bed https://www.amazon.com/dp/B07K3SZBHJ/ref=cm_sw_r_cp_api_i_XRfxCbH8D4B7B
https://www.amazon.es/Creality-3D-impresora-Ensamblada-impression/dp/B07D218NX3/ref=sr_1_2?srs=15777914031&ie=UTF8&qid=1542106979&sr=8-2
https://www.amazon.es/Creality-3D-Impresora-Easy-assemble-Impresión/dp/B07DPJHML9/ref=sr_1_11?srs=15777914031&ie=UTF8&qid=1542106979&sr=8-11
https://www.amazon.es/Creality-3D-Ender-3-Printer/dp/B07D39QWGM/ref=sr_1_27?srs=15777914031&ie=UTF8&qid=1542107057&sr=8-27 .
https://www.amazon.es/Creality-Resume-Printing-220x220x250mm-Source/dp/B07JC93LKS/ref=sr_1_31?srs=15777914031&ie=UTF8&qid=1542107057&sr=8-31
I think that they change from versions but that doesn't explain a 60€ difference I tried sorting it by newest to oldest and maybe its that but I'm not sure
https://www.amazon.com/Official-Creality-3D-Printer-Source/dp/B07D218NX3
i see a lot of people say the same thing about Ender 3. now i see a lot of copycats of that model.
but this must be a legit one right? https://www.amazon.com/gp/product/B07D218NX3/
Looking to get into 3D printing mostly for wargaming terrain and some other misc things. Trying to stay on the cheaper side of things: $200-250.
Been looking at the Ender 3 and this filament since there are several different shades for the price.
Is there anything else I might need with that printer? Does anyone have experience with that filament or is there a better kind that is around the same price point?(Doesn't have to have multiple colors, just thought I would get something with multiple colors to begin with) Last question, what is the best software if I plan of using the printer mostly with Ubuntu?
Thanks in advance.
The couplings I use don't have those clips. These are the ones a lot of people seem to recommend so I don't think that they should give a problem. I tried that trick with using the bowden tube to clear the space but I didn't find any old filament.
Ah! Just learned a mistake in my learning. I had retraction mixed around with what must be Z Hop. I had seen the extruder drive make reverse moves but had not considered this to be retraction. A little confused as to why the profile would come with such a high retraction if this was way too long. (See the large dragon profile https://www.3dprintedtabletop.com/resources/3d-printing-profiles/)
I picked up a replacement bowden tube as recommended for the Ender 3 so will be fitting this soon. https://www.amazon.co.uk/dp/B07DC594D6?ref_=pe_3187911_248764861_302_E_DDE_dt_1 . I'll also be upgrading the fan sets as my next purchase as well.
​
I'll do the following for my next attempt:
Hmmm, maybe I should just go ahead and replace the whole tube and the fittings while I'm at it. That seems to be a highly recommended upgrade.
One day I'll actually get to do some printing of cool things instead of merely trying to get my Ender 3 operational. :/
​
Yup. Nothing really changed other then +5 degrees on the hot end. I do have small mods like these
Aluminum Extruder
tube & fittings
You seem knowledgeable about the couplers... Would these be better than stock? 4 Pieces PC4-M6 Quick Fitting + 4 Pieces PC4-M10 Straight Pneumatic Fitting
I changed to a PTFE tube that came with some coupling that e bought, because i didnt like the original couplings. The diference i noticed is that this tube lets the filament flow more freely.
Link to the couplings and tube:
https://www.amazon.co.uk/gp/product/B07DC594D6/ref=ppx_yo_dt_b_asin_title_o00_s00?ie=UTF8&psc=1
I got this comes with a lot of tube, probably a few feet and a lot of extra couplers, I've had it up to 260 since and haven't had an issue
Go glass.
PLA sticks with nothing for prep, smooth bottom surface, and very, very flat.
(edit) - with the upgraded yellow springs, I don't even need to level anymore - except when I change tips.
Yep. Just the standard Creality bed.
Official Creality 3D Ender 3 Ender 3 Pro Ender 5 Tempered Glass Upgraded Build Plate Printing Surface for Heated Bed 235x235mm https://www.amazon.com/dp/B07F16WPR5/ref=cm_sw_r_cp_apa_i_35VBDbA6SHFZB
Watch this video to help with assembly. The included instructions are full of engrish and hard to follow. This guy makes it easy, and adds some handy tips. If you're not replacing the bowden tube immediately (you don't need to, but it's a cheap and relatively easy upgrade), skip the steps in his video where he removes the tube and its couplers.
Read this comment for my advice on how to level the bed. Leveling is a misnomer - you don't want it level compared to gravity, but compared to the gantry. The usual advice involves sliding a piece of paper under the nozzle as a feeler gauge. That'll get you close - the steps in my comment will get you just about perfect.
Once you've done that, this fan shroud is one of the few things I'd call an essential upgrade. Also a glass bed.
I am confused by this issue, so many people seem to be using all kinds of different adhesives on the glass, I use none at all. Ender 3 with https://www.amazon.com/gp/product/B07F16WPR5/ref=ppx_yo_dt_b_asin_title_o03_s02?ie=UTF8&psc=1 glass bed, and mp select mini v2 with a random piece of glass and a piece of borosilicate, I've never had a problem with sticking, bed temps of all sorts. I wonder if this could be a climate type issue, I live in Fort Collins Colorado, it is fairly dry here and not to hot or cold, what type of climate are you guys printing in?
Amazon's where I got mine...
The stock bed is known to warp sometimes. Ever since I got the glass bed for mine it's been amazing. https://www.amazon.com/gp/product/B07F16WPR5/ref=ppx_yo_dt_b_asin_title_o07_s00?ie=UTF8&psc=1
Directly. Creality 3D Printer Platform Heated Bed Build Surface Tempered Glass Plate for Ender 3/Ender 3 Pro 3D Printer 235x235x3mm https://www.amazon.com/dp/B07FSM8DK9/ref=cm_sw_r_cp_tai_s9RvDbM16RZ7Y is the one I got. It has a coating on it. I have been extremely happy, though it took me another 15 minutes to relieved since it’s thicker and you gotta reset everything.
Only real change is you should wait for it to cool before pulling stuff off, but once it cools, it doesn’t stick. Like... at all. It’s quite nice. Also, it doesn’t warp, which I only found out after, because I was only after a new bed and figured I’d upgrade. Then I read about it ;)
Creality 3D Printer Platform Heated Bed Build Surface Tempered Glass Plate for Ender 3/Ender 3 Pro 3D Printer 235x235x3mm https://www.amazon.com/dp/B07FSM8DK9/ref=cm_sw_r_cp_apa_i_SxkoDb69RT69H.
If you print PLA, you're good to go. Any other you might need glue stick, (it ain't that bad).
Using this bed
Creality 3D Printer Platform Heated Bed Build Surface Tempered Glass Plate for Ender 3/Ender 3 Pro 3D Printer 235x235x3mm https://www.amazon.com/dp/B07FSM8DK9/ref=cm_sw_r_cp_api_i_4BwJDb8ZYB5F2
https://www.amazon.com/Creality-3D-Platform-Tempered-235x235x3mm/dp/B07FSM8DK9/ref=mp_s_a_1_6?crid=3FDMZV71B8DWJ&keywords=ender+3+glass+bed&qid=1551067444&s=gateway&sprefix=ender+3&sr=8-6
I just ordered one today. https://www.amazon.com/dp/B07FSM8DK9/ref=cm_sw_r_cp_apa_i_ApDCCb7WCN032
I want to say it has a textured surface where you don't have to use hairspray and the like.
I bought a heated glass plate also: https://www.amazon.com/dp/B07FSM8DK9/ref=cm_sw_r_cp_apa_i_i-RBCbRVFQ0FN
All I do is maybe 8 back and fourths over where it's going to print then rub it in with my hand.
Here's the aluminum extruder assembly. The plastic one that comes on the printer WILL break. It's just a matter of time. They crack from stress after a while and even before that they creep and you'll start getting missed extrusion.
Here's the stiffer bed springs. You won't have to compress these as much to get a good stiffness.
Another really popular upgrade is this glass build plate. It has a special coating that makes it so parts stick without adhesive, and it leaves a really smooth surface on your prints. Parts stick really well then when it cools down they self-release.
The 3 upgrades I linked are extremely popular upgrades. You can get by without the glass bed, it's just an option because the stock bed will wear out eventually.
Printed in two parts. You can see the seam right above where I redacted my PII. Printed in Overture PETG. I used CHEP's petg profile in Cura but had to turn the flow rate down on the printer to 65% because the infill was falling apart. took about 18 hours total I think. printed on the this glass bed because my build plate has a huge bulge in the center. 205C/50C. Going to CA glue and clamp it together and prime and paint it to look like aged/patinaed copper.
This is only about my fourth print and my first with PETG. I can't believe the quality and surface finish I can get out of this little workhorse
Yeah, that's kinda what I was worried about. This is what I purchased. https://www.amazon.com/gp/product/B07FSM8DK9/ref=ppx_yo_dt_b_asin_title_o01_s00?ie=UTF8&psc=1
I was kinda hoping to be able to put the sticky build sheet on the back side, and leave the coated side against the heated plate. The reviews seem to suggest that the coating wears away very quickly. But I'm afraid that the coating will mess with the adhesion of the polycarb build sheet.
Ideally, it would be great if I could just put the polycarb sheet on the back, and just flip it back and forth and use both surfaces. Just don't know how safe it would be having either surface directly against the build plate.
Thanks for the detailed reply.
​
I need to read more to understand the z switch and z screws you are referring to. I have no idea what those are. I assembled by watching some channel on youtube do it. It was like a tales from the crypt vibe channel.
​
As much as it sucks, I probably need to completely disassemble it and start over. There has to be something done incorrectly for it to be this difficult. I am definitely going to get one of those gauges before I get back into. I returned the springs today and ordered different springs on amazon. When they get here, I might sit down one night and try again.
​
As for the bed, the glass one I got was scratched to hell from those stupid springs. I didn't know I had to raise or lower whatever switch you were talking about. Like I said earlier, I already ordered a SD card reader so that will be a definite mod. As for the octopi, is there a list somewhere on this subreddit of everything you need to purchase before starting? I have a raspberry pi at the house. I originally bought it to build a retropie but I haven't gotten around to it yet. I could use it for the printer if needed. I really like the idea of remote printing, having a webcam to see the print live, and putting a part on there that stops the print if there is a filament issue.
​
I have to go into the city tomorrow so I was thinking of stopping by ikea and getting some Lack Tables for the eventual enclosure but now I don't know if I am even going to keep the Ender 3. I am debating on returning it and moving up a tier. I really want to get started on this but it seems like I am never going to be able to print any of this awesome stuff. So many awesome files on thingiverse and I can't use any of them.....
​
Here are the parts I have purchased so far....
​
SD Card Extension
​
Glass Bed
​
Springs that I bought that would not lower bed enough
​
Most Recent Springs I am going to try
​
Metal Extruder Upgrade
​
Filament Black and Red
This is the one I bought.
https://www.amazon.com/gp/aw/d/B07FSM8DK9/ref=yo_ii_img?ie=UTF8&psc=1
Its a great printer. Upgrade your springs and get an aluminum extruder. Those two things were so cheap, but definitely made a difference for me. I use a glass bed with a PEI sheet and have been very happy with it. I use eSun PLA Pro for my minis. Check out Tomb of 3d Printed Horros for their cura profiles and tips!
https://www.amazon.com/Gizmo-Dorks-Preapplied-Laminated-Adhesive/dp/B07GSJSDWR/ref=asc_df_B07GSJSDWR/?tag=hyprod-20&linkCode=df0&hvadid=312163444503&hvpos=1o1&hvnetw=g&hvrand=3399292976891203176&hvpone=&hvptwo=&hvqmt=&hvdev=m&hvdvcmdl=&hvlocint=&hvlocphy=9001880&hvtargid=aud-801657747996:pla-584394961083&psc=1
Mine came with 3m already on the backing so I just had to carefully apply it to the glass.
Gizmo Dorks PEI Sheet 3D Printer... https://www.amazon.com/dp/B07GSJSDWR?ref=ppx_pop_mob_ap_share
I bought a regular glass bed off amazon and really liked that but the textured surface started to fail after a while and I didn't like having to clean off adhesives or hairspray. I got this PEI build surface from amazon and stuck that on top of it. The ender 3 pro's magnetic bed base is enough to keep the glass in place and the PEI sheet has adhesive on the bottom of it so I don't need to use the binder clips like I thought I would have to at first. It all just stays in place without shifting and I have access to the full print bed. The glass is still on there to correct a warp in the base bed and the PEI is honestly such an upgrade from glass. Things stick with no effort and come off easily at the end, except PETG which sticks like nobody's business and is harder to remove.
I struggled with adhesion for the first couple weeks of printing. Then I swapped my stock bed for a glass + PEI combo. Got the flatness of the glass + the adhesion of the PEI. Once the plate cools down a few degrees, the parts come right off. No need for sticky hairspray to get things to stick, and no need to put the bed in the freezer to get things to unstick. Best upgrade I’ve made on my ender 3 (~$30 total). Always wipe down with isopropyl alcohol in between prints for best adhesion.
Tip: I also recommend gently wet sanding the PEI. Helps with adhesion and creates a very nice matte finish on the first layer.
Glass Bed:
Nearly Natural 4855 35in.... https://www.amazon.com/dp/B07JKGNB6W?ref=ppx_pop_mob_ap_share
PEI:
Gizmo Dorks PEI Sheet 3D Printer... https://www.amazon.com/dp/B07GSJSDWR?ref=ppx_pop_mob_ap_share
The problem is that people still refer to information from 10 years ago in regards to 3d printing and wont let go of it. Hairspray and glue stick are one of those ideas that needs to be buried.
Buy some PEI
https://www.amazon.com/Gizmo-Dorks-Preapplied-Laminated-Adhesive/dp/B07GSJSDWR/ref=sr_1_5?keywords=pei&qid=1574003872&sr=8-5
and apply this to your glass. Then just wipe it with isopropyl once and a while.
Then the only time you will use gluestick is when you want less adhesion. To give you an idea, I can turn on my heated bed and get old prints to stick again.
I recommend a PEI sheet
Gizmo Dorks PEI Sheet 3D Printer Build Surface 235mm x 235mm (9.3" x 9.3") with Preapplied Laminated 3M 468MP Adhesive for Creality Ender 3 or CR 20 | Made in The USA https://www.amazon.com/dp/B07GSJSDWR/ref=cm_sw_r_cp_apa_i_FVfVCb8Q5VK3N
Hey I also new on this, got my printer a month ago, I was super exited as everyone here when receive their printer, I read a LOT while waiting for the printer, so I heard that the stock bed springs are crappy, so I ordered this ones FYSETC Bed springs, also ordered the Aluminium Extruder feeder, and read about the leveling, the paper sheath method, which I think you should already heard about, I did it at the first time the printer gave me a nearly perfect first print (demo dog) , after a few prints and on my third print I came home just to find a mess on my printer, so I did my research again, find out it was bed adhesion, and find out that the best way was glass bed + PEI sheet was the best option, while waiting to arrive I tried to clean the stock bed sheet with mineral spirits (did have rubbing alcohol) but it worsened the adhesion, so I used one adhesion sticker that comes with the overture filament, and again flawless adhesion, at least for the first 4 prints, then again the frustration, I tried some glue stick and worked but it leaves a mess on your print so I decided to try painters tape directly onto the aluminum bed (which lucky for me it is perfectly flat) this is the best adhesion I have tried, problem is also makes a mess with the down face of the print, Finally mi Gass-PEI arrived, (3 days ago), it has a great adhesion but is not perfect, also you have to raise the Z limit switch to compensate the 5~ mm of Glass-PEI, find out that it isn't perfectly flat it has a good adhesion and leaves a very smooth down face, but at some section it does't sticks well and leaves artifacts on the down face, I'm currently working to fix this.
Sorry for the long post, need to talk about my frustration and let you know you are not alone on this, once you manage to make a good print is very satisfying, I have a PETG filament waiting to be used but I don't think is a great idea to try it until a learn more about 3D printing and the Ender.
I posted:
>a nationwide chain of hackerspaces will be proposed.
(nope, not yet, dammit, closest is techshop with california and michigan)
>3d printers will be for sale on amazon.com for under $500.00
(yup http://www.amazon.com/XYZprinting-Da-Vinci-1-0-Printer/dp/B00H7VEU0G/ref=sr_1_1?ie=UTF8&qid=1395948942&sr=8-1&keywords=3d+printer)
>A hundred million dollars will be pledged to a crowdsourced proposal, such as kickstarter.
(nope, order of magnitude wrong, pebble made ten million. https://www.kickstarter.com/projects/597507018/pebble-e-paper-watch-for-iphone-and-android?ref=most_funded unless you count the military and business crowdsourcing projects... I'm wrong.)
>simple encryption tools will be widely available as an app, allowing smart phones to communicate via wifi, without the capability of a third party listening in. This will cause madness.
(yup but not that common yet, even though there are several available, none of them are popular, and no madness I'm aware of.)
This one? "Item Under Review / This item is currently unavailable because customers have told us there may be something wrong with our inventory of the item, the way we are shipping it, or the way it's described here. (Thanks for the tip!) We're working to fix the problem as quickly as possible."
$500 on amazon. ;)
http://www.amazon.com/XYZprinting-Da-Vinci-1-0-Printer/dp/B00H7VEU0G
Do you have this one (or similar)? We just bought this one and calibrating it is a pain in the ass.
Dude buy this and try to tell me you didn't enjoy the hell out of it
3D printer
Nice 3D printer
3D pen
yup! not the greatest reviews, but at that price it still looks like a good deal, we ordered one for my dad who's about to retire in February.
This one. It's little (relatively) and mighty!
The XYZprinting Da Vinci form amazon is probably your best bet.
http://www.amazon.com/gp/aw/d/B00H7VEU0G?cache=6fe83597e495305d43d73736bafe7b8d&pi=AC_SX110_SY165_QL70&qid=1414253482&sr=8-5#ref=mp_s_a_1_5
The only downside is that it uses filament cartridges which give you less filament at a higher cost. Unless you get one of these.
http://wctek.com/xyz/
Get some cleaning filament.
As far as quality gains you'll experience from changing over to a Bowden/E3d v6 is that you're lightening the overall mass of the Hotend carriage.
If you stop and think, the gantry is carrying the load of the stock Hotend as well as the weight of the stepper motor and the enertia it's contending with in those back and forth movements which can cause defects in your print if your frame isn't solid.
Is not a design flaw, but just an effect of the design.
Like I mentioned earlier you're limiting yourself with exotic filaments with a Bowden, but you're shedding weight to reduce vibration and gaining the opportunity for more speed without having to reinforce the frame a great deal.
But look at extruders like the Titan. These are high performance direct drive extruders that are lighter than stock, but still heavier than a Bowden but you keep the benefits of printing any filament you like.
As well as you don't have the bad characteristics of A Bowden. The Teflon tube that will run from the extruder to the Hotend on a Bowden system, that guides the filament will have a bit of 'give' in it when the extruder is pushing and pulling the filament.
Here is a crude way of describing it...
Let's say for the sake of simple math, that it takes 1 pound of pressure in your stock, direct drive extruder to properly push the exact amount of required filament required for laying a line of plastic onto the heat bed. Now realistically that pressure changes constantly but let's just say you need a consistent 1lb of pressure all the time. It only has to travel a couple of mm's before it's in the Hotend.
In a Bowden system, the extruder pushes the filament through the long Teflon tube and the tube will give way to that pressure. So though your extruder is pushing at 1lb, by the time it reaches the Hotend its only seeing 0.95 lbs because of the tube absorbing some of the pressure. You can compensate with firmware to tell the extruder to actually push 1.05lbs so that when it reaches the Hotend, it's getting the 1lb that it needs. But it's never really 100% accurate. And if your firmware isn't set perfectly you'll see it in the print, like uneven layers and such. Not a very elegant explanation but I'm typing from my phone.
PETG is stronger and much more heat resistant than PLA. PLA is good for whatnots and things you'll sit on your desk that don't need to be structurally sound. PETG is used for things like printing a hook to hang a rolled up extension cord out in your non climate controlled garage and it not break under the weight over time.
PLA is super easy to print and has a broad window of settings to get a nice print. PETG is not as forgiving in the settings department and you have a narrow margin for error. But once you get it dialed in, it prints like PLA. I mentioned polycarbonate earlier. It's even stronger and more heat resistant and you could print chain links with it and hang your front porch swing on it. But it's damn unforgiving and I struggle with it to this day.
Here is the cleaning filament I use. https://www.amazon.com/dp/B00MVIYNFW/ref=cm_sw_r_cp_apa_i_Q8bkDbV3KFZDT
I only use it when going from one type of filament to another. Like from PLA to PETG. Just changing colors of the same type of filament you wouldn't need it. It's the temperature differences between the 2 that cause jams. PLA prints around 190C. PETG is around 240C. That reminds me of another benefit of the E3d v6. It's all metal and can handle the hotter temperatures of filaments like PETG. You have a Teflon liner in the throat of your stock extruder. I think it's only good up to about 210C.
I haven't really shopped for SLA printers. Consumer SLA printers are still in their infancy. But what I have stumbled across are very small. Like only 6 inch by 6 inch build volumes for $200-$300. And you're limited to the resins that are available. I think only PLA type plastics are available right now. Nothing you could print anything functional with.
I swear by this filament. I run it through when doing filament changes, as well as nozzle changes. I also use it if I get a clog.
A new heatbed is around $30. Another option is to buy a $10 square silicone heat pad from aliexpress, stick it underneath the stock bed and clip a sheet of picture frame glass to the top.
Don't be discouraged by a jam, it's a simple system. Take the fan shroud off, unscrew the fitting and take the tube out. Heat up the block and try to push filament through by hand. This usually clears blockages. If still a no-go, use cleaning filament instead. It's does wonders for cleaning hotends.
It is possible you might need some of this.
I've been lucky and have never had to deal with a clog myself, so I'm afraid I'm not much help from here on. I think it's probably clog related and would suggest some more targeted Google searches with that in mind to find solutions.
There is also cleaning filament. It is safe to use at ABS and PLA temperatures. Just extrude the cleaning filament until it starts coming out clean. Then lower or raise the temperature to match the new plastic and extrude it until the cleaning filament is no longer being extruded. https://www.amazon.com/dp/B00MVIYNFW/ref=cm_sw_r_cp_apa_HzGvybEZNY8K2
Just printed my first ninjaflex test print and it came out way better than i expected. The only problem is how long it takes for all the previous filament to be cleaned out. I was thinking of getting the following from eSun but wanted to make sure there wasn't any other options I'm missing.
http://www.amazon.com/Printer-CLEANING-Filament-Makerbot-Printers/dp/B00MVIYNFW/
If anyone has used eSun with a bowden setup i would love to hear how you used it. Did you put it right into the hot end by removing the PTFE tubing or did you just put in a piece between your filament chance and have the new filament push it though? I'm just wondering how that would work with ninjaflex already being hard to get back pressure on with a bowden.
Not from Prusa, but here are some other things I use over and over and over and am glad I bought. These are not affiliate links and you can probably find some of these items cheaper elsewhere:
Thin craft spatulas for removing prints: https://www.amazon.com/gp/product/B075SLTY8B (some say "never scrape using a metal tool" but these are very thin and flexible and really help with some prints)
Cleaning filament: https://www.amazon.com/gp/product/B00MVIYNFW
Silicone socks: https://www.amazon.com/gp/product/B07779TP4S
Good quality hex drivers https://www.amazon.com/gp/product/B0006O5014 these will make assembly and maintenance MUCH easier than the included tools. Especially the smallest one that fits the set screw in the Bondtech extruder gear really well, much better than the "decent" hex keys I already had in my toolkit
Filament and cleaner.
Buy
($6)Wires:For the MOFSET mod
($1o)MOFSET
($6)Wire spades:For the MOFSET mod
($8)Assorted M3 Bolts:You need some for a few mods and for the bolts you will inevitably strip on this
cheapwonderful machine($13)Longer assorted M3 Bolts:For a few mods
($9)M4 Bolts:For one of the mods
($9)Metric allen wrench set:Had to order one of these since metric tools aren’t common round these parts
(~$20) PLA of preferred choice- You’ll run out of the sample bit quick so go ahead and order a roll or two to be prepared. You will note some upgrades require ABS so a small spool of that to your order will also help.
($6)M3 Lock nuts:Critically needed for a simple mod
($10)Threaded rod and nuts:Please note that this item seemed difficult to find online. I recommend going to your local hardware store and getting two 5/16” rods of at least 16” in length. They should have an assortment of threaded rod in various lengths available. Also note that the pitch of the threading matches the nuts you buy. Further instructions regarding this can be seen in Azza’s Z-Axis braces below.)
($6)9mm Wrench for the nozzle: Don’t wait for your first clog, go ahead and have this on hand to remove/change the nozzle. Note to only tighten/loosen the nozzle when heated.
Below is the order of printable upgrades I recommend but I suggest you mix in a few other prints along the way because this is a hobby after all and you should be having fun. It helps to have your quality as tuned in as much as possible for some of these so be patient and keep trying if you need to.
Print
Spool holder- temporary : Until you can mount your spool on top of the enclosure or any other personal preference.
Belt tensioner- print x2
Z-brace
Shielded stop button
Cable relocator : It’s a pain, but if you spend the time to do this and turn your extruder motor 90 degrees then you can get the full Z height without ruining your cables. It does involve opening all the cables to the PSU and feeding a few extra inches back through the cable chains.
Cable shroud : Looks nice if you do the cable relocator.
The following need to be printed in ABS:
M3 Bed Nut retainer: 10/10 upgrade. I know they look worse than the nice metal stock ones, but these help keep your bed level longer.
CiiCooler
Glass bed Holder
Now that the first major round of printed upgrades is done it’s time to shift to a few more supplies to pick up to really fine tune the machine.
Buy
($5)Radial fan: For CiiCooler
($5)Glue sticksThis and a glass bed is magic
($25)Borosilicate glass 8” x 8”
($26)Y-Carriage plate upgrade: This has been a nice upgrade as I now only need to relevel the bed every couple weeks instead of every print. Check out this guide for a ‘how to’ as well as a free upgrade by shifting your Y pulley over.
($15)rechargeable dehumidifier: For keeping in the bin with your opened filaments
($9)Extruder gears: Might be able to hold off on these, but will need eventually. If for some reason you have a Maker Select with metal X-axis blocks (V1 and V2, but not V2.1) then this is a must. You can follow this guide for a how to.
($28)Metal extruder plate and lever: Not needed, but nice.
($14)Noctua 40mm fan: Not needed, but makes the printer a lot quitter. A LOT quieter.
($50)MicroSwiss All Metal Hot End: The destruction of my PTFE tube by this point pushed me to doing this upgrade. If needed you can follow this guide for replacement. Remember to tighten/loosen when the nozzle its hot.
($6)Ceramic cotton: Tore off the stock one when replacing for the all metal hot end by accident. At least its thicker than stock
Now that the printer is in its final form, its time for the enclosure which is a stacked Ikea Lack hack.
Print
Spool holder
Pi Case
120mm fan cover
Fan grill
120mm fan PSU modification: I edited this to fit upside down since my PSU is mounted on the underside. This was nice since I blew the 40mm fan anyways so it made everything a lot quieter than before.
IKEA Lack filament guide
Webcam holder: This is one I designed specifically for the webcam I happen to have lying around. The camera mount piece can be changed out no problem though for what ever webcam you have or buy. The SketchUp file is included on Thingiverse for such purpose.
Buy
($20)2x Ikea Lack: Luckily there is one right down the street from me. I am located in North America though, so we do not have the STUVA, if you live literally anywhere else you may check in to this as an alternative.
($80)Plexi glass for enclosure: Could be cheaper alternatives, but it looks cool
($9)Foam pads for feet
($42)Raspberry Pi3: For OctoPrint. I also suggest using a different USB cable than the stock one provided by Monoprice or you will have issues.
($9)2x 120mm fans: Used for the power supply cooling and enclosure
($6)Rocker Switches so that the enclosure fan can be on for PLA, but off for ABS
($15)Dimmable LED lights
($10)8mm LED light connectors
Total:
$250 printer + $452 upgrades/parts + ~$80 PLA/ABS to date
The first one is fine. Not sure if the last one is any different. That being said, I was able to print PETG pretty well with the stock heating block, though the MS is definitely better. While you're at it, pick up a new extruder gear. Definitely helps, but don't forget to re-calibrate your e-steps.
https://www.amazon.com/Signswise-Extruder-Driver-Makerbot-Printer/dp/B00ZZRI0DC/ref=sr_1_fkmr2_1?ie=UTF8&qid=1495639138&sr=8-1-fkmr2&keywords=duplicator+extruder+gear
i buy all my printer parts off of amazon. [gears.] (https://www.amazon.com/Signswise-Extruder-Driver-Makerbot-Printer/dp/B00ZZRI0DC/ref=sr_1_2?ie=UTF8&qid=1497980826&sr=8-2&keywords=extruder+gear)
It kinda looks like the set screw on your extruder gear might be loose, but the backlash of the extruder gear slipping can make it skip a step. I replaced mine with a hardened steel extruder gear when it was doing the same thing, and now it works fine. Specifically one of these.
​
The other option is that your temperature is too low and your hot end can't extrude as much as it needs to, or the path your PLA follows is causing too much friction.
No I don't think so, but poor extrusion consistency could be why my print quality goes down when I go under 0.60 layer height or slow speeds down below 20mm/s. Both of these changes would theorectically decrease extrusion pressure and cause problems with poor extrusion.
Here is the PLA I use: https://www.amazon.com/gp/product/B00J0ECR5I/ref=oh_aui_detailpage_o03_s02?ie=UTF8&psc=1
One possible solution to poor extrusion is an upgrade to the extrusion gear. This is one of the upgrades I'm hoping to try in the future: https://www.amazon.com/Signswise-Extruder-Driver-Makerbot-Printer/dp/B00ZZRI0DC/ref=as_at?imprToken=aQzkLClLVwaOhO32jAnr3g&slotNum=0&SubscriptionId=AKIAJSOXNA2EGTA44JQA&tag=letsprint3d-20&linkCode=xm2&camp=2025&creative=165953&creativeASIN=B00ZZRI0DC
Another option for making extrusion more consistent and smooth is to increase temperature.
I have the same printer. Same problem. This solved it:
https://www.amazon.com/Signswise-Extruder-Driver-Makerbot-Printer/dp/B00ZZRI0DC/
This site also helped: https://www.printer3d.one/en/wanhao-duplicator-6-monoprice-maker-ultimate-tips-improvements/
These guys: https://www.amazon.com/gp/product/B00ZZRI0DC/ref=oh_aui_detailpage_o01_s05?ie=UTF8&psc=1
Print settings:
Printer: Wanhao Duplicator i3 Plus - Powerspec rebrand
Filament: Hatchbox PLA
Printing Temperature: 205 C
Layer Height: .2 mm
Nozzle Diameter: .4 mm
Other Modifications: Microswiss All Metal Hot End w/Hardened Steel Nozzle, Microswiss CNC extruder lever.
Trying to fix these little blobs that show up regularly in my prints. If I'm printing something with a little more curvature, they not as visible, but they show up regularly (i.e. with the same frequency related to the extrusion) along straight lines.
They're not due to retraction (like simplify3d is trying to tell me ) as that was disabled, there's no retraction in the object anyway, and these blobs occur during constant extrusion.
My initial thought was overextrusion, but I can bump my esteps from 94 steps/mm down to 60 steps/mm and still get them; anything lower than that and the (rather massive) underextrusion makes it hard to tell if the bumps are still there or not.
Next idea was a problem with my extruder gear. I checked it for any visible blemishes, and didn't notice any, and I swapped the gear (to this just to be on the safe side); no dice.
They seem to be less noticeable/disappear at a smaller layer height.
Any ideas?
Gears
Thats not the problem for me. It seems like there is something wrong with my printer retracting so much that it gets past the point of the inlet piece headed into the heating element.
This one should work fine, or any made for the MK10. Bought some from China to try, waiting for them to arrive. Don't forget to calibre the e-step.
https://www.amazon.com/gp/aw/d/B00ZZRI0DC/ref=mp_s_a_1_1?ie=UTF8&qid=1487643503&sr=8-1&pi=AC_SX236_SY340_FMwebp_QL65&keywords=mk10+extruder+gear&dpPl=1&dpID=31pamITDHBL&ref=plSrch
https://www.amazon.com/gp/product/B00ZZRI0DC/ref=oh_aui_detailpage_o04_s00?ie=UTF8&psc=1
I bought these.
You will have to re-calibrate your extrude steps. but it made a world of difference with my prints.
Actually I think I did. A new extruder stepper coupled with a new extruder gear (/u/speeddemon974 recommended) seems to have fixed the problems. I used these gears: https://smile.amazon.com/gp/product/B00ZZRI0DC/ref=oh_aui_search_detailpage?ie=UTF8&psc=1
Pretty new to 3d printing but really interested. I basically just want to print stuff that people post and probably dabble in designing my own stuff. I am a technical guy, but I know that the designing of the models is pretty tough. I have sifted through the comments and saw two printers that stood out to me within the range I was thinking of. The CR-10 and the Prusa i3. I don't know which version is good for the CR-10 and I'm looking in the $400 range, but could go up to $800 if you guys think my value would be best there. Here are other printers I was looking at and not sure how everyone feels about those. If anyone can give me some feedback about them it'll help immensely in my decision.
https://www.amazon.com/dp/B00I8NM6JO/_encoding=UTF8?coliid=I3MX1XJ2F9XGZ7&colid=30UBVRH3KC9LH
https://www.amazon.com/dp/B07421SR9J/_encoding=UTF8?coliid=I3SEAHNKKLM0QY&colid=30UBVRH3KC9LH
https://www.amazon.com/dp/B016R9E7J2/_encoding=UTF8?coliid=I205Z5A0OGO6ZD&colid=30UBVRH3KC9LH
Right now I'm looking at possibly getting a 3D printer, and these are the 2 I'm looking at.
Anycubic Upgraded Full Metal I3 Mega 3D PRINTER with Ultra Base Heated and 3.5" Touch Screen
And
FlashForge Finder 3D Printers with Cloud, Wi-Fi, USB cable and Flash drive connectivity
Which of these two is best?
​
Well this Millennium falcon is $800 wheras you could get a small 3D printer for $300 so assuming you print 7000. So if you print more than 2700 bricks it's already breaking even.
I've been thinking of buying my first 3D printer, and found the [FlashForge Finder] (https://www.amazon.com/FlashForge-3D-Printers-New-Model/dp/B016R9E7J2/ref=cm_cr_arp_d_product_top?ie=UTF8). Do you think it is a good first buy?
I've got a 3D Printer
https://www.amazon.com/FlashForge-3D-Printers-New-Model/dp/B016R9E7J2/ref=sr_1_1?ie=UTF8&qid=1502825957&sr=8-1&keywords=flashforge+finder
And it has free two day shipping for prime members ;)
[I think it might be more than 330 euros I don’t know the conversion](FlashForge 3D Printers, New Model: Finder https://www.amazon.com/dp/B016R9E7J2/ref=cm_sw_r_cp_api_i_1li.AbYGZ918M)
210-215 so far. The printer auto heated to 215, then I tried at 210 since that's what the Hatchbox directions said. Is this the hotend? I actually already purchased this but didn't install it yet. So I should purchase this as well? Thanks so much for the help!
I used the replacement PTFE as well and it didn't work. I then tried cutting my own and still couldn't get it quite right. here's everything you need for the all metal replacement. It's incredibly painless to switch over and my prints are extremely consistent. I will say though that I know people have had troubles with the microswiss occasionally, so it's not a miracle worker.
I am using the Micro Swiss mk10... https://www.amazon.com/Hotend-Nozzle-WANHAO-FlashForge-Builder/dp/B01C3HEQZC
Looks like you have a clog in your nozzle. Happened to me recently and i had to end up swapping the whole thing out.
Do your self a favor and grab one of these: http://www.amazon.com/Hotend-Nozzle-WANHAO-FlashForge-Builder/dp/B01C3HEQZC/
Its an all-metal hot end upgrade that is all sorts of better than what came stock on your printer and really easy to install. It will also fix the issue you're having right now.
Otherwise you need to figure out a way to get what ever is clogging your print head and causing you to under extrude out.
https://www.amazon.com/Hotend-Nozzle-WANHAO-FlashForge-Builder/dp/B01C3HEQZC
Edit: AS much of a clone the QIDI is, I personally can't guarantee it'll be compatible.
Got two of them.
The $50 version includes a replacement for the cooling block. I got the $38 version and reused the original cooling block, and it works fine. Here's a link to the cheaper one: https://www.amazon.com/dp/B01C3HEQZC
The OEM in mine was a shroud of metal with a plastic feed tube. The material of that tube melts slightly below ABS temps (230C).
Original
New
I did this one
I am already running this but have not yet recieved this
EDIT: I just saw the Microswiss extruder plate. I have not purchased that. If you have it, do you recommend it?
I bought the Maker Select V2 a few weeks ago, so I'll give you a dump of what I've bought so far:
MOSFET - You'll also need some 14 gauge wire, spade connectors, and something (like velcro) to mount it inside the case.
PEI Sheet - After going through tape/hairspray/glue this is what you'll end up wishing you started with. I bought some standard window glass from a big box store and had them cut it to size. I used the thermal pads at first, but I prefer just clipping it on. This way I can have 4 different glass beds to swap among.
Raspberry Pi 3 - OctoPrint is so much nicer than transferring the sd card back and forth.
Fan - DiiCooler or CiiCooler or a few others you can print out that are compatible with this fan (I think, I haven't finished printing them yet).
Y carriage plate - Not sure what the difference between this and yours is - I haven't installed mine yet).
MicroSwiss
Also ordered a couple rolls of Inand PLA from MicroCenter online.
Did you print using the generic filament they give you? I also just purchased this printer and printed the same thing but I used Hatchbox filament and it printed perfect. I wish I had a better answer but I'm also new to printing. If you haven't ordered one of these yet https://www.amazon.com/gp/product/B01C3HEQZC/ref=oh_aui_detailpage_o04_s00?ie=UTF8&psc=1 order it right meow well worth the $$ and a glass bed will make your print bottoms butter smooth https://www.amazon.com/gp/product/B00QQ5Q3BI/ref=oh_aui_detailpage_o02_s00?ie=UTF8&psc=1
Had to get spare aluminum strip, and aluminum blocks from FFCP directly.
my glass bed from amazon https://www.amazon.com/gp/product/B00NY8F172/ref=oh_aui_search_detailpage?ie=UTF8&psc=1
thermocouples from amazon as well https://www.amazon.com/gp/product/B00QKQ8G0E/ref=oh_aui_search_detailpage?ie=UTF8&psc=1 note they are 4mm and 24volt, thats unique to flashforge, my model at least.
and heating elements from amazon as well https://www.amazon.com/gp/product/B00SUYVLYC/ref=oh_aui_search_detailpage?ie=UTF8&psc=1 again note the 24v specialty, apparently flashforge is one of the few that uses that, everyone else is on 12v or something?
and lastly but most importantly, the all metal hot end. https://www.amazon.com/gp/product/B01C3HEQZC/ref=oh_aui_search_detailpage?ie=UTF8&psc=1 dual printing sucks, i just run 1 nozzle.
Which one did you buy this one?
https://www.amazon.com/gp/aw/d/B01C3HEQZC/ref=mp_s_a_1_4?ie=UTF8&qid=1526789946&sr=8-4&pi=AC_SX236_SY340_FMwebp_QL65&keywords=micro+swiss+mk10+all+metal+hotend+kit&dpPl=1&dpID=31PL9jMit-L&ref=plSrch
Yes I would say the heated bed is a necessity if you want to print ABS the stock bed only reaches 45-50c and takes along time to heatup , the bed I bought is from folgertech it's the 12v silicone heated bed 300x300 and yes you could do a separate PSU as well I just didn't need to and the mosfet I bought is the trigorilla mosfet on Amazon, I would recommend that mosfet over any other as I bought a DCDC SSR and it didn't work, i then bought a BIQU mosfet on Amazon and it started smoking so I returned it but the trigorilla mosfet has had no issues so far, to add to my heated im going to add some cork to insulate it to hold the heat better.. hope this helps
https://www.amazon.com/dp/B01HCVJ3K2/ref=cm_sw_r_cp_ep_dp_PI.Cyb7TB37GQ
This is the board I'm looking doing. I like it because of the heat sink.
I know there is that is half the price, but the heat sink I think is better.
I went with this Mosfet for my Maker Select and am very pleased with it:
ANYCUBIC 3D Printer Heating Controller MKS MOSFET for Heatbed Extruder MOS Module https://www.amazon.com/dp/B01HCVJ3K2/ref=cm_sw_r_cp_apap_5g3yWwXefECUF
It used to be branded TriGorilla. The thing is a beast.
That's a very good point. I'm confident in my soldering skills, I neglected that others may not be. I have seen a few FET's out in the wild. I'm not sure if they are all created equally.
I'm aware of the reprap one:
http://www.reprap.me/power-expander.html
and the Amazon Trigorilla one:
https://www.amazon.com/TriGorilla-Printer-Heating-Controller-Extruder/dp/B01HCVJ3K2/ref=sr_1_1?ie=UTF8&qid=1482884825&sr=8-1&keywords=3d+printer+mosfet
Can anyone chime in on the best Mosfet solution for those that don't have the skills or want to possibly void their warranty?
Yeah, a second external mosfet. One of these: https://www.amazon.com/TriGorilla-Printer-Heating-Controller-Extruder/dp/B01HCVJ3K2/ref=sr_1_19?ie=UTF8&qid=1526154992&sr=8-19&keywords=mosfet The MK2/S has had a history of having arching and melting in the plug they use to hook the heat bed to the RAMBO. That's why the MK3 uses screw terminals so its less necessary. They're much safer and more robust. The PSU has a spare empty 12V +/- terminal. So I desoldered the heatbed end. Ran those leads to the on/off signal input of the external mosfet. The RAMBO bed output now becomes a lower amperage enable/disable signal. Then I ran new power leads from the PSU to the power in on the mosfet then power out to the bed, soldering those new leads onto the bed. Printed a small enclosure and use some self adhesive velcro to stick it to my rambo case. Aint pretty, but the risk of a meltdown is greatly reduced. Probably overkill but better safe than sorry.
So if anyone ever ends up in a situation like mine, I'd like to leave a note here. I purchased an aftermarket mosfet board (as long as it supports 5v switching you'll be fine). I soldered into the bypass pad on the main board, ran this to my + input on the mosfet and ran a jumper wire to the - from the power supply. Then I wired up my power supply and the bed, and the bed is heating properly. I bought a super beefy mosfet with a heatsink which is probably overkill, but it's working, so I can't complain.
Now I just have to figure out how to mount this thing in the box...
also look into a the mosfet upgrade. the a8 is notorious for burning the connectors. https://www.amazon.com/gp/product/B01HCVJ3K2/ref=oh_aui_detailpage_o01_s00?ie=UTF8&psc=1
This is the one i ordered for mine
I've tried clips with glass. The problem is your printhead and/or cooling fan will hit the clips unless you're really careful. I recommend the silicone thermal pads.
http://3dprinterwiki.info/wiki/wanhao-duplicator-i3/duplicator-i3-basic-mods/adding-a-glass-bed/
I've also tried hairspray on glass, and gluestick on glass, and painter's tape on glass. To hell with all of those, it's always either not sticky enough, or too sticky. Get yourself a sheet of PEI to put on your glass. It's soooooo much better than anything else. Perfect adhesion while printing, then your part just pops off easily when it's done.
Thermal glass $12: https://www.amazon.com/Signstek-Printer-Heated-Tempered-Borosilicate/dp/B00QQ5Q3BI
PEI + adhesive $17: https://www.amazon.com/Gizmo-Dorks-Printing-Surface-Adhesive/dp/B01KGDTPQK
Setup took maybe 20 minutes or so total. Assembling takes about 10, then about another 10 to get the bed leveled. Assembly is literally just 6 bolts you screw in. The bed leveling is a bit of a pain but not difficult. Directions say to use a piece of paper during leveling, but I found it more accurate to use a feeler gauge instead if you have one handy, if not the paper will work.
I tried the painters tape and had some success but still kept detaching from the base about 1/2 the time. I did not try glue or hairspray. While researching lots of people mentioned the PEI sheet so I figured I'd gamble on it. I have printed 7 or 8 things with it and only had 1 that didn't stick and that was probably my fault because I did not remember to wipe it down with rubbing alcohol. This is the one I got: https://www.amazon.com/Gizmo-Dorks-Printing-Surface-Adhesive/dp/B01KGDTPQK/ref=sr_1_2?ie=UTF8&qid=1484765745&sr=8-2&keywords=pei
My suggestion is try it with the stock surface and/or the painters tape and see what kind of luck you have. If you have issues with sticking, then buy the PEI sheet.
https://www.amazon.com/Gizmo-Dorks-Printing-Surface-Adhesive/dp/B01KGDTPQK/ref=sr_1_1?ie=UTF8&qid=1484800825&sr=8-1&keywords=pei+sheet
was it this material?
He means like this, adhered to glass, or directly to the heater.
I'd personally recommend glass with hairspray. Best print bed I've gotten yet!
Gizmo Dorks PEI Sheet, 8" x 8" 3D Printing Build Surface with 3M 468MP Adhesive Tape https://www.amazon.com/dp/B01KGDTPQK/ref=cm_sw_r_cp_apa_WB3qybRCVC0HD
To increase your chances, make sure you use some quality PLA. The difference is in the chemistry and the quality control. I'm getting some great results with MatterHackers PLA. Pro grade, I think it's called.
Oh haha sorry.[ Gizmo dorks] (https://www.amazon.com/gp/aw/d/B01KGDTPQK/ref=sxts1?ie=UTF8&qid=1483410646&sr=1&pi=AC_SX236_SY340_FMwebp_QL65)
https://www.amazon.com/gp/aw/d/B01KGDTPQK/
Look into purchasing a PEI (Polythermide) sheet to put onto your printing surface. I did so and it works incredible!
Just make sure that you take your time while applying it to reduce the amount of air bubbles. I picked up this kit from amazon: https://www.amazon.com/gp/product/B01KGDTPQK/ref=oh_aui_detailpage_o04_s00?ie=UTF8&psc=1
Edit: It takes virtually no maintenance, and everything sticks to it incredibly well. I also forgot to mention that I have only tested it with ABS, but I hear PLA works well too. I have also heard that PETG sticks better than ABS or PLA.
Edit 2: I also should mention that I was able to stick it directly to the aluminum bed. Make sure to clean it really well if you do plan on taking this route.
I have a set of 7 picked out on amazon and my free trial expires in 3 days I'm gonna order them soon, just waiting on a link to something else I am supposed to order for my dad.
Here are the ones that I have chosen what do you think of them? https://www.amazon.com/dp/B06XPRCMJS/ref=cm_sw_r_cp_apa_i_5IjoDb99E75FN
Thanks for the info. Sadly yes [I bought the correct ones](http://www.3D.com/ Printer Solid Polymer LM8UU Bearing 8mm shaft - Igus Drylin RJ4JP-01-08 for Anet A8 Prusa i3 3D Printer RepRap https://www.amazon.com/dp/B06XPRCMJS/ref=cm_sw_r_cp_apa_OPhWBbA71R3DG)
Thanks for the info on the hotend. I bought a gcr model and had clogging issues.
I am also interested in changing the bearings on the y axis and the x axis. Are these good bearings to make the printer quieter and maybe more stable?
https://www.amazon.com/Printer-Solid-Polymer-LM8UU-Bearing/dp/B06XPRCMJS/ref=cm_cr_arp_d_product_top?ie=UTF8
these are the bushings that most people talk about for this printer. Igus doesn't make sleeved bushings that can fit as a drop-in replacement for the LM8UU bearings. IIRC last time I did the research, I found they do sell sleeved bushings that will fit in the Prusa (as in they have the correct outer diameter and length), but not with the correct inner diameter needed for the stock smooth rods. So if you went that route you'd need to not only get new bushings across the board, but you'd also need new rods everywhere too, and that pushed the cost up to about $75 when I last looked.
Honestly for the price I'm not really upset that I tried them, but I absolutely learned to just stick with stock unless it's giving me major issues.
Getting the y axis to move smoothly was a challenge, as the stock u-bolts would squeeze it vertically and leave wiggle room horizontally, which would allow the plate to cock sideways a bit and bind. With some finagling I was able to get it working, but there was a lot more resistance than I would have liked, it was consistent resistance across the whole range of movement, but it was still more than I wanted. The X axis I never got them fully working, as ANY force parallel to the smooth rods (but slightly offset in one direction) would cause binding by cocking the x carriage one way or another.
But don't let me be all doom and gloom, if someone is able to get them working and can talk about their experience, I'd love to hear! And I'm sure there are people out there who value the silence they provide over some unreliability or increased maintenance/tuning required, but I was overall unhappy with them and I won't try it again.
remember to use your og blocks can be removed with c-clip pliers $9.94 https://www.amazon.com/gp/product/B06XPRCMJS/ref=ppx_yo_dt_b_search_asin_title?ie=UTF8&psc=1 6,00https://www.amazon.com/gp/product/B07GLQMMLJ/ref=ppx_yo_dt_b_search_asin_title?ie=UTF8&psc=1
I bought some of these.
I haven't installed them yet, though.
I plan to do that when I do my Mk2.5 upgrade.
https://smile.amazon.com/gp/product/B06XPRCMJS/ref=oh_aui_search_detailpage?ie=UTF8&psc=1
The linear bearings that come with the Maker Select V2 are crappy ones which made grinding sounds every so often. I wonder if the same on the Select Plus.
I ended up swapping the stock ones for these:
https://www.amazon.com/gp/product/B06XPRCMJS/ref=oh_aui_detailpage_o02_s01?ie=UTF8&psc=1
No more grinding sound.
If it is the same issue on yours, you may want to swap out the bearings.
Yea of course, i have the [MP Select Mini v2](Monoprice Select Mini 3D Printer V2 - Black With Heated (120 x 120 x 120 mm) Build Plate, Fully Assembled + Free Sample PLA Filament And MicroSD Card Preloaded With Printable 3D Models https://www.amazon.com/dp/B073ZLSMFT/ref=cm_sw_r_cp_api_3AG7BbCWZBJJ0)
[This](Comgrow Creality Ender 3 3D Printer Aluminum DIY with Resume Print 220x220x250mm https://www.amazon.com/dp/B07BR3F9N6/ref=cm_sw_r_cp_api_6CG7BbW9QA8GM) got amazing reviews when i was looking but it was too big for my apartment
If you want a beginning printer go with Monoprice select mini v2. It has a small printing bed but it has good quality and is easy to set up. I got mine from https://www.amazon.com/Monoprice-Select-Mini-Printer-Assembled/dp/B073ZLSMFT/ref=mp_s_a_1_1_sspa?keywords=monoprice+select+mini+3d+printer+v2&qid=1558146876&s=gateway&sprefix=monoprice+selec&sr=8-1-spons&psc=1 for $190 or you could get one off the official website.
[Monoprice Select Mini 3D Printer V2 - Black with Heated (120 x 120 x 120 mm) Build Plate, Fully Assembled + Free Sample PLA Filament and MicroSD Card Preloaded with Printable 3D Models] (https://www.amazon.com/dp/B073ZLSMFT/ref=cm_sw_r_cp_apa_3DsOBb6GV9BJV)
This one?
Is the Monoprice select mini a good printer for a beginner? Specifically this one:
https://www.amazon.ca/dp/B073ZLSMFT/ref=cm_sw_r_cp_apa_4YQTAbRCYEVB5
Have a look at the MP Select Mini
HATCHBOX 1.75mm White PLA 3D Printer Filament - 1kg Spool (2.2 lbs) - Dimensional Accuracy +/- 0.05mm https://www.amazon.com/dp/B00J0GMMP6/ref=cm_sw_r_cp_apa_i_EBHPCb8CJ9QV2
Its only $20 and you could crank out a lot of minis at high quality. I'm not familiar with other printers other then my monoprice mini v2. So i can't attest to the quality/price. If you're interested in just minis for now then i would honestly get: Monoprice Select Mini 3D Printer V2 - Black with Heated (120 x 120 x 120 mm) Build Plate, Fully Assembled + Free Sample PLA Filament and MicroSD Card Preloaded with Printable 3D Models https://www.amazon.com/dp/B073ZLSMFT/ref=cm_sw_r_cp_apa_i_nFHPCb6W5JNDZ
Its print ready right out of the box and user friendly. Lots of mods to do and lots of youtube videos to guide you along the way, a great beginner's 3d printer. Plus it doesn't break the bank.
Monoprice Select Mini 3D Printer with Heated Build Plate, Includes Micro SD Card and Sample PLA Filament - 121711 - Black
https://www.amazon.ca/gp/product/B073ZLSMFT/ref=as_li_ss_tl?ie=UTF8&linkCode=ll1&tag=thebigaawes06-20&linkId=ed9c49199f5a2e54a63b814462488ec7
https://images-na.ssl-images-amazon.com/images/I/61Kd3AteCjL._SL1200_.jpg
info available here - https://www.amazon.com/gp/product/B073ZLSMFT/ref=ppx_yo_dt_b_asin_title_o03_s00?ie=UTF8&psc=1
I've been using a sheet of PEI that works like a charm. The one i got was from amazon, something like this would work https://www.amazon.com/Gizmo-Dorks-Printer-Surface-Adhesive/dp/B074XLD5QH/ref=pd_sim_328_3?_encoding=UTF8&psc=1&refRID=PPGSHY9T4C0YC14V4FVS
It even comes with the adhesive.
It's multiples of 0.04, but it won't have a huge impact.
Regarding hair spray/glue stick etc... a PEI sheet will save you a lot of effort. You put it on top of the glass and then print directly on it, no need to do anything. Edit: and yes, as /u/PuterPro says, get your bed flat.
Mine worked great without having to scuff it at all. I just heat the bed to 60°, when the print is done and the bed cools down the print pops right off. Here is the link to the one I bought.
Gizmo Dorks PEI Sheet 12" x 12" (305mm x 305mm) 1mm Thick 3D Printer Build Surface with 3M 468MP Adhesive, Made in The USA https://www.amazon.com/dp/B074XLD5QH/ref=cm_sw_r_cp_apa_i_PVGzCb0HBTC1P
Printed using a FolgerTech FT-5 R2, with Gizmo Dorks PEI build surface. Filament is just basic hatchbox PLA.
get one of these, night and day difference: https://www.amazon.com/Gizmo-Dorks-Printer-Surface-Adhesive/dp/B074XLD5QH
The pei sheet I got from amazon (https://smile.amazon.com/gp/aw/d/B074XLD5QH/ref=ppx_yo_mob_b_track_package_o0_img?ie=UTF8&psc=1) didn’t have the adhesive pre-applied, it was just smooth on both sides with a thin film over it for protection, and a 3m double sided tape was included in the package. If yours has adhesive already on it, I’m not sure about the temp limit on the film, but suspect you’re right that it isn’t very high.
I had been thinking about just clipping it on before it arrived, but it was thin and flexible enough that I’m pretty sure it would get pulled up slightly by larger prints. I had considered just buying a 1cm thick sheet from McMaster Carr or somewhere rather than one being marketed for 3D printing, I think you could definitely clip that since it would be rigid, but I was concerned if it didn’t show up perfectly flat I wouldn’t be able to do anything about it.
I watched a few videos before putting it on, and it was actually easier than I expected. Even though it has some flex to it, it’s ridged enough that there wasn’t really any issues with bubbles under the pei sheet itself. The adhesive bubbled a little when I put it on the glass, but it wasn’t very hard to either work them out, or in a few cases just poke them with an xacto. The hardest part was actually removing the plastic from the top of the adhesive without peeling the whole thing off the glass, but once done the pei went on nicely. If you’ve seen them mounted before, it’s normal for it to look kind of mottled with some visible pockets of air, but still be flat with no significant bubbles. I checked for flatness and it was good. I will take a picture later and update this so you can see what I mean.
I’m jealous of your 2 backups, I have been afraid to print anything but PLA and be unable to get it off. I ended up with the pei because I kept destroying various stick on surfaces by squishing the first layer of PETG too much and ending up with it welded on.
Kapton tape works for ABS @110c, PLA@50-60c, and PETG at 80c. Cooling the bed releases the part mostly.
Edit: Hardest part of Kapton is getting it on to the glass smoothly. Use the Windex and credit card method. I'm sure there are videos out there. Everyone used to use Kapton. Not sure why others have forgotten it.
Get these: https://www.amazon.com/dp/B07779TP4S/ref=cm_sw_r_cp_apa_i_3BvjDb847519E
Print is looking good, but you should pick up some socks for your hot end.
The problem is that when pushing a lot of plastic it drains 2 X jules per second of heat. So even going at full force the heater can't keep up and the hot end will start to cool.
So if say you're filament cant work below 180 setting the hot end at 230 instead of say 190 guves it more room to drop more in temp b4 it gets to cold to function
when you're heater is trying desperately to keep the hot end above 180. These things help stop half the heat being made from being lost to the air. More of it goes into the filament. Which means less chance of hitting that dreaded 180
Acceleration control handles the same thing but with regards to speed changes instead of direction changes
Without some control at these speeds you will find odd artifacts like what you've described(curling and all) and eventually will likely damage your x or y axis belt
+1 for the silicone sock! I am now running those and they are great! Here is what I ordered https://www.amazon.com/dp/B07779TP4S I think you will be okay to heat up your hotend, the thermistor wires are definitely not going anywhere.
Would this work? https://smile.amazon.com/Micro-Hotend-Creality-Printers-TronXY/dp/B0789V2D7C
First off, there is no perfect printer. There are only tradeoffs and choices. But between the gMax and the S5, we would choose the CR-10 S5. Why? Here are some of my thoughts about each...
gMax 1.5 XT+
Creatily CR-10 S5
The Bottom Line
That's our experience in a nutshell.
Micro Swiss All Metal Hotend Kit for Creality CR-10 / CR10 / CR10S / Ender 2 / Ender 3 Ender 5 Printers .4mm https://www.amazon.com/dp/B0789V2D7C/ref=cm_sw_r_other_apa_i_J-AFDb6CRKAMW
Is this hot end considered a good upgrade. Right now I'm having clogging, a lot of stringing. And I'm levelled well and all my settings are pre-loaded with this auto-leveling print. I'm lost, i feel like things aren't flowing well.
A genuine microswiss, sure https://www.amazon.com/Micro-Hotend-Creality-Printers-TronXY/dp/B0789V2D7C/ref=pd_cp_328_1/135-5486205-8497053?_encoding=UTF8&pd_rd_i=B0789V2D7C&pd_rd_r=e8b874f2-aefe-4408-a022-6a0c0272998d&pd_rd_w=RcLct&pd_rd_wg=Ravoy&pf_rd_p=0e5324e1-c848-4872-bbd5-5be6baedf80e&pf_rd_r=A9ZWV06R064NQD1A9VDT&psc=1&refRID=A9ZWV06R064NQD1A9VDT
But when it comes to clones, trianglelab is the only company that makes them as good or very close to the real thing.
I"m going to say no. That is a stock Ender 3 hotend. The PTFE bowden tube will break down at or before 240C and release potentially toxic fumes. You want a hot end that does not allow the bowden tube to get too close to the melt zone & heating element. You can replace the standard heatbreak with something that keeps the PTFE away from the heat zone like this one (not saying it works with the Ender 3, I haven't tried it but look at the drawing and you see the bowden tube is kept a fair distance from the nozzle end of the heatbreak) https://www.amazon.com/dp/B077GRX256/?coliid=IOHVUCVLQ020R&colid=130JFFKF5YAUO&psc=0&ref_=lv_ov_lig_dp_it
​
Microswiss hot end ( https://www.amazon.com/Micro-Hotend-Creality-Printers-TronXY/dp/B0789V2D7C/ref=sr_1_1_sspa?keywords=microswiss+ender+3&qid=1555949725&s=industrial&sr=1-1-spons&psc=1 ) seems to be the gold standard for all metal hot ends.
I never had this happen, but I had a lot of clogging etc, until I switched to a Micro Swiss all metal hotend. It, plus printing out a fang cooling duct made things so much better. Search Thingiverse for "fang" and you will see a bazillion different flavors.
Thanks - I'll check that one out. Here's the hot end I got:
https://www.amazon.com/gp/product/B0789V2D7C/ref=oh_aui_detailpage_o04_s00?ie=UTF8&psc=1
That's possible if you're overconstraining the bed and warping it yourself. That's why people recommend 3 point leveling nowadays.
Instead of the bed, look to see if the y-carraige is bent. That's the thing under the bed that the bed rides on. https://www.amazon.com/Gulfcoast-Robotics-Carriage-Duplicatior-Printers/dp/B07B251KBS you can get replacments of those. And if that's bent, you'll run into issues too.
Thanks! I got my carriage plate from Amazon, this one specifically: https://www.amazon.com/gp/product/B07B251KBS
The buildtak that came on it was awesome for about 40 days or so of print time. No issues at all, everything stuck real nice but popped off easily with a woodworking chisel. Eventually it started to wear smooth, and the plate it's attached to started to warp pretty bad in the middle. That's when I switched to glass + gluestick. btw I put my glass right on top of the old buildtak rather than try to remove it because it was really stuck on there.
As for the carriage plate, things were good for around 70 days, but eventually what happened was the original plate bent up in the corners so bad that I wasn't able to keep the bed level for more than a single print, and then suddenly I couldn't level anything at all. Since installing the carriage plate, I haven't leveled it again yet.
I'm going to suck it up and print that dii cooler too lol. Might have a friend do my first one since he has awesome cooling already.
I have a maker select v2 and recently switched to 3 point leveling with one of these. Highly recommended.
This gives an excellent overview of the benefits of 3 point leveling.
I was having the same problems as you prior to the upgrade. I couldn't get even leveling across the bed which led to my printer collecting dust for a few months.
So far I've made the following Mods:
Z-Axis Stabilizer
https://www.thingiverse.com/thing:1549403
Cii Cooler
https://www.thingiverse.com/thing:2004629
Y-Carriage upgrade
https://www.amazon.com/gp/product/B07B251KBS/ref=oh_aui_detailpage_o03_s00?ie=UTF8&psc=1
Glass Bed
https://www.amazon.com/gp/product/B07B2YLWF9/ref=oh_aui_detailpage_o05_s00?ie=UTF8&psc=1
Y and X Belt Tensioners
https://www.thingiverse.com/thing:1784375
Adjustable Z stop
https://www.thingiverse.com/thing:2916757
Hotend replacement:
I replaced the stock hotend/PTFE tube setup with an all-metal Micro Swiss hotend ($50):Amazon link to the Micro Swiss all-metal hotend kit: https://amazon.com/gp/product/B01E1HANLS/ref=ppx_yo_dt_b_search_asin_title?ie=UTF8&psc=1
Bed leveling:
Frame Stabilization:
I printed the parts, and purchased the hardware at Home Depot for the Z-brace mod, which stabilized the printer frame:Thingiverse link for Z-brace mod for I3 Plus: https://www.thingiverse.com/thing:1653631(note the original Thingiverse link in comments, which is required for the other Z-brace parts: https://www.thingiverse.com/thing:921948)
Cooling:
I printed a Dii Cooler in PETG and replaced the stock cooler with one of those 24V "squirrel cage" fans, which provided much better cooling for all sides of my prints. Before that it really only cooled the front of prints, leaving the sides and especially the rear of prints looking pretty bad.Thingiverse link for Dii Cooler for i3 Plus: https://www.thingiverse.com/thing:1025471
Couple of thoughts -
Also, it will cost you some money but replacing the Y carriage and adding a good glass plate help too. I'll edit this in a sec with the links.
Edit!
Glass bed: https://www.amazon.com/gp/product/B07B2YLWF9
Y-carriage: https://www.amazon.com/gp/product/B07B251KBS
I originally was using thermal pads between the glass and the print surface. Eventually I found I had better results by skipping the pads, peeling off the print surface, and putting the glass directly on the metal bed with small binder clips on the left and right edges. I use Elmer's purple glue sticks for adhesion and rough it up with a sanding block between prints. Make sure your Y axis rods are level, as well.
Good luck!
​
Anyone got any others?
I put these aluminum spacers on my Ender 3 and CR-10S. They worked fine.
I already have stepper dampers and those solved any noise/vibrations I was worried about.
I should mention that I quit using glass beds, so I'm slinging around a half a kilo less mass than you might be.
I switched to this build surface directly on the aluminum plate and I'll never use glass again. Mesh-bed leveling solves the warped bed problem and prints stick like GLUE until I give them a solid tap.
I really recommend.
the Da Vinci 1.0
http://www.amazon.com/XYZprinting-Da-Vinci-1-0-Printer/dp/B00H7VEU0G/ref=sr_1_2?ie=UTF8&qid=1397587069&sr=8-2&keywords=xyz+printing
its 500.00 and it's my first 3d printer and works perfect out of the box. I have hacked mine to use other filament so I dont have to use xyz filament anymore
Hey! I got the same printer and was using ABS for my first couple prints. Couple things--First the built in items on the SD card are sliced for PLA printing, so you need to up the temps on the extruder and bed--I had success just upping it to 240/80. This got it to stick, but I had to get my z positioning (the thumb wheels on the corners) just right. Also I absolutely needed a raft for anything to really stick.
If you're slicing your own items in Cura, the default filament size is 2.8mm and you're probably using 1.75mm filament.
Unfortunately on any prints longer than an hour the ABS would start to curl off the bed--I chalked that up to the somewhat breezy room I have my printer set up in currently.
tl;dr Make sure your bed/z is leveled precisely so that a piece of standard printer paper can slide underneath the nozzle in each corner with resistance. Try upping your temps and checking your slicer settings as well.
/u/Redditull mentioned a glass bed. I picked one up on amazon, this fits the bed pretty nicely (just lays between the corner screws)--you do need to raise your z-stop, there's a metal lever contraption screwed into one of the sides of your printer's frame that you need to unscrew and raise. I also attached a PEI sheet to this and I used thermal pads to attach all this to the bed. This all improves adhesion greatly, I've mostly been using PLA after the difficulties I had but I would imagine ABS would stick just fine as well.
Borosilicate Glass
PEI Sheet
Thermal Sheet
ADIMLab Gantry 3D Printer 90% Assembled 310X310X410 3D Printing Size with 24V15A Power Heat Bed Glass Control Box Filament Detector, Nozzle Light, Modifiable to Upgrade to Auto Leveling https://www.amazon.com/dp/B07CPQQ57D/ref=cm_sw_r_cp_apa_i_TzpHDbYJ9N93K
I use the ADIMLAB gantry i3 pro. It is a workhorse and when tuned right can go for a month or more without needing maintenance. It is 370 usd and is HUGE. I use it for cosplay and am currently making a suit of iron man armor.
It is a great first time printer and I couldn’t recommend it more.
The customer support is amazing and couldn’t be better.
https://www.amazon.com/dp/B07CPQQ57D/ref=cm_sw_r_cp_api_i_qlS1DbCFFAEB7
Some other things I'd recommend
TL-Smoothers https://smile.amazon.com/gp/product/B071WG3SZQ/ref=ppx_yo_dt_b_asin_title_o01_s01?ie=UTF8&psc=1
I know you already upgraded the extruder assembly but this duel geared version is nice: https://smile.amazon.com/gp/product/B07SY745CF/ref=ppx_yo_dt_b_asin_title_o01_s01?ie=UTF8&psc=1
PEI Bed surface (has to date been the best upgrade): https://smile.amazon.com/gp/product/B07GSJSDWR/ref=ppx_yo_dt_b_asin_title_o09_s00?ie=UTF8&psc=1
and if you don't have a glass: https://smile.amazon.com/Creality-Ender-Glass-Upgraded-235x235x4mm/dp/B07RD6D2ZQ/ref=sr_1_5?keywords=creality+glass&qid=1571456745&sr=8-5
I'd recommend applying the pei in the smooth side of the glass that way you can flip it over to have the textured side if you want.
I would also look at this one if you want to print right out of the box http://www.amazon.com/dp/B00H7VEU0G/ref=cm_sw_r_udp_awd_7Cjutb12PTRGN
What about the Da Vinci? Version 1.0 is only 399 on amazon.
http://www.amazon.com/XYZprinting-Da-Vinci-1-0-Printer/dp/B00H7VEU0G
Duo is 649
http://www.amazon.com/gp/product/B00LMBJKEI/ref=pd_lpo_sbs_dp_ss_2?pf_rd_p=1944687682&pf_rd_s=lpo-top-stripe-1&pf_rd_t=201&pf_rd_i=B00H7VEU0G&pf_rd_m=ATVPDKIKX0DER&pf_rd_r=04Z353DM1D5393755W05
and the Aio is 799
http://www.amazon.com/XYZprinting-Vinci-All--Printer-Print/dp/B00OCG91IK/ref=sr_1_12?s=industrial&ie=UTF8&qid=1417646202&sr=1-12
I'm waiting for the next gen Aio suppose to have dual extruder plus scanner. Should be out some time beginning of next year. Only thing I don't like is the fact that the filament is proprietary but you can hack the cartridges, but it voids your warranty. Then again this is the maker world so who cares about warranty.
I always recommend the FlashForge Finder as someone's first 3D Printer. Comes fully assembled and ready to print (aside from levelling the bed). 14 x 14 x 14 cm build area, high quality prints. I use one for PLA orders for my online shop. It's also built like a brick shithouse.