(Part 3) Best automotive tools & equipment according to redditors
We found 6,302 Reddit comments discussing the best automotive tools & equipment. We ranked the 2,268 resulting products by number of redditors who mentioned them. Here are the products ranked 41-60. You can also go back to the previous section.


![BESTEK 200W Power Inverter DC 12V to 110V AC Inverter with 4.2A 4-Port USB Car Adapter [ETL Listed]](https://m.media-amazon.com/images/I/41ZGj91ZqoL.jpg)
ahh man all you guys had to do was get some powdered sanitizer and hot water and a one of those hand pumps and pump the hot water with sanitizer thorugh it. this and this
https://www.amazon.com/Car-Guy-Tools-Socket-Drive/dp/B078719VN1
This is my go-to gift for my mechanic/diy friends.
They do!! https://www.amazon.com/10mm-Socket-Ten-Pack-Multi-Type/dp/B07F7LDYJF
For OP: Amazon sells 10 packs
Here's your device, here's your app, here's your how-to.
EDIT - I wanna add: I didn't make that how-to. That's not me. However, it worked for me.
You need a kit like this.
amazon.com/dp/B0002SRF4O
Its a simple repair.
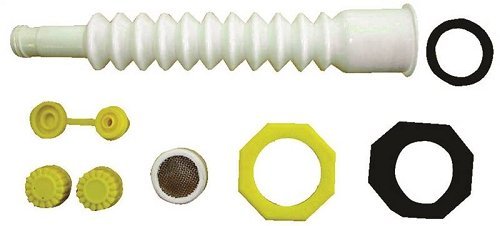
https://www.amazon.com/Replacement-Spout-Water-Update-Your/dp/B00CYNDNM8/ref=sr_1_1?ie=UTF8&qid=1524158581&sr=8-1&keywords=gas+can+nozzle
They can sell these because it should only be used for water cans ;)
I replace all those shitty spouts with this kit. It pisses me off to no end that I have to hold the MFing 5 gal can for what feels like 10 min to fill my tractor and mower.
Just be careful you don’t put the vent to low like I did. Lost about a 1/2 gallon capacity.
Replacement Spout - Water Jug Or Gas Can Spout - Update Your Old Can! https://www.amazon.com/dp/B00CYNDNM8/ref=cm_sw_r_cp_api_HTgJBbWSVWAT7
Like this?
LPT: Convert those "safety" cans to the old vented style for ~$10.
EZ-POUR Replacement Spout - Water Jug Or Gas Can Spout - Update Your Old Can https://www.amazon.com/dp/B00CYNDNM8/
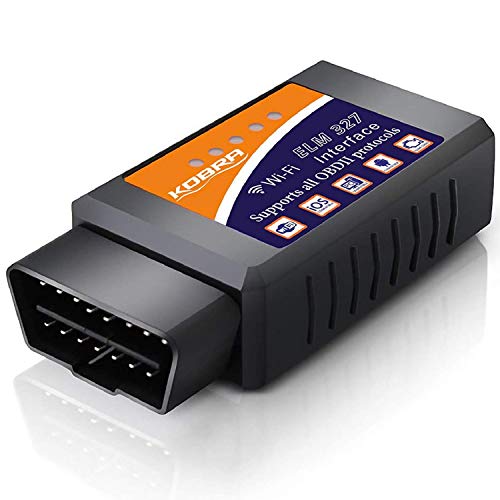
computer diagnostic system is easy these days
even in bluetooth
Hey guys as a heads up. In the lab if we make silicone we always degas the mixture before pouring. To degas just put the silicone after mixing into a closed container and pull vacuum. I think even a cheap aspirator will pull enough vacuum to work. Pull until the bubbles stop than you're good to go.
https://www.amazon.com/Dynalon-312635-Faucet-Aspirator-Vacuum/dp/B004AHL77E
https://www.amazon.com/Nalgene-6140-0010-Aspirator-Polypropylene-Threading/dp/B003OBYNBO
Both look promising. Google degassing silicone for more it's a common technique in soft litho.
Edit: For a chamber just get a plastic dessicator. They aren't that expensive : https://www.amazon.com/United-Scientific-55204-Polypropylene-Polycarbonate/dp/B00ES3GPMM
Edit2: Cus degassing silicone just looks so pretty : https://www.youtube.com/watch?v=bbSvzD8g_S0
Edit3: Decent part combo for degassing
https://www.amazon.com/Stainless-Chamber-Urethanes-Silicones-Epoxies/dp/B00KSWL29I/
https://www.amazon.com/Single-Stage-Rotary-Economy-Vacuum-Refrigerant/dp/B012CFTYX4/ref=pd_bxgy_236_img_2?ie=UTF8&refRID=1N0WKYM5MHVXTF9FVB8K
Remember keep the vacuum so that it slowly degasses you do not want it to bubble over and all into your chamber.
Unfortunately, when you order them, you get a message: "The system says they're in stock, but we can't seem to find any, so they're on backorder."
It cost me around $50-$60 I think. I used this camera and I used this OBD2 adapter. I also needed some small connectors to plug the video wire into the back of the head unit (these things).
I used this thread by /u/brbauer2 as a guide, which was very helpful.
It was kind of difficult, but mostly because I don't really have much experience with the wiring stuff so I went slow to make sure I didn't mess up any splices or anything. I also initially put the wrong wire into the back of the head unit, so I had to take it back apart and use the right wire (the thread I used shows a red wire in the back of the head unit connector, its actually the yellow wire from the video cable that you want) but that only took maybe an additional 30 minutes.
Overall, I'd say go for it if you're interested!
https://www.amazon.com/dp/B01HXGX8V6/ref=cm_sw_r_cp_api_-WiOAb41R8HDW
I think I used the Carista app
They do..
Car Guy Tools 10mm Socket Six Pack (3/8" Drive, Multi Type: 6pt, 12pt, Deep, Shallow) https://www.amazon.com/dp/B078719VN1/ref=cm_sw_r_cp_apa_i_UgOgDb1GGFMNA
https://www.amazon.com/10mm-Socket-Pack-Multi-Type/dp/B078719VN1/
At least a few
You can buy everything online, though it's easier to go to a harbor freight with a coupon if you have one. There are plenty of polishers you can buy online of course, but none are as cheap (at least with decent quality) as the harbor freight model. You can of course buy a much better polisher at your local lowes / home depot however unless you have a lot more use for it it's probably not worth it over the harbor freight one (a good polisher will cost you $200+). Everything else you can find at any auto parts store, or maybe even walmart.
Here's some links
Basic steps:
You are done! In most environments the duragloss will last 6+ months. If you keep your car protected with it, you won't need to do the cutting/polishing again (or at least, not for a while).
The trickiest part of the whole process is the compounding and polishing. Here are some helpful videos.
And that's about it! It's easier if you don't do touch ups, but I figure if I'm going to put this much work in it, might as well get them. And if you do it right (with careful application and then sanding) the touch ups look nearly flawless (most look terrible because people don't bother to sand them flush).
edit: two other tips...
If you are planning to detail for the long term, I'd suggest investing in some bulk / concentrated products rather than the consumer-grade & Ultimate Meguiar's line.
I've tried to break down the supplies I'd suggest. Of course, don't just throw out your existing supplies. Use them up and then get the concentrates / bulk.
Note: There's no need to get everything in this list. Just get what you need. There's also cheaper alternatives to several of the products, and probably cheaper sites than those in my links. Some of the products I use because I want to support the manufacturer and/or because I trust the manufacturer. Use what you like and use it often. :)
 
Dust, light bug gut, and light bird bomb removal / lube
 
Heavy bug gut and bird bomb removal / light grime removal
 
Wheels & Tires
Cleaning
Drying
Dressing
Protecting
 
Body
Rinseless wash
Two bucket wash
Drying
Protecting
 
Glass
Cleaning
Drying
Protecting
 
Engine
 
Exhaust
 
Paint Prep
 
Paint Correction
This is what we used this last year Stanley J7CS 350 Amp Battery Jump Starter with Compressor https://www.amazon.com/dp/B00RZXVQSU/ref=cm_sw_r_cp_api_0dYryb53RQN05
Jump starts your car and comes with an air compressor. My group of four was able to charge our phones and play music all weekend. Just get a power inverter ( BESTEK 200W Power Inverter DC 12V to 110V AC Inverter with 4.2A 4-Port USB Car Adapter https://www.amazon.com/dp/B00EY6RJKA/ref=cm_sw_r_cp_api_8kYryb7XBT29W ) and you can power anything with it.
https://www.amazon.com/dp/B0002SRF4O
https://www.amazon.com/Replacement-Spout-Water-Update-Your/dp/B00CYNDNM8
http://www.amazon.com/outlets-inverter-adapter-notebook-MRI3011BU/dp/B004MDXS0U/ref=sr_1_2?ie=UTF8&qid=1405470334&sr=8-2&keywords=12v+inverter+with+usb
or for even cheaper
http://www.amazon.com/inverter-adapter-outlets-charging-MRI2011GU/dp/B00EY6RJKA/ref=sr_1_8?ie=UTF8&qid=1405470334&sr=8-8&keywords=12v+inverter+with+usb
This way you're not limited to just powering your wii u, you can use it for other things (even a tv, heh!)
You’re welcome
Here ya go
Cheap, easy, and butt dyno approved:
Are you going to turn your SE into an ST? Nope. But hey, you're spending about $80. You could throw another $462 at Tom's tune (comes with an SCT X4 tuner, which is why it's so expensive). It will improve performance; whether or not that improvement is worth the money is up to you. It might also help with shudder if you have it (and if you don't yet, you will, so get ready).
I am a huge fan of these.
If you don't want to spend the money on new foam you can buy cheap camp sleeping pads from Walmart. Here's my field kit / with the walmart pads.
I was also a beginner at the beginning of the year. I went out and bought [Meguiars 105] (https://www.amazon.com/Meguiars-Mirror-Glaze-Ultra-Cut-Compound/dp/B003LMGDHI/ref=sr_1_1?ie=UTF8&qid=1496750162&sr=8-1&keywords=meguiars+105), and [Meguiars 205] (https://www.amazon.com/Meguiars-Mirror-Glaze-Finishing-Polish/dp/B003LMJP4Q/ref=pd_sim_263_1?_encoding=UTF8&pd_rd_i=B003LMJP4Q&pd_rd_r=YK6JBJ416NKY6325PPQG&pd_rd_w=WZ6u4&pd_rd_wg=LD9ed&psc=1&refRID=YK6JBJ416NKY6325PPQG), a [chicago electric DA from harbor freight] (https://www.harborfreight.com/6-in-57-Amp-Heavy-Duty-Dual-Action-Variable-Speed-Polisher-62862.html?ccdenc=eyJjb2RlIjoiODkwMjE0MTgiLCJza3UiOiI2Mjg2MiIsImlzIjoiNDkuOTkiLCJwcm9kdWN0X2lk%0D%0AIjoiMTE0NDYifQ%3D%3D%0D%0A), and ordered [orange and white hex logic pads from amazon] (https://www.amazon.com/Chemical-Guys-BUFX-102-HEX5-Hex-Logic-Medium-Heavy/dp/B0040MI9H0/ref=sr_1_1?s=automotive&ie=UTF8&qid=1496750285&sr=1-1&keywords=hex+logic+pads). This will be a good start. Get these things, should cost between 120 and 150 for all of it depending on where you buy, and that DA goes on sale quite often, looks like it's currently down to 49.99, so now would be the time to buy. I started off doing my Formula and then did my Sierra, and now have had a few other people come to me for correction and have a pretty good grasp on what I'm doing.
If that doesn't work out: These things are pefect
Buy a couple of gas cans at costco, toss their horrible spouts, replace with the above and enjoy gas can bliss!
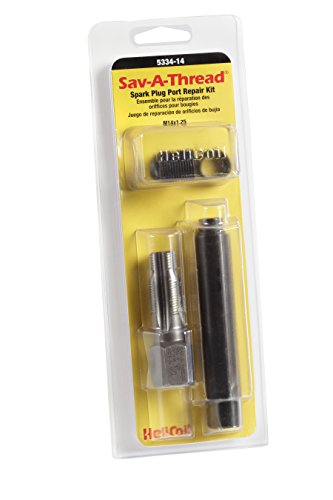
The plug hole should be repairable. They make spark plug specific heli-coil kits, with a reamer / tap that will cut a new thread for the heli-coil insert to fit into, then screw the heli-coil in and lock it in place, then put the plug into the heli-coil. Here's a link from Amazon for the kit. This kit is like what you want, but it's not the right thread, I'm still looking for the right one, which is an M10 thread.
Adobe products care more about frequency then about number of cores.
You do not need anything specific to build a PC. If you want to make it easy on yourself, get a magnetic screwdriver with a magnetic pickup tool. The long and thin pickup tool will help you retrieve screws that wander into cracks.
GreatNeck SD7C 8-in-1 Screwdriver with Magnetic Telescoping Pick-Up Tool
Dropping screws is inevitable, so avoid working over carpet. If you do drop a screw on carpet, sweep the pickup tool over the area slowly. The tip magnet will grab it off the surface. You could get a magnetic tray to reduce the chance of drops.
Titan Tools 11061 Mini Magnetic Parts Tray
While some people suggest a grounding wristband to dissipate static, I think they are a waste for PC building. Just plug in your power supply and touch it each time you come to the workplace. A powerstrip with an off switch can be used, if your power supply does not have a physical power switch on the back.
I would suggest you watch another couple PC builder videos.
How To Build a $800 Gaming PC in Late 2018
How To Build a $500 ITX Gaming PC in 2018
I would also suggest this post-POST video:
First Five things to Do with a New Computer
PCPartPicker part list / Price breakdown by merchant
Type|Item|Price
:----|:----|:----
CPU | AMD - Ryzen 5 2600 3.4 GHz 6-Core Processor | $228.00 @ Powertop
Motherboard | *ASRock - B450M PRO4 Micro ATX AM4 Motherboard | $79.90 @ Vuugo
Memory | *G.Skill - Ripjaws 4 Series 16 GB (2 x 8 GB) DDR4-3000 Memory | $129.99 @ Newegg Canada
Storage | *Western Digital - Black NVMe 500 GB M.2-2280 Solid State Drive | $119.99 @ Memory Express
Storage | *Seagate - Barracuda 2 TB 3.5" 7200RPM Internal Hard Drive | $67.95 @ Vuugo
Video Card | *Gigabyte - Radeon RX 570 8 GB GAMING 8G Video Card | $199.99 @ Memory Express
Case | *Inwin - 301 White MicroATX Mini Tower Case | $99.99 @ Memory Express
Power Supply | *EVGA - BR 450 W 80+ Bronze Certified ATX Power Supply | $29.99 @ Canada Computers
Case Fan | Noctua - NF-A12x25 PWM 60.1 CFM 120mm Fan | $37.90 @ Amazon Canada
| | Total (before mail-in rebates) | $1043.70
| | Mail-in rebates | -$50.00
| Total | $993.70
| | *Lowest price parts chosen from parametric criteria |
.
PCPartPicker part list / Price breakdown by merchant
Type|Item|Price
:----|:----|:----
CPU | *Intel - Core i3-8350K 4 GHz Quad-Core Processor | $224.99 @ Amazon Canada
CPU Cooler | *Deepcool - GAMMAXX 400 White 74.34 CFM CPU Cooler | $48.33 @ Amazon Canada
Motherboard | *MSI - Z370M GAMING PRO AC Micro ATX LGA1151 Motherboard | $210.99 @ Amazon Canada
Memory | *G.Skill - Ripjaws 4 Series 16 GB (2 x 8 GB) DDR4-3000 Memory | $129.99 @ Newegg Canada
Storage | *Western Digital - Black NVMe 500 GB M.2-2280 Solid State Drive | $119.99 @ Memory Express
Storage | *Seagate - Barracuda 2 TB 3.5" 7200RPM Internal Hard Drive | $67.95 @ Vuugo
Video Card | *Gigabyte - Radeon RX 570 8 GB GAMING 8G Video Card | $199.99 @ Memory Express
Case | *Inwin - 301 White MicroATX Mini Tower Case | $99.99 @ Memory Express
Power Supply | *EVGA - BR 450 W 80+ Bronze Certified ATX Power Supply | $29.99 @ Canada Computers
Case Fan | Noctua - NF-A12x25 PWM 60.1 CFM 120mm Fan | $37.90 @ Amazon Canada
| | Total (before mail-in rebates) | $1190.11
| | Mail-in rebates | -$20.00
| Total | $1170.11
| | *Lowest price parts chosen from parametric criteria |
Someone needs to get one of these things to fill/bleed coolant. Pretty standard stuff.
Well the first, and biggest, difference is power. The one you linked is 1.1amp, the griots is 7 amp and has adjustable speed, so it can work faster than the buffer you linked. The type of pads they use is different as well, the griots has a velcro backing plate so you can use pads like these. 10 inches also is quite big and probably nearly impossible to use on tighter areas.
(I'm not an expert so please feel free to correct me on anything)
Personally for local or camping (not air travel) I like the 35-55 AH AGM SLA scooter batteries. (SLA = sealed lead acid aka non-spillable) If you turn of heated hose & humidification (passover humidification is okay) they will last a few nights. See the ResMed battery guide for more detailed run estimates at https://www.resmed.com/us/dam/documents/articles/198103_battery-guide_glo_eng.pdf.
Basic list of parts you need:
Depending on which CPAP machine you have:
Edit: the cigarette adapter is only optional for ResMed since it comes with a clamp adapter - Philips does not. I'd still get one though since it can bolt to the battery terminals.
https://www.amazon.com/10mm-Socket-Ten-Pack-Multi-Type/dp/B07F7LDYJF/
Theres a half inch collection too if thats what you turn.
Your welcome
Also paint them all pink, they will stick around longer.
Missing 10mm is no joke, bro.
https://www.amazon.com/10mm-Socket-Ten-Pack-Multi-Type/dp/B07F7LDYJF
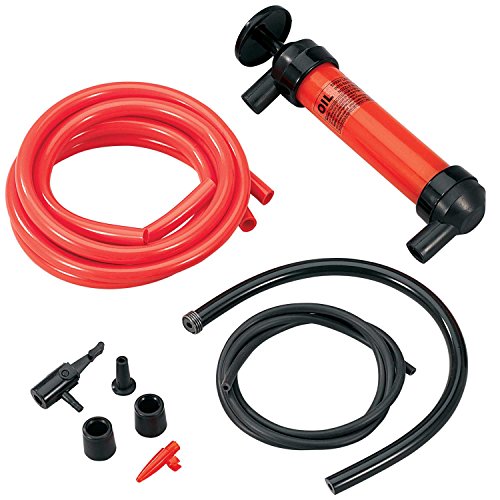
A siphon pump is going to be your best bet. Less than ten dollars.
Koehler Enterprises RA990 Multi-Use Siphon Fuel Transfer Pump Kit (for Gas Oil and Liquids) https://www.amazon.com/dp/B0181EDCZ6/ref=cm_sw_r_cp_api_7kJOyb5JVPD8R
MOst used tool I see is the spill free funnel for radiators: http://www.amazon.com/Lisle-24610-Spill-Free-Funnel/dp/B001A4EAV0
https://www.amazon.com/gp/aw/d/B001C6NL52/ref=mp_s_a_1_3?ie=UTF8&qid=1501519580&sr=8-3&pi=AC_SX236_SY340_QL65&keywords=socket+organizer&dpPl=1&dpID=51-8Yw7rjDL&ref=plSrch
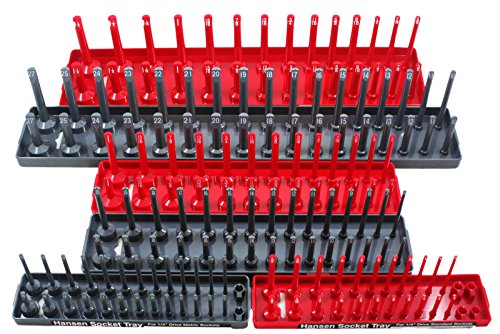
I've been using these and haven't looked back at using those cheap socket rails. Those things always pissed me off and never held sockets on very well, these plastic racks just let the sockets sit on a plastic pin and you can use them like a tray and put the whole thing in your service cart and it keeps everything handy
Go to Amazon and order this (I like Meg's products),
This should run you about $345 for everything and have you setup to take care of your car for a long time. You can find a 20% discount code online for harbor freight to bring the price down $55 for the DA. Go to home depot and buy a couple buckets and you will be good to go.
Edit: To add, I went to Lowes and bought a cheap inline sprayer for my hose and it works fine for foaming up the vehicle, plus it only costs $5.
Edit2: If you are going to downvote me please post why you don't like my recommendation.
It's an ideal use of a Leaf. Your only issue is the little 12v battery won't get charged in short trips.
Either use the windshield wipers on every trip (the leaf charges the 12v faster when the wipers are on and for 2 mins afterwards) or buy an external charger like https://smile.amazon.com/dp/B004LWVEKS and charge the 12v every month or two.
Really you can drive it and not worry but if you want to be preventative so you don't have to deal with a dead 12v someday by surprise you can do so.
Note this isn't true just for the Leaf, it'd be the same for any car you drive on that short of a trip.
You should certainly have your typical "manual" screwdrivers....but I would recommend a rechargeable electric driver 100000x.
The time and effort it saves is incredible. You can get a fancier one, but this one has served me well for years.
Regarding the outlet tester...get it if it makes you feel better...but, really, what good will it do? Do you know how to fix a bad ground? You could do the same tests (plus a lot more) with a good multimeter.
You buy a kit similar to this (its based on the thread size and pitch of the plug) https://www.amazon.com/Helicoil-5334-14-Thread-Thread-Repair/dp/B0002SRF4O It is a steel insert and not a helicoil.
Or you take the head off and replace it or repair it.
https://www.amazon.com/Helicoil-5334-14-Thread-Thread-Repair/dp/B0002SRF4O/ref=sr_1_1?s=electronics&ie=UTF8&qid=1505680583&sr=8-1&keywords=spark+plug+helicoil this is the one I use that's $200 cheaper.
You're probably fine.
Buy one of these, it will show you if everything is working:
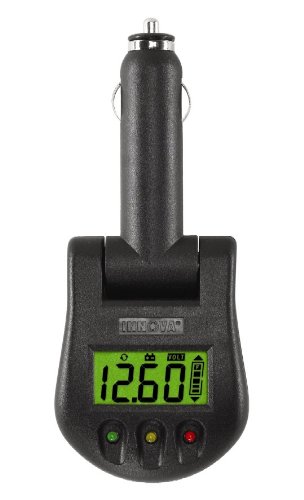
https://www.amazon.com/INNOVA-3721-Battery-Charging-Monitor/dp/B000EVWDU0
http://www.amazon.com/gp/product/B000EVWDU0/ref=cm_cr_ryp_prd_ttl_sol_17
If you just want voltage, which will give you an idea of battery drain, this is it
A better question is what on the ladder is magnetic? Aren't most ladders either aluminum or fiberglass and non-magnetic?
What about including a magnetic tray, such as this Titan Tools Mini Magnetic Parts Tray on Amazon (cheaper than alternatives at McMaster). But even then, you run into the same problem, what is magnetic that you stick this tray to?
I seriously could not work at a bench now that didn't have a magnetic bowl sitting on the back of the vise. It helps so much.
They are called Hansen Socket Trays. I think he got his at Harbor Freight but just about anywhere that sells tools should carry them.
https://www.amazon.com/gp/aw/d/B001C6NL52
You can also buy singles, instead of the whole set.
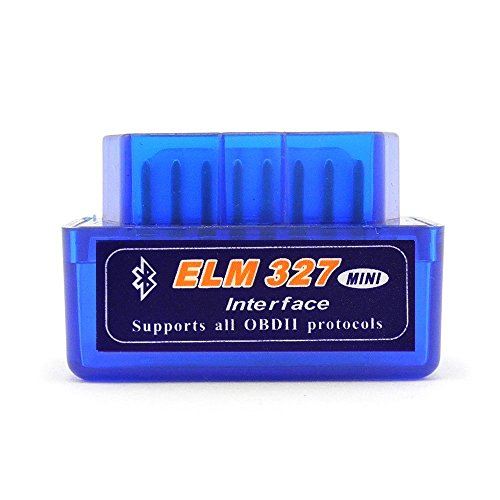
Most DIYers use the torque app (https://play.google.com/store/apps/details?id=org.prowl.torque&hl=en)for androids and use this ((http://www.amazon.com/Version-Bluetooth-Diagnostic-Interface-Scanner/dp/B008UR7J6I/ref=sr_1_1?s=electronics&ie=UTF8&qid=1372219549&sr=1-1&keywords=elm327) to link it to their car
This might be what you're looking for
Replacement Spout - Water Jug Or Gas Can Spout - Update Your Old Can! https://www.amazon.com/dp/B00CYNDNM8/ref=cm_sw_r_cp_awd_CEAIwbXXNKA89
If you actually use this can more than once a month save yourself the trouble and go with these.
Next time, use a siphon pump.
https://www.amazon.com/gp/aw/d/B0181EDCZ6/
You should have one somewhere for emergencies.
P.S. call poison control!
Kinda like....
https://www.amazon.com/dp/B078719VN1/ref=cm\_sw\_em\_r\_mt\_dp\_U\_eOCrDbCHG23YR
I just have this on the monthly order thingy. They aren't good quality, but they mostly disappear before they break. So it's all good.
CarBridge is a tweak for jailbroken iPhones. It lets you run nearly any app over CarPlay. It also lets you adjust the number of icons on the CarPlay home screen. I just got it up and running tonight so I’m still playing around with it. I wasn’t able to get PS4 Remote Play working but Splashtop works perfectly so I can access my desktop PC from my car stereo, which is awesome. I'm totally going to Photoshop something using Sync 3 haha. YouTube was my primary reason for installing CarBridge but the Xfinity app and VLC also work great. Looking forward to being able to watch live TV and even recordings from my DVR while I’m stuck in traffic.
A few others I tried are weather radar, iMessages that let you actually see the messages, the camera app, and an OBDII app that communicates with my ELM327 Wi-Fi OBDII reader. Now that I know it works I’m going to choose an app that shows gauges (those all cost money) so I can see stuff like oil pressure, boost, voltage, etc. when I’m running the car hard. Oh, and of course, Apollo for Reddit works as it should.
All the apps perform quickly and the image actually looks pretty crisp and detailed in person. These pics aren't doing it justice (had to use my iPad) but I was really impressed by how sharp it was when I used 720 or 1080 resolution in YouTube. I also highly recommend this glass screen protector to improve the look and feel of the screen. It’s like a night and day difference vs the fingerprint magnet plastic factory touchscreen. Much less glare too.
The one downside I noticed is that Sync 3 doesn't support multi-touch but overall I’m really happy with the results. Well worth the $4.99 for CarBridge. Let me know if you can think of any other apps that would be fun to try.
Hey man, get whatever size you want. Recalibrating the speedo is super easy and takes 10 minutes.
Buy an ELM compatible dongle (this is mine) and run Forscan on your laptop. You can change your tire size to whatever you want and your speedo, odo and everything else will be 100% accurate.
I'm running OEM FiST wheels on my EcoBoost and my speedo is still perfect, even though the 17"s are about 1" bigger on the diameter.
No joke, OP
Car Guy Tools 10mm Socket Six Pack (3/8" Drive, Multi Type: 6pt, 12pt, Deep, Shallow) https://www.amazon.com/dp/B078719VN1/ref=cm_sw_r_cp_api_i_pvipDbRXJ01N4
You can get them by the half-dozen on Amazon.
A microfiber or foam applicator pad is what you should probably use.
http://www.amazon.com/Meguiars-X3070-Soft-Foam-Applicator/dp/B0009IQZPW/ref=sr_1_1?ie=UTF8&qid=1407524279&sr=8-1&keywords=meguiars+applicator+pad
http://www.amazon.com/Meguiars-X3080-EvenCoat-Applicator-Pads/dp/B0009IQZQG/ref=sr_1_3?ie=UTF8&qid=1407524279&sr=8-3&keywords=meguiars+applicator+pad
Since your just starting out this might be a good kit http://www.amazon.com/Meguiars-G3300-Brilliant-Solutions-Restoration/dp/B004EB12FS/ref=sr_1_13?ie=UTF8&qid=1407524279&sr=8-13&keywords=meguiars+applicator+pad
Depending on your budget and how much you see washing by hand etc, you might look at /u/TheRagCompany microfibers. They are really liked here, I just got mine and are going to try them out tonight.
Make sure to read up on good technique on the wash and correction so you don't introduce any more scratches etc.
The second bucket is a "rinse" bucket. It is used to clean the dirt off your mitt from the dirt it encounters on your car. It contains just water, and you rub your mitt on the grit guard to get all the dirt and grime off off it. Then I typically ring it out and put it into my "wash" bucket. This bucket contains the actual car wash, I run the mitt along the grit guard and then ring it a bit and use it on the car again.
This video will provide a little insight into the process.
As far as applicator pads go, it's best to go with a foam applicator when it comes to applying wax. The reason for this is simply because a foam applicator is going to evenly distribute the wax and not provide any abrasiveness against the surface of your paint. These pads by Meguiar's should do the trick. I personally use Pinnacle Polyfoam pads from AutoGeek.net, but these are probably the same thing, they just have the Meguiar's logo.
I would recommend not using a pad for different applications. Keep one pad for wax, one for sealant, etc. The foam pads I linked can be used for sealant and wax.
However, for compound, I would go with a microfiber applicator if you are going to do it by hand. You may not get stellar results this way, but it may work, I personally have never tried it. The reason for microfiber pads here is because they offer a little more abrasiveness against your paint as opposed to the foam applicators. These may do the trick if you want to apply compound and polish by hand.
TBH i don think that little thing will do much at most it only puts back like 4 watts under ideal circumstances. meanwhile your computer is drawing at least 40watts and phone about 5 watts.
​
​
i use something like this to monitor my battery whenever im listening to the radio or charging my computer. once it gets too low ill turn the car on for a little while. but i also pack a jump starter in all my cars just incase.
https://www.amazon.com/INNOVA-3721-Battery-Charging-Monitor/dp/B000EVWDU0/ref=pd_cp_107_1?pd_rd_w=bySXE&pf_rd_p=ef4dc990-a9ca-4945-ae0b-f8d549198ed6&pf_rd_r=WT057VG43YSGXRCZH4Z2&pd_rd_r=56420b0a-67b9-11e9-aa29-13293a7f6817&pd_rd_wg=y2YGT&pd_rd_i=B000EVWDU0&psc=1&refRID=WT057VG43YSGXRCZH4Z2
that'd do it; i don't know why you'd need two inverters though.
also you want a deep cycle battery rather than a regular car one as car batteries are designed for short bursts of high energy rather than a sustained drain. deep cycle batteries are used for running the electricity on boats and RVs. make sure to get one that's "100ah" or higher. that's essentially the amount of power available in the battery and the more you have the longer you can power your stuff. you can get two and connect them in parallel (google image this for a diagram) to increase your available energy.
you'll also want to get a battery charge reader so you can monitor how much charge the battery has. a full charged battery is 12.6v, and you should turn everything off and recharge if you dip down to 12v as that's around 50% charge and anything less than that will actually kill your battery and it won't charge again.
definitely don't do the gennie, we have enough air and noise pollution out there...
battery
http://www.amazon.com/Universal-Power-Group-45978-Battery/dp/B0044Z8DJW/ref=sr_1_1?ie=UTF8&qid=1374787029&sr=8-1&keywords=UPG+UB121000
combine these two items to create a battery charge reader
http://www.amazon.com/gp/product/B00065L2D8/ref=oh_details_o00_s01_i02?ie=UTF8&psc=1
http://www.amazon.com/gp/product/B000EVWDU0/ref=wms_ohs_product?ie=UTF8&psc=1
this is another one of those inexpensive useful gadgets that gets used a lot in a shop:
https://www.matcotools.com/catalog/product/LSC4487/universal-lift-support-clamp/
So is this:
https://www.amazon.com/Lisle-41250-Push-Pin-Pliers/dp/B00EARCXXG/ref=sr_1_2?s=automotive&ie=UTF8&qid=1494551818&sr=1-2&keywords=body+clip+pliers
And this:
https://www.amazon.com/Lisle-24610-Spill-Free-Funnel/dp/B001A4EAV0
This video is also super useful if you have a ton of air in the system. For example, after a radiator or hose replacement. I use a spill-free funnel when using this method to avoid the mess that comes from pulling the funnel off the radiator when finished. https://www.amazon.com/Lisle-24610-Spill-Free-Funnel/dp/B001A4EAV0
Top off the coolant and idle the car with the radiator cap off until you don't see any bubbles floating up. You can rev the car to 3000rpm for about a minute to push any stubborn bubbles out. Also squeeze the radiator hose, sometimes there can be bubbles trapped there.
If you maintain more than a couple of cars, it's nice to have this funnel: https://smile.amazon.com/Lisle-24610-Spill-Free-Funnel/dp/B001A4EAV0
i've been really happy with those Hansen trays. Works great for the standard-size sockets. The problems always come when you get to the weird sockets, like swivels and spark plugs and stuff. For my swivels I just keep them on the rail they were bought with, and then I just got some plastic divider thingies from menards [edit: this one and those fit my "normal" ratchets, the extended swivels, and spark plugs. Actually in my top drawer i have two of those, and then the second one has my extensions in one pocket and then pens/lights in the lower.
This is what I have. It works awesome. You will need a velcro backing plate and the pads to go with it.
So for example, my setup was the porter cable polisher, the Meguiar's 105 & 205 polishes, a 6in. velcro backing plate, orange pads used with the 105, and white pads used with the 205 polish.
I started with the orange pads and the 105 to "cut" the paint. Just to get all those deeps swirls out. This will leave micro swirls, which is why you have to follow up with the 205 and white pads. You could probably skip the 105 step all together and just use either the white pads or black pads. (that is if you don't have really bad swirls) I would probably try to black pads first as they would be the safest and less abrasive.
So here's how I would do it with your car if you just want to try and get minor swirls out. I would 2 bucket wash, dry, and then clay. I would then tape off all your trim (if you plan on doing the whole car) as getting polish stuck between trim or on trim is a PITA. I would just worry about trim that is close to paint. Prep work will take time, but you won't have to slow down when polishing each panel. So once your trim is taped off it's time to get to work. Decide which panel you want to start with. Apply 3-5 drops of 205 polish to the black pad, have some water (preferably distilled) in a spray bottle and mist the pad. Go over to the panel and stick the pad against the panel to spread out the polish. You should have a couple spots where there's 3-5 drops of polish on the panel now. Bring the polisher up to speed, (I usually do a middle speed) and start working the polish into the panel going back and forth in a sweeping motion. Once you have thoroughly gone over the panel, carefully turn off your polisher without lifting off. If you lift off you will get polish EVERYWHERE. Now wipe it dry with a soft microfiber towel. I purchased brand new microfiber towels (basically the softest ones too) from The Rag Company. You want to remove ALL polish residue from the panel as soon as possible. Do not move onto the next panel without doing this. This will also give you an opportunity to check your work. Use a bright light to see if you can spot anymore swirls. You shouldn't see any.
I am by no means a professional, I have only done this once on my own personal vehicle. I believe I got pretty good results. Take my advice with a grain of salt. I just watched Youtube videos to learn what I know. I hope this helps! Don't be too worried or nervous. It's pretty easy and was pretty fun. But I won't lie, because I went over my car twice, my arms were killing me by the end of the day. I could barely finish the last panel (it was on the side) because my arms just wanted to give out. It was hard work, but so so worth it!
It should also go without saying, but be sure to either do this in a garage or in complete spot. You want the paint to be cool and you don't want the polish to dry on the panel. Also you don't want to have any dust blow on your paint or settle. Basically you want your paint as clean as possible before you go to town with your polisher.
If you have enough coat built up, sand with 400, 800, and maybe 1500. Then use a buffing compound with some water and a pad on a ROS sander. If that doesn't add a glossy finish...Idk what will.
The Pioneer will fit your car, and think it's a good choice.
A soldering iron, digital multimeter, shrink tubing and good electrical tape (3m super 33+) are all good investments to have if you are doing car audio/electrical work.
If you don't have access to a soldering iron or butt connectors you can use a military splice and electrical tape. If you do solder the connecting you can still do a military splice first.
For a decently priced digital multimeter I'd recommend this one.
A multimeter costs like $20 FYI, and is a good tool to have.
It wont help you now but you can get OBDII bluetooth receivers off ebay/amazon for about $20. You can hook them up to your phone and read/clear codes with the Torque app (free version).
> how and where do you get the car registered?
If you're in the US, you phone the local DMV and ask them how to register the car. You probably go to an office, write a cheque, fill out forms, prove that you didn't steal it, and then get registration.
If not, you text a car-savvy relative and ask them who you contact.
> How do you know when something is broken, and how do you fix/handle that?
You suspect that something is broken if a dashboard light comes on or if the car makes a motion or sound that it didn't used to. Then you Google it, watch some YouTube, read the car's manual, and maybe take it to a mechanic. For most newish cars you can also plug one of these things into a port under the dashboard, pair it with an app on your phone, and listen to the computer telling you what it thinks is wrong with itself.
> How do you choose a mechanic that isn't awful?
I dunno... Ask your friends, and read online reviews? How do you choose, like, a doctor or a lawyer?
> What are the basic parts under the hood, and what do they do?
Depends on the car. Depends on if it's gas or diesel. Probably best to Google your exact model of car once you've picked one.
> What sort of insurance coverage should I get?
If you're in the US, your state probably has a legally mandated minimum amount of insurance. If not, uh, ask someone car-savvy whom you trust.
> Etc.
Go buy a $15 blutooth OBDII reader as well as Dash Command if you have an iPhone, or there's also an equivalent Android app, $9. It'll spit out the actual code thrown, and you can look it up online.
http://imgur.com/mh08pNW
This is a cheap Amazon version of what I use to integrate with my Android phone. If you have a phone that can use the Torque app, download it (the free one works just fine) and connect your phone and the OBDII reader via bluetooth. It will display the code and give you the option to clear it. I do this every once in a while because the O2 sensor in my downpipe trips out every once in a while and throws P0420 at me. If after you clear the code using Torque it comes back, you probably have a problem you need to fix.
It depends. If you use an Android or Windows, Bluetooth is the better bet. If you use an iPhone, you're better off with wifi because of the way that Apple licenses bluetooth (it's complicated).
I personally use this. Almost the exact same one comes with bluetooth and is significantly cheaper.
At least they can be fixed. I did this with my gas cans.
https://www.amazon.com/Replacement-Spout-Water-Update-Your/dp/B00CYNDNM8/
I just bought one of these and installed it on my old can.
I borrowed a friend's DC car inverter, which has two AC outlets and two USB ports. Worked great. Looks something like this
https://www.amazon.com/gp/aw/d/B00EY6RJKA/ref=mp_s_a_1_2?ie=UTF8&qid=1467592138&sr=8-2&pi=SY200_QL40&keywords=car+inverter+power+outlet&dpPl=1&dpID=41l9Yi7L6kL&ref=plSrch
I would probably hit it hard with PB Blaster and/or ATF fluid and let them soak in overnight, then following day try the removal. Maybe an Impact gun on lowest setting (and also lower the air pressure to half as well to ensure not too much torque on them)
I have heard of people using a helicoil tap kit to redo the threads entirely. (This may not be the right size for you but concept: https://www.amazon.ca/Helicoil-5334-14-Thread-Thread-Repair/dp/B0002SRF4O)
When I was looking into a P71, there was lots of talk on the Net indicating that this can be a problem in both the 4.6L and 5.4. An earlier issue seemed to be the opposite of plugs getting ejected while running and taking the threads with them...
I would probably use a tiny bit of never-seize on the damn things when they get replaced, but just about everyone out there disagrees with me on that.
Having said all of above, all my current cars are iron heads, so I am not at all expert on Aluminum ones
> This works just as well as a timsert and doesnt cost 2 arms and a leg https://www.amazon.com/Helicoil-5334-14-Thread-Thread-Repair/dp/B0002SRF4O
What is meant in the description by
This are woodworking project kit ?
If you don't want to spend 170$, here's an alternative I've used in my Civic https://www.amazon.com/Helicoil-5334-14-Thread-Thread-Repair/dp/B0002SRF4O
Check to see if this vehicle has had Heli-coils or Timeserts installed due to plug blowout. Heli-coils are a good stop-gap fix to get you moving again. Timeserts are a more expensive, but more permanent solution. If it has never had a plug blow-out I'd highly recommend investing in one of these kits and keep a tube of grease and red thread-locker in your vehicle. Even if you lose a plug you'll be able to be on your way again in about an hour once the engine cools (30 minutes to install the insert, 30 to give the loctite a chance to set). The only other tools you'll need are a ratchet set with 6" extension, spark plug socket, and hammer.
I'm assuming you have the 1.9l engine? We install the repair inserts on those where I work for $100. It takes the same insert the 5.4l triton engines do that always blow out spark plugs. They are easy to do so i'm sure if you call around to local shops you can find a place willing to do it. Dephaze is right you should check the other plugs to make sure they are tight. I would probably just replace them all while you are at it.
http://www.amazon.com/Helicoil-5334-14-Save-A-Thread-Thread-Repair/dp/B0002SRF4O/
If you want to try it yourself this is a simpler version of the kit I use. It locks the insert in very well. I have yet to have one come back. You can either pack the flutes of the tap with grease to keep the aluminum shavings from going into the cylinder or you can just fire up the engine for a few seconds after you tap the hole to blow the shavings out.
The clay kit says it comes with some clay lube, but thanks for the tip!
Foam applicators like this: http://www.amazon.com/Meguiars-X3070-Soft-Foam-Applicator/dp/B0009IQZPW/ref=sr_1_1?ie=UTF8&qid=1395465318&sr=8-1&keywords=foam+applicator?
And would I use the mitt in place of all the microfiber towels or just in some cases?
Thanks!
The first thing I would try is this:
Meguiar's Ultimate Compound
Meguiar's X3070 Soft Foam 4" Applicator Pads
Meguiar's X2020 Supreme Shine Microfiber Towels
All 3 of those together is under $20 (need to spend $25 since one is an add on item). This stuff is amazing for scratches and paint in general. While it won't make your car showroom ready, it will make it look much better and is totally worth the $20.
Essentially what you do is first make sure the area is clean, then apply the compound to the pad and rub the compound on your car using circular motions. After you do that for a minute or two, use the towel to remove the compound form the car.
these are the pads
Also the pack came with two microfiber towels so I'll use those on windows then.
Hey man, what an awesome job!
I am preparing to do my first detail by hand too...just wanted to get your ideas. Which pads did you use for the ultimate compound? Any of these you recommend? http://www.amazon.com/gp/product/B0009IQZQG/ or http://www.amazon.com/Meguiars-HiTech-Applicator-Pad-Pack/dp/B0009IQZPW
Did you switch pads on each of those steps (ie, compound, polish, wax..)
I'm thinking to:
Is there any breaks in between any of those processes? Or can I do it one after the other consecutively.
Thanks buddy :):)
Sure!
Foam Applicator 1
Foam Applicator 2
Microfiber Applicator these also come in packs of two
Wash then clay then wax. I like to use a foam applicator pad like this.
A microfiber will work but you may end up absorbing more into the towel than actually applying it onto the car
I have one of these volt meters that plugs into the 12v socket so you can monitor voltage when driving. Very handy. Voltage should be ~14 volts while running and ~12.x while stopped.
You can do this with a regular multimeter but sometimes it's helpful to be able to keep an eye on it while driving.
It looks like the 1999 Escort uses a serpentine belt and thus does not require manual adjustment, so I doubt your belt is slipping unless certain conditions exist:
Check the belt and the tensioner first.
It might be possible that your alternator is supplying too much voltage, actually. Possibly due to a faulty regulator. I'm not sure if the alternator test carried out at O'Reilly's would detect that if it's only done with the engine at idle.
Apparently the '99 Escort doesn't have any battery gauge on the instrument cluster, but just an idiot light. You might want to check the voltage while driving or increasing the engine RPM to see what's actually going on.
Something similar to this thing could be useful and also probably the easiest way. Alternatively, just get a volt meter and check the voltage right at the battery terminals while revving the engine.
https://www.amazon.com/INNOVA-3721-Battery-Charging-Monitor/dp/B000EVWDU0
I just donated a decent amount of money to my local church for you. That was much appreciated since they were trying to raise money in order to buy a magnetic tray for the daily mass prayer. Apparently they are extremely expensive.
I even gave them a link for a decent one: http://www.amazon.com/Titan-TIT11061-Mini-Magnetic-Tray/dp/B000HYL20G
They promise they will all pray for you although they are doubtful about a full recovery.
Take care!
I used one of these throughout my entire build and it was fantastic to have. If you have a Microcenter near you they sell them by the checkout for $1.99. I grabbed it at the last second, luckily.
I have more if you want.
I'm not sure what an add-on is! BUT this is something that would be very helpful to me! I am always dropping bolts and nuts when I work on my truck (or anything really) these things are great at helping to prevent that!
pay attention in class! (especially if you are paying for school!)
Grab one of These and burp the radiator.
No, I just used the regular housing gasket.
Oh yeah, I had a tough time bleeding my car for some reason. I ended up using this tool to bleed it. If you have access to an air compressor, this or this cheaper one would work better. With the funnel, there's no BMW adapter, so I had to make one out of an old cap by drilling a hole with step bit.
Burp it better. Borrow a bleed kit, lots of mechanics seem to skip over using them because they seem to think they are unnecessary, but I hear lots of stories about comebacks due to trapped air.
Better to know it's really bled out rather than screw up a new head job on the first hill you run into.
https://www.amazon.com/Lisle-24610-Spill-Free-Funnel/dp/B001A4EAV0 something like that
You probably need to jack up the front end too.
https://www.amazon.com/Hansen-Global-Metric-Socket-Storage/dp/B001C6NL52/ref=sr_1_4?ie=UTF8&qid=1517575540&sr=8-4&keywords=socket+organizer
I have these dividers and I love them. They're perfect for a large toolbox. The rest of the page shows you can buy it piecemeal if you have special needs.
Small boxes within drawers are a godsend. You can buy pre-built tool-specific ones like on the site I linked to above, but you can also find useful similar items at dollar stores.
If you use sockets, nothing beats a Hanson socket tray. (Overkill tray linked, but you can buy individuals for $10 or so. Totally worth it.)
Kudos on getting the toolbox built. More fun awaits you! :-)
Edit: Oh, I almost forgot. If you have lots of pliers, this is worth its weight in gold.
https://www.amazon.com/Hansen-Global-Metric-Socket-Storage/dp/B001C6NL52/ref=sr_1_5 maybe?
https://amzn.com/B001C6NL52
I have them as well. They're the only ones I've ever owned that I actually like, and don't end up throwing away in anger.
I would buy this DA:
http://www.amazon.com/PORTER-CABLE-7424XP-6-Inch-Variable-Speed-Polisher/dp/B002654I46/ref=sr_1_1?ie=UTF8&qid=1407291588&sr=8-1&keywords=porter+cable+7424+xp
This backing plate:
http://www.amazon.com/Astro-Pneumatic-4607-Velcro-Backing/dp/B003CH3Z8W/ref=pd_bxgy_hi_img_y
3 of these:
http://www.amazon.com/Chemical-Guys-BUFX_102HEX5-Hex-Logic-Medium-Heavy/dp/B0040MI9H0/ref=pd_sim_hi_6?ie=UTF8&refRID=0NJJRSFYV45X3EWAS3NA
2 of these:
http://www.amazon.com/Chemical-Guys-BUFX_104HEX5-Hex-Logic-Light-Medium/dp/B0041MVQ4M/ref=pd_sim_auto_1?ie=UTF8&refRID=11TRQVZC789CNJ8EXED1
1 of these:
http://www.amazon.com/Chemical-Guys-BUFX_106HEX5-Hex-Logic-Finishing/dp/B0042TTIYO/ref=pd_sim_auto_2?ie=UTF8&refRID=08HEKJEWM7H5NRFGAQNH
Pretty sure they are all compatible with the backing plate.
You can look into these pads instead:
Chemical Guys BUFX_102HEX5 - Hex-Logic Medium-Heavy Cutting Pad, Orange
Chemical Guys BUFX_106HEX5 - Hex-Logic Finishing Pad, Black
Chemical Guys BUFX_104HEX5 - Hex-Logic Light-Medium Polishing Pad, White
Colors are not the same across brands, but these Hex-Logic are the same.
Multiple pads are used when your pad gets full of product or too dirty. You can clean them, but this slows you down and sometimes I feel safer using a newer (fully cleaned) pad. I often use 2 pads for compounding and 2 pads for polishing.
DISCLAIMER: Fixing Scratches is an art, you should invest in a decent random orbital polisher, this will help with the polishing and minimize the damage you do. The pads will be based on how abrasive the polish is and how hard you want it to cut. Start light and move to more abrasive polish and pads if necessary. You can ruin the clear coat, create buffer burn areas and do some serious damage if you are not careful.
 
There are all in one products out there like Chemical Guys VSS ( https://amzn.to/2J1bJtS ) matched with an Orange Hexlogic pad ( https://amzn.to/2uvSg1e ) that starts abrasive and breaks down to a fine polish as you make additional passes. For a beginner this is a great place to start, if you are buying a Polisher the Torqx is a great polisher that won't break the bank and this link (https://amzn.to/2GTloly) bundles in some pads (including the orange hexlogic) and samples of a few of the polishes I use, V32, v34, v36 and v38 so if the VSS doesn't work you have some more aggressive stuff to work with.
 
VSS will work on most of the light scratches and paint transfer scuffs. I used it to remove almost all the blemishes and swirls on my wife's truck, however there were some instances where I needed to use the other more aggressive polishes then work my way up. This video gives a good explanation on the use of VSS https://www.youtube.com/watch?v=1-hr71oylIM
Awesome Thx... I'll try that. Few questions
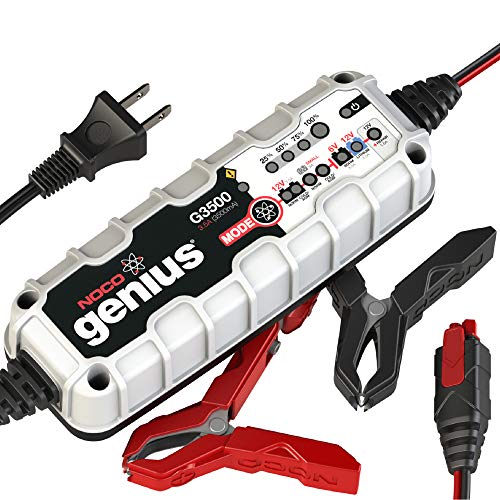
Maine here. A good AGM battery and a smart charger if you're getting some extreme temps in the winter. My batteries are a few years old but they are still 13v and hold a charge like they are brand new. By no means do you have to charge the battery when you're not using it, as AGM's are much more resistant to the cold, but it's not a bad idea to charge it over the weekends.
I have this one that I'm happy with.
It'll do moto and car batteries and has an "exercise" type mode that will drain a battery and recharge it a couple of times to try to loosen up some of the "stuck" material that causes a battery to go dead.
http://www.amazon.com/industrial-scientific/dp/B0050LVFS0
My job uses Fluke, but they are pretty pricey. If you are only going to use them for Ecigs, then like everyone else has said the 20$ digital multimeters are good. Sears, RadioShack, Home Depot, and Lowes all carry budget priced tools.
I bought this one for my personal use, but I use it for PC and Auto troubleshooting as well.
I bought a scanner just like this one:
https://www.amazon.com/Bluetooth-Diagnostic-Scanner-Engine-Reader/dp/B0051CAE1C
You'll need an app to use it with your phone via bluetooth, I use the free version of torque. Have had it for a couple years now and it hasn't let me down.
keep an eye out, when you reset the ECU, it cleared the codes, sometimes they come back after driving some amount of miles. I doubt if this one will though.
I strongly suggest getting a bluetooth ODBII reader and the torque app for your phone, the reader and the app are cheap, you can read codes, clear codes and read pretty much every sensor on your jeep.
I have this scanner and it works like a charm
They're pretty much all the same thing. I've been using this one for a couple years and it has yet to let me down. I use it with the Torque app on Android, and it works fine on my 13' Volt.
Here are the ones I use, 10 bucks each, and yes they work with Torque on Android. OBD2 Bluetooth Adapter
Yep. This one to be exact.
I recently took a road trip with my mother (60), a 10 year old and a nearly 3 year old. We drove from North Texas, to Southern Ontario Canada and then to the Jersey Shore then back to Canada. Just under 4000 miles, lots of time on the road!
This made our trip a lot easier to manage.
My sedan only had two car chargers and between my phone and my mothers-not to mention the DVD players the kids had, the computer, our Kindles etc. I knew charging various things would be an issue. This one was around $20 and worked well. It has a fan inside, but I was able to put it under the seat while in use and the sound couldn't be heard.
You might consider one!
you probably want to use leds for the lighting as you can very cheaply aquire and run some 12v leds straight off the battery without needing an inverter.
Same goes for a cell phone charger. Use a 12v car charger.
If those are the only 2 things you need to power you'll have plenty of juice in that battery.
Why that battery in particular?
If you're getting a solar panel you'll need a charge controller, and neither of those will be super portable anyway.
Consider a 12v 7ah sealed lead acid battery.
They are super cheap for their capacity.
As far as the solar panel, something like this would work.
it includes a charge controller.
here's a couple images of one of the solar power kits ive put together.
http://i.imgur.com/nfA1GnO.jpg
http://i.imgur.com/rQKQ1uD.jpg
4 x 12v 7ah SLA batteries
1 10 watt solar panel
1 charge controller (much better than the ones that are often included with inexpensive panels
1 200w inverter
I can run just about anything with this setup.
12v devices and wires can be connected straight to the "Load" terminals on the charge controller.
Anything 110v can be plugged into the inverter.
The thing I REALLY like about that inverter is is has 4 usb charging ports that are on even when the inverter is off.
2 x 2 amp usb.
2 x 1 amp usb.
Sure, this is the one we used:
https://smile.amazon.com/gp/product/B00EY6RJKA/ref=oh_aui_detailpage_o08_s00?ie=UTF8&psc=1
If you get license plate DYB15 that was ours!
Since I read all the horror stories about broken equipment and getting charged for preexisting dents and scratches I also made a list of all the things to check out once we picked the van up: all supplies were provided, heater worked, extras like GPS and Wifi were included, video/photo all existing scratches, etc. The guy who checked us in was very thorough and showed us how to work everything. They were great overall and I never felt like they were scamming us for extra charges.
Just don't get stuck in a deep gravel parking lot like we did and pay $350 for a tow truck! That was embarrassing. We called the rental company and they sent someone out to help within an hour. Other than that we had no problems with the van. Would definitely rent from campervaniceland again.
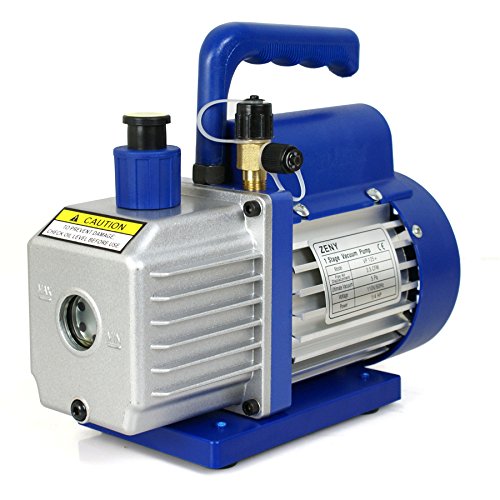
vacuum pumps for your needs are cheap, https://www.amazon.com/ZENY-Single-Stage-Economy-Conditioner-Refrigerant/dp/B012CFTYX4/ref=sr_1_1_sspa?ie=UTF8&qid=1541948266&sr=8-1-spons&keywords=vacuum+pump&psc=1
I just purchased a $100 5G vac chamber off amazon along with a vac pump off amazon as well - all said and done $160.
Tried to get link for Vac chamber setup but doesn’t look like it’s sold anymore, see vac pump link below though -
https://www.amazon.com/gp/aw/d/B012CFTYX4/ref=ppx_yo_mob_b_inactive_ship_o0_img?ie=UTF8&psc=1
Here's my setup:
Vacuum Chamber: https://www.amazon.com/gp/product/B00I3Q8D2K
$117
Pump:
https://www.amazon.com/gp/product/B012CFTYX4
$52
That pot will hold a lot of wood, but you also need a couple gallons of Catus Juice to fill it. Grab a cheap toaster oven from Salvation Army to cure.
Listen to /u/Glock19mos. I don't typically dye (I purchase mine dyed) and his pictures speak volumes about his capabilities with the process.
Car Guy Tools 10mm Socket Six Pack (3/8" Drive, Multi Type: 6pt, 12pt, Deep, Shallow) https://www.amazon.com/dp/B078719VN1/ref=cm_sw_r_cp_api_i_korRCbZZQBBFH
Is this cheating, or just paying it forward?
https://www.amazon.com/Car-Guy-Tools-Socket-Drive/dp/B078719VN1
From what I recall - AutoZone also sells a similar kit in their brand. Neither will likely stand up to pro "abuse" - but might be worth having as a last-minute just-in-case get-r-dun emergency pack...
This is the one I bought, is recommended by a modding guru at a Fusion forum (2GFusions), and works great: https://smile.amazon.com/gp/product/B01F0GVBWY/ref=ppx_yo_dt_b_search_asin_title?ie=UTF8&psc=1
Don't know if you can get it from Amazon Germany though. I thought the vendor, OHP, was based in England but not 100% sure.... Looks like they're from Estonia after all.
https://www.amazon.com/10mm-Socket-Ten-Pack-Multi-Type/dp/B07F7LDYJF it exist lol, but honestly I'd still get in the sketchy 10mil van always losing them.
https://www.amazon.com/10mm-Socket-Ten-Pack-Multi-Type/dp/B07F7LDYJF
Just in case you need something: https://www.amazon.com/10mm-Socket-Ten-Pack-Multi-Type/dp/B07F7LDYJF
ELM327 is the one you want to be looking for.
https://www.amazon.com/OBD2-OBDII-Bluetooth-Diagnostic-Scanner/dp/B01HXGX8V6/ref=sr_1_3?crid=2HZI9Y1SS61UY&keywords=elm327+bluetooth+obd2&qid=1554761236&s=gateway&sprefix=elm327+%2Caps%2C296&sr=8-3
Something like this.
Yeah, 87,000 is close enough that it wouldn't hurt to do the spark plugs now. With that bad vibration/check engine light it's hard to say what might have caused it.
Over the years I've had a few occasions where I've had something similar, but it's been so few and far between that it's usually easiest to chalk up to a computer glitch that's resolved by the restart and not something with a mechanical cause. If it happens again try to read the code. An inexpensive code reading solution is any cheap ELM327 bluetooth OBD II adapter from Amazon (around $10) and the Torque app for an Android phone. A more powerful solution that can give you BMW specific codes and also lets you do lots of coding to customize features in your car is to buy the Carly adapter (Android adapter, iOS adapter) and their app.
They're all DIYable, some with a higher skill level than others of course. If you have a place to do it and can read and follow instructions you can do any job and save lots of money even if you need to buy the tools first. Lots of people are intimidated by it but with just a bit of care it's something anyone can handle. One of the big things I follow that solves the biggest problems new DIYers face is using a torque wrench when tightening fasteners. If you do that you won't need to worry about overtightening anything and breaking off a bolt, or undertightening and having it come out. If you aren't comfortable with it or you can't afford to take the time to do it yourself, a good independent shop will be a much better bet than the dealership.
Here are DIYs for the ones I mentioned:
Spark Plugs (Easy)
Ignition coil removal - Part of spark plug DIY.
Valve cover gasket (Challenging)
Motor Mount (Moderate challenge, but more in the getting to bolts way than complexity) Couldn't find a Youtube video I liked, this has lots of pictures and good step-by-step though. The only thing I would change from their DIY is to use this or similar engine support bar rather than supporting the engine from below.
I'd say the spark plugs and coils are absolutely something you can do yourself but read and watch the DIYs on the motor mounts and VCG carefully before deciding to tackle that. If you see no oil down in the spark plug you likely don't need the VCG anyway, and the motor mounts would just cause you to feel the misfires more and you can actually see it on the tach.
Thanks, bluetooth elm327 obd2 dongle ($15 from amazon) and the app Torque for android (5$), the best 20 dollars I've spent on my car in a long long time.
https://www.amazon.com/Mestart-Bluetooth-Diagnostic-Scanner-Android/dp/B01HXGX8V6/ref=sr_1_4?ie=UTF8&qid=1538283099&sr=8-4&keywords=elm327+bluetooth
https://play.google.com/store/apps/details?id=org.prowl.torque&hl=en
It looks like this - exact same design - except mine is all metal, the siphon hoses are clear and cost it $30 (can't find the exact one I have):
Koehler Enterprises RA990 Multi-Use Siphon Fuel Transfer Pump Kit (for Gas Oil and Liquids) https://www.amazon.com/dp/B0181EDCZ6/ref=cm_sw_r_cp_api_i_5lfrDbY36MTHC
The hosing is long and only 1/4" so can make it around the anti-rollover valve, although it takes some spinning and jiggling. It works on my VW Gti, Prius C and is long enough to work on the RV too.
You can see the tarp we use, which is great for the burn -- super heavy, and other fuel things on our packing list: https://www.trippingly.net/burning-man-bin-organization
with that many miles, i wouldn't suggest draining/filling via the drain plug.
i'd suggest siphoning some out with a device like this:
https://www.amazon.com/Koehler-Enterprises-RA990-Multi-Use-Transfer/dp/B0181EDCZ6/
siphon out 2 qts worth, as its likely black. then fill in 2 qts.
in 1 month, do the same again. keep doing this
please keep in mind the condition of your ATF via color. here is a chart to help.
https://cdn-enterprise.discourse.org/cartalk/uploads/default/original/2X/a/ae8d95d195f3bc88f3aad95c4a7358a12600c85f.gif
in total, the job is likely to take 20-25 minutes... the point of this slow siphon/fill method is to slowly remove the garbage from your trans, without increasing the risk the trans blowing up.
https://www.amazon.com/gp/aw/d/B01C3HAHCS/ref=mp_s_a_1_2
This works great if you just want to read codes.
You can search this site, or LKQ's online website to find a Sync 3 Screen and APIM. Junkyards sell them as separate units and for a lot more, so I recommend LKQ's site first; they usually sell them together for one low price. Make sure it is Sync 3 (2016+ Focus) and not Sync 2.
​
Next, you'll need a new media hub (Part # HU5Z-19A387-A) for Android Auto and Apply CarPlay to work, as well as an adapter plate and wiring harness from 4Dtech. When you have all of these, you can plug the Sync 3 system in and it will work on its own.
​
You can choose to leave it as such and deal with some of the small bugs it may have, or you can reprogram it to work with your vehicle options. 2012 is the only year where you need to program the APIM for it to recognize the steering wheel controls. To program, you will need this OBDII reader and the FORscan program with a free extended license. With FORscan, you can flash the APIM to enable or disable settings such as the back-up camera--if you do not have one, climate control repeater (where the temperature displays on the sceen), colors and themes, steering wheel controls, etc. Do NOT play around with the hex codes too much or you may brick your APIM. I have a hex code master list I can forward to you via email if you decide to undergo the project. It sounds harder than it actually is. I was able to have it installed and programmed in about an hour.
https://www.amazon.com/KOBRA-Wireless-OBD-Scanner-Connects/dp/B01C3HAHCS?keywords=OBD2+Scanner&qid=1537278656&s=Automotive&sr=1-10&ref=sr_1_10
You (and everyone else) should purchaase a bluetooth IBD2 scanner. They are fairly cheap and come with a ton of cool features if you have the right apps on your phone
Amazon and eBay are full of knockoff ELM327 ones that work about the same. I've got this one, and it works fine but I don't like how far it sticks out from the ODB2 port. So this one might be better?
Clog fuel filters, clog injectors, gum up your fuel pump,dirty your MAF, etc. Lots of bad stuff that will make a $1000 car a write off
https://www.amazon.com/Koehler-Enterprises-RA990-Multi-Use-Transfer/dp/B0181EDCZ6/ref=sr_1_3?keywords=transfer+pump&qid=1555898667&s=gateway&sr=8-3
because some transmissions dont have dipsticks, but when you change the fluid you also should change the filter.
If you have a dipstick and want to pull the fluid out that way, you just need a pump. Like this one but that doesn't really prepare you for how doable this actually is.
How can you afford a 55 G drum of VG but not a pump?!
The cheapest method here will be a fuel transfer pump. I've used them to get old gasoline out of cars.
Might be easier to turn up the heat in the room or place a space heater by the drum to warm up the VG a bit before to make things go faster.
Here is the first one I found but I'm sure you could find it cheaper at like a Harbor Freight or any auto store:
Koehler Enterprises RA990 Multi-Use Siphon Fuel Transfer Pump Kit (for Gas Oil and Liquids) https://www.amazon.com/dp/B0181EDCZ6/ref=cm_sw_r_cp_api_fAs7xbHQNMW4M
https://www.amazon.com/KOBRA-Wireless-OBD-Scanner-Connects/dp/B01C3HAHCS/ref=sr_1_5?s=automotive&ie=UTF8&qid=1491692186&sr=1-5&keywords=obd2+scanner
If you think you're going to finish the keg you could always just use a hand pump. They sell them at HD or Harbor Freight for a couple bucks. You'd just have to worry about oxidation if you leave the O2 on the beer if you don't finish it.
I do this to push sanitizer through so I don't waste CO2.
This was $5 at harbor freight: Koehler Enterprises RA990 Multi-Use Siphon Fuel Transfer Pump Kit (for Gas Oil and Liquids) https://www.amazon.com/dp/B0181EDCZ6/ref=cm_sw_r_cp_apa_i_Yld.AbJMSA7W1
https://www.amazon.com/KOBRA-Wireless-Upgraded-Version-Connects/dp/B01C3HAHCS/ref=sr_1_1?ie=UTF8&qid=1486618318&sr=8-1&keywords=obd+code+reader+iphone
I keep these bookmarked for whenever I need to head to a shop. They're about the same price as donuts or beer and will last far longer. If you can't tell I'm a pragmatic gift-giver.
https://www.amazon.com/dp/B07F7LDYJF/
Yeah but since you don't know about cars what are you gonna do even if you find out? Just take it in to a shop anyway right?
Plus there's this so it'd not end of the works expensive if you do want to find out https://www.amazon.com/dp/B01C3HAHCS/ref=cm_sw_r_other_apa_OMxqybKVX4J86
https://www.amazon.com/Goliath-Industry-Wireless-Upgraded-Connects/dp/B01C3HAHCS/ref=sr_1_9?ie=UTF8&qid=1480687470&sr=8-9&keywords=OBD+II+reader
I can't find my original model I purchased but it was similar to this one. Just make sure to unplug it after use. Most have protection to ensure it can't send signals INTO your car...and well bluetooth is shoddy as hell in a vehicle...but you never know.
Got a smart phone?
Reader 1
Reader 2
I don't know how shipping works to Canada, but it isn't too expensive of a product, and I am sure you can find it locally. It is a very handy tool.
That sounds like pretty good fuel econ lol. With my tune my 335i gets around 14-18 MPG
you can, or even lower around a quarter if you want. It will take time to work its way into the fuel system, so you're going to want to go through at least 1/8 of a tank, or more. Or try a full tank like this, every highway run leave it in a lower gear to get the cat cooking hot.
Ive had good luck with this scanner, and a $4 app.
https://smile.amazon.com/gp/product/B01C3HAHCS/ref=oh_aui_detailpage_o04_s01?ie=UTF8&psc=1
You can clear a check engine code with one of those $20 WiFi or Bluetooth OBDII code readers and an app. Not sure if it can clear the other lights but it’s worth a try.
Edit: I have this one
https://www.amazon.com/gp/aw/d/B01C3HAHCS/ref=mp_s_a_1_7?ie=UTF8&qid=1520275478&sr=8-7&pi=AC_SX236_SY340_QL65&keywords=obd2+scanner&dpPl=1&dpID=41xGaO7JCrL&ref=plSrch
Thanks, I took my truck back to the dealer and they agreed with me that it was not bad sensors and had him try to change it but their software will only let it be set to a higher pressure and would not let them disable it.
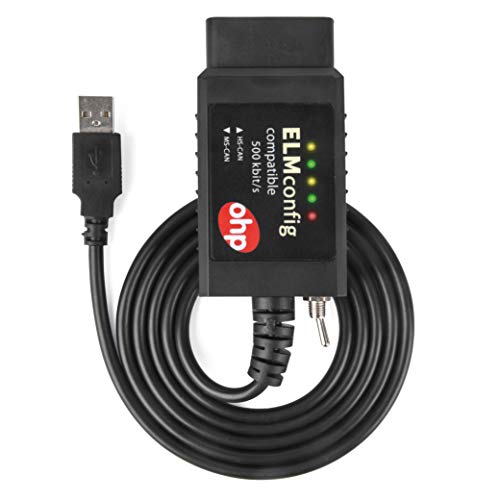
I am going to order a USB to ODB2 adapter (https://www.amazon.com/OHP-ELMconfig-compatible-interface-diagnostics/dp/B01F0GVBWY ) and download Forscan and give this a shot. Can you tell me where it is at in the software?
Forscan is a software you install on a laptop/phone, and use an OBD adapter to change settings within the Ford software.
It sounds crazy, but it’s insane how easy it is. You can change literally any setting on the car, as well as add features. I added the digital speedometer, and tire pressure monitor to screen in the middle of the gauges.
Let me know if you need help with it. Forscan is free, and OBD adapters are like $20-30 on Amazon. I would recommend the OHP ELM27 adapter.
https://www.amazon.com/dp/B01F0GVBWY/
My mistake it was $10 I keep one in every car. You just download the torque app on your phone.
If you don't want to spend as much, I bought this one
https://www.amazon.com/gp/aw/d/B01F0GVBWY?psc=1&ref=ppx_pop_mob_b_asin_title
And it's worked perfectly without any issues whatsoever.
Have you tried a wired usb adapter? I couldn't get bluetooth or wifi ones to work but a wired one works great.
This is the one that worked for me
https://smile.amazon.com/gp/product/B01F0GVBWY/ref=ppx_yo_dt_b_search_asin_title?ie=UTF8&psc=1
For ForScan, I went with the wired OBD2-USB device https://www.amazon.com/gp/product/B01F0GVBWY/ref=oh_aui_search_detailpage?ie=UTF8&psc=1
A lot of people use a bluetooth version, I just didn't want to have to worry about the BT connection dropping in the middle of a "write" and have it mess something up.
Make sure you request your ForScan software license as soon as you order your device, it takes about a day to get approved.
I got the Anzo's and the LED grill lights from Amazon.
https://www.amazon.com/gp/product/B01KBP9RRK/ref=oh_aui_detailpage_o07_s00?ie=UTF8&psc=1
https://www.amazon.com/gp/product/B015ZXPTXO/ref=oh_aui_detailpage_o08_s01?ie=UTF8&psc=1
These are the H7 LEDs I used. (You can't reuse stock H11s) http://www.ebay.com/itm/LED-Headlight-Conversion-LED-Headlight-Bulbs-8000-Lumens-6000K-Plug-N-Play-H7/192063990764?ssPageName=STRK%3AMEBIDX%3AIT&_trksid=p2057872.m2749.l2649 They're unbranded versions of the Oracle's that Stage3 sells, but for about half the price. http://www.stage3motorsports.com//5232-001-Oracle-4-000-Lumen-H7-LED-Conversion-Kit.html
You can get a Bluetooth OBD2 scanner on Amazon for around $11. This is the one I use with Torque.
https://www.amazon.com/dp/B01HXGX8V6/ref=cm_sw_r_cp_apa_1icJAbT64GMYR
I bought this one. I only had it a few weeks, but has worked without issue. There are cheaper ones, bit I got this because it had prime. https://www.amazon.com/dp/B01HXGX8V6/ref=cm_sw_r_cp_dp_T1_VZjqzb9WVN19B
OBD2 OBDII Bluetooth for Android Devices https://www.amazon.com/dp/B01HXGX8V6/ref=cm_sw_r_cp_apa_i_ygp5BbARC58R8
Sorry I just saw your comment. This is the one I have. And the app I have is
https://play.google.com/store/apps/details?id=org.prowl.torque
obd2 elm327 readers can be had for $15
With $8 software, you get verbose at home diagnostic info, including real time while driving.
https://www.amazon.com/dp/B01HXGX8V6/ref=cm_sw_r_cp_awdb_t1_NzW-BbYKWTYMV
Newer cars, it might not even be the alt.
Get this (iOS has an equivalent), and one of these, and you can crack any engine light issue. Mine is going on 11 years. Best purchase I've made.
OHP ELMconfig OBD2 to USB ELM327 Adapter with MS-Can & HS-Can Switch and Forscan Compatible for DIY Ford Diagnostics on Windows https://www.amazon.com/dp/B01F0GVBWY/ref=cm_sw_r_cp_api_i_UHV.Bb509ZBEM
you can buy one of these https://www.amazon.com/OHP-ELMconfig-Adapter-Compatible-Diagnostics/dp/B01F0GVBWY/ref=pd_bxgy_263_2/143-9378873-2981068?_encoding=UTF8&pd_rd_i=B01F0GVBWY&pd_rd_r=2e7e2eef-66cc-497e-9fd2-f88a2d85c46c&pd_rd_w=sYW8F&pd_rd_wg=FswH1&pf_rd_p=09627863-9889-4290-b90a-5e9f86682449&pf_rd_r=8YD7YHWEV7ERNQWK632B&psc=1&refRID=8YD7YHWEV7ERNQWK632B
and download this forscan.org
​
to access the CAN bus and modify LCM data ie turn off dark mode and enable keyless entry, without going to the dealership.
That scan tool also will read out OBD2 codes and live stream diagnostic data ie cylinder head temps etc.
I've done 2 plugs now with the following kit. It's easy to do, and never had any issues with them since. Take your time, follow directions, and don't rush it. They hold solid and I've never had another issue:
https://www.amazon.com/Helicoil-5334-14-Thread-Thread-Repair/dp/B0002SRF4O/ref=sr_1_fkmr0_1?ie=UTF8&qid=1543236298&sr=8-1-fkmr0&keywords=save+a+thread+spark+plug+repair+4.6
I used this kit to fix a stripped spark plug hole on an old trimmer. No real problems except the coil coming out with the plug the first time I removed it.
Your list looks good, but is lacking a few item IMO:
http://www.amazon.com/Meguiars-X3002-Microfiber-Wash-Mitt/dp/B000RXKR6M/ref=sr_1_1?s=automotive&ie=UTF8&qid=1396913798&sr=1-1&keywords=microfiber+wash+mitt The mitt you listed should be fine, but I use these. I have 3 of them and it's good to have more than one lying around in case one gets too dirty during the wash. I like to use a different one for the bottom of my car anyway.
I'd get at least one more pack of those Chemical Guys microfiber towels. The more the better.
I use Sonax Full Effect Wheel Cleaner. http://www.amazon.com/Sonax-230200-755-Wheel-Cleaner/dp/B003UT3S6Q/ref=sr_1_1?s=automotive&ie=UTF8&qid=1396914006&sr=1-1&keywords=sonax+full+effect+wheel+cleaner It's a bit pricey but it's very effective at removing brake dust.
For applying the wax, you'll need an applicator pad http://www.amazon.com/Meguiars-X3070-Soft-Foam-Applicator/dp/B0009IQZPW/ref=sr_1_1?s=automotive&ie=UTF8&qid=1396914054&sr=1-1&keywords=foam+applicator+pad
Get one of these:
http://www.amazon.com/INNOVA-3721-Battery-Charging-Monitor/dp/B000EVWDU0
And report back voltage with car running at around 1500RPM.
Having said that, I'm pretty sure that your alternator is shot.
would something like this or this be able to tell me?
I think it's more to do with the battery not having enough time to fully charge due to the short driving distance.
Perhaps you should pick up a voltmeter for like $10ish on Amazon.com or a local shop? You can take measurements in the morning when it's not starting well and later in the day when it is starting well. It'll be difficult for the dealership to replicate your driving pattern so perhaps it's best that you do it.
Something like this: http://www.amazon.com/INNOVA-3721-Battery-Charging-Monitor/dp/B000EVWDU0/ref=sr_1_3?ie=UTF8&qid=1406872499&sr=8-3&keywords=voltmeter+car
I have this one but it's a bit more complicated and works on other things also: http://www.amazon.com/Mastech-MS8268-Digital-Manual-Multimeter/dp/B0050LVFS0/ref=sr_1_7?ie=UTF8&qid=1406872598&sr=8-7&keywords=voltmeter
As long as you're taking some long drives or you're doing extra charging at the correct voltage for AGM you should be good without a diode mod, I'm not sure how the voltage regulator works exactly, but I'm guessing this just tricks it into regulating at a higher voltage since silicon diodes have a forward voltage of about 0.7v this would raise an alternator putting out 14.2v to 14.9v. How the stock regulator adjusts for bulk, absorption, equalization, and float charge I'm not sure, and I'm not sure how this mod would effect it. But it looks like enough people have done it that if there were issues it would be known by now, I wouldn't do as some people are doing and just putting a diode in place of a fuse, but put it in line with a fuse like the product above is with an add a circuit mod.
I'd just get a cheap volt meter to measure usage. As long as the battery isn't under much load, it should be accurate enough. Typically you don't want to run a deep cycle battery below 50% for best life, though you can go down to 20% occasionally without much damage to a quality deep cycle, for an AGM that is usually 12.2v(50% @80ºF) and 11.8v(20% @80ºF) with full charge being around 12.8v after the float charge is gone. With a big battery like this you could probably start your truck with 20% charge, but I'd carry a lithium jump pack if I was planning on trying it alone with no one around to jump me.
The switch pro units do look pretty awesome, despite being expensive. Being able to use ignition only wired thing by using the app rather than putting the key in does look like an awesome feature. As well as output dimming for lights that support it. 2 year warranty does seem kind crummy, but I imagine most failure would be DOA/Crib deaths or from abuse, being solid state and not using relays that wear out over time.
A noco G3500 or G7200 is plenty for overnight charging of a single 100ah battery like yours, especially if just topping it off. Get the 7200 if you think you'll go dual battery in the future.
Get yourself one of these lil guys. It checks both your battery and your alternator.
I use one of these on both my starting and house systems.
http://www.amazon.com/gp/product/B000EVWDU0?keywords=voltmeter&qid=1448302823&ref_=sr_1_23&s=automotive&sr=1-23
If you're handy with tools you could probably knock the cigarette lighter adapter off and stick it on the wall wired in to your house system.
If you're designing the system for scratch, it would be nice to include an shunt and ammeter so you can see real time draw on the system.
I recently purchased one of these handy little gadgets that help me determine intermittent no start issues. http://www.amazon.com/gp/product/B000EVWDU0/ref=oh_details_o01_s00_i01?ie=UTF8&psc=1
You plug it in before starting to get an idea of the level your battery is at, while starting and cranking. Also, you can get a GENERAL idea of battery drain by checking level when you turn car off and checking next morning before starting. Best way is for a shop to hook a test light in the circuit to represent battery draw. However, a minute draw is normal as well. Have you installed anything aftermarket like alarms, amplifiers, or have anything hooked to your cigarette lighter? Anything weird youve noticed with lighting? Also, if you do not connect a boost box, charger, or anything and let it sit, will it start back up later? Also, when the problem occurs and the engine "gives up" do the lights dim down and it starts doing multiple clicks?
Yup anytime. Fixing your own stuff is really rewarding. Its nice to look at how much money you saved doing a repair yourself to justify investing the money on tools and your own experience. You may break parts along the way, break tools, bash knuckles, and get frustrated but it's all part of learning and appreciating machinery. I am a firm believer that you will do a far better job and have far more vested interest in your machine than any mechanic you are paying. Check out this book if you need a good read, nice discussion on the value of working on your own things.
The option to admit defeat and take it to a shop is always there. Just remember that none of these things are magic, bikes are pretty simple machines when compared to what else is out there. Don't be afraid to set it down and come back to it later.
OH! One of these is also super useful.
If you have some free time, and don't mind the occasional swear word, this guy AvE makes some awesome videos...takes aparts things and explains what's going on, tests tools, cool fixes, general machine shop tom foolery. Worth a watch.
I hate when this happens. Bought one of these and they changed my life lol
LPT: Use some of these. It is a life saver.
http://www.amazon.com/Titan-TIT11061-Mini-Magnetic-Tray/dp/B000HYL20G
invest in these...
https://www.amazon.com/Rosewill-Anti-Static-Components-RTK-002-Yellow/dp/B004N8ZQKY
https://www.amazon.com/Titan-Tools-11061-Magnetic-Parts/dp/B000HYL20G/ref=sr_1_1?ie=UTF8&qid=1504297831&sr=8-1&keywords=magnetic+bowl
https://www.amazon.com/TANKING-Reusable-Fastening-Microfiber-Cloth-6/dp/B01K021UAG/ref=sr_1_7?s=electronics&ie=UTF8&qid=1504297886&sr=1-7&keywords=velcro+cable+ties
It was not hard to build the mobo into the case, just keep on top of your cable management. If you can, remove the HD sled first (unless of course you need it). All the screws come with the products that I purchased, yes. Be careful about stripping screws, just use the proper driver (no power!). I believe I have 8 standoffs mounted + 1 nub that comes pre-attached to the case. I probably watched ALL the youtube videos, lol. https://www.youtube.com/results?search_query=fractal+meshify+c+build
Things I made sure I had for my build before all my parts showed up.
I got most of these items as a tip from a youtube video but I can not find it at the moment. Yeah, definitely let me know if you need help with anything or just want me to show you "how I did it". The manual for the mother board has the header LEDs defined on there, there is one dead spot (no pin) in the top right, obviously dont use that one but also don't use the one below it even though its labeled ground for the reset button (thats the only issue I had).
This Maybe tray is an exageration. It's a small bowl
Be 100% sure there are no bubbles. I also worked on my car in the garage. Flushed twice, filled, overheated, bought burping kit and haven't overheated since.
Lisle 24610 Spill-Free Funnel https://www.amazon.com/dp/B001A4EAV0/ref=cm_sw_r_cp_apa_HGbYxb7B0MGKA
If you need to bleed the system for some reason (when the car is cold) you can open the top coolant tank near the turbo, then start the engine and fill from there while the car is running with the heater on full, and it will self purge all the air out of the system. When no more bubbles are coming out you can cap it off then shut it down.
I use one of these http://www.amazon.com/Lisle-24610-Spill-Free-Funnel/dp/B001A4EAV0/ref=sr_1_1?ie=UTF8&qid=1397505519&sr=8-1&keywords=no+spill+funnel and run a full heat cycle (all the way up to temp and then back to cold), but I change or am pulling the radiator frequently for various reasons.
Standard cautions apply: coolant gets very hot and if you don't know what you are doing you can seriously burn yourself. Just trying to add some helpful tips as a starting point if you need them in the future.
Have you bleed the cooling system? Try a Lisle coolant bleeder funnel.
http://www.amazon.com/Lisle-24610-Spill-Free-Funnel/dp/B001A4EAV0
If your heater doesn't work you have air in the system. Did you loosen the bleeder screw above the water pump in the heater hose to let all the air out? If it doesn't have that screw take the elbow hose loose above the pump(at it's highest point) and fill till coolant comes out. Then run engine letting the thermostat cycle a few times keeping it near full each time. I've found an engine burp funnel to be very handy on that engine. Running the engine low like that can blow a headgasket or crack a head, takes a while but...
http://www.amazon.com/Lisle-24610-Spill-Free-Funnel/dp/B001A4EAV0
You'll definitely want a set of these babies:
https://www.amazon.com/Hansen-Global-Metric-Socket-Storage/dp/B001C6NL52/ref=sr_1_1?ie=UTF8&qid=1468292113&sr=8-1&keywords=socket+organizer
Yep. They're called Hansen trays I believe.
http://www.amazon.com/Hansen-Global-Socket-Tray-Pack/dp/B001C6NL52/ref=sr_1_1?s=hi&ie=UTF8&qid=1398258178&sr=1-1&keywords=hansen+socket+tray
That's per set of 3. So you would need 2 of those sets to cover standard and metric. Looks like they're $45 right now on Amazon, thought I remembered them being a few dollars cheaper. So ok they're $5 more expensive than regular price at HF. Depending on your sales tax that makes it pretty much a wash. If the coupon works and your willing to make a couple trips then HF is a cheaper, as long as the quality is ok.
They look like these.
http://www.amazon.com/Hansen-Global-92000-Metric-Storage/dp/B001C6NL52/ref=sr_1_1?ie=UTF8&qid=1426925670&sr=8-1&keywords=hansen+socket+tray
But $10 is a lot for a plastic tray with some numbers on it.
These orange pads are 7 dollars with prime. Is that too expensive? I use these occasionally for AIO and they've been ok. Lake country is better but not available the way you want to get them.
You want pads that match the aggressiveness of the product you are using to get the best finish possible using that product. That's just how it works. You can certainly use compounding pads for polish to up the aggressiveness(m205 comes to mind with this) but you still want polishing pads to finish without micromarring. I use a minimum of two per car, per color(except lsp, I have dedicated pads for each of my products that I use), switching at about the halfway point, maybe more if I use heavier polishes/compounds. Never work with a dirty pad, you're creating frustrations for yourself.
I use these when applying the M105:
Chemical Guys BUFX_102_HEX5 Hex-Logic Medium-Heavy Cutting Pad, Orange (5.5 Inch) https://www.amazon.com/dp/B0040MI9H0/ref=cm_sw_r_cp_apap_JnEUTcXh1t2xd
Then I switch to these to apply the M205:
Chemical Guys BUFX_104_HEX5 Hex-Logic Light-Medium Polishing Pad, White (5.5 Inch) https://www.amazon.com/dp/B0041MVQ4M/ref=cm_sw_r_cp_apap_3CuEdXSpOPLHj
To be honest, I can't tell much of a difference before and after using the M205. I can definitely see improvement after using the M105 but yeah, last week I did my front driver's side fender and it took me five hours. Sad face.
Sometimes I think I should have bought a flex as I understand they work faster. I went with the PC because I understood it to be extremely safe. Being my first time and all, I wanted to be safe rather than burn my paint. But yeah, five hours/panel is ridiculous.
Look at all of the colors of pads out there. Blues, blacks, and Red are for finishing. Whites, oranges,and yellows are medium to high aggressive.
On my black paint I used an Orange, Green, Black, then red for waxing. I used CG V36 and V38. But used the V36 on my Orange pad only then V38 on the Green and Black pads. To bring me to a liquid wax/sealant on the red pad. Let it cure, then the next day applying Collinite as my last step.
I don't think you should focus on removing 100% of the swirls. But make it look 50-80% better. You don't want to wear down your paint. I highly recommend a test spot. My favorite is the top of the trunk. Tape off half of it. Do half through all of your steps. Review it with a few different lights, and sunlight to see your progress. Maybe take some photos of it. Once you get to the waxing with the polisher, it'll cover up the remaining swirls as the machine is amazing for waxing. Just don't machine wax a car if you haven't clayed or polished.
The biggest thing is to get the pattern of buffing down. And to be patient. For me, I could never do an entire car in one day. I'd do the hood and one half of the car, as best I could, then do the other half the next weekend or the next day.
Another thing, go on the Lexus Forums or even Autopia detailing and look at their detailing steps on the same car/paint. They may show the products they used and pads. But it's also not about the products but you can ask them questions if you need any quick tips. Overall, I think a few passes with 3 pads with a liquid wax will do wonders for your test spot. And if you proceed then tape off sections of the hood into 6ths and door panels into 4ths.
Amazon example: Hover over the Style for the pad and it will show you the color.. You can review the crap out of every product out there, but you just have to decide, then do it. I've used those exact pads and they worked awesome. Choose 2 polishes and 1 liquid wax along with 1 hand wax like Collinite or something else. Don't forget to clay bar your car before polishing and even though I don't always use a backing plate, it makes handling the DA polisher easier.
Why a smaller pad size? Just to focus on a smaller area? Also what do you think about Chemical Guys Backing Pads. I'm not sure really which ones I would need though in terms of light/medium/heavy for cutting, polishing.
If that is correct for the steel wool would I be able to buff that out using the 1200 then 2000? I only did a couple passes lightly on the scratches with the steel wool, but the result is a "fuzzy" looking area with the rest of my car having that black gloss look. I'm not looking for perfection just not as noticeable as it is now since there isn't a luster/shine.
Thanks for the feedback!
Are you going to be using them in parallel for 12v or series for 24 volt? If your end goal is 70ah of 12v you can just connect the charger to the batteries positive and negative respectively with the two batteries still connected together.
If you dont plan on draining the batteries much or don't mind longer charging times something like
this will work just fine. If you want faster charging time or plan on draining more amps out of the batteries then I would buy one of the higher amperage charger offered in the link.
Some batteries will show a C rating. That's the charging rate relative to the battery capacity.
For instance, I have a 7.2Ah battery that mentions a 0.3C charging rate. That means that I should charge it at 7.2Ah * 0.3 = 2,16 amps.
15 amps is probably too much for a 18 Ah. From what I see online, a certain battery mentions 5.4A max. Yours should be around that, too.
Plus, most modern deep discharge SLAs are AGM (Absorbent Glass Mat) and will need a bit more voltage than car batteries. Mine should be charged at 14.7V.
For that reason, I would suggest using a charger designed for AGMs. I have this one that can charger both my car and my AGMs and it works well.
Feel free to ask any question if you have some :)
That was my worry.
I have a "smart" battery charger linked here but it refuses to start charging unless the voltage is above 1.8V. I have read in the reviews that it might require at least 3V to understand what battery it is dealing with.
Thats why I was asking if there was any charger that would trickle charge it manually to get it up to a higher voltage. Like would something like the famous "Battery Tender Junior" work?
What would you say if I were to just jump the battery from the portable charger that I linked, run the car for 10 minutes just to get a little bit of voltage, then use my slow "smart" charger to slowly charge the battery over the course of many hours or days.
I feel like this will put the least amount of strain on my battery, prevent me from having to risk some other car, and not have to undo the battery, its bolted bracket, and lug it somewhere.
What is your honest opinion on this course of action? Do you think the alternator and\or dead battery will suffer severe damage from this plan?
I wonder if I need something like this would suffice, or if I'd need something like this.
Power / Inverter Question:
With out going into too much detail, let's just say my rig will be connected to shore power on most excursions, call me a weekend warrior.
Somewhere down the road I will probably add Solar but that is not within the next 1-2 years.
When connected to shore power my LED lights would still be on 12v power. So here we go...
​
​
​
Thanks!
Your solar panel produces DC energy while a charging station offers AC energy for a different type of charging system.
You could bypass everything and use a conventional battery charger. What type of battery(s) are you charging?
This one on amazon
resistance is close if you null the leads, or in the case of cheap meters without a delta function, note the lead resistance, check the resistance of the thing you're looking, then subtract the lead resistance.
Here, I took a few pics of nulling leads My meter is a $10 "broken" Fluke 87 from fleabay about 15 years ago(had a blown fuse and one of the battery wires was broken) and the leads are $5 HP/Agilent probes. My Cats is 0.5Ω on a Cana, 0.50Ω on efest meter, 0.3Ω lead resistance, 0.8Ω total resistance of Cats and Leads, or 0.8Ω - 0.3Ω = 0.5Ω, or pressing the delta button while reading the leads, then reading the Cats gave me 0.5Ω. The cat's has 4 ~1.8Ω coils plus the resistance of the RDA itself, so it's pretty close.
For people that don't have a meter, and want a cheap one, Here's a great one for $25 with autoranging, screen light, rel, and everything else you need.
I wouldn't say that all multimeters are accurate. I have a few of the free harbor freight ones and I wouldn't trust them to read ohms. I only use them to test voltage of my batteries. You're supposed to test the resistance of your leads and then subtract that from your reading that you get, but I still find that it tends to be .1 or .2 above or below my real ohms.
I know this is one that a lot of vapers use. I heard its pretty accurate but I can't comment on that myself as I haven't owned one. It's an auto ranging one so you don't have to include the resistance of your leads if you're trying to read ohms.
If you're going for accuracy, I would trust my life with a fluke multimeter but obviously that's quite far from being affordable. It would be worth picking one up if you could get one for cheap from someone you know or craigslist or something though.
I am looking at this one - http://www.amazon.com/dp/B0050LVFS0/ref=wl_it_dp_o_pC_nS_ttl?_encoding=UTF8&colid=28TFHN6YFDN48&coliid=I2YTJG4QJS5MMA
I don't see anything particularly wrong with that -- any shoddy multimeter will do fine for ohming out a coil.
I'd suggest getting a halfway-decent auto-ranging multimeter just because they're nice to use and because whatever you buy will inevitably get tossed into the toolbox and you'll be using it for other stuff for the house or car.
This one seems okay for an inexpensive meter, based on all of two minutes of searching around: http://www.amazon.com/dp/B0050LVFS0
http://www.amazon.com/gp/aw/d/B0050LVFS0 and http://www.amazon.com/gp/aw/d/B002LZTKIU
I've never used a fluke before, only heard good things about them. I will say that the one I recently purchased http://www.amazon.com/gp/aw/d/B0050LVFS0 is worlds better than my previous cheap ones.
Just got one of these:
http://www.amazon.com/gp/product/B0050LVFS0/ref=oh_details_o00_s00_i00
It's been great so far.
A simpler option is to tie things to a bluetooth device that is always in the car, and is only turned on when the car is turned on. There are bluetooth car kits available. Another option (if you don't want a car kit) is to get a bluetooth ELM327 adapter like this http://www.amazon.com/Bluetooth-Diagnostic-Scanner-Engine-Reader/dp/B0051CAE1C. It plugs into the ODBII port on the car. If you install an app like Torque you can read the information from your car computer as well - helpful if the "check engine" light comes on.
In order for this to work would I need to get something like this? http://www.amazon.com/ELM327-Bluetooth-Diagnostic-Scanner-Scantool/dp/B0051CAE1C
If so, what's the best scanner for the money
Getcha one of these:
http://www.amazon.com/ELM327-Bluetooth-Diagnostic-Scanner-Scantool/dp/B0051CAE1C
And this app:
https://play.google.com/store/apps/details?id=org.prowl.torque&hl=en
I don't know the iPhone equivalent but I'm sure there is one.
App was $5 when I bought it so you're looking at an outlay of about $20.
Being a former VW owner myself...you're going to want to spend this money.
theyre $12 not really that special.
https://www.amazon.com/Bluetooth-Diagnostic-Scanner-Engine-Reader/dp/B0051CAE1C
How fast is your deadline? Order a bluetooth or wifi elm 327 adapter & get the code yourself. You'll need wifi for iphone or bluetooth will work with android: https://www.amazon.ca/ELM327-Bluetooth-Diagnostic-Scanner-Scantool/dp/B0051CAE1C
Unlikely. The check engine light comes on for a variety of reasons but fuel economy and tire pressure is not one of them, not directly at least. What is causing the check engine light to come on may indirectly affect your fuel economy but it definitely won't come on just because the mileage has gone down or the tire pressure sensor light is on.
Get one of these ($13) and any one of the myriad programs for your phone that will read your codes. Torque is excellent if you have Android, and there is a free version.
http://www.amazon.com/gp/product/B0051CAE1C/ref=oh_aui_detailpage_o00_s00?ie=UTF8&psc=1
I just got this. Works fine. Takes maybe a minute or two to fully connect though,
Next time, get one of these. You can plug it into the OBDII port of your car. If you have android, get this app. Connect your phone to the scanner via Bluetooth and use the app to read the code.
The one I have looks like this and this. If you plan on leaving it plugged in, I'd recommend a smaller one as long as it has good reviews, depending on where your car's port is located. The one I got sticks out about 3 inches so my knee or foot hits it when it's plugged in.
I have had this one:
http://www.amazon.com/Version-Bluetooth-Diagnostic-Interface-Scanner/dp/B008UR7J6I
for 2 years - works FANTASTIC I use it on my Mini, BMW, GTO and Civic as well as my dad's Ram and mom's A4.
For iPhone:
http://www.amazon.com/Elm327-Wirless-Diagnostic-Scanner-Wireless/dp/B00871CJFI
For Android:
http://www.amazon.com/Version-Bluetooth-Diagnostic-Interface-Scanner/dp/B008UR7J6I
There are "mini" versions but I have 0 experience with those. I'm sure they work just as well. Hope this helps!
https://www.amazon.com/gp/aw/d/B008UR7J6I/ref=yo_ii_img?ie=UTF8&psc=1
Cheaper version that works just as well!
Amazon has a replacement spout that is just the old-style bendy tube.
Get a normal can and get rid of all the EPA crap.
https://www.amazon.com/dp/B00CYNDNM8/ref=cm_sw_r_sms_c_api_ztQWBb4ZJZ1GS
You're welcome! Happy I could help.
Speaking of my spare gas, I'm just about to order one of these:
https://www.amazon.com/gp/aw/d/B00CYNDNM8/ref=mp_s_a_1_1?ie=UTF8&qid=1469220954&sr=8-1&pi=SY200_QL40&keywords=replacement+spout&dpPl=1&dpID=41NzOnHgyZL&ref=plSrch
My plastic gas container has one of those EPA approved annoying as hell spouts on it. So I'm replacing it with this "water" spout. Coincidentally I was low on gas but not out yet and needed to get somewhere just a couple weeks ago so I poured in my gallon and was reminded of just what a pain the standard spout is. So I'm getting a better spout. You may want to also.
For oil, use a funnel. For gas, get a kit that converts the gas can to a "water can".
Here is one solution to that bullshit.
https://www.amazon.com/gp/aw/d/B00CYNDNM8/ref=mp_s_a_1_1?ie=UTF8&qid=1478797756&sr=8-1&pi=AC_SX236_SY340_FMwebp_QL65&keywords=B00CYNDNM8%7CB00NB3UUDK%7CB00P9QKPEG%7CB00YP3YTXM&dpPl=1&dpID=41NzOnHgyZL&ref=plSrch
One of the best portable phone chargers I have ever used (though its $5 over your limit): http://www.amazon.com/gp/product/B009V5X1CE/ref=oh_details_o04_s00_i00?ie=UTF8&psc=1
Someone else suggested this same fan (but here is a link for $9.99 instead of $19.95) I used it last year in my tent and it worked great: http://www.amazon.com/gp/product/B001AVMSEY/ref=oh_details_o00_s01_i00?ie=UTF8&psc=1 (thinking about making a swamp cooler with this fan and a styrofoam cooler this year!)
If your car camping, this is can charge/run 7 different items at once: http://www.amazon.com/gp/product/B00EY6RJKA/ref=oh_details_o01_s00_i01?ie=UTF8&psc=1
Also if car camping, and will need to run your car at all to charge things, a flexible duct to route exhaust out of your campground is invaluable!: http://www.amazon.com/Dundas-Jafine-BTD48TC-ProFlex-Transition/dp/B0015UGPWQ/ref=sr_1_3?ie=UTF8&qid=1396231801&sr=8-3&keywords=dryer+vent
So this weekend I plan on playing music through speakers and a laptop power through my car. I am using this which has a stated output of 200W Rated, 250W Max, 500W Peak (AC). The speakers I am using are LSR305s which have an LF Driver Power Amp 41W Class D and a HF Driver Power Amp 41 W Class D. I am using two of these and at times I'll need to charge my 2012 Macbook (simultaneously maybe) which uses a 60W charger.
I'm kind of lost looking at all these numbers. For example, do I add the LF and HF amp and multiply by two an add the charger wattage? The back of the LSR305s say 127W Max, is that at full volume?
-- If you email them they can answer your questions about the inverter, and that might be a good idea because it can vary from what's pictured, but the pic looks like it has one USB port and one plug port for European plugs. I brought my own inverter, this one which has 4 USB ports and 3 US outlets. The red version has better USB ports (4x 2.1a instead of 2x 2.1 and 2x 1a). With this I never needed to look for an outlet to charge any of my gear.
-- The stoves are usually butane fuel and come with one bottle. On my trip fuel was readily available at gas stations and some campgrounds. They may have supplies from previous renters you can pick through as well.
-- I bought all my food there (my van had a fridge) so I'm no help on this one.
Enjoy your trip!
The Schumacher will certainly do the job - but for [$125 you get to carry around 24 lbs. of 22 amp hour battery and a compressor] (http://www.amazon.com/gp/product/B004EIAADG/ref=as_li_tl?ie=UTF8&camp=1789&creative=390957&creativeASIN=B004EIAADG&linkCode=as2&tag=battleforthew-20). The thing is so heavy that I hate carrying it back and forth to the car after I charge it up in the garage.
I bought this thing 3 years ago, and it has served me well, but I wouldn't buy it again now that lithium batteries have come down so far in price.
Today, you can get a [50.8 amp hour lithium jump starter/power pack for $62 that weighs less than a pound] (http://www.amazon.com/gp/product/B012SF971W/ref=as_li_tl?ie=UTF8&camp=1789&creative=390957&creativeASIN=B012SF971W&linkCode=as2&tag=battleforthew-20). With a [$13.79 female cigarette socket] (http://www.amazon.com/gp/product/B007SP4KV0/ref=as_li_tl?ie=UTF8&camp=1789&creative=390957&creativeASIN=B007SP4KV0&linkCode=as2&tag=battleforthew-20) and a [$25.99 inverter] (http://www.amazon.com/gp/product/B00EY6RJKA/ref=as_li_tl?ie=UTF8&camp=1789&creative=390957&creativeASIN=B00EY6RJKA&linkCode=as2&tag=battleforthew-20), you can pay $24 less, charge everything you need to charge - and not break your back carrying an old-style lead acid battery around.
Again, hope this is helpful!
https://www.amazon.com/ZENY-Single-Stage-Economy-Conditioner-Refrigerant/dp/B012CFTYX4/ref=sr_1_1_sspa?s=automotive&ie=UTF8&qid=1541546220&sr=1-1-spons&keywords=vacuum+pump&psc=1
Here is the vacuum pump I use with a pressure gauge and a big pickle jar. It works. https://www.amazon.com/ZENY-Single-Stage-Economy-Conditioner-Refrigerant/dp/B012CFTYX4/ref=sr_1_4?ie=UTF8&qid=1501206918&sr=8-4&keywords=vacuum+pump
fuck that, my truck needs this
I bought my chamber off of ebay, if you want to stabilize wood ive read you need to get a pyrex lid for the chamber, or if you're just using a pressure pot or something to make one I guess you don't have to worry about it but it helps to see inside to prevent overflow. There's a few different brands but shattervac is the one that comes to mind it's designed specifically for stabalizing wood .This is the pump I bought and it works like a champ, what you're paying for with the pumps is speed, and to evacuate a small chamber doesn't really take long. I would definitely invest in some casting resin though it's amazing what you can do with it, i think I paid 30$ for half a gallon and I haven't even gone through half of it yet even with all my dicking around with it.
https://www.amazon.com/dp/B012CFTYX4/ref=cm_sw_r_other_awd_CB2IwbH651W8M. This is all you need in a vacuum. I've been working on both a bestvalue and a provac recently. Hands down the best value has an easier seal to deal with than the provac. The vacuum listed links an adapter. You might need this depending on the hosing you use
I've actually been looking online recently, I just wanted to know if I could find anything locally. And does one stage or two stage matter?
I've been thinking about this one.
https://www.amazon.com/ZENY-Single-Stage-Economy-Conditioner-Refrigerant/dp/B012CFTYX4
Being that it was Firestone, I'm surprised it wasn't more to be honest. Still though you can certainly save yourself $40-$50. You can get a cheap vacuum pump off amazon that will get the job done for $60 here: https://www.amazon.com/gp/product/B012CFTYX4/ref=s9_acsd_top_hd_bw_b13u7N_c_x_1_w?pf_rd_m=ATVPDKIKX0DER&pf_rd_s=merchandised-search-3&pf_rd_r=NXXYP4JC802N2NRXEGN7&pf_rd_t=101&pf_rd_p=e98866ae-299e-5a56-8e32-a4a8bf2f2b3f&pf_rd_i=15707041
Just dont expect it to be /r/buyitforlife quality of course.
As far as finding on the how to of AC systems I would check out ChrisFix's videos here:
How to replace a compressor: https://www.youtube.com/watch?v=rulXlnG2Unk
How to recharge an AC system: https://www.youtube.com/watch?v=Pdq8JAlct6s
How to find a leak (if need be): https://www.youtube.com/watch?v=pCv7rCdcXsc
A friendly reminder that just about any repair for any vehicle is available on youtube. Give your symptoms a google or post in /r/cartalk. Maybe pick up a cheap OBDII scanner.
I have zero training in person on how to fix cars. Everything I know came from youtube. I now do all of my own repairs. Even if you have to buy tools, the total cost comes out cheaper. When I started doing my own repair work, I didn't know the difference between an intake and a spark plug; if I can do it, you can do it.
It's a water jug, not a jet fighter. How hard can filling it up be? What kind of question is this?
Maybe you're thinking about filling them up at the last minute before an emergency? If that's the case I'll say don't do that. Fill them both up now using whatever reasonable means you have at your disposal and maybe alternate emptying one out (either use it all up or dump it) and refilling it every month so you have a nice fresh backup supply if you need it.
Plain non-perfumed Clorox is great for disinfecting and preserving water. While eight drops per gallon is prescribed, I'll assume you get your water from an already clean municipal source. In that case, maybe just put 10 drops in your filled jug before putting it away.
If your concern is filling it up quickly in the field, in a hostile environment, and from a shallow water source I'll recommend something like this to include in your kit.
Otherwise... I don't know... this question is kinda...
I'll go first,
Just use a parts tray, it is magnetic so he screws won't get lost. If you can't figure out where the screws go back, you shouldn't be taking the PC apart in the first place!