(Part 3) Best gardening & lawn care products according to redditors
We found 11,386 Reddit comments discussing the best gardening & lawn care products. We ranked the 4,316 resulting products by number of redditors who mentioned them. Here are the products ranked 41-60. You can also go back to the previous section.


![Lovebay Timing Function Dual Head Grow Light 36LED 5 Dimmable Levels Grow Lamp Bulbs with Adjustable 360 Degree Gooseneck for Indoor Plants Hydroponics Greenhouse Gardening [2019 Upgraded]](https://m.media-amazon.com/images/I/51daLEzWR0L.jpg)
![DIY Micro Automatic Drip Irrigation Kit,Houseplants Self Watering System with 30-Day Digital Programmable Water Timer 5V USB Power Operation for Indoor Potted Plants Vacation Plant Watering [Gen 4]](https://m.media-amazon.com/images/I/41IH5WoYcgL.jpg)


My hands would hurt so bad after a day of using those. I prefer bonsai trimmers like these. They’re cheap, you can trim just as tight, and they’re way easier on the hands.
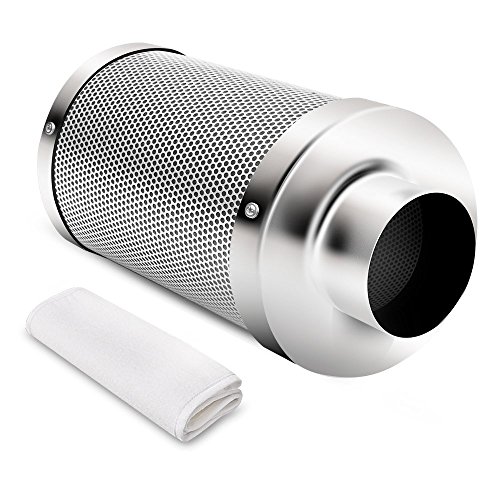
These carbon filters are used mostly in commercial spaces. In the United States they are commonly found in marijuana grow houses to move air outside. A carbon filter removes a high percentage of odors to reduce the risk of detection.
I like them in my home because I'm not a fan of buying other scented products that "mask" smells. When I walk into my home and my carbon filter is on it smells clean. I'm not sure if that clean smell is due to something from the carbon? Either way it's a clean, crisp smell that many people comment on and cannot be replicated by chemicals.
Cons: inline fans are loud and the system is a little bulky. Noise can be reduced by adding ducting to the end or buying insulated fans as referenced below.
Pros: I breath amazing air. You can cook/smoke inside your home and it's still going to smell amazing!
Filter: https://www.amazon.com/gp/aw/d/B008NYF8S4/ref=ya_aw_od_pi?ie=UTF8&psc=1
Quiet fan: https://www.amazon.com/gp/aw/d/B00EIRU2YU/ref=ya_aw_od_pi?ie=UTF8&psc=1
Or..use spring loaded nippers.
Can I start off by saying that this well researched, well organized, informative post is a breath of fresh air compared to the "These balls mean its female, right?" and "Got clone, wat do guyz, lol" type posts, thank you for that.
I'd advise you skip the cheapo fan controllers and go with a Mercury 4 to maintain way tighter temp control. These controllers will raise and lower your fan speed to maintain a 10 degree swing. Or go full bore with the Arduino and control it with that.
A variac fan controller is also a good alternative to the cheap ones.
I'd also recommend a 6 inch setup as they're much more prevalent in home improvement stores. A six inch fan moving the same amount of air will also be quieter.
Consider Jack's hydro 321 if you're concerned you're paying a bit too much for Scott's brand bottled water... I mean GH nutes, sorry, I get confused sometimes.
I like these scissors.
https://smile.amazon.com/Sago-Brothers-Pruning-Scissors-Trimmer/dp/B00P0FK7W6/ref=pd_sim_86_23?_encoding=UTF8&psc=1&refRID=M6MNMDEB9656STMBFWVM
A 40x loupe will be hard to get pics with. People seem to have good luck with those phone attachment macro lenses.
You may need a temp controller for the seedling mat, but I've read of people using pencils under their seedling tray for a little air gap.
That's very cool! I should warn you though, caring for a baby beardie isn't easy or cheap. They need to eat at least twice a day, have salad made every morning, have poops cleaned every day, and have baths regularly, which is a lot to do and can be overwhelming. Their food is also pretty expensive because they can eat over 100 insects per day, it often comes to $20-40 a month. Plus the initial setup will cost a few hundred dollars. I say this not to scare you off (I always love when people get their first reptile) but to warn you. Reading it again it sounds more complicated than it actually is, but you should definitely be prepared to deal with those things.
For now make sure he/she is in a place where they can get to 75-80f. You can worry about high temps later, right now I don't want to risk overheating. Don't worry about feeding for now, they need specific temps to be able to digest, just give some water for now, maybe a place to hide. This should be fine for a few days while you gather the materials you need.
Read through the sidebar and ask questions if something is confusing.
The basic list of stuff you'll need is here:
Enclosure: minimum adult size is 36" x 18" x 18", but 4' x 2' x 2' is better. Can be an aquarium or a wood/pvc enclosure. You can get a 20g tank and upgrade, but there's no point in spending extra money, they don't get scared by big spaces.
Heat: a heat lamp is the best heat source for beardies, it doesn't have to be reptile branded. As long as it gives off bright white/yellow light and gets the temp to 100-110f it works, I have a 90w halogen flood light.
UVB: proper UVB light is essential. The best/only guaranteed good UVB lights are either Mercury vapor bulbs (heat and UVB combined) or fluorescent tubes. Compact bulbs can cause eye problems. Tubes are used much more often and are cheaper and better for beardies. You'll want either a reptisun 10.0 or Arcadia 12% tube, roughly 2/3 the length of the enclosure. They come in two sizes, t5 and t8, t5 is newer, stronger, and better. It gives you more options for where to place it and is lasts 12 months instead of 6 so it's cheaper. Basically, you want either a reptisun 10.0 t5 or Arcadia 12% t5.
UVB fixture: heat lamp fixtures are easy to find, but for uvb it's a bit tougher. This is what I use for my 22" t5: https://www.amazon.com/dp/B00AKKUBDQ/ref=cm_sw_r_cp_apap_as8FHHQMbU3iD
Timer for the lights
Substrate: tile is the best, imo. Paper towels and reptile carpet also work, just stay away from sand.
Basking spot: a large, flat object that absorbs heat well, a tile on a platform works well.
Hides: personally I've never seen my Beardie use a hide, but they're good to have.
Other decor: totally up to you, just make sure it's safe. Reptile hammocks are popular.
Dusting powder: you'll want calcium w/D3 and vitamins, calcium should be used more often.
Thermometer: analog thermometers are inaccurate, you want either a probe thermometer or a temp gun. This is what I have: https://www.amazon.com/dp/B00837ZGRY/ref=cm_sw_r_cp_apap_L679M528XRDNl
Some housing for feeder insects to stay alive for a few weeks and to gut-load them.
Let me know if I forget anything or if you have any questions. Good luck!
Game changing: https://www.amazon.com/Sago-Brothers-Pruning-Scissors-Trimmer/dp/B00P0FK7W6
Just bought another 24 pairs of these babies.
It looks like a thermal burn to me, if it's also scale rot, the care instructions would be the same. But if you are not regulating your heat sources, it's probably a burn.
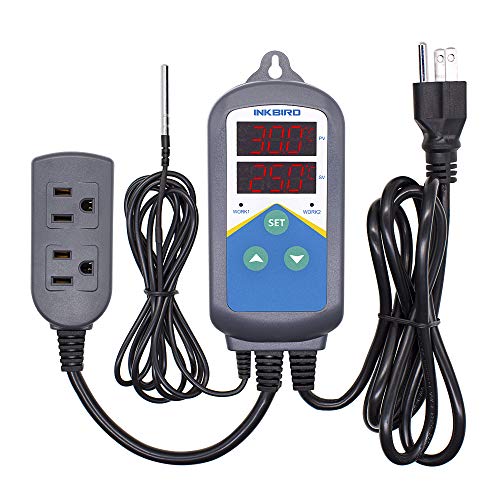
Inkbird makes some affordable thermostats with a few extra safety features. I would start off by making sure every heat source (heating pads, lamps) are hooked up to one. If you have extra money and want a ton of safety features, go with something by Spyder Robotics - their Herpstat line is the best of the best and they are what I use. I know places like PetCo / etc don't say you need a thermostat, but they are absolutely a must-have. Even the most high end heat pads that swear they don't go over X degrees can and will fail and will get hot enough to burn a pet.
Make sure humidity is above 60% at all times. If you are using an enclosure with wire mesh top, cover most of it in saran wrap or foil, this should keep the humidity in. Even after your snake gets better, keep humidity at this level.
Switch to unprinted newspaper or undyed paper towels for substrate for now. Something easily cleanable and sterile. Change it often. Change water and wash bowl daily. Going for a sterile environment while she heals. If you haven't done a deep clean, get some F10 SC and do a deep clean of her enclosure and everything in it. This stuff looks SUPER SCARY, but it's ok! I put 1 ounce in an empty spray bottle and then fill the rest of the spray bottle with water, so it's super diluted. Once diluted, it can be sprayed on any of her decor and be left to dry and still be safe for her.
It goes without saying, but also follow any medication and care directions the vet gives!
Also - there's a lot of info in here that you might not have known before, and it's really understandable. There's a lot of incomplete, inaccurate, and out of date care sheets out there for ball pythons, and even after doing a ton of research, you still could have missed something. But you've figured it out now, and are taking appropriate steps to make her better which is a ton better than a lot of other pet owners. I hope your girl makes a full recovery and you have many more years with her. Please keep us updated!
I would either stop feeding (she probably wouldn't take it anyways) for now, or go down a prey size until she is better.
Unfortunately shiitakes are a bit trickier. They grow best on hardwood logs (oak or the like) in fairly cool temperatures and quite a long time. With work they can grow on "fake logs" but I wouldn't recommend them to a first time grower. It takes a bit of experience juggling temperature, humidity, and air exchange that is best done with another species.
Oysters, on the other hand, will grow on damn near anything. I've seen grows done on phone books, money, even a stuffed bra once. Only thing to watch out for is spore drop. Oysters put out ridiculous amounts of spores and if you are the least bit allergic (or even might be) you do NOT want to attempt growing in your home.
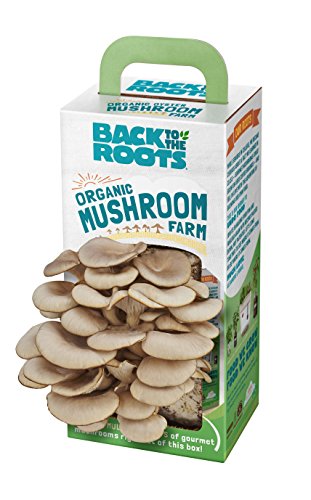
If you just want to experience the fruiting part of the process, you can buy little "grow your own mushroom" kits many places these days (My local grocery store carries them sometimes) for about 20$. This is a block of already-colonized substrate that you just fruit. Quick and simple, its a good way to get your toes wet with minimal expenditure. http://www.amazon.com/Back-Roots-Organic-Mushroom-Farm/dp/B00CD0KZ78?ie=UTF8&keywords=mushroom&qid=1463901150&ref_=sr_1_1_a_it&sr=8-1
Right then, on to the links! Best place online to find mycological information is shroomery.org . Its focus is largely on illegal mushrooms but they have a large and well curated gourmet/medicinal section as well.
https://www.shroomery.org/forums/postlist.php/Board/13
The north american mycological association also has a website with a fairly well written step by step guide through growing oysters.
http://www.namyco.org/cultivation.php
We also have a few fungus friendly subreddits here too!
https://www.reddit.com/r/MushroomGrowers
https://www.reddit.com/r/mycology/
And to round things out, an imgur walk through that would end up with a bucket very like the one in the video up above. This fellow doesn't pasteurize his substrate (risky, but thats his choice) but beyond that the process is more or less the same.
http://imgur.com/a/hjU0o
I can post more/better links when I get home. This work laptop has the horsepower of an anemic wood frog so its a little frustrating pulling things up.
This. For 2k sq ft (which is what I have in my backyard) it will take you about 2-3 hours total of work. Really not that bad at all. Drink a beer and listen to music, podcast, sports, etc. Just water a good amount morning of or day before, it will make it SO much easier.
Alternatively, you can have local landscaping company do it. Prices vary, but typically ~$70-110 USD seems like the average.
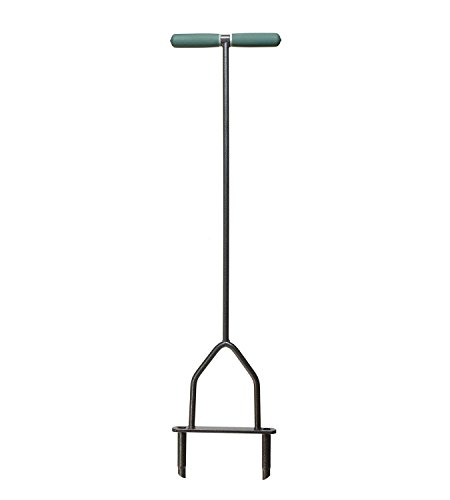
I killed all my grass/weed without pesticides by covering everything with cardboard weighed down by bricks for 3 weeks. I then watered and used a manual aerator. It all cost about $30.
Yard Butler Lawn Coring Aerator Manual Grass Dethatching Turf Plug Core Aeration Tool ID-6C https://www.amazon.com/dp/B00EOMCJD6/ref=cm_sw_r_cp_apa_i_CcuWCbTQNKB10
Burning works and it's way faster. I didn't do that because my area burns easily.
TL;DR: see links below.
Beyond the actual science of which light is best, it really depends for many casual plant owners whether they want the light to look "decor friendly" or they want it to do a bang-up job of growing their plants. Honestly, there aren't many effective lights that look like they belong in a residence. No matter what anyone says, when it comes to grow lights, you do get what you pay for.
Below are 5 well-recommended options. I own all these (and others), having tried many entry-level grow lights. They're ordered by price, low to high, from $15 bulbs that go in ordinary lamps to an excellent entry-level grow light for about $175. The lower end work best as a supplement for natural light. The higher end will let you grow almost anything, even without a window.
Hope this helps you. Any questions, just ask. And yes, there are detailed, technical, scientific explanations for why these are better options than others; you can dive in there if you choose. Let's get to those 5 lights:
Miracle LED Almost Free Energy 100W Spectrum Grow Lite - Daylight White Full Spectrum LED Indoor Plant Growing Light Bulb for DIY Horticulture, Hydroponics, and Indoor Gardens Single Pack
ACKE LED Grow Light for Indoor Plants,Plant Light for Grow Light Stand,DIY Indoor Growing Light Panel for Germination,Seedling,Vegetative Growth and Flowering
Three Heads Grow Lamp, Bevice Full Spectrum LED Plant Light Auto ON&Off with 3/6/12H Timer and Memory Function, Light Intensity Adjustable, for House Plants Seedling Growing Blooming Fruiting
Roleadro LED Grow Light 1000W Full Spectrum 3500k Sunlike Plant Light Dual-Chip with ON/Off Switch and Daisy Chain for Indoor Plants for Seedling,Succulents,Growing,Blooming and Fruiting
Spider Farmer SF 1000 LED Grow Light,with Samsung Chips LM301B & Dimmable Mean Well Driver, Sunlike Full Spectrum 3000K 5000K 660nm 760nm IR for Indoor Plants Veg Flower
Would a fixture like this solve the directional issues of a bulb style light? Just downloaded a light meter, what lux measurement is the goal at the leaves?
a thermostat is a device that regulates the power of another device, such as a heat lamp, in order to control the temperature. a thermometer measures temperature, nothing else.
i'm seeing a ton of red flags here, so i'm going to post my BP info dump. the first three links are detailed care sheets, then a tub tutorial, and the rest are product recommendations. read everything thoroughly, come back with any questions. let me know if any of the links don't work.
glass tanks can be very challenging for ball python husbandry due to the high amount of air flow with the screen top and the total lack of insulation with the glass walls. it's generally recommended to use tubs or pvc reptile cages instead. wood enclosures can also be suitable if they're designed well and sealed properly to protect the wood against moisture. glass tanks can work, but they require a lot of modification and maintenance, which you'll find tips for in the second link. i'll give you product recommendations to cover options for tanks, tubs, and pvc/wood enclosures.
First-hand experience three brands--Apollo, iPower, Aggro Max. Apollo tents are my favorite. And ~$100 US for a 4x4. If you plan on moving/breaking down and setting up the tent a bunch, the more expensive options will be made of stronger materials. If this tent is going to be in a really bright room during dark cycles, be prepared to tape up seams and zippers. Anything less than a $600 Gorilla tent is going to have some minor light leaks.
Reconsider two 600w HPS lights. Lots of people run one 600w in a 4x4. A 4x4 calls for about 800w of HID lighting. Once you pass that, you'll start to see diminishing returns. One dimmable 1000w with a cheap, wide hood will give you all the coverage you need. You'll likely be dialing it down a lot of the time.
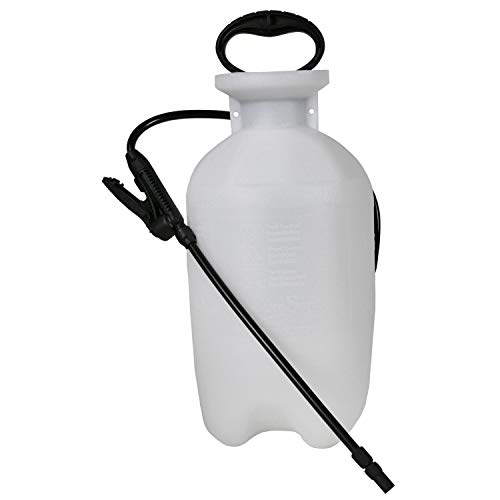
I posted this the other day but a Reddit user suggested I paint it black to have it absorb more heat so I figured I'd post up the finished product. If anyone is interested here's the materials I used, just cut the rubber hose attached to a new clean insecticide sprayer, attach adapter, put on your hose and boom, camp shower with fairly decent water pressure.
https://www.amazon.com/gp/aw/d/B002SAO7XQ/ref=yo_ii_img?ie=UTF8&psc=1
https://www.amazon.com/gp/aw/d/B001GZZFXA/ref=yo_ii_img?ie=UTF8&psc=1
https://www.amazon.com/gp/aw/d/B0039EEN0M/ref=yo_ii_img?ie=UTF8&psc=1
I was cheap and just bought these from Amazon. I have them about two inches away from the top of these succulents. The lights stay on for 8-10 hours.
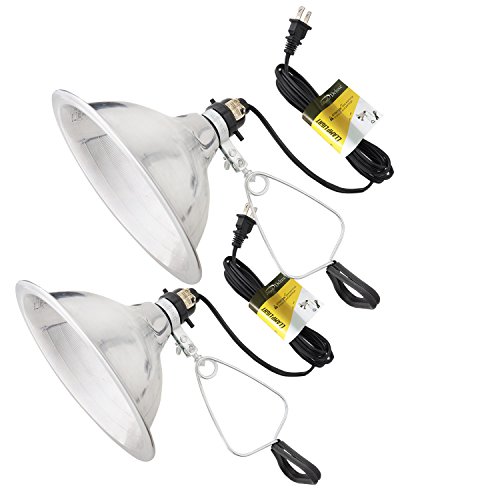
I totally get it. When I had less budget I bought regular old clip lights and a couple of really high lumen bulbs, just enough for a couple of plants (more if you have only small plants, which is mostly what my collection consists of now.) Here's my old setup, you can just see the clip and how close I put super needy plants. Used
this light.
Just bought these at a recommendation from ewwmayo on gardenweb, wonderful so far. If your semps are still alive you can try putting them out now, more likely to survive in cold than no light.
Here is the pump I’ve only been using it a few weeks so I can’t tell you anything about its longevity but I like it. You can set it to run for 1-99 seconds in intervals from 1hr to 30 days. Unfortunately that means a little math. For example I found with my setup it pumps 1 gallon in 540 seconds. So for 1/4gallon / day / each of 3 plants = 68 seconds of watering every 4 hours.
If you get it don’t use the clear tubing that comes with it. Get some proper black irrigation tubing so you don’t get stuff growing in the lines.
https://www.amazon.com/Back-Roots-Organic-Mushroom-Farm/dp/B00CD0KZ78
here you go:
https://www.amazon.com/Apollo-Horticulture-GLK600LS24-Digital-Dimmable/dp/B005ECZQTY/ref=sr_1_6?ie=UTF8&qid=1510944022&sr=8-6&keywords=HPS+600w&dpID=51oUcNAloTL&preST=_SY300_QL70_&dpSrc=srch
First grow.
This took 2-3 months. Seems like I ran into a number of first-timer pitfalls along the way. Good learning experience though.
Can't wait. So god damn tired of shady, undependable hook ups.
Edit 2:
Photos of my setup.
Edit 1:
Some have asked about my setup. This is about everything. This is my first grow so take my suggestions with a cup of salt but this stuff has worked well for me.
Tent:
Zero complains. Very happy with this. It just fits perfectly into a closet (had to remove the hanger bar though).
http://www.amazon.com/gp/product/B004U6WCMY
Air
Carbon filter:
The inside of my tent stinks. I smell absolutely nothing outside. Don't get caught. Get a good carbon filter. Maybe not this one, but something.
http://www.amazon.com/gp/product/B004FVJK60
Inline fan:
I hand this outside the tent. No need to take up any space or add any heat inside the tent.
http://www.amazon.com/gp/product/B002JQ14F8
Variable xformer for fan control:
This allows me to control the noise and airflow. Every other fan controller made the fan buzz. This thing is quality built. I keep it around 50v.
http://www.amazon.com/gp/product/B006NGI8VS
Circulation fans:
http://www.amazon.com/gp/product/B004RTMD8C
DWC
Bucket top net pots:
http://www.amazon.com/gp/product/B0049XIIGC
Air pump:
http://www.amazon.com/gp/product/B002JPEVMC
Airline:
The black just prevents light from getting into my res.
http://www.amazon.com/gp/product/B001D4XTUU
Air stones:
http://www.amazon.com/gp/product/B0050HJ7Q6
Check valves:
You NEED these. Many airlines are thin enough that if the power goes out or a hose becomes disconnected, capillary action might permit water to back-flow into your electrical air pump and/or just flood your room. Don't take chances when a .50 cent valve will protect you. There are some horror stories in the aquarium hobby about this. Note, even if the air pump is higher than your res, capillary action can pull the water up through the air hose. This is the same principle that allows 100ft trees carry water from the roots to the canopy.
http://www.amazon.com/gp/product/B00977J508
Lighting
Lights:
Word of warning. Start off a good distance between the lights and your canopy. These product more light than you think and I have burned and cooked plants from keeping these too close. They don't product a ton of heat or anything. I think it's just too much light if they aren't a good foot or so away from the canopy. I assumed I could practically lay LEDs on top of my canopy. Not so.
http://www.amazon.com/gp/product/B00FGFLCXS
Adjustable ropes for lights:
Chains work, these are just faster/easier to adjust.
http://www.amazon.com/gp/product/B0098R0600
Tools
Temp/humidity sensors:
http://www.amazon.com/gp/product/B0013BKDO8
pH pen:
I used to do chemical reagent tests (I have tons of aquariums so I had it laying around). Never again. A pen is fucking awesome for dialing in pH every morning. Get one!
http://www.amazon.com/gp/product/B00EQISYQO
Pruning snips:
These are great. Sharp as fuck and solid.
http://www.amazon.com/gp/product/B00004SD76
Training wire:
What I use for my scrog screen and early training before the screen goes in. Also good for random shit that's temporary enough I don't want to waste a zip tie.
http://www.amazon.com/gp/product/B001EXJ652
Nutes/Water changes
Pond pump:
This is another must have! I've been using these for a while now to handle water changes in my aquariums. It's also awesome for mixing nutes before they go into your DWC. I drop one in a bucket without a hose attached and then just dump all my nutes and such in. The pump does all the mixing. Then I adjust the pH a little. Give the pump about 10-20 seconds to mix my pH up or down in and test again. I don't have to worry my pH adjustment isn't probably mixed yet. I makes the mixing process so easy and fast. I also use these to pump out my res once the scrog screen is in place.
http://www.amazon.com/gp/product/B006M6MSL0
Root protectant:
One of my early problems was with brown algae. This cleared it right up after a week.
http://www.amazon.com/gp/product/B00IGFH3FG
Syringes:
No guess work. I know exactly how many ml I'm adding.
http://www.amazon.com/gp/product/B000RB3CV6
Cal-mag:
http://www.amazon.com/gp/product/B000J2CUPW
pH control:
http://www.amazon.com/gp/product/B000BNKWZY
Nutes:
http://www.amazon.com/gp/product/B000COBT54
http://www.amazon.com/gp/product/B000CO7U02
I usually only grow 2 or 3 plants at a time so I'm probably not as particular about what I use to trim as others who end up spending days doing it. I am happy to use bonsai trimmers such as this
https://www.amazon.com/Sago-Brothers-Bonsai-Pruning-Scissors/dp/B00P0FK7W6/ref=sr_1_14?ie=UTF8&qid=1542645012&sr=8-14&keywords=trimming+shears
good effort, but don't get that one, get this one. it's cheaper, by the same company, and the probe is designed for aquariums:
https://www.amazon.com/Inkbird-Temperature-Controller-Thermostat-100-240V/dp/B015FKG4CC/ref=sr_1_3?keywords=Inkbird+Digital+Temperature+Controller+Thermostat&qid=1554760604&s=lawn-garden&sr=1-3-catcorr
No pictures being as I am at work but:
I think that the Mars 600 everyone was talking about was Mars I 600, whereas that product line seems discontinued officially, so that leaves Mars II options only.
see: Mars 600 amazon
Remove the rocks and anything glued. Get a (small) grow light on Amazon or wherever can find one (I leave mine on for 12 hrs. Keep in the warmest room in the house and lightly spray it with water once a day but watch for fungus.
https://www.amazon.com/dp/B074GR1KRT/ref=cm_sw_r_cp_apa_i_zppyCbS4P977K
I had this question for another grower. They said they used a 2 gallon Chapin Sprayer
https://www.amazon.com/Apollo-Horticulture-Adjustable-Improved-Internal/dp/B0098R0600/.
https://www.amazon.com/s/ref=nb_sb_noss?url=search-alias%3Dlawngarden&field-keywords=Reflector+yoyo&rh=n%3A2972638011%2Ck%3AReflector+yoyo
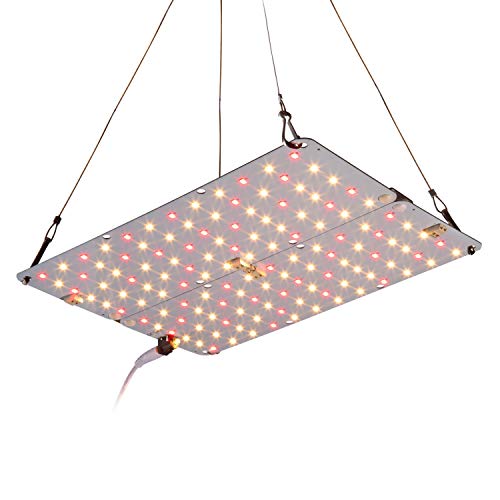
I had the same concern at first. These came with my light (MarsHydro 900w LED), but probably a cheaper knock off version. Worked great! I always held the beams the light hangers were secured to when i moved the lights up higher as they tended to flex. Since i was very paranoid i used paracord secured to the top side tent beams in case the light fell when i wasn't home. i can happily say i didn't need to do that since the light never fell, but small price to pay for peace of mind though. Hope that helps!
As a vague generality, if you take a plant and put it under a light and give it water, it will grow, and with enough time, will produce -something-. Obviously, you think it takes a bit more, so that's why you're here. When it comes to indoor growing, there are many things that have to be taken into consideration because we are first removing all of the things a plant requires for survival then take it upon ourselves to be the one to provide it. To make these things apparent, we need to account for all of the things deprived to the plant by removing it from the outdoors:
The Law of the Minimum states that a natural system is only as strong as it's weakest input. The number of factors that can limit a plant's health are near limitless, but these above items need to be addressed to begin encroaching on the realm of 'happy, healthy plant'. The information below will be debated by some, but here's my stance: Growing indoors is an energy intensive activity, and the costs can get out of control quickly. My philosophy is that I want the biggest possible return on my investment of money, time, and energy, so I aim to produce the best possible product. Ambient airflow, air pressure, and humidity affect all aspects of growing; changing one, changes the other. For example, setting up a exhaust in the tent that can move air out at a rate higher than it flows in causes something referred to as a Vapor Pressure Deficit, in which the pressure of the air literally sucks moisture out of the air and restricts the plants natural "respiration" process, resulting in upward curled leaves on plants, and stunted growth (this is fixed by using a fan speed controller and using an appropriately sized fan for the space). You want all the air inside of a tent replaced every 5 minutes in order to cause no interference, but a plant can usually take significantly more pressure before showing signs of stress. Like temperature, this factor is unique to each type of plant, so YMMV. If you're not going for smell control however, a minimal amount of air flow will suffice. The less interference you have to introduce to a grow tent, the less variables that have to be accounted for. Generally, you want your humidity around 70% for leafy greens and herbs, and 40-50% for anything that bears vegetables or fruit. This isn't a panacea, but in your case it gets you to 'close enough' with the least consequences. Adding degrees of varying control will give you the ability to adjust your environment accordingly to meet these unique requirements.
There are many, many ways to measure light, and it can be as simple or as complicated an ordeal as you like. I like to break it down and compare the earth to the sun like we compare a grow tent's square footage to wattage of the grow light. That said, the sun produces 3.86 x 1026 watts of energy, or 380,000,000,000,000,000,000,000,000 watts. Most of that energy goes off into space, but about 1.74 x 10¹⁷ watts strikes the earth. (ie: 174,000,000,000,000,000, or 174 quadrillion watts). Broken down to the 197 million square feet that makes up the surface of the planet, approximately 100-130 watts of sunlight are needed per square foot of growing space in order to create an environment suitably similar to sunlight. In your environment, you need approximately 1,000 watts of light in order to get the same kind of results you'd see with old fashioned direct sunlight. It should be noted however that you can just as well get away with weaker lights (I use 600 watts in the same footprint dimmed to 450W with no major problems, and recommend the same here to avoid ventilation complications).
Now, what kind of light do you need? pre-tl;dr If you're operating on a tight budget, get an array of T5s and call it good. You can get away with just about anything, although anything in the 5500k spectrum for a T5, CFL or HID light will be perfectly suitable. For LED lights, don't trust the advertised wattage, and look at the actual wattage rating of the product to get a good ballpark estimate of what kind of experience you can expect with any given light (while manufacturers can fudge light spectrums on LEDs, they can't fudge true watts). Some lights have more abstract advantages over others (e.g. par levels, spectrum ranges, etc), but for simplicity's sake we'll not worry about those.
CFL lights are far and away one of the cheapest ways to get into indoor growing, and the lights produce very little heat, minimizing needs for ventilation. An added benefit of being a cool light is that plants can be extremely close to CFL bulbs without blanching the leaves, enablng a grower to create grow spaces in extremely confined areas. The downside is clutter and the requirement to construct a hood: You would need 20 50 watt CFL bulbs to match a single 1,000 watt HID bulb, and 20-bulb hoods that fit in a 2x4 footprint don't exist so far as I know). Plants grown on fluorescent lights tend to experience less dense growth than HID when grown using equivalent amounts of light wattage per square foot. Fluorescent lights are good for around 10,000 hours of use in growing. You can expect to pay around $75-$125 for a CFL array, and around 12 hours constructing the array itself.
T5 lights have all of the advantages of CFL, and fewer disadvantages (less clutter, no need to build a hood) at the exchange of increased cost (a bit higher than HID for the really nice arrays). You can expect to pay around $175 for a T5 fixture. T5 and CFL lights can be kept around 10-12" from plants.
HID lights are the industry standard, forming a balance between cost, output, and required infrastructure to support. The cost is comparable to T5 lights, but come with a number of distinct advantages. Science aside, an HID will produce denser, fuller plants through all stages of growth using the same wattage of T5s and CFLs and are produced with a significantly lower failure rate than many LED units. HIDs produce a LOT of residual heat, but this problem has long been accounted for with the advent of ventilated hoods. These hoods are designed to perfectly mate with HVAC components, allowing for cold air to be blown directly over the hot bulb, and none of that residual heat ever making it's way into the tent. HID lights are kept 12-16" from the plants
LED lights are the new kids in the block. Beginning with the trendy magenta glow, LED lights were designed to utilize specific spectrums of visible light and eliminate spectrums deemed 'harmful to plants'. We now know that to be farce, and nearly all of the highest end LED arrays are full spectrum COB (chip on board) arrays that can go into the thousands of dollars in price (or about the same as a T5 array, if you're savvy enough to build one yourself). There are a number of magenta lights that still exist, and they can be utilized to great effect (I've done a number of grows through flower on a Mars Hydro II light), however this information comes with a disclaimer: Many LED light manufacturers lie, and many LED light fixtures fail. While many manufacturers will list data sheets and cite numbers til they're red in the face, most LED lights are manufactured in China, and many more fail to meet the quality control standards of the original design. If you want a good comparison, consider the 'hoverboard' fiasco last Christmas, with thousands of knockoff boards catching fire across the world. Speaking of fire, the latest and most powerful LEDs produce a LOT of waste heat, enough so that a large part of many arrays include a number of heatsinks and fans to keep them cool. This bothers me, because instead of being able to pipe hot air away from the tent in a nice, single direction, the LED light is piping out hot air in every direction. I generally find my tents run around 10 degrees (fahrenheit) hotter when I run LED lights than HID. LED lights are kept 18-24" from the plants.
Assuming a non-defective unit, LED lights have an expected lifespan of 30,000-50,000 hours. A single LED light is worth the price of 3 HID bulbs. LED Lights offer even higher PAR levels than HID (often described a bit inaccurately by some as 'light penetration'), creating compact, bushier plants than HID lights using an equivalent wattage. LED makes sense if you're investing in this hobby for the long term, and want the most out of your money.
All of the above taken into account, and with your space, I recommend a 4 foot 450w T5 light, or 600W HPS HID light with a dimmable ballast and cool hood, dialed down to 450w to increase bulb lifespan.
I was wondering what the catch was. I was trying to find the product history.
OP, it's a Chinese special with razor thin margins (they have a different ballast in the photo). You can see on their webpage that the ballast is even different than the one shown on the Amazon link.
I'd go with this more efficient reflector if you do decide on this brand. The cool tube is a relatively inefficient reflector.
Looks like the seller has inconsistent pricing. edit: the seller buys for half this price
Same ballast, different label. Typical of Chinese imports.
That shipping price makes it too good to be true.
Ordered Via Amazon.
Overall, 3/5 stars. The hood weld seams, spot welds, are garbage and falling apart. Both inlets for the hood are bent and will need fixing. It will function and do it's job, but the package protection for shipping was underwhelming. Shipped by Psychedelic FrogFish Co in Walnut, CA.
I have a 4'x4' Aviditi tent, fan + filter combo, and some other stuff coming up for my next review. I will post pictures once it is all setup.
EDIT: Contacted the seller and he is shipping a new hood, free of charge, and didn't request the old hood back. He is legit.
I used a 6" filter that worked nice for me, I'm sure they have a 4" version
https://www.amazon.com/gp/product/B008NYF8S4/ref=oh_aui_search_detailpage?ie=UTF8&psc=1
yeah there's basic, dead simple ones available thru amazon
my local grocer sells these.
Last year Superstore sold this Back to the Roots Mushroom Farm Kit for $20, and haven't seen it in store since. It was placed right next to the bulk white mushrooms in the produce section. I didn't buy it at the time cause I thought it was too expensive.
I bought it on Amazon a few months back
MaxiBloom is the easiest and I believe cheapest bet. Breakdown of cost: 2.2lb=997gms, 7gm per gl=142gl solution. $14.54/142=.10gl. And follow the Lucas Formula. Big Thanks! To MrMajors for pointing it out to me :)
I use this style scissors for my fine trimming. I bought two pairs for a buck on wish.
Sago Brothers Bonsai Scissors, Pruning Shears for Bud and Leaves Trimmer 5 PCS https://www.amazon.com/dp/B00P0FK7W6/ref=cm_sw_r_cp_apa_DeANBbJVTGJQ5
two of these https://www.amazon.com/MarsHydro-Mars600-Spectrum-Certificate-Hydroponic/dp/B00XC3LBIW
I'd suggest going with a different light setup but otherwise the other stuff looks good.
The light you picked will create a lot of heat and use a lot of power. The LED is lower power, lower temperature, and will give you more PAR (Photosynthetically Active Radiation) for the money.
Those 6 LEDs you are using aren't strong enough for what you're using them for :( Adding 6 more weak lights is only throwing good money after bad, sadly. If I were you I would try to sell the ones you have already and get fewer, but more powerful LEDs such as [this one] (https://www.amazon.com/MarsHydro-Mars600-Spectrum-Certificate-Hydroponic/dp/B00XC3LBIW/ref=sr_1_7?ie=UTF8&qid=1485985374&sr=8-7&keywords=600W+led). That 600w LED is supposed to cover a 2.5x2.5 foot area during veg, less for bloom so the number you need will depend on how many plants you have in there.
Here are some led options from Amazon that i use and like. These are white/sun-like instead of the ubiquitous blue/purple lights.
--This one's a panel-- https://www.amazon.com/dp/B07T28YHTY?ref=ppx_pop_mob_ap_share
--This one's a gooseneck-- https://www.amazon.com/dp/B07FM4X64W?ref=ppx_pop_mob_ap_share
--A bulb i haven't tried but plan to buy next-- https://www.amazon.com/dp/B07NN6SVG6/ref=cm_sw_r_cp_apa_i_4p93Db3D0KKDZ
An Amazon search for led grow lights will turn up tons of great options. Read the reviews and go from there. Good luck!
At 8ft high, the light would do very little to help the plants achieve growth. Try to get a smaller lamp, preferably with a scissor arm and buy one of these. I have a 2' bird of paradise in my bedroom that has eastern facing windows and use that to supplement it later in the day when there isn't enough natural sunlight. Hope this helps.
I added half a miracle grow plant food stick (6-12-6) and an LED light from Amazon (Lighting schedule is six hrs/day plus natural light from the east facing window)
The leaves are greener and the leaves that used to be yellow or now perkier with a bit more color. It’s only been 4 days since adding the light. My other plants have also benefited from the light.
Light:
Lovebay Timing Function Dual Head... https://www.amazon.com/dp/B074GR1KRT?ref=ppx_pop_mob_ap_share
Yes! They pretty much all fit any lamp that could feasibly fit a flood light, so most desk lamps will do the trick. I use IKEA Ranarp lamps because aesthetic and they aren’t too expensive and come in different sizes and colors. I also troll Facebook Marketplace for vintage lamps of a similar style, because again, aesthetic
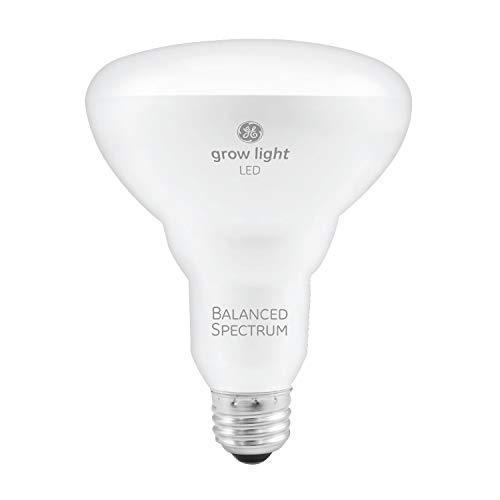
As far as bulbs go, I’ve been using the standard GE grow lights that you can get just about anywhere that sells lightbulbs (https://www.amazon.com/dp/B07NN6SVG6/ref=cm_sw_r_cp_api_i_QxujDb0276PFA). They’re a little too pink hued for my liking even though they claim to be full spectrum, so I’m trying out a Phillips bulb (https://www.amazon.com/dp/B07JBPYBNS/ref=cm_sw_r_cp_api_i_bzujDbNBYPPT9), but I just got it so I can’t attest to whether or not it’s worth the extra ~$10. So far it looks way brighter and way whiter (no color hue that I can tell), so I’ve got it on a croton that hasn’t had new growth for a while so I think that will be a fair test, lol.
I hope this helps!
No I have one, wouldn’t recommend- it’s hard to get them close enough to actually give enough light without burning the plants. This one is better IMO https://www.amazon.com/Lovebay-Adjustable-Gooseneck-Hydroponics-Greenhouse/dp/B074GR1KRT/ref=pd_aw_lpo_86_lp_img_3?_encoding=UTF8&psc=1&refRID=P0434TAXANH3A8A5GXCN
I've been using this little auto-watering pump I got off amazon. It draws from a 5 gal bucket and puts out 1 C of water per 60 second run. Plenty for my seed trays. Not bad for $40. The Space heater is on a timer and keeps it about 10*F warmer than the ambient temp at night... not sure if this will be enough when it drops down to 16* next week but I assume it will be OK as I am only keeping cold hardy stuff in there for now and my tomatoes, peppers, and eggplant are inside under a fluorescent shop light til April. Zone 6a TN.
​
I'm using one of those goose neck red/blue ones. I don't think it'd be strong enough on it's own but since I'm using it as supplement to natural sunlight just for the winter (my plants are in a south facing window) it's been sufficient for my plants.
Edit: this is the exact light I'm using but again, I wouldn't recommend this a sole light source. There were a couple weeks where I had to move my plants away from the window due to the temperature and the light alone was not sufficient on its own.
The more you spend, the better the light. The better the light, the better the plant. The better the plant, the more you yield. The more you yield, the more cost effective the operation is.
Cheapest option. Buy two:
https://www.amazon.com/ACKE-Germination-Seedling-Vegetative-Flowering/dp/B07GGX3R9T
Slightly better:
https://www.amazon.com/Lenofocus-Spectrum-Hydroponic-Vegetable-Flowering/dp/B07TV9GWPB
Best option within your price range:
https://www.amazon.com/Horticulture-Lighting-Group-High-Efficiency-Upgraded/dp/B076QDKVDZ
Thanks! This is the light I’m using.
GE Lighting 93101230 9-Watt BR30 LED Grow Light Bulb for Indoor Plants, Balanced Full Spectrum https://www.amazon.com/dp/B07NN6SVG6/ref=cm_sw_r_cp_api_i_Yi2LDb7YVX9YM
I’ve only had my office garden for about 3 weeks (I have a bunch at home but this is my first work garden). So these plants are all straight from the grower.
Thanks so much! It's these ones: GE Lighting 93101230 9-Watt BR30 LED Grow Light Bulb for Indoor Plants, Balanced Full Spectrum https://www.amazon.com/dp/B07NN6SVG6/ref=cm_sw_r_cp_apa_i_t3ELDbT351RM8
It looks like they are sold out at the moment but I got mine from Target at the same price (:
They have a more powerful one called PAR38, but the ones I got are already pretty bright so I think they are best so smaller spaces. Although it is worth mentioning that I got three of the BR30's because I put them in my existing fixture in the bathroom (:
Yeah, exactly that. Here is the instructions for the stand. You may have to adjust the height of the side pieces depending where you want to the lights to clip. I spray painted mine and put Christmas lights on it because I like for things to be pretty, haha. My CFL lights are 1600 lumens if I remember correctly. I want to switch to LED soon.
Edit: these are the exact lights I have, it provides measurements for the reflector and clip so you can adjust your setup as needed. I'm sure Home Depot has something similar. Lastly, I put a bread tie around the clamp part of mine. The clamps are ridiculously strong, but it gives me piece of mind if one fails or gets bumped off the PVC that I won't burn my house down, haha.
The one on the right is this GE bulb which is super heavy and expensive-ish but it’s doing its job. I have like ten of these ones that are cheaper for the rest of my apartment.
This is the one my mom uses, bendy but gets hot so make sure it's away from hazards!
This is the one I use! I have two currently.
Going to second this! I grow my monstera exclusively with grow lights and it currently has 6 new leafs coming in.
I use this one because it can go in any lamp but there's many options
https://www.amazon.com/GE-Lighting-93101230-Horticultural-Balanced/dp/B07NN6SVG6
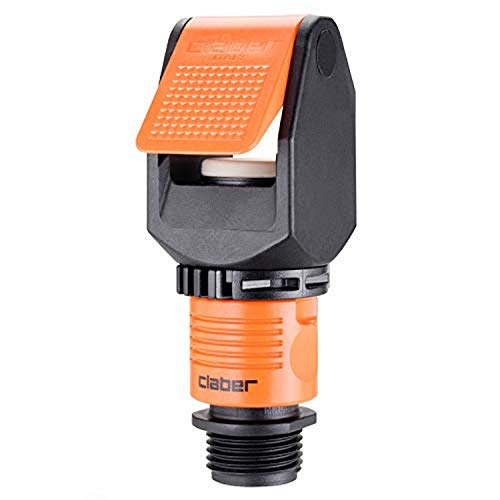
https://www.amazon.com/gp/product/B000BPFYG4/ref=pd_sim_86_6?ie=UTF8&pd_rd_i=B000BPFYG4&pd_rd_r=TX6NDP511EN0B22G0TNZ&pd_rd_w=TjCWM&pd_rd_wg=Ojn0F&psc=1&refRID=TX6NDP511EN0B22G0TNZ
https://images-na.ssl-images-amazon.com/images/G/01/outdoor-living/detailpages/claber/claber-koala-howtouse-sm.jpg
Depending on the shape of your spout, you can use something like this: https://www.amazon.com/gp/aw/d/B000BPFYG4/ref=mp_s_a_1_7?ie=UTF8&qid=1487694645&sr=8-7&pi=AC_SX236_SY340_FMwebp_QL65&keywords=sink+to+garden+hose+adapter
Or, get a small submersible pump and a decent sized cooler and run a loop.
Kind of depends on if it's hot or not (Antibalas last year was real toasty), but if you bring one of these filled with water for your group and people around you that want it, it's always a hit.
https://www.amazon.com/Chapin-20002-Fertilizer-Herbicides-Pesticides/dp/B0039EEN0M/
I wet it down using a garden sprayer like This and a 6" drywall knife
That's what I do, even with access to a hose, because it's too cold to use the hose about half the year. Get some Optimum no-rinse, and a garden sprayer and use in conjunction with a two-bucket wash or just one bucket and ton of microfiber towels. There's no foam, but it has the same effect.
Grab one of these sprayers off amazon.
https://www.amazon.com/gp/product/B0039EEN0M/ref=ppx_yo_dt_b_search_asin_title?ie=UTF8&psc=1
and a gallon of the goods
https://www.amazon.com/gp/product/B00ARKS3XO/ref=ppx_yo_dt_b_search_asin_title?ie=UTF8&psc=1
A splash of the goods and fill the rest up with water and away you go.
I have a ton of cracks and I spray every couple months. I kind of like doing it too.
https://www.amazon.ca/gp/product/B0039EEN0M/ref=ppx_yo_dt_b_asin_title_o04_s00?ie=UTF8&psc=1
This thing has saved me. I fill it up, set a chair next to the tent, pump a few times, throw on some tunes and water away. Might take a bit longer, but I find it saves my back pain !
I'm currently using the Ryobi 1,600-PSI 1.2-GPM Electric Pressure Washer. It comes with three swappable nozzles and also fits my MTM Hydro Original Professional Foam Lance.
4 different ones.
lights
https://www.amazon.com/gp/product/B07C59J8L2
https://www.amazon.com/gp/product/B01IVQ96WW
https://www.amazon.com/gp/product/B01IVQ96MW
https://www.amazon.com/gp/product/B015FLSOCE
fans
https://www.amazon.com/gp/product/B07D8ZC566
https://www.amazon.com/gp/product/B00I8Q30SC
clip fan
other stuffs
Frog soil
Smart pots - half 3 gallon half 5 gallon
Advanced nutrients nutrients
hygrometer: https://www.amazon.com/SensorPush-Wireless-Thermometer-Hygrometer-Android/dp/B01AEQ9X9I/
6 inch intake fan from home depot
filter: https://www.amazon.com/gp/product/B008NYF8S4
filter fan: https://www.amazon.com/gp/product/B01CTM0JF2
strains
1 white widow
1 amnesia haze
2 money bush
2 jack herrer
Start small. It'll save you money, let you get your feet wet, and help you learn how to grow better, and then you can buy bigger.
My "starter package" is:
https://www.amazon.com/gp/product/B00SWGYYWO
https://www.amazon.com/gp/product/B01I4NY8KW
https://www.amazon.com/gp/product/B00F8ZQYHA
https://www.amazon.com/gp/product/B0098R0600
https://www.amazon.com/gp/product/B004Q2ER5C/
https://www.amazon.com/gp/product/B006NGI8VS
https://www.amazon.com/Smart-Pots-5-Gallon-Soft-Sided-Container/dp/B002JUOWB2
https://www.amazon.com/FoxFarm-FX14053-12-Quart-Organic-Potting/dp/B001I49Q98
https://www.lowes.com/pd/Garden-Treasures-15-31-in-Rust-Plastic-Plant-Saucer/50445000
https://www.amazon.com/gp/product/B004PS4B08
So for about $420 (heh), you can get your foot in the door and start growing. This is a nice setup too, you can probably save $100 by shopping around, buying used, or doing-it-yourself. I've left off a few odds and ends like dryer duct, Fiskers for trimming, weed fabric pins for low-stress training, pitcher for watering, Mason jars for storage, but you can likely find those or suitable replacements around the house without spending money.
I also have a Raspberry Pi 3 ($43) with Sense Hat ($37) and metal case ($15) in each of my grow tents to log temperature/humidity and other things. I'm interested in eventually using the GPIO functionality to water my plants too. Not critical, but definitely a nice thing to have, especially if you're the hacker type. If you go this route, you might look at raspiviv.com too.
https://www.amazon.com/gp/product/B01C6FFNY4
https://www.amazon.com/gp/product/B014HDG74S
https://www.amazon.com/gp/product/B0722L338Q
I'm glad I bought a good intro setup because I still use it now that I've upgraded. I now have a 3' x 3' GG Shorty tent with HLG 300 LED for flower, a 2' x 2.5' GG Shorty tent with two 400W Roleadro COB's for veg, and my "intro package" is now my germination/cloning tent (and drying tent too since several people suggested that too). Being able to have three tents (germination -> veg -> flower) working simultaneously is increasing my output quite sharply. I'm doing this to help a relative with cancer, so you may not need to go quite as crazy as I did.
You mentioned using 35+ gs (~1.25 oz) a month. You probably aren't going to be able to grow that much given the constraints of tent size and light wattage (plus being a first-time grower! You'll learn a lot!). So once you get used to it, you'll probably want to buy more stuff. Marijuana isn't addictive, but growing marijuana absolutely is.
Once you've got your hardware, the variable cost is seed (~$10), soil (~$5), nutrients (~$20), and electricity (~$30). From that, I'm going to estimate you can grow ~1.5 ozs (you can do more as you learn more though). So you're looking at ~$40/oz after you've made the initial hardware investment.
Hope this helps. Depression, cancer, and everything else can just go suck it.
My light also came with the same kind of diagram, I have it about 12" away at 1070 "PAR" and everyone has very good stress coloring and are loving it. I wouldn't set up the light to be at that distance right away, however, since they won't be used to the light, I started out about 2 feet away and moved it closer every few days to get them used to it. I got these little rope hangers so it's easy to adjust the height.
Both of the lights you've linked will do super! You want at least 60w, since wattage will determine how close you have to put it to be effective (with 60w you'll want plants to be like 6inches away for it to be effective, less wattage and you basically have to have them touching), and then you'll look for full spectrum (6500k).
I have this light: https://www.amazon.com/VIPARSPECTRA-Reflector-Spectrum-Indoor-Plants/dp/B01B4GQ6MO
It's doing well covering a 2ftx2ft square shelf. I have about 20 plants under it and the next shelf down gets some trickle light because it's just a metal shelf and all my props are doing good under there.
You might want to look into a 250w there is a kit for 130$usd on Amazon
Edit: link link to 250w setup for $131 this is a great starter setup and will provide great lighting and includes most everything lighting related that you need. here is a 250w grow toutorial.
PS the yoyos are crap dont even try them. just buy the correct ones. yoyo's i dont have these cause i bought the expensive ones, but i hear these are good.
I actually didn't tally up the cost as that wasn't really of a concern to me, but I'll try my best to provide links to the things I bought for this. Feel free to add it up for me!
I also bought various tools, like crimpers, Dremel kit, drill, etc, but I don't consider those to be project-specific as I'll have them for the foreseeable future. Let me know if there's anything you see that you think I missed!
Don’t mind at all! I’ll just post the whole setup below:
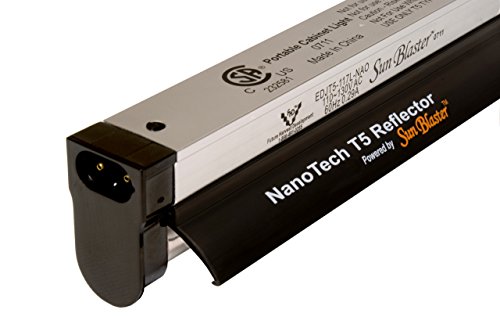
Using these T5s: https://www.amazon.com/dp/B00AKKUBDQ?ref=yo_pop_ma_swf
Using these LEDs: https://www.amazon.com/dp/B074Y32PFZ?ref=yo_pop_ma_swf
Using this outlet timer for 12 hours on/off: https://www.amazon.com/dp/B00MVF16JG?ref=yo_pop_ma_swf
Using these for gnat control (it was pretty bad at the beginning): https://www.amazon.com/dp/B00O2KYORO?ref=yo_pop_ma_swf
Anything like these will work real nice
It is a 2ft sunblaster.
https://smile.amazon.com/gp/product/B00AKKUBDQ
Get this on Amazon. The HD link is OOS. Make sure you saturate your lawn to easily get the cores out. 1 to 1.5 hrs of watering would be good.
https://www.amazon.com/Yard-Butler-Dethatching-Aeration-ID-6C/dp/B00EOMCJD6
Try the lawn butler manual core aerator. https://amazon.com/gp/product/B00EOMCJD6
It actually worked. Spike aeration can supposedly actually increase compaction. I paid $25 new, looks like its 30 now, but warehouse deals has it for 22.
Save yourself a lot of hassle. Buy a cheap but reliable tent. Apollo makes great tents, cheap too.
It sounds like you're being exceptionally picky when you trim? Maybe relax a bit? Are you trying to get every single little bit of leaf out?
My wife and I use a bunch of these little bonsai scissors. We keep a glass of alcohol out to soak the gunked-up ones in and just switch them out as needed. It takes us roughly an hour to trim a plant.
Our basic process is:
Edit: Oh, and if you're totally fine just extracting the plant, you really don't need to do much at all. I'd cut the fan leaves off since its quick and they're just needless bulk, but even that isn't mandatory.
These are the best for trimming. They look shitty but once you get them you'll be amazed at the quality. Razor sharp and a single one lasted me through trimming 5 plants before I felt they could be sharper.
http://www.amazon.com/Bonsai-Pruner-Bud-Leaf-Trimmer/dp/B00P0FK7W6
https://www.amazon.com/gp/aw/d/B00P0FK7W6
I like these along with micro tip shears similar to the fiskars for larger leaves. These get a bit more precise for those little sugar leaves.
https://www.amazon.com/gp/aw/d/B00P0FK7W6/ref=mp_s_a_1_5?ie=UTF8&qid=1527029595&sr=8-5&pi=AC_SX236_SY340_FMwebp_QL65&keywords=bonsai+shears
These are by far my favorite for trimming sugar leaves. Super precise and razor sharp, makes it really easy to cut leaves precisely. Use any type of larger shears or scissors for stems and branches.
Two changes - folks always want a thermostat. This thermostat is the same as the HydroFarm stat /u/_ataraxia mentioned, and is a good low end/entry level stat. It's literally the same exact piece of hardware with a different label. Most of my enclosures are on Herpstat thermostats with proportional control. These are sort of the high end of stand-alone thermostats. Some people have also gone on the more computerized, high tech route. If that's interesting to you, it works great, but it's definitely not necessary.
On/off thermostats are actually not suitable for light bulbs, because the bulb will go on and off all the time, sort of strobing. It's fine for non-light emitting heat sources like ceramic heaters and radiant heat panels, although proportional are still more accurate.
I’ve been using these [seedling heating pads](VIVOSUN Durable Waterproof Seedling Heat Mat Warm Hydroponic Heating Pad 3'' x 20" for Kombucha Tea & Beer Brewing, Fermentation, Seedlings & Plant Germination https://www.amazon.com/dp/B073PTZCJ4/ref=cm_sw_r_cp_api_i_Lfn8AbDNHSQ89 ) with great success the last 4 months. I wrap them around my 1F jars
I use this [temperature controller with sensor](VIVOSUN Digital Seedling Heat Mat Thermostat Controller 68-108℉ https://www.amazon.com/dp/B015F4VFGI?ref=yo_pop_ma_swf) to control them
>I've read that big enclosures for small noodles makes them feel unsafe
You can put a tiny snake in it's own mansion sized fine, as long as there is plenty of places to hide. Just think, are baby snakes stuck in 10 gallon tanks in the wild until they grow up? Snakes hate open spaces, not large ones.
I use aspen for my Western hognose. He loves it. It holds burrows really well, and I try to reset all his burrows every couple weeks or so to keep it interesting for him. I have mine in a 10 gallon tank since I have a male. I have about 6" of aspen in the tank.
Yes, a thermostat is absolutely needed. Heat pads can reach high levels, that would be dangerous for the snake. I use these for all my snakes. They work great and are cheap.
A western hognose was my first snake (now I have more). He's a bugger. He'll hiss and puff up inside his tank but once you get him out he's fine. He's gone off food for a few months at a time a couple times now, so he was definately stressful for a first snake (for me). It also didn't help that he loved to burrow (duh), and I'd worry about him since I couldn't see him. Good first snake IMO though, love the little guy and he has taught me a lot.
Best of luck and post pictures once you get them!
https://www.amazon.com/gp/product/B00WJNVPZU/ref=oh_aui_detailpage_o07_s01?ie=UTF8&psc=1 https://www.amazon.com/gp/product/B01BOY6Y2I/ref=oh_aui_detailpage_o07_s01?ie=UTF8&psc=1 https://www.amazon.com/gp/product/B015ZXUSX0/ref=oh_aui_detailpage_o06_s00?ie=UTF8&psc=1 https://www.amazon.com/gp/product/B015F4VFGI/ref=oh_aui_detailpage_o07_s00?ie=UTF8&psc=1
Did you watch the discussion video?
The wax in the measuring cup was barely liquid, it was quite manageable. I do agree that it would be nicer to have a melt pot and ladle the wax out from there. I've been eyeing this and this.
Yeah, wax does make a mess. I usually have a set of sheets set aside for wax play. I have been impressed with the beeswax as it's more solid when it dries and It was easy to clean up.
Soy wax is the absolute easiest as it washes out of most things.
I am using one of these personally with a pair of Eheim heaters:
https://www.amazon.com/Inkbird-Temperature-Controller-Thermostat-100-240V/dp/B015FKG4CC/
Just get an inkbird and turn the freezer down to the coldest setting possible. I attach the temperature probe to the side of my fermenter with some type of insulation. There is a couple options for warming as well if you do some light googling.
https://www.amazon.com/Sago-Brothers-Pruning-Scissors-Trimmer/dp/B00P0FK7W6/ref=sr_1_6?ie=UTF8&qid=1494649320&sr=8-6&keywords=trimming+scissors+for+marijuana
These things changed my life, can trim twice as fast with these as other snips.
these are the ones I got
They’re amazing dude. The spring comes from the metal at the end. It’s basically two razor blades springing together. I don’t think I could go back to any type of actual scissor type shears after using these now. Also they’re cheap so if you didn’t want to clean them and just chuck a pair that’s a viable option as well. But they don’t make my hands hurt compared to the others so that’s the biggest thing for me next to how well they cut.
Try these. I still love fiskars but i found these to be better for a lot of trimming
https://www.amazon.com/gp/aw/d/B00P0FK7W6?psc=1&ref=ppx_pop_mob_b_asin_title
These are the ones I got and I've been pretty happy with them so far. I'd love to get some nice forged ones someday though.
Are you including the Mars Reflector 96 or the Mars I "600W" in that? I've got them but they didn't seem to make it into the frame for either of these two pictures. Thanks for the feedback either way!
Okay, look for a thermostat . This will control the temp and it’s very, very easy to use. Please, this is very important. You can cause severe burns and even kill the gecko. I would try to find a dimming thermostat. I know it’s an investment but it is 100% necessary.
You can get a heat mat like this one - they're often sold for germination trays but many plants love them. Strongly recommend picking up a thermostat to go with it so you can better control the temp.
My first thought is a Reptile heater or Plant Heating Mats. Then you need a Thermostat Controller
When I bought this it was $17: the digital heat sensors
https://www.amazon.com/VIVOSUN-Digital-Seedling-Thermostat-Controller/dp/B015F4VFGI/ref=pd_bxgy_86_2?_encoding=UTF8&pd_rd_i=B015F4VFGI&pd_rd_r=1HCKJXJJBBV0NW2W1AYK&pd_rd_w=fJNYN&pd_rd_wg=iKA5l&psc=1&refRID=1HCKJXJJBBV0NW2W1AYK
Here is the heat pad, it is always on full blast (you put it under the tray and the heat goes up, and put the heat sensor at the top so when the thing is fully heated, it turns off) :
https://www.amazon.com/Plant-Babies-Heating-Waterproof-Seedling/dp/B013HFKRMK/ref=pd_sim_86_3?_encoding=UTF8&pd_rd_i=B013HFKRMK&pd_rd_r=1HCKJXJJBBV0NW2W1AYK&pd_rd_w=152tJ&pd_rd_wg=iKA5l&psc=1&refRID=1HCKJXJJBBV0NW2W1AYK
Or you can use this programmable controller the head:
https://www.amazon.com/bayite-Fahrenheit-Digital-Temperature-Controller/dp/B011VGASLW/ref=sr_1_5?s=hi&ie=UTF8&qid=1481436370&sr=1-5&keywords=digital+heat+switch
But you have to do some wiring (outlet cord, and wire an outlet) and you have to read up on how to program it
I use the programmable timer for Quail and the timer above in the first link for grow trays/starts. Either combination should work. Can you post pictures of your worm farm? Thanks
Hi,
Caveats to below:
Interesting you bring up glass...I used a Walmart 2 gallon glass jar for months (no problems with mold due to use of grow mat with thermostat...at least this is why I think I did not have mold) and decided I like continuous brew (had this going in a 2.5 gall glass lemonade dispenser seperately) So I went to kombucha Kamp to see what they were selling for continuous brew...NO glass...they had porcelain, 304+stainless and one other material if I recall correctly, but no glass. This made me really start to wonder....why???...why are the kombucha experts not selling glass. I knew about glass possibly containing lead (no relationship to your original post...I think)...but this fact alone...that kombucha Kamp was not selling glass for their kombucha continuous brew made me retire all my glass when I switched over to continuous brew. I decided on porcelain...and found 2.5 gal continuous brew setups for very cheap online.
In my opinion the biggest reason for mold is temps too cold...glass, without insulation looses heat quickly....especially in winter.
My setup: Brew Container: https://foryourwater.com/collections/water-dispenser-crocks/products/solid-black-crock-dispenser-porcelain-silver-faucet-fyw-cksblk?variant=5588511457311
Germination mat: VIVOSUN Durable Waterproof Seedling Heat Mat Warm Hydroponic Heating Pad 3'' x 20" for Kombucha Tea & Beer Brewing, Fermentation, Seedlings & Plant Germination https://www.amazon.com/dp/B073PTZCJ4/ref=cm_sw_r_cp_taa_Y0QMCbVKHEB93
Thermostat: VIVOSUN Digital Seedling Heat Mat Thermostat Controller 68-108℉ https://www.amazon.com/dp/B015F4VFGI/ref=cm_sw_r_cp_taa_81QMCb2K5YSWK
Stainless steel dispenser: Oak Leaf Replacement Spigot for Beverage Dispenser,Water Dispenser Faucet, Stainless Steel Spigot for Drink Dispenser, Food Grade, 2-Pack https://www.amazon.com/dp/B07JZ6KJQJ/ref=cm_sw_r_cp_taa_T2QMCbJTK12ED
And insulation in colder weather...Reflectix for inner and outer layer and middle layer of thick insulating fabric...velcro to hold it all together....insulation saves money in cold weather....cutout where the spigot is.
Place germination mat wrapped around upper part of brewing container.
Hope this post is not too long.
You can use either an overhead heat source like a ceramic heat emitter (they put off heat and no light) or an under tank source like an undertank heat pad. Any kind of source needs to be on a thermostat (such as this one) so it doesn't get too hot. IIRC, cali kings need a hotspot of around 85F.
It does sound like he's trying to shed. You may need to bring the humidity up a bit for him. Misting a couple of times a day with a hand mister might help him out (distilled or reverse osmosis water will prevent water spots on glass). Another option is to make a humid hide. Some kind of container that is completely sealed except for one entrance, with some damp sphagnum moss inside.
You can also provide him a deep water dish...big enough for him to lay in. My Florida kingsnake likes to lay in his water dish from time to time, but they like a bit more humidity in general compared to calis.
You need a thermostat. Place the probe between the map and the bottom of the tank. All below the tank. Inexpensive thermostats:
https://www.amazon.com/Inkbird-Temperature-Controller-Thermostat-100-240V/dp/B015FKG4CC/
https://www.amazon.com/MTPRTC-ETL-Certified-Thermostat-Germination-Reptiles/dp/B000NZZG3S/
This is a very common mistake, but it can have very deadly consequences if not changed.
Get a [thermostat](https://www.amazon.com/dp/B015FKG4CC/ref=asc_df_B015FKG4CC5396573/?tag=hyprod-20&creative=395033&creativeASIN=B015FKG4CC&linkCode=df0&hvadid=198107334619&hvpos=1o1&hvnetw=g&hvrand=14493505548356397280&hvpone=&hvptwo=&hvqmt=&hvdev=c&hvdvcmdl=&hvlocint=&hvlocphy=9018821&hvtargid=pla-326308171578 (I linked the one I have, it's not too expensive and it works great) as soon as possible, otherwise you risk burning your snake very badly, and the vet bills caused by that would be much more expensive than the thermostat, not to mention the emotional distress.
Fermentation temp will be higher than ambient, so 65-72 ambient could be pushing you out of optimal for some yeasts, though you could be fine.
I bought a chest freezer on sale and an inkbird temp controller and this works well for me and would fit in your budget. Even more so if you’re willing to find a Craigslist freezer. My (7 cu ft?) freezer can squeeze in two PET carboys if needed, though I currently just do 5 gal batches.
Hi! A little late to the party, but something else to keep in mind that I did not see mentioned is that you will definitely want a thermostat (not just a thermometer) to regulate the heat from your heat pad and/or Ceramic Heating Element. You will probably want one for each heat element, although CHEs can be controlled with dimmer switches as well I believe.
A thermostat lets you regulate the output of a heat pad or CHE. This is important because without regulation, it is possible for either of them to overheat beyond typical heating abilities. This could lead to extreme temperatures in your tank that could burn the snake or even cause neurological damage if it's hot enough.
I'm taking my list of suggestions from other users who post around snek subreddits as I am not yet a snek owner myself :(.
Cheap options are Jump Start thermostats, although they do not have safety features that will shut down the heating element if the thermostat fails. Another option that's in the same price range but a bit safer is an Inkbird thermostat. If you wanna splurge and get a very high quality thermostat for your little buddy, you can go for a Spyder Robotics thermostat.
Also, not necessarily required but useful and fun: an Infrared Thermometer
I use these
multijoint desk clamp
clamp with aluminum reflector
LED 150watt equivalent 5000k daylight bulb
They’re game changers. Good luck
Lovebay Timing Function Dual Head Grow Light 36LED 5 Dimmable Levels Grow Lamp Bulbs with Adjustable 360 Degree Gooseneck for Indoor Plants Hydroponics Greenhouse Gardening [2019 Upgraded] https://www.amazon.com/dp/B074GR1KRT/ref=cm_sw_r_cp_api_i_v0A7CbKWM812E
Sorry, I don’t know much about the strips and shelves - though I do use some on my reef tank macroalgae reactor (clear tube with led strips wrapped around) seems to work well and puts up with occasional salt water with out electrocuting me or fish. I don’t know how to fix them onto shelves tho.
I use these one on my plant shelves and added one of these just so it wasn’t bright red. You can see my shelves in my last post. They’re super low profile. But my shelves are wire mesh which allowed me to easily tie them to the underside.
I have purchased 3 of these and although I have no long term results they are working quite well for the price. My lettuce likes it. There is a slight pink hue but not as much as other led grow lights imo.
Hopefully Amazon links are ok:
https://www.amazon.com/dp/B07GGX3R9T
Take them home and place a growing light on them during winter. If you have your own office or are the last one to leave, set a growing light on them for the night.
This is the one I use. It has 5 brightness settings and 3 timer modes.
Good luck.
Right? I really dislike the idea of a purple light in my kitchen. ACKE LED Grow Light for Indoor... https://www.amazon.com/dp/B07GGX3R9T?ref=ppx_pop_mob_ap_share
The big traps are pre-dormancy, but all those little ones are post-dormancy. (You can't see well in the pics, but from the other side there are TONS of tiny ones.) I got it last November, so it isn't fresh out of a nursery. From November to February, it lived on a windowsill in an uninsulated basement. Now, I spend all day moving it around the apartment to wherever the sun is. I also have this little baby grow light that I bought without knowing anything, and I'm aware that I definitely need to get better lighting. (Figuring that out is its own challenge!)
Currently, I live in an apartment in a big house and don't have the option to put it outside, but will once I move to a new place June 1. There, I'm hoping it can live outside in the backyard at least until autumn. It wasn't very smart of me to buy a carnivorous plant in Zone 6a, so now I'm just trying to do the best I can to take care of it!
I’m using this one. It was super easy to set up, but the thing is on the flimsy side and as you can see in the pictures, it’s really the bare minimum. No casing or anything. But it doesn’t get too hot and because it’s so minimal, it fits flat on the underside of the shelf so you don’t see it unless you’re sitting on the ground. Like I said in another comment, all this gear is super new so I can’t give any solid recommendation other than that I’ve had a good experience so far!
Thanks. I've been using this light that I got to give my fly traps some extra light at night. Too weak? I literally have no idea what I'm doing, my friend had an extra seed so I just planted it to see what happens. This morning I made a tunnel from tinfoil around it to direct some airflow and reflect more light, maybe they will help.
Thanks! I got it on Amazon
ACKE LED Grow Light
Here’s the link:
https://www.amazon.com/dp/B07GGX3R9T/ref=cm_sw_r_cp_apip_UvcJJIwRc5cwY
It comes with a hook so that you can hang it over your plants, but I liked the flat look against my shelves. I just used heavy duty command strips as it’s very lightweight, but we’ll see how they hold up!
I have this one as well. Not entirely sure which one is better, if any of those are good for weed plants at all. But it’s what I have and what I’ve been working with thus far
I use one of these with great success. It's cheap, it's simple and it's worked well for me for ages. I have the intake tube stuck through a hole in the lid of a 5 gallon bucket full of water with the nutes already mixed in.
It's pretty simple, set the length of time to water, tell it how many times a day to water and that's it. I'm using 1 unit for my tent containing 4-5 plants. I'd estimate that I've got it pretty close to maxed out. You might be able to do 6-7 plants if they were smaller or otherwise didn't need a ton of water.
I use a Phillips Grow bulb and a clamp lamp, but that’s because I’m growing my mushrooms in the same room I’m growing my weed, and that room is locked down like Fort Knox against light.
But indirect sunlight should be just fine, my friends growing mushrooms in her craft room/office, and her tub’s only getting indirect sunlight and they’re doing fine. Bod even tells you that sunlight isn’t necessary, mushrooms just look weird apparently without any.
Bulbs and lamp. This is my set up and it's a game changer! You can use any old desk lamp lying around
you know ... i have the same problem, although i don't like the typical red purple ones. checking a youtuber (summer rayne) i fell in love with the GE ones.
https://www.amazon.com/GE-Lighting-93101230-Balanced-Spectrum/dp/B07NN6SVG6/ref=sr_1_2?keywords=general+electric+growing+light&qid=1569920167&s=gateway&sr=8-2
Always happy to share knowledge. :) All my lights are diy pendant lights so I don't have personal suggestions for clamp hood setups but here are a few suggestions:
Clamp light fixture - No personal experience with this one but it's a broader clamp hood to accomodate larger LED lights but they may poke out of the bottom of the hood. Ymmv
LED Light suggestions:
Hope this helps and good luck! 🌱☘🍀
I like 100watt daylight CFL bulbs that have a 5-6.5k spectrum (a 4 pack is like $12) And for clip-on housings I really like this style
So I bought this strip for my office at work, it's been there for a little over a week now. Plants seem to be happy. The red & blue can be hard to made to look intentional though, but if you do it right it can look nice. https://www.amazon.com/dp/B07DK6M6X6?ref=ppx_pop_mob_ap_share
And then this bulb I put in the lamp on my desk, and the philodendron sitting under it is thriving. https://www.amazon.com/dp/B07NN6SVG6?ref=ppx_pop_mob_ap_share
What I haven't been able to find is like a set of string lights much like the G40s you have there, but made for plant growth. I'm wondering if I should patent the idea lol
light fixtures
Fish tank pump on a smart plug?
I use one of these for my normal watering without the auto function.
DIY Micro Automatic Drip Irrigation Kit,Houseplants Self Watering System with 30-Day Digital Programmable Water Timer 5V USB Power Operation for Indoor Potted Plants Vacation Plant Watering [Gen 4] https://www.amazon.com/dp/B0743F4532/ref=cm_sw_r_cp_apa_i_Ky3BCb9APHBAN
But unfortunately at the max setting it only does 1/2gal per time interval and only equal time intervals. It works well with autos in small pots and just to keep plants from totally drying out if I go out of town.
Top tier has 2x Relassy 45W LED Grow Lights Goosenecks.
Bottom tier has 2x ACKE 20W Warm White LED Grow Light Panels.
I used this when I was out of town for a week, worked well :
DIY Micro Automatic Drip Irrigation Kit,Houseplants Self Watering System with 30-Day Programmable Water Timer and 5V USB Power Operation for Indoor Potted Plants or Vacation Plant Watering [Gen 3] https://www.amazon.com/dp/B0743F4532/ref=cm_sw_r_cp_api_5g1KBb3B2ZMHR
That small pressure washer should work fine for spraying out screens. This is what I used for a while to connect a hose to the bathroom faucet..
There are adapters available ( like this one or this one ) if you do want to use your sink.
I haven't used one of these but if you're able to clean your bike off on your balcony, this might be a decent option: http://www.amazon.com/Claber-8583-Indoor-Faucet-Adapter/dp/B000BPFYG4
Claber 8583 Koala Indoor Faucet Adapter https://www.amazon.com/dp/B000BPFYG4/ref=cm_sw_r_cp_api_U.CLzb96184GR
This might work for you.
A sink hose adapter runs $10-15 at any home improvement store and let's you connect a garden hose to a kitchen sink.
Edit: Apparently Amazon has them too
I use this takes a second to connect to the faucet.https://www.youtube.com/watch?v=SJDSP7MvBiA
I use something like this to give it a good spray down any time it's subjected to salt. It's not as good as actually cleaning it, but certainly better than nothing.
I asked, and this is what we have. There's apparently a guide included about what dilutions to use for various pests and applications. He thinks he uses the second lowest concentration (second highest dilution).
You'd also need a sprayer. We have one of the hand pump sprayers. He thinks this is the one. He sometimes also uses a paintbrush for application around windows.
https://smile.amazon.com/gp/product/B0039EEN0M/ref=oh_aui_detailpage_o03_s00?ie=UTF8&psc=1
Got a couple of these, for cheap they work fine. One is for rinsing, one is for ONR pre-soak.
This made life a billion times easier to water the back https://www.amazon.ca/gp/product/B0039EEN0M/ref=ppx_yo_dt_b_asin_title_o02_s00?ie=UTF8&th=1
I use this one: https://www.amazon.com/gp/product/B0039EEN0M/ref=oh_aui_search_detailpage?ie=UTF8&psc=1
It works well, I usually will spray the bike, then apply a bike cleaning soap like the one white lightning makes, scrub the bike with a something like the pedros wash kit that they give away like candy, then rinse again.
Full album, http://imgur.com/a/UYQRW
Pressure washer: http://www.amazon.com/Joe-SPX3000-Electric-Pressure-14-5-Amp/dp/B00CPGMUXW
Foam lance: http://www.amazon.com/Professional-Foam-Lance-Adjustable-Bottle/dp/B004GNZYY4
Soap: http://www.amazon.com/Chemical-Guys-CWS40216-Super-Shampoo/dp/B00AFBXQNC
Towels: http://www.amazon.com/Chemical-Guys-MIC50706-Professional-Microfiber/dp/B00BQYCKE8
dispenser: http://amzn.com/B004GNZYY4
soap: http://amzn.com/B00BJCAPEE
I use these both to wash my car, check out chemical guys for more stuff. you need a pressure washer for the dispenser. but you can find ones that connect to the garden hose as well but won't output as much foam.
edit: personal picture of them in action: http://imgur.com/OpIw4PJ
very high quality, and I kinda thought about the price as well but then put it into perspective. A 600w grow kit cost less than the two 300w leds which are actually around 180 true watts. two of them in my 36x36x78 is wonderful, not great but sufficient. one 300w led in my tent would not be enough though, I need two so it makes sense they're not very expensive yet beautiful quality. I would only worry that the delivery service handles them with care. I was lucky and both arrived in perfect condition from UPS.
You amurrica eh? This was on Amazon
https://www.amazon.com/dp/B005ECZQTY/ref=cm_sw_r_cp_awdb_jCNGzbKHZ98YS
Let me try to help you figure this out. These will give off quite a bit of heat (which is great for winter northerners) but summer can get pretty hot. You will want to seal off the room somehow as well, like the other comments said, fuck bugs! This can be hung maximum 1.5 feet before you burn the plant so you might be ok with some training.
600 watt will cover about 4 x 4 foot area so squish each plant in that space roughly and bunch all the branches up like roses, this will give a good lollipop shape and save space but at the same time maximize the light of the main colas. I just hope you have enough headroom for flower stretch!
Hopefully you have some fans laying around to simulate a gentle breeze and help temp control. I try to be as crafty as possible before spending a ton of money, (the light was an exception). Use what you have around the house or go to dollar stores for like white paint sheets to create your own tent for cheap, until you can invest more.
Goodluck, hopefully this ramble is useful to you!
I have this light.
So I can just shove it in the corner of a dark room with some panda plastic and it will be fine for the veg stage? Is it crazy/stupid to be thinking about closing off the corners with some cardboard/plywood or something? So it's like a little square area, top open, that the light will hang over?
I started with 100 bucks bought 4 t8 shop lights from home depot, 2 pieces of plywood, and 4 5 gallon buckets. Used organic miracle grow and was in business.
I got like 4 ounces of bud from that investment, but it was a pain too use and I had so many problems, that the 2nd and 3rd harvests; were so bad I was dry for 3 months.
But I've learned a lot since than if you have the money, these items will save you the bullshit that i went through.
600w grow light $200
[Carbon Air Filter]
(http://www.amazon.com/gp/product/B0052ZPMAG/ref=oh_details_o09_s00_i00?ie=UTF8&psc=1) $175
Some Bubble pack insulation at home depot $50-100
[General Organics]
(http://www.amazon.com/General-Hydroponics-Box-Starter-Kit/dp/B004PS4B08/ref=sr_1_1?ie=UTF8&qid=1367524539&sr=8-1&keywords=General+Organics) $40 starter box will last one cycle
these should get you through your first grow np. and I've already recouped all of the money I've spent on these items with the first harvest, I was paying 350 an ounce before hand to a dealer and now for way pennies on the dollar I have the dankest dank around and it's fucking awesome fucking awesome.
Reading is ok but once you get started you'll realize that most things people post are bs and the best way to learn it is to just do it, and experiment on your own; most things look much harder than they actually are.
I feel so liberated now that I can produce my own and the money that you save omfg the money you save.
Given that there's no such thing as a BIFL filtration system of any kind, the DIY recommendations here are rather reasonable. I quite like the furnace filter + box fan suggestion.
If you want something a little more robust, look into getting a carbon filter and a fan to go with it. I think the usual recommendation for carbon filters is for 24/7 use they need replaced every year or two. Here's one on amazon that you could use with a 6 inch fan which would add pretty good circulation for a large room: http://www.amazon.com/iPower-GLFILT6M-Control-Australia-Charcoal/dp/B008NYF8S4/ref=sr_1_2?ie=UTF8&qid=1396198801&sr=8-2&keywords=carbon+filter
This one comes with a fan: http://www.amazon.com/VenTech-IF6CF620-Inline-Virgin-Charcoal/dp/B0052ZPMAG/ref=sr_1_5?ie=UTF8&qid=1396198801&sr=8-5&keywords=carbon+filter
Not that great of a deal, but still: iPower GLFILT6M Air Carbon Filter and Odor Control with 1050+ IAV Australia Virgin Charcoal for Inline Fan, 6-Inch, Pre-filter Included, Reversible Flange https://www.amazon.com/dp/B008NYF8S4/ref=cm_sw_r_cp_api_fPozzbEXNQYCV
I have that Variac and vortex combo and love it; look for the amazon used section I pick it up for 110 instead. I have this fan and it works wonderful for a 2 x 4 tent PACKED TO THE FUCKING BRIM with plants. Tis cheaper. Edit: it's the one you linked... woops!
I'm just tossing it out there that you can pay with amazon prime card on rapid LED and get this vastly superior light I was told of tonight. I used the prime credit card to get LEDs there. ;)
What are you going to put the plants in?
A small 6 inch carbon filter with intake. I actually used this brand and many of their larger sizes. Intake should be 6" and cost appx. $40, worth it , electric is minimal clears the air of your whole apt (if under 600) you will actually notice cleaner air (I'm in LA and these have always made a diff from my small college apt by the freeway to the house I live in the hills now, would never grow without a nice carbon filter set up even when I move to Mendocino (Plus They create a nice ambient sound, increase C02 (bud size) and you should cut down on mold issues) not sure what part of the world you are in but filters in humid or arid, small or large grow, are key and worth the small investment for several reasons) If you're skeptical do some research.
https://www.amazon.com/iPower-Charcoal-Prefilter-Included-Reversible/dp/B008NYF8S4/ref=sr_1_3?ie=UTF8&qid=1501722851&sr=8-3&keywords=6+carbon+filter
CFM won't matter regarding if it can push air through the filter. What you want to look for is the static pressure rating of the fan. It will be in the unit of mmH2O. Try to get a fan rated at 6 mmH2O or greater. Basically, the motor must be strong enough to push air through a thicker medium like a filter.
My fan (Delta AFB1212HHE-F00) is a 120mm PC fan rated at 9mmH2O and 120 CFM. My other fan (Scythe Kaze 3000) is also 120mm PC fan rated at 6mmH2O and 133 CFM. Both push through my homemade carbon scrubber.
Also, from what I've read, you don't want to use a carbon 'fabric' like those sheets. They wear out quite quickly and making a filter from small activated carbon granules would be superior. You might be able to find one relatively cheap like this. You could attach a 6-to-4 inch rubber reducer like this and let it sit on top of your fan on the cabinet. I made my scrubber out of an atrium grate, pantyhose, rubber reducer and the carbon and it sits right on top of my bucket with no need to seal around it as the air pushes through nicely with not much back pressure.
I have a 6" fan. This filter works great. $62 bucks.
https://www.amazon.com/gp/product/B008NYF8S4/ref=oh_aui_detailpage_o09_s02?ie=UTF8&psc=1
My LED has the same connections and I ended up not using the connectors it came with at all and got 4 of these: https://www.amazon.com/dp/B0098R0600/ref=cm_sw_r_cp_apa_56PPybPHJ6F4D
Connected them from the tent top bars and directly to the hooks on the lights. Can basically raise it right up to about 1-2 inches from the ceiling.
First off, i'm simply recommending them, the stuff you got works but theyre a bit over priced so i'm going to recommend a few cheaper stuff.
You can get away with a 4'' fan/filter/duct with the grow space tent you provided. heres a recommended one.
https://www.amazon.com/gp/product/B004Q2ER5C/ref=oh_aui_detailpage_o08_s01?ie=UTF8&psc=1
Your tent and led is fine
Ph up and ph down is fine as well, i recommend getting a digital ph and ppm meter combo on amazon, doesnt matter if theyre cheap, they'll work.
As for your timer, i highly recommend this https://www.amazon.com/gp/product/B0042I5FF6/ref=oh_aui_detailpage_o07_s00?ie=UTF8&psc=1
That timer will give you the ability to upgrade to two led if you want too in the future.
Don't forget hangers for the lights.
https://www.amazon.com/dp/B0098R0600/ref=twister_B00FL6MTJI?_encoding=UTF8&th=1
Everythign else seems fine.
You can keep the light that far away from the plants throughout. You can also play with the height. Get those ratchet light hangers. They are adjustable. Like These
The 300w does not really cover much space. For reference in my tent I am growing 2 plants right now. I used only the 300w for veg and just let them veg longer to make up for the lack of light. No problems for me there. As for flower you'd want more than one if you are doing more than one plant. In my tent, as I said, I have two going right now. I have a 250w HPS that's over one plant and the 300w is over the other.
To summarize, the 300w will be perfect for one plant throughout the entire veg/flower cycle. The 300w will be adequate to veg 2 plants but not enough to flower. Maybe with your cfls and the new ones you are adding plus the 300w you should be good for 2 plants.
Awesome to hear! Yeah I scoured the net too and tried a few designs before deciding on this one. It's just a simple PVC frame I hung from the top of the tent using adjustable light ropes.
Here's the materials with some example links and short instructions. I was sort of winging it at the time I built.... so let me know if you have any more questions and I can take some closer pictures of the screen or something. :)
 
Materials |
---------|
| 1" Schedule 40 PVC pipe - Frame edges. |
| 1" Schedule 40 PVC 90 degree elbow. |
| 3/4" Truss-Head Screws |
| White Twisted Mason's String Line |
| Light Rope Hangers |
 
| Short Instructions |
----------|
| 1)) Measure out Length x Width you'll need for frame pieces. (accounting for the inch or two that gets added by the elbows when they're on) |
| 2)) Cut 4 pieces of pipe to desired length and fit them together using the 90 degree elbows. I used a rubber mallet to make sure they were seated all the way into the elbows. |
| 3)) Once the frame is assembled, you may have to twist it a little to make sure it's completely flat. My first attempt was a little tweaked by having an elbow rotated slightly. I just twisted the frame a bit to fix it and made sure it laid on the ground completely flat. |
| 4)) Grab a ruler and start marking out the spots where you'll drill for the screws. I start at the elbow and make a mark every 2". Continue this all the way around. You'll want to make sure the holes lineup perfectly even with the holes directly across. Just for a visual aid, If the screen is leaning up against a wall - you'll want to mark the top & bottom edges first, then the left and right sides. This way you make sure you don't accidentally end up with any angled or diagonal strings going across when it's done. ;) |
| 5)) Drill the pilot holes in the side of the pipe you marked previously. I drill all the way through the pipe wall and stop when it hits the opposite wall. |
| 6)) Screw in the truss-head screws about 75% of the way. Just enough to make them secure but also leave enough room to wrap the Mason's String around. |
| 7)) Once all the screws are in, I pick one corner as a starting spot and I tie up the string there and bring it across to the matching screw. From there it's just a time consuming game of rounding the screw next to it, bringing it across, rounding the next screw, bringing it back across, so on and so forth. Whatever weaving technique you want to use here is fine. |
| 8)) Hang the completed screen at the desired height by attaching the adjustable light rope hangers and you're good to go! I threw some zip ties around the elbows and clipped the rope hangers to those. |
My Setup:
Quick question.....Should these lights still be 12" above the young seedlings? I think right now I have them hanging between 12-15"
Also will I need a second light later on in the grow when the 2 plants get bigger?
https://www.amazon.com/Back-Roots-Organic-Mushroom-Farm/dp/B00CD0KZ78
Back to the Roots. I got it as a gift for Christmas.
You can spend $20 on one of these pre-made mushroom "farms", or you could spend ~$100-$300 on a four tier greenhouse, humidifier, controller, fan, timer, pressure cooker, substrates, still air box or glove box, grow bags, etc.
Or you could spend many thousands on a grow room, laminar flow hood, and all the fanciest supplies. It's up to you. You can really invest as much time and money as you want. You decide your own level of involvement. ;)
Temperature for growing depends on the mushroom but in general is around 70F-ish. Some like cooler temps, some warmer.
Here it is! https://www.amazon.com/gp/product/B00CD0KZ78/ref=ppx_yo_dt_b_asin_title_o00_s00?ie=UTF8&psc=1
Yeah you can rent an aerator, but looking at your yard you might be able to get by with a manual one like this.
I wouldn't mow now. I know we're seeing some crazy weather now, but it won't do you any good until your lawn comes out of dormancy and that's still a bit away.
I have a hand held spike aerator and I can't really say that it helped or did much of anything this season. I've since bought a core aerator with a good grip. I usually have a core aeration service do this but I would also like to have something onsite to do this whenever necessary. It works really well for my soil actually.
https://www.amazon.com/Yard-Butler-ID-6C-Coring-Aerator/dp/B00EOMCJD6/
> Should I just buy a core aerator and do it manually?
I would. (Assuming you are talking about something like this: https://www.amazon.com/Yard-Butler-ID-6C-Coring-Aerator/dp/B00EOMCJD6)
They do make "manual" core aerators, if you have a seriously small lawn:
https://www.amazon.com/Yard-Butler-ID-6C-Coring-Aerator/dp/B00EOMCJD6/ref=zg_bs_3480687011_2?_encoding=UTF8&psc=1&refRID=45WH0KW0RF6GT4XNNXVV
This for a smaller yard. Spikes compact the soil more by simply pressing it to the sides and down, a core aerator pulls a plug out on top on the grass.
You may find a used one on Craigslist or similar for around $1000. These seem to only really be made for the commercial market. You can buy a manual one, though.
https://www.amazon.com/Yard-Butler-ID-6C-Coring-Aerator/dp/B00EOMCJD6/ref=sr_1_2?ie=UTF8&qid=1491416518&sr=8-2&keywords=manual+core+aerator
I have a manual aerator where I step down with my foot to martial he holes.
Like this one: http://www.amazon.com/gp/aw/d/B00EOMCJD6/ref=mp_s_a_1_1?qid=1414330297&sr=8-1&pi=SY200_QL40
4x4x7 Grow Tent There you go. I use this same tent but in a 3x3. It's not the best grow tent, but I don't have light leak issues, and it seems to be holding up pretty well.
I used this one: https://www.amazon.com/gp/product/B00H9O6UJ0/ref=oh_aui_detailpage_o00_s02?ie=UTF8&psc=1
Worked really well for me so far! Can't comment on lifespan yet.
The kratky method is a great beginners method to get into hydroponics. I currently have about 30 plants all doing the kratky.
General Hydroponics is a good brand and mix of nutrients. Its simple to use and doesnt require a scale to mesure stuff out. Use a tablespoon to measure stuff or a syringe.
Buy the PH up/down from GH too but be warned you will need to dilute it first or youre in for a fun time trying to correct your PH. (let me know when you get to this step and I can give better directions.
Get a simple PH tester. It will make your life a lot easier. Once I figured out that adding nutrients to my water brought my PH to around 5.9 I stopped testing everytime. (but i recommend that you do use it everytime)
You DO NOT need to grow in soil first, but like /u/BroposkisRump said you can just be careful washing off the roots. GOTO the youtube channels mentioned on check out Khang Starr's video first.
Some advice:
You cangrow those with no effort.
Thats all I got for now. Once you understand this method try hydroponics using a different method as well.
Here's what I have so far and my quick write up.
My dad started the tomato plant that I am using in soil. He had too many for his garden, so I used that instead of starting one from seed in rockwool. My next plant will be started from seed.
I picked up a 5 gal bucket and Lid from Home Depot. <$5.
I cut a hole in the Lid to fit the 3" Net Cups. I put one right in the center. I quickly found out the cup it too small to support the plant so I had to use a support stick. I just bought this 6" net cup bucket lid.
The plant is supported in Expanded Clay balls. I chose this material as apposed to 'Hydroton, Coco coir, Viagrow stones, pearlite...' because from my very little research I found the clay to be the most environmentally friendly and easiest to use, disclaimer: I could be very wrong here.
The nutrient solution used General Hydroponics Maxi Grow. Simple to use, add X scoops per X gal of water. I am about to switch to Maxi Bloom. She is flowering and starting to produce fruit. I do now know when the best time to switch solutions. I am learning by experiment here.
To keep the nutrient solution oxygenated, I used this Air pump,two of of these air stones, and tubing. Any items will do, I used this products because I know an employee of Penn Plax and got them for cost $. Any pump will work, I got a two outlet pump for future expansion.
You should also be sure to have the correct pH for your particular plant. Here is a chart and a great site. I used this pH Test Kit and pH adjust.
It's that simple. Right now the plant is outside and gets about 8 hours of sun. I plan on keeping it outside as long as possible, then will bring it in and have to choose a light source for it.
tl;dr What I used for my first DWC tomato plant experiment. Step 1: Click all links above. Step2: Buy. Step 3: Tomatoes
Edit: Also, Watch this video
In dirt in my raised beds for peppers and tomatoes I amend the soil with cow manure compost, turkey manure compost & top dress with tomato tone.
In containers I like to grow in ProMix BX and I use General Hydroponics Maxibloom which is a dry, water soluble 1 part complete fertilizer that has all the macro & micro nutrients you need. It grows amazing peppers and tomatoes and doesn't require any additional supplements like cal-mag or epsom salt. From planting out til end of season it's the only thing I use for my peppers & tomatoes.
Plus it's super cheap at $12.49 for a 2.2lb bag on Amazon. If you have ever heard of the Lucas Formula Maxibloom at 7g/gallon of water is spot on.
For seedlings I like to use kelp & fish emulsion until planting out.
Yeah, Maxibloom is 100% complete and can be used in hydro, soilless or even soil (although I never use it in actual soil). At 1/2tsp to 1tsp per gallon a 1kg bag goes a LONG way. Growing like 14 plants in 5 to 20 gallon pots I went through just a little over 1 bag in a season from April til late August. Best thing ever IMO, peppers and tomatoes love it. Makes growing in inert soilless mix a snap.
It's pretty cheap too, $14.50 for a 1kg bag on Amazon: http://www.amazon.com/General-Hydroponics-MaxiBloom-Gardening-2-2-Pound/dp/B00NXVZQUW
I can't find any good pics of my tomatos but this is an Aji Lemon Drop pepper in a 20 gal pot of promix + perlite that was fed nothing but maxibloom its whole life: http://i.imgur.com/GdmaZj6.jpg
General Hydroponics MaxiBloom for Gardening, 2.2-Pound https://www.amazon.com/dp/B00NXVZQUW/ref=cm_sw_r_cp_api_yrnfzbR1PEFQ5 So this is all you need and your set ? You won't need anything else ?
Yeah MG has a nasty habit of downvoting things that work but don’t look cool or are cutting edge.
I use maxibloom powder as my main nute. 5-15-14, calmag included. Plus suppliments of course (add N in veg, PK in flower), but I could get by fine with just maxibloom.
I’m pretty sure GH and Scott’s are all the same company.
https://www.amazon.com/dp/B00NXVZQUW/ref=cm_sw_r_cp_api_yXzMAb40A1Y7D
I live in an apartment so I can't modify the faucet. This thing works like a champ.
http://www.amazon.com/dp/B000BPFYG4/ref=cm_sw_r_udp_awd_hFwwtb1DQ7V53
You can try this item from amazon. It gives you a hose connector without the need of threads. I used to use it when I brewed inside. http://www.amazon.com/Claber-8583-Indoor-Faucet-Connector/dp/B000BPFYG4/ref=sr_1_1?ie=UTF8&amp;qid=1320278321&amp;sr=8-1
I mean.. I'm in an apartment lol. There is barely enough room for me let alone water barrels! I like the idea though. I ended up ordering a clamp thing from Amazon (Claber 8583 Koala Indoor Faucet Adapter https://www.amazon.ca/dp/B000BPFYG4/ref=cm_sw_r_cp_apa_i_JbArDbCCE0QDB). It seems to be working! Just was difficult to figure out if it would fit the specific faucet before ording.
http://www.amazon.com/Claber-8583-Indoor-Faucet-Adapter/dp/B000BPFYG4/ref=sr_1_11?ie=UTF8&amp;qid=1412103740&amp;sr=8-11&amp;keywords=hose+adapter
This is so easy, Get a Indoor Faucet Adapter Walmart sell's them also. Check out a video https://www.youtube.com/watch?v=SJDSP7MvBiA I have one and been using it for almost a year with no problems, Takes seconds to attach and use.
It looks like you could use a claber koala
https://www.amazon.com/dp/B000BPFYG4/ref=cm_sw_r_cp_apa_i8QEzbKHZ0JMW
I have one to hook my counterflow chiller to my sink, and it works great. My only concern is that the aerator seems to extend down a bit.
I got the 4 stage 50 GPD and it's been good so far.
I only have a 7 gallon and 9 gallon tank. So, I don't need much for water changes and top-offs.
I have a 7 gallon jug with a spigot which makes dispensing it very easy. I fill two 1 gallon jugs throughout the week for top offs and water changes.
It takes about 2.5 hours to fill the 7 gal. It varies with temperature.
I've heard you can get resin for the DI cartridge and save a lot more money that way versus replacing the cart each time.
Oh yeah, I use this faucet adapter instead of the included one. If your faucet is compatible, it makes connecting and storing so quick if you need this kind of solution.
$10 sink adapter would have worked, or this adapter for even cheaper depending on your sink
I have this to water plants on my balcony: https://www.amazon.com/dp/B000BPFYG4/
You may get better flow out of one of the other fittings but this thing is super easy to use if your faucet is the right shape for it.
Probably better off keeping it simple, more than a hundred bucks less and will never run out of batteries - https://www.amazon.com/Chapin-International-617407731200-20002-Multi-Purpose/dp/B0039EEN0M/ref=sr_1_7?keywords=pump%2Bsprayer&qid=1568512164&s=lawn-garden&sr=1-7&th=1&psc=1
$15 can solve the problem somewhat more elegantly.....
https://www.amazon.com/Chapin-International-617407731200-20002-Multi-Purpose/dp/B0039EEN0M
I use one to hose the salt off in the winter when then hose is shut down for the season.
marry a weed sprayer with a sink sprayer
Assemble the brand new never used weed sprayer, but instead of using the wand, splice in a sink sprayer.
Heat water on the stove to about 110 °F, pour it in the sprayer and pump it up. You will probably want a wash cloth for this and a draft free environment. Maybe a second bucket of warm water to wash with, leaving you most of the spray to rinse off with, but it's optional.
You need to take a navy shower with this rig, but it will get you clean.
If you use this in the cabin's shower stall you'll have to get some RV antifreeze to pour into the plumbing traps before you leave.
I bought a solar shower like this for my first year. I never used it. All the girls in my camp would use up all the water before I got a chance. I don't really like it anyway. It's fucking heavy when it's full and a bitch to carry, especially if you're far from water. I wouldn't recommend it.
I've seen some people hook up showers like mine in little tents like this, which is probably nice for privacy's sake, but if you're gonna spend all that money, you may as well just buy a shower pass and use the showers at Roo.
Someone at our camp bought a garden sprayer like this, which I thought was genius. It works great, you just need a buddy to spray you down.
In all honesty, I just use water jugs and pour them over my head in the mornings. Two gallons is exactly how much I need and it's simple and cheap. Plus, you never really want hot water anyway. It's so fucking hot out all the time that cold/room temperature water feels fucking great.
Bifen XTS Bifenthrin Concentrate 1 Quart https://www.amazon.com/dp/B007SI74GA/ref=cm_sw_r_cp_api_i_CCAUDbCHKBS84
You’ll also need a garden sprayer
Chapin 20002, 2 Gallon Lawn, Garden and Multi-Purpose Sprayer with Adjustable Nozzle, Translucent White https://www.amazon.com/dp/B0039EEN0M/ref=cm_sw_r_cp_api_i_qDAUDbYZ169P3
Also, it’s not a bad idea to get a respirator, this stuff is strong. I picked mine up from harbor freight but here is a link to a similar one.
Breath Buddy Respirator Mask (Plus Safety Glasses) Reusable Professional Breathing Protection Against Dust, Pollen, Pesticides, and Organic Vapors - Perfect For Painters and DIY Projects https://www.amazon.com/dp/B01M67SJ0S/ref=cm_sw_r_cp_api_i_-EAUDbF7988H6
I don't know of any actual stores you can buy one from, but you can get it from Amazon for pretty cheap compared to Chemical Guys. (I assume from you saying "California")
http://www.amazon.com/Professional-Foam-Lance-Adjustable-Bottle/dp/B004GNZYY4/ref=sr_1_1?ie=UTF8&amp;qid=1394840710&amp;sr=8-1&amp;keywords=mtm+foam+cannon
Is this the same one? But for non-karcher (SunJoe)? https://www.amazon.com/dp/B004GNZYY4/_encoding=UTF8?coliid=IJOZ1NS7ZQPR&amp;colid=1X845QHCWNHBH
I'm asking because it doesn't say 2600 psi in the title of the listing.
What do you figure about this foam cannon?
http://www.amazon.com/Professional-Foam-Lance-Adjustable-Bottle/dp/B004GNZYY4
I just bought a Ryobi pressure washer this week. I bought this one. Yes, the one I bought will clean concrete and decks, not sure about the one you posted though. Here is the front walk at my house midway through using the pressure washer, without any detergent.
I bought this foam cannon to go with it. I read after the fact on here that people recommend going with the lower pressure version of it for a low-pressure electric pressure washer. However, it still made pretty good foam! I used CG Honeydew, 5oz to make that foam.
I don't own a PC, so I can't comment. I've got a RUPES 21 and highly recommend it, but it's pricey.
EDIT: Because I'm an idiot my original comment said I bought the pressure washer you linked. I didn't. It was another Ryobi one (fixed now). I looked at the URL and got confused because I'd looked at so many recently and thought it was the same one. Sorry -- hope I didn't mislead you!
Awesome response :). On a personal note, the smell of a product is irrelevant to me, though I do appreciate them.
The foam lance I purchased is this unit: Professional Foam Lance Adjustable with 32 oz. Bottle https://www.amazon.com/dp/B004GNZYY4/ref=cm_sw_r_other_awd_WSfkxbN7VPXR6
The questions asked in the Q/A section mentioned its compatibility with 2000 PSI, so I picked it.
If you have a Sams Club membership. This is the one I have Sams Club It works great had it for about a year now nothing has gone wrong with it. If your going to get a foam cannon I have Amazon hooks up with the quick disconnect. It won't clean concrete or house siding as quickly as say something with 3,000 PSI but it gets the job done. I'm happy with it.
Edit:The one thing I don't like about it is the hose from the pressure washer to the wand is not very long I have to move the pressure washer around to rinse my SUV. Yea first world problems. The electric cord is very long so thats great.
Sorry for graveposting, want to make sure I grab the right foam cannon:
This is the low psi version: Professional 2600 PSI Adjustable Foamer
and this is the high psi version: Professional Foam Lance Adjustable with 32 oz. Bottle
right? it looks like the low psi version doesn't come with quick disconnects, which I'm pretty sure I need to connect to my pressure washer, right?
I'd get a fine grade nanoskin mitt or something similar for decon. Maybe a foam gun or foam lance and some soap. Might want to grab an APC for interior cleaning, although I think you can dilute ONR down as an APC... I really like Optimum APC though, very safe and effective.
I saw this today on slickdeals, choose subscribe & save to get it down to $13.35: 1-Gallon Chemical Guys Maxi-Suds II Super Suds Car Wash
And this is the handle for the unit
Best of luck.
I have the SPX3000 also, great pressure washer for the amount you pay. I have this foam cannon and it works great with it.
(http://www.amazon.com/Professional-Foam-Lance-Adjustable-Bottle/dp/B004GNZYY4/ref=sr_1_3?ie=UTF8&amp;qid=1448944408&amp;sr=8-3&amp;keywords=mtm+foam+cannon)
Foam Guns made by Gilmour $35.79
or $38. The orange foam gun's price fluctuates a lot.
MTM Foam Lance $59.99 shipped.
I don't know about best, but amazon has it at https://www.amazon.com/gp/aw/d/B004GNZYY4/ref=mp_s_a_1_1_a_it?ie=UTF8&amp;qid=1469576875&amp;sr=8-1&amp;keywords=mtm+foam+cannon&amp;pi=SY200_QL40
Mods: is this is a problem, please delete.
This [MTM Hydro] (http://www.amazon.com/gp/product/B004GNZYY4/ref=s9_hps_bw_g121_i1) is probably one of the most popular ones out there.
I got this one it's more expensive but should be the same mechanically. I use a 1700PSI Greenworks pressure washer and get great results http://imgur.com/a/sCGn4 like others have said just adjust the knobs and make sure it is assembled correctly and that you are using the right adapters (if needed). also I use McGuire's gold class soap, the soap could be your problem.
http://www.amazon.com/gp/aw/d/B004GNZYY4/ref=mp_s_a_1_5_a_it?qid=1457622601&amp;sr=8-5&amp;keywords=mtm+foam+cannon
I have a Mars 600 I use in my veg tent, and its great for tight node spacing in early veg.
But I flower with HPS, and its worth it IMO
If I could only pick one it would be a MH/HPS kit over cheap LED no question.
I have one of these and like it
https://www.amazon.com/Apollo-Horticulture-GLK600LS24-Digital-Dimmable/dp/B005ECZQTY/ref=sr_1_1?ie=UTF8&amp;qid=1484365758&amp;sr=8-1&amp;keywords=600w+hid
I also have the large reflector cool tube version, but it cost more and doesnt cool any better than the other hood.
Interesting. Do you mean something like this?
https://www.amazon.com/Apollo-Horticulture-GLK600LS24-Digital-Dimmable/dp/B005ECZQTY/ref=sr_1_5?ie=UTF8&amp;qid=1494802924&amp;sr=8-5&amp;keywords=hps+600watt
My fan was on the out-take pulling air out of the tent. This is what I used for ventilation http://www.ebay.com/itm/VenTech-4-6-Inline-Duct-Fan-with-Carbon-Filter-and-Variable-Speed-Controller-/181246860768
My light setup is: http://www.amazon.com/Apollo-Horticulture-GLK600LS24-Digital-Dimmable/dp/B005ECZQTY
No, but here's the first one that pops up when you search on amazon
Apollo Horticulture GLK600LS24 600 Watt Grow Light Digital Dimmable HPS MH System for Plants Air Cool Hood Set https://www.amazon.com/dp/B005ECZQTY/ref=cm_sw_r_cp_api_YMP4ybBEE64H8
> Or you could hop on Apollo Horticulture 600w air cooled digital MH/HPS ~200$ and get a higher yield than that
Yeah, price & yield are definitely factors.
On the Apollo, would you recommend the cool-tube model
Or the standard air-cooled version:
Definitely worried about heat in the smaller tent.
Imo you'd be better off getting a cob setup with cbx 3590 or vero 29 cobs this site has some good options to choose from. If you want to try out something different with good coverage and efficiency check out qb boards. If you want something affordable, yet powerful go with a 600/1000 mh/hps light. If you just want a basic cheap led light marshydro 300w(132w actual) is a good start.
Ok, so I am scrapping the 2 smaller CFLs that I have and selling them on Ebay and amazon. I am going with a package like this that includes a 600W HPS and MH bulb, timer, and an Aircool hood.
Does dimming them essentially reduce the Kelvins without sacrificing wattage? Or will both be reduced? Or am I completely wrong haha.
We were using CFL's for vegging and LED for flowering. Our LED light is just a really thin strip so I don't think it's distributing enough light out to the plants. I just bought a 600w HPS: https://www.amazon.com/gp/product/B005ECZQTY/ref=oh_aui_detailpage_o01_s00?ie=UTF8&amp;psc=1
We're growing in a basement. It can get fairly cold in the winter so hopefully the HPS will even out the temp a little. Otherwise we do have a space heater we can turn on occasionally.
I was planning on just setting up an oscilating fan in the bud room. But with this new money I was thinking we could get the actual 6in fan that goes in the hood.
Do you use ducting for ventilation? Is it possible to connect the ventilation from the grow room to the ventilation from the dryer or water heater thing? There are ducts that go right through the grow room. Otherwise there's a window in the grow room but it's pretty easy to see from outside. I don't need it to be super discreet since it's medical but I don't want to advertise what we're doing either.
I also was considering getting an actual grow tent. Right now we kind of just surrounded the area where the plants are with mylar from emergency blankets and tents. I'm a little worried about them getting either too hot or not being sealed enough to keep the light in.
Any thoughts on the above info is definitely welcome :) We're very much new time growers. We harvested once and it was a pretty small amount, but we got high off of it! So goal semi accomplished haha
So then this one right?
https://www.amazon.com/gp/aw/d/B005ECZQTY/ref=mp_s_a_1_4?ie=UTF8&amp;qid=1499052997&amp;sr=8-4&amp;pi=AC_SX236_SY340_FMwebp_QL65&amp;keywords=600W+hps+grow+light&amp;dpPl=1&amp;dpID=51w9ciKiSYL&amp;ref=plSrch
Thank you for your advice! I have been looking at Mars Hydro LEDs on Amazon. I see a 300w for $90 or a 600w for $159. Do you think it's worth the jump in price to go with the 600w for a smaller scale grow? I was looking at HID kits as well, for nearly the same price as the 600w Mars Hydro you can go with this option as well http://amzn.com/B005ECZQTY
Thanks for your insight, it is greatly appreciated!
What size fan (cfm)? What size ducting? I used this carbon filter in my 2x4x5 tent with a 6" 400 cfm inline fan. Worked great.
Yea some filters are just poor quality especially the small ones. I run this filter and it's worked great. http://www.amazon.com/iPower-GLFILT6M-Australia-Pre-filter-Reversible/dp/B008NYF8S4 it's also able to be flipped.
No, that’s crazy expensive. You want a cylinder like this https://www.amazon.com/iPower-Scrubber-Australia-Reversible-Prefilter/dp/B008NYF8S4/ref=mp_s_a_1_3?ie=UTF8&amp;qid=1549037948&amp;sr=8-3&amp;pi=AC_SX236_SY340_QL65&amp;keywords=ipower+6+inch+carbon+filter&amp;dpPl=1&amp;dpID=51gvYylKTpL&amp;ref=plSrch
Here is how I do it. Tent on right gets first air ( the coldest and driest as it's for flowering ) air moves to second tent ( the air is warmer and more humid now, ideal for vegging flowers),the air moves into the dry tent,which usually has it's own dehumidifier. Finally exhausting thru a carbon filter back into the room.
https://imgur.com/a/IkN2T9W
I hope this inspires ideas. It wont smell like cannabis in the exhaust air until like 2 weeks into floweing, from that point it progressively gets WAY stronger. I highly advise a carbon filter if you want stealth. I found this to work amazing ( iPower GLFILT6M 6 Inch Air Carbon Filter Odor Control Scrubber with Australia Virgin Charcoal for Inline Fan, Reversible Flange, Prefilter Included https://www.amazon.com/dp/B008NYF8S4/ref=cm_sw_r_cp_apa_i_J3bWDbSH6F9XR )
hope this all helps you 😎
Why do you want to inline it?
And if you want to inline it, why not buy a regular filter and put it in a box and be done with it? For 2 tents you can get away with a fairly cheap filter for below 50$
Take this random one of Amazon...
https://www.amazon.com/iPower-Charcoal-Prefilter-Included-Reversible/dp/B008NYF8S4/ref=sr_1_4?s=lawn-garden&amp;ie=UTF8&amp;qid=1503753117&amp;sr=1-4&amp;keywords=carbon+filter
It even has screws so you can replace the coal if it gets old
You can just blow the air out of the filter
-i use a BreatheRight by Allen for my allergies. It’s expensive ($600-ish) but if you get the charcoal filter it’s crazy good. Will remove scented candle smells and Bacon smells as well as the very marijuana smoke that I smoke inside my own apartment.
I haven’t received any complaints. It’s been 2 years.
The next thing would be to go one step higher and purpose an in-line fan filter and attach a huge 24” charcoal filter.
This option is actually WAYYYY more effective, but requires just a little bit of knowing how to put stuff together, and it’s slightly loud, but god damn, it totally cleans all smells and allergies.
This first link is for an in-line fan:
https://www.amazon.com/gp/aw/d/B07FPFVZTZ?pf_rd_p=731c2082-c3b6-4ec5-ba3b-337a0516607d&amp;aaxitk=i0llSkJCSVXgMhex-F1n.Q&amp;hsa_cr_id=3570293760101
Second link for the filter:
https://www.amazon.com/gp/aw/d/B008NYF8S4/ref=psdcmw_5446824011_t1_B07FPFVZTZ
Third link is for the Allen Breathe Right:
https://www.amazon.com/Alen-Customizable-Purifier-HEPA-Pure-Allergies/dp/B00APO426E/ref=mp_s_a_1_3?keywords=allen+breath&amp;qid=1574290745&amp;sr=8-3
The Allen is more aesthetically pleasing and is a complete unit that requires zero installation. Simply plug and play. This model is for 1100sqft. If you get this, get the charcoal filter. They have lots of filters.
The in-line fan and filter option will be like 10x more powerful and way more affordable than the Allen, but unpleasant to look at and is louder.
This fan
6" Inline Fan - 395 CFM Exhaust Duct Fan, Built-in Speed Controller, ETL Listed, Pre-Wired 6 FT Grounded Cord - Great Use in Grow Tent with Carbon Filters, Light Fixtures, Intake. Fits 6 Inch Ducts. https://www.amazon.com/dp/B01L0D0UEQ/ref=cm_sw_r_cp_apa_i_5YNSCb9Y7EARS
With this filter
iPower 6" Inch Air Carbon Filter Odor Control with Australia Virgin Charcoal for Inline Fan, 420 CFM https://www.amazon.com/dp/B008NYF8S4/ref=cm_sw_r_cp_apa_i_6ZNSCbGZX32RJ
Just know that when you open the tent. Shits gonna smell ..
This is still a work in progress
Details:
Essential shoping list (to me)
-[6" fan and carbon filter]
(https://www.amazon.com/gp/product/B008NYF8S4/ref=oh_aui_detailpage_o00_s01?ie=UTF8&amp;psc=1) works great, no smell, plenty of airflow, relatively loud at 100%, virtually silent when turned down to below 30% with some sound absorbing foam around the intake and fan. 4" would have worked for my small setup. I'm pushing through the filter which is outside my grow area with no problems. Don't forget some ducting and real duct tape. Clamps aren't really needed at these speeds and pressures if you have good tape, but they won't hurt.
-[Speed controller for fan.] (https://www.amazon.com/gp/product/B006NGI2RS/ref=oh_aui_detailpage_o06_s00?ie=UTF8&amp;psc=1) This was definitely overkill, I just didn't trust cheaper voltage regulators, plus I can and have used it for other things. Pretty well made, works great.
-[pH meter.] (https://www.amazon.com/gp/product/B00CMFVXMA/ref=oh_aui_detailpage_o05_s00?ie=UTF8&amp;psc=1) I didn't want to cheap out on this since pH is so important. Meter works great. Only note is you probably want to get some extra storage solution, it only comes with a little, and after a few months you'll run out.
-Light was a Viparspectra 300 (130 actual watts). Worked well, had good growth. I added more light later but for my small space that would have probably given me decent yields.
-[This timer for lights] (https://www.amazon.com/gp/product/B01MYOD58S/ref=oh_aui_detailpage_o01_s00?ie=UTF8&amp;psc=1) was super easy to program and hasn't failed. It has a bright blue LED indicating if the timer is sending power to the lights which is nice, but I had to tape over it because it was so bright. Also, the timer gets a little warm which makes me a little uneasy since I only have ~250 watts going through it.
-General Hydroponics FloraGrow, FloraMicro, FloraBloom, CaliMagic. I also got Fox Farms Big Bloom part way through flower but don't have any way to know its actual benefits so it's not an essential.
-Coco for growing medium. Most people add perlite, I didn't.
-7 gal smart pot
-Plastic storage container with a kitchen cooling rack to sit the pot into and onto and allow drainage without making a mess. Cooling rack allows for 1/2" of water to accumulate before the pot is sitting in it.
-[adjustable hangers for lights.] (https://www.amazon.com/gp/product/B0098R0600/ref=oh_aui_detailpage_o00_s00?ie=UTF8&amp;psc=1) Work great, easy to use
Set up and process
I have a different LED but maybe this can help.
This is my current grow: http://imgur.com/a/FnEdV (The second picture in the album shows the hook)
and this is the 300 watt light that I have: http://www.amazon.com/ViparSpectra-Reflector-Spectrum-Indoor-Plants/dp/B01B4GQ6MO?ie=UTF8&amp;psc=1&amp;redirect=true&amp;ref_=oh_aui_detailpage_o00_s00
Our hooks might be different but maybe this will give you an idea on how to hang it
Also these may be the hooks you are looking for: http://www.amazon.com/Apollo-Horticulture-Adjustable-Improved-Internal/dp/B0098R0600/ref=pd_bxgy_86_img_2?ie=UTF8&amp;refRID=05TYKJTTZ9XTFCD7SRCJ
You need these... Adjustable Lighting
I'd recommend spending just a little more and getting ones with metal gears like these. The iPower ones came with my lights and I do not trust them to hold, they are very cheaply made. The carabiner is tied on and the internal gears are plastic. Now I use the cheap ones as backups for my ducting or filter in case my straps slip.
I have mine currently on my laundry room shelf with an LED light. Ha. Nice setup. I don't have any reflective insulation right now since I will be moving mine outside soon. But next year I plan on it. Would you say it's cheaper to do that or just get a tent?
Anyone curious, this the LED and hooks I have:
https://www.amazon.com/gp/product/B01F53LP46
https://www.amazon.com/gp/product/B0098R0600
I've used this before. It's ok. I had a hard time mounting it inside of the enclosure so I had to just set it on top. The reflector isn't very good so I wasn't getting as strong of UVB as I wanted through the screen.
https://www.amazon.com/Sunblaster-904296-NanoTech-Fixture-Reflector/dp/B00AKKUBDQ/ref=sr_1_9?crid=1TS5E52TNPND5&amp;keywords=t5ho+reptile+light+fixture&amp;qid=1563203259&amp;s=gateway&amp;sprefix=T5ho%2Caps%2C247&amp;sr=8-9
I switched to something like this. They usually come with a mounting kit and I like the reflector on it.
I bought a t5 fixture on amazon, I believe I got this one but I would recommend this one if you can get it while it’s in stock, they sell out quickly. However the one I got off amazon hasn’t caused me any issues and I was able to mount it on top of my 4x2x2 PVC enclosure for my geyri. For the basking bulbs I use the ceramic fixture that came with my enclosure that I ordered off of diycages.com, I believe they sell the fixtures separately but they are meant to be mounted to the top of a PVC or wooden enclosure so if you are using glass that fixture would not work, but the t5 still could be set on the screen.
Try this link https://www.amazon.com/Sunblaster-904296-NanoTech-Fixture-Reflector/dp/B00AKKUBDQ/ref=mp_s_a_1_1?keywords=sunblaster&amp;qid=1565807059&amp;s=gateway&amp;sr=8-1
Looks like your standard T5HO grow light and reflector combo to me. Perhaps a Sunblaster T5HO?
Sunblaster tend to be slightly more pricey than other manufacturers so you can probably bag a cheaper bargain if you look for other T5HO grow lights online. You can also get different setups i.e. from single tube with a reflector right up to significantly larger 8 tube combos.
you could move the basking spot up as close to the screen as possible as a temporary solution, when I was waiting for my t5's I just cut a hole in the screen for the t8 to get through better, but then you have to worry about an escaping dragon.
&#x200B;
this is the fixture I use: https://www.amazon.com/Sunblaster-904296-NanoTech-Fixture-Reflector/dp/B00AKKUBDQ/
the bulbs are cheapest on petco.com : https://www.petco.com/shop/en/petcostore/product/reptile/reptile-heating-lighting/zoo-med-reptisun-100-uvb-t5-ho-lamp-24-watts
I just invested in this one myself, haven't had any issues yet. But I've only had it a week or so thus far.
Sunblaster 904296 NanoTech T5 High Output Fixture Reflector Combo, 2-Feet https://www.amazon.com/dp/B00AKKUBDQ/ref=cm_sw_r_cp_apa_GE6UBbV4EQJD2
Those definitely need a lot of light, and basil likes heat. I'm sure it could work in a cabinet if you have reflective material (mylar is great) on all sides but one for viewing. It would work better if it was on all sides, but it'll still work.
The lights I recommended (COB) tend to have a pinkish tint. If you want something that looks closer to regular sunlight for the sake of aesthetics, T5's are great. You could probably light the whole thing with 4 of these. Maybe add a COB or two.
The succulents under the cheapo gooseneck lights are etiolating slightly but not horribly, but those plants also get some filtered afternoon sun next to a window. I recently bought this Sunblaster 904296 NanoTech T5 High Output Fixture Reflector Combo, 2-Feet https://www.amazon.com/dp/B00AKKUBDQ/ref=cm_sw_r_cp_apa_i_4naQDbKMJ1YZ4 I'm am confident it will work better, but I just received it and haven't taken it out of the box yet.
My sansii bulb works well, but I'm not using it for sun-hungry succulents. I have my pineapple plants, Sansevieria and some other medium light succulents under it.
i think this will work?
I got one of these for my 20g long and has been great. a bit too much light until I added water lettuce and duckweed. Now however it works well. I have it on a $10 timer from a box store running 4 on 4 off 4 on. I'm happy, and the tank seems happy.
http://www.amazon.com/Sunblaster-904296-NanoTech-Fixture-Reflector/dp/B00AKKUBDQ/ref=sr_1_1?ie=UTF8&amp;qid=1427398388&amp;sr=8-1&amp;keywords=24+sunblaster+nanotech
Another possibility. https://www.amazon.com/Back-Roots-Organic-Mushroom-Farm/dp/B00CD0KZ78 Make mushroom growing at home a hobby to understand how they grow. Good for explaining to kids. Could be a science project.
I am not a mushroom hunter (try /r/Mushrooms/ ?), but here are some ideas -
edit: also, I really like the morel wine stopper on this site: http://morelmania.com/3Catalog/newcarvedmorels.html
you can buy preinnoculated kits at the grocery store usually too
or off amazon.
https://www.amazon.com/Back-Roots-Organic-Mushroom-Farm/dp/B00CD0KZ78/ref=sr_1_4_a_it?ie=UTF8&amp;qid=1503533628&amp;sr=8-4&amp;keywords=oyster+mushroom+kit
link to the product for more details
I received it as a gift, but I think this is it http://www.amazon.com/gp/aw/d/B00CD0KZ78
Good price right now. It’s up in the $30s sometimes. Make sure you get the Coring one. I wore my work boots and just got into a rhythm as I did rows in my yard. Not “fun”, but it’s not hard. Sometimes have to knock the aerator against a rock to loosen dirt stuck inside.
Yard Butler Lawn Coring Aerator Manual Grass Dethatching Turf Plug Core Aeration Tool ID-6C https://www.amazon.com/dp/B00EOMCJD6/ref=cm_sw_r_cp_api_i_nVgtDbXTQ2MH2
My understanding is that core aerators work much better than spike aerators. You could get one of these, but I've heard they can clog pretty easily, especially if you have a lot of clay in your soil. For me, it was actually cheaper to have a lawn care company come out ($50) than it would have been to to rent an actual plug aerator.
For manual stomp aerator, are you talking about something like this? I was told that things like this are essentially worthless because they don't pull any plugs.
What about this for a dethatcher?
You could rent one but that would likely be overkill for 900 sq ft. You could buy a manual one like this: https://www.amazon.com/dp/B00EOMCJD6/ref=cm_sw_r_cp_apa_2G09ybVGG02FW
Yep, this thing. In general, it wasn't terrible, but some of the compacted solid required a bit of force and my hip was jacked up for a few days afterwards.
I would say use a grow box like this
Apollo Horticulture 48"x48"x80" Mylar Hydroponic Grow Tent for Indoor Plant Growing https://www.amazon.com/dp/B00H9O6UJ0/ref=cm_sw_r_cp_apa_mi85xbV5MPKCT
Here is the tent:
Apollo Horticulture 48"x48"x80" Mylar Hydroponic Grow Tent for Indoor Plant Growing https://www.amazon.com/dp/B00H9O6UJ0/ref=cm_sw_r_cp_api_93rZxbJJ5D780
I'm using the same lights from my previous setup and have another carbon filter and inline fan on the way. Do you guys think two inline fans would be overkill for this tent? I've got 1000 total watts that'll be running and I haven't tested anything for temps just yet. Any advice is super appreciated and welcome!
48x48x80 Apollo Horticulture 48”x48”x80” Mylar Hydroponic Grow Tent for Indoor Plant Growing https://www.amazon.com/dp/B00H9O6UJ0/ref=cm_sw_r_cp_api_-sHdAb565QMF7
It is definitely a cheaply made tent but I’m only on my 5th grow. Plan on getting a better one soon.
No, the 4x4x6.6 (48”x48”x80”) is only $95, which is like 117CAD. I’d look through all the links on Amazon as sometimes they sort the more expensive sellers first.
Edit: Apollo Horticulture: https://www.amazon.com/Apollo-Horticulture-Hydroponic-Indoor-Growing/dp/B00H9O6UJ0
I'll have to use a tent, and it will most likely be this one http://www.amazon.com/Apollo-Horticulture-Hydroponic-Indoor-Growing/dp/B00H9O6UJ0/ref=sr_1_2?ie=UTF8&amp;qid=1458706703&amp;sr=8-2&amp;keywords=grow+tent+48
Whatever I end up doing, I want at least 6 oz of weed, more if possible. I'll be selling it and keeping a little.
Ya the confusion is the picture in the Amazon add doesn't match the size you selected. The size you've selected is right but the tent pictured in the amazon post is like 4'x8'x8'
You've got the right size tent picked though you might want to consider a different seller on Amazon. Plus the one you've selected is overpriced.
check this out:
https://www.amazon.com/Apollo-Horticulture-Hydroponic-Indoor-Growing/dp/B00H9O6UJ0/ref=sr_1_3?ie=UTF8&amp;qid=1487184293&amp;sr=8-3&amp;keywords=grow+tent
4x4 tent with 4 plants and a decent veg time and you could get about a lb or maybe a little less every 5 months.
4x4 set up is a lot less than $1000
tent $100 https://www.amazon.com/Apollo-Horticulture-Hydroponic-Indoor-Growing/dp/B00H9O6UJ0
light $170 https://www.amazon.com/iPower-Digital-Dimmable-System-Reflector/dp/B005GYRZV2
exhaust fan $100 https://www.amazon.com/Hydrofarm-ACDF6-Active-Air-Inline/dp/B00KWYJQYA
clip fans $20 - $40 https://www.amazon.com/Comfort-Zone-Clip-Stands-anywhere/dp/B000U9V47E
You still need buckets and soil as well as seeds or clones, but the bulk of what you need is right there.
You could swap out the HID lamp for some leds easily enough. Or upgrade to slightly better quality items, but you can get started for pretty cheap if you want.
Add a second set up like this and you can go perpetual grow and harvest several times a year.
https://www.amazon.com/gp/product/B00H9O6UJ0
Here is the mobile version of your link
little bigger than you want prolly but you'll be happy for the room after first grow, love these, inexpensive and with Prime shipping
I like having access on three sides too even if I don't use all three I can stick in a variety of spots
https://www.amazon.com/gp/product/B00H9O6UJ0/
Apollo Horticulture makes great tents and products. I'm running a 6in premium carbon filter from them as well. Have both rents connected and it is doing its job just right.
IMO tent thickness isn't needed. Where I live it gets down to the mid 20s. My garage isn't heated and gets too around 50s, and with my lighting, A small space heater, and the tent, I'm keeping a nice 74(sleep time) 78(daylight) at 40% to 50% humidity constantly.
This is one tent I recommend , and my carbon filter
https://www.amazon.com/gp/aw/d/B00H9O6UJ0/ref=mp_s_a_1_1?ie=UTF8&amp;qid=1479327070&amp;sr=8-1&amp;pi=SY200_QL40&amp;keywords=grow+tent
https://www.amazon.com/gp/aw/d/B00QB0UOXQ/ref=yo_ii_img?ie=UTF8&amp;psc=1
Working great for me:
https://www.amazon.com/General-Hydroponics-MaxiGro-Gardening-2-2-Pound/dp/B01N1TQZ21/ref=sr_1_4?s=lawn-garden&amp;ie=UTF8&amp;qid=1484365456&amp;sr=1-4&amp;keywords=general+hydroponics+maxigro
https://www.amazon.com/General-Hydroponics-MaxiBloom-Gardening-2-2-Pound/dp/B00NXVZQUW/ref=sr_1_3?s=lawn-garden&amp;ie=UTF8&amp;qid=1484365487&amp;sr=1-3&amp;keywords=general+hydroponics+maxigro
these?
General Hydroponics MaxiBloom for Gardening, 2.2-Pound https://www.amazon.com/dp/B00NXVZQUW/ref=cm_sw_r_cp_api_UfwEybVRY0PTH
General Hydroponics Liquid Kool Bloom Fertilizers, 1-Quart https://www.amazon.com/dp/B002DV8TBQ/ref=cm_sw_r_cp_api_PgwEybNG19KZF
how long will each of these last me? what's the better bang for buck?
Dyna-Gro Foliage Pro
Dyna-Gro Bloom
You could try Maxigro and then Maxibloom when flowers start appearing. It's a very cost effective fertiliser and supposedly works well in soil although I use it in coco coir.
If you use the maxigro and maxibloom make sure it's fully dissolved before you feed your plants. You can mix a teaspoon of it in a small bottle of hot watter and shake the bottle and then add that to a bigger container with water.
There are other fertilisers you can use too. Any 9-3-6 npk fert will be fine and you can find that at most gardening shops.
None of these are super hots so please don't beat me. I came here for pretty much all my pepper growing advice so I figure I'll "give back" by posting my "crop" so far. I'll post everything including today's update in this post and reply to this for future updates unless you'd rather me go ahead and space it out.
These were started from seeds on April 1st. A mixture of normal "hots"(pablano, jalapeno, cayenne, etc) and sweet peppers. here they are on 4/19/2016 right before I thinned them out to 1 seedling per pod.
On 5/2/2016 I transplanted them to solo cups. I kept them indoors for a bit longer before hardening off but I did it rather quickly due to not being able to get them adequate light indoors.
This was taken on 6/6/2016, which was about 1-2 days before I transplanted them to their forever homes.
Here they are today (7/5/2016) which is just a few days shy of 1 month since transplant. I know the spacing/pot size isn't the best but this is my first year attempting growing more than 1 pepper and I am honestly not looking to grow a huge amount of peppers. The ones in the container are planted in a "square foot gardening" approach with each having a 1ft space. The other ones (I have 5 in total) are in 3 gallon pots. Soil mixture in an approximate "mel's mix" and I currently just switched over to maxibloom as my fertilizer. Currently still cutting off buds as I'd like them to get a bit bigger before allowing them to produce(October is first frost so hopefully still have time).
Again, I'm really new to this so I'm all ears to any suggestions, comments, and advice (outside of the spacing, I know they need more than that lol).
Could try some MaxiBloom
Doesn't get any easier or cheaper than this for beginners.
For lettuce:
https://www.amazon.com/General-Hydroponics-MaxiGro-Gardening-2-2-Pound/dp/B00NQANQAC/ref=sr_1_25?srs=3029221011&amp;ie=UTF8&amp;qid=1498793863&amp;sr=8-25
For tomatoes:
https://www.amazon.com/General-Hydroponics-MaxiBloom-Gardening-2-2-Pound/dp/B00NXVZQUW/ref=pd_bxgy_86_img_2?_encoding=UTF8&amp;pd_rd_i=B00NXVZQUW&amp;pd_rd_r=N34HAQYTWQ06PBVKJ5Q6&amp;pd_rd_w=AjPTO&amp;pd_rd_wg=pRXDh&amp;psc=1&amp;refRID=N34HAQYTWQ06PBVKJ5Q6
If hydro does not work out for you, you can still use these products for regular gardening.
Maxibloom flower is all you'll need for basic growing. 7+ grams per gallon (for the explanation on the method) and you can get it here. I just did this for a tent in a soil grow and it worked pretty well. You might have to dial the amount depending on your strain and plant size but once you find it, you won't need 5 different additives to mix.
I'd highly suggest following the K.I.S.S (Keep it simple stoner, err stupid lol) lucas formula way of growing. All this means is giving the plant everything it needs in a single step formula, the general rule being giving it more fertilizer past this wouldn't increase your results because the plant simply can't make use of it past what you already gave it.
What I use to achieve this is General Hydroponics MaxiBloom, you can pickup a 2.2lb bag for less than $13 on amazon. You only need 0.75-1 teaspoon per gallon of water (depending on the rate of which each individual plant requires its nutes), 1 bag easily lasts me 2-3 grows and I'm using close to 300+ gallons of water per grow.
You don't need any other nutrient in veg, this is it (well, besides silicia for thickness & seaweed after transplants to hasten recovery/help prevent shock). Yes it's a bloom nutrient but the nitrogen levels are more than sufficient for veg, the maxigro line for example would only result in more elongated/lanky plants without increased light/Co2.
To dissolve the mixture is simple, I fill my sink with warm water, fill a mason jar half way with water and add my 1 teaspoon in. I let the mason jar sit in the warm water shaking the jar periodically until it's completely dissolved. Add it to the gallon and you're ready to feed!
Please don't be dissuaded by my lengthy explanation, it's rather easy as hell! Liquid nutrients are a waste when it comes to veg nutes imo, you're mostly paying for water.
https://www.gemplers.com/product/ARS320/ARS-Grape-Scissors
https://www.ebay.com/itm/Chikamasa-B-500sf-Stainless-Steel-Scissors-w-Fluorine-Coating-Resin-resistant/263795173535?epid=8016915205&amp;hash=item3d6b6ae89f:g:IAQAAOSw7XNbPLH5
https://www.amazon.com/dp/B00P0FK7W6/ref=cm_sw_r_cp_apa_DeANBbJVTGJQ5
Heres what i grabbed except i got the curved and angled blade versions of the first two. Theres lots of other good ones though too im sure. I havent even tried these ones yet though so i cant really recommend them lol its just what i ordered after researching it.
That was my first thought. https://www.amazon.com/dp/B00P0FK7W6/ref=cm_sw_r_cp_awdb_x8S7ybK6PTP7J
Immediately after a full trim (im lazy so I only want to handle and trim my crop one time). Then its on to dry and cure. I have a big 4'x4' oak box I dry in. Its outside on covered patio, I keep a rh meter in it. I have some control over humidity in the box through leaving the lid fully open, slightly open, closed, water bucket... I drop buds in bags and leave open for the 1st day or so (im bud washing so humidity is a little higher than if not washing). I have rh meter in the bag, when it gets down to 60-70 or so I fold over and clip the top closed. I monitor the bags 2,3,4 times a day. Its true, a very important part of the grow is dry/cure. I bet 99% of the crops that get jacked end up worse or trash because the thief does not know how to dry/cure. Good Luck bro/
I use these for bud trimming
https://www.amazon.com/gp/product/B00P0FK7W6/ref=oh_aui_detailpage_o03_s01?ie=UTF8&psc=1
I helped set up a grow with an LED light. The light itself was about $150-$200 but it's perfect for veg and flowering. I would recommend going that route since it helps with the heat and electricity.
This is the light. 600w equivalent only using 300w. It's full spectrum and the light is actually a really intense violet color, its pretty badass. The person growing says their electricity has only gone up by about $30 (.12c/kWh or so)
MarsHydro Mars300 Mars600 Led Grpow Light(Mars600 with Veg/Bloom Spectrum for Hydroponic Indoor Greenhouse/Garden Plant Growing, 272W True Watt Panel) https://www.amazon.com/dp/B00XC3LBIW/ref=cm_sw_r_cp_apa_KvovxbYQTRKNV
Sorry for the link formatting, on mobile. I highly recommend the light though. It has had plenty of power for the three plants that they have in about the same footage as your grow.
DIY are superior, as you can get the exact nm frequencies you like, but if you aren't handy with electronics you can run the risk of fire or simply blowing money on a dud product. You can get 600w leds for 150 now on amazon, and they work really well.
https://www.amazon.com/MarsHydro-Mars600-Spectrum-Hydroponic-Greenhouse/dp/B00XC3LBIW
Good luck, and keep the sub updated!
its a marketing ploy really, they say its to increase the longevity of the light boards themselves but who knows. https://www.amazon.com/MarsHydro-Updated-Spectrum-Certificate-Hydroponic/dp/B00XC3LBIW
if this is the same light or similar then you can read on the page that it actually only pulls 132 watts +- 10%
" ENERGY-SAVING: Consuming only 132watt±10% with the same effect of typical 150W hps or HID grow lights. "
its a common mistake you shouldn't really worry about it, just know that most people recommend anywhere from 30-50 watts of actual true wattage per sqft of tent, and in your case you only have about just a little over 15.
Again only saying mars hydro 600w gives it a bit of leniency but the best 600w blurple led ive seen maxes out at like 180 watts which could work but you would probably see a massive improvement if you added some more light in there.
If your light isnt a blurple then i could be totally off.
Thanks! Im going to get some today.
The light im using is a Marshydro 600W LED (275W true output). I got it for $140 from the Marshydro store on ebay!
http://www.ebay.com/usr/marshydro?_trksid=p2057872.m2749.l2754
https://www.amazon.com/MarsHydro-Mars600-Spectrum-Hydroponic-Greenhouse/dp/B00XC3LBIW/ref=pd_sim_86_4?ie=UTF8&amp;psc=1&amp;refRID=P6JXBRPZQ6WV5ANKFJA2
I really like the light because I feel it has good penetration, it does not produce a lot of heat, and it is easy of my electric bill haha. I have not experienced a single problem with it!
Thanks for the info, I'm not sure on the version, https://www.amazon.com/MarsHydro-Mars600-Spectrum-Certificate-Hydroponic/dp/B00XC3LBIW/ref=sr_1_1?ie=UTF8&amp;qid=1486758106&amp;sr=8-1&amp;keywords=mars+hydro+600w
whatever that one is?
I thought aiming for around 50 watts per sq ft was best to aim for. Have you any idea how much difference there could be to the plants in the two different spaces (~71W per sq ft in the 2x2 to ~31W in the 3x3)?
Which one of these would work for the tent in my OP and 4 plants? Or would I need an HPS?
https://www.amazon.com/Double-Specturm-Greenhouse-Flowering-Growing/dp/B01JLKUA2W/ref=pd_sim_86_3?_encoding=UTF8&amp;psc=1&amp;refRID=MK1MKFVY1BY0RPG81WB3
https://www.amazon.com/MarsHydro-Mars600-Spectrum-Certificate-Hydroponic/dp/B00XC3LBIW/ref=sr_1_1?s=lawn-garden&amp;ie=UTF8&amp;qid=1487102778&amp;sr=1-1&amp;keywords=mars+hydro+600w
Thanks for the suggestion. It looks like the mars 600 is a little cheaper than 2 mars 300s. Any reason I should buy one over the other?
https://www.amazon.com/MarsHydro-Mars600-Spectrum-Certificate-Hydroponic/dp/B00XC3LBIW/ref=sr_1_2?srs=10776211011&amp;ie=UTF8&amp;qid=1482214894&amp;sr=8-2
I was thinking 4ft would be too big inside as well, so cloning definitely seems like the way to go. I was thinking of using this light since it seems to have good reviews and isn't super expensive.
https://www.amazon.com/MarsHydro-Spectrum-Certificate-Hydroponic-Growing/dp/B00XC3LBIW?SubscriptionId=AKIAILSHYYTFIVPWUY6Q&amp;tag=duckduckgo-d-20&amp;linkCode=x
Indeed you can keep auto flowering plants small, but you can actually do that with any plant. Look up sea of green or screen of green methods to run small plants effectively. But can't stress this enough, I don't recommend autos, and if you're beginning with clones it's doubtful anyone has auto clones. Autos by nature are tough to clone, as the clones almost immediately begin to flower and don't have time to grow out as they would if they had been from seeds.
The tent method is great for beginners, but will run a bit more than $100. In total you would need a tent, LED light, inline fan, pots, soil, nutes, bamboo stalks, garden twine, PH testing kit, carbon filter, hanging clips, trimmers, drying rack, mason jars, and 62% boveda packs. If you search craigslist you can probably find a bunch of people selling their used gear. With a 2 x 4 tent you could yield 8 ounces or more, although it's more likely that you'll harvest 3-4 ounces your first go. A 4 x 4 tent would allow you lots of room and twice the yield.
Also in regards to LED's, be mindful of how many square feet you're trying to cover. I've got a few different LED's in my gardens, as well as MH/HPS lights. Many of the LED's claim to be full spectrum, and while that may be true, they vary quite a bit in terms of what they mean by that. I've got ones that are blueish white, blue, purple, more red, and one that has a switch from veg to flower. Out of all of them I really like my Mars Hydro , although I will say it does run very blue. Despite the dominantly blue spectrum, it's produced buds comparable to a 600w HPS, but with significantly more frost.
Any heat source will work as long as it gets warm enough and not too hot. You’re looking for about 85 degrees. For me, this means setting my mat to 93 degrees.
Here’s the mat I have with temp controller. It’s cheap but works. $28 shipped.
controller
mat
You could also try a dimmer with the lamp.
https://www.amazon.com/Apollo-Horticulture-68-108%C2%B0F-Thermostat-Controller/dp/B010GFADNM
https://www.amazon.com/VIVOSUN-Seedling-Thermostat-Controller-Alternation/dp/B015F4VFGI/ref=cm_cr_arp_d_product_top?ie=UTF8
I use these two. There's also an additional one linked in the beginner post I think
I have been using this one with no issues so far. A little cheaper and it does the same thing. Although it reads about 2-4 degrees cooler than what my gun reads and I usually go with what my temp gun tells me so I match the thermostat accordingly.
VIVOSUN Digital Seedling Heat Mat... https://www.amazon.com/dp/B015F4VFGI?ref=yo_pop_ma_swf
I have that thermostat connected to a Large ZooMed (petsmart) Under Tank Heater. Warm side shouldn’t exceed 95!
Thermostat
And for an UTH just get one from zoomed, I've never had a problem with theirs before.
Inkbird thermostat, I figured it would be good enough to use temporarily. I have my other snake on a Herpstat 2 and I intend to use it for the BP too, once she's done with quarantine.
I use this temp gun to check the temps under the hide, at least once a day.
I am a bot programmed to automatically provide the following content by /u/_Ataraxia when summoned. Link to the most recent version of this content here
The first three links are detailed care sheets, then a tub tutorial, and the rest are product recommendations. read everything thoroughly, come back with any questions. Let /u/_Ataraxia know if any of the links don't work.
Glass tanks can be very challenging for ball python husbandry due to the high amount of air flow with the screen top and the total lack of insulation with the glass walls. it's generally recommended to use tubs or pvc reptile cages instead. wood enclosures can also be suitable if they're designed well and sealed properly to protect the wood against moisture. glass tanks can work, but they require a lot of modification and maintenance, which you'll find tips for in the second link. i'll give you product recommendations to cover options for tanks, tubs, and pvc/wood enclosures.
Ball Python Care Guides
Set-up Recommendations
Copypasta version 7/24/2018 (c) /u/_Ataraxia
I am a bot, and this action was performed automatically. Please contact the moderators of this subreddit if you have any questions or concerns.
looks good. if your interested in exploring this type of cooking more but don't want to spring for an anova or other sousvide cooker. use the crockpot method. more precise. and can do longer cooks without losing heat.
basically you hook this
https://www.amazon.com/dp/B015FKG4CC/ref=asc_df_B015FKG4CC5097413/?tag=hyprod-20&amp;creative=395033&amp;creativeASIN=B015FKG4CC&amp;linkCode=df0&amp;hvadid=198107334619&amp;hvpos=1o2&amp;hvnetw=g&amp;hvrand=12722699865548230849&amp;hvpone=&amp;hvptwo=&amp;hvqmt=&amp;hvdev=c&amp;hvdvcmdl=&amp;hvlocint=&amp;hvlocphy=9017523&amp;hvtargid=pla-326308171578
inline with your crockpot. then put the temp probe in the water. bring water up to temp with high once its at temp though switch it to low or warm, otherwise the heater element gets too much momentum during heat cycles and overshoots the temperature. this is what I use currently. i've done 48hr chuck roasts in it and works awesome.
Yeah, I suppose that would work. All you would need then is just a single stage temp controller such as this one:
https://www.amazon.com/dp/B015FKG4CC/ref=asc_df_B015FKG4CC5149652
Haven't grown my koji yet because I'm on vacation, but here's what I purchased and it all works:
&#x200B;
- Humidistat: https://www.amazon.com/gp/product/B071ND7N8L/ref=oh\_aui\_detailpage\_o00\_s00?ie=UTF8&amp;psc=1
- Perforated pan: https://www.amazon.com/gp/product/B01E95D6H0/ref=oh\_aui\_detailpage\_o02\_s00?ie=UTF8&amp;psc=1
- Pan: https://www.amazon.com/gp/product/B001VZ6Y4O/ref=oh\_aui\_detailpage\_o01\_s00?ie=UTF8&amp;psc=1
- Humidistat: https://www.amazon.com/gp/product/B01J1E5LWM/ref=oh\_aui\_detailpage\_o04\_s00?ie=UTF8&amp;psc=1
- Thermostat: https://www.amazon.com/gp/product/B015FKG4CC/ref=oh\_aui\_detailpage\_o04\_s00?ie=UTF8&amp;psc=1
- Heating pad (I fold it in half): https://www.amazon.com/gp/product/B00P7U259C/ref=oh\_aui\_detailpage\_o04\_s00?ie=UTF8&amp;psc=1
- Styrofoam container: https://www.amazon.com/gp/product/B000NO6F8E/ref=oh\_aui\_detailpage\_o05\_s00?ie=UTF8&amp;psc=1
My apartment has pretty terrible lighting and with fall/winter coming on strong in the Boston area, I decided to put together a little home gardening station to help with lighting and movement of the plants for watering. I went into this with the goal of having my setup accommodate most of my small collection of plants and to allow for easy movement without having to mess with the grow lights. In the end, I decided on a cart-based design composed of the following items:
Bror Utility Cart 33 ½” X 21 ⅝” X 34 ⅝” ($99)
https://www.ikea.com/us/en/p/bror-utility-cart-black-pine-plywood-60333850/
Bror Add-on Shelf 21 ⅝” X 6 ¼” X 5 ½” ($10)
https://www.ikea.com/us/en/p/bror-add-on-shelf-black-20402001/
Koppla 3 Outlet Power Strip 19 ¾” ($4.99 for two pack)
https://www.ikea.com/us/en/p/koppla-3-outlet-power-strip-grounded-white-00086428/
2x Hemma Cord Set, Black 15’ 5” ($7.00 each)
https://www.ikea.com/us/en/p/hemma-cord-set-white-10175810/
(IKEA site only has white showing up now, black was available in-store)
2x Luftmassa Lamp Shade 10” ($17.99 each)
https://www.ikea.com/us/en/p/luftmassa-lamp-shade-rounded-70462648/
Kasa Smart WiFi Plug Mini HS105 ($21.75)
https://www.amazon.com/gp/product/B01K1JVZOE/
Relassy 20 Watt Dual Head, Gooseneck, Full Spectrum Grow Lamp ($27.39)
https://www.amazon.com/gp/product/B07C68N7PC/
2x GE 9 Watt BR30 Balanced Full Spectrum Bulbs ($9.98 each)
https://www.amazon.com/dp/B07NN6SVG6/
4x 3M Command Utility Hooks 3 lbs ($8.99 for nine)
https://www.amazon.com/gp/product/B0751RPD3V/
2x Velcro Thin Ties 8” X ½” ($9.70 for 100)
https://www.amazon.com/gp/product/B001E1Y5O6/
Total Cost (pre-tax): $234.76
GE is the best! I have so many.
GE Lighting 93101230 9-Watt BR30 LED Grow Light Bulb for Indoor Plants, Full, Balanced Spectrum https://www.amazon.com/dp/B07NN6SVG6/ref=cm_sw_r_cp_api_i_sJ3ZDb2NX6ZW5
GE Lighting 93101232 32-Watt PAR38 LED Grow Light for Indoor Plants, Full, Balanced Spectrum https://www.amazon.com/dp/B07NNT3G7J/ref=cm_sw_r_cp_api_i_QK3ZDb65S42K7
The purple/red and blue lights hurt your eyes so bad after awhile. I would def recommend getting the lights that appear white so your eyes don’t burn off your face. I have the GE grow lights. They have it available on Amazon, but I actually found mine at my local Target. https://www.amazon.com/GE-Lighting-93101230-Horticultural-Balanced/dp/B07NN6SVG6
I've had good luck with this one
I use 20w LED lights. Specifically this model:
ACKE LED Grow Light for Indoor Plants,Plant Light for Grow Light Stand,DIY Indoor Growing Light Panel for Germination,Seedling,Vegetative Growth and Flowering https://www.amazon.com/dp/B07GGX3R9T/ref=cm_sw_r_cp_api_i_daXOCb4WJYD91
I switched to LED from fluorescent this year. If you use fluorescent you need to move them to be about 3 inches from the tallest plant so they don’t burnt on the bulb.
With my LED lights I have the plants up to 1 foot away and they aren’t stretching for the light because they offer great lighting for plants.
Does that help? If you like you can check out my channel for a bunch more of pepper related stuff:
www.youtube.com/c/farmergeorge
Let’s Share and Grow Together :)
A small 20watt LED panel, but one that's NOT blurple since it's on all the time in a living area of the house and I really didn't want to deal with a pink glow in my kitchen all the time.
This is the one I got.
https://www.amazon.com/dp/B07GGX3R9T/ref=cm_sw_r_em_apa_i_3FkNDb82DW4C7
My Monstera perked up even more throughout the day today, so I remain hopeful for both of our battered plants!
I'm still figuring out grow lights myself so I don't think I'm the best person to ask for recommendations. I've tried to "research" it on YouTube but the best videos on grow lights don't focus on household/LED use, the videos are definitely more for folks growing pot (which is cool, no hate, but they're talking about different types of lights, different scale production etc.). So I can show you what I bought that's been working but I'm far from an expert.
If you have a spare lamp, you can use this guy, this is what I have right now that I screwed into an old cheapo adjustable-neck desk lamp from Target: https://smile.amazon.com/gp/product/B07NN6SVG6/ref=ppx_yo_dt_b_asin_title_o05_s01?ie=UTF8&amp;psc=1
It is not an attractive setup but my crown of thorns, Euphorbia trigona, Albuca spiralis, and my succulent bowl are all doing well under it. My succulent bowl has calico hearts, an elephant food plant, an Echeveria elegans, a blue barrel cactus, and a goat's horn cactus. So yeah they're all doing pretty well at the moment despite the average temperature in my house dropping 10 degrees over the past 6 weeks.
I just bought this and it arrives tomorrow. There are options that have built-in timers but I already had a couple of Ikea light timers floating around so I'm using those (and I 1000% recommend a timer so you don't even have to think about it--my light turns on before I get up and turns off before I get home from work, shit's mad convenient): https://smile.amazon.com/gp/product/B07Q8GMRWB/ref=ppx_yo_dt_b_asin_title_o00_s00?ie=UTF8&amp;psc=1
I tried to find a clip-on grow light like that made in USA (or at least not in China) but I wasn't able to find one. (I've been trying to reduce the number of products I buy made in China in support of the protests in HK/in protest of the Uighur imprisonments.. not that anyone will notice though!) Turns out American-made grow lights are out of my price range at the moment, and mainly of such a size they're clearly for commercial operations. When I'm earning more and buy a house in the next couple of years I'd like to treat myself to a couple shop-style lights though. That would be cool
Reddit seems to have a particular hangup with calathea but so far mine have been behaving.
I get fairly good light in my apartment but being in the Northeast I wanted to supplement for winter. I actually just use a balanced spectrum grow bulb in a hanging lamp I built with parts from Amazon. I didn't like the look of anything so made my own.
Rustic State Industrial Retro Style Mesh Wire Cage for Pendant Ceiling Lamp (White) https://www.amazon.com/dp/B0786X9FBH/ref=cm_sw_r_cp_apa_i_ahGTDb6PWDP3M
GE Lighting 93101230 9-Watt BR30... https://www.amazon.com/dp/B07NN6SVG6?
ACKE LED Grow Light for Indoor Plants,Plant Light for Grow Light Stand,DIY Indoor Growing Light Panel for Germination,Seedling,Vegetative Growth and Flowering https://www.amazon.com/dp/B07GGX3R9T/ref=cm_sw_r_cp_api_i_p3LYDbDX85QCH
These would work great with your table!!
i use an ordinary clamp lamp with a high watt halogen spotlight in it. Wonderfully cheap and portable. The “daylight” or “true color” lamps are way too blue for me.
basically bought this https://www.amazon.ca/Automatic-Irrigation-Houseplants-Programmable-Operation/dp/B0743F4532/ref=sr_1_19?crid=11LXMM521O95X&keywords=drip+irrigation+system&qid=1559330762&s=gateway&sprefix=drip+iri%2Caps%2C134&sr=8-19
&#x200B;
&#x200B;
You can get pretty much everything from Home Depot. They have a section for drip irrigation at the big one near me.
I will definitely have to grab a timer for my light.
The small system Im going to use is this
DIY Micro Automatic Drip Irrigation Kit,Houseplants Self Watering System 30-Day Digital Programmable Water Timer 5V USB Power Operation Indoor Potted Plants Vacation Plant Watering [Gen 4] https://www.amazon.ca/dp/B0743F4532/ref=cm_sw_r_cp_api_i_oqC0Cb786QFCK
5M Micro Irrigation Set Water Misting Cooling Drip Sprinkler System for Patio Garden Landscape Flower https://www.amazon.ca/dp/B072VBBN6Z/ref=cm_sw_r_cp_api_i_RLC0CbDFGCF5T
I plan on using wooden dowels drilled into the wooden crates so that I can vertically position the misting nozzles properly. The rest of the line/drip nozzles I will secure to the wood and run to the plants to (hopefully) keep it looking clean.
Im considering a basic wooden ikea type shelf where I can separate the Bonsais and strategically place lights / misting nozzles above.
Hopefully these links work..Im pretty new to redit and this is only my 3rd post. I apologize if it doesn’t work.
You need this!
How long do you think an inverter/car battery setup would run a small water pump to water plants? What would be a good way to recharge the car battery? Are you saying there are more options to run a water pump/timer remotely? Cause my crop is far away from traditional means of power and water and I'm trying like crazy to find a reasonable way to do this so I can setup automatic watering.
This is way originally have me the idea for a battery operated pump with a timer. It gets so many mixed reviews about quality that I'm hesitant to try it.
DIY Micro Automatic Drip Irrigation Kit,Houseplants Self Watering System with 30-Day Digital Programmable Water Timer 5V USB Power Operation for Indoor Potted Plants Vacation Plant Watering [Gen 4] https://www.amazon.com/dp/B0743F4532/ref=cm_sw_r_cp_apa_i_.NyBDb95WRT4W
DIY Micro Automatic Drip Irrigation Kit,Houseplants Self Watering System with 30-Day Digital Programmable Water Timer 5V USB Power Operation for Indoor Potted Plants Vacation Plant Watering [Gen 4] https://www.amazon.com/dp/B0743F4532/ref=cm_sw_r_cp_api_i_.y8BDb92BV4CB
You could get a programmable timer that attaches to a faucet, and pick up some irrigation tubing at your local hardware store - they have all sorts of nozzles / sprayers / drippers that could be set up to auto-water your outdoor plants.
If you're in an apartment (with no faucet access) another alternative could be to get one of the pump systems that attaches to a bucket. I'm not sure if it would be strong enough to mist/spray, but perhaps just some dripping water in the right place would be enough?
https://www.amazon.ca/dp/B0743F4532?psc=1&amp;ref=ppx_pop_dt_b_product_details
That’s the one I bought. I’m sure I could get away with using it on 4 plants but I wouldn’t want to go any more than that.
https://floraflex.com
This is the system I’ll buy once This one breaks. Looks better for the long term. I wanted something cheap to try it out for the first time.
As of right now, I am good on space. I have some room on my window sill on the other side behind my bed that I can fit some IF I get any more. I have 42 total plants so I really don't NEED any more... I am trying to stay pretty cheap to be honest. Less than $50 but I don't want something so cheaply made that it won't last me a month. I have been looking at something like this bulb in this lamp to clip onto my bed to get pointed at each window or even onto a cat tree, which I moved out of the way for the sake of the photo but I usually keep to the left of my nightstand. I don't know about the LED lightbulb but I also know that succs prefer blue light but I read that fluorescent light is ideal for a cheap, quality lighting setup. While I know that LEDs aren't cheaper than fluorescent, do they work as well? I honestly know little to nothing about plant lighting, sorry for the essay!
Edit: Looked at the Overwinter Megathread and someone posted that their Succs loved this bulb so I might just get 2 these if they are tried and true. I also might just end up getting a real, hard setup with shelves, lighting, the mix. It might be my best option at this time.
It's actually just a clamp light like you get from home Depot or Lowe's or any big box hardware store. They're all the same really roughly cost around 6-10 bucks. I got 2 of these off Amazon for about 16 bucks, and bought a 6 pack of 6500k LED lights as well for I believe 23?
Simple Deluxe 2-Pack Clamp Lamp Light with 8.5 Inch Aluminum Reflector up to 60 Watt E26 (no Bulb Included) 6 Feet Cord UL Listed https://www.amazon.com/dp/B06XD1PK37/ref=cm_sw_r_cp_apa_i_UxkaBbF461FSZ
(They're on sale for 14 and some change lol)
Leson 100 Watt Equivalent A19 LED Light Bulb Standard E26/E27 Base 13W Energy Saving, Daylight Cool White 6500k (6 Pack) https://www.amazon.com/dp/B01FYGDX3A/ref=cm_sw_r_cp_apa_i_xykaBbVR6BNS1
I like [clamp lamps] (https://www.amazon.com/Simple-Deluxe-Aluminum-Reflector-Included/dp/B06XD1PK37?psc=1&amp;SubscriptionId=AKIAILSHYYTFIVPWUY6Q&amp;tag=duckduckgo-d-20&amp;linkCode=xm2&amp;camp=2025&amp;creative=165953&amp;creativeASIN=B06XD1PK37) myself. And I attach them to [pole lamps] (https://www.amazon.com/Boston-Harbor-TL-TREE-134-BK-3L-Light-Black/dp/B003A9E734/ref=sr_1_5?s=hi&amp;ie=UTF8&amp;qid=1537695631&amp;sr=1-5&amp;keywords=pole+lamps) such as these.
You can also get these sort of things cheaper at big box stores sometimes.
I recently bought an LED light bulb at a dollar store (for a dollar) and was surprised at how bright white it is.
https://www.amazon.ca/Simple-Deluxe-Brooder-Aluminum-Reflector/dp/B06XD1PK37/ref=mp_s_a_1_3?crid=31E775FZ2CXZI&amp;keywords=clamp+light&amp;qid=1556669544&amp;s=gateway&amp;sprefix=clamp&amp;sr=8-3
https://www.amazon.ca/Satco-Products-S3929-Incandescent-Shatterproof/dp/B000V52X7C/ref=mp_s_a_1_5?keywords=100+watt+incandescent+light+bulbs&amp;qid=1556669767&amp;s=gateway&amp;sr=8-5
How quickly do you need to set up / tear down?
A couple of these:
CHAUVET DJ CH06 Lightweight Lighting Stand w/T-Bar (50lb Capacity) https://www.amazon.com/dp/B0096JYRY6/
...would give you a mounting location above eye level. Now you can decide your light budget. At the cheapest would be 4-6 basic hardware clamp lights (like these, but get them at a local hardware store for about $6):
Simple Deluxe 2-Pack Clamp Lamp Light with 8.5 Inch Aluminum Reflector up to 150 Watt E26/E27 Socket (no Bulb Included) 6 Feet 18/2 SPT-2 Cord UL Listed https://www.amazon.com/dp/B06XD1PK37/
Point them up at the ceiling for good ambient light, or aim one or two at the performance area. Higher in budget, a couple of inexpensive LED par lights may be enough to light the practice space. You probably won't need sandbags for that small amount of weight.
Brighter, but a bit more expensive: you could even suspend /attach shop lights to the light tree cross bars. I recommend LED in case they fall.
Sunco Lighting 2 Pack LED Utility Shop Light, 4 FT, Linkable Integrated Fixture, 40W=260W, 5000K Daylight, 4100 LM, Frosted Lens, Surface/Suspension Mount, Pull Chain, Garage - ETL, Energy Star https://www.amazon.com/dp/B0725D24X2/
The trees will make setup and teardown easier, you can run power right up them, and if you move spaces they're useful in the future. Those string lights are not very bright and you'll begin losing bulbs as soon as they get jostled while hot (if incandescent). Plus taking tape on and off each time may be a big pain.
If your plants can't get sufficient light indoors you will need actual grow lights. Try something like this, I've used these for overwintering peppers with success.
https://www.amazon.com/dp/B074GR1KRT/ref=cm_sw_r_other_apa_c7pUBbEC87M8N
I got it off of Amazon its super low profile and I just mounted it above my shelf.
ACKE LED Grow Light for Indoor... https://www.amazon.com/dp/B07GGX3R9T?ref=ppx_pop_mob_ap_share
I have this light hanging from a shelf that I use for growing basil indoors: ACKE LED Grow Light for Indoor Plants,Plant Light for Grow Light Stand,DIY Indoor Growing Light Panel for Germination,Seedling,Vegetative Growth and Flowering
https://www.amazon.com/ACKE-Germination-Seedling-Vegetative-Flowering/dp/B07GGX3R9T
You can configure it lengthwise instead of how it’s shown in the picture. And I think you can connect two set together, but don’t know that for sure.
It’s a warm white light which is accomplished by having white and red LEDs
Edit: link
Yes!
https://www.amazon.com/dp/B074GR1KRT/ref=cm_sw_r_cp_api_zQwAAb2DZB0M5
Thank you! It’s partial indirect sun light, and this grow light. It has a timer and a dimmer which are really handy!
I use this:
Lovebay Timing Function Dual Head Grow Light https://www.amazon.com/dp/B074GR1KRT/ref=cm_sw_r_cp_apa_i_HNw4Cb83S2GBY
I like that I can set it as a timer, and it will auto shut off in the morning in case I forget (I turn it on at night because I don't like the color during the day). I also like that there are two heads, which I face in slightly different directions to reach all my plants. Currently, 8 plants are using this on a shelf where one light gets the ones that are high, and the other gets the ones that are low. Works well for me!
Typically nepenthes aren’t too picky on lighting but a cheap grow light I love(mainly for the low price and simplicity) is the Acke grow light https://www.amazon.com/ACKE-Germination-Seedling-Vegetative-Flowering/dp/B07GGX3R9T/ref=asc_df_B07GGX3R9T/?tag=hyprod-20&amp;linkCode=df0&amp;hvadid=242081228138&amp;hvpos=1o3&amp;hvnetw=g&amp;hvrand=9594542324276355578&amp;hvpone=&amp;hvptwo=&amp;hvqmt=&amp;hvdev=m&amp;hvdvcmdl=&amp;hvlocint=&amp;hvlocphy=9022987&amp;hvtargid=pla-533179316540&amp;psc=1
That’s the “normal light” version, there’s another one that’s super pink. I haven’t noticed much difference in the effectiveness of either.
Lovebay Timing Function Dual Head... https://www.amazon.com/dp/B074GR1KRT?ref=ppx_pop_mob_ap_share
Is an indoor plant safe outside? I currently keep it under a grow light (link below) for 12 hours a day next to window. It is also watered daily with a liquid fertilizer diluted with water.
https://www.amazon.com/dp/B074GR1KRT/ref=cm_sw_r_cp_apa_i_qApjDb55P7JZX
Amazon sells a auto waterer that's powered by AAs and/or a usb cord, I use one for one of my indoor trees, just hook it in the side of a 5 gallon bucket and set it for how often you want it watered, the little brass filter will clog, it's best to take it off and weigh the hose down with something so it stays at the bottom. https://www.amazon.com/gp/aw/d/B0743F4532/
Super easy and I've been using mine for a couple of months now, no issues so far except for the clogged filter thing. Make sure you test it before, and make sure it's set for minutes not seconds.
Go get some Sledgehammer flush. and run it through the plant after you have let the soil dry for 4- 5 days. Do yourself a favor and buy an automated watering system, which will run you about 35$ on amazon. This way you will be able to have precise watering on a schedule and prevent this type of noob mistake.
https://www.amazon.com/gp/product/B0743F4532/ref=oh_aui_search_asin_title?ie=UTF8&amp;psc=1
here the one i use. I just went to the store and bought a 5 gallon jug and use it for the reservoir. Best move ever. Also, if it is your first grow, take a tip from an old head and DONT fuck with them too much. Less is more with growing.
Someone a few weeks ago had a similar issue and used this thing and said it worked...
when I upgrade should I go for a 300w or the 600w?
https://www.amazon.com/Chapin-International-617407731200-20002-Multi-Purpose/dp/B0039EEN0M/ref=sr_1_36?gclid=Cj0KCQjws7TqBRDgARIsAAHLHP5v1xtproNTHroGCwFmUuxCfaRRo2d5RnUprmrf4zU9xmcQVRmhL20aAu58EALw_wcB&amp;hvadid=174205407345&amp;hvdev=c&amp;hvlocphy=9004392&amp;hvnetw=g&amp;hvpos=1t2&amp;hvqmt=e&amp;hvrand=4809304190223278778&amp;hvtargid=kwd-4982744865&amp;hydadcr=24630_9648900&amp;keywords=commercial+spray+bottles&amp;qid=1565346758&amp;s=gateway&amp;sr=8-36