(Part 3) Best welding & soldering according to redditors
We found 4,015 Reddit comments discussing the best welding & soldering. We ranked the 1,086 resulting products by number of redditors who mentioned them. Here are the products ranked 41-60. You can also go back to the previous section.


![Nulink153; Deluxe Series Desoldering Pump Solder Iron Remover Sucker Hand Tool [Blue, Plastic] [Heavy Duty]](https://m.media-amazon.com/images/I/41iBJQJFYiL.jpg)


It’s a part from this soldering kit.
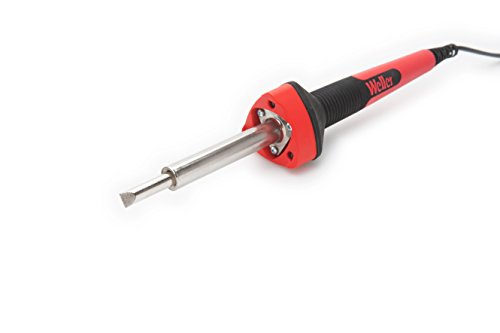
https://www.amazon.co.uk/WELLER-SP23LK-25-Watt-Soldering-Iron/dp/B0009ZD2AG
So damn irritating. The old model had a simple dial. Same form factor. Now they don’t make them with a dial and you basically need to dig up an instruction manual to figure these things out.
OP, is there any advantage to the new one besides the fact that it led me to find the TS100 ?
Surprised nobody mentioned the cold joints, but when you redo the soldering, you can fix that as well. Basically, use your iron to heat the pad and wire together and then touch the solder to the joint. The metal will melt the solder, and it will flow right in and make a "hot" joint, which will be much more mechanically sound. It also has the benefit of guaranteeing that the flux melts; if you're not using rosin core solder, get a flux pen. The flux will etch the oxide layer off the metals, and also help the solder flow into the joint. No-clean flux is nice, but you can always clean it off with some rubbing alcohol to be safe.
If your iron has an adjustable temp, shoot for 300° C at minimum for leaded solder, I prefer 320° personally. Lead-free solder will need a higher temperature, but it's a moot point since you shouldn't ever bother with that stuff. If your iron isn't temperature controlled, make it a priority to replace it. The TS-100 is popular for good reason, but you can find a perfectly good adjustable iron for less than $30. I think. My last cheap iron was like 15 years ago. ¯\_(ツ)_/¯
Also, you might want to tape the motor wires to the arms so they can't find their way into the props.
I wish there was a very clear answer that isn't a
thousand823 words. But there isn't, so bear with me. Or is that bare with me? Regardless, beer with me.Okay, as far as I know there are three ways to do a battery swap (as long as you aren't trying to keep your saves on the game. Then there are wires, lots of prayers, and it is a pain in the bottom). The first two methods are the guide you linked to and soldering the battery. The last is finding a tabbed battery.
As your guide shows, and as both of the first methods will follow, you need to break the connectors off the battery. Don't bust out a soldering iron just yet, these aren't soldered. They are spot welded. Unless you have a spot welder (and you don't - don't lie to me and say you do, I doubt any of us have one) you won't be able to get it back together the same way it was. You need to break the connections in order to get a fresh battery in there.
Grab your finest razor blade in order to sever the connections, and a handful of bandaids in order to stop the bleeding from your accidental cuts. It is bound to happen, maybe not the first time, hopefully not every time, but you will be poking and cutting your hands. It will suck. A sharp razor won't hurt you as much, but try to be careful anyway.
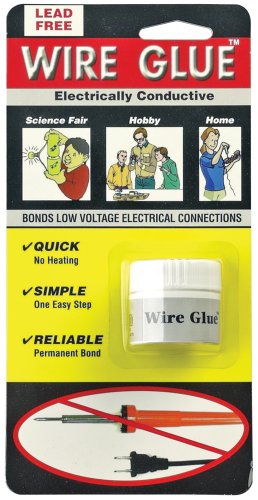
After you clean your blood off the circuit board, you can choose which of the first two methods to go down. You can use the soldering iron or tape / wire glue. Wire glue is, as far as I've been told, basically iron mixed into elmer's glue. It is suppose to hold well, but it wouldn't hurt to tape after using it. Mix it up well before using it, or else you might not get a very conductive result.
The issue with using glue or tape to hold your battery is when you get to Gannon in the dark world, or maybe battling Giygas, or vanquishing dracula, your method of holding the battery will fail. Maybe you'll bump the cart just the right way, or maybe the dog will run in and knock the SNES down, then you'll lose all that time. And be upset at the dog that just was super excited to see you, because he only knows a few people and he loves you so very much. He won't understand why you are angry, and it will break his tiny little heart.
Don't break your dogs tiny little heart. If you don't own a soldering iron, use good electrical tape and use the glue, and make sure it is as secure as possible. Some people will add hot glue in there to hold that sucker in place, and it isn't a bad idea.
So, you love your dog and you are thinking you should use a soldering iron. Well, it is going to be hard to play fetch with fido when you are blind, and you might get angry at me if I don't mention it. Hot things and batteries aren't a good combination. They can pop, spray acid, and ruin your day. Wear safety glasses at the very least, and try to keep the iron on the battery as little as possible. A soldered battery will hold in place much better, but it still isn't great.
So, you've arrived at option 3. I like to call this the expensive option, but it is the right way to do it. You need to find the batteries (and without spending a bunch of time researching, there is a pretty good chance it is one of the ones in this list )then you need to have a soldering iron, and some solder. A desoldering iron would be really handy, but soldering wick could be used in its place, or you could just not use anything and probably be okay. Buy a/some tabbed batteries, remove the old battery by heating up the tabs through the board and pull it out. A desoldering iron can be used to suck the solder away, which will make this easier for you, and a wick can be used in a similar fashion. Pop the old one out, put the new one in, solder it in place, and you'd be good to go. The batteries aren't going to be cheap, and you can't ship them (easily) via USPS because they are lithium.
As for soldering, you might need to practice the basics. There are cheap little kits at Radio Shack. Make a FM radio or something using one of them. Take your time, be careful, and keep some burn ointment on hand. Seriously, there isn't a method here that won't lead you to some sort of minor injury.
Good luck, and tell your Dog I said "Woof!"
Easy-peasey repair even for a beginner.
First you'll need a decent soldering iron like this, some 63/37 solder and a solder sucker like this.
You'll need to remove the old solder on the three pads to the left of where the connector was mounted. Heat up the soldering iron, touch it to each pad and add a tiny dab of solder so the whole thing melts. If it doesn't melt within 5 seconds you'll need to turn up the iron temperature. Then grab your soldapullt, cock it by pushing down on the plunger until it clicks, put it on top of the liquid solder and push its button. The solder should get sucked into the soldapullt and the joint should be shiny and flat with the board. Repeat this for all three pads.
Now place the old headphone socket so the solder tabs on its left side line up with the circuit board pads and its case hole. Grab the soldering iron and touch it to one of the solder pads then add enough solder to cover the pad and the tab. Pull the iron away and let the joint cool for 10 seconds. Make sure the jack is still aligned and if it is then solder the other pads.
As cute as that is. My god the hits are going to be harsh! Try using a soldering iron for clean vape hits!
So you've selected some intense elbow grease as the trade off. That's honestly my preferred route. What I suggest in that case, is to get a weedeater or a mower and take the whole yard down as low as you can get it. Probably not all in one pass. Then I would dispose of as much material as possible via a green waste bin. Then you have a couple options. You can either keep cutting it back, and it will eventually end up kinda-sorta lawn-ish after enough consistent cuttings. Second option is to "sheet" the area with cardboard and some weights. Bricks, rocks, paint cans, whatever is handy. If you let that sit a week or two, it will mostly shade out the plants, they'll wilt, and die. Third option is to solarize the area. You get some rolls of painter's plastic, and essentially plastic wrap the entire ground like it's a casserole dish of leftovers. The idea there is that the plastic creates a greenhouse effect and cooks off all of the plants underneath.
Regardless of your choice, you'll probably still have some pretty serious grow-back from whatever roots survive, and any dormant seeds that sprout after the fact. You can then either repeat the process later, which will produce fewer and fewer survivors, or you can just cut and/or hand pull whatever manages to return.
I strongly advise against the use of any herbicides like Roundup, as the chemicals in them do a lot of damage to the ecosystem beyond your yard. It's pretty selfish and petty to broadly apply such damaging chemicals over some inconvenient-at-worst weeds in a backyard.
Edit: As an alternative to spraying, a solution for the touch up work after using one of the above methods, is to use a propane torch (example). You can get them at home improvement stores, and they do a pretty decent job of toasting weeds into submission. Just read the directions thoroughly, watch some youtube videos about how to do it, and have a hose on standby in case things get exciting.
Although not the cheapest, ebay is probably the easiest way to find faulty systems.
Some equipment recommendations:
It looks like you have a decent soldering station, that is really the main thing. You'll need a small tip, but probably not as small as you think. I like the Weller ETL, but a ~2mm screwdriver style tip works well for SMD in my experience. If you go too small it can actually cause trouble for heat transfer and thermal recovery.
If you've mostly been doing through-hole stuff, you'll want smaller solder. Having small diameter solder makes it easier to feed just the right amount. I like Kester 0.020, some people go even smaller. Of course there are lead-free versions of that, too, if you prefer.
For through-hole, the flux that is inside the solder is usually enough, but for surface mount, you'll need extra flux. You'll probably be fine with a flux pen. You'll probably want some solder wick because mistakes happen, and a solder sucker thingie doesn't work as well with surface mount.
As u/t_Lancer says, you won't need a hot air station and solder paste unless you're planning on doing leadless packages. If you decide to get a hot air station, though, they're pretty cheap. You don't even strictly need solder paste, I've been making do by tinning the pads with regular solder first with my soldering iron before hitting it with the hot air.
For vision, it depends on how your eyesight is. I'm fine eyeballing down to 0603 but I can't read the markings without help. I've started doing all of my soldering under light magnification with the Optivisor DA-3 with a LED attachment which has really helped, but it isn't strictly necessary. You can get those visors with more magnification at the cost of a shorter working distance. Good room lighting and a magnifying glass work fine, too.
And most important thing you need is practice. Watch this video and grab one or two of those SMD practice kits and you'll be knocking out surface mount stuff in no time.
To mention some other homebrewing supplies and tools that haven't come up here:
I run this instead of a Dremel brand tool. I have had a couple Dremels die on me over the years, so I tried this one and it has lasted 4 years so far! I also got a lot of my bits from harbor freight. I use the cuttoff wheels (ALWAYS WEAR FACE PROTECTION WITH THESE), Sanding Drums, and grinding stones the most. Use the cutoff for cutting out large swaths of material, sanding drums for tighter areas, and grinding stones to debur and smooth it all out. Most work that needs a dremel can be done with hand tools for better control. Coping saw, files, and flush cutters can go a long way. A lot of the "pros" don't use Dremels because they can jump out of control and hit a part of the blaster you planned on leaving stock and leaving a huge gash.
As for soldering Irons, I've heard wonderful things about this model, but cheaper models will work fine. TBH, I'd grab something in the $10 range and see if he sticks with the hobby. Maybe for christmas you can get him a nicer one if he's still going at it. I use a super duper old school Weller soldering station, so really anything will work. The issue you'll get with the cheaper soldering irons is the tips will tend to not last long and the heating element might crap out after a few months. Don't go cheaper than $10 here as some of them are meant for wood engraving, not soldering and wont get hot enough to melt solder. Any size solder is fine. I personally use lead/tin solder and just avoid breathing fumes as well as wash my hands when I'm done modding. Lead solder is MUCH easier to work with and requires less heat. Look for "Rosin Core solder" as it's easier to work with as it has flux in the center of the solder.
Good flush cutters, hobby knife, wire strippers, heatshrink, wire, loctite, etc are all valuable modding supplies. We sell some on our shop (shameless plug). I would recommend for plastic to plastic bonds he use Devcon Plastic Welder (make sure it contains Methyl Methacrylate as this acts as a solvent weld to bond the plastics together chemically instead of a weak adhesive grip like putty). Putty should be used as a filler material. I use two different putties. Free form Air for large amounts of gap fill, it is 6 times less dense than normal putty so it wont make the blaster weight 8 pounds when done. It is VERY easy to sand, but sometimes requires a thin layer of bondo over top of it to leave a perfect finish. I also use Apoxie Sculpt which is a direct replacement for normal putty for gap filling purposes. It's MUCH easier to sand than JB Weld putty, and leaves a nice smooth finish when sanded down.
Speaking of sandpaper, get various grades of sandpaper from 100 down to 600 grit (I go as far as 1000 if I want a gloss sheen on something).
Other than all of that, the tools I have on my bench that I would hate to mod without now are: Helping hands (for soldering), various different sizes of needle nose pliers, numerous sizes of small to medium screwdrivers, silicone lubricant, hot glue (for securing wires inside the shell), Electric Screwdriver, and various tweezers.
Absolutely!
How to Solder
Various soldering irons from Radioshack - If you're doing simple DIY stuff you won't need anything for overkill.
Some lead solder (hard to find at a store, works better than resin solder and won't be legal for much longer so stock up)
A good website for project kits, parts, tutorials, and schematics - site is down for maintenance at the moment
Shameless plug for a class I took- Links to CircuitMaker (abandon-ware but good circuit modeling software, easier to use than PSPICE or similar). It also has charts for reading resistors and standard capacitor/inductor/resistor component values as well as datasheets for common components in audio.
The advanced section of that class with links to schematics, datasheets, and parts stores.
Some more topics to look over
Distortion:
Diode clipper and clamper circuits. Simple, cheap, and easy to build. They also sound pretty good too and there are tons of circuits out there. Tube screamer's use diodes.
Transistor distortion circuits are usually variations on these effects, or by using a transistor as two diodes (I've seen it in a few circuits, kind of weird and I'm not sure it totally works in theory). The Fuzz Face and other "fuzz" pedals use transistor distortion circuits.
I can't find any good sources for using tubes for distortion and I've only done it once for a school project where I had to modify a tube screamer to actually use tubes, and my only source is a textbook that isn't officially published. If I find any later I'll post this again.
Filters, equalizers, etc
Texas Instruments has a good resource on designing active filters, low pass, high pass, bandpass and band reject. Don't skip over the math, it's actually important for designing the filters. You don't really need to understand the complex numbers and transfer functions in the s domain but understanding how to find a cutoff frequency is important.
Probably the most popular filter of all time, the moog transistor ladder filter is pretty freaking cool in design. I have no idea how it works, but it sounds awesome and looks like an advanced DIY project.
Another popular filter, the Dunlop Crybaby. The thing to note is it uses a bandpass filter using a toroidal inductor and capacitor instead of two capacitors. This makes it pretty expensive to build (the housings can be a bitch to find too), but it sounds amazing. I've seen mods with a variable Q pot but I'm not sure how that one works.
Dynamics Processors
How they work is difficult to explain without understanding some circuit theory and electronics and there tends to be math involved (as you may notice from the filter section)
THAT Corporation makes awesome audio ICs and has example circuits for designing compressor/limiter/gate circuits using them. Way easier than trying to figure out FET circuits and how to design a VCA.
Also, /r/diyaudio and /r/diypedals are good subreddits where most people know what they're talking about and are supportive of projects.
Remember if you ever find yourself trying to design something and it isn't working out, there's probably an IC for that. My friend who works for Shure tells me when he interned he was designing a bunch of complicated circuits, and the boss just laughed and told him to order an IC. They make ICs for everything.
Build Log 5: Viterbi
Highlights
Parts List
Resources
Tools
Notes
Absolutely there are ways to bring up the pattern. You can do this!
The professionals use Ferric Chloride and I recommend you do too. It's easy, it's (relatively) safe (compared to the other methods), and it produces a nice finish.
You will need; a bottle of ferric chloride solution, a new kitchen sponge, some 0000 steel wool, baking soda, gloves, and some masking tape.
First, put on some damn gloves, this stuff eats metal, don't let it burn your skin too.
Clean and degrease your knife.
Next you're going to want to mask off the cutting edge of your blade. If you use super thin tape you can get damn close to the edge and have it be almost unnoticeable. Like automotive pin striping thin masking.
Take the ferric chloride solution and mix one part FC to three parts water in a glass or ceramic bowl. This is your etching solution
Next you will want to simply wet the sponge with the etching solution and rub it along the blade, taking care not to get it on the cutting edge. You masked it off, but let's not test the mask alright. Typically knife makes do a full immersion etch then sharpen the blade, so the edge isn't really there until after the etch, but for a home done cosmetic upgrade we will only apply the chemicals to the flats not the edge. Anywhere the solution touched will be eaten by the chemicals. The carbon steel will be eaten first and turn black, the nickle steel will last longer and stay shiny.
You will begin to see results in a few moments, but the longer you leave it sit, the deeper and more lasting the etch will be. Too little and it will wear quickly, too much and it eat into the steel. I know a knife maker who does one hour full immersion etching and the pattern is VERY aggressive, almost like your fingerprints, you can feel the layers. Too much for a prized kitchen knife. Fifteen minutes of exposure tends to be very pretty. I would guess that 5-10 minutes of exposure will produce a nice cosmetic etch on a blade. When you see what you like, add some baking soda to neutralize the acid, and wash it off.
Being able to see where you are in the etching process moment to moment makes it east to know when to stop. Full immersion etching doesn't really unless you're constantly pulling it out.
Immediately after the etch, the knife will be matte in appearance from all the microscopic pitting. You're going to want to gently gently gently buff that up to a good sheen with some steel wool. Too much and you'll wear right through the pattern again. You could also use 600 grit sand paper and wet sand it to bring up the sheen.
To cleanup, you'll need to add baking soda to the etching solution before disposal. Hold on to the concentrate FC solution, you'll probably want to do this again someday.
It may seem like there's a lot going on here, but it's not really difficult.
I'm using a Yihua 936B (a Hakko 936 clone that is reportedly alright) and this Hakko tip.
Yes, I have this 60/40 solder and this rosin paste flux handy.
Parametrek suggested lifting the board off the heat sink before desoldering (seems obvious in retrospect), so I'll try that. Any other suggestions will also be appreciated.
Got it covered.
I like this type because they are small and take disposable lighters as a fuel cartridge so you can pick up a refill just about anywhere.
Yeah, the Edysn Soldapullt works really well.
That Weller has power settings, not heat settings, it is as unregulated a $5 Harbor Freight one. It looks like the one OP has is actually temperature controlled.
Here is a similar one to the OP's. It takes Hakko 900M series tips and is actually temperature controlled. I've used one that a friend bought and it did just fine.
Here’s the solder wick I got that works great! https://www.amazon.com/dp/B0195UVWJ8/ref=cm_sw_r_cp_api_i_z1kcBbWDJCB0T
> Weller WD1
Seriously? If you're going to be dropping $400+ on a soldering station, then you buy some quality HW. JBC > Weller in precision soldering equipment.
OP is looking for something like a TS-100, or a FX-888
OP can buy cheaper if they're not planning to get into the hobby, but I'd suggest investing in a station with adjustable heat as a minimum.
I was dinking around on her here and that made me laugh out loud. I never really thought about this before. Honest. You just blew my mind...like a 18 year old taking their first philosophy class.
I'm a fire ecologist who grew up in the true middle of nowhere on a ranch. I love welding, but I'm not that good at it. My dad is. I also LOVE glassblowing. I learned how to do it during my masters and took to it like a duck in water. I'll never get to do it again as it's too expensive (like $80 an hour). I'm too much of a tight ass. I'm in my early 30's.
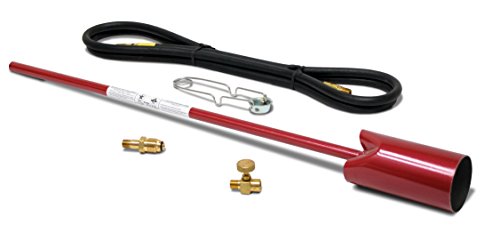
I pretty much light shit on fire for work and fun. I'm a complete pyro. One of my proudest achievements is a 10,000 acre prescribed burn I planned and was in charge of. This spring, my girlfriend bought me this for my birthday. I wanted it to light cedars on fire. Plus I can melt a beer can in seconds.
https://www.amazon.com/Red-Dragon-VT-3-30-Propane/dp/B00004Z2FQ/ref=sr_1_3?ie=UTF8&qid=1498565976&sr=8-3&keywords=red+dragon+torch
My brother bought me a JATO rocket for the same birthday.
I don't think I could be more of pyro if I tried. I never realized this. No one ever pointed this out to me...
I just spent 5k getting 3 phase power into a shed my dad owns. Why? Because I bought a super nice and fancy plasma cutter at an auction. I didn't need it. My dad didn't need it. It was just cheap and awesome. Plus I wanted to be able to run a good welder in that shop.
My masters is literally about plant responses to lighting shit on fire after it got chainsawed.
There is a video of me starting a campfire with 5 gallons of white gas. It was zesty.
Random person...you just gave me an existential crisis. My name is probably on federal watchlists. Hello government worker! I never realized I was a pyro before.....
How much are you going to be making electronics a hobby? If you're just going to be soldering some boards occasionally you could save a bit on the iron and get this Weller. Also a cleaner. If you go with the 888 that will have a wire cleaner built in. I'm getting old so I personally would recommend at least a magnifying glass. I have this helping hand The clips didn't do much for me but the glass did. There are times where the switch pin just gets lost and the glass helped a lot. I also picked up this kit when I started, primarily for the sucker, but I thought the other tools may come in handy. So far they haven't, other than the solder. The first time I tried to use the sucker I could not get it to work correctly, I just wasn't getting enough of a seal around the hot solder, thinking I'd melt the tip, so I ended up buying a different pump that I still have never used, because I eventually DID learn to use the cheaper sucker. I also can't make solder wick work properly, apparently. If this is your first time soldering/desoldering I recommend getting a cheap practice kit that you don't care if you ruin. I can recommend this one as it has you intentionally foul up joins so you can learn to fix them. You won't need strippers. Flush cutters would be helpful if you need to trim the pcb mount legs off your switches (like Zealios, which you will if you have a GH60 Satan pcb) or trimming LEDs. Work mat would be helpful to keep your work area clean but not necessary. You will need a small screwdriver but I can't remember what size. Tweezers or one of these grabber thingies are always helpful when the screw flips sideways when you are trying to seat it. I used this solder on 3 builds so far and have had no issues with joins failing.
I would be careful using that in a computer. For electrical hobby kits and simple circuits it might work, but I would be wary of using it for anything else.
Here's a similar product with widely varying reviews. Some of which seem to confirm my fears. Others say differently, but I wouldn't risk it.
If you're able to solder, you're better off doing that, but it's your computer.
Soto Pocket Torch
Like this? Seems like one of those things that's not very economical or functional...
For anyone that might be interested, from Amazon: Soto Pocket Torch
LOL, that last part, it's happened to all of us though being honest. :P Anyways u/superuser41's suggestions are spot on. I use a Hakko FX888D myself & love it, very nice station for the money IMHO. Never used that particular sodapult but they are well regarded in the community.
Edit: This is a good tip for soldering switches & LEDs (my personal fav size/type for it). You may want to grab a few, it looks like the linked bundle only comes with one tip. Also this is a high quality solder in the right diameter for soldering switches/LEDs. This is good solder wick, This is a good flux, & I always recommend getting some tip tinner.
I'd check the tip of your iron; if it's silver and shiny, it's fine; black and pitted, it probably doesn't conduct heat as well, and it's time to get a new one.
There are also other irons, like this Hakko that are higher wattage for about half the cost of the mentioned station.
I'd suggest switching to silicone hobby wire; a lot of the nerf stores like OutOfDarts, FoamBlast, and Containment crew carry it. It will handle high heat will, but is still pretty reasonable to strip by hand. You can also check out PVC coated wire; it's cheaper and a little thinner (though a bit less flexible), but it will burn much sooner than silicone.
Lead Free soldering is a bit more challenging, but it's certainly doable.
the most popular opinions you're about to get will cost around $100
This one is $37
https://www.amazon.com/gp/product/B006MQD7M4/ref=oh_aui_search_detailpage?ie=UTF8&psc=1
I doubt you can find anything actually decent under $30. While I was in high school, I made do with a dollar store soldering iron, replacing it every few weeks wasn't too bad.
Amazon
I bought this one off of Amazon for $20, and it was exactly what I needed.
Don't forget to buy some paperclips/wire to hang it on, nail polish to cover up the important bits (pivot hole, threads, detent, lock faces), nail polish remover to remove the nail polish, and a container to put it all in. I used a large mason jar for that.
You should be able to clean off the pads, re-tin them, and re-solder new wires to them.
 
You'll need a few tools:
 
Clean and tin the soldering iron tip:
 
Remove the solder from the pads on the heat bed:
 
 
Add some solder to the pads - you'll want a little bit of solder to cover the whole pad, with enough to make a small bump.
 
Tin the wires:
 
Attach the tinned wires to the tinned solder pads on the heat bed:
 
Also: You can use some isopropyl alcohol (rubbing alcohol) to clean up the excess rosin paste - it can get sticky.
 
Hope this helps!
Edit: Please make sure you turn off and unplug your power supply before cutting any wires.
Parts / tool list below, this what i used but there are substitutes out there.
Note: Main thing that is slightly challenging is soldering the XT60s, basic idea is to “tin” (soldering term) the wires and the XT60s first, then heat the connector with your iron as you put the wire in to get a good fusion. Decent video on soldering them:solder XT60s
My soldering Iron:
https://www.amazon.com/gp/product/B00ANZRT4M/ref=ppx_yo_dt_b_asin_title_o00_s00?ie=UTF8&psc=1
Soldering Flux:
https://www.amazon.com/gp/product/B008ZIV85A/ref=ppx_yo_dt_b_asin_title_o01_s00?ie=UTF8&psc=1
Solder (60-40)
https://www.amazon.com/gp/product/B071G1J3W6/ref=ppx_yo_dt_b_asin_title_o01_s00?ie=UTF8&psc=1
New XT-60’s and Shroud:
https://www.amazon.com/gp/product/B074PN6N4K/ref=ppx_yo_dt_b_asin_title_o03_s00?ie=UTF8&psc=1
Helping Hands (not required, but def helpful)
https://www.amazon.com/gp/product/B000RB38X8/ref=ppx_yo_dt_b_asin_title_o01_s01?ie=UTF8&psc=1
Bought this a while ago, but any heat shrink will do:
https://www.amazon.com/gp/product/B01MFA3OFA/ref=ppx_yo_dt_b_asin_title_o02_s00?ie=UTF8&psc=1
Wire - If you’re new to soldering and need practice, or you’re going to split your cables for Rasberry Pi, or other components, etc:
https://www.amazon.com/gp/product/B01ABOPMEI/ref=ppx_yo_dt_b_asin_title_o03_s00?ie=UTF8&psc=1
you may need a 3rd hand
https://www.amazon.com/QuadHands-Helping-Hands-Third-Soldering/dp/B00GIKVP5K/ref=sr_1_1_sspa?ie=UTF8&qid=1511884159&sr=8-1-spons&keywords=soldering+holder&psc=1
I have found this one to be much, much better.
Thanks for your interest!
The acrylic case comes with a plate, and I'm working on my next order of aluminum plates to go with those. If you want an acrylic plate you can get that now. You are correct that the aluminum plate sold separately is for the aluminum case.
I'm not currently offering soldering for LED's, but I may in the future. You can get someone on /r/mechmarket to do that, or you can pick up some quite reasonably priced soldering irons on amazon. It's cheaper than my assembly fee. :)
The layout you want to do has been physically verified on my Danger Zone board: http://i.imgur.com/Le0hEpH.jpg
The middle layer is hard to do because it's 0.34" thick, which is an unusual size. I can get orange for other layers, and in fact have been considering it lately.
That carbon mockup is looking pretty sweet.
red dragon
Essentially the same thing, no paperwork required
brass pencil flame torch + propane tank might be cheaper than a creme brulee torch + you can do dabs with it
A torch is better for this because a soldering iron concentrates the heat in a very very small area. And since metal is so conductive and has a high thermal mass, it looses heat faster than you can apply it with a soldering iron, so it will never get hot enough to actually solder. Flux comes in a paste (or sometimes liquid) and is a weak acid that etches the metal to clean and roughen the surface so the solder wets to the metal and bonds better. It also helps keep air out of the connection to prevent oxidation while you're soldering, which would weaken the joint.
The steps would be to clean each piece, position or clamp them together, apply a good amount of flux, heat it all up with the torch, then touch the solder to the hot metal so that it melts on. If you need to apply heat directly to the solder (ie, the solder doesn't melt on its own when it touches the metal) then your metal isn't hot enough and it will make a cold solder connection that will be weak, or completely non-existent if it's too cold. It may look like it joined things, but the smallest bit of force (even from just normal handling) would break the joint and you would need to start all over by first cleaning off all the solder, then cleaning the metal, applying flux, and trying again.
Here's the torch I use:
Torch
Fuel
Optional extension hose so you don't have to hold the cylinder the whole time
Solder and flux. This kit comes with some emery cloth to clean the metal a bit before soldering.
EDIT: Here's a video about soldering copper pipe. Same process for small sheet metal parts.
I got a 2-pack of propane tanks as well as a torch tip for under $20 total. Burns hotter and will last much longer. You can get a self-igniting tip if you prefer for only a couple dollars more.
propane and butane and the mixture of the two gasses have the exact same combustion temperature with air.
http://www.engineeringtoolbox.com/flame-temperatures-gases-d_422.html
the combustion of propane and butane is an oxidation reaction, thus a more complete oxidation to CO2 is actually a good thing. neither propane or butane is more susceptible to incomplete oxidation than the other.
properly functioning propane and butane torches producing ideal burns present no danger of carbon monoxide poisoning.
http://www.propane101.com/carbonmonoxideandpropane.htm
as long as sufficient oxygen is present (the 21% present in the atmosphere is more than sufficient) both propane and butane are safe to use.
on a side note, a propane torch like the one linked below is much better built and thus safer to use than the crème brûlée butane torches most people use.
http://www.amazon.com/BernzOmatic-Basic-UL2317-Pencil-Propane/dp/B00008ZA0C/ref=sr_1_7?ie=UTF8&qid=1451884928&sr=8-7&keywords=bernzomatic+propane
That's a little tool to help hold wires and components when soldering.
Example: https://www.amazon.com/dp/B0009ZD2AG/ref=cm_sw_r_cp_api_i_xxa5AbJP0EBTK
As far as soldering irons go, I've had relatively good luck with the 25W Wellers. I would ask your local hardware store if you can buy a box or half a box of them for a discount.
I would also look at structuring your projects so that they build on each other and have a low / cheap parts count. There are deals to be had.
That soldering iron heats to 925 degrees F according to the packaging, and about 650 to 750 degrees is more appropriate for PCB work. However, if you're quick you could probably get away with using it. You shouldn't be holding the iron to anything on the PCB for "a few seconds". Also, your solder wire (which I can see in the picture of your iron) is too thick. What is it, 0.062"? 0.020 to 0.025" is ideal for most PCB work, and I wouldn't go any bigger than 0.032".
You don't need an adjustable temperature iron. If you want to play it safe, you can just get a lower wattage non-adjustable iron, i.e., 15 to 25 watts. Those will reach equilibrium at a lower temperature than your 60 watt iron will. Something like this for example - https://www.amazon.com/Weller-SP23LK-25-Watt-Soldering-Iron/dp/B0009ZD2AG - which reaches equilibrium at 750 degrees. It also comes with a couple of chisel tips, which is what you should use to most efficiently transfer the heat (due to having a lot of contact area) so you can solder quickly. With high end irons like the 13.56 mHz Metcals, small conical tips work perfectly (especially the bent ones), even for relatively large joints, but those work on a completely different principle than inexpensive, conventional irons.
I would not generally use a soldering gun for circuit boards.
Here's a 12w iron on amazon.com. Only $13. Weller is a good brand.
This 25w kit seems to include a small roll of solder. For electronics, you want something like 60/40 rosin core. I've used Kester brand solder since 1970. I'm happy with it.
If you also need to remove solder, get a sucker and some desoldering wick. Wick comes in different widths; order various widths, or guess at the optimal width for your circuit boards.
That is for car stereos. It will drop blobs of solder on the board and ruin it. You need one specifically for circuit boards. Weller is a little higher quality and still inexpensive. But you might consider a soldering station.
http://www.amazon.com/Weller-SP23LK-25-Watt-Soldering-Iron/dp/B0009ZD2AG/ref=sr_1_8/178-0341211-8873629?ie=UTF8&qid=1426782390&sr=8-8&keywords=circuit+board+soldering+kit
Soldering Station
http://soldering-store.com/
Does this look good?
https://www.amazon.com/gp/product/B0747KYF6S/ref=oh_aui_detailpage_o00_s01?ie=UTF8&psc=1
https://www.amazon.com/gp/product/B008ZIV85A/ref=oh_aui_detailpage_o00_s00?ie=UTF8&psc=1
https://www.amazon.com/gp/product/B000G36BYU/ref=oh_aui_detailpage_o00_s00?ie=UTF8&psc=1
How long does this thing need to run? Using AA or even a 9 V is very heavy, a LiPo is expensive.... Do you really need it to last a week?
The 5 V pro micro consumes 19.9 milliamps in active mode, so using 6 SR416SW watch batteries (8 mAh) in series will provide an operating life of (8 mAh / 19.9 mA) = .4 hr = 24 minutes. Using 6 watch batteries of a higher capacity (SR44SW) could get you up to 8.8 hours of operating time. Using AA batteries would get you over 100 hours at a significant cost in weight.
There's no sense in carrying any more battery than required. You can always use solder-glue to connect wires to the batteries, which is probably easier than figuring out how to hold the batteries in some sort of clip.
When finding batteries you just need to take the battery capacity in mAh (current*time) and divide it by the current draw you plan on giving it - the quotient will be the operating life of your device in whatever unit of time you chose to do the math in (probably hours).
Your strategy should be to start with a desired operational lifetime, and then from this number work backwards to find a battery capacity that suits your needs. Don't forget to add some margin - so maybe buy the size up from the battery your math specified.
Tape. Just about any Tape will work. Don't any of you know about Led Throwies?
You can also buy (Wire Glue ) or make conductive glue (Elmer's Glue and powdered graphite).
proper way is to re-crimp like the rest of the folks said.
janky way is to use conductive glue
https://www.amazon.com/Sciplus-Electrically-Conductive-Soldering-Wire/dp/B000Z9H7ZW
if this is part of the heater, it wont work, but if it is a limit switch or something else, it should be fine.
Actually, I'm really excited to try something ...
I want to lay out the board in plastic, maybe 1mm, with grooves for wires to run. Then, I want to leave holes, probably 2mm diameter, that will fit two wires, or 1 wire and one pin. If I can design it on one layer, or at least with minimal overlap, I can make a second piece that glues down to it, and make all the solder connections with solder glue (http://www.amazon.com/Sciplus-Electrically-Conductive-Soldering-Wire/dp/B000Z9H7ZW/ref=sr_1_1?ie=UTF8&qid=1426020527&sr=8-1&keywords=wire+glue)
So, ideally, I could spend all my time in design, and end up with something that can be printed/assembled in about an hour.
I'm thinking I could use the 3D printer to emboss the logo over the battery-cover, and leave the micro-controller and Flash chip bare.
Like I said, I think I've probably gone too far down the rabbit hole on this one. I've got the whole thing laid out in my head. I'll probably just order parts this week, and start working as soon as they get here.
Yup.
https://www.amazon.com/SOTO-ST-PT-14SB-Soto-Pocket-Torch/dp/B0046UZRNU/
https://www.amazon.com/gp/product/B0046UZRNU/ref=oh_aui_detailpage_o03_s00?ie=UTF8&psc=1
I never fly without it!
You can buy them off of amazon for ~10.
https://www.amazon.com/Hakko-T18D16P-Fx-888-Station-1-6mm/dp/B004OR9BV4/ref=sr_1_6?ie=UTF8&qid=1484107753&sr=8-6&keywords=hakko+soldering+tip
Yeah, there are all kinds of good ones. Weller and Hakko are the big names, but I've also used some units made by a group called auyue? that I liked. The ones with the digital readouts are worth a few extra dollars if you ask me.
I use a hakko fx-888 and I love it. Mine even came with a bunch of extra tips, I prefer the smaller chisel tip like this. I feel like I can get joints hotter faster and I get better solder joints with a flat tip vs a conical one. Again, personal preference. I didn't mind using the Auyue 937 and that is like 40$ cheaper than mine. Just see what you can find on sale, but a good station like that is easily worth a couple crappy handheld soldiering irons from radioshack.
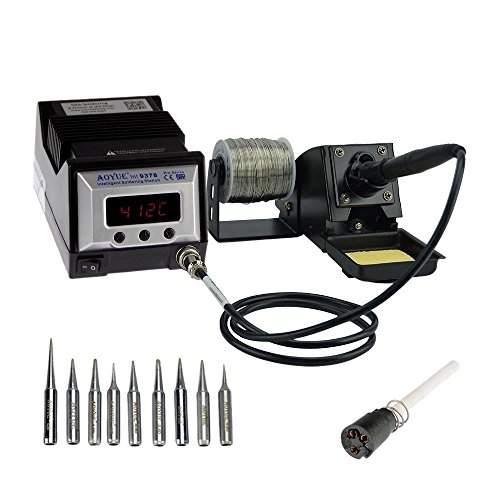
I have a $40 AOYUE 40ish watt adjustable soldering station (it's a clone of the hakko old 936) I got from Amazon, then added a real hakko 1/16" chisel tip. These have been reviewed by a bunch of people including EEVBlog and Big Clive on YouTube. They are solid and inexpensive. They are Chinese, so if you ebay or aliexpress etc around you'll find identical ones under other brands. There's also now several slight variations, like digital control etc with very similar looks and naming (937 are the digital for example). All the variations have the same soldering iron. They take genuine hakko tips, and since chisel tips are better than thin pointy "pen" type tips for our usage, I went ahead and just got a real tip. Had this for like 3 years and it's never let me down.
Plus you can find them as low as $19+shipping from some places.
https://www.amazon.com/Aoyue-AO936-AOYUE-Soldering-Station/dp/B000VINMRO
https://www.amazon.com/gp/aw/d/B004OR9BV4/ref=mp_s_a_1_4?ie=UTF8&qid=1495002165&sr=8-4&pi=AC_SX236_SY340_FMwebp_QL65&keywords=hakko+chisel+tip&dpPl=1&dpID=41bjcAF3UYL&ref=plSrch
> Do these look good? What else will I need?
Get a chisel tip for the iron. Looks like that X-tronic uses Hakko tips
https://www.amazon.com/Hakko-T18D16P-Fx-888-Station-1-6mm/dp/B004OR9BV4/ref=sr_1_1?ie=UTF8&qid=1503937038&sr=8-1&keywords=hakko+chisel+tip
https://www.amazon.com/Soldering-Tip-Chisel-2-4mm-14-5mm/dp/B004ORB8J2/ref=sr_1_2?ie=UTF8&qid=1503937038&sr=8-2&keywords=hakko+chisel+tip
I've been messing with small electronics since I was a kid, but just started getting more serious about it in the last few years. I own a recording studio so I like to build my own gear and make repairs.
One of the best investments I ever made was buying some high-quality Hakko tips (and a decent solder station of course). I didn't realize what a MASSIVE difference the tip makes. In both even heat distribution and length of life for the tip. I also got really particular about keeping my tips clean and properly-tinned. I check before and after every use to make sure there aren't any rough spots or leftover solder/burn marks. If your tip isn't properly tinned and cleaned you're going to end up with exactly what you see in your picture.
Something like this: Radioshack Tip Cleaner & Tinner has been absolutely invaluable to me!
I also never use flux, but I do typically use a solder with a rosin core. It all depends on what you're working on, but it seems like you may be running your iron too hot, or completely un-tinned. Which is just going to burn out tips pretty quickly. Look up some rough temperature guidelines and recommended tip sizes/types for what you're working on.
I work on small electronics. So guitar pots and jacks, audio connectors, PCB boards (not the teeny tiny surface mounted ones), making audio cables, swapping dead components on a PCB, etc.
So I use This soldering station that I actually just got recently. It was only $50 and I'm REALLY impressed with its performance and build quality. Couldn't recommend it more for a rig on a tight budget. I typically run it anywhere from 350c to 450c (if I'm working pretty fast).
I use This Hakko tip which I found to be the perfect one-size-fits-all solution for what I usually need.
I don't know the dimensions but I prefer this
https://www.amazon.com/gp/aw/d/B004OR9BV4/ref=mp_s_a_1_6?ie=UTF8&qid=1502302745&sr=8-6&pi=AC_SX236_SY340_FMwebp_QL65&keywords=hakko+soldering+tips&dpPl=1&dpID=41bjcAF3UYL&ref=plSrch
Are you asking about the large soldapullt or one of the smaller ones?
I have one of each of those, and I find I always use the smaller one as I can use it single handed. I can 'single hand it' with the large one if I invert it and push the plunger down on the table, but then you don't evacuate what you can of the sucked up solder and the chamber becomes more full and is then more prone to bind on the sides. Also when the tip clearing rod pushes solder out that has stuck to the inside of the tip it falls out on the desk and your hand, so it is more messy. I also have used my forearm/wrist of the hand holding the soldering iron to push it down, but as you can expect after burning my hand, or dealing with the iron cord for a few times it gets old fast.
Also the larger one I have is one of the mkawa modified ones with the viton quad or x-ring oring and krytox lubricated. And I found that having a better seal just means it jams more often. These are tools that are meant to be messy inside so you need your engineered tolerances for gunk and crud.
Been using one of these whenever the wick doesn't work.
Edsyn Deluxe Soldapullt
Good for when there is a lot of solder in a plated through hole.
The original is the Soldapult. The clones probably work about as well but I wouldn't expect them to last as long.
I use a Weller WES-51 and you'll need this or a clone:
http://www.amazon.com/Edsyn-Deluxe-Soldapullt-Heavy-Vacuum/dp/B006GOKVKI/ref=sr_1_1?s=hi&ie=UTF8&qid=1426885680&sr=1-1&keywords=soldapullt
Also see the Modifications Wiki for soldering equipment suggestions.
https://www.reddit.com/r/MechanicalKeyboards/wiki/modifications#wiki_soldering_tutorials
I recently bought one of these for myself and I couldn't be happier as a DIY hobbyist:
Hakko Dial type temperature limiting soldering iron FX600
I only use it for hobby stuff such as Quadcopters, 3D printers and electronics kits but it's way better than the 8watt USB powered I was using before.
Pair it with this and this and you should be good for a while and roughly within budget.
https://www.amazon.com/dp/B006MQD7M4/ref=psdc_3207126011_t1_B00FZPSX3G
Get a Hakko. If you plan on doing soldering at all more than just once or twice, it's a worthwhile investment.
Hakko makes good ones. My dad's experience with Wellers are they die fast. (He solders all day for his business/I do it as a hobby). There is one that has a temp adjustment on the unit itself, which is pretty good. https://www.amazon.com/gp/product/B006MQD7M4/ref=ppx_yo_dt_b_search_asin_title?ie=UTF8&psc=1 this is the one I got him. he has been using it for four months, daily and all day. Still on the same tip.
I'm legally blind and I have no problems soldering, so long as I don't get my nose too close. :P
Seriously, though, the smaller the component the harder it will be, but soldering key switches is pretty easy. Just don't rush and be patient/careful. The trick is getting the right amount of solder, which just takes practice to get a feel for (and having your iron the right temperature really helps here).
You can pick up soldering practice kits for around $10 if you want to give it a try. If you've never soldered before, I'd definitely recommend that before you dive right in to working on a $100+ keyboard.
I recommend not using the cheap $10-15 irons though. They can be a great source of frustration and put you off of the whole experience. If you don't want to sink the money into a full soldering station, something like this would probably be a great place to start.
Ferric chloride. It's really easy.
https://www.amazon.com/MG-Chemicals-Ferric-Chloride-Liquid/dp/B008UH3SAE
https://www.youtube.com/watch?v=XofFmA8wT3E
I wear nitrile gloves while sanding, and the blade went right from sanding, to a cotton cloth, to the bath. The steel is O1 from Jantz, so I trust that, and the bath was made using this.
I haven't sanded it other than a water and cloth rub down, because I am still debating if I like the look.
Here
I'm just going to assume this may interest you.. I really only use 2 things.. Photo gloss paper from office depot with a laserjet printer:
https://www.officedepot.com/a/products/394925/Office-Depot-Brand-Standard-Photo-Paper/
And etching fluid in an old plastic tupperware container:
https://www.amazon.com/MG-Chemicals-Chloride-Etchant-Solution/dp/B008UH3SAE/ref=sr_1_3?ie=UTF8&qid=1550866951&sr=8-3&keywords=ferric+chloride
Print off your circuit (I use Fritzing to make my circuit designs) onto the inkjet paper.. It adheres pretty well.. Transfer with an iron and a roller.. It takes 3-4 minutes and should get so hot that the paper kind of sticks to it.. Peel off the paper, I usually have to run it under water to get all the paper off.. You should be able to rub on it w/o hurting the transfer once it gets to this point..
All you'll be left w/ is a mask.. There'll be some spots that didn't transfer.. Just use a black sharpie to mask those spots in..
Drop it in the fluid for about 6-12 minutes.. It only takes enough to barely cover the board.. And that amount of fluid can do 3-5 boards. Close the tupperware and shake it like one of those old pictures people talk about..
Drill your holes w/ a dremel.. Boom.. Done.. I have probably done 20 or 30 of these and they're a pain in the butt, but you can have them done in an hour and know if your design works before sending off and wasting money.
I called my city disposal team and they said that it's safe to dispose of in the drain with lots of water.. Alternatively, you can soak paper towels with the material after it's spent and throw those out.. I wear a vapor mask, goggles and gloves when I use the ferric chloride, but I think I go overboard.. Just gloves and goggles are probably fine. Always make sure you're in a well ventilated area..
​
​
Here is the mobile version of your link
It comes in a wide variety of forms including wax and a liquid. It removes the oxidation that’s getting in the way of your soldering.
I've done a few NES console builds and a few more NES cartridge builds. This album isn't mine, but for the port access I HIGHLY recommend using the decora keystone wall plate. You can get a gray one on Amazon that comes decently close to matching, and with some good glue work you'll barely notice it's there. Since you'll be using a dremel anyway to get rid of screw standoffs that are no longer necessary, cutting that opening should just take some patience.
I was a complete idiot with a soldering iron, and after getting some reps with it doing projects like these it's kind of amazing what you pick up. I found this site hugely helpful, since a lot of what I was doing was desoldering USB cables from PCB's (for the cartridge builds) and resoldering microUSB heads. You won't be doing a lot of desoldering, however everyone makes mistakes and sometimes fixing those mistakes involves removing solder. There are plenty of youtube vids out there for soldering, but all you need to get started is something like this. It's not the best iron in the world, but it's temperature controllable and something cheep to get you started. The only thing I'd add to that is a little flux, it will help tinning wire ends immeasurably.
Something else that's going to help you out a LOT for the console build: RELOCATE THE MICROSD CARD. Buy one of these, I routed mine to the left side of the cartridge opening, set vertically against the opening and at an angle so i can get the SD card in and out. You really don't want to rip apart 6 screws to open and close the unit, and if the SD card gets corrupted or you just want to change something on there that's exactly what you'll have to do. Move that sumbitch to the front and you'll never have to worry about it.
This is what I've been using to build my quads
Solder
Wick
Flux
This is the lead free solder I am using... https://www.amazon.com/gp/product/B01B61TWGY/ref=oh_aui_detailpage_o04_s00?ie=UTF8&psc=1
And here is my flux... https://www.amazon.com/gp/product/B008ZIV85A/ref=oh_aui_detailpage_o04_s01?ie=UTF8&psc=1
It wets the tip of my iron just fine, but if I hold the iron against the wire lead I'm trying to tin the wire lead never seems to get hot enough for the solder to flow. It's really maddening. I clean the tip of the iron frequently, and it always comes away from the sponge shiny silver. It's definitely getting hot (and I can show you the spot on the back of my right thumb where I learned that lesson the hard way). I will check for tightness of fit on to the iron whenever I get home, but I don't think it's loose.
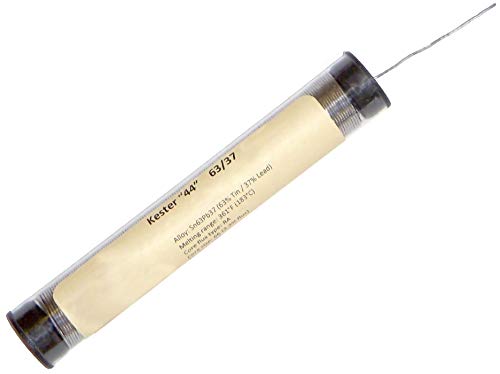
Which ones did you get? Buy the smallest diameter solder you can. This works great Kester 44 Rosin Core Solder 63/37 .020" 3/4oz Dispense-Pak https://www.amazon.com/dp/B00AYJ0B7Y/ref=cm_sw_r_cp_api_i_WEWlDbJ4VFMPW
Also I find the cheaper longer ones much easier to solder as long as your board has the clearance for them.
Kester 44 Rosin Core Solder 63/37 .020" 3/4oz Dispense-Pak http://www.amazon.com/Kester-Rosin-Core-Solder-Dispense-Pak/dp/B00AYJ0B7Y/ref=sr_1_7?s=hi&ie=UTF8&qid=1395671772&sr=1-7&keywords=kester+44
Desoldering Wick - 2mm http://www.amazon.com/Aven-17541-Desoldering-Wick-Width/dp/B003E48ERK/ref=sr_1_3?ie=UTF8&qid=1395672458&sr=8-3&keywords=desoldering+braid
No Clean Flux Paste http://www.amazon.com/MG-Chemicals-Clean-Paste-Syringe/dp/B00425FUW2/ref=sr_1_2?ie=UTF8&qid=1395672365&sr=8-2&keywords=flux
Solder Tip Cleaner
http://www.amazon.com/Hakko-599B-02-Solder-Cleaning-Holder/dp/B00FZPGDLA/ref=sr_1_1?ie=UTF8&qid=1395673163&sr=8-1&keywords=solder+tip+cleaner
+1 for kester 63/37 I like the .020 size
This is what I use to repair old consoles
Weller SP40NKUS 40-Watts Soldering Iron Kit https://www.amazon.com/dp/B00B3SG7F0/ref=cm_sw_r_cp_apa_i_5koSCbHNHK4S6
It's inexpensive and works great.
All you need is some solder and wick and this will literally only take a couple mins and you have a fixed Atari
That is not an electronics soldering iron. Depending on your budget, i'd recommend either this aoyue at $30 or this aoyue at $90 if you want a nice high quality station. The nicer one has the advantage of exact tempature measurements and also comes with a ton of extra sized tips.
As for the frame, its really not common to break arms as a beginner. Its REALLY hard to break an arm and you have to be going really fast and hit something really hard. The reason you may have read about arms breaking is because most beginners start with some cheap frame built with bad/thin carbon. The QAV250 wont break easily (although i've heard of the skinny part in the top frame breaking, but that can just be glued/taped back together).
Would something like this help?
These types of things are generally considered hobbyist level and in all honestly, you are best doing this yourself with a good Weller Soldering Iron, a 56 SMD Desk Magnafier and some helping hands.
If that is out of the question though, I'd recommend checking out Fab Lab. It is a non-profit community space that has all the equipment available to anyone who dabbles in everything from Raspberry Pi to all things electronics. You may be able to consign someone or do it yourself there.Their address is 847 14th Street, San Diego 92101
Hope this helps and good luck!
I've used those, and they're kind of garbage. Once you've used this type, there is no going back.
Here is a comparable one, and OPs is definitely cheaper.
quad hands there are probly better versions but I grabbed this one to be quick about it.
This it?
Or this?
If not here is a good wick and sucker
I use this iron for everything I do. It has basic thermal control and the iron has a good selection of tips that you can buy: https://www.amazon.com/dp/B000AS28UC/ref=cm_sw_r_cp_apa_divAyb3066AWC. I would definitely get fine point tips. Here is a vacuum that I use as well for desoldering: https://www.amazon.com/dp/B00U1SFNYE/ref=cm_sw_r_cp_apa_LkvAybGPPWMF1.
Whatever iron you have now will probably be fine, but definitely will want precision tips if you can find them.
You may need to swap out your pump. The first one I tried didn't work worth a damn either, but then I bought one that was about three times the size on Amazon and it works beautifully. This is the one I bought.
The Soldapullt is fantastic. If people havn't used one, then it makes sense that they are steering you towards the bargain bin. Get the Edsyn. The large diameter barrel makes a massive difference in the volume of air that this thing draws in. I likewise had the same concern as you regarding tip degradation so I picked up a couple spare tips when I bought mine. I'm still on the first tip though. For the record, silicone begins to degrade above 300C (it doesn't melt per se), while PTFE's melting point is 326C. I've never had a jamming issue and the one handed operation of flip and bump (it has integral bumper for this) makes it a fast workhorse.
I suppose if you're really trying to save dough, you can get a $6 knockoff:
https://www.amazon.com/dp/B01K72SBWY
or this $9 one if you want spare tips:
https://www.amazon.com/dp/B00U1SFNYE
UK cheapie:
https://www.amazon.co.uk/dp/B00ZBUCNE0
Can't vouch for the durability of any of these clones though.
I soldered my ergodox PCBs with my hakko set to 650 F (about 340-350 C). Just don't keep the iron on the switch solder posts any longer than necessary. Basically, if you don't have a perfect joint in 3 seconds, you did something wrong. The traces are small enough on keyboard PCBs that you probably don't even need that high of a temp, but I think it helped to make nice shiny joints when using lead-free solder.
The same temps worked with a separate de-soldering pump that I have that is similar to this one. I haven't used the integrated kind that you linked to before. Over 400C, you are risking burning up small traces and delicate components, but you are probably okay if you work fast. If you really wanted to control temp on that cheap desoldering iron, you could plug it in through a variable transformer.
Soldering components to a huge, thick PCB ground plane on my tesla coil kit, on the other hand... that was more of a challenge. I dialed it up to 750F (400C), and should have been using extra flux.
I have https://www.amazon.com/NulinkTM-Deluxe-Desoldering-Remover-Plastic/dp/B00U1SFNYE/ref=sr_1_9?ie=UTF8&qid=1486421878&sr=8-9&keywords=solder+sucker. It's big but works very well.
The soldering station you're looking at will be fine for replacing capacitors. Its adjustable, which will come in handy when you want to further your skills. Get some extra tips, and find some fine point ones. I like to use long conical ones, as well as long small flat ones.
As other posters have said, you want to practice on something you don't necessarily want to keep. Find something cheap from a thrift store and take it apart.. an old clock radio, vcr, something of that sort. Then identify the capacitors and give it a go. Once you get the hang of it, try on the genesis.
Solder - you want some 60/40 solder (60%tin 40%lead). Stay away from acid core, its not for electronics. Find this in a thin gauge, you'll have a better time with it.
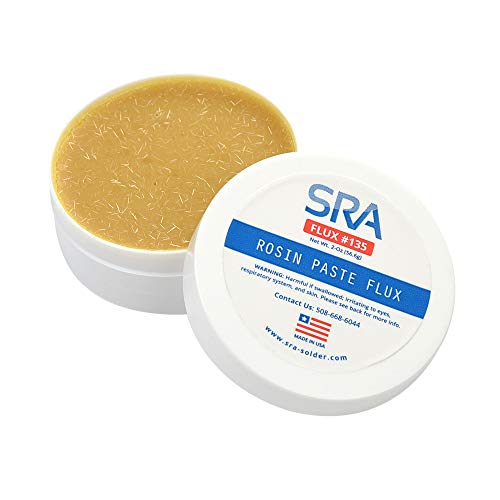
Flux - nice to have around. On some joints, the old solder doesn't really like to flow all that well. You can put some flux on it, and it'll flow a bit better. Use it on the new joint as well. There's several different types, and you can get lost in it, but you really want a liquid or gel type flux that is "no clean". I still give it a rinse with alcohol and a brush after I'm finished, but it cleans up way easier than regular flux. Here's what I use : MG Chemical's Paste flux
You will also need something to remove the old solder from the holes. Tools like this Vacuum pump and desoldering wick like Desoldering wick are good for removing the old solder.
As for the actual removal and replacement of the capacitors, I usually heat up one side from the bottom of the board, and rock the cap so it slides out a bit, then do the other side, working the cap out a little at a time. After that I clear the hole with a vacuum pump (while heating the solder up, get the vacuum pump as close as possible and press the button) or the desoldering wick (put the wick on top of the solder, then heat both, pull the soldering iron and the wick off at the same time, lest you pull up traces - This takes a bit more practice to perfect)
Make sure you put the new capacitor in correctly. Electrolytic caps are polarized. You want to make sure positive goes to positive and negative to negative. Look at the cap before you remove it. Most boards are marked, but no reason to risk the board being marked wrong.
Make sure the caps you're using are the proper rating. A general rule is the capacitance needs to be the same (farad rating), and the voltage rating needs to be at least the rated, but can be higher with no ill effects.
Its late and I'm rambling. Hope this helps.
Does anyone have any soldering iron recommendations?
I was going to get this Vastar one, but it doesn't really seem to be readily available in Australia. I'm probably gonna go with this Weller now.
It's probably not gonna get a whole lot of use, mainly just for the Whitefox :\^)
Tools
You'll also need to get a soldering iron. Something like this should work fine (I have a cheap soldering iron I bought from RadioShack 10 years ago that I still use on all my electronics projects).
Good luck! :)
As was said before, these are rotary encoders.
I had an old piece of gear with these. One knob was broken. I discovered there are many options to consider for what the encoder is:
So probably this https://www.digikey.ca/product-detail/en/bourns-inc/PEC11R-4020F-N0024/PEC11R-4020F-N0024-ND/4699190
​
In general, I used their search filters, here is a link to one less narrowed down too https://www.digikey.ca/products/en/sensors-transducers/encoders/507?k=&pkeyword=&sv=0&pv545=142&sf=0&FV=fffc0076%2Ca4019a%2C1140291%2C6240002%2Cffe001fb%2C3400006&quantity=&ColumnSort=0&page=1&pageSize=25
​
To remove these from the PCB, you need to be good at desoldering. I used a solder iron with desolder wick
​
I have this solder station https://www.circuitspecialists.com/csi-premier-75w-Soldering-Station.html
A good solder station is important as the tip is very fine point, the heat is regulated and can be adjusted. I used about 350 to 400 degrees C heat. And the device is safe to use for static sensitive boards.
And solder wick https://www.amazon.ca/NTE-Electronics-SW02-10-No-Clean-Blue-098/dp/B0195UVWJ8/ref=sr_1_1?keywords=solder+wick&qid=1565443539&s=gateway&sr=8-1
Having some fine tweezers is good too. I have these https://www.amazon.ca/TWEEZERMAN-Stainless-Tweezer-Assorted-Colors/dp/B000782SQY/ref=sr_1_54?keywords=tweezers&qid=1565443795&s=gateway&sr=8-54
​
It is very important to not damage the circuit board when desoldering. be patient. The hard part with taking out rotary encoders is desoldering the mechanical support metal clips on the sides. These usually are wider and require more heat and time to melt and more messing with the solder wick to get all the solder out. I recommend desoldering the pins first, using small tweezers to move the pins to make sure they are loose. then work with the iron to alternate the mecanical support pieces to heat and gently rock back and forth.
​
Another thing migh to try is to destroy the old broken encoder, small cutters to cut apart the pins and the supports. Just be careful again to not damage the other parts and the board. Then you can easier desolder the loose bits of metal remaining in the holes.
The approach worked well for me. I had a few iterations, since the first time I replaced an encoder, put the device back together, then i found a different encoder had stopped working. So back apart and I had to desolder it as well. But then I went on the learning curve of getting an encoder with the wrong number of pulses per revolution. It was a big wheel for the options, so it had 24 detents, but 12 pulses per revolution, and a push button switch, so some kind of special snow flake.
If these encoders you have here are just regular encoders without switches it should be possible for it to be repaired.
Of course if you don't have the tools already then it can be very expensive to ge them just to do this. I would recommend then finding someone who does have the tools and experience doing this.
https://www.amazon.com/NTE-Electronics-SW02-10-No-Clean-Solder/dp/B0195UVWJ8/ref=sr_1_2?ie=UTF8&qid=1498946921&sr=8-2&keywords=copper+wick
60/40 rosin core should be good.
Alpha Fry AT-31604 60-40 Rosin Core Solder (4 Ounces) https://www.amazon.com/dp/B00030AP48/ref=cm_sw_r_cp_apa_BhXXzbASH0FHM
Use solder wick and a wide tip to clean the old solder off
NTE Electronics SW02-10 No-Clean Solder Wick, #4 Blue, .098" Width, 10' Length https://www.amazon.com/dp/B0195UVWJ8/ref=cm_sw_r_cp_apa_9eXXzb1S3RHKS
Use lots flux. Coat the area before you use the wick and again before you solder. It helps bond the solder to the metal.
MG Chemicals No Clean Flux Paste, 10 ml Syringe https://www.amazon.com/dp/B00425FUW2/ref=cm_sw_r_cp_apa_mgXXzbTRM5G78
A good iron helps so very much. This is what I have
Weller WES51 Analog Soldering Station https://www.amazon.com/dp/B000BRC2XU/ref=cm_sw_r_cp_apa_RiXXzb76H6WDS
However this should do for occasional use
Vastar 60W 110V Welding Soldering Iron with Adjustable Temperature Dial, 5pcs Interchangeable Different Soldering Iron Tips and Solder Tube for Soldering Repaired Usage, Blue https://www.amazon.com/dp/B071RCB7KB/ref=cm_sw_r_cp_apa_slXXzbQRJVVZ2
When you are done clean with 90% or above isopropyl alcohol and let dry before you use.
Watch some videos on how to use the wick. Its a great tool to have and works so much better than the crappy suckers.
I personally think you should've gone for one of these. A much better experience and a better price, I use it for everything and is super convenient because of how small it is.
> I've also found an old laptop AC power adapter with a DC output of 19V at 3.0 amp.
What you have there is an excellent match for a TS100 soldering pencil.
20V is a negligible shock hazard. But at 3A it's enough power to heat up and sometimes even explode components that are connected wrong. So use eye protection and beware of possible hot components and you should be fine.
Hey, best tip i can give you to get better is to find junk printers, motherboards, ect... and just practice de-soldering and re-soldering caps, resistors, anything that just has two pins. Also I would also suggest lowering the temp on the Iron (if you can) I use about 320 C for most of my stuff, and I would also recommend getting a good soldering iron it helps a lot. The soldering Iron I would recommend the TS100 with the D24-Tip, then look online for how to set it up.
If you like you can contact me by discord, and I can help you with what ever you need, (my discord Demi 소금#9026)
One last thing is that Twisting and pre-tinning the wires is almost a must when soldering anything.
Soldering Tip(D24-Tip) : https://www.amazon.com/gp/product/B06XYR3VTJ/ref=ox_sc_saved_title_7?smid=A2FGAWCX62OR7U&psc=1
Soldering Iron: https://www.amazon.com/NovelLife-Mini-TS100-Soldering-Digital/dp/B07D35B75T/ref=sr_1_2_sspa?crid=1PGZOPAOX1MUO&keywords=ts100+soldering+iron&qid=1557599888&s=gateway&sprefix=ts100%2Caps%2C148&sr=8-2-spons&psc=1
https://www.amazon.com/UY-CHAN-Programmable-Pocket-size-Acceleration/dp/B01MDTO6X7
i came up with this so far (still doing this as an exercise to determine value, i havent decided against the GK64 yet):
 
 
Total: $222
this one? if so then you should be at about 350 on the dial on the iron. the solder in that kit is leaded, for reference.
yeah surface mount stuff is a little tetchy at first. did you add a blob of solder to one of the pads and then tack the mosfet in place or something else?
Don't you think that fire would be a more effective and quicker option than the one you are using?
Flamethrower and some good dry wood splits and you'll be cruisin.
http://www.amazon.com/Red-Dragon-VT-3-30-Propane/dp/B00004Z2FQ/
http://www.amazon.com/gp/aw/d/B00004Z2FQ/ref=mp_s_a_1_3?qid=1462376270&sr=1-3&pi=SX200_QL40&keywords=Dragon+torch&dpPl=1&dpID=313Db7iqdWL&ref=plSrch
Wait a second...
http://astore.amazon.com/wwwpropanefla-20/detail/B00004Z2FQ
Would a torch like this work? or this one?
you are overkilling it for that little furnace. You could just use a propane tank and burner from home depot like in that imgur album. You dont need to go crazy with it if that small. you will focus the heat on the little crucible and the wool will hold in the heat. so you wont need to make a burner or use a 20lb tank to melt an oz or two of metal. you could buy a 15.00 bernzomatic setup and start on this right away.
​
also - maybe look into spin casting (centrifugal casting) as that's the right method for casting precious metals into smaller shapes like a ring. its kinda different and comes with its own way of doing things that means different PPE than typical metal casting.
Here is the desktop version of your link
Good hardware store might have one, any pluming supply store, online .
http://www.supplyhouse.com/Taco-334-3-Taco-Cast-Iron-Pressure-Reducing-Valve-Dual-Control-Sweat
learn how to solder pipe. lots of Utubes out there, you don't need a fancy rig for homeowner stuff, this is good enough for homeowners.
https://www.amazon.com/BernzOmatic-Basic-UL2317-Pencil-Propane/dp/B00008ZA0C/ref=sr_1_6?ie=UTF8&qid=1481992375&sr=8-6&keywords=propane+flame+torch
Basically clean the fitting with a fitting cleaning brush, clean the pipe with plumber sandcloth, flux the inside of the fitting, the outside of the pipe, assemble, apply heat , when the flux stops boiling apply the solder to the opposite side of the heat and let it run around.
Don't over heat the fitting if the flux turns black you got it to hot, I usually move the flame around a little when heating the fitting.
If making up adapters solder them to the pipe ( short piece ) before screwing them to the valve.
Buy some extra pipe and fittings and practice, ells are pretty inexpensive, practice on them.
I like my orca torch very much... I upgraded from using a basic propane torch attachment (https://www.amazon.com/BernzOmatic-Basic-UL2317-Pencil-Propane/dp/B00008ZA0C/) on a regular small green propane tank.
I'm interested in building one of these. About how long does one of these cans last in one of these?
Also, would one of the basic use BernzOmatic Basic Use Pencil Flame Propane Torch Head work with one of these, or does it need to be one of the higher-intensity torches?
THIS is very similar, if not identical to, the torch head I used.
EDIT: OK, I went back and looked at the torch I bought, it says Propane only. I returned it and and got a Berzomatic TS8000
Ok, thanks for the replies!
I picked up this flux: Harris SSWF1 Stay Silv Brazing Flux, 1 lb. Jar, White https://www.amazon.com/dp/B002075B0U/ref=cm_sw_r_cp_apa_i_790RCb2K2T97F
^(And this torch head: BernzOmatic Basic Use UL2317 Brass Pencil Flame Propane Torch Head)^(https://www.amazon.com/dp/B00008ZA0C/ref=cm_sw_r_cp_apa_i_N.0RCbY4860NK)^(And did buy propane, but it was only like $6 for 2 camping cans so no big loss.)I'll grab a can of MAPP.
I assume that because it's only 12 gauge wire and a 20 gauge "solder" it won't take long at all to heat up. As I understand it:
I've also seen people cut little bits of the soldering wire and place it on the target, then heat the wires until it flows. Is that incorrect?
Thanks again!
If I wanted to make a propane forge could I use this propane head ( http://www.amazon.com/gp/aw/d/B00008ZA0C/ref=pd_aw_sbs_2?pi=SL500_SS115&simLd=1 ) and just attach it to the side of the forge or do I need something like a trigger start torch ( http://www.amazon.com/gp/aw/d/B00008ZA09/ref=pd_aw_sbs_3?pi=SY115&simLd=1 )?
I know this is a dumb question but I'm on a budget for my starter setup
If I think of any others, I'll add them, but that's a good start from me.
I've been a hobbits soldering for about 25 years now, but have done a bit in the professional field. For about the last 15 years I've used a Weller WM120 as my primary hobby iron with a super low end SP23LK 25 watt iron for heavier duty things. On my bench in the office I used a Hakko 936 which is a great unit, but it's pretty spendy for a home gamer.
About two months ago I saw an EEVBlog video on a chinese replicate of the Hakko936 and Dave had a lot of really good things to say about it during his teardown. Clive has also done a video on this same iron, and uses a Yuhua soldering station as his regular bench unit. This prompted me to buy one from Hobbyking about two weeks ago and I've been very happy with it so far.
Some notes: The station slides around on my plastic covered table, as does the iron stand. This was easily resolved by adding a couple little rubber feet to the bottom of both. Also, the iron stand is VERY light and easily picked up when you're attempting to retrieve the iron, but simply adding a little bit of weight in the bottom resolved that. For $30 shipped to my house, It's pretty legit. Can use Hakko tips on it as well.
I have been looking for the same thing as you, and here have been some of the ones I've been considering:
https://www.sparkfun.com/products/10707
http://www.amazon.com/Aoyue-937-Digital-Soldering-Station/dp/B000I30QBW/ref=sr_1_1?ie=UTF8&qid=1369866027&sr=8-1&keywords=aoyue+937
http://www.amazon.com/Weller-SP23LK-25-Watt-Soldering-Iron/dp/B0009ZD2AG/ref=sr_1_4?ie=UTF8&qid=1369866094&sr=8-4&keywords=weller+soldering+iron
The first two are temperature adjustable which is a huge plus, however the Weller would suffice. Hope this helped!
Looks like you've started down the road to learning how to make your own cables, and you need some guidance while you're practicing.
This page has a nice picture of good, bad and ugly results. Yours are not bad for a beginner but ... ugly.
This set of search results will provide lots of information. Read as much as you can.
Here's what I use for guitar cable soldering tools. The links are for explanation. You don't have to get them at Amazon. An electronics store will have them. You may decide it's less expensive to buy the patch cables. But, if you are a do it yourself type, the tools will pay for themselves.
Weller 25W iron Get some extra chisel tips. They get destroyed quickly by noobs.
Helping hands
Wire stripper
Solder sucker
Brass wool solder iron cleaner
63/37/resin core .6mm solder
Sure thing. Like with most hobbies, it's when you first get into things that is the most expensive. Thankfully, it's not that bad to get started.
First off, you'll need some solder. That's a meltable metal used to join two things together. This roll will last you for several projects: https://www.amazon.com/gp/product/B000G36BYU/ref=oh_aui_search_detailpage?ie=UTF8&psc=1
Next, you'll need a soldering iron. I've been pretty happy with this one: https://www.amazon.com/gp/product/B00KS8XA2Y/ref=oh_aui_search_detailpage?ie=UTF8&psc=1 but people swear by Weller. I'm not sure I'd get that 40 watt one that's a similar price on Amazon though, I tend to keep mine at a fairly high power and it works nicely that way.
(I'm assuming you have a Harbor Freight near you for the other stuff. They're pretty common) Then you'll want a multimeter. This is your cheapest option, and if you check your junk mail you might have a coupon for a free one: https://www.harborfreight.com/7-function-digital-multimeter-90899.html but it's lacking in audible continuity (translation: if you want to check that two points are electrically connected, it beeps if they are). This might be worth the extra money: https://www.harborfreight.com/11-function-digital-multimeter-with-audible-continuity-61593.html. Or if you really have some money burning a hole in your pocket, get one of these: https://www.harborfreight.com/5-in-1-digital-multimeter-98674.html - that has some extra features that really come in handy, but aren't totally necessary either.
That covers the most expensive tools, but there are still a few odds and ends you'll want.
Try something like this:
Alpha Metals #am31605 4oz.032elec Lead Solder https://www.amazon.com/dp/B000G36BYU/
Dunno about the DA but for keyboards you can. As /u/01111000x said it'll void any warranty you may have with it.
I changed out all my LED's and Cherry switches using the following items:
Weller SP40NKUS - May be too powerful but it got the job done fine.
Solder sucker
Leaded solder with rosin core
Desoldering wick
I guess for Green LED's anything on eBay would work. 2x3x4mm square led's or flangless 3mm will both work. I got mine frome here because im impatient.
That solder looks pretty thick, this one would be easier to work with: https://www.amazon.com/Alpha-Metals-am31605-4oz-032elec-Solder/dp/B000G36BYU
You won't need additional flux.
My success rate with wiring guitar builds increased greatly when I bought a "nice" soldering iron and some small diameter solder. You'll get much cleaner joints with a soldering iron that lets you control the temperature. I bought this Weller soldering station, and it was the best investment I've made.
Soldering Iron
Solder Sucker
Solder just be aware this does have lead in it, so wear gloves and a mask if possible when working with it. it has a small enough diameter that makes it quite easy to do work with switches though
This solder is amazing! 60/40 and thin diameter. Alpha Metals
Soldering is easier then you think and that's coming from someone who is pretty crappy at it. Lots of good Youtube videos on it.
I suppose you could probably use conductive wire glue too, but that looks messy.
Okay, I've never tried this but I would recommend trying to use 1206 SMD LEDs, they're about 1/8x1/16 of an inch. The one I linked makes a red-orange when lit and runs about $10 for 100 LEDs. Since you need it to look like trailer lights I'd connect them with hard steel, like a paperclip bent/cut how you need it. 1206 is pretty big for SMD LEDs, but in case you can't solder it you can use electrically conductive adhesive. Just dip the end of the wire in there and get it to stick to the LED or apply with a toothpick.
You can try something like a conductive glue and apply it with a toothpick.
http://www.amazon.com/Sciplus-Electrically-Conductive-Soldering-Wire/dp/B000Z9H7ZW
In the reviews on there some guy talks about how he fixed an internal connector on his phone with it so worth a shot I suppose. I think taking it to a professional might cost you enough to warrant actually buying a second hand replacement phone if you so desire.
You can buy power buttons premade online
If your looking for a cool button you'll need to find one that is a momentary switch so you can hold it in to force power off your pc
A button like this is pretty bitchin http://r.ebay.com/sdBS4d but you would need to find one that is momentary
I don't recommend soldering to the board in case you were thinking that. get a cable that connects to the mb and splice it/connect it to your switch
If your concerned about soldering you can use wire glue: https://www.amazon.com/dp/B000Z9H7ZW/ref=cm_sw_r_cp_awdb_F5OXzbPRZPQG1
They also sell glue which is electrically conductive. I'll try to find a link for you. You might try that.
Here it is: Sciplus 400.
Amazon search terms: electrically conductive adhesive
I was thinking something like this:
http://www.frys.com/product/2931025
but I have not actually done it.
I once broke off the end of touchpad ribbon cable for a laptop -- I scraped the new end with an exacto knife and inserted into connector and another soldered to a board.
they also have conductive greese:
http://www.frys.com/product/4707359
If you do that you would need to put little bit on the traces and then drops of super glue on both sides and between each trace.
Or this on Amazon
http://www.amazon.com/Sciplus-Electrically-Conductive-Soldering-Wire/dp/B000Z9H7ZW
and maybe you can find something like this in the auto parts store
http://www.amazon.com/Permatex-21351-Electrically-Conductive-Defogger/dp/B000HBGKWE
And, oh yeah, that stuff you linked at RadioShack looks good, too.
The scraping part will be hard to do without breaking so be carefull.
Without seeing pictures I don't know if this would help, but they make a conductive glue that might be appropriate.
No problem at all. Just my sense that most that care enough to buy a DuPont would not use a Bic to light a cigar. I also use a Bic (actually have to use Scripto) along with this when traveling.
Thanks for the feedback!
For the water, I agree that I brought too much water. When I went to Olympic last year I only carried a liter of water with me at a time, but for Big Bend there is only a few streams that generally dry up in the summer (can't be relied on) and the Rio Grande. The route we went only came within about 5 miles of the Rio Grande, and the creeks were reduced to stagnant puddles by the time we went. The Big Bend website suggests a gallon per person per day of water, and we brought 4 gallons between us for 3 days, and that was still too much. I am a hyper water conservationist when I backpack, and I think I can get by with about 2 liters per person per day going forward. I had never done a desert trip before, so I went conservative to be safe.
The trash compactor bag is an intriguing idea. I have historically just done the ducks back to keep my stuff mostly dry and the dry sack to keep my sleeping bag dry so I would never freeze to death, but I like the idea of the compactor bag without the dry bag. I think I messed up my sub kilo by using a compression sack for the first 6 years that I owned it.
I have been eyeing those thermarest xlite pads. My current thermarest is about 10 years old and not very thick.
The rain jacket umbrella combo is something I have been testing recently. The Patagonia jacket I have is essentially a wind shirt, so anything more than a drizzle goes straight through it. So without an umbrella, I would be almost without rain gear. The umbrella has some other benefits like being a wind break, allowing easy night time bathroom breaks, and makes it easier to check maps while its raining and such. I think I will get an OR Helium at some point and bring that whenever it is a low chance of rain, or for particularly long trips.
I searched a bit for a torch style lighter, and these are the only ones that I have found:
Soto Which just loads generic bic style lighters into it for fuel.
Gizga Which requires you to buy separate fuel and recharge it.
I tried the Gizga one time, and I could only get a tiny bit of fuel to charge it, so it only lasted a day or two. I might have a defective unit, so I may try getting another one.
Thanks again for the advice! I will definitely test your ideas out!
$20 from Amazon. Seems like a lot of money, but I think I'm in anyway.
I was having the same issues, likely related to my filling technique. I stumbled across the Soto pocket torch. It uses any non-bic cheapo lighter. When the lighter is empty you open the torch, throw it away and put a new one. I got 20 lighters for $10.
Soto Pocket Torch https://www.amazon.com/dp/B0046UZRNU?ref=yo_pop_ma_swf
The flask miss_mchammerpants is pretty solid. Another neat tool I've not seen around often is this converter kit for lighters. It turns a normal cigarette lighter into a mini torch. Happy holidays!
well let's see, not so good iron, not so good solder, wrong flux = no mystery there.
If you're going the solder sucker route, get the Soldapult. Trust me. Save yourself the aggravation and decrease the chances of ruining your expensive keyboards.
I went through 2 cheapies. You will appreciate it in the end. Or as posted a day or two ago, get a desoldering iron with the bulb attached. I kinda wish and still may buy one... though I'm more about building than modding at this point. It's just such a pain in the ass.
So the one that I've used at my job is the Edsyn Deluxe Soldapullt but I've seen some third party clones on amazon for about the a third of the price, and they look pretty much identical and have the same design. I've personally never used any of the third party clones, but I can imagine it works just just as well as the Sodapullt. Here's the one I'm looking at on amazon, and it looks to have pretty good reviews. What's nice about this kind of desoldering pump is that you can 'reload" the pump while holding the iron in one hand and the pump in the other. Just push the end with the spring against the table and it will lock in place until you press the trigger to release it.
Opinions on these three soldering irons? It's only use will be for keyboards, and I don't anticipate building them as often as we all dream, haha. But I do want one that'll do the job well without going over the $100 mark, and preferably under $80 if any of these are decent.
Hakko Dial type temperature limiting soldering iron FX600 https://www.amazon.com/dp/B006MQD7M4/ref=cm_sw_r_cp_api_pBXMAb3DXH857
Hakko FX601-02 Adjustable Temperature Controlled Soldering Iron, 67 Watts https://www.amazon.com/dp/B00FZPSX3G/ref=cm_sw_r_cp_api_UDXMAbYNHEAWS
UY CHAN Upgraded Original TS100 Digital OLED Programmable Pocket-size Smart Mini Outdoor Portable Soldering Iron Station Kit Embedded Interface DC5525 Acceleration Sensors STM32 Chip Fast Heat (B2) https://www.amazon.com/dp/B01MDTO6X7/ref=cm_sw_r_cp_api_CEXMAb7A2CDNW
I use this one at work all the time - Hakko FX-600
For $44, it's a good deal. You want an iron where you can set temperature and change the tips. A cheap chinese soldering station with temperature control will be in the $50-70 range.
> ferric chloride acid (which you might be able to get online or from computer supply stores)
I've gotten it from Amazon. This is the one.
I'm not sure what you mean by "...more controlled way to connect each button to ground".
As far as connecting wires to pins, soldering is often the best way. A tutorial on soldering would probably be useful if you've never done it before. I recommend lead free solder, some flux, and a cheapo soldering iron with a finer chisel tip. Such as, this one. Or, something comparable. Flux: Rosin Flux. You want to make sure it's a thick rosin based flux otherwise you may have to obsessively your joint and the surrounding area.
​
Google images:
http://slagcoin.com/joystick/pcb_diagrams/gc_diagram1.jpg
http://3.bp.blogspot.com/-Yy4Wdbp3cpM/VRYTb7T4fGI/AAAAAAAAAbU/AcAbPTgP05g/s1600/2015-03-27%2B17.22.34.jpg
http://gc-forever.com/mega/Ashen/Controller_Trimming/1.png
​
The button work by closing the circuit to ground. Personally. I would just solder the wires to the corresponding contacts on the PCB simply because it would make trouble shooting easier on an unknown board. A daisy chain could be fine, but only if all those grounds are a common ground, but with signals I'm not sure that can be relied upon. If they aren't a common ground, linking them could lead to unexpected/undesired behavior. You could probably use a voltmeter to carefully explore if they are a common ground, and if you find that they are, your daisy chain idea would probably be fine. I would use solder and cover joints with shrink tubing.
what kind of flux do you recommend? is this good? how about what solder to use? someone said that .8mm is better than what i'm using.
bit of a newbie, but I have the same pen, and it does basically work like a paint pen requiring you to 'pump' the tip for flux to flow, which is problematic and annoying. The flux is also quite loose, I've found that I greatly prefer paste flux and a toothpick over this quick evaporating liquid that runs all over. pastier flux like this:
https://www.amazon.com/SRA-Rosin-Paste-Flux-135/dp/B008ZIV85A/ref=sr_1_3?keywords=flux+paste&qid=1572457035&s=industrial&sr=1-3
also, given your application, you may want to look into chip quik :)
Thanks for the information. This is the liquid flux I ordered. Would you recommend something different?
solder
I keep the heat almost all the way down. My kit is actually slightly different here and came with a stand, sponge, and the tweezers are SUPER useful
Kester is the best brand .02" diameter.
https://www.amazon.com/Kester-Rosin-Core-Solder-Dispense-Pak/dp/B00AYJ0B7Y/ref=sr_1_11?keywords=kester+solder&link_code=qs&qid=1562729149&s=gateway&sourceid=Mozilla-search&sr=8-11
I'm almost ready to start soldering my custom keyboard. However I wanted to check and make sure that my solder/ soldering iron combo is okay for a keyboard. This is my iron and [this]
(https://www.amazon.com/gp/product/B00AYJ0B7Y/ref=oh_aui_search_detailpage?ie=UTF8&psc=1) is the solder I got.
The iron isn't adjustable and it says
"up to 925.F"
and the solder says
"Solder iron tip temperatures between 315-371°C (600-700°F)"
Is this gonna be okay, or should I get an adjustable temp iron? Thanks for any help.
I use this as well as some .04" 60/40.
This or maybe a slightly smaller diameter. It was recommended to me by another /u/
https://www.amazon.com/gp/product/B00AYJ0B7Y/ref=ppx_yo_dt_b_search_asin_title?ie=UTF8&psc=1
For very occasional soldering that doesn't involve small things, a Weller SP40 is a good choice. Also, I've never used it, but if you're after the absolute cheapest, Sparkfun has a very cheap iron.
For more control (smaller tips, better temperature control, etc), I'd take a look at these:
Sparkfun 50W
Weller WES51
Hakko FX888D
this is what i bought
http://www.amazon.com/Weller-SP40NKUS-Watt-Soldering-Black/dp/B00B3SG7F0/ref=sr_1_40?s=hi&ie=UTF8&qid=1465181784&sr=1-40&keywords=soldering
http://www.amazon.com/ATH-M50-ATH-M50s-MDR-7506-Headphones-Replacement/dp/B00PL8BLP4/ref=sr_1_1?ie=UTF8&qid=1465181830&sr=8-1&keywords=mdr+7506+replacement+cord
its the golden aux input thing. when i spin that in whatever hole i put it into then at the right angle the sound comes back into the right ear pad. it stays there even if i move it a little.
I just ordered components to make my first box mod, but have done small electrical work before.
Helping Hands will make your life much easier, may not be necessary if you only intend to make one mod.
a decent digital multimeter is required, as is a Soldering iron.
A Breadboard is very useful to ensure everything works as it should, before you have it all finished and put in the case.
those are all I can think of right now, sure there are others people use regularly though
Ive been using this for few months. Didnt run in to any issues whether it was for SMDs, Switches, and etc. If you want to try it out for yourself, just remember to take your time with it and you should be fine.
Soldering is really easy but it takes some practice beforehand. Grab something old that isn't being used anymore (or find something that someone left at the corner near their garbage can) and take it apart. Desolder some stuff and practice soldering it back on. Also, don't buy cheap junk, you don't need a $200 iron, but don't get one of the $5 irons off ebay either. I use these:
Weller Iron: http://www.amazon.com/dp/B00B3SG7F0/
Solder: http://www.amazon.com/gp/product/B000G31N8Y/
Desoldering Pump: http://www.amazon.com/dp/B00QTGEL18/
If you are willing to drop a little bit of coin, but don't want to go too crazy this guy is pretty popular: http://www.amazon.com/dp/B000AS28UC/ref=wl_it_dp_o_pC_nS_ttl?_encoding=UTF8&colid=33Z9SEU0RU74U&coliid=I177ELVX243CET
For starting out, and into the foreseeable future, one like this would probably server you just fine: http://www.amazon.com/Weller-SP40NKUS-Watt-Soldering-Black/dp/B00B3SG7F0/ref=sr_1_2?s=hi&ie=UTF8&qid=1421030141&sr=1-2&keywords=weller+soldering+iron
What was it? I need one for replacing blown capacitors and was looking at the Weller SP40.
http://www.amazon.com/Weller-SP40NKUS-Watt-Soldering-Black/dp/B00B3SG7F0
I don't think this comes with a stand. I have the $40 Weller one.
I just ordered 3x digital temp control switch for $10.80 shipped. Also 3x 3 pin fan controllers for $7.17 shipped. Along with a few different 4 pin and 3 pin fan plugs and adapters. New Weller 40w soldering pencil for <$20 after 20% discount.
I'm ready to automate my fans! :D I'm hoping to run 2 thermostats and 2 fans from one DC 12v psu. I'm thinking something like exhaust starts at a lower temp, like 71.6F/22C, and stops at 68F/20C; intake starts at 80F/27C, and stops at 75F/24C. Give or take a few degrees..
I'll just recommend these:
https://www.getfpv.com/ts100-digital-oled-programmable-interface-mini-soldering-iron.html <----- Fantastic portable and desktop but best if you need portable. I own this one.
https://www.amazon.com/Aoyue-Variable-Soldering-Station-Removable/dp/B00MCVCHJM?ref_=ast_bbp_dp60W so you can split the diff.
https://www.amazon.com/Aoyue-9378-Programmable-Digital-Soldering/dp/B00BSW69LI?ref_=ast_bbp_dp <---- I own this one. Works very very well.
Never owned a Weller that I've liked.
I just bought this off Amazon to do soldering related projects with my pi.
http://www.amazon.ca/dp/B00BSW69LI/ref=sr_ph?ie=UTF8&amp;qid=1419892846&amp;sr=1&amp;keywords=aoyue+soldering
I haven't had a chance to test it out yet but the reviews seem good and from the research that I did, the brand is pretty good
If you plan on taking it further than just simple mods a couple times a year, I recommend spending a little more if you can. You don't have to go crazy either. I know that a lot of people go the Hakko or Weller route, but I've been very happy with my Aoyue 9378. Here is the Aoyue 937+ which is cheaper (45w vs 60w and a couple other things). Like others have said, get some wick and grab one of these over the sponge crap.
EDIT: Oh, and pick up some flux. There are flux fans and some that use it sparingly, but just pick it up.
Also, this goes much further than just installing a battery holder, but check out Voultar's videos to watch some technique. He's also a liberal flux / No Clean user and you'll see why.
Can I get your guys opinion on this one?
http://www.amazon.ca/dp/B00BSW69LI/ref=cm_sw_em_r_am_wp_am_ca?ie=UTF8
I've had it in my cart for almost a month now and I'm thinking I might pull the trigger. Currently I'm limping along with a $12 soldering iron from radio shack that's probably 15 years old.
Thanks!
It's a Weller 23w basic iron. I had my eye on this model a while ago, I think it was available for <$100 But it never made the top of my list when I was buying stuff.
You definitely want to get a soldering station. So something that can control the temperature of the of the iron. The reason being is the ones that just plug into the wall usually fluctuate between extremely hot and very hot which can become if you’re trying to solder next to very delicate transistors on the pcb.
I know people say you can get away with the cheapest everything but that’s usually not the case at all and sometimes dangerous to your health.
Getting good solder, tip tinner, brass sponge, flux pen, and a fan with a carbon filter will do you great things.
The fan is extremely important when your desoldering as that will give off a tonne of chemicals.
This is what I personally have
https://www.amazon.com/gp/aw/d/B00BSW69LI/ref=ya_aw_oh_bia_dp?ie=UTF8&amp;psc=1
https://www.amazon.com/gp/aw/d/B074J6R1KQ/ref=ya_aw_oh_bia_dp?ie=UTF8&amp;psc=1
https://www.amazon.com/gp/aw/d/B001W2XZOS/ref=ya_aw_oh_bia_dp?ie=UTF8&amp;psc=1
https://www.amazon.com/gp/aw/d/B00FZPGDLA/ref=ya_aw_oh_bia_dp?ie=UTF8&amp;psc=1
https://www.amazon.com/gp/aw/d/B00NS4J6BY/ref=ya_aw_oh_bia_dp?ie=UTF8&amp;psc=1
The soldering iron is overkill if you’re just using it for trains
Eh, soldering just takes a bit of practice, and there are tons of Youtube videos that explain in detail the best ways to do so.
(I'd recommend this channel https://www.youtube.com/channel/UChbLnX8JcsN9bH4BNgJZ6wA)
Really it's all about not holding the iron on the board too long. Once you get that down, it's easy. Learning the wire gauges and all that is also very easy as most boards have recommendations in the paperwork. (if it carries power, big wire... If it carries signal, smaller wire). These new DNA boards are about the easiest thing ever to work with, and even someone with little to no experience could solder them with ease. (now the DNA20/30/40, notsomuch)
If you're looking for a good soldering iron, you want something with wattage control, and while weller has been the standard for decades, they are overpriced and a bit hardcore unless you are a pro. I'd highly recommend the Hakko FX888D http://amzn.com/B00ANZRT4M which is what pretty much everyone uses, or what I personally use, the Aoyue 9378 http://amzn.com/B00BSW69LI which has served me very well. There are others for considerably less, and if you aren't planning on making this a hobby, then something like the Aoyue 469 http://amzn.com/B00MCVCHJM would be perfectly fine. (60w is about a low as you'll want for a variable wattage iron, so you'll have a little wiggle room)
This looks pretty decent
https://www.amazon.ca/dp/B00GIKVP5K/ref=cm_sw_r_cp_awdb_f0BCyb94CVFXW
Source: https://youtu.be/gKGjxq96m-o
I have a very similar vise in my workshop. Works great and I love it, but third-hands are amazing if you get a good one. I tried this one out after seeing the amazing reviews on Amazon and was not let down. Having 4 clamps instead of 2, and having them be able to lock down makes a world of difference.
https://www.amazon.com/QuadHands-Helping-Hands-Third-Soldering/dp/B00GIKVP5K
I also have one like this, only not quite as expensive:
https://www.amazon.com/Tools-004-570-Regular-Soldering-Station/dp/B01579QJYO/ref=sr_1_95?s=hi&amp;ie=UTF8&amp;qid=1518811625&amp;sr=1-95&amp;keywords=third+hand
I used to have one of those. The magnifying glass (plastic) broke off almost immediately.
I'd like to get this, but it is way more expensive...
https://www.amazon.com/QuadHands-Helping-Hands-Third-Soldering/dp/B00GIKVP5K/ref=sr_1_6?s=hi&amp;ie=UTF8&amp;qid=1495130651&amp;sr=1-6&amp;keywords=helping+hands
Haha, completely self taught through trial and error, thanks! Having the right kind of paste flux and magnification helps. I’ve also purchased one of these to help keep things steady with this and future jobs.
QuadHands Helping Hands Third Hand Soldering Tool and Vise
https://www.amazon.com/dp/B00GIKVP5K/ref=cm_sw_r_cp_api_Oh.MBb478C70E
My business partner and I just started making our own cables in December. We use Switchcraft connectors (personal preference) and Canare Star Quad cable. It hasn't been too hard to learn on star quad. We use a Weller WES51 which is around $85.
Also recommend a brass sponge and this helping hands tool if you have the budget for it.
EDIT: Neither one of us had really soldered much before, but we did have someone showing us how to do it. So Quad-Core might be tough if you're totally trying to teach yourself.
This one is really good:
https://www.amazon.com/dp/B00GIKVP5K/ref=cm_sw_r_cp_apa_Gx0ryb2535NT7
Shows out of stock on Amazon right now though.
Continued.....
Ok, so for the electronics:
Get a solder sucker for all the electronics work. This guitar has leaded solder, and a lot of what you find in stores now is lead-free. Mixing those two can cause bad solder joints, so it's best to remove all the old solder and start fresh (assuming the solder lugs and eyelets hold up).
I'd start with testing the pickups to see if they work. This is easy - just hold the leads on a cable plugged into an amp (one on the tip, one on the sleeve) and they'll pass signal if they work. You can either tap the pole pieces with a screwdriver or anything that sticks to a magnet, or hold the pickup to the strings of another guitar. You can also take ohm readings of the coils, but this tests the entire unit to see if it generates signal.
After testing the pickups, I'd replace the jack and battery connections, tag all the switches and pots with electronics cleaner, and test all these parts with a multimeter to see that they work. This would isolate any electronics issues to just the circuitry on the board.
That circuit is actually fairly simple, but you have some components that might give you problems. Those metal cylinders with three orange wires coming out look to be old school transistors. The problem is, I don't see any markings on them to let you know what variety they are or which leg is which. This means that if you have to rebuild the circuit, you can't replace these or lose track of where the legs are connect. You also have to just hope that they still work. If you get it all together and it still doesn't have signal, you can never know with 100% certainty that the problem is or isn't these parts.
Past that, the rest of components are very straightforward - just caps and resistors. You can replace all these if you want just going off the labels. It's not a terrible idea to replace all the capacitors. The material they're made from degrades over time, so even if they work, they certainly won't be operating to the specs printed on the label.
Soldering is a good skill to have, in general.
And if you're careful, there's not much you can screw up.
Watch a YT tutorial or two and you'll be good to go.
For tools you'll eventually want what is in this kit, but probably not that kit itself.
I bought a Weller WLC100 40 watt kit (definitely get a norrower ST2 or ST3 tip as well), a solder sucker tool (you can use desoldering wick, but the solder sucker is worth the money), a Helping Hands and 60/40 rosin-core solder.
In addition, I like using tip tinner, a wire tip cleaner like this because I found that using a wet sponge reduced the tip temperature too much.
Also, solder fumes are not great so only do this is in a well-ventilated area. I like to use a small fan to blow the fumes away from my face.
The only thing you'll need to do is desolder/clip the existing swtich and wire up the replacement. You don't have to mess with the pots or caps unless you want to.
Phostenix Tele diagram page.
edit: fixed solder type
I ordered one of these. Should I cancel the order?
https://www.amazon.com/dp/B014KBIB3M/ref=cm_sw_r_cp_api_i22IybS6JXTXR
That's what I'm using. I didn't suggest it because Amazon is out of them. You can look for something similar.
I think this is the iron I used.
It is 25w but I would question the efficiency of a 25w soldering iron from the 50s....
If you feel you need one stronger, and don't need the practice boards:
https://www.amazon.com/Vastar-Adjustable-Temperature-Soldering-additional/dp/B014KBIB3M/ref=sr_1_1?ie=UTF8&amp;qid=1465916565&amp;sr=8-1&amp;keywords=soldering+kit+50w
From my tools wishlist. You can make all sort of electronics, if you know how to wire them right.
/u/kerjigger I summon you.
This is under $20. The only other thing I would add is a decent stand with a sponge tray which should be under $10. If you need more solder get 60/40 rosin core. I actually recommend 63/37 rosin core because it reduces the chance of a bad joint due to movement while cooling.
Here's an ARF (Almost Ready To Fly) drone kit that's around your budget ($194) Make sure to add FPV if you want to see what your drone is seeing:
http://www.miniquadbros.com/collections/frontpage/products/miniquadkit?variant=5994973827
__
You're also going to need some other equipment to get you up and running:
OPTIONAL:
The reason why this is optional is because there's two ways of flying a quadcopter.
There's Line-Of-Sight (LOS) flying, where you don't see what the drone sees and fly it from your sight. This can save you money since you don't need video equipment.
Then there's First-Person-View (FPV). This adds so much immersion and fun to your drone! However, you should keep in mind that adding this on will set you up for another $100-150 for something mediocre/beginner.
__
Yes yes I know, the hobby is VERY expensive, even for beginner equipment. But there's a saying that goes like this, "Buy it nice or buy it twice". I've spent easily $750 in my first months of drone building.
If the price puts you off, you can purchase this which comes pre-assembled. All you need is to add your radio receiver and video antennas (if you're doing FPV).
__
Hopefully the amount of information supplied isn't too much. If you have any questions, just PM me! I'll be glad to help :) /r/multicopter
I ordered This $17 Vastar about six months ago and have been very happy with it.
https://smile.amazon.com/NTE-Electronics-SW02-10-No-Clean-Solder/dp/B0195UVWJ8/ref=sr_1_4?s=hi&amp;ie=UTF8&amp;qid=1498369574&amp;sr=1-4&amp;keywords=solder+wick
This is what I got and it works pretty well. Try adding a little more solder so the wick can get better access to what's left and take it all away.
The wires have to be disconnected, otherwise you will be measuring the parallel resistance of the speaker and the crossover board, which is different than just the speaker alone. Since parallel resistance is always less than the lowest of the separate resistances, that means the board could read 8 and your speaker could read 50 and your meter would say 6.9 measuring them together.
The sticker on the side says it's a 6 ohm, so it should measure somewhat close to that. If you get some solder wick and a solder sucker, de-soldering becomes much easier.
The backs of those tweeters do look different. Is that black part on the back the magnet, or is it a plastic cover? It makes me think maybe someone has been in these speakers before trying to figure out what was wrong with them. Although, it could be that they're just a different year and design than the other ones. Testing them will at least give you a rough idea if the voice coils are shot. You could replace them but if that doesn't fix the problem, then you've spent a lot of money for nothing. I prefer to test things and only replace the broken parts.
If you're convinced there is something wrong with these speakers, and you can't find anything wrong with the tweeters, then I think you may have no choice but to dig into the crossover board. It's the most likely culprit. The nice thing is, caps are not all that expensive, they're just a lot of work.
On the high end stuff, sometimes the crossover is integrated with the wire hookups, so you unscrew that from the back and pull it out. But if these don't have anything like that, you might have to take out the woofer. Make sure you save all the stuffing and put it back when you're done. Either way, there should be a way to access the board, usually either through the back or the woofer hole if the cabinet is glued together.
Still, make sure you double check everything upstream before you tear these speakers apart. This really sounds like an amp or a source problem.
Don't use lead free solder, ever. Use rosin core, use a good solding iron.
Good solder
https://www.amazon.com/dp/B00DKF13JY/ref=cm_sw_r_cp_apa_KQKdAb2SRMP17
Good soldering iron
https://www.amazon.com/dp/B01MDTO6X7/ref=cm_sw_r_cp_apa_8TKdAbNTRP60A
Build Your Own Clone
I doubt you'd keep track of any more websites I could mention above once you find a few kits there. As far as equipment goes, get:
A decent soldering iron ... Alternative (please also get this with the alternative)
Solder
Micro Cutters to trim leads
Hopefully you have a small flat-head screwdriver to set knobs and a small flat pair of pliers to attach hardware to the enclosures.
I doubt you'd need to but if you ever need to get any components that aren't supplied with a kit, go to Tayda Electronics for nearly any part (they tend to be cheapest for hobbyists, you can find anything from passive components like resistors and capacitors, to knobs/switches/audio and power jacks, etc.).
The counterfeit isn't a bad counterfeit, some people even like it more than the original. If you can get it for significantly cheaper then go for it, just don't buy it for anywhere near the price of a non counterfeit item.
There is another one you can get for about 60% of the cost called the TS100, it's a pretty quality iron https://www.amazon.com/Programmable-Pocket-size-Soldering-Interface-Acceleration/dp/B01MDTO6X7/
I've managed to desolder a couple hundred switches now with a $20 kit off amazon and it's still working fine.
If you really just need it for a small project, no need to invest much.
An IC puller (not the cheapest place, but it's fulfilled by Amazon so it won't take forever to arrive at least.) makes releasing the switch from the plate so much easier as well. Just squeeze the tabs at the top and bottom of the switch.
Depending on the kind of solder they used and what's in the way, you may be able to use the method I described here to pop the switches out really quickly as well with it.
But generally watch some tutorials, and never pull too hard. If the switch is really not coming out, don't force it. That's how you rip up pads/traces. Adding more solder to help the heat reach all the way through and starting over is a better solution.
Heres a good middle of tbe road kit I'm thinking of buying myself off of amazon, it even has a desolder pump sucker. It is the Soldering Iron Kit, Including 60W Temperature Control Soldering Iron with ON/OFF Switch, Tips, Solder Sucker, Desoldering Wick, Solder Wire, Anti-static Tweezers and Stand with Cleaning Sponge https://www.amazon.com/dp/B01MR65RJD/ref=cm_sw_r_cp_apa_7ZzHAbYM5ZP5A
https://smile.amazon.com/Soldering-Including-Temperature-Desoldering-Anti-static/dp/B01MR65RJD/ref=sr_1_11?s=hi&amp;ie=UTF8&amp;qid=1495560179&amp;sr=1-11&amp;keywords=soldering+iron this one comes with everything you'll need and then some and gets good reviews.
I have this one https://smile.amazon.com/X-Tronic-3020-XTS-Digital-Display-Soldering/dp/B01DGZFSNE/ref=sr_1_14?s=hi&amp;ie=UTF8&amp;qid=1495560179&amp;sr=1-14&amp;keywords=soldering+iron and absolutely love it, but it doesn't cost a bit more.
https://www.amazon.com/dp/B01MR65RJD?psc=1
if its only for one time...
I decided to setup a spare pc on this desk... many workbenches I've been researching included one and it does make sense.
Just ordered Soldering Iron Kit, https://www.amazon.com/dp/B01MR65RJD/ref=cm_sw_r_cp_api_fzBxzbDWE45QX due to its very high rating and reviews.
The multi tool is still under investigation.
Came with the iron. I believe it is this kit on amazon:
https://www.amazon.com/Soldering-Including-Temperature-Desoldering-Anti-static/dp/B01MR65RJD/ref=sr_1_11?s=hi&amp;ie=UTF8&amp;qid=1520309067&amp;sr=1-11&amp;keywords=soldering+iron
I used these fans:
https://www.amazon.com/gp/product/B071WMHNG5/ref=oh_aui_detailpage_o07_s01?ie=UTF8&amp;psc=1
https://www.amazon.com/gp/product/B009NQLT0M/ref=oh_aui_detailpage_o07_s01?ie=UTF8&amp;psc=1
This soldering iron:
https://www.amazon.com/gp/product/B01MR65RJD/ref=oh_aui_detailpage_o05_s00?ie=UTF8&amp;psc=1
The screws mentioned in the video (bought them, and used the ones that came with the printer)
And I printed off these files:
V2_5015_CR10_tevoEZPrintDuct4
v2_CR10_TevoGeneric_Base
v2_CR10-TevoWireStrain
Is this a good place to start
Soldering Iron Kit, Including 60W Temperature Control Soldering Iron with ON/OFF Switch, Tips, Solder Sucker, Desoldering Wick, Solder Wire, Anti-static Tweezers and Stand with Cleaning Sponge https://www.amazon.com/dp/B01MR65RJD/ref=cm_sw_r_cp_apa_iJGHAb8XDC58B
additional parts
ribbon cable
Pro micro 3 pack
solder
Flux
Solder Wick
EDIT
In case you lose your marbles