(Part 3) Best replacement parts according to redditors
We found 9,935 Reddit comments discussing the best replacement parts. We ranked the 5,520 resulting products by number of redditors who mentioned them. Here are the products ranked 41-60. You can also go back to the previous section.


![6 Way Blade Fuse Box for Automotive [ATC/ATO Blade Fuses] [100 Amp][LED Indicator] [Protection Cover] [10-30V DC; 12V] Auto Marine Fuse Block](https://m.media-amazon.com/images/I/51UG0KP8TNL.jpg)


My friend spotted this vehicle in a public parking lot in SF Bay Area.
Additional photos:
http://i.imgur.com/dfJXcn6.jpg
http://i.imgur.com/uulAUJc.jpg
http://i.imgur.com/Qrbfmxx.jpg
Anybody any more information on what this is?
edit: A few more pics:
Not radar, but IbeoLux modules: Actually 2 there are 2 on each rear side looking sideways, two more on the rear bumper looking backwards, and two more under the front headlights looking forwards. http://i.imgur.com/ez0tlee.jpg
Also, there are two rectangular panels adjacent to the front radar. (Looks like a Delphi ESR 2.5 Radar ) http://i.imgur.com/703JyDp.jpg
There are Lidars on the right side mirror too. The molding looks perfect. http://i.imgur.com/ruKO5ee.jpg
2 Garmin GPS antennas on the back roof roof corners near the rear window. http://i.imgur.com/nx0VAQh.jpg
Lastly, there is a 'NOCO Genius GCP1' power port on the front bumper, adjacent to the 80/20 beam, which is probably used to provide power to whatever additional equipment they screw into the beam. http://i.imgur.com/SqCbiMF.jpg
My conclusion is that this is NOT a Tesla prototype, rather some small company who is working on self-driving/computer vision software. I'm not sure why they would choose a Model S for this though, except perhaps because they want to sell their software to Tesla, or perhaps they are a Tesla partner which has managed to get access to the control systems for steering, braking and speed.
https://www.amazon.com/COGEEK-Mini-Universal-Decorative-Spoiler/dp/B01KQ3D81S
You can buy it here
it's a tiny spoiler
like this
Amazon link.
Found it on amazon.
https://www.amazon.com/COGEEK-Mini-Universal-Decorative-Spoiler/dp/B01KQ3D81S
You can get reflective tape in several colors. Here's a link to a roll of black tape (reflects white):
https://www.amazon.com/3M-Scotchcal-Reflective-Striping-Black-5-Inch/dp/B00063XI64
Last summer's bike show had a vendor giving out samples of their tape - it was a matte-black finish that reflected white. I stuck the sample on my matte-black Jamis commuter and it's damn near invisible in daylight.
This rally-style mirror is too awesome to not use
Charging the battery while driving is pretty simple but took me a year to figure out how simple it was. Hopefully you are planning on using a trailer wire junction box. If so, run a 14ga wire from the junction box (that connects to your truck) to the positive side of the battery. Add something like this inline between the junction and the battery for safety. https://www.amazon.com/Fastronix-Automatic-Reset-Circuit-Breaker/dp/B07NSD3KYH
For shore power, I used one of these on the side of the camper which then runs to a 2 amp charger that charges the battery. In hindsight, I should of done a 4 or 5 amp charger.
https://www.amazon.com/NOCO-GCP1-16-Inch-Integrated-Extension/dp/B009ANV81S
​
Solar, do as other have said and get a controller.
I just upgraded the lights on my kawasaki, so I got all this worked out.
For the fast/4-way flashing issues, I can't say if they will effect your bike. I have a feeling they will, and if they do you know how to address them. All in this upgrade runs about 90 bucks, minus 17 if you decide to stick with halogen rear turn signals.
​
Good lord that's a long post
Just put a wing on it!
When I bought my 2011 Prius the cigarette lighter socket was completely dead. My fuses in the fuse box tested good (continuity test). Turns out there is an inline fuse on the socket itself that was blown. I pulled the socket out and replaced it with this: https://www.amazon.com/gp/product/B01N6S2SNM works perfectly!
You should pop one of those Tiny wings on it haha
They usually have a little springy cable that connects to your seat or handlebars as a reminder to remove the lock... because yes, if you try to ride it with the lock still on, you're gonna have a bad time
​
https://www.amazon.ca/Master-Lock-8303DPS-Disc-Brake/dp/B0009V1WR0
​
This kind of thing is what Speedyworm is talking about, I think.
All I needed to do after converting my battery voltage to 12 volts was wire up a few switches and a blinker relay. Here is the tail light and blinker relay
Taillight: Greenclick 40W Motorcycle Tail... https://www.amazon.com/dp/B072Q5MK75?ref=ppx_pop_mob_ap_share
Blinker relay: AUDEW 2-Pin Electronic Turn... https://www.amazon.com/dp/B011BTMDQM?ref=ppx_pop_mob_ap_share
They also have hideaway plates that attach to the underside of your front end. I forget the prices, like $50 for the regular option. $150-ish for the motorized, remote controlled mount.
http://www.hidetheplates.com
You can also get four pack of tiny suction cups for $4 to attach the plate to the inside of your windshield. Just make sure it's not obscured or tucked into anything, must be readily and easily visible. I always kept mine just high enough so that it appeared directly above my resting wiper blade.
http://www.amazon.com/Cruiser-Accessories-78410-Suction-Clear/dp/B00032KBEA
Then I just stopped rocking a front plate all together. No problems in two years. <3 you Texas.
Beautiful car, and great photos!
Clear side markers are available here, and install in minutes.
Also, if you need to temporarily attach a front license plate when parking (e.g. street parking in VA cities), these work well.
Enjoy your new ride, and I hope the break-in period goes quickly!
Bought here and took about 20 mins of some steady Xacto knife skills
Only name-brand that makes something like this is iSimple, but it's twice the price of the other options, only has 1 port, only does 1A, and is still made in China.
Point is, they're all cheap crap from China, even if you're buying name brand and paying twice as much.
These devices are extraordinarily simple and cheap to make, there's nothing that's going to explode, and nothing is going to melt and catch fire (especially if you use a fuse).
2.4A isn't a standard amperage, so a real 2.4A USB is pretty uncommon, especially in this form factor (it's usually a 2.1 that they over-rated so you'll pay more).
Here's a decent option
https://smile.amazon.com/Dorman-929-301-Leaf-Spring-Cherokee/dp/B005VPS358/ref=sr_1_1?ie=UTF8&amp;qid=1492782578&amp;sr=8-1&amp;keywords=jeep+cherokee+rear+leaf+springs
using something like this:
http://www.amazon.com/Shipping-CIRCUIT-BLADE-PROFILE-FUSETAP/dp/B00K17A2E6
Allows you to tap into an existing fuse slot fairly easily, its pretty much unplug a fuse, plug it and two fuses in.. then you can wire to the existing wire and a metal to the frame point under the dash.
I have done this with my car since my cigarette lighters are always on.
I used it to wire one of these in: http://www.amazon.com/uxcell%C2%AE-Charger-Cigarette-Lighter-Female/dp/B00EZJBELQ
And I just plugged my cam into that.
Well, I have a splitter on that now and my cam and gps are on it.. but same thing..
https://www.amazon.com/COGEEK-Mini-Universal-Decorative-Spoiler/dp/B01KQ3D81S
Hey dude!
https://www.amazon.com/Parts-Express-Water-Resistant-Fuse-Holder/dp/B0002KR88A
Just make sure that's crimped/spliced somewhere between the positive lead of the battery and your fishfinder. Very Bad Things can happen should your fishfinder get dunked without it in place.
I'm guessing Amazon.
You're looking for black, engineer grade/type 1 retroreflective tape.
http://reflective-tape.com/black-retro-reflective-tape/
http://www.colebrothers.com/reflective/index2.html
http://www.amazon.com/3M-Scotchcal-Reflective-Striping-5-Inch/dp/B00063XI64
http://www.amazon.com/3M-Scotchlite-Reflective-Striping-50-Foot/dp/B0010ASWF4
The amazon links aren't a great deal. You can get 150', instead of 50', of 1" tape for the same price off the other links.
https://www.amazon.com/Fit-System-RM011-Clip-Mirror/dp/B001A0J2JO
There's an example. It's nice, especially in full speed traffic on the freeway and you're worried the asshole in front of you is going to brake check you the moment you turn your head.
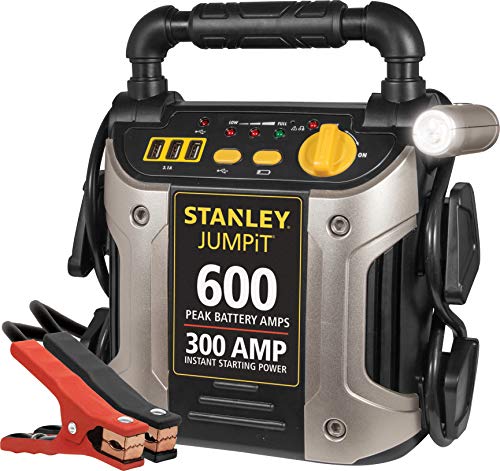
Hope you got a jump. You should invest in one of these: http://www.amazon.com/Stanley-J309-300-Jump-Starter/dp/B001U04NCA/ref=pd_cp_hi_1
Check last week's thread on this. In short, read the reviews on Amazon. They are not good. I would stay away.
Second, do not waste your money on a lithium jump starter. Again, check the reviews - don't just look at the star rating, but read them. They fail quickly and often dangerously. NOCOs are especially notorious for the charging circuitry blowing itself up and not working anymore only a few months after purchase. And that's the leading brand for the market... you want to carry a Chinese Taobao special lithium battery in your trunk all the time?
Finally, to answer your question, if the car's battery is totally dead, no, probably not reliably. The CVPI's starter draws around 200 amps. This battery will not be able to supply that reliably. The 600 peak amp rating is total marketing wank and means basically nothing. The 300 starting amp rating is only for 32° F or above for 5 seconds when the battery is brand new and fully charged. Your typical car battery is rated in cold cranking amps, which is measured at 0° F for 30 seconds. A CVPI's starter may only draw 200 amps, but most car batteries you find for the CVPI will be 500-1000 cold cranking amps.
I would look at one of these. Even the higher-spec Stanley units have bad reviews across the board.
this is the one I have
Never let me down.
I can't answer all of your questions but I can say that yes the batteries should have been left on a trickle charger over the winter.
The symptoms all seem to just point to dead batteries, hopefully after charging for a couple days they'll regain their ability to hold a full charge.
As far as jump starting, I see no reason why you would not be able to, as long as your truck's battery can provide similar cranking amps.
For my merc 5.7, I use a dual purpose for starting the engine and deep cycle for boat electronics. I've got them wired with this guy: https://www.amazon.com/gp/product/B00400IYTK/ref=oh_aui_search_detailpage?ie=UTF8&amp;psc=1 that way both can charge when the engine is running and I don't have to worry about the boat electronics draining my starting battery.
If you want to do a full suspension redo, not just add a leaf this is what I did. I didn't do sway bar disconnects.
Skyjacker 0-3inch shock absorbers
Dorman leaf springs ~2" http://www.amazon.com/Dorman-929-301-Leaf-Spring-Cherokee/dp/B005VPS358
Moog coil springs:http://www.amazon.com/Moog-CC782-Variable-Rate-Spring/dp/B000C53ZSC/ref=cm_cr_pr_product_top
lets take the lift out of the equation here...
http://www.amazon.com/Dorman-929-301-Leaf-Spring-Cherokee/dp/B005VPS358/ref=sr_1_1?ie=UTF8&amp;qid=1395953396&amp;sr=8-1&amp;keywords=jeep+cherokee+rear+leaf+spring
still 100 bucks a spring for a OE style replacement. I'm not trying to bust your balls here man, just saying leaf springs are more expensive then coils any day.
coils:
http://www.amazon.com/Moog-CC782-Variable-Rate-Spring/dp/B000C53ZSC/ref=sr_1_13?ie=UTF8&amp;qid=1395953494&amp;sr=8-13&amp;keywords=jeep+cherokee+front+coil+spring
61 for a pair of stock height, with free shipping!
http://www.amazon.com/dp/B005VPS358/
Not "HD" springs but they include bushings and are under $100
So here she is... I'm planning to give some attention to the suspension because as you can see she is a bit slouched. I don't want to get to high so I'm looking at just replacing the leaf springs with these; https://www.amazon.ca/gp/aw/d/B005VPS358/ref=ox_sc_act_image_1?smid=A1VMTU9W4873PK&amp;psc=1
and the coils with these;
https://www.amazon.ca/gp/aw/d/B000C53ZSC/ref=ox_sc_act_image_3?smid=A3DWYIK6Y9EEQB&amp;psc=1.
However these are spec'd to provide some over stock height by 1.5" - 2"
Therefore I am wondering if the shocks that come with this rough country 1.5" lift will work. http://www.roughcountry.com/jeep-suspension-lift-kit-680-20.html
Really happy to be a part of this group and appreciate all advice and critique!
I did spraypaint them with a metallic gold (they were black). I put an old jack in there to keep paint from seeping into the input itself. The power input was on Amazon and the paint job definitely adds a little steampunk/vintage vibe, since it didn't coat the rubber it looks kind of tarnished.
[this] (https://www.amazon.com/Universal-Power-Actuator-12-Volt-Motor/dp/B00CZBQCR2/ref=sr_1_1?ie=UTF8&amp;qid=1467696805&amp;sr=8-1&amp;keywords=car+door+lock+actuator)
Yes. I have a pioneer w4400nex in my 2018 wrx base model. Great headunit with wireless CarPlay. It’s relatively plug and play with a harness from autoharnesshouse. Here are all the links:
AutoHarnessHouse Aftermarket... https://www.amazon.com/dp/B07GD8627K?ref=ppx_pop_mob_ap_share
Direct wire harness for Pioneer... https://www.amazon.com/dp/B078GBDRVX?ref=ppx_pop_mob_ap_share
Maestro ADS-MSW Universal Analog Steering Wheel Interface https://www.amazon.com/dp/B00J4W10XG/ref=cm_sw_r_cp_api_i_Jg22Db6PFF6R1
Need this to connect FM radio to new Headunit:
Aftermarket Radio Antenna Adapter by Vehicle Aerial Stereo Converter Cable, DIN (Motorola Type) to Antenna Terminal https://www.amazon.com/dp/B07QNL9QQ8/ref=cm_sw_r_cp_api_i_7l22DbVWFF1K2
Need this if you want to retain factory USB port:
Metra Electronics AX-SUBUSB Multicolored Subaru 2011 & Up 4-Pin USB Adapter https://www.amazon.com/dp/B00JYTLW14/ref=cm_sw_r_cp_api_i_do22DbN1SNNSH
This is the dash kit to make the headunit fit properly:
https://www.crutchfield.com/p_142SU2031B/Scosche-SU2031B-Dash-Kit-Gloss-Black.html
Those are all the harnesses/wires you’ll need to make it plug and play. The USB adapter might not work if your car has 2 USB ports in the center console. This shouldn’t be a problem anyways since CarPlay is wireless. The USB ports will still charge your phone regardless. If you have the base wrx, it’ll be fine. On YouTube there are plenty of install vids if you ever feel confused.
Edit: the guy from autoharnesshouse (Brian) is also very friendly if you have any questions about the harness, just email him.
Any double din will fit, but you will have space on the sides. Im not too sure about other years but I know the 2017 brz has a trapezoidal shaped head unit.
There is one headunit that will fill in the gaps. I cannot remember what its called atm.
Edit: Also you will need to either create a harness or buy one. I have this one and its completely plug n play. If you want your steering wheel controls to work youll need one of these. This is exactly what I have and it is super easy to use, once you figure out the vague instructions.
Edit2: my link to the harness doesnt seem to be going through. www.autoharnesshouse.com/67122.html
Edit3: The stock units are 200mm.
Hey y'all! Some of you asked about mods so here is a full list of what I have done so far with links.
Radiator guard - Has a nice little FZ-07 etched at the bottom.
https://www.amazon.com/gp/product/B075MCXCM7/ref=oh_aui_detailpage_o08_s00?ie=UTF8&amp;psc=1
Shorty levers - Mine are gray but they come in lots of colors.
https://www.amazon.com/gp/product/B0197N3KA2/ref=oh_aui_detailpage_o03_s00?ie=UTF8&amp;psc=1
Bar end mirrors - You can find these for less but I chose these because the reviews indicated that they might be better quality than others.
https://www.amazon.com/gp/product/B00Q3UL6S6/ref=oh_aui_detailpage_o06_s00?ie=UTF8&amp;psc=1
Yoshimura fender eliminator - Kinda pricey for what it is but it looks really nice.
https://www.amazon.com/gp/product/B00T6J9IM2/ref=oh_aui_detailpage_o05_s00?ie=UTF8&amp;psc=1
Motodynamic integrated tail light - I also looked at the TST but after looking at some videos decided on this one.
https://www.amazon.com/gp/product/B015NN3YUG/ref=oh_aui_detailpage_o04_s00?ie=UTF8&amp;psc=1
Proton 500 flush mount LED - These things are brighter than the sun. You can also change the signal pattern which I thought was cool.
http://www.hightechspeed.com/products/Proton500/yamaha.html
Flasher relay - Prevents hyper flash and let me get rid of resistors.https://www.amazon.com/gp/product/B00RM26LXO/ref=oh_aui_detailpage_o01_s00?ie=UTF8&amp;psc=1
Stompgrip volcano black - I really like these and they have great grip. You can also get them in clear from their website if that's your thing.
https://www.amazon.com/gp/product/B018NH74BE/ref=oh_aui_detailpage_o00_s00?ie=UTF8&amp;psc=1
Akrapovic TI - This exhaust sounds sweet, I also purchased the CAT for it through cyclegear.
https://www.amazon.com/gp/product/B00L44J56G/ref=oh_aui_detailpage_o02_s00?ie=UTF8&amp;psc=1
Other mods that i'm considering in the future
Stainless Steel braided brake lines, FTECU on the bike flash kit, T-Rex Racing no cut combo.
Bonus - https://i.redd.it/en8vfnpv46u01.jpg
Try new relay. Just switched mine and it worked. If it's 2 prong try this one:
AUDEW 2-Pin Electronic Turn Signal Flasher Relay Fix Motorcycle Turn Signal Hyper Flash https://www.amazon.com/dp/B011BTMDQM/ref=cm_sw_r_cp_apa_i_hl0KDbNXGA6KB
You need to replace the flasher unit with a led one. I got mine on Amazon {https://www.amazon.com/gp/product/B011BTMDQM/ref=oh_aui_detailpage_o02_s00?ie=UTF8&amp;psc=1}
Design Engineering 010378 Engine Fuel Rail and Injecter Cover (Jeep, 4.0L) https://www.amazon.com/dp/B015NOKWQY/ref=cm_sw_r_cp_api_3frMBbCHHJP47
Oddly my Amazon is showing it as unavailable but that is the way to go, if you still have issues after that then check your fuel pressure at the rail.
Spoiler
I was concerned about that too since I love listening to music and appreciate the quiet cabin. It’s a bit louder than the aeros but I haven’t found it to be annoying. I also bought this kit to get back some of the quiet and it made a little difference but still not as quiet as the aeros:
https://www.amazon.com/BASENOR-Soundproof-Rubber-Weather-Reduction/dp/B07R13DYYY/ref=gwm_tlc_pi?pf_rd_s=blackjack-personal-1&amp;pf_rd_t=Gateway&amp;pf_rd_i=mobile&amp;pf_rd_m=ATVPDKIKX0DER&amp;pf_rd_r=VEKTZVMWME85X2TEAQ0W&amp;pf_rd_p=1dfcfc84-3ad7-4be1-8cf4-d1dd1de5a0dc&amp;pd_rd_i=B07R13DYYY
It’s very dependent on the road. If you do 85 miles an hour (typical Bay Area fast lane), and the road isn’t great it will be noticeable.
The wind noise and the reverse camera delay are my two biggest complaints. Reverse camera delay is software related so that will likely get fixed in the coming months.
I have purchased both this basenor wind reduction kit and this wind guard which seem to help a little but I think most of the noise is coming through the front windshield somehow.
I beg to differ... for $30 this is one of the cheapest mods I have done and was very quick and easy to install. Forget about noise dampening for a moment. The doors sound much more solid during close and give a nice sort of pop when opening. Door sill will stay nice and clean. I bought this kit during a sale: https://smile.amazon.com/dp/B07R13DYYY/ref=cm_sw_r_cp_apa_i_3K5hDbEZK2Q8X
All my cars did this. Unfortunately for you and me, its most noticeable on white cars mostly as the dirt blends into darker colors.
I installed these on mine and it does help quite a bit with the dirt. amazon.com/BASENOR-Soundproof-Rubber-Weather-Reduction/dp/B07R13DYYY. Side effect is you now have to close the doors with a little more force, especially the back ones.
If that blade fuse is blown, I'd suggest replacing it with a newer fuse holder with some ring connectors crimped on. Way easier and cheaper than finding a new blade fuse.
Fuse Holder
Ring Connectors
Regular car batteries are made to have a lot of cranking power, and then stay on a trickle charge once the alternator gets going. Running the battery voltage down each night and charging it daily will kill the life of your battery (if it's not deep cycle).
Honestly, charging a phone (5w), running some small LED lighting (8w), and a couple 12VDC fans (6w) can all be done through your cigarette lighter port and won't be drawing more than 20watts. If you ran that all night, you would only be using 15amp/hrs or so of your battery; and if you get 8 hours of sunlight, you only need a 30watt solar panel to charge it back up. Whenever you are talking about solar though, you should plan on doubling your capacity to account for non-optimal performance, cloudy days, long winter nights, etc.
kieranmullen gives a pretty good rundown of what you would need to setup a separate 12v system but seems like overkill for what you are asking (and would run you about $300-400).
Personally, I would get a 100 watt panel, 7 amp charge controller, the cheapest 12v deep cycle marine battery from walmart, and maybe a 3-400w inverter (for a laptop charger or any other AC devices). Also, I'd put an inline fuse between my charge controller and load, and maybe another between the battery and charge controller.
I don’t own this beautiful car yet, but from what I gathered they are using this they suctioned it to the windshield, don’t think it would scratch anything.
They make [suction cups for the front window] (https://www.amazon.com/dp/B00032KBEA/ref=cm_sw_r_cp_apa_UkqGAbB4P6RE4), if that's your worry.
Get a hide away plate frame that attaches to your under belly
http://www.pfyc.com/GN1046.html
or these little suction cups (this is what I use) to attach the plate to the inside of you windshield.
http://www.amazon.com/Cruiser-Accessories-78410-Suction-Clear/dp/B00032KBEA
As someone who lived in Ohio for a few years and doesn't like that ugly license plate on the front of the car, try some of these. I got the OK from a cop for having my front plate mounted visibly at the top of my windshield, but I was up in Chardon so who knows. Great looking car!
Ed: had a few guys chime in to say they've been pulled over for having the front plate in the windshield. Best solution I have is to move to a state that respects cars.
3M makes black reflective tape that works well
I used this for my stuff. But its thin, so itd be a pain for tracing a decal out.
There are 2 inch versions that would be easier to use. Finding the color you want might be hard. Example 1, Example 2
It looks like plain electrical tape until you shine a light on it when its dark.
The Indiana code cited concerns red reflectors (presumably the circular ones found on vehicles) and says nothing about reflective tape. To my knowledge, no jurisdiction in the US concerns itself with what tape or decals you can and cannot place on your own clothing and vehicles.
I bought a 50-foot roll of 3M Scotchcal Reflective Striping Tape, Black, .5-Inch to apply to the rear and sides of my panniers and am very pleased with the results. It cost me $27.04 on Amazon two years ago and is now priced at $35.91.
https://www.amazon.com/gp/product/B00063XI64/
This tape is black but highly reflective. It can be put all over the place without being noticed except in headlights and flash photography.
>What are some ways of preventing theft of the scooter? Does it involve some specialty lock or perhaps being specific about where I park?
I have a [Gorilla Alarm] (https://www.amazon.com/dp/B00J3QM4SS/ref=twister_B00WGCGQWQ?_encoding=UTF8&amp;psc=1) on my scoot but sometimes it goes off unexpectedly and it drains the battery quick if you don't ride your scooter often.
I use to use a U-Lock to attach to my wheel but I've almost rode off a couple of times with it still attached so I hardly use it.
You can get one of [disc brake locks] (https://www.amazon.com/Master-Lock-8303DPS-Disc-Brake/dp/B0009V1WR0/ref=sr_1_1?ie=UTF8&amp;qid=1469235803&amp;sr=8-1&amp;keywords=disc+brake+lock) that attaches to your front brake disc and comes with a reminder strap that you attach to the handlebars so you don't ride off with it still attached.
But I highly suggest getting full coverage insurance if you don't have it already in case the scooter does get stolen. Scooters are so light that 2 people could lift it onto the back of a truck and take off. The money you get back from full coverage insurance is surprisingly fair, at least with State Farm.
>I live in Houston. The sun is pretty intense and I love the paint job on my scooter. Is there a way to protect the paint with products or is a simple scooter cover the solution?
This is a great question because if you don't protect the body, it will start fading on you.
You can either use a [paste wax] (https://www.amazon.com/Mothers-05500-California-Brazilian-Carnauba/dp/B0002U1TVW/ref=sr_1_1?s=automotive&amp;ie=UTF8&amp;qid=1469236135&amp;sr=1-1&amp;keywords=mother%27s+wax) or [liquid wax] (https://www.amazon.com/Mothers-05750-California-Brazilian-Carnauba/dp/B0002U1TX0/ref=sr_1_2?s=automotive&amp;ie=UTF8&amp;qid=1469236135&amp;sr=1-2&amp;keywords=mother%27s+wax) to give you the best protection. Remember to follow the instructions that come with the wax.
You can use a [spray wax] (https://www.amazon.com/Mothers-05724-California-Gold-Spray/dp/B001MXX5D8/ref=sr_1_1?s=automotive&amp;ie=UTF8&amp;qid=1469236261&amp;sr=1-1&amp;keywords=mother%27s+spray+wax) which is the easiest to apply and remove but it doesn't offer the same kind of protection that a paste or liquid wax gives.
Btw, I only used Mother's as an example but most of the brands that you find at your local auto parts store should be fine. Also, make sure to always use a Microfiber towel when doing anything on the scooter's body. Microfiber towels scratch the body the least vs. any other kind of towel.
It's only $15 if you find you do this often.
http://www.amazon.com/Master-Lock-8303DPS-Disc-Brake/dp/B0009V1WR0/ref=sr_1_1?ie=UTF8&qid=1453246144&sr=8-1&keywords=motorcycle+lock
If you want an easy way to increase your situational awareness, spend $9 on a clip-on wide-angle mirror.
If you want to be more hardcore, spend $19 on a 5-panel mirror, which doesn't distort distances.
My tips would be to try driving a smaller or a more compact car. I find they have a better turning radius, thus are much easier to parallel park, getting into tight corners, navigating through tight spaces, etc. Also try replacing your rear view mirror with a wider one like one of these: Fit System RM011 Clip-on Wide Angle Rear View Mirror https://www.amazon.com/dp/B001A0J2JO/ref=cm_sw_r_awd_hYf-wbBME5VY5
I use this particular 18 inch mirror that just clips on to your existing mirror. This gives you a much bigger field of vision of what's behind you when your driving, and you can see your blindspots and everything! It just feels much more safer, thus making you feel more confident when driving..
Having a backup camera can help you alot too. I mainly use mine for parallel parking because it's sometimes hard to judge the distance between the back of my car and the front of the car behind me.
You can also try investing in brighter LED headlights for your car if you don't have them already. Or turn on your fog lights as well. I know, driving at night can be dangerous especially when it's hard to read the road signs or see the street lines, especially if your not familiar with the roads. Just remember, if its really hard to see at night and there are no cars around you, feel free to use your high beams! That's what they are there for. Just make sure you don't have them on if there is a car coming in front of you because you can seriously blind the hell out of them lol. I deliver food as part of my job so I am always driving and exploring new areas, driving at night is always much harder..
Buy a panoramic mirror and clip it on.
Here's a 11.75-inch version.
Here's the 17.75 inch version.
They'll take some getting used to, but once you do, you can see infinitely more behind you and to your left and right. I credit these mirrors with saving my life more than 10 actual times in all weather conditions. I won't drive any car without one now.
One thing you didn't mention that might be worth considering is one of those big, police style rear view mirrors:
http://www.amazon.com/gp/product/B001A0J2JO/ref=pd_lpo_sbs_dp_ss_1?pf_rd_p=1944687622&amp;pf_rd_s=lpo-top-stripe-1&amp;pf_rd_t=201&amp;pf_rd_i=B0015FYQ90&amp;pf_rd_m=ATVPDKIKX0DER&amp;pf_rd_r=1B3CNP4PMY6P8XDX2YQE
I've not tested one of these but it sounds worth at least considering given the circumstances you describe.
So - I charged two batteries in the field during some field work last week. One of those big 12V jump-start / tyre pump batteries with the 12V Mavic recharger can refill a Mavic battery in about an hour - you will need a larger capacity one to recharge more than once. But realistically - you need a generator.
This fits the "breaker or switch" suggestion perfectly and is exactly what its for, albeit a bit more expensive than a manual switch ;P
https://smile.amazon.com/dp/B00400IYTK/
Alternators give out anywhere from 60-130 Amps, depending on what model came with your van. A single 100W solar panel, laid out flat, is going to produce in the neighborhood of 80W for about 5 hours on a good sunny day, or roughly 400W per day. Even the smallest available alternator will produce twice that much energy in an hour of driving per day.
If you are going to charge your "house" battery off of your alternator, be sure you get a battery isolator circuit that will prevent your house electronics from draining your starter battery. Something like this: http://www.amazon.com/Smart-Dual-Battery-140A-Isolator/dp/B00400IYTK
> but at that rate I'm better off charging my batteries with my diesel's alternator
Yep. I frequently ask people on this sub why they think solar is so important when they're driving around in something that generates electricity already. Solar is expensive. It doesn't work in Seattle except for three weeks in August. Unless you're in the desert southwest, you need to have sufficient battery capacity for multiple days without sun which means you need an even bigger solar panel array to recharge that battery pack on the 2 sunny days during a two week period of overcast and showers.
Unless the van is parked somewhere for days and days without moving, just charge the house battery from the alternator. Even if it's parked on a sunny day, there's a huge incentive to park it in the shade to prevent the interior temps from killing anyone inside.
Using the alternator is easy. The absolute brute force, quick-n-dirty, cheap way is to run a #2 or #4 gauge wire from the positive terminal of your your van's battery to the positive terminal of your house battery through a simple switch and a high capacity (100A) fuse.
Under $10 crude switch from any auto parts store: https://www.amazon.com/Post-Battery-Master-Disconnect-Switch/dp/B001N729FS/ You use this to 'disconnect' the wire between the batteries when you park. This prevents that 60W fan you're running 24/7 from running down your starter battery. Get a better switch as your budget allows.
Better is an 'isolation relay' - there are two basic kinds. The inexpensive kind https://www.amazon.com/gp/product/B005JCX8OY/ requires that you also find a 12v power source that goes active when your ignition is turned on. This powers the relay to connect your house battery to the alternator/starting battery. It's not a big deal, but possibly a small hassle. Any Napa, Reibes, Pep-Boys, Autozone, etc auto parts place will have one.
Or, an automatic type that senses when the voltage on your starter battery rises due to the alternator and then automatically connects your house battery so it gets charged, too. https://www.amazon.com/gp/product/B00400IYTK/ You take the 12v cable from your van battery to one terminal. The 12V from your house battery to the 2nd terminal. And, the last terminal goes to ground.
BTW, I wasn't trying to 'burn you' but rather put some realism into your needs. At least you didn't mention electric heater or electric air conditioning like some folks do. For heating or cooking, gas/propane is the practical way to go. (There are some great, BUT EXPENSIVE, diesel heaters that can tap into your van's fuel system).
For air conditioning, there isn't any van-sized alternative other than a gas powered generator or an electrical outlet near the van.
Good choice on the fridge. And, you're right - it's not a 'now' sort of requirement.
Those battery powered LED things last forever. If you haven't bought any yet, try to get ones with diffusers - intentionally stay away from the brightest ones you can find. The issue is that in the small confines of a van, they just sear burn marks in your retinas. 'dimmer is better' I have these - multi brightness, magnetic stick on to my van's metal interior: https://www.amazon.com/gp/product/B01H731UNS/
I got the non-rechargeable ones but use Amazon Basics Eneloop- equivalent rechargeable AAA batteries: https://www.amazon.com/AmazonBasics-AAA-Rechargeable-Batteries-12-Pack/dp/B007B9NXAC/ and a USB recharger for them sort of like this: https://www.amazon.com/gp/product/B00PZ6V99U/
I have one of these. You do not want this 2 ft from your eyes in a van: https://www.amazon.com/BUYGO-11-LED-Outdoor-Lantern-Camping/
Thanks for the reply. I was able to get a look at the batteries today to check the connections and noticed one seems to have been leaking. I removed it and so far the system works fine on the remaining battery.
So I'm thinking it developed a crack OR the leak is due to overcharging. How can I figure this out?
Maybe you can help me answer this question: If my batteries were topped off and then I drove for 10 hours, would my battery isolator be overcharging the batteries? And one of them finally quit?
This is the smart isolator I'm using-
https://www.amazon.com/gp/product/B00400IYTK/ref=ask_ql_qh_dp_hza
Funny enough my previous tires were 235/75s and my springs in the rear sagged like crazy. The wheels would rub when I would haul things.
I used Dorman leaf spring assembly's that already had built in bushings. Here's the link for the rears:
Dorman 929-301 Leaf Spring for Jeep Cherokee, Pack of 1 https://www.amazon.com/dp/B005VPS358/ref=cm_sw_r_cp_api_3ozTybXGCSV7Q
I'll have to come back to you with that measurement!
I think your local mechanic just doesn't want to install new leaf springs because it's kind of a bitch.
There are cheaper ways to do it, but you can get a brand new pair for about $230, I put these in my 93 and they include the bushings (but not the shackle bolts) https://www.amazon.com/dp/B005VPS358/?coliid=IR3CWRIGZE8TL&amp;colid=3B3H2P3OO3L7T&amp;psc=0&amp;ref_=lv_ov_lig_dp_it
My leaf springs were also inverted and I gained about 4" of lift in the rear with these and some longer shackles.
Tbh I'm surprised you aren't having issues with the rear tires hitting the wheel wells
I think I might understand you... would something like this do what you are envisioning?
https://www.amazon.com/NOCO-GCP1-125V-Integrated-Extension/dp/B009ANV81S
https://www.amazon.com/NOCO-Genius-GCP1-Black-125V/dp/B009ANV81S/ref=pd_bxgy_200_img_2?ie=UTF8&amp;psc=1&amp;refRID=X6SE3S6B3876Q0A3TDS0
I didn't get a working link to the FB page on your progress, but just let me know your TNTTT account handle and I'll pop over there to look. One other thing - of the several 120V inlets out there, this one is the best behaved so far. The only caveat is that you'll have to trim the idiot-proofing rubber nub off your extension cord receptacles.
here it is
For basic 15 amp power, I run something similar to this: https://www.amazon.com/NOCO-GCP1-125V-Integrated-Extension/dp/B009ANV81S/ref=sr_1_1?s=automotive&amp;ie=UTF8&amp;qid=1537219599&amp;sr=1-1&amp;keywords=15+amp+power+inlet
I plan on someday, maybe, running a 30 or 50 amp service through the wall.
like this
https://www.amazon.com/gp/product/B009ANV81S
Looking at your picture... You have the ultrasonic part. Then you need either a servo to raise the lid or one of these power door lock actuators with some mechanical engineering. https://www.amazon.com/InstallGear-Universal-Power-Actuators-12-Volt/dp/B00CZBQCR2
&#x200B;
Personally, I would probably use the actuator and a relay. When distance < whatever, activate relay, which activates actuator. Easy peasy! If you need more help working this out, let me know.
&#x200B;
I would like to see you write the code to fire off the relay even if it is not attached.
So it looks like the kit I ordered is out of stock now but I will double check when I get home.
Here's the link: InstallGear Universal Car Power Door Lock Actuators 12-Volt Motor (2 Pack) https://www.amazon.com/dp/B00CZBQCR2/ref=cm_sw_r_sms_c_api_jsKDzb5GR2HB6
Edit: this is not what I ordered, but this is the seller. The kit was $30 and comes with everything. I might document the installation.
Door lock actuators (Amazon also has set of 4 if you have a 4 door)
https://www.amazon.com/gp/aw/d/B00CZBQCR2/ref=mp_s_a_1_3?ie=UTF8&amp;qid=1517585328&amp;sr=8-3&amp;pi=AC_SX236_SY340_FMwebp_QL65&amp;keywords=door+lock+actuator
Cable door lock adaptor kit I also used
https://www.amazon.com/gp/aw/d/B009Q119LI/ref=mp_s_a_1_16?ie=UTF8&amp;qid=1517585478&amp;sr=8-16&amp;pi=AC_SX236_SY340_QL65&amp;keywords=cable+door+lock+car
In my Mk6, I tapped into the cigarette lighter line and added another cigarette outlet inside of my center console. Then ran the provided cigarette lighter power supply line down the A pillar, through the fuse box, in the trim behind the wheel, into the console. That meant I didn't have to butcher the included power supply to wire it in, and I didn't have to find a fuse position that would work.
I stole the idea from the DoubleApex USB Charger install - I basically just did it a second time, but instead of tapping in their lighter/USB power supply, tappen in an outlet I bought. Here's their instructions(PDF) if you want to get an idea. May not be best for your situation, but it's an option.
You need either a in line wired USB or wire a cigarette lighter receptacle in and use your existing adapter. You can't just wire the USB cable in directly. USB is 5v.
This
http://www.amazon.com/Inverter-Converter-Adapter-Cellphone-Hard-wired/dp/B017PWWA9O/ref=sr_1_1?ie=UTF8&amp;qid=1457222128&amp;sr=8-1&amp;keywords=wired+USB+12+volt+adapter
or This
http://www.amazon.com/Hardwire-Smartphone-Navigation-SiriusXM-Satellite/dp/B00I3P6QQG/ref=sr_1_3?ie=UTF8&amp;qid=1457222128&amp;sr=8-3&amp;keywords=wired+USB+12+volt+adapter
or this
http://www.amazon.com/uxcell%C2%AE-Charger-Cigarette-Lighter-Female/dp/B00EZJBELQ/ref=sr_1_5?s=automotive&amp;ie=UTF8&amp;qid=1457222216&amp;sr=1-5&amp;keywords=cigarette+lighter+socket+adapter
I have a cig lighter wired in under the dash and one of those 3 output USB adapters for dashcam and some other stuff.
Cigartte lighter socket + quality car phone charger + Add-a-circuit kit (check your fuse type) + some quality tape + Right-angle USB charging cable
You wire the red wire on the cigarette adapter to an add-a-ciruit (i.e. with a crimp tool). The black wire goes to ground (i.e. tucked under some bolt someplace, or a ring terminal ). You put the charger in the now-attached cigarette adapter in the fuse area under your driver's side dash. Then you need to route an appropriate USB cable (i.e. with one with a right-angle head or right-angle adapter on the dash cam side) to the under dash area (usually by tucking it under the headliner over the windshield, and then by popping the A-pillar cover off and the side panel of the dashboard, and feeding the cable through). Once you have all the wires under the dash, you just need to hook them up, test them, and then tape them together so they can't come loose.
The advantage of going this route is that you 'own' all the pieces. If any part of the formula isn't working out, you can change just that part. You also get a spare USB-C charging port for free since that adapter has both A and C.
The dash kit for your car ALONE is almost $300:
PAC RPK4-HD1101
Bonus points is it comes with the radio harness and SWC is built in.
Metra makes one with rubber buttons that's gross and I hate it because it's terrible and bad but might be found cheaper.
I SUPPOSE you could do the pocket replacement kit:
Metra 95-7862
But it looks ril bad and the factory radio just kinda sits there and looks dumb.
As far as radios for your budget? Alpine iLX-W650
Does what you want, none of what you don't. Add the install parts and a new SXM tuner and you're off.
Wanna do it cheap AND keep SWC: Maestro SW
And still need the wiring harness to the car, I wanna say Metra 1721? Don't quote me.
MICTUNING MIC-B1002 LED Light Bar Wiring Harness, Fuse 40A Relay On-off Waterproof Switch https://www.amazon.com/dp/B00O72R7Z8?ref=yo_pop_ma_swf
I hope this works
I used this harness. Worked out perfect and drilled a 3/4" hole in one of the blank knock outs in the dash near the light dimmer dial. Has an illuminated switch when on and has spade connectors for two front lights. I just used one since I have a 20" led bar behind the lower grille.
MICTUNING MIC-B1002 LED Light Bar Wiring Harness, Fuse 40A Relay On-off Waterproof Switch https://www.amazon.com/dp/B00O72R7Z8/ref=cm_sw_r_cp_apip_ZYjgQJvFDJ4ET
The vehicle has a wire from the alternator to the battery. It is usually too small. If you connect your house battery charging wire at the alternator rather than at the vehicle battery you will improve the charging of the house battery without adding additional current and voltage drop to the charging path for the vehicle battery.
The wire from the vehicle alternator to the house battery gets the switch somewhere between the two. It doesn't matter where. If it is near either end or in the middle it doesn't matter. The switch instructions say to put it near the vehicle battery. It doesn't matter. The ohms are the same no matter where you put it. Make the wire as short as possible. Locate the switch out of the weather and wherever it is best to have a short total wire length.
Fuses protect wires to avoid fires. The size of the wire sets the upper limit of fuse size. The wire needs to be protected at every source of power. Your house battery charging wire has a connection to two sources of power. The house battery and the vehicle battery / alternator both feed the wire and both need a fuse. Mount the fuses as close as possible to their power sources.
The inverter takes a large DC current. A 440 watt blender using a 90% efficient inverter will need 40 Amps running, maybe twice that starting. Mount the inverter as close as possible to the house battery. If the inverter has its own fuse and the cable from the battery to the inverter is so short that it can't touch any ground even if cut or disconnected then maybe you don't need a fuse between the battery and the inverter.
The fuse box I used is:
https://www.amazon.com/OLS-PSZACCEPS051H-6-Way-Illuminated-Blade/dp/B00QMTAZ1W/ref=sr_1_1?s=automotive&amp;ie=UTF8&amp;qid=1478725271&amp;sr=1-1&amp;keywords=automotive+fuse+block
You connect a wire from the house battery to it, put in the fuses then connect the fuse box outlet connectors to your loads. Again, put a fuse at the battery to protect the fat wire to your fuse box. If the wire to the fuse box is short enough so that even if the nut holding the wire on the fuse box falls off the wire can't reach anything grounded then maybe skip the fuse.
Specific answers
1 and 2) Wire from alternator - fuse - fat wire - separator - fat wire - fuse - house battery. Then from house battery to inverter, house battery to fuse box, both with fuses if necessary.
3) fuse size depends on wire. For small loads just use #12 wire and a 20 amp fuse. For your fat wire for charging the wire size depends on the length. If you mount the house batteries behind the driver's seat and the alternator is on that side of the engine you can probably get by with 10 to 15 feet. At that length #6 would be the smallest I would recommend. For #6 I would suggest 80 amp fuses.
https://www.amazon.com/gp/product/B00W5SG2C0/ref=oh_aui_detailpage_o04_s00?ie=UTF8&amp;psc=1
4) Standard blade fuses fit in the fuse box linked above, not mini.
https://www.amazon.com/120-Pieces-EPAuto-Assorted-Standard/dp/B01DYQ5T3O/ref=sr_1_5?ie=UTF8&amp;qid=1478727709&amp;sr=8-5&amp;keywords=automotive+fuses
5) Grounds are equal in importance to the +12 wiring. Any resistance will drop voltage and cause problems. When 2 items share a ground connection and that connection gets high resistance the symptoms get strange and diagnosis gets difficult. For a battery ground you need a hole drilled and a bolt run through. Star washers on both sides of the steel are helpful. You must grind away any paint. Find some ground connections that already exist to see how Sprinter did it. The battery black wire is like what you need for your house battery. Small wires around tail lights are like what you need for your small loads. The inverter should be connected with a short fat wire directly to the battery. The separator switch needs a small ground like other loads. There may be small grounds around the van that you can add to.
6) The fuse box doesn't get a ground connection.
7) The biggest risk (but least likely) is burning down the van with an electrical fire. The most likely risk is making some small arcs and blowing some fuses. A likely risk is connecting something backwards. LEDS just don't work backwards. If you connect your inverter backwards it will likely blow internal fuses, maybe fry the thing. The fan may go backwards, maybe fry. If there is arcing that involves alternator current it could kill the alternator.
Now the fierce criticism. Those coolers will kill batteries and not keep your food cold. If your van is 90F inside and the cooler drops it 30 then inside the cooler it is 60F. Not cold enough. 55 Watts is 110 Amp hours per day. You need to have a volt meter to keep from killing your battery. Do not wire an inverter like you wire a phone charger. The inverter needs short fat wiring. Search the internet and you tube about crimp connectors for fat wire and for #12. Don't strip a wire and twist it around a bolt and then tighten a nut. Look at the way wires are done from the factory in your van. No sharp edges, no loose unsupported wires. Before working on vehicle wiring disconnect the battery minus wire.
For the sake of argument, I actually have the products I have linked. I have only one battery and no disconnect switch. I upgraded the vehicle battery size. I have a vent fan, LED lights, chargers, no blender, 100 Watt solar. That makes me informed and experienced, not expert.
https://www.amazon.com/gp/aw/d/B00QMTAZ1W/ref=mp_s_a_1_3?ie=UTF8&amp;qid=1484512150&amp;sr=8-3&amp;pi=AC_SX236_SY340_FMwebp_QL65&amp;keywords=12v+fuse+block
Here's a solid one.
clinometer
Removed the radio and capped it with abs plastic, fit it with a usb charger and [four of these switches in different colors] (https://www.amazon.com/gp/product/B001GH1PU0/ref=oh_aui_search_detailpage?ie=UTF8&amp;psc=1) using these housings
the switches got to [relays] (https://www.amazon.com/gp/product/B017VDI0GY/ref=oh_aui_search_detailpage?ie=UTF8&amp;psc=1) that are powered [by this fuse box] (https://www.amazon.com/gp/product/B00QMTAZ1W/ref=oh_aui_search_detailpage?ie=UTF8&amp;psc=1) that is mounted to the top of the OEM fuse box under the hood.
Those power my OBHS and OBA. Other two switches not in use yet, hoping for rock lights/light bar some day maybe?
Removed the old fog light switch panel, replaced with abs plastic and volume control that goes to an amp that goes to a stereo jack that i just plug into my phone for music.
I put LED turn signals on my bike and I used an electronic turn signal flasher instead of the stock one. You just unplug your old flasher and plug this one in, this way is a lot easier than resistors. You'll have to use an electronic flasher or resistors if you change to LEDs otherwise you'll get hyperflashing.
You can use something like this, this one might even work for your bike.
https://www.amazon.com/iJDMTOY-Electronic-Flasher-Motorcycle-Signal/dp/B00RM26LXO
God I hope this formats correctly - I am a neophyte.
Exhaust - http://www.ixilusa.com/ixil-l3xb-black-hyperlow-xl-full-exhaust-yamaha-mt-07-2014-2015/
Super deep and loud sound - videos online don't do it justice, its unbelievably loud when the baffles are out. Had to have the cat cut out of it. Be aware they have a cat in the V section before the end of the pipe.
Removed the snorkel covering the airbox - I was told its basically blocks airflow.
ECU Flash / Dyno by 2wheelDynoWorks - https://2wheeldynoworks.com/shop/ecu-flashing-service/15-17-yamaha-fz07-mail-in-ecu-flashing-service/
Nels himself worked on my bike - super stoked (shout out to Nate too) They have the best customer service.
Active Tune - https://2wheeldynoworks.com/shop/ecu-flashing-service/yamaha-activetune-afr-closed-loop-self-tuning-ecu-kit-2/
Tune as you go
Bike side harness - https://2wheeldynoworks.com/shop/ecu-flashing-service/ftlink-v1-1-6-pin-bike-side-harnesses/
For tuning later
Windscreen - https://www.revzilla.com/motorcycle/puig-touring-naked-new-generation-windscreen-yamaha-mt-07-2018
I got light smoke, I think it goes better with the bike and pushes wind over my shoulders even at 80+ mph
Protection - https://tstindustries.com/Womet-Tech-Total-Crash-Protection-Pack-for-Yamaha-FZ-07-MT-07-2015.html
Basically got everything from this except the bar ends
Bar Ends - https://motostarz.com/collections/mt-07-2018/products/rhinomoto-barends-mirror-mounts-for-yamaha-fz-mt-models
Super easy to replace mirrors etc with these - and they add protection
Throttle tube - https://www.amazon.com/gp/product/B005C59NO2/ref=oh_aui_detailpage_o01_s00?ie=UTF8&amp;psc=1
90 to 60 degree conversion - its amazing for the price
Dash Screen Protector - https://www.amazon.com/gp/product/B078SMP4ND/ref=oh_aui_detailpage_o00_s00?ie=UTF8&amp;psc=1
Mirror stem deletes - https://www.amazon.com/gp/product/B07BN8QGPV/ref=oh_aui_detailpage_o02_s00?ie=UTF8&amp;psc=1
Current Mirrors - https://www.amazon.com/gp/product/B01N6GB7DZ/ref=oh_aui_detailpage_o02_s00?ie=UTF8&amp;psc=1
Mirrors in photo - https://www.amazon.com/gp/product/B003RESHVU/ref=oh_aui_detailpage_o00_s00?ie=UTF8&amp;psc=1
I like the CRG Mirrors but they get bumped and are hard to readjust - the cheap ebay/amazon mirrors work great
Headlight replacement - https://www.amazon.com/gp/product/B01H6NZ5QW/ref=oh_aui_detailpage_o01_s00?ie=UTF8&amp;psc=1
Signal replacement LED bulbs - https://www.amazon.com/gp/product/B06XK4PL33/ref=oh_aui_detailpage_o01_s00?ie=UTF8&amp;psc=1
Super bright replacements for stock bulbs - used the original housings, they plug right in
Running light LED replacements - https://www.amazon.com/gp/product/B00JRE38EA/ref=oh_aui_detailpage_o01_s01?ie=UTF8&amp;psc=1
For inside the headlight housing
Tail Tidy - https://www.amazon.com/gp/product/B01BH5YGOM/ref=oh_aui_detailpage_o04_s00?ie=UTF8&amp;psc=1
Flasher Relay for LEDs - https://www.amazon.com/gp/product/B00RM26LXO/ref=oh_aui_detailpage_o01_s00?ie=UTF8&amp;psc=1
Levers - https://www.ebay.com/itm/CNC-Brake-Clutch-Yamaha-MT-07-FZ-07-2014-2018-Adjustable-Engrave-Long-Lever/123350737715?_trkparms=aid%3D555018%26algo%3DPL.SIM%26ao%3D1%26asc%3D20131003132420%26meid%3D17a37c1b2d204ffcba65903d19a97b4a%26pid%3D100005%26rk%3D4%26rkt%3D12%26sd%3D122997203335%26itm%3D123350737715&amp;_trksid=p2047675.c100005.m1851
Passenger peg deletes - https://www.ebay.com/itm/for-YAMAHA-MT07-FZ07-Footrest-Cover-Passenger-Footpeg-Removal-Delete-Kit-2014/253869999740?hash=item3b1bd4c67c:g:3qEAAOSw0JVbm1FQ:rk:1:pf:0
I removed the passenger pegs, needed a bracket to hold the brake fluid reservoir - also cleaned up the pegs
Havent done the brakes yet - going to replace the lines etc with steel braid.
Also want to do a sprocket / chain swap for acceleration
I used a quadlock phone mount for a little bit - but took it off because I was playing with my phone too much.
this
I just put lights on my drive.
I used this on the front and this on the rear.
Since the motorcycle taillight has a circuit for both the tail light and brake light, I wired the tail light to the same switch as the head light. I bought an adjustable motorcycle led flasher and put the brake light on a second circuit and switch.
So, I ended up with a headlight/taillight combo on one switch, and a brighter, flashing taillight on the other switch. Both of these circuits are only active when the key is turned on. I am quite pleased with the outcome.
While I was in the dash, I also added a 12 volt power port for charging phones and my bluetooth speaker, which has a mount on the dash.
FYI, there is a factory power harness which has unused 12 volt power located behind the key switch.
I'll try to post pics when my phone is charged.
Feel free to ask any questions. I'm pretty familiar with the electrical on the drive now (mine is gas).
Edit: Here are some pics. Excuse the dirty cart. Believe it or not, that little cheapo light bar actually put out too much light. At first, it would light up a stop sign 150 yards down my street. I aimed it at the ground to keep from blinding oncoming traffic.
Ok well nice job deleting as much as you can it's very necessary on these bikes. Do you have a manual? I ha e a copy of a minimal wiring diagram I used on mine I can forward to you so you can trace your own wiring. Have you tested the LEDs? Most of these old bikes can't read a signal that small and need a relay (ex:AUDEW 2-Pin Electronic Turn Signal Flasher Relay Fix Motorcycle Turn Signal Hyper Flash https://www.amazon.com/dp/B011BTMDQM/ref=cm_sw_r_cp_apa_KmirzbTJDKYAQ)
With a 6.5 gallon tank it would be sad to only take advantage of 70 miles at a time.... Lol
Get yourself a Voltmeter and test the resistance on the ignition pack, THE STATOR (in case you were unaware... Stator is:the stationary portion of an electric generator. It's under the right side cover. Replacements are not easy to find...trust me...) you're actually at an advantage with no wiring on these bikes. The 80s Japanese bikes were notorious for tons of wiring for no reason.)
I don't know how proficient you are mechanically and I don't want to suggest something crazy and out of you're league... But look at this https://youtu.be/nFAnxpPOlnU
Wish I had a picture of when it was finished but I can't seem to find one... Here was my 80' xs850 http://i.imgur.com/TPY4UMy.jpg
I had the same code and it turned out to be heat soak. The intake manifold sits right above the exhaust manifold, so on very hot days the hotter air in the intake was causing fuel to partially vaporize in the fuel rail before it could get to the injectors. Fuel can't atomize properly which means its not combusting as completely which can trigger P0455 even with the vapor return line is doing its job properly.
Check all your lines, tighten your gas cap, and buy a $20 code reader so you can reset your check engine code(s) yourself. If the code doesn't come back within a day or so then heat soak could be your cause. I bought and installed this kit and that solved my problem for good.
I went with the Generic 12 hole from Amazon: https://www.amazon.com/TOHUU-0280156161-Upgrade-Injector-1999-2004/dp/B07KWWQXL4/ref=sr_1_fkmrnull_4?crid=32B7CIJNN1XON&keywords=2000+jeep+cherokee+fuel+injectors+12+hole&qid=1554903065&replacementKeywords=fuel+injectors+12+hole&s=gateway&sprefix=12+Hole+fuel+injectors+%2Caps%2C582&sr=8-4-fkmrnull&vehicle=2000-42-347------------&vehicleName=2000+Jeep+Cherokee
But you can go with any from other Suppliers too. all are about the same quality. Definitely a difference in pickup, but fuel economy depends on driving style. Don't forget to replace the fuel rail shield while you have the fuel rail off. https://www.amazon.com/Design-Engineering-010378-Engine-Injecter/dp/B015NOKWQY/ref=sr_1_fkmrnull_3?keywords=2000+jeep+cherokee+fuel+rail+shield&qid=1554903190&replacementKeywords=fuel+rail+shield&s=gateway&sr=8-3-fkmrnull&vehicle=2000-42-347------------&vehicleName=2000+Jeep+Cherokee.
Otherwise, A Cold Air intake with K&N filter and a Throttle body spacer will be some of the first (and least work intensive) performance enhancing things you can do. There is a trade off between pick up power, low end torque and economy that you should watch. A Jeep is not a dragster (not built for it, though the project would be fun) and you don't want the wheels breaking loose when you are on a pile of boulders. Stopping at every gas station you pass is also not a desirable feature....
Have fun!
The first thing you should do is change fluids, then fix the heat soak problem if you have a 4.0 and it hasn't been taken care of. I bought a kit from Amazon that's supposed to be an adequate fix for about 60 bucks which can be found here :
https://www.amazon.com/gp/aw/d/B015NOKWQY/ref=ya_aw_od_pi?ie=UTF8&amp;psc=1
After that, I'd focus on the rust problem. There's a good thread here:
https://wranglertjforum.com/threads/taking-care-of-frame-rust.328/
This is another good resource for questions that you may have:
www.wranglerforum.com
Also, Epstein didn't kill himself.
Looks like a tiny spoiler.
https://www.amazon.com/COGEEK-Mini-Universal-Decorative-Spoiler/dp/B01KQ3D81S
I've used these with good success. You'll need to fabricate a cowl or something to have it plugged in all the time and keep water off it. Though it really shouldn't matter all that much if it gets a little wet.
Try: https://www.amazon.com/BASENOR-Soundproof-Rubber-Weather-Reduction/dp/B07R13DYYY
Recommended in this sub before.
BASENOR Tesla Model 3 Door Seal Kit Soundproof Rubber Weather Draft Seal Strip Wind Noise Reduction Kit https://www.amazon.com/dp/B07R13DYYY/ref=cm_sw_r_cp_api_i_YfMFDb7HNGBDK
The way I setup my LEDs is I wired the lights directly to the battery with an inline 5A (I believe....might be way too high, could be around 2A, I don't remember, just calculate what your lights will draw) fuse on the ground.
Here is what I used (not the same brand etc etc, I got mine at a PepBoys for double that price because I was impatient), and it worked great!
EDIT: this will provide you with constant power, which is what I wanted because I can switch the lights on without having to turn the key. Great ambient lighting for relaxing in a lot at night.
Pops are caused by slight differences in timing of +/- power supplies reaching their design voltages. Better amplifiers should have muting circuits/output relays to prevent this. The only time that changing input volumes will have an effect is when the pop originates from outside the amp (mixer, xover, EQs, etc.). If your Bryston pops with nothing connected in to it, have it checked out.
Also, make sure to add in-line fuses when testing, if not permanently. NS-10s can be pricey to repair.
I had a studio client replace many NS-10 drivers because some client complained "the fuses corrupt the sound." I added internal fuses and they charge the complainer for a repair every time a speaker stopped working. Funny how complainer never noticed the corrupt sound. I got paid every time I had to open speakers to replace fuses.
Edits: typos
Ok, so if I want to switch them all with one switch I should ideally have a switch that can handle 15a+?
&nbsp;
So run the 5v and ground cables to all the strips in parallel from the power supply to get even illumination? I'm assuming the reason to do this has to do with voltage drop across 5m of LED's.
&nbsp;
So something like this fuse box holder with a 15a fuse on the wires powering the LED would do it?
Friend, "super confused" and a 72W battery stack start to make me nervous about advising you. Here's a pic about how to connect a BMS. https://imgur.com/a/eeh7C4h
Short circuit fault currents can be really high. I highly advise you to fuse your battery as close to the + terminal of your holder as you can. I like this automotive type: https://www.amazon.com/Nilight-Harness-Automotive-Standard-Warranty/dp/B0002KR88A
The 7.5A fuse would be a good starting choice.
be safe.
I'll be using inline fuse holders like this one: http://www.amazon.com/Parts-Express-Water-resistant-Fuse-Holder/dp/B0002KR88A/ref=pd_sim_263_4?ie=UTF8&amp;dpID=41xeCvxvLdL&amp;dpSrc=sims&amp;preST=_AC_UL160_SR160%2C160_&amp;refRID=15HM852D3AFHRX18VJ0X
Hey, thanks!
I'm going to go into detail on the equipment I bought with my next video (and I've got a really fascinating powerpoint presentation where I try to explain a little electrical theory without putting everyone to sleep). I'll answer your question here though:
I started with a kit that came with the wires you're asking about. The solar panels have those short (2 or 3 feet) wires that end with what's called an MC4 connector. The wires have the MC4 connector on one end, and a bare wire on the other. The MC4 is a weatherproof, snap-on connector.
For the second panel, I had to get the MC4-tipped cables separately. From browsing YouTube, it looks like you can save some money by buying the connectors alone and splicing them onto a wire. I didn't feel like messing with this.
I got all my stuff on Amazon. Here's the list:
The parts for my installation came out to a little over $400.
Hope that helps! :)
Remove the dash piece under the steering column and then the metal plate behind it to gain access to the main ignition harness that goes up to the steering wheel. Cut back the wire loom and look for a heavier guage solid pink or pink with black stripe wire. Make sure to test it with a dmm that it goes from 0 to 12v with the key turning on and off. You will need to get an inline fuse holder like this: http://www.amazon.com/gp/aw/d/B0002KR88A/ref=mp_s_a_1_2?qid=1452992553&amp;sr=8-2&amp;pi=SY200_QL40&amp;keywords=inline+fuse&amp;dpPl=1&amp;dpID=41xeCvxvLdL&amp;ref=plSrch and a 10 amp fuse to go in the fuse holder. Solder one side of the inline fuse holder into the pink or pink/black wire and wire an extension wire to go from the other side of the fuse holder up to the radio. Wire the extension to the red ignition wire of the aftermarket deck harness and test that it turns on and off with the key. Once that's done bolt the metal plate back up then the under dash and put the rest back together.
I bought suction cups for my license plate so it's suctioned to my front windshield. I got rear ended not too long ago and it didn't move at all. Just my $0.02
Edit: These. They cost $2 and they work really good.
https://www.amazon.com/Cruiser-Accessories-78410-Suction-Clear/dp/B00032KBEA/ref=sr_1_1/138-0897253-5765706?ie=UTF8&amp;qid=1495958756&amp;sr=8-1&amp;keywords=suction+cup+for+license+plate
I use this: https://www.amazon.com/dp/B07CV5PLFM?ref=ppx_pop_mob_ap_share
and this:
https://www.amazon.com/dp/B00032KBEA?ref=ppx_pop_mob_ap_share
in the corner of my windshield. Might be an alternative for you.
I'm in California by the way.
Cruiser Accessories 78410 Suction Cups, Clear, 4 pack – approx. 1” each https://www.amazon.com/dp/B00032KBEA/ref=cm_sw_r_cp_api_vG3Hzb2CWADSZ
They fit perfectly in the Model S front plate plastic holder, not sure if it works on other cars.
I put suction cups on a plate holder. I pull this out only when using metered parking (which is fortunately only a few times a month).
https://www.amazon.com/gp/product/B00032KBEA
https://www.amazon.com/gp/product/B07CV5PLFM
There are black reflective strips that reflect a sort of light grey.
Here's one, there are fabric strips too.
Scotchcal: https://www.amazon.com/gp/product/B00063XI64/ (It comes in many widths and colors.)
The only real way to secure it would be to chain it to something solid since most scooters are stolen by a couple of guys hoisting it into the back of a pickup truck.
But since that's not an option for most, I suggest one of these [brake disc locks] (https://www.amazon.com/Master-Lock-8303DPS-Disc-Brake/dp/B0009V1WR0/ref=sr_1_2?ie=UTF8&amp;qid=1500700029&amp;sr=8-2&amp;keywords=brake+disc+lock) but more importantly, get full coverage insurance with a low deductible.
Woah shit. Maybe invest in one yourself then?
Not the best possible security - but I agree it's somewhat safer now. It doesn't have to be impossible to steal: it just needs to be a bit harder than they are prepared to deal with.
Not that someone can't cut it off - but they'd have to approach the bike with cutters and actually cut it. Of course they can just pick it up and put it in a van - but the quality of the cable/chain/lock wouldn't affect that at all.
As an alternative, even a cheap disc lock is pretty hard to remove.
https://www.amazon.com/Master-Lock-Brake-Shackle-8303DPS/dp/B0009V1WR0
While all locks are simply a deterrent, not really protection adding this to your bag with a u-lock or beefy hardened chain lock would help keep your scooter yours.
Also, I would never lock my scooter up for more than 5 minutes, max. If I'm going to in somewhere for more than that the scooter stays home or goes in with me.
The padlock would definitely stop your scooter from rolling but one day, you might forget it's on there and try to take off which would cause some damage.
They sell [disc brake locks] (http://www.amazon.com/Master-Lock-8303DPS-Disc-Brake/dp/B0009V1WR0/ref=sr_1_2?ie=UTF8&amp;qid=1427514154&amp;sr=8-2&amp;keywords=disc+brake+lock) that come with a coiled strap that you attach to your handlebars after attaching the lock to your disc. The strap is a reminder that you have the disc brake attached before you try and take off.
I just got and installed one of [these] (http://www.amazon.com/Gorilla-9000-Motorcycle-Remote-Transmitter/dp/B00J3QM4SS/ref=sr_1_1?ie=UTF8&amp;qid=1427513872&amp;sr=8-1&amp;keywords=gorilla+alarm)
Although it's just an alarm without an ignition kill, it is pretty loud and it only took me about an hour to install.
This alarm also has the option of adding a 2-way remote which supposedly works for up to a 1/2 mile away and it notifies you if your alarm is going off.
I highly recommend this alarm if you could spare $100 bucks.
You can try using this or this.
Disc locks are useful. And for good measure you can use a bicycle lock on the rear wheel and lock it to a immobile object like a street lamp.
First I'll say the built in steering lock is useless and can be broken in seconds. Use it, but never depend on it. (It will help with idiots.)
Get at least one, maybe two, disk brake locks. This will help keep them from moving the bike. Also, an alarm and a GPS unit help too. Keep the cover on as well.
Not usually.
In NY state I have a restriction on my drivers license that says I have to be wearing my hearing aides or have a full length rear-view mirror (or blind-spot mirror).
When I first started driving I had one. I used to get reminded of it all the time because passengers would not realize and hit their head on it while getting in to my hatchback. It's really not a bad thing to have regardless of hearing impairment or not, you can see everything behind you.
I recommend getting a wide angle rear view mirror. It's physically about twice as wide as a standard mirror, and it lets you see out of your side windows through your central mirror. The remaining blind spots are very small.
e.g.
https://www.amazon.com/Fit-System-RM011-Clip-Mirror/dp/B001A0J2JO/
First of all, nice job swapping IRS in to your '96
> I've had my Mustang long enough to see it go from "Oh my god, I can't see out of this thing!" to "Oh my god, it's so open and airy in here!"
I felt the same way initially with my Mustang, but then I installed this wide mirror. Works wonders on rearview visibility (just make sure to strengthen your rearview mirror's balljoint - it's a heavy mirror):
https://www.amazon.com/gp/product/B001A0J2JO/ref=oh_aui_detailpage_o07_s02?ie=UTF8&amp;psc=1
I think this is it, although I bought it at a Napa and not online. http://www.amazon.com/Clore-ES5000-Booster-Portable-Battery/dp/B000JFHNQA
I bought this one first, and it died on me in a couple months. http://www.amazon.com/Stanley-J309-Peak-Jump-Starter/dp/B001U04NCA/
do you have a jump pack. something like this
https://www.amazon.com/STANLEY-J5C09-Jump-Starter-Compressor/dp/B001U04NCA/ref=sr_1_8?ie=UTF8&amp;qid=1498047641&amp;sr=8-8&amp;keywords=jump%2Bstarter%2Bpower%2Bbank&amp;th=1
Definitely something I'm looking into. I live in a REALLY remote place, and the nearest Canadian Tire is about 9 hours away =/.
I was looking at this one on amazon, what do you think?
http://www.amazon.ca/Stanley-J309-300-Amp-Jump-Starter/dp/B001U04NCA/ref=sr_1_1?s=automotive&amp;ie=UTF8&amp;qid=1417790369&amp;sr=1-1
This is the one I got many moons ago and it has saved me so much headache.
STANLEY J309 Power Station Jump Starter: 600 Peak/300 Instant Amps with Battery Clamps
https://www.amazon.com/STANLEY-FATMAX-J7CS-Jump-Starter/dp/B001U04NCA
Just so I get this straight, you want to put the dashcam inside your house or your car? It sounds like you want to put it inside the car but I'm just checking. Additionally, unless you angle it straight up, I'm not sure you'll get a good angle on the third floor balcony from the windshield of a car.
To answer your question, you could run the camera off a booster pack for cars if you have one. They're usually fairly large in capacity and have a cigarette lighter plug included. Something like this.
Some cameras just use a USB cable that plugs into a cigarette lighter adapter so you could also use a large battery bank and use it on motion detect like that. At that point though, I'm not sure if something like a cheap 1080p security camera like this one wouldn't do the same job. Just be careful with the battery bank if you live in a place where it gets really hot.
Dual battery you will at least need this:
https://www.amazon.com/Smart-Dual-Battery-140A-Isolator/dp/B00400IYTK
https://www.amazon.com/Scoshe-EWFH-Single-Fuse-Holder/dp/B000KIR8M0/ref=pd_bxgy_263_img_2?ie=UTF8&amp;psc=1&amp;refRID=Y4S68RZF6CFYXAZBN52B
https://www.amazon.com/Absolute-ANL200-2-Pack-Fuses-Plated/dp/B005EUTLYW/ref=pd_bxgy_263_img_3?ie=UTF8&amp;psc=1&amp;refRID=Y4S68RZF6CFYXAZBN52B
Then its on to pwm vs mppt charge controller
and a panel and wiring.
Maybe something like this? https://www.amazon.com/Smart-Battery-Isolator-Voltage-Sensitive/dp/B00400IYTK
One thing to keep in mind is that normal lead-acid batteries require charging over long periods of time. If you drain your lead-acid house batteries to 50% charge (which is the maximum for deep discharge lead-acid/AGM) it will take hours of charging to bring them back up to 100%, and many people just don't drive that many hours. That's why there is usually solar which will charge all day long.
Nowadays, you can also buy Lithium Iron batteries, which don't suffer from being part discharged, and which charge much faster. But that's a bigger up-front investment.
As for how you hook up your battery pack to the alternator - you need a smart battery isolator that first fills up your car battery, and only then switches to send charge to your house battery. To keep your voltage drop to a minimum, you need thick wires to go 18 feet (which is 36 feet total, as the number that matters is the full round trip, not just one way.)
https://www.amazon.com/Smart-Battery-Isolator-Voltage-Sensitive/dp/B00400IYTK for example.
> I need to take a look and see if I have the space for it under the hood (probably) but would be best if I could use a battery box in the bed of the truck.
Either way works, but it's a lot more fairly expensive wire to get back to the bed.
This is what I'm using (or something really similar): http://www.amazon.com/Smart-Dual-Battery-140A-Isolator/dp/B00400IYTK/ref=sr_1_8?ie=UTF8&amp;qid=1416450132&amp;sr=8-8&amp;keywords=battery+isolator
Yeah, cheap chinese stuff. But it's been fine for a couple of years so I don't feel like it owes me anything. Expect that much more in properly sized cable and cable ends.
I had this and all the accessories on a previous plow truck: http://www.hellroaring.com/bic75150.php
It's really nice, but more than I wanted to spend for the foul weather/off road toy the new setup is on.
Cool, I plan on using one of [these] to isolate the two. (https://www.amazon.com/gp/product/B00400IYTK/ref=crt_ewc_img_dp_1?ie=UTF8&amp;psc=1&amp;smid=A1Z9PJN6YB119)
Dorman 929-301 Leaf Spring for Jeep Cherokee, Pack of 1 https://www.amazon.com/dp/B005VPS358/ref=cm_sw_r_cp_apip_5HU4aN3uIEDRl
Dorman 722-024 Leaf Spring Shackle https://www.amazon.com/dp/B00A195TN8/ref=cm_sw_r_cp_apip_38T55FkKZrZlk
Kept the U-bolts
http://www.morris4x4center.com/coil-spring-52001122.html?utm_campaign=map&amp;utm_medium=email&amp;utm_source=yotpo&amp;yotpo_token=5c055200d7e5d61e6a7288fe977d4cc04aa61bcc
Springs felt softer than the old ones I took out. But that's just a feeling.
I just bought these and I am pleased.
http://www.amazon.com/gp/aw/d/B005VPS358?pc_redir=1411222595&amp;robot_redir=1
https://www.amazon.com/gp/product/B005VPS358/ref=oh_aui_detailpage_o00_s00?ie=UTF8&amp;psc=1
I have a 2" shackle lift on the back and my stock springs were flat so I decided to get the HD OEM ones. The jeep has kind of a Rat Fink stance now but Dr Google says that it will flatten out eventually.
Would recommend getting that plug mounted up into the lower grille or bumper before the winter hits, otherwise it's going to be a corroded mess. NOCO is a nice option, it's the one I have.
I bought some door actuators. They use linear movement. Combine that with a L293D chip to change polarity and you have a simple button pusher for cheap.
PIXNOR 10pcs L293D DIP 16-pin IC Stepper Motor Drivers Controllers (Black) https://www.amazon.com/dp/B00ODQM8KC/ref=cm_sw_r_cp_apa_EkxBybF3HW1ZK
InstallGear Universal Car Power Door Lock Actuators 12-Volt Motor (2 Pack) https://www.amazon.com/dp/B00CZBQCR2/ref=cm_sw_r_cp_apa_OjxBybTETBVE1
You could make something like this https://www.youtube.com/watch?v=UMskp5M8Igw using a cheap car door lock actuator and keyless entry system
http://www.amazon.com/Remote-Central-Locking-Keyless-Controllers/dp/B006QH9C5A
http://www.amazon.com/Universal-Power-Actuator-12-Volt-Motor/dp/B00CZBQCR2/ref=pd_bxgy_e_img_y
You can use a small 12V motorcycle battery as the power source.
http://www.amazon.com/ExpertPower%C2%AE-Rechargeable-Sealed-Battery-BLMFM12_7/dp/B003S1RQ2S/ref=sr_1_2?ie=UTF8&amp;qid=1415825130&amp;sr=8-2&amp;keywords=12v+battery
And if you feel ambitious you can hook it up to a solar panel recharge so you don't have to charge or swap the battery.
http://www.amazon.com/Instapark%C2%AE-Black-Mono-crystalline-Charge-Controller/dp/B004FOEUI0/ref=sr_1_3?ie=UTF8&amp;qid=1415825203&amp;sr=8-3&amp;keywords=12v+solar+panel
Hmm. Even an aftermarket one? The fronts recently crapped out so I had to replace them with these guys. Just like the original ones, they only took two wires.
Yeah. Here's what you want
OR
You could put a full alarm system in - though this is obviously more complicated. I'd recommend any 'directed' system, only because that's what I'm familiar with.
Obviously the full alarm would be more complicated to install, but only marginally. There's also the possibility you clip the wrong wire and mess something critical up...
If you wanted to put in the actuators yourself, I'd say go for it. Give yourself a weekend with at least 12 hours of time to spend on it. It won't likely take that much, but you don't want to run out of time half-way through. Maybe you could get the actuators installed on one day and the brain on the next.
This one seems like a good reference for the actuator install
OR - you can buy the genuine mazda actuators and then you only have to worry about wiring them up. A quick google shows replacement parts available for $20-40 each door... You might even find the car/door is pre-wired for them.
There is nothing special about any power door lock solenoid. They are all pretty much Chinese crap.
$10 a pair on Amazon. Will last about 3 years. Piece of cake to replace:
https://www.amazon.com/gp/product/B00CZBQCR2/ref=oh_aui_search_detailpage?ie=UTF8&amp;psc=1
Here they are, you'll need relays of course and if you do the alarm it'll lock them when you're driving automagically and unlock when you stop driving. It's really nice.
I did a semi-hardwire install on my 2008 Civic. It is very simple.
&nbsp;
Do you have any technical, hands-on skills?
&nbsp;
Buy 1 of each. You can buy in AutoZone too.
&nbsp;
https://www.amazon.com/Bussmann-BP-HHH-ATM-Add-A-Fuse/dp/B000GKEXK2
&nbsp;
https://www.amazon.com/uxcell%C2%AE-Charger-Cigarette-Lighter-Female/dp/B00EZJBELQ/
&nbsp;
Find a switched source (or constant if you have a camera that triggers when you are parked) using your multimeter, tap into it and route the wires. Should take 1-3 hours depending on your skills. DO NOT use the ScotchLok Taps.
What I did instead was buy a female cigarette lighter end (similar to below) and wire that into the power source. This way I didn't have to cut the dashcam power cord, and could move it to another car in the future.
https://www.amazon.com/uxcell-Charger-Cigarette-Lighter-Adapter/dp/B00EZJBELQ
Sounds like you're looking for a terminal block. You'll need a step down converter to take the 12v battery juice down to whatever your pi and cell phones require. You could also just wire a female car charger adapter and then use a car charger to properly do the voltage step down for charging cell phones and tablets. Raspberry Pi's require 5v and seem to work fine at USB 2.0's standard of .5 amps, but I'm pretty sure they'll work at the 2-3 amps most high end chargers utilize, but that all depends on what kinds of peripherals you'll be running.
That one is a 12v in but it's directly connected to an AC adaptor for a house, so I wouldn't touch it as you'd void any warranty cutting the wires. You can get something like this and wire it up with this, and your cigarette lighter should have enough amperage to power it unless it's not accessory in which case a relay can be used. Depends how technical you want to get with it.
It's really, really easy to add your own ambient lighting to the Focus (or any car really). Most LED strips are already 12v. They'd need an adapter from house wall power but in a car (the vast majority of them anyway) the 12V circuits are already there! If you're concerned about your own electrical knowledge they make kits too; they're pretty inexpensive and you could splice open that cigarette adapter line to wire it in directly or get something like this. Personally I'd buy my own strips, controllers, and hard wire it though (make sure you confirm controller works with your strip). Since you're in the footwell I'd also recommend weatherproof but it's not super necessary since it won't be directly exposed.
You could tap in to an accessory line/fuse to have them always on or get fancy and wire them in to the dash lighting for when the headlights are on so that they only come on at night. I just used these fuse taps the other day for a dash cam and radar detector install; make sure you have the right fuses for your install though. I had to pickup some lower amperage ones to properly protect my lower amperage gear.
Some LED strip lighting is easy to adhere or screw down depending on your preference and you can even get RGB and an IR/RF/bluetooth controller to customize.
Anyway, the whole thing should take nothing more than an hour or two and less than $100 in parts.
About the least expensive way you can wire this up to your fuse box is to buy a 'add-a-fuse' and a DIY lighter socket, together these will cost you $10.
http://www.lightinthebox.com/add-a-circuit-fuse-tap-piggy-back-mini-blade-fuse-holder-apr-atc_p4498022.html?currency=CAD&amp;litb_from=paid_adwords_shopping&amp;utm_source=google_shopping&amp;utm_medium=cpc&amp;adword_mt=&amp;adword_ct=84538326434&amp;adword_kw=&amp;adword_pos=1o1&amp;adword_pl=&amp;adword_net=g&amp;adword_tar=&amp;adw_src_id=1810908567_303092114_21769052474_pla-61865531738&amp;gclid=CP-BrKvCyNACFY-BaQodGBYPeg
https://www.amazon.com/uxcell-Charger-Cigarette-Lighter-Female/dp/B00EZJBELQ/ref=sr_1_1?s=automotive&amp;ie=UTF8&amp;qid=1480235267&amp;sr=1-1&amp;keywords=lighter+socket
and here is a video showing how to do it:
https://www.youtube.com/watch?v=ht6GDkFz9Is
edit
You can buy these parts locally at any automotive parts type store, NAPA for example.
Seems like the hardwiring kit in /u/nonvideas post is out of stock. You can use these two things instead:
http://www.amazon.com/gp/product/B00I0MWPXU?psc=1&amp;redirect=true&amp;ref_=od_aui_detailpages00
http://www.amazon.com/gp/product/B00EZJBELQ?psc=1&amp;redirect=true&amp;ref_=od_aui_detailpages00
This is what I used. There's a panel under the fuel lid/hood release latches that uncovers a small fuse panel. First, unscrew the big bolt you see (you may have to pry the bigger plastic cover slightly) using a 13mm socket. Tighten the bolt so that the black ground cable from the cigarette lighter thing is secure. Then, insert the red power cable into the red wire connector from the fuse tap and crimp the wire. Now you're ready to tap your fuse box. Take out the fuse you want to tap, insert it into the fuse tap, then insert the fusetap fuse into that same socket. Now you're tapped into the battery power and only the ignition will power the cigarette lighter.
Nex2300
https://www.amazon.com/dp/B073BKPWNC/
With this
https://www.amazon.com/dp/B00J4W10XG/
I would use this steering wheel control module. User programmable double function for all buttons and better customer support.
My dealer called and said the car is ready and the factory radio is in the car and there are no issues with remote start. So I’ll run with this for a while to see if I have any issues with remote start again.
I called idatalink support again and asked about the OBD2 port causing this issue. They now say that it is possible that having remote start and the maestro on the ODB2 port both talking to the car can cause issues. But none that would blow a fuse. I asked if I just unplugged that would I eliminate this issue. They said maybe but unplugging the OBD2 plug will not allow the backup camera to work. I definitely need the backup camera to work.
I might buy the harnesses that auto harness house makes for Subaru and use those because they have a harness that gets power for the rear camera from some other pin on the factory harness. I’d then need the maestro SW not the RR for steering wheel controls but at least I’d not be using the maestro OBD2 plug anymore. I don’t care about the data it provides to the screen anyway.
Pioneer to Subaru harness - https://autoharnesshouse.com/AHH-70-1761.html
Subaru 28 pin harness with voltage step down for reverse camera - https://autoharnesshouse.com/49021b.html
Maestro SW - https://www.amazon.com/gp/product/B00J4W10XG/ref=ppx_yo_dt_b_asin_title_o00_s00?ie=UTF8&amp;psc=1
Or maybe I just return the pioneer head unit and get a Sony that has steering wheel controls built in and does not need a Maesto at all. They don’t have HD Radio though which I really would miss.
https://www.amazon.com/gp/product/B07GD8627K/ref=ppx_yo_dt_b_asin_title_o05_s00?ie=UTF8&psc=1 this is the harness i used, has the reverse 6v signal already to go. all you need us usb retention https://www.amazon.com/gp/product/B01DJ4KVQ6/ref=oh_aui_search_asin_title?ie=UTF8&psc=1
then the speaker harness. https://www.amazon.com/gp/product/B0002BEQJ8/ref=oh_aui_search_asin_title?ie=UTF8&psc=1
and lastly the antenna harness https://www.amazon.com/gp/product/B003VYWSES/ref=oh_aui_search_asin_title?ie=UTF8&psc=1
these were all the things i used to wire in my kenwood. besides the tool to keep steering wheel buttons https://www.amazon.com/gp/product/B00J4W10XG/ref=ppx_yo_dt_b_asin_title_o04_s00?ie=UTF8&psc=1
the autoharnesshouse harness makes it easy to use the maestro by the way. hope this helped. i have a 2017 wrx by the way so i dont know if there is a difference with 2015 and the new 2018+s
From memory/Amazon history, here's what I installed:
This is what car installers use to hook up steering wheel controls to the head units.
http://amzn.com/B00J4W10XG
The kit appears to be universal... so if you don't have steering wheel controls built in... with this you should be able to wire switches/knobs in and program them pretty easily.
My plan was to use one of those generic harnesses you can get on amazon
https://www.amazon.com/MICTUNING-MIC-B1002-Wiring-Harness-Waterproof/dp/B00O72R7Z8/ref=pd_sim_263_1?_encoding=UTF8&amp;pd_rd_i=B00O72R7Z8&amp;pd_rd_r=EMCEVT45F8CJRMC2888D&amp;pd_rd_w=iMy2G&amp;pd_rd_wg=ob0Kh&amp;psc=1&amp;refRID=EMCEVT45F8CJRMC2888D
(Pair) 5''x7'' 6''x7'' High Low... https://www.amazon.com/dp/B06XRXTX32?ref=ppx_pop_mob_ap_share
SAMLIGHT Led Light Bar 2 PCS... https://www.amazon.com/dp/B077VDYFWW?ref=ppx_pop_mob_ap_share
MICTUNING MIC-B1002 LED Light Bar... https://www.amazon.com/dp/B00O72R7Z8?ref=ppx_pop_mob_ap_share
Wiring harness for the fog lamps
These are the brackets I used. These are the lights I used. Installation of the brackets is fairly straightforward. A guide comes with the purchase. Wiring the lights was probably the most difficult aspect just because I had to extend the reach of the relay . Feel free to ask me any more specific questions.
I had fog lights added to my '04 Grand Cherokee that didn't have the factory option. Holes were there already, but the wiring wasn't. I used this kit. The wires weren't long enough for my car, so more had to be added. Everything worked perfectly besides that.
I bought this wiring harness
https://www.amazon.com/gp/aw/d/B00O72R7Z8/ref=mp_s_a_1_4?ie=UTF8&amp;qid=1509824892&amp;sr=8-4&amp;pi=AC_SX236_SY340_QL65&amp;keywords=light%2Bbar%2Bwiring%2Bharness&amp;dpPl=1&amp;dpID=514cd74Z1UL&amp;ref=plSrch&amp;th=1&amp;psc=1
It’s basically plug and play. Wire the lights. I mounted the relay next to the battery. Connect to battery, then run switch wires through the firewall and into the dash. Took me two hours.
Its this one here, for the 300w max, while the light bar is only abour 120W
https://www.amazon.com/gp/product/B00O72R7Z8/ref=oh_aui_detailpage_o03_s00?ie=UTF8&amp;psc=1
The diagram for the wiring is the 4th pic down
Unfortunately without a wiring diagram of how you have it connected I'm not sure what the issue is. The wiring doesn't sound correct, you shouldn't be routing main power lines to a switch and you should try using relays kits such as linked below, you can get power from the cig lighter for the illumination for the switch.
https://www.amazon.com/gp/aw/d/B00O72R7Z8/ref=mp_s_a_1_1?ie=UTF8&amp;qid=1478261904&amp;sr=8-1&amp;pi=SY200_QL40&amp;keywords=relay+light+harness&amp;dpPl=1&amp;dpID=51AotTzudvL&amp;ref=plSrch
They have an included wiring diagram and you only run a grounding wire inside to switch the main power which means you only need one wire running inside and you can ground to anything metal inside the cabin. Now on this switch Since it has illumination that's why it shows power wires to the switch but they show them as thin wires as this is just for an led which is super low current
Hi, thanks for the reply! Dealing with AC power seems a bit scary for a completely unexperienced person like me. I was trying to stay away from inverters, but I may not have a choice with my laptop. How much efficiency is lost from going from 12v to 110 to 19? On a separate note, have you had any experience with wiring 5v usb charger ports to the battery? Could I just use dc to dc converters with heatsinks?
&nbsp;
Also, I'm a bit confused about the fuses. Right now I'm planning on hooking up the battery to 3 switches (master, 12v cig outlets, and usb), two 12v cig outlets, and two usb ports (usb on one connection). Between those things, I was thinking of setting up a fuse box with one of these with a 3a fuse for the usb ports and possibly 5a for the car chargers? I don't know if it would be better to use 3a since I'm just going to have a dew heater and maybe (if I can find an adapter) a charger for my laptop.
If I were to use the kind of fuse setup you mentioned, how would that work? It says it includes 40a fuses, would I just replace those with 10/15a? Also, if I were to use those wire fuses for each connection rather than a box like that, is there any downside to using different gauge wires? The website mostly says those wire fuses are 10 or 12 gauge while I was planning on using 16. I'm honestly not sure if I even need 16 for the setup or if I should just go with a thicker wire like 12 gauge for the entire setup.
&nbsp;
I'm very interested in those powerpole connections.Do you have an example on your setup on how they are connected to the different components both inside the battery container and outside? Did you use the powerpoles on the inside or just normal wiring with insulated terminal connections?
>Edit: For external use of those powerpoles, would you remove the 12v adapter male end from the wires on the device, connect the wires to their associated powerpole connection, and then plug that into the powerpole box?
&nbsp;
Thanks!
Here is what I crudely drew
This is the Radio
This is the Fuse Box
Basically where the fuse is going for the Radio I was wondering if I could cut them off and have it go from the fuse box to the radio and put a 15 amp fuse in and get the same results.
The fuse box on the radio is supposed to be plugged directly to the battery for max power but the auxiliary fuse box will be plugged the same way.
If not that's fine I just wanted to make sure before I went and cut it out and I will just run a wire from the battery to the radio.
I actually just bought this for a project on my jeep. Works really well and is pretty small.
Yes, also, you might want to consider adding a relay and fuse block for accessories:
[Relay]( https://www.amazon.com/dp/B078T8CMF6/ref=cm_sw_r_tw_dp_U_x_bqmiDbBMSEFWX via @amazon)
[Fuse Block](https://www.amazon.com/dp/B00QMTAZ1W/ref=cm_sw_r_tw_dp_U_x_yrmiDbE7ZJ4HY via @amazon)
Wiring Guide
The fuse block should be under the seat/tail in a protected area.
Is there any reason why you wouldn't just buy a normal 12v relay and run it to the ignition switch from the fuse panel instead of spending $60 on one with a relay built in? For example use these:
https://www.amazon.com/OLS-6-Way-Blade-Indicator-Protection/dp/B00QMTAZ1W/ref=sr_1_3?ie=UTF8&amp;qid=1497658098&amp;sr=8-3&amp;keywords=fuse+panel
https://www.amazon.com/OLS-Split-Charge-Relay-Switch/dp/B01MYPTVJD/ref=sr_1_1?ie=UTF8&amp;qid=1497658136&amp;sr=8-1-spons&amp;keywords=12v+relay&amp;psc=1
Do you have a multi meter? Is the battery dead? Seems like a silly question, sorry. If that's all your going to run off your fuse block, you might not need that heavy duty thing. The only thing drawing the most amps is your bilge pump. I'm guessing around 15 amps. You won't need the ground bus bar if everything is on the battery. The negative side will essentially keep everything grounded.
I would think you only need something like this.
http://www.amazon.com/gp/aw/d/B00QMTAZ1W/ref=mp_s_a_1_3?qid=1457629487&amp;amp;sr=8-3&amp;amp;pi=SL75_QL70&amp;amp;keywords=auto+fuse+block
You just need to hook up the positive side of the battery to the post. Then properly fuse each output. Then run a return line to the negative terminal of the battery.
Most of my experience is navy radios and wiring police cars with all their sirens,lights, radios and what not.
Our grounds were essentially the body of the car which is connected to the negative end of the battery.
Just pay attention to your wire Guage too.
I just bought a 07 FZ6 and my blinkers/hazards were not working. I was at wits end because everything checked out. Turns out my signal relay (a 2 pin connector) was messed up.
Ordered http://www.amazon.com/iJDMTOY-Electronic-Flasher-Motorcycle-Signal/dp/B00RM26LXO/ref=sr_1_3?ie=UTF8&amp;qid=1453800145&amp;sr=8-3&amp;keywords=motorcycle+signal+relay and pluged it in and now im blinking again.
dont know if this applies to your older bike though
Edit: My running lights, tail and brake were all working. Just no blinky
Here's what I'm using: https://www.amazon.com/iJDMTOY-Electronic-LED-Hyper-Issue/dp/B00RM26LXO
Plug and play for my '14 STR. You really only need two of the three wires if I remember correctly.
SECTION | CONTENT
:--|:--
Title | FZ-07 Progress Report
Description | The Build Parts so far, TwoBros "The Garden Snake" edition Exhaust - [email protected] Stage Two Filter and Lid Kit, https://www.e-dnafilters.com/product/Stage-2-and-3-Applications/Yamaha/DNA-1092/YMA-MT07/Yamaha-MT-07-(13-15)-DNA-Air-Box-Cover-and-Filter-TC-Y7N14-S2 ECU Flash Tune - http://www.veloxracing.com/ Core Moto brake lines - http://amzn.to/2iYwoR2 LED Relay - http://amzn.to/2iq0Mnj Pro Taper Carmichael Bars - http://amzn.to/2iGkCyz Pro Taper Pillow Top MX Grips - http://amzn.to/2j6VDFB Shorty CNC Levers - http://amzn.to/2iGe6It R6 Throttle Tube - http://amzn.to/2iGbJFq RAM Mounts - http://amzn.to/2hPo0aY Phone Mount - http://amzn.to/2iG7slt GoPro Mount - http://amzn.to/2j2EGrz Bar End Mirrors - http://amzn.to/2iGdouu Bar End Mount Kit for MX Bars - http://amzn.to/2hQqdRT Washers Needed for Bar Mount - https://www.napaonline.com/napa/en/p/RFD8071034B/RFD8071034B The Proton 500 blinkers SAVE 15%-http://hightechspeed.refr.cc/bullwacky Motodynamic Fender Eliminator - http://amzn.to/2iP0L0A Motodynamic Integrated Tail Light - http://amzn.to/2ircKkB Mini Fly / Windscreen (Its only $30!) http://amzn.to/2iz4Q61 Merch http://bit.ly/1Rxcefz Shirts https://teespring.com/stores/thegardensnake Support my Patreon here, https://www.patreon.com/TheGardenSnake TheGardenSnakes Second Channel, https://www.youtube.com/channel/UCjDp-bUClKTq8lzoC18iJLw TheGardenSnake on Instagram http://instagram.com/jake_thegardensnake TheGardenSnake on FaceBook http://www.facebook.com/TheGardenSnake TheGardenSnake on Twitter https://twitter.com/#!/thegardensnake and only if you want to, https://www.paypal.com/cgi-bin/webscr?cmd=_s-xclick&amp;hosted_button_id=DSV4PQ4B2L28E Business inquiries, [email protected] Cold Funk - Funkorama by Kevin MacLeod is licensed under a Creative Commons Attribution license (https://creativecommons.org/licenses/by/4.0/) Source: http://incompetech.com/music/royalty-free/index.html?isrc=USUAN1100499 Artist: http://incompetech.com/
Length | 0:11:55
****
^(I am a bot, this is an auto-generated reply | )^Info ^| ^Feedback ^| ^(Reply STOP to opt out permanently)
Yes,
Two issues.
1.you need a digital flasher. I use these. AUDEW 2-Pin Electronic Turn Signal Flasher Relay Fix Motorcycle Turn Signal Hyper Flash https://www.amazon.com/dp/B011BTMDQM/ref=cm_sw_r_cp_tai_i_O4o4AbK3MZFNH
2.most Japanese MC’c back feed the dash indicator ( TS) from the signals themselves. The guaranteed and easy fix ( without all the resistors and janky wiring is to use one of these. Kuryakyn 4709 Diode Kit https://www.amazon.com/dp/B000TK7XMY/ref=cm_sw_r_cp_tai_i_s7o4AbN8C7F71
Then get into your headlight bucket or under the dash. Find the turn signal wires and the indicator socket. Pull out the indicator bulb holder and cut the two wires going to it. Wire up the Diode. 1 red wire connects to each right and left positive wires. The blue wire goes to the center conductor ( wire you cut ) of the indicator bulb. The black wire connects to the other wire of the indicator bulb. The black wire goes to ground - any ground wire. The left over wire ( you cut ) from the original Indicator wire just gets taped / shrink wrapped over as it is no longer used.
This will fix everyone’s “LED lights don’t work, don’t flash, stay on” problems as long as the original lights worked. This is your fix. If you ever change back to stock. It still works with no changes. This works on every Japanese bike that doesn’t work correctly with LEDS. Some bikes you can get away with changing the indicator bulb for an LED as an led bulb is a diode, but this solution only works if they didn’t backfeed the Indicator light across the negative terminal ( outer side ) of the bulb.
Instead of a resistor you can replace the blinker module with an adjustable $4 one from amazon:
https://www.amazon.com/AUDEW-Electronic-Signal-Flasher-Motorcycle/dp/B011BTMDQM/ref=sr_1_1?ie=UTF8&amp;qid=1494862870&amp;sr=8-1&amp;keywords=Blinker+relay
Those wires are going to be battery, flasher out, and ground. For standard filament bulbs, just buy a 2 prong standard mechanical relay and leave the ground disconnected. If you upgrade to LED bulbs, switching to a load independent relay (usually 3 prongs) will fix the fast blink issue.
In the 3 prong the coil side seeks ground for discharge through the additional ground, otherwise it has to discharge through the circuit. Because the load (resistance) is low with LED bulbs, the capacitor that controls the coil latch timing can discharge really fast and the flasher blinks fast or not at all. There are some electronic relays without a standard coil/cap that have a rheostat in them that allows you to adjust the discharge load. Those will be 2 prong - they discharge through the bulbs/circuit. The standard mechanical relays are available at any auto parts store.
Electronic solid state 2 prong with adjustable load:
https://www.amazon.com/AUDEW-Electronic-Signal-Flasher-Motorcycle/dp/B011BTMDQM/ref=sr_1_4?ie=UTF8&amp;qid=1493815500&amp;sr=8-4&amp;keywords=electronic+flasher
Standard mechanical coil 2 prong:
https://www.amazon.com/Bussmann-NO-552-12-8-Thermal-Flasher/dp/B000GKAZCW/ref=sr_1_1?ie=UTF8&amp;qid=1493815609&amp;sr=8-1&amp;keywords=12v+flasher
3 prong with load independent grounded coil (my preferred type - these still need some load to function):
https://www.amazon.com/uxcell-Vehicle-Blinker-Flasher-0-02-20A/dp/B00BLZ9XQK/ref=pd_sbs_263_2?_encoding=UTF8&amp;pd_rd_i=B00BLZ9XQK&amp;pd_rd_r=B9EGDRDCQ81ZH9VWKT7A&amp;pd_rd_w=SRsBN&amp;pd_rd_wg=UBlTA&amp;psc=1&amp;refRID=B9EGDRDCQ81ZH9VWKT7A
It's good but not great. My riding buddy says daylight visibility is ok, but to my eyes it seems a bit dim. That being said I've had several cops behind me and no issues to date.
Functionally it's been perfect except for having to redrill the plate mounting holes. As I'm sure you know it requires an LED compatible blinker relay. Another $7 Amazon purchase. Adjustable Blinker Relay
Future... I'll replace it with something brighter and more integrated. I've toyed with the thought of embedding it into a custom seat pan but it still won't be as bright as I'd like.
https://www.amazon.com/Design-Engineering-010378-Engine-Injecter/dp/B015NOKWQY#customerReviews
That's it, I've only heard good stuff about it. But I would do more research on it as a just in case measure to make sure your money is being spent well.
The long start on hot 4.0 engines is often caused by a heat soak issue that affects the injectors/fuel rail. There is supposed to be a heat shield on top of the intake manifold that keeps heat of the injectors but it’s flimsy and often gets trashed/torn out during repairs. On some 4.0s there are TSBs issued that also call for the injector to be wrapped in individual shields. They make kits for it. I don’t know about your fuel pump issue, but just something to note regarding hot engine starting issues.
Design Engineering 010378 Fuel Rail and Injector Cover Kit for Jeep (1997-2004, 4.0L Engine) https://www.amazon.com/dp/B015NOKWQY/ref=cm_sw_r_cp_api_i_XXEwDb1PVADX9
Design Engineering 010378 Engine Fuel Rail and Injecter Cover (Jeep, 4.0L) https://www.amazon.com/dp/B015NOKWQY/ref=cm_sw_r_cp_apa_ZKl0Bb2F0NPJQ
This is a good kit
https://www.amazon.com/Design-Engineering-010378-Engine-Injecter/dp/B015NOKWQY/ref=asc_df_B015NOKWQY/?tag=hyprod-20&amp;linkCode=df0&amp;hvadid=312684231807&amp;hvpos=1o1&amp;hvnetw=g&amp;hvrand=6194809803259040541&amp;hvpone=&amp;hvptwo=&amp;hvqmt=&amp;hvdev=m&amp;hvdvcmdl=&amp;hvlocint=&amp;hvlocphy=9030815&amp;hvtargid=pla-570207636650&amp;psc=1&amp;tag=&amp;ref=&amp;adgrpid=60983009663&amp;hvpone=&amp;hvptwo=&amp;hvadid=312684231807&amp;hvpos=1o1&amp;hvnetw=g&amp;hvrand=6194809803259040541&amp;hvqmt=&amp;hvdev=m&amp;hvdvcmdl=&amp;hvlocint=&amp;hvlocphy=9030815&amp;hvtargid=pla-570207636650
Might be a good time to do the fuel injector upgrade. Look it up there is a ton of info on this upgrade. Replacing the spark plugs would be good preventative maintenance. If you can maybe run a compression test before you reinstall the spark plugs. I do that to all my new cars to get an idea of engine performance and wear-down.
Installing a new heat shield worked for me when I was having multiple misfires. I was having this issue because of heat soak like a previous commenter said. P303 came back though, so I got a new cylinder head coming this summer.
Try this:
Design Engineering 010378 Engine Fuel Rail and Injecter Cover (Jeep, 4.0L) https://www.amazon.com/dp/B015NOKWQY/ref=cm_sw_r_cp_api_i_1TedBbG7THY43
I found just the larger heat shield for like $20 on eBay but if you want to go all out there is this one.
And here it is... https://www.amazon.com/dp/B01KQ3D81S/ref=cm_sw_r_cp_apis_1504551944755
AUKEY CC-S1 Car Charger, Flush Fit Dual Port 4.8A Output for iPhone iPad Samsung & other - Black https://www.amazon.com/dp/B00M6QODH2/ref=cm_sw_r_cp_taa_RMwezbEHZQ8SE
or...
***
Ginsco Dual USB Charger Socket Power Outlet 2.1A & 2.1A(4.2A) for Car Boat Marine Mobile with Wire Fuse DIY Kit Blue LED https://www.amazon.com/dp/B01N6S2SNM/ref=cm_sw_r_cp_taa_nOwezbM2AG9AZ
Throw one of these bad boys in your system with a switch and youre good to go. Ive taken my kit out playing Pokemon go and recharged multiple phones without putting much of a dent in the battery. Im sure someone can do the math, but those power banks that will charge your phones like 5 times are 10 AH 5 volt, so lord knows how long you can charge your phone of a 12 volt 35 AH stepped down to 5 volts.
...hope you dont have any neighbors.
Easiest way? Get a small 50watt solar panel, a usb adapter, and one of those portable bluetooth speakers with built-in batteries. wire it up, mount it somewhere sheltered from rain, and you're good to go.
&#x200B;
panel: https://www.amazon.com/HQST-Monocrystalline-Applications-Compact-Design/dp/B07HYGSZKL
usb adapter: https://www.amazon.com/Ginsco-Charger-Socket-Outlet-2-1A(4-2A)/dp/B01N6S2SNM
bluetooth speaker with 8hrs battery: https://www.amazon.com/Bose-SoundLink-Color-Bluetooth-speaker/dp/B01HETFQKS (something with a remote would be best)
Well, I'm pretty sure the primary intention for them is USB sticks or the likes for media files, so it makes sense since the infotainment makes use of that and for working with firmware and the likes.
I kind of doubt you'd be able to modify that without extensive circuit work. You'd be better off adding another Set of USB ports to the car that are hardwired and meant for high output charging. You'd just need to cut the trim to add the outputs. Something like this would do it:
https://www.amazon.com/Ginsco-Charger-Socket-Outlet-2-1A%EF%BC%884-2A%EF%BC%89/dp/B01N6S2SNM
The USB 2.0 standard is 500 mAh for data transfer. So it still technically charges, just really, really slow. USB 3.0 I believe is 900mAh (there's 5 extra contacts, which is more than likely why).
It's cost and benefit thing. There are more electricity heavy appliances now than in 76 and have the opportunity to covert propane appliances to electricity. I have a dedicated 20 amp circuit in my kitchen area and my fridge, microwave, and induction cooktop, and ice maker runs while another 20 amp dedicated service in my bathroom runs the dual mode 10 gallon water heater. I haven't used any propane this year at all. If my wife used blow dryer at the same time, it won't trip the circuit. I do have 2 ACs, also on their own dedicated circuit but that I concede was an overkill... We simply never needed 2 this year. But if we ever do, I can run both at the same time while everything else is running without fear of tripping any circuit. It's the difference of having 30 amp available and 100 amp available.
The cost of conversion was very reasonable. The biggest expense was a [Progressive Dynamics converter panel] (https://www.amazon.com/gp/product/B002UC8PN0/ref=oh_aui_search_detailpage?ie=UTF8&amp;psc=1) at $282 but I'd have to purchase a new converter panel for 30 amp anyway since I scraped the crappy 2 circuit one that the Airstream came with. 25 ft of 50 amp RV power cord was $100. Both of these I was going to replace so the true cost is actually less than the total. Add to this the circuit breakers and that's the cost of upgrading 30 amp to 50 amp. Just the peace of mind to run anything at anytime was worth it. The induction hot plate heats faster than propane and I have the peace of mind of not having an open flame inside, especially with 2 little kids. The Dometic dual mode water heater is great. I usually have the Airstream parked at home for a day before we leave and I preheat the water then and when we arrive at a campsite, the water takes maybe another hour to heat to hot with electricity and keeps up with usage while camping. We have another hot plate and electric grill we set up outside, plugged to the outside outlet (shared with interior AC circuit) and those run fine while everything inside is running. I did go a little crazy with the inside outlets... I think I have 16 or 17 outlets inside but hardly anything is plugged in that circuit other than TVs. Small electronic devices are connected to the 12 v system using 12v to 5v [USB sockets] (https://www.amazon.com/gp/product/B01N6S2SNM/ref=oh_aui_search_detailpage?ie=UTF8&amp;psc=1). I have about 8 of those.
Anyway, 50 amp gives you flexibility at not a very high cost. Even if I'm reno'ing a Bambi, I'd still put in 50 amp.
I bought it from Amazon. https://www.amazon.com/BASENOR-Soundproof-Rubber-Weather-Reduction/dp/B07R13DYYY/ref=sr_1_4?keywords=tesla+model+3&amp;qid=1564800630&amp;s=gateway&amp;sr=8-4
That happened when we put that rubber stopper up there. Didn't help the noise. But know that apparently water doesn't get in there either as told to is by Tesla service. But what did help actually was putting rubber around the door using this kit. It's unnoticeable since ours is black/black. And doesn't look discombobulated when you open your doors.
Check this out at Amazon.com
BASENOR Tesla Model 3 Door Seal Kit Soundproof Rubber Weather Draft Seal Strip Wind Noise Reduction Kit https://www.amazon.com/dp/B07R13DYYY/ref=cm_sw_r_other_apa_i_MowxDbSWWQ6JB
I bought these to help with noise and keep the cabin temp stable.
BASENOR Tesla Model 3 Door Seal Kit Soundproof Rubber Weather Draft Seal Strip Wind Noise Reduction Kit https://www.amazon.com/dp/B07R13DYYY/ref=cm_sw_r_cp_api_i_zHESDbSFEYHJB
https://www.amazon.com/gp/product/B07R13DYYY/
Two of the bags had the names swapped. So that was fun. But they come with a qr code for each step which links to a youtube video. 1st step took 20 min. The rest was done in 10. So 30 min to figure it out and install. Mine might just be better then the rest. I don't know. Just sick of seeing the.
Agreed. Audis look stupid with front plates -- haven't used one for 10 years. But you can't park on the street in DC without a meter maid waddling by and seeing an easy ticket. On the rare occasions I have to, this sticks my plate in the window.