(Part 3) Best kitchen utensils & gadgets according to redditors
We found 20,494 Reddit comments discussing the best kitchen utensils & gadgets. We ranked the 6,486 resulting products by number of redditors who mentioned them. Here are the products ranked 41-60. You can also go back to the previous section.


http://www.amazon.com/Spinning-Hat-Bottle-Opener-Multicolored/dp/B00BKQSL2C
https://www.amazon.com/Spinning-Hat-Bottle-Opener-Multicolored/dp/B00BKQSL2C
I doubt I'd play with it much beyond a day because it's a bit big for a keychain and I'm not an alcoholic, but it's $3
I try to find cool stuff like this for /r/INEEEEDIT, my sub. If you like stuff like this you'd probably like the subreddit too.
Adorable kitchen gadgets that look like animals. I don't know what it is, but if it is animal-like, it is coming home with me even if I don't need it.
I am talking about various kitty spatulas, spoons, hot pads...a dinosaur pasta server, a manatee tea infuser (get it? Mana-tea?), many kitchen timers that look like animals....
Lodge is a proven manufacturer, which is really all you need in cast iron. It's pretty straight forward stuff, so you want a brand that has no quality issues with the
forgingcasting.^1 Their preseason is good, but don't expect to cook eggs on it first thing. Cornbread should be OK out of the box with plenty of fat.That said, don't expect the iron the be silky smooth. The biggest complaint I've seen is that it's nothing like their mom's 2 generation old Griswold, which you could "slide eggs off of". I've never seen a brand new Griswold, as neither have most people today, but I guarantee that most of the smoothness came from just using it everyday for years.^2 Buy a good stainless turner. I personally like this one. It's sharp, and it's got a lot of flex but just enough rigidity to keep it from permanently bending, which is perfect for a cast iron skillet.
So, don't be bothered by all the stuff you see online about using flax oil and baking it for 500 degrees for hours and hours. Buy it, rinse it, cook some bacon in it. Just use the damn thing. Pioneers crossed the country through all manner of hell with them hanging off their wagons. They survived that, they can survive the domestic kitchen.
EDIT: ^1 I'm dumb sometimes.
^2 Also, people that know more about this stuff than I do disagree with this statement, as Griswolds and the like were given a smooth finish at the factory, and Lodge isn't. Whether or not a baby's-ass-smooth finish is necessary, I would personally still say is up for debate. It ultimately depends upon what you want to cook in the thing. I may buy a small Wagner to see the difference for myself.
I have a few of these. They feel kind of flimsy, but work surprisingly well. Get them here:
https://www.amazon.com/gp/product/B00BKQSL2C/ref=ppx_yo_dt_b_asin_title_o00_s00?ie=UTF8&psc=1
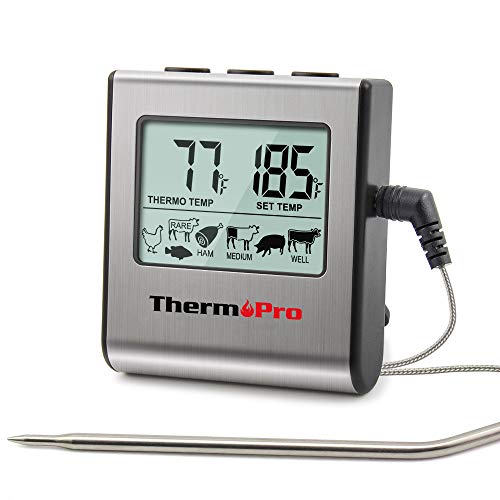
Lasers are for surface temperature, for thick meat you want to be able to measure the inside. An electronic monitor with a probe that you can leave in is the best, then you don't have to keep opening your oven to check the temperature. Something like: https://smile.amazon.com/ThermoPro-TP-16-Thermometer-Stainless-Standard/dp/B017613C3C
I'm pretty sure you can get one of those timers for christmas tree lights. It's shut off the power at a certain time. Then you could have it switch back on at a certain time.
I think this would work because you tv doesn't turn on as soon as it get electricity (ie plugged in).
TV: on Power: on
-timer off
TV: off Power: off
-timer on
TV: off Power: on
then repeat.
The same item on Amazon UK is frequently brought with Silicone Beer Savers Bottle Caps Tops :/
Posting initially without links and will edit them in my mobile browser is crashy.
Keychain: nite-ize S-biner bottle opener 2.98 (it's really useful to clip onto belt loops etc for cycling)
Wallet: A6 leather notebook cover wallet w/ pen loop - 36.99( fantastic thing to have i would imagine, a6 is w bit larger than "field notes")
Pen: Kaweco Sport in blue. 24.94 (It is the space pen of fountain pens)
Knife: Case Sodbuster in american workman blue - 24.98 (I am a sucker for a traditional slip-joint)
Light: Maglite Solitaire in blue 9.43 (very tiny and pocketable, 40 lumen, made in the USA!)
It comes to 99 and change
I need this.
Edit: Found it, Cap Zappa.
Get yourself a nice kitchen scale - it has tons of uses. Measure 4oz every time. The box suggests 2oz but that's for pussies or maybe an appetizer.
The scale comes in handy for all sorts of shit. Like measuring how much meat you put on your sandwich. So you can make sure you get 4 equal sandwiches out of your pound of turkey instead of that last sandwich with like 2 slices of meat. You can also weight postage and boxes under 11lbs. If you have a small dog, you can keep its weight in check. You can even weigh your balls.
Yes, it will be fine. Although some may disagree.
I prefer steel spatulas actually; I think they help even out the seasoning that is slowly building. I use mine for scraping off any burnt items as well.
I have a #9 pre 1942 griswold pan that was unseasoned when I bought it, and it has built up an incredibly smooth surface, almost like glass.
I use this spatula (and another one that is the same but a smaller size). Love the wood handles. I sanded the end a little smoother than it was when I got it, and I periodically wipe it down with cutting board oil (mineral oil).
*edit:
I would add that it probably should only be a flat spatula/turner, as a rounded one will create a small point of contact and could possibly harm the seasoning.
Pastasaurus
Love Kiwi knives... Got all mine from https://importfood.com/
So cheap, sooo sharp.
Also this guy, the pastasaurus:
https://www.amazon.com/Fred-Friends-PSAUR-PASTASAURUS-Server/dp/B002L162HQ/ref=sr_1_1?keywords=pastasaurus&qid=1555418858&s=gateway&sr=8-1
Serves pasta like a champ, but I'd also honestly be comfortable defending my home with just that thing against a small army.
Some gift ideas that have gone over well in the past:
Also, here's my link to a review on here of Etsy/ArtfullyWalls/Society6 artists in case you want to shop for yourself/others with the upcoming sales.
Here you go!
get a $30 kindle and note taking apps
Fire 7 Tablet with Alexa, 7" Display, 8 GB, Black - with Special Offers https://www.amazon.com/dp/B01GEW27DA/ref=cm_sw_r_cp_api_exnQBb1XCYNYZ
I used the dough mix from Detroit Style Pizza Co. and the 10x14 pan from them as well. I would have to weigh the dough mix to figure out what's in it but there is a big pack of flour (not sure what kind but I'm assuming AP would work fine) (EDIT: 3 cups flour but I can't determine how much salt) and a small pack of yeast and sugar. The yeast did not activate so I ended up using my own and eyeballing what was in the packet. Turned out to be about 1 teaspoon of yeast and about 1/2+ teaspoon of sugar.
Dough
Sauce - I use Jersey Italian Gravy Pizza Sauce as it tastes great and saves me time if I don't feel like making it myself
Cheese - I use a 50/50 mix of dry aged, whole milk (full fat) mozzarella and muenster cheese
Pepperoni - I think the best pepperoni on a pizza is the kind that curls up and chars at the edges to form little grease cups.
I will have to look at the label when I get home to find out which brand I used but this oneI used Carando pepperoni and it worked really well. I always refer to /u/J_Kenji_Lopez-Alt's study on pepperoni curl. My slices were about 2-3mm thick.Method
EDIT: I used Carando pepperoni and there were 3 cups of flour in the packet but I don't know how much salt is in there.
Uh, Amazon... https://www.amazon.com/dp/B0009X1P9S/
Hijacking top post to recommend to /u/yubimarcano cheap options.
$50 tablet:
https://www.amazon.com/All-New-Amazon-Fire-7-Tablet/dp/B01GEW27DA/ref=mp_s_a_1_3?ie=UTF8&qid=1524777318&sr=8-3&pi=AC_SX236_SY340_FMwebp_QL65&keywords=kindle&dpPl=1&dpID=51zfRJ3JqeL&ref=plSrch
Refurb Chromebooks can be under $100:
https://www.amazon.com/gp/offer-listing/B0067U9VUC/ref=mw_dp_olp?ie=UTF8&condition=refurbished
New ones not much more:
https://www.walmart.com/ip/11-6-Chromebook-4GB-Memory-32-Hard-Drive-Bluetooth-4-0-1-0MHD-WebCam-Red/56123859?wmlspartner=wlpa&selectedSellerId=0&adid=22222222228000000000&wl0=&wl1=g&wl2=m&wl3=42423897272&wl4=pla-51320962143&wl5=9007365&wl6=&wl7=&wl8=&wl9=pla&wl10=8175035&wl11=online&wl12=56123859&wl13=&veh=sem
Also could look on craigslist and Facebook marketplace for deals on used devices.
No idea what situation you're in, but you do have great options that are relatively inexpensive. Hope that helps
If you have access to Trader Joe's I suggest checking out their high protein tofu. It looks like this. It doesn't need to be pressed. It's very firm. It might be the best tofu I've used. I won't use anything else unless silken is required because you don't need to press that, either.
I'd otherwise suggest getting a tofu press because the taste and texture of your tofu will be night and day. I've pressed tofu with a towel and plates which works texturally if done for 3-5 hours but I've noticed the tofu still won't absorb flavor properly. This is the press I own and used to swear by.
Looks like this
Here ya go!
http://www.amazon.com/Spinning-Hat-Bottle-Opener-Multicolored/dp/B00BKQSL2C
Found it
I LOVE the L-Ascorbic acid powder. Once you learn how to use it, it's a versatile, stable product that will last a long time. I'm currently mixing it with Hada Labo Premium. Here is how I measure for precision:
The scoop it comes with is far too large, so I bought these tiny measuring spoons: https://www.amazon.com/gp/product/B0009X1P9S/ref=ppx_yo_dt_b_asin_title_o07_s00?ie=UTF8&psc=1
The smallest spoon is called "Drop" and it is equivalent to 1/64th of a teaspoon. I measure one level spoon of this and tap it into the palm of my hand. Next, I mix 4 drops of Hada Labo into the palm of my hand (**handy trick--one drop carefully dispersed from the bottle is equivalent to the "drop" measuring spoon). Use the spoon to mix it all up. The powder dissolves completely so there is no grittiness, leaving a perfect 20% strength, 3.0 PH Vitamin C serum in your hand. I test with these strips: https://www.amazon.com/gp/product/B07DTH14XZ/ref=ppx_yo_dt_b_asin_title_o07_s00?ie=UTF8&psc=1
This works out to be enough for my face, neck, décolletage, and the backs of my hands. Voila!
I hiked the Appalachian trail and cooked dinners (and the odd lunch or breakfast) the whole way.
Lightweight backpacking food means dehydrated, and high in fat since it has the most calories per weight. My staples were pasta sides of varying flavors, peanut butter, ramen, quick-cooking pasta and dehydrated sauce, jerky, dried fruit, junk food (candy, honey buns, granola bars etc), cheese, oatmeal, summer sausages, and instant potatoes. I brought some dehydrated vegetables for a little nutrition, added olive oil/cheese to most things to add more calories. A few hot sauce packets go a long way too.
Hikers rarely to never used freeze dried foods due to cost. I ate a couple but they were all given to me.
You could move the butter in a screw top jar, maybe a small peanut butter container?
I did the whole trail with one pot (the infamous grease pot, get rid of the strainer and replace the handle with something lighter. It's as light as expensive backpacking pots at 1/5 the price), one small plastic cup for tea, and a spork. Boil some water, dump in your food, let it simmer for 5-10 minutes, eat. No one carried a pan since they were just dead weight.
Cooking in foil in coals does work. The problem is that stuff you can wrap in foil (potatoes, ground beef, onions etc.) has a very high water content and will therefore be very heavy.
Ask and you shall receive: Dexter-Russell
Some things are a little ridiculous, but a good spatula is not one of them.
Edit: I made an assumption that you wanted a "spatula" like a pancake turner, which I believe is a misnomer. These, I believe, are true spatulas...
Most likely problem: You are using the wrong spatula.
Once teflon pans went mainstream, a lot of stores stopped carrying proper spatulas for anything but teflon. You want something like this: http://www.amazon.com/Dexter-Russell-2-5-Inch-Stainless-Walnut-Pancake/dp/B002CJNBTO
Why? The sharp stainless cuts the food off the pan, allowing carbon to build up and smooth the surface of the pan. After a period of use the pan becomes smooth and the non-stick properties develop to the point where you could use a plastic spatula, but don't.
Don't use a silicone or other plastic spatula that was designed to protect teflon. Don't use a thick rigid BBQ/commercial griddle turner designed to work on large very flat surfaces instead of a 10" frying pan. Use a thin, flexible, sharp stainless steel spatula that was designed for small pans with metal surfaces.
Fire 7 : https://smile.amazon.com/dp/B01GEW27DA/
Fire 8 : https://smile.amazon.com/dp/B01J94SWWU/
Discount also applies to the 16GB Fire 7 and 32GB Fire 8, which are $10/$30 more than their base models, respectively.
Both come with a Micro SD Slot so I don't really see a reason to get the higher capacity model unless you don't plan on using a SD Card(though on the HD 8 it's quite a bit more expensive for such a small storage gain so i wouldn't get that one at all).
EZ Tofu Press - Removes Water from Tofu for Better Flavor and Texture. https://www.amazon.com/dp/B007LLGMG2/ref=cm_sw_r_cp_api_i_LLoqDb7CNS8XW
Speakers will make your life so much better. I'd recommend getting a shower speaker too, your flatmates will love you.
A door stop is the right answer.
If you get a memory foam mattress topper your life will be so much better. It makes any bed amazing, and, although they aren't particularly cheap, they can last a very long time. I have this one
Get some good quality pens and books of paper. You don't want the refil pads as they always fall apart sooner or later, get some which have metal binding on one side. For pens I always got a box of these or these. They make the vast amounts of notes you need to take much better.
Don't buy the recommended reading until you have checked how many copies the library has. There's a good chance you'll be able to read them enough without paying for them, or search Bookname.pdf into google and it will probably be there.
Pint glasses are very useful things to have, but I found it added a nice touch to my flat if they were all borrowed from pubs.
get a multipack of playing cards on the cheap from amazon. You'll probably get through a fair few packs in first year. Some poker chips were a nice thing to own as well. In 3rd year I got Cards Against humanity as well, and it is a very good game for predrinks
Get minimum 1 good frying pan, 1 good saucepan, a good wooden chopping board, a good chefs knife, a baking sheet, and a colander.
Get a bottle opener like this one and you will have hours of fun pinging the caps at people
I didn't use mine much in 1st year, but all the other years of uni my bike was a great thing to have. It allows you to shop further away (so cheaper) and reduces your reliance on public transport. It also means you can get out of your area of the city occasionally, which is nice.
A french press means you can make a whole pot of great coffee for your flatmates when you are all getting up after a heavy night, at which point they might crown you or start worshiping you or some shit
First steps: download Fitness Pal app. Buy a digital food scale. And if you can, buy a big water bottle and a Fitbit.
More detailed version:
Just remember this is a 1lbs journey at a time. I would get discouraged easily because it felt like the finish line was so far away. But as the weeks pass, it gets easier and easier and the lbs loss add up and before you know it you will have lost a substantial amount of weight! You CAN do this, and you will!
30lbs, then your food and the extra clothes you're going to add on. You're carrying so much weight you might be miserable. I'm a believer in hike your own hike but man, that's a lot of crap you don't need and a lot of crap that's heavy. Every item you don't NEED is extra weight. It's luxury. It's luxury that's heavy and you're carrying for "just in case" or "so my butt doesn't get dirty"...like that 3oz seat cushion. That stuff adds up fast. Dump it.
Dump that huge pot and get a grease pot.
Dump the zippo for a bic, zippos suck in the woods, bics rarely fail.
Do you already own that tent? 6 pounds is freaking heavy.
Dump the knife sharpener, dump the lantern, the batteries and the charger, dump all of those drysacks and just use trash compactor bags...they cost less and weight almost nothing.
Your sleeping pad is also heavy. Get a cheap blue pad like this for now
Your pillow is among the heaviest available. An Exped Air UL and spare t shirt will save almost half a pound.
You dont need the scrapers and dishcloths, just the scraper, and you don't really need that.
Just those changes saves 5 lbs 2 oz, not counting the tent.
I freeze and press my tofu all the time. It works great for making crumbled tac filling or just to get some extra texture. If you use tofu a lot I recommend a tofu press like this. I find it makes quick work of draining.
https://www.amazon.com/Spinning-Hat-Zappa-Bottle-Opener/dp/B00BKQSL2C
Any cheap kitchen scale will work for smaller items, I would get one that's actually useful for you other than just for gear (baking, coffee, etc).
Here are two decent scales that I would grab (I have the hook scale, and a different kitchen scale):
http://www.amazon.com/Electronic-Balance-Digital-Fishing-Hanging/dp/B00B301MPI/ref=sr_1_1?ie=UTF8&qid=1464199451&sr=8-1
http://www.amazon.com/AmazonBasics-Digital-Kitchen-Scale-Display/dp/B00V5IM5PY/ref=sr_1_5?ie=UTF8&qid=1464199428&sr=8-5
Can you set what time the pot starts? I used to use a plug timer to start the pot when I wasn't around. Throw all the ingredients in the pot in the morning before leaving, set the timer to turn on at noon, and leave the crockpot dialed to LOW -- by the time I got home at 6, the food would be done.
I just got this off Amazon and have been pretty happy with it. The keif catcher seems to produce more than my old grinder and it's a nice size. So far, I'm happy and use it for my Pax 2 and Vapcap M.
https://www.amazon.com/gp/aw/d/B00GXSFB1Q?psc=1&ref=yo_pop_mb_pd
My cues for eating are definitely less pronounced. But not stopping -- whatever is put in front of me, I could probably eat it all. Even at Thanksgivings, my stomach would be stuffed and bloated, but my mind would still tell me I was hungry.
The Amazon kitchen scale I bought is a very useful tool. It keeps me from getting my portion sizes too large. And it's a much easier way to put together a recipe -- just add ingredients by grams instead of measuring each with teaspoons, tablespoons, measuring cups, etc.
I live in a retirement community and get breakfast plus one other meal. Everything is brought home instead of eaten in the dining room, because I often need to rinse off meats and measure out servings. For example, at breakfast, I always get an "everything" omelet. It can weigh between 6 and 20 ounces. The bigger ones get cut in half (or I'd eat all of it one sitting). :)
When I have my Halo Top ice cream, I dish it into a four ounce serving cup. When I'm done with it, I'm not looking for more. But if I were eating it out of the pint-size container, that would be my serving size. Doesn't keep me from using my finger to get every drop of ice cream out of that four ounce cup.
As Clint Eastwood's Harry Callahan said, "A man's got to know his limitations".
I was just not able to manage them well before Keto.
I have a few recipes I could give out, [VG and PG are on Amazon] (https://www.amazon.com/Glycerin-Vegetable-Kosher-USP-Pharmaceutical/dp/B00PSGWHIO/ref=sr_1_13_a_it?ie=UTF8&qid=1524904013&sr=8-13&keywords=vegetable+glycerine). and excigexpress is where I buy all my flavors. You also need a beaker set, .01 g scale, syringes, medical gloves, glass bottles for steeping, and plastic bottles
Edit: links
This one, I think. I have it too.
http://www.amazon.com/Polder-Original-Cooking-All-In-One-Thermometer/dp/B0000CF5MT/ref=sr_1_4?ie=UTF8&qid=1367934782&sr=8-4&keywords=probe+thermometer
Ladle and a gravy separator (which to be fair would probably be a specific/specialized tool if you didn't already have one). Ladle the fat out without having to be too fussy, then use the separator to pour the stock back in. Alternately, you can just ladle it into any old container or measuring cup, then pop that in the fridge to harden the fat and recover the extra stock, without having to chill the entire stockpot.
I'd recommend against the sharp corners on your spatula. Too much chance they will dig in to the corners and gouge perfectly good seasoning.
But you've got the right idea other than that. This is the spatula I use, exactly in the manner you describe.
I'll throw my vote in for a sharpening stone. If he doesn't already have a nice sharpening set, maybe consider getting him something like a nice diamond sharpening stone; I've seen them for $50 or less.
Tools are always nice. Here are some suggestions to think about:
~ microplane grater
~ Japanese mandolines can be fun to have around.
~ Fish spatulas can be a handy tool.
~ Does he have a good quality peeler? Everyone has a "normal" peeler, but I like to have a good quality horizontal peeler, like one of these, to use sometimes.
~ Does he do a lot of baking? If so, maybe some silicone baking mats for his baking sheets, or maybe some parchment paper.
~ Does he like to use fresh citrus juice very much? Does he have a citrus reamer?
~ Does he like to use fresh garlic? Maybe a garlic press?
~ Silicone spatulas?
~ Does he have a pepper grinder for fresh ground pepper?
~ Does he have a set of mise en place bowls or something to use to keep his stuff organized when he's working?
~ Does he have a scale? You can find plenty of options for home-use digital scales that can weigh up to 11 or 12 pounds, and use either pounds, or grams (if he's doing anything metric.)
~ Something like a good quality cast iron pan can be a lifetime investment, because if they're well cared for, he'll be able to pass it on to his grandkids someday.
~ A dutch oven will always be useful to serious home cooks. The enameled cast iron type are very popular, but they come in many different sizes and shapes, so keep that in mind when picking one out.
~ Knives are always nice. Paring knife, utility knife, serrated slicer, etc.
Those are just a few suggestions that popped into mind. Good luck, I hope you find something nice for him.
I’ve always used something like this: https://www.amazon.com/dp/B0002YTGIQ/ref=cm_sw_r_cp_api_i_YdUVDbK5WBVDV
The fat rises to the top, and you’re able to pour the soup out. Works well hot, but I can never find one large enough so multiple fills and pouring is necessary.
Also if you have any large objects, like meat or noodles, it won’t work if you put it in this device. So you’ll never get all the fat, but definitely most.
If you don't want to spend a lot of money right now go with this: http://andrewskurka.com/2011/how-to-make-a-fancy-feast-alcohol-stove/
and this:
https://www.amazon.com/Stanco-Non-Stick-Grease-Strainer-Black/dp/B000MVTIOQ
Then grab some foil from your house for a windscreen and grab a spork from KFC. You'll have a complete cooking setup for less that $10. Plus it's super light.
This is my go to spatula, FYI. Works fine with CI. Also, I have multiple Lodge pans, including 2 10.25" which I use often multiple times a day. You'll enjoy them. Also, despite what you've heard you can use soap and scrubby sponges. Basically, the only thing I do differently that cleaning any pan is drying thoroughly and using a very light coating of oil.
https://www.amazon.com/gp/product/B002CJNBTO/ref=oh_aui_search_detailpage?ie=UTF8&psc=1
http://www.amazon.com/Spinning-Hat-Bottle-Opener-Multicolored/dp/B00BKQSL2C
Kindle fire is 50 bucks and you can pick a cheap sd card that you can fill with movies or musics from the places you mentioned.
https://www.amazon.com/dp/B01GEW27DA/ref=cm_sw_r_cp_api_CBKKBbBKW0FJY
Before you pick that up though pm, I might have one I can send to you.
Yep. Not OP, but this is what I use: https://www.amazon.com/dp/B0000CF5MT
Like a lot of other folks, I have a benriner and I'm happy with it. It is extremely sharp so watch your fingertips.
One of my favorites.
/np/https://www.amazon.com/OXO-Good-Grips-4-Cup-Separator/dp/B0002YTGIQ
Just wish it came with a bottle-brush that could clean the spout. I bought a brush set and none fit as well as I'd like.
Philosophy: spend as much money as you can on the best Big 3 you can. Leave worrying about shaving grams with titanium mugs and other small shit until you get bored and you budget is bigger. :)
Big 3: $610
Cooking: $24.50
First Aid: $32
Clothing: $64
Other: $58
Total: $788.50
base weight : ~10lbs
get a couple of these! http://www.amazon.com/Dexter-Russell--2-5-Inch-Stainless-Walnut-Pancake/dp/B002CJNBTO/ref=sr_1_5?s=kitchen&ie=UTF8&qid=1382129627&sr=1-5&keywords=flipper
as for the spots, I personally would scrape at them with a scotch brite pad until smooth, then oil.
Suggestions for improving your pocket experience, based on my experience with trying to minimize the amount of stuff in my pockets:
You'd probably have to do something similar for your stylus (although what is a stylus useful for on an iPhone?)
But of course, you have to pick one that works for you, and none of them will hold coins, and most don't hold bills well either.
I also wouldn't really trust those door locking / unlocking apps; they're generally finicky and require trading security for minor convenience. Not to mention what happens if your phone gets stolen. Or runs out of battery. Or the power goes out. And, of course, you're keyless at that point :|
TL;DR warning
Are you willing to invest in some tools? Do you like Five Guys? (skinny burgers) The fastest burger procedure that I know of is Kenji's Ultra-Smash technique, which makes a pair of thin patties in no time. Takes about a minute per burger (two patties with cheese). Details here:
http://www.seriouseats.com/2014/03/the-food-lab-maximize-flavor-by-ultra-smashin.html
You can also do a regular smash burger, which is thicker (McDonalds-thin), but takes longer (~1.5 minutes per side, about 3 minutes total per burger):
http://aht.seriouseats.com/archives/2012/09/the-burger-lab-smashed-burgers-vs-smashing-burgers.html
The advantage of the ultra-smash is that it's super quick & you can toss a piece of cheese to melt between two patties, so you can pump out a ton of burgers in no time. You will need a few tools, namely:
It's not rocket science, but getting a proper setup will let you have a workflow that makes cooking for a crowd a breeze. I have a big extended family, so I cook in bulk a lot, but I also use this for just my immediate family because it's so fast to get setup. There is an up-front investment required, but everything you'll buy will pretty much last forever, so it's worth it if you like to eat burgers!
So the first two things you need are a metal cooking surface & a heat source that can pump out a lot of heat. I don't recommend a regular grill because they simply don't get hot enough; you need 600 to 700F to do this. You can either do a compact setup (a 2-burger surface with a single burner) or invest in a quality flat-top setup (more expensive, but lets you do more burgers at once). The ideal surface to do this on is a Baking Steel, which is very expensive. There are knockoffs for cheaper, but I like BS because they have a Griddle version with grooves to catch the grease:
http://www.bakingsteel.com/
You can also do it with cast iron. Lodge has a griddle for $25:
http://www.amazon.com/Lodge-LDP3-Double-Reversible-Griddle/dp/B002CMLTXG
If I'm just doing a single regular smash burger at a time, I use a 12" cast-iron pan. $28:
http://www.amazon.com/Lodge-Cast-Iron-Skillet-L10SK3ASHH41B-12-Inch/dp/B00G2XGC88/
If you do get into cast-iron, read up on this seasoning procedure (i.e. the way to keep it smooth & slippery without Teflon). It's a bit of a pain, but it's worth learning because anything you buy in cast-iron can be handed down to your kids because it lasts forever:
http://sherylcanter.com/wordpress/2010/01/a-science-based-technique-for-seasoning-cast-iron/
You will want a heavy smashing tool as well. I have this massive 2.5-pound cast-iron press. It fits inside the 12" pan above (but not the 10"). $13:
http://www.amazon.com/Update-International-Heavy-Weight-Hamburger-Commercial/dp/B002LDDKZ6
If you plan on doing ultra-smash burgers, you'll need a scraper. This is the one Kenji recommends, but you can probably find something locally: (Home Depot or Lowes)
http://www.amazon.com/Plextool-Wall-Paper-Stripper/dp/B00AU6GQLQ/
Anyway, getting back to the cooking part: you'll need a hi-temp burner. I like Bayou Burners, they sell them on Amazon. I have an SP10: ($50)
http://www.amazon.com/Bayou-Classic-SP10-High-Pressure-Outdoor/dp/B000291GBQ
I use that with my 12" cast-iron pan for when I'm just doing a few burgers for the family. 15 minutes = 5 burgers. You can also slap a flat surface like a cast-iron griddle or Baking Steel on that puppy. Also comes in a square version (not sure how the BTU's compare). I also have some KAB4 burners that I use with my Baking Steel, among other things. More expensive, but larger shell & burner: (more even heat over the cooking surface)
http://www.amazon.com/Bayou-Classic-KAB4-Pressure-Cooker/dp/B0009JXYQY/
For cooking more at a time, you can get a cooktop. Blackstone has a 36" cooktop available, but it doesn't get very hot (don't get me wrong, it's an awesome tool, but I've had trouble breaking 500F on mine, which means you're not cooking 1-minute burgers on it, plus the heating is kind of uneven, so you have to work in the hot spots for faster cook times). Also comes in a slightly smaller 28" version (but it's only like $50 less, so it makes more sense to get the full-sized version because you get so much more cooking area). The nice thing with this setup is that for $299 (or a bit less if you shop around at places like Cabela's), you can cook like 20 burgers at a time, it's absolutely insane! I make epic breakfasts on it. Plus it folds up for transport, which is really handy. We use it for all of our family events & holidays:
http://www.amazon.com/gp/product/B00DYN0438
A better version is from Tejas Smokers. They make camping stove carts that have burners built-in & have griddles available separately. They get super hot, downside is the cost: you can easily spend $700 on a nice setup.
https://tejassmokers.com/Camp-Stove-Carts/23
Oh yeah, Blackstone did just come out with a compact outdoor griddle which can run off those little one-pound green tanks if you want. They go for around $99 ($79 if you have an Ace Hardware near you). I have not tried this, but it gets good reviews. I'd be curious to see what kind of temperatures it can achieve:
http://www.amazon.com/Blackstone-Portable-Griddle-Outdoors-Camping/dp/B0195MZHBK
So that's a basic introduction to the cooktops: you need some kind of decently-sized metal surface, a hi-temp burner, a smashing tool, and optionally (but recommended) a scraper. You will also want to get a strong, high-quality spatula. A good one is $32:
http://www.seriouseats.com/2010/07/equipment-the-due-buoi-wide-spatula-my-new-fa.html
Available here:
http://www.duebuoi.it/x/uk_usd/catalog/p/spatulas~805-16x10.html
If you opt for cast-iron, get an infrared temperature gun (doesn't work too well on shiny metal surfaces like steel tho). $17:
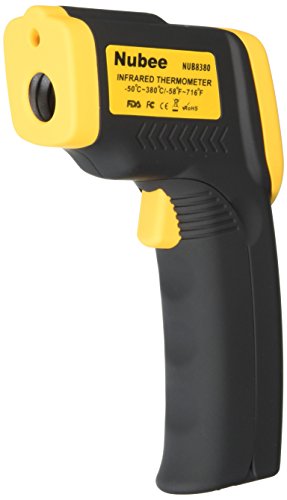
http://www.amazon.com/Etekcity-Lasergrip-1080-Non-contact-Thermometer/dp/B00DMI632G/
A cheap digital kitchen scale is useful too, for measuring out the proper amount of meat. $14:
http://www.amazon.com/Ozeri-Digital-Kitchen-Capacity-Stylish/dp/B003E7AZQA/
This collection of tools ensures that you have the proper workflow: a metal surface to cook on, the ability to bring the surface to a high temperature (and know what that temperature is for precise control), the ability to weigh your meat so you can pre-measure out what you need, the ability to smash the burger down, and also to properly scrape it off. Again, it's not rocket science, but if you have a wussy grill or a crappy surface or weak smashing/scraping tools, you're gonna have a bad time. You just need the right setup to pump burgers out fast!
So on to prep. For ultra-smash, you do a pair of 2-ounce ground beef balls. In the tutorial above, they use a mix of meat for 25% fat. I just grab some regular 80/20 ground plus some salt & pepper. For regular smash burgers, do a single 4-ounce ball (optionally 5 ounces...useful if you have a big cooktop for a bunch of burgers at one time & are only doing a single patty per burger). The nice thing is, there's no special prep required for the meat, so you can make all of your burger balls ahead of time. If you have 10 people & are doing ultra-smash, let's say half of them get 2 burgers, so 15 burgers total, or thirty 2oz balls. If you have 20 people & are doing regular smash, again with half getting an extra burger, that's 30 burgers total or thirty 4 or 5oz balls. So that takes care of prep...adjust as needed. If you're feeding mostly dudes, you'll want to add more seconds (and thirds) to the equation.
There are a variety of buns you can get. Crap buns will make for a crap burger. See if you can find potato buns or brioche buns. Those are pretty soft. Buns aren't overly hard to make, but I have yet to find a decent recipe that takes under 40 minutes, so I usually only doing fancy home-baked buns for my family rather than a crowd. Buying 5 or 10 pounds of ground beef & making smash balls out of them will take you all of ten minutes, but making buns can take forever. Here's a good recipe if you want to try it out tho:
http://smittenkitchen.com/blog/2009/07/light-brioche-burger-buns/
Or this, if you wanna get crazy:
http://www.seriouseats.com/2015/05/fresh-cemita-rolls-mexican-sandwich-burger-bun-bread-food-lab-recipe.html
Or this one, nom nom nom:
http://amazingribs.com/recipes/breads/brioche_hamburger_buns.html
But eh, just hit up Sam's/Coscto/BJ's and buy some hamburger buns in bulk, problem solved. Or find a local bakery that has good rolls. There's a good shootout of buns here:
http://aht.seriouseats.com/archives/2011/04/the-burger-lab-whats-the-best-bun-for-my-burger-taste-test.html
(continued)
I have this and I love it. It gets more water out then the pressing between two plates or cutting board or whatever method you might be using. And it's half the price of the one you're looking at.
I highly recommend this tofu press . Saves so much time and paper towels.
alright duder im about to change your life rn.
first off- dont worry about BMI. BMI is BS. Lebron james has an overweight - obese BMI at 6'8 250lbs and he probably hast the most elite human body on earth.
second - look at the bright side. you have done this before. that weight will come back twice as fast.
another bright side - you are probably lean as fuck. you will pack on muscle so much easier than other people.
another bright side - youre only 19!!! You know what i would give to be a teenager again and get those teen gains??
lastly - make this protein shake twice a day -
8 oz milk (1% is 100 calories whole is 150 calories)
1 scoop protein powder (MP brand is 100 calories, O.N. brand is 120 calories)
1 tbsp olive oil (120 calories and you can not taste it at all in the shake)
32g peanut butter (190 calories) (weigh one spoon, get the tare (zero out the scale with the spoon on it) put 32 grams of P.B. on it (30-34 is OKAY) then use another spoon to get the PB off)
this shake is 500+ calories and tastes great. only about 10oz of thick shake so you can put it down easy. pretty cheap as well. and if you want more calories you can buy whole milk or add more PB or olive oil
buy this food scale start tracking calories. Im guessing you already know how to do this though...
Available on Amazon - The Spinning Hat Cap Zappa Bottle Opener
Homebrew Materials:
Vacuum Pump Oil
Vacuum Tubing
1/4" Barb x 1/4" NPT Male Hose Fitting
1/4" Male x 1/4" Female NPT Extension Hose
Vacuum Pump
Filters
Spatulas
Magnetic Stir Bar
Digital Hotplate with Magnetic Stirrer
Nitrile Gloves (Better than Latex)
Empty Capsules (Buy Separated unless you hate your life)
Capsule Machine (If you value your sanity, buy more than a 100... I hated my life doing this)
Mohr Pipets
Pipette 10ml
Mortar and Pestle (If you're doing orals, get this... Otherwise, you're playing Russian Roulette with your doses and liver)
Funnel (For pouring into small places)
Alconox (For clean your shit)
Temperature Gun (How hot is my shit?)
Graduated Cylinder (If you measure with beakers, you're a fucking idiot... And you should consider Volumetric Flasks)
Beaker Set
1 Liter Beaker (Because brewing en'masse is better)
Scale (I have a 2kg one, too)
Calibration Weight Set
Calibration Weight 100g (Because you need two for the scale linked)
Vacuum Regulator (Unless you want to filter 9001 times due to broken shit)
Oil (Any USP grade, filtered or unfitlered)
BB
BA
Butyl Stoppers
Flip Top Seals
Crimper
Vials (Unsealed)
Autoclave (Cheaper than an oven, why are you using an oven?!)
Weight Boats (Buy a million of these. They're cheap and useful)
Did I miss something? Probably. Yes.
your heating system and temperatures are a problem. your equipment to monitor your temperature and humidity is a problem. your humidity maintenance is a problem. your log hide is a problem. your small water dish is a problem. your lid clips are a problem.
my advice is to ditch the tank and start over. it's possible to make glass tanks with screen lids work for ball pythons, but it requires a lot of modification and maintenance. many of the tricks to increase heat will decrease humidity, and it becomes this domino effect you have to balance properly or everything falls to pieces. a plastic setup is your best bet right now. plastic is a better insulator for heat, and with a tub you have 100% control over the air flow [and therefor 100% control over the humidity] because you have to drill your own air holes. here's a list of basic necessities for a low budget:
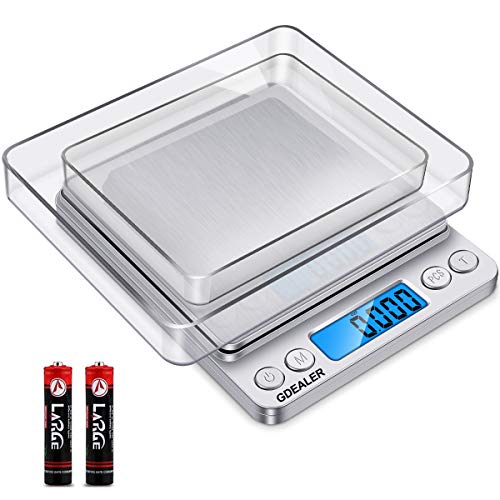
Several people have asked recently for recommendations for a cheap, accurate scale. I thought I'd post this -- bought two of these for $12.99 each off Amazon w/Prime free shipping. Comparing them side-by-side, they read identically and come with covers/trays and support grams, dwt, oz, ozt. Accurate to 0.001 ozt or 0.01 gram.
Best of luck! That's a 1/4 AGE on ozt - it shows 0.273 ozt because it's a 0.9167 purity coin. Multiply the two and you get 0.2502591. Close enough to 1/4 ozt for my calibration purposes!
https://www.amazon.com/dp/B01E6RE3A0/ref=sr_ph_1?ie=UTF8&qid=1492522710&sr=sr-1&keywords=gdealer+0.01+scale
One thing I would strongly suggest (if you haven't done so already) is going out yet today or tomorrow and obtaining a remote-probe thermometer with alarm - something like this. Try Target or Wal-Mart or BBB, or somewhere that sells a decent selection of kitchen supplies.
Secondly, consider employing a reverse-sear technique if time permits (it takes hours, but yields great results) . See this article.
Thirdly, if one of your company likes medium-well/well-done and you can't disinvite them (j/k), I agree with the slice-and-sear method mentioned by /u/AlabamaAviator.
If I were to build my kitchen from scratch, it would be pretty much what I have today w/out having to go through all the old, cheap stuff that I wound up buying getting rid of because it was low quality and wore out or broke or didn't work as well as it should have. So as follows:
All Clad Stainless:
Cast iron:
Enameled dutch oven (Staub):
Various Appliances:
Knives:
Other misc stuff:
Bakeware:
Fun things to have if you think you'll use them:
These are the things that I have right now that I'd get from the start if I were starting over from scratch. I have other stuff, but it's been gathered over time and I'm sure I've left out a few things, since I'm kind of working off the top of my head. Oh yeah, like a good set of storage stuff (Rubbermaid or similar) and a garlic press ... and ... and ... :)
I don't think anyone should include microscoops. It promotes the idea that volumetric dosing is accurate, which cannot be further from the case. A milligram scale is ALWAYS needed to accurately measure lower dosages. Not to mention all the plastic waste is causes. The only things I use scoops on are products that need larger dosages, have a low side effect profile, and that I have already calibrated using an accurate scale. So things like creatine or mushroom powder extracts I will use one of my stainless steel scoops to dose my powder, as I have already determined which scoops deliver a specific weight for that batch powder, and I know a little variability in the dosage is not going to cause any issues for me. I can wash the stainless steel scoops, and make sure they are sterilized. Plus, they can be used forever, instead of me wasting tons of them by throwing them out. Even with the stainless steel ones, I do not use them for things that need small dosages, like Noopept or Tianeptine. Those ALWAYS get weighed on an accurate milligram scale every time. Accuracy matters. The Gemini-20 is an inexpensive scale that you can get for like $20 on Amazon. There is no reason to not get one.
These are the stainless steel scoops I use: https://www.amazon.com/Norpro-3080-Stainless-Measuring-smidgen/dp/B0009X1P9S/
Here is the Gemini-20: https://www.amazon.com/American-Weigh-GEMINI-20-Portable-MilliGram/dp/B0012TDNAM/
Buy this, use it forever.
https://www.amazon.com/Dexter-Russell-Pancake-Turner-Stainless-Walnut/dp/B002CJNBTO/ref=sr_1_4?s=home-garden&ie=UTF8&qid=1493328450&sr=1-4&keywords=metal+spatula
Benriner is my personal favorite. OXO has too many parts and I don't like dragging it out of the cupboard. Don't love the Borner either- it feels flimsy, even if it might not be. Serious Eats did this review, though: Best Inexpensive Mandoline
Hard to say without knowing what he already has. Assuming he has knife, cuttingboard, pans etc, maybe a stick blender like this: http://www.amazon.com/gp/aw/d/B00ARQVM5O/ref=dp_ob_neva_mobile
Or a mandoline like this: http://www.amazon.com/Benriner-Japanese-Mandoline-Slicer-Green/dp/B0000VZ57C
Those are two of my favorite odds and ends that make life easier but took me a while to purchase them because they weren't necessary per se
yeah, theres a device thats used to seperate fat from drippings. it looks like this.
what i do is, i pour the hot (but not boiling) gravy into a zip lock freezer bag. then i "hang" the bag in the fridge. you dont want it to keep getting jostled, you just want it to remain exactly upright and stretched out. this basically amounted to hanging it off of one shelf and weighing it down with a gallon of milk.
the fat goes up, the gravy goes down. then you cut a corner off of the bag and let the gravy portion pour out, and pinch it shut/tip it when the fat gets to the bottom.
you can use it the same way you use bacon fat. also, in ramen and other soups, you can take a tsp or so of it and mix it into 1 cup of soup for some added richness and flavor.
You can get a fat/gravy separator. It looks like a measuring cup with a spout. Here's one for $15: OXO Good Grips 4-Cup Fat Separator
I've been using this, works great. Looks very similar to OP's, but without the bevel along the edges.
I use mine literally everyday. http://www.amazon.com/Nite-Ize-SBO-03-01-S-Biner-Carabiner/dp/B0037H3EB0
Get this remove the "on" plugs and set the "off" plug for your desired end time, you can manually turn it on.
Lots of good stuff in here.
I'd add to get a couple of timers and connect them to lamps and/or a radio. Make sure to change the timing every so often. It'll give the appearance someone is around.
Also, when I was young and starting out, I would stock up on non perishable items when I had a few extra bucks. I pretty much always have a back up of soap, shampoo and the like, even now. Sucks to run out of things, and sucks even worse if it's a lean week. If you cook, this is a good plan with meat too. When the store has meat on sale, buy and freeze. Saves money and you'll pretty much always have food in the house.
Good luck! Living alone can be really great.
Edit: link derp
Please do yourselves a favor and invest in this little guy. tofu press You'll regret not getting it sooner especially if you want to stop using so many paper towels
https://www.amazon.com/Spinning-Hat-Bottle-Opener-Multicolored/dp/B00BKQSL2C
For the lazy: Spinning Hat Cap Zappa Bottle Opener https://www.amazon.com/dp/B00BKQSL2C/ref=cm_sw_r_cp_apa_GVzozbB327DSJ
http://www.amazon.com/Spinning-Hat-Bottle-Opener-Multicolored/dp/B00BKQSL2C
Looks like they're for sale for $3.50 on some other sites but idk how much shipping is there! I googled "beer opener shooter"!
I actually bought this yesterday haha
It's not the best in terms of interface, but my Maverick dual probe has worked well enough for me for 4 years now.
Here it is for $35.
I've heard good things for the thermpro TP08. Here it is for $46.
Better off getting legit powder toremifene from ceretropic. I personally find it much more effective.
https://www.ceretropic.com/toremifene-citrate-powder
But a mg scale from amazon and measure it out. https://www.amazon.com/GDEALER-Digital-Kitchen-0-001oz-Stainless/dp/B01E6RE3A0/ref=sr_1_4?s=home-garden&ie=UTF8&qid=1506026218&sr=1-4&keywords=milligram+scale
I do 4 weeks 120-120-90-60
Better option than rolling the dice on some random vendor.
I want even more precision than you, obviously, because I spent $13 on a scale that gives me 0.01 g accuracy. I just throw my money away!
$30 total for the Fire 7. https://www.amazon.com/dp/B01GEW27DA/ref=cm_sw_r_cp_apa_yVezzb14RTXSN
The Fire 8HD is going for $50 instead of $80 as well. https://www.amazon.com/dp/B01J94SWWU/ref=fs_ods_tab_ds
Ah, the good old OLPC computer. Still trying to get the price down from $200 to $100 while Amazon is selling $50 tablets. https://www.amazon.com/gp/product/B01GEW27DA/
I've had this one for a year and it hasn't failed me yet. Not sure if it's quite what you're looking for, but I love it. (also, I got it because it's what Alton used a lot in earlier episodes)
http://www.amazon.com/Polder-Original-Cooking-Timer-Thermometer/dp/B0000CF5MT
thermapens are great if you use them all the time, but expensive if you're only using it once in a while. Seriously a $15 digital probe like this one should be just fine for cooking steaks.
Agreed with the other parts of the comment though. I prefer stovetop to oven, but you can do it all stove top if your pans aren't ovenproof. Just turn down the heat a bit when you flip it and pull your steaks off the heat ~5-10 before your desired doneness temp (10 if you're going to tent it with foil)
The major advantage of the oven method (IMO) is the decrease in smoke and it's much more forgiving time wise.
Also, you might try the frozen steak method which is pretty forgiving.
Okay, so a while ago I said I was going to make a gummy bear tutorial and I never did so I thought it was about time I at least made a write up for them. This recipe will get you right around 200 gummy bears.
Tools:
Ingredients:
Decarbing
Pre-heat your oven to 250F - 260F, use the digital theremometer to keep an eye on the temp to make sure it stays around there and does not get above 260F. I like to place my concentrates into the small pyrex dish and decarb in that. Put the dish with your concentrates in the oven for 30 minutes. You can check it around the 30 minute mark and see if it is fully decarbed. Look for it to be pretty clear of all little "carbination" like bubbles. When those are mostly gone you are done decarbing. It will take around 30 minutes. Go a little longer if you want couch lock / sleepy time gummies.
When it is done decarbing pull it out and set it to the side for a minute.
Infusing the coconut oil
Grab your medium sized pot and put a few inches of water in it. get it to a boil then turn the temp all the way down to a very low heat. When the water is ready place your dish with the freshly decarbed oil into the water bath and add the 1 Tbsp of coconut oil to the dish.
Let the two mix for a few minutes until they are nicely combined. It shouldn't take long maybe 10 minutes max.
Grease your molds
At this point if you dont have silicone molds (I do and I still grease mine for precautions) grease your molds so you don't forget to do it before adding your gummies.
Preping fruit juice (or water)
In the second small pyrex dish pour your real fruit juice / water or whatever base liquid you are using for your gummies. I havent tried much besides fruit juice and water but you can experiment with other liquids, but don't do an experiment on a batch with THC in it just in case something doesn't work out.
To the fruit juice / water add 1 tsp of soy lecthin and stir with the fork. Place the dish in the fridge for 5 minutes or so and stir again. Let it sit in the fridge stirring occasionaly until the soy lecthin is fully desolved.
This liquid mixture NEEDS TO BE COLD for the blooming process to work so make sure to keep it cold.
Mixing the dry ingredients
In your small non-stick pot mix the following together: 85 grams of Jello, 5 Tbsp of Gelatin, 1/4 cup of sugar. Completely mix them all together and dont let any of them get wet yet. Stir and stir until they are completely mixed.
Blooming
Take your mixed dry ingredients and pour in your friut juice (water) soy lecthin mixture. Stir it and get everything evenly mixed and make sure there are no lumps. When everything is evenly mixed place the lid on the small pot and let it sit for 10 minutes.
This is called "blooming" the gelatin and allows the gelatin to absorbe the water. The water needs to be cold because gelatin activates at about 120F and after that will start to set when it cools. We don't want it setting right now.
Here are some ideas:
They're incredible tools. If you'd like a slightly less medieval one, this is hands-down the best one out there
I was a cook for 7 years and used one on an almost daily basis, never cut myself with one. Start slow and don't try and go fast like on TV, and you'll be fine. If there is a tiny piece of food left don't be a hero and try to cut it with the mandoline. It really boils down to "Don't put your fleshy bits onto the sharp bit.
That said, try and find a Benriner . All those super expensive and gimmicky french and "v" slicer ones are crap and hard to clean. I got mine off of Amazon. Easy to clean, sharp as fuck, and can put up with the abuse Cooks put it through. Get this one and you won't regret it. Downside is it can't make waffle cuts like some of them, but really, if I want waves I'll go to the Ocean. I don't need waves on my carrots.
A mandoline with the right blade would probably do the job. Maybe something like this.
Like this?
http://www.amazon.com/OXO-Good-Grips-4-Cup-Separator/dp/B0002YTGIQ
It would most likely be okay, but it would be more expensive. That is the main reason that people suggest dry dosing or preparing your own liquid fert stocks.
The easiest way for you to dose a full nitrate, phosphate, potassium (NPK) and trace routine is NiloCG Thrive. This solution has everything that plants would need and you can just follow the instructions on the bottle. For this option you just buy the Thrive, put one or two pumps worth in your tank (start with one and if plants aren't growing well go to two) each week, and then do a 20-30% weekly water change. Easy! You absolutely need to do water changes weekly if you continue adding ferts otherwise the ferts will build up in the water and cause algae or hurt your animal friends.
EI and PPS-pro are more complicated to get going, but once you start they are just as easy as Thrive. I don't know a ton about PPS-pro so I'll focus on EI. Maybe someone else will come in and explain PPS-pro. The general theoretical idea of EI is that you dose nutrients each week so you have more nutrients in the water than your plants could possibly use, but not enough to cause algae. You "reset" nutrient levels each week by doing a 50% water change. The issue with this method is they assume you are running high light and CO2 with fast growing stems that will use lots and lots of nutrients. If this isn't your situation and you follow EI with the instructions that they lay out here you'll end up with too much nutrient in the water relative to what your plants use. This is a recipe for algae. For a true EI dosing routine you dose each nutrient three times each week.
To do the actual dosing you will need this fert package(or an equivalent) and a small set of teaspoons similar to this. These teaspoons are useful because they allow you to measure 1/64 teaspoons, 1/32 teaspoons, 1/16 teaspoons, 1/8 teaspoons, and 1/4 teaspoons, which is right within the range most people need for a single dose. Now we go into this site and look at the table labeled "EI Method Dosing without GH Booster." Find your tank size and it tells you how much of each fertilizer, in teaspoons, you need to add for each dose. For a 10-20 gallon high tech tank that would be 1/8 teaspoon KNO3 (the nitrate source,N), 1/32 teaspoon KH2PO4 (the phosphate source,P), 1/32 teaspoon K2SO4 (an extra source of potassium,K), and 1/32 teaspoon Plantex CSM+B (the trace metal source). Since your tank is low tech I would use 1/4 of these doses. That would mean 1/32 teaspoon KNO3, 1/128 teaspoon KH2PO4, 1/128 teaspoon K2SO4, and 1/128 teaspoon Plantex CSM+B. Add the powders directly to the water one or two times each week and end the week with a 50% water change. I would suggest starting with one dose each week and seeing how your plants look/grow. If they're growing slowly add another dose during the week. If you're unsure if you need additional doses you can measure the nitrate/phosphate levels of your tank at the
"beginning" of the week after you water change, follow regular dosing, and measure at the "end" of the week before you water change. This will give you an idea of how much nutrient is being used on a weekly basis. If its everything you're putting in then your doses are too small or you aren't dosing frequently enough. If you're getting way too much nutrient buildup or you're starting to see algae you should cut down on dosing. At this point you are no longer doing EI, but following your own fertilizer dosing routine that works for your specific tank and conditions. Good job!
One final note is that EI suggests alternating dosing the NPK nutrients on one day and the trace nutrients on the next. This is because the trace nutrients contain iron that can interact with phosphate to form an insoluble precipitate that is unusable by plants. If you're lazy and want to dose on a single day you can do that, but be sure to give the phosphate or traces a few minutes to dissolve in your water before adding the next. One other final note is that once you start modifying EI you should try to decrease the frequency of water changes. Water changes introduce CO2 into your water and fluctuations in CO2 may cause algae. This hasn't been my experience, but others, including the creator of EI dosing, warn against this. I don't know if this is a good enough explanation, but feel free to ask me any questions.
you're welcome
Stanco Grease Pot from Amazon is well regarded for lightweight and cheap.
I wouldn't cheap out on a pan. The GSI Pinnacle 8" is good quality and the MSR skillet is also worth the money.
I have a few of these that I use almost daily:
https://www.amazon.com/Polder-Digital-Oven-Thermometer-Graphite/dp/B000P6FLOY
At $20 (there's even a $11 one), it's not a huge risk to try it to see if it suits your use cases.
I have to agree with cboss911 on one thing. It seems to be either about cooking or seasoning. I'd prefer to cook with my skillets. What good is a seasoned skillet if you don't cook. But if you cook, a skillet will season by itself while you benefit from the food.
But here's how I clean (or don't clean) mine. After making a dish, casserole, bread, or bacon or whatever...I wipe out the pan with a paper towel or terri cloth. Then I warm up the pan again with a little oil spread around with a silicone basting brush while I do the other dishes. Then I wipe it out again. Sometimes I scrape it. If there is anything that needs scraped I use oil and a metal turner to scrape it off. It will eventually smooth the surface especially on rough Lodge skillets. I love my results. I'm not saying other methods are bad, there are many. Find the one you like. I've shared my favorite with you. Happy Cooking! (as opposed to happy seasoning)
Oh! Almost forgot. Eggs should slip right out of the pan as if it were teflon! Don't be afraid to use Pam either. It doesn't hurt anything and sure helps if you are in a sticky situation.
Dude. Cast iron is the way to go! Love my skillet. My only suggestion is to get a metal "cookie turner" or "pancake flipper" as your spatula. Cast iron is not quite as stick-free as teflon, and it can be a bit harder to clean.
I use one of these and it lets me manage eggs, bacon, steak, etc. no problem.
It helps with cleaning the skillet too.
Oh, if you have food stuck to your skillet, just put some water in it and boil it for a few minutes. It'll come right off.
Congrats on the salary, congrats on the cast iron!
This is the spatula I use in my pan. It's awesome, has held up very well too. I scrape the heck out of my pan when I'm cooking in it, and I scrape gunk out of it after I cook too, all with that spatula.
like I said, the main concern is to create an extremely flat surface. I see a lot of people using wood spatulas or plastic spatulas in fear of ruining their surface, but this is the opposite of what you want to do.
When you use a completely flat metal spatula (like this guy) it scrapes over the surface evenly, allowing the microscopic holes to stay filled with carbonized grease (the "seasoned" surface), and removing the the bumps. Having a textured surface, even at a microscopic level, is what causes food to stick to the pan.
If your food is sticking to your pan, in my experience it's because it is not flat. I use this type of spatula every time i cook, and scrape the pan as a first cleaning step.
That being said, seems like there is a lot of tradition in the different ways people keep their pans, and probably more than one way works. This way has just proven to me to be the most efficient, I never have to resurface my pans (baking it with oil), and my food never sticks.
I have a tea rex and a pastasaurus rex. Both are pretty awesome.
This one: http://www.amazon.com/Ozeri-Digital-Kitchen-Capacity-Stylish/dp/B003E7AZQA/ref=sr_1_9?ie=UTF8&qid=1463895830&sr=8-9&keywords=food+scale
is the one I use and it's recommended on here a lot. It works well for me. I've had it for 2 years and it's still working fine.
https://www.amazon.com/EatSmart-Precision-Elite-Digital-Kitchen/dp/B009EUPMFK
https://www.amazon.com/gp/product/B003E7AZQA
or
just go to Walmart and get a kitchen scale that can go up to around 11 or 12 poounds
Definitely doable man. No better time than to start now, if you haven't already.
I highly suggest signing up at My Fitness Pal, and buying a food scale. Make sure you stay within your deficit.
Other than that, it's just consistency. Every time you don't want to work out, any time you are about to pick up that phone and order take out, ask yourself, is that AFTER picture you're looking to take worth never happening? Be a beast. Surround yourself with like-minded people.
https://www.amazon.com/Spinning-Hat-Bottle-Opener-Multicolored/dp/B00BKQSL2C
I bought it from amazon, it was like $6. Kinda a crappy bottle opener but its great for shooting your buddy from the other side of the couch while he's looking at his phone.
Link
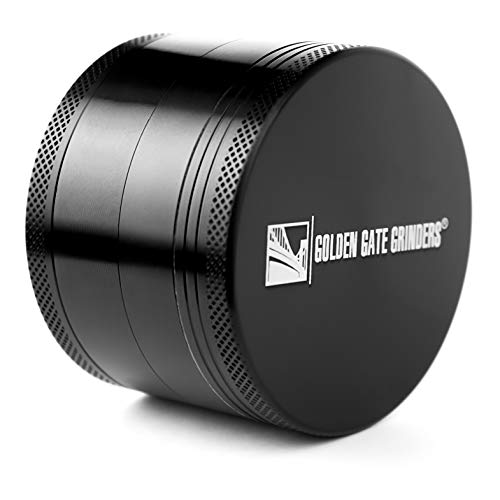
I love this one, and for a mere $18.95...
Golden Gate Grinders 2.5 Inch 4-piece Anodized Aluminum
You don't have to spend that much for good coffee.
You can get a pour over dripper for $12 on Amazon
100 filters for $6
Electric kettle for $12
Manual coffee grinder for $10
Digital scale for $10
That's $50 for gear, (you can probably pick up some of that even cheaper if you look around) and then you can spend what you want on beans. I'm really into Stumptown coffee right now, which is $18 for 12oz. but you can definitely go a little cheaper or a lot more expensive depending on your tastes.
You can spend as much as you want making coffee, but I haven't noticed a discernible difference between coffee from that setup and coffee from a $500ish setup. A large part of what makes a cup of pour over good is the skill level of the person pouring it, and there's no reason to spend more than $75-$100 on gear until you reach a point where you know for sure your bottleneck is your equipment. I've been making my own coffee this way (as well as french press and espresso) for a few years and I still don't feel like I need to upgrade.
EDIT: Ignore the scale I linked, refer to /u/throwswithfats comment below instead.
There was a BPL thread on this topic a few days ago.
TL;DR:
countertop
hanging
Great suggestions here, but I feel like one thing is missing.
Learn portion control! Use an app like MyFitnessPal Calorie Counter(Free Version). If you can swing it, get a scale. Amazon Basics $11.99
This will definitely help both your budgeting and your waistline. :) It has done that for me!
And practice boning a chicken, it saves a lot of money and it's lean protein. Use the bones for stock to make sauces, gravy, and soups.
https://www.youtube.com/watch?v=nfY0lrdXar8
The same product is available for not add on status here
for $4.74
I use these sbiners for the same purpose, as well as to fuel my vacation alcohol binges.
Before I automated my house, I was using inexpensive timer like these
You really need an infrared temperature gun for just this reason. This would detect surface temperature. It's a snake owner staple.
Edit: this is the one I have, and it works great
Get one of these: http://smile.amazon.com/gp/product/B00CVHIJDK/ref=oh_aui_detailpage_o02_s00?ie=UTF8&psc=1
I think I actually paid $12 a couple of weeks ago.
Maybe I'm the weirdo, but if Amazon sells something I loathe purchasing it anywhere else.
This scale is 11.99 with free prime shipping, so it is 1 dollar more expensive (if you include shipping) than the scale you posted, and I know Amazon will take back the scale for any reason whatsoever if I asked em' to.
An infrared thermometer, closely-followed by a Polder probe.
Take the guesswork out of cooking, and use these so that you aren't afraid to apply heat!
Or buy a $20 mandolin. Sorry for the poorly formatted link, I’m on mobile! This is the one I have and it’s the brand a lot of professional kitchens use. No bells and whistles, but it works like a charm.
Vegetable Slicer Green (Old Version) https://www.amazon.com/dp/B0000VZ57C/ref=cm_sw_r_cp_api_UuzJAbVWC1K6X
http://www.amazon.com/gp/product/B0000VZ57C/ref=oh_details_o09_s01_i00?ie=UTF8&psc=1
A few of my favorites that are fairly cost effective:
The Benriner is just over $20 and the other two are under. I can't get enough use out of my Microplane for mincing garlic and adding freshness with citrus zest. Some people don't really like the Benriner as you have to use one hand to hold it as it doesn't have legs - I find that it stores easier and cuts more evenly overall. As for the grease separator, I'm always making stock and such - pretty straight-forward design that doesn't leak.
I'm also a big fan of ring molds(or biscuit cutters) of various sizes as they make for easy plating and cutting of biscuits/polenta & grit cakes/etc...
Oh yeah, immersion blenders are definitely useful and you can get away with the cheaper ones as long as you let it cool down a bit once it starts smelling like ozone!
Get yourself a gravy separator
http://www.amazon.com/OXO-Good-Grips-4-Cup-Separator/dp/B0002YTGIQ
I find this essential for braising/slowcooking so I can skim fat easily and leave those condensed cooking juices in the recipe.
I ordered these from amazon and they work great for various vapes
Measuring spoons like these. They go as small as 1/64 of a teaspoon, which should cover you, I think. I use the 1/4 tsp for my 55g.
A good metal spatula with rounded corners. Scrapes all of that right off, and works to polish and smooth down the bottom of the pan every time you use it. The plastic scrapers others mentioned are good too, but for tough jobs I like to have a metal spatula around. Other benefits is you can use it on the pan while its still hot.
> Fresh meat is better than the discounted stuff near its pull date.
Dry aging.
But a probe meat thermometer meant to stick into the oven is a worthy investment for roasts, especially.
https://www.amazon.com/dp/B0000CF5MT/
I think this is the same probe as the other poster suggested. Works great for me. Sometimes I will wrap the wire around the kettle handle once or twice to keep in somewhere in the middle of the wort. You can set alarms when you hit temps so it keeps me from constantly staring at the wort like watching paint dry.
This is the one I have.
http://www.amazon.com/dp/B0000CF5MT/
Heh.. Indeed, you can buy any level of quality / price / technology in a probe thermometer, the above referenced example, I'd place on the high-end of the scale. I own, and use 2 remote probe thermometers (with alarms) and have gone through a few others in the previous years. This Polder model ( http://www.amazon.com/Polder-Original-Cooking-Timer-Thermometer/dp/B0000CF5MT/ref=sr_1_4?ie=UTF8&qid=1450201255&sr=8-4&keywords=remote+probe+thermometer) can be found at local mega-marts usually, or another brand of roughly the same quality for ~$20. The Amazon sellers have them as cheap as $14 or $15. They're fairly cheap, very convenient, and typically accurate within a degree or two. (I have a Nanmac factory calibrated type C thermocouple, on a eurotherm 2704 3 loop PID controller to reference with..) /u/Blog_Pope has a very practical solution to "police" your Anova, that will alert you if there's indeed a problem... Its just that theres considerably cheaper probe thermometers than he linked to.
Plus, they're great to have around for any other cooking you may be doing.. Say butt-can chicken on the grill, or Thanksgiving Turkey, or Christmas Ham, or Tuesday night Meatloaf... Having a constant temp reading on what your protein is doing in the cooking environment, can help you avoid dry, over-done meat. Set the temp alarm for a little under your target temp, and you dont have to worry about it until the beeps! :-)
No dumb questions! You can use a temperature probe like this'n, or just pull out the oven rack and stick it with a digital thermometer after ~45 min and every 10 min thereafter, depending on thickness.
For a beginner who wants his steak cooked right, a thermometer is a must. A thermometer will not ruin the steak. Especially if you use a probe thermometer and put it in the steak before cooking. Those hand and face tricks are bullshit.
https://www.amazon.com/gp/aw/d/B0000CF5MT/ref=psdcmw_289812_t1_B000P6FLOY
A good old fashioned, sharp, mandolin.
http://www.amazon.com/Benriner-Japanese-Mandoline-Slicer-Green/dp/B0000VZ57C
That one is going to be too small for lettuce, but for smaller veggie prep it'll get you where you want to go.
For lettuce maybe:
this
You see where I'm going.
Get at least one counter lowered to chair-height. You can cook pretty much anything you want while sitting in a chair.
If you're reasonably coordinated, but lack strength, you can cut lots of stuff with a mandoline (make absolutely certain you buy and use a safety glove)
The production of vegetable based pastas is certainly a worthy cause, and I'm sure the veggetti is very capable, but I think the point is that you could also just buy a $20 mandoline slicer and do pretty much the same thing (okay, you might be stuck with shorter noodles...) plus much more
If you don't have one, a fat separator would be great for removing the surface fat. (I'm not endorsing this Oxo - haven't used it - but here's a link to one.)
Food looks awesome.
If you need to add water because of pressure cooking then you can probably just use a fat seperator at the end to extract the liquid gold.
Another good one Frank. If you do this often, I'd recommend getting one of these fat separators. You could pour the last few cups into this and then pour off the solids cleanly. Thanks for the information as always.
What is your favorite food?
Grilled Cheese is easy. Skillet to medium-high. 2 pieces of bread, a pat of butter, and a few slices of cheese. Half of the butter in the skillet with the bread on top. Layer the cheese on top of the bread and cover with remaining piece of bread. Cover (very important to melt the cheese). Cook until bottom of bread is starting to blacken, spread butter on other piece of bread and flip. Cook til starting to blacken or cheese is melting like crazy. Remove and serve.
Also, I suggest my easy lunch special. 1 medium sized chuck roast. Rub a modicum of kosher salt on it the night before. Preheat oven to 225F. When hot lay roast naked on the rack with a drip tray below. Let cook for 4 hours. Remove and wrap in foil. Return to rack for another 4 hours. Remove and wait 15mins before unwrapping. If you want to be awesome puncture the wrap and drain the juice into a cup before removing from foil. To make the lunches with this start a whole diced yellow onion in a skillet w/ some butter on medium-low. Sweat the onions for 5 mins then add diced green pepper. Throw on some Ms. Dash and a bit of soy sauce and skillet for a bit. While this is cooking take your leftover roast and chop into bite sized pieces. Throw onto a separate skillet on medium/medium-high. If you saved the juice throw it in there as well. If you removed the fat from the juice it'll be even better. Skillet until reheated, you are not cooking this meat. When it's done and the veggies are done, mix and skillet on medium for a bit to mingle the flavors. Now, this part is done. You are going to be pairing it with either Rice or Couscous. Couscous is easier unless you have a rice cooker. Either way, layer your lunches rice first then veggies/meat on top. Easy to microwave, tasty too.
[yup] (http://www.amazon.com/OXO-Good-Grips-4-Cup-Separator/dp/B0002YTGIQ)
If you let the drippings sit for a minute, the fat will separate (as you noticed) and float. So next time, let it sit before you serve it, and skim off the fat with a spoon or ladle.
You can let it sit right in the roasting pan, then gently tip the pan so the juices collect in the corner. The deeper the pool, the deeper the fat and the easier it'll be to skim.
Or you can let it sit in a separate container, like a measuring cup or gravy separator (the latter has a spout that lets you pour from the bottom, leaving the fat behind).
I usually use the "Dash" and "Smidgeon" size for my scooping needs
https://www.amazon.com/Norpro-3080-Stainless-Measuring-smidgen/dp/B0009X1P9S
These are mine (read the comments. Pure gold.)
https://www.amazon.com/gp/aw/d/B0009X1P9S/ref=mp_s_a_1_1?ie=UTF8&qid=1484829339&sr=8-1&pi=AC_SX236_SY340_FMwebp_QL65&keywords=tiny+spoons+stainless+steel&dpPl=1&dpID=31azPto8XVL&ref=plSrch
Get this
https://www.rei.com/product/127720/rei-co-op-backpacking-bundle
That's a pretty good deal for what you get. Note that the sleeping pad is not an optional item. You need insulation from the ground. You'll also need a pack, and on a budget I would recommend the REI Coop Flash 55. REI has a reputation for being expensive, but the REI brand stuff tends to be pretty good value.
You can also keep an eye on used gear on Craigslist. It's not uncommon to find used gear in good condition for 50% off retail. Good brands to look out for are Osprey for packs, Big Agnes for tents, Western Mountaineering/Feathered Friends for bags (tons of brands here), and Thermarest for pads. There are way more good brands (e.g. NEMO), but those are the big ones known for high quality.
Beyond those four things, you will need:
I probably forgot something but that should cover it.
I would consider a headlight or a sleeping pad
Depending on what type of cooking you want to do a homemade alcohol stove and a grease pot will let you cook all of these recipes. from Andrew Surka http://andrewskurka.com/section/how-to/food-nutrition/meal-recipes/
Here it is on Amazon. I've been using one for years with a cat stove and aluminum foil windscreen. Total cost less than $10 and UL.
https://www.amazon.com/Stanco-GS1200-Non-Stick-Grease-Strainer/dp/B000MVTIOQ
If you are doing mostly "freezer bag" meals, you will not need a very large pot, and shape is less crucial. However, if you plan to cook in your pot a lot, you will need to be more picky. Wider bottom pots are easier to cook in and eat from, and typically you want a pot wider than your stove for efficiency. Think about stability, both in the width of the pot and weight/length of the handle.
Titanium isn't really lighter, it's just stronger. I have an aluminum grease pot from Kmart, weight 3.5oz and holds 1.5 liters, it's nice and wide. Only cons are that it does not have a handle or fry pan lid, and will dent much more easily (but can also be bent back into shape or replaced cheaply). Grease pot from amazon.
Well, for a large piece of meat, there are general cooking time guidelines that you would be better off using than a recipe anyway. But like what moikederp said, get one of these: http://www.amazon.com/Polder-Digital-In-Oven-Thermometer-Graphite/dp/B000P6FLOY Your food will end up being much better, and your life much easier. I know it seems a bit like overkill now, but you will be thankful later.
Since this AskCulinary, I am also going to recommend that when cooking you avoid just merely following recipes. Look at the food. Learn by site/smell/feel when things are done. Read more about techniques, so instead of blindly following a recipe that says "Turn a skillet up to medium-high heat, add some oil, then brown chicken breasts for 4 mintues on each side. Take the chicken cutlets out of the pan and add chicken stock" You can understand that you are using a very common technique where you brown the chicken, then deglaze the pan making a gravy.
Have the butcher cut two pieces and do hers separately for a little time more. I guess that is what you are saying, but I am not sure. Get a Probe thermometer with an alarm for best results. I use the Alton Brown method which works well for me. Start hers about 1/2 hour earlier. The thermometer ensures perfect meat every time. DO NOT forget to set the alarm though.
https://www.amazon.com/Polder-THM-362-86-Thermometer-Resistant-Graphite/dp/B000P6FLOY
~~~~~< BEEF - ALTON BROWN’S PRIME RIB ROAST, 4 LB >~~~~~
1 rib roast, about 4 lbs......olive oil, to coat roast......1/2 cup water......1/2 cup red wine......1 tsp sage......Garlic powder......Lawry's seasoned salt
NOTE: If frozen, place roast in fridge for 3 days to thaw loosely covered by paper towels for 3 days, change towels daily.
Preheat oven to 250F.
Add Lawry's and garlic powder to olive oil brush roast with oil including bones.
Let stand 2 hours at room temp.
Place roast in pan.
Place probe thermometer into center of roast halfway in and set for 123F - no foil.
Put roast into oven till target temp achieved.
When temp achieved ( about 2-3 hours) remove roast and turn oven up to 500 F.
Cover roast with heavy-duty foil till 500 F achieved.
Remove foil and place roast back into preheated 500 F oven for about 12 - 15 minutes.
Remove and transfer roast to cutting board.
Keep covered with foil for about 15 minutes.
Add wine to pan and scrape goody bits into saucepan. Add sage and water to sauce and cook for 1 minute.
The biggest help to me in getting moist chicken results was when I started using a probe thermometer.
Something like this, but you can find them at Walmart and Kohl's as well. I like having the long probe cord for roasting recipes that will reach inside the oven during cooking so that I can set an alarm and walk away.
The official temperature to cook to is 165F or more, but I don't like going past 160F in a piece of breast meat. I usually will pull mine off of the heat at 155F and let the residual heat coast to 160.
Use a thermometer. You'll see a lot of people talking about poking the meat and comparing it to a hand or whatever, but that can be incredibly imprecise and vary wildly based on things like cuts of meat, starting temperature, cooking temperature, and how muscle-y your hands are. Cooking is science, and measuring is your friend.
To measure accurately, put the thermometer centrally in the thickest portion of the meat. If there's a bone, put it near that but not directly against it. Pull your food off 5 degrees below where you want to serve it, and keep it covered as you move it to the table. There's no need to let it rest extra time (warning: controversial topic). Very thin cuts under 1/2'' should be pulled off closer to 3 degrees from final temp, since they'll cool faster.
http://amzn.com/B009IH0BZ0 is a nice simple example, though I use one of these ( http://amzn.com/B000P6FLOY ) since I tend to do a lot of things in my broiler and don't want to open it during cooking. (City living, no grill)
Dexter Russel makes some nice ones. Here
I've been using a Lodge that I bought new on Amazon for about the same time. Likewise, I crack and egg on it dry (though it's never really bone dry...it always has a bit of a sheen to it from the seasoning).
I struggled for a while using cast iron until I bought a really nice turner that would effectively scrape the iron clean and eliminate almost all need to wash with soap and water.
I could mill the bottom of my pan smooth, but I don't see any need to whatsoever. There is one annoying little clump of iron that my turner catches on sometimes, so I'll probably grind that off eventually. So if you're shopping in a store, check for that and avoid it if possible.
btw this is the turner I use, which I would consider BIFL if you take care to hand wash and immediately towel dry after each use.
As far as tools, all I need is a nice metal spatula. Wood is good too for certain things but silicone and plastic I find unnecessary.
My tips:
Buy a really old quality skillet and griddle.
Avoid cooking large volumes of tomato and wine and other acidic foods.
No water.
The dinosaur is my pastasaurus Rex. The ninja turtles are TMNT action figures on top of my cabinets, with X-Men action figures on the other side, and Joan of Arc fighting a Nazgul on the other set of cabinets.
I gave up my other grills for a weber kettle and have been happy with the choice ever since.
For slow cooks, look up the snake method. It's fantastic for things like a pork butt for holding a lower temp for hours. I picked up two things that made it much easier for me do the cook without as much stress.
The first is a Thermapro 2 probe wireless thermometer so I can monitor the grill temp and the meat temp. So i can basically ignore the grill while it smokes the meat and enjoy my company instead of focusing on the grill.
The second is Tip Top airflow regulator. This sits on top of the exhaust and uses a temperature sensitive coil to open and close the vent to help control airflow. Takes a little practice to get used to, but when you do, it really helps with my temp stability.
(Those should not be affiliate links but I wouldn't know one if I saw one)
250 is way too high. I guess you got it from ribs/brisket smoking recipes, but sausages are not supposed to be smoked under higher than 170F-175F temperatures. You are right that you cook the fat off. It will give you dry sausage without nice glossy surface. Get a meat thermometer to make sure that you won't overcook your sausage. 155 internal should be OK. I invested $50 recently in these guys. Very convenient. You can monitor both temp of your smoker and internal. Highly recommend.
Got a link? I've gone through a ton of cheap instant read thermometers so I was considering pulling the trigger on a Thermapen.
Right now I'm pretty happy with this ThermoPro dual probe though.
I can't speak to this particular product, but I use their wireless thermometer all the time for smoking meats. It's a great product that works really well, and I would hazard a guess to say that this thermometer would be great, too.
This is what I have from them: https://www.amazon.com/gp/product/B014DAVHSQ/ref=oh_aui_search_detailpage?ie=UTF8&amp;psc=1
Yes it is! Im using the one that came with the smoker. I am also using this one. It works pretty well and has an alarm that lets you know when the meat is at the temp you set it to alarm you at. I found that only having one meat thermometer was only good for me if I was only smoking one thing at a time, but I quickly realized that if I have the smoker out I might as well do more than one thing.
Yes, the amount of coal you add is the determining factor. You might want to buy a [digital thermometer] (https://www.amazon.com/ThermoPro-Digital-Cooking-Thermometer-Stainless/dp/B017613C3C/ref=sr_1_14?ie=UTF8&amp;qid=1491328348&amp;sr=8-14&amp;keywords=BBQ+thermometer) to monitor the temperature.
Masterbuilt 20071117 30" Digital Electric Smoker https://www.amazon.com/dp/B01JGF97D0/ref=cm_sw_r_cp_api_fNe8ybZJZSQ2M
That's the one I have, got on sales for $170.
ThermoPro TP16 Large LCD Digital Cooking Kitchen Food Meat Thermometer for BBQ Oven Smoker Built-in Clock Timer with Stainless Steel Probe https://www.amazon.com/dp/B017613C3C/ref=cm_sw_r_cp_api_ZQe8yb6JGYF04
Also get a digital remote thermometer with a temperature alarm. Just set it to the ideal temp and wait for the beep.
Pork butts/shoulders are super forgiving to start out. Anything pork is pretty easy. Also poultry is pretty easy as it doesn't benefit from a slow cook (pro-tip: brine). I've smoked a turkey for the last three years and they are amazing!!!
Happy to answer any questions if you decide to invest.
It doesn't sound like a likely scenario, but if you have access to a oven thermometer like this I'd be curious if it's always 100 degrees under. An over will rarely sit at the right temperature and instead fluctuates to hit an average temperature. Again, 100 degrees is a pretty huge dip so I don't think that's the case, but might be worth checking.
I've made Alton Brown's roast turkey recipe every year for five years running, no regrets! It comes out amazingly flavorful and moist!
Don't forget a quality probe thermometer either if you don't already have one! It WILL make or break a good turkey - don't rely on those silly plastic pop-up things that come with them!
Get a digital meat thermometer, makes a huge difference in how easy it is to monitor internal temperature.
https://www.amazon.com/gp/product/B017613C3C/ref=oh_aui_detailpage_o00_s00?ie=UTF8&amp;psc=1
I consistently get within 0.03g. Here is the scale I use. It does measure by 100ths, which is what I wanted.
https://www.amazon.com/GDEALER-Digital-Kitchen-0-001oz-Stainless/dp/B01E6RE3A0/ref=mp_s_a_1_3?keywords=gdealer+scale&amp;qid=1564881520&amp;s=gateway&amp;sprefix=gdealer+sc&amp;sr=8-3
I may be OCD enough to cut a bean in half. Don't tempt me. I have a pill cutter ha ha ha.
Thanks for the detailed answer.
Use a .00 scale. Something like this.
Amazon.
https://www.amazon.com/gp/product/B01E6RE3A0/
I bought a tablet just for summoners war (Nvidia Shield K1) and it´s pretty much chargeing while playing so idk :)
Just get a Amazon Fire Tablet 7" for 29.99$ or the Amazon Fire Tablet HD 8" for 49.99$ .
They are on sale now.
A friend just bought the 7" (just for summoners war) and he is happy with it .
$49 USD - Amazon Fire 7
$99 USD - Kids Edition Fire 7. If kid breaks it, they replace it
amazon sells branded tablets for 50 bucks https://www.amazon.com/All-New-Amazon-Fire-7-Tablet/dp/B01GEW27DA/ref=sr_1_1?ie=UTF8&amp;qid=1524522712&amp;sr=8-1&amp;keywords=amazon+tablet
(would very strongly recommend you spend the extra 20 for a 16gb model, or buy a micro sd card to put in it.)
Consider that you can get a solid 7" Android tablet for $50.
Now consider how much it costs them to fly sales reps out or host luncheons at steakhouses or buy the lists of potential customers.
Now consider the profits involved in selling a few hundred thousand dollars worth of hardware.
I'm surprised we haven't seen more of this type of thing TBH.
Here's my setup:
https://www.thingiverse.com/thing:2479759
It's a Fire 7 Tablet running Wall Panel that points to my ActionTiles page.
Pockets
Keys
That's pretty much it. Any questions feel free.
Just thought this would be fun to do.
(from left to right, top to bottom)
2009 13" Macbook Pro w/ 256 GB SSD
Pentel GraphGear 1000
Moleskine Notebook
Nebo Redline
Bolle Anaconda
Time Easy Reader
Ultimate Ears TripleFi 10
Boy Scouts Swiss Army Knife (not sure which model)
Audio-Technica M50 with EDT250 pads
Nintendo Wallet from NYC Nintendo World
Insulated 20oz Klean Kanteen
Kenneth Cole Reaction Bag
Arbor Bandana (as a face mask for cold days)
iPhone 4S
S-Biner
Keys (glowing tritium, apt, mail, bike, lockbox, utili-key, LED, room, car keys)
There's hundreds of good ones on Amazon between $10-15. I use this one: https://www.amazon.com/Ozeri-Digital-Kitchen-Capacity-Stylish/dp/B003E7AZQA/ref=sr_1_9?ie=UTF8&amp;qid=1484410263&amp;sr=8-9&amp;keywords=food+scale
Prep everything. Weigh it all raw before cooking.
Alternatively, buy something like this:
http://www.amazon.com/Ozeri-Digital-Kitchen-Capacity-Stylish/dp/B003E7AZQA/
and a couple of ziploc bags. Toss them in you bag. Wrap the scale in the ziploc and weigh your food. Then toss the ziploc away after your meal for no mess.
with a scale. EYEBALLING DOES NOT WORK
I can maybe eyeball amounts after 2 years of weighing and when I double check with the scale my estimate is off at least half the time. Buy a scale. Weigh everything. Stick to only food you prepare or come with Nutrition data on the package for a few weeks.
Then see what happens. The speed and amount of your weight gain is concerning and there may very well be underlying issues but I find it hard to believe your calorie count is correct, you're gaining weight and not dead tired all the time from some sort of malfunction in your metabolism. For all of these things to be true you'd have to be defying the very laws of physics.
In the USA, you're smaller than average yet, yes, you're in that overweight population range on the height-weight charts. That's because most Americans are so heavy, not because they're healthy. We live in weird times.
> I've been eating between 1500 and 1700 calories per day
Let's get more confident about your tracking. You're making your own sandwiches. What's the difficulty in tracking them? That should make it easy.
Do you have a digital food scale? This one is on sale for $8 right now... a scale really makes a difference to my tracking effort.
You're past the big hurdle by already logging in two weeks. Good work on the initial weight loss, too. =)
MyFitnessPal and a food scale are your two strongest allies in the realm of accurate food intake measurements. MFP gives you a lot of information about everything -- from what you're eating at home to restaurant meals and more.
Over time, regular use of the scale will teach you how to eyeball serving sizes, understand how portion sizes actually look when compared to the nutrition facts, and really recognize how to improve your eating for both weight loss and healthy ongoing maintenance of a goal weight.
Good news: it's not a big investment to get a food scale. You can get one from Amazon for around $15 without Prime. Here's a good one that's highly rated and can hold up to 12 pounds for measuring.
Keep on truckin' OP.
https://www.amazon.com/Ozeri-Digital-Kitchen-Capacity-Stylish/dp/B003E7AZQA/
The exact one I have! It's held up well for the three or so years I've had it
Cereal - retarded o'calories
Fast food - retarded o'calories
What you're going to need to bag an Adonis:
I went from 250 - 200 in about 3 months by simply cutting out carbs entirely. Ketogenic diets can definitely help speed the process along, but you may find that chocolate cravings will replace penis cravings, so watch out for the backlash from hijacking a Hostess truck and devouring its contents wholesale.
It's been said before, but read the FAQ.
Use the food scale to help you plan accordingly to the nutritional data given by what you eat. Compare grams to grams. Boom, head shot.
Measuring yourself with the tape is a much better metric than using a scale, in my opinion. Scales don't account for water weight or how full/empty your stomach was last time/is now.
You can't out-exercise a shitty diet. Say that to yourself every time you go to eat something you shouldn't. You can have a treat when you're getting dicked by the type of guy you want. But then cut out the bullshit and get back to work. Beauty takes maintenance.
Despite your desire for wanting cock, I highly recommend you exercise. Being healthy is a good thing. You may feel you have missed out X years, but health allows you to extend your life that much further. It's probably not as good, but getting in the habit now allows you to get boned by the old guys in your convalescent home.
Your tits are probably going to sag. I'm just saying that now to mentally prepare you. I don't know what you look like, but I'm sure they're going to have a bit of sway that is unwelcome. I'm balding; we all have our flaws. On the bright side, I never have to pay for a hair cut again. I don't know what the silver lining is for saggy tits, but I'm sure you can figure it out. You're a smart person.
I have this scale.
Had it for a couple years now and it works like a charm. Bought it originally for baking but it's primary use is food measuring now.
Go to amazon and look for one between $10 and $20 with a lot of reviews. You don't need anything fancy, a basic scale will be reliable and cheap. I have this guy, great little scale.
Fold 'em up the night before and toss them in HERE. Put it on ONE OF THESE. Done.
It sounds like we might have similar coffee machines (here's mine). I like to have mine come on an hour before I wake up to give the group head and portafilter time to come up to full temp. The cheap and simple approach would be to plug in one of these and call it a day.
In my case, I'm using a SmartThings hub along with a Z-Wave switch which allows me to schedule the on/off in a little more intelligent manner, while also monitoring power utilization and allowing me to integrate control into additional environments. For example, the Rocket will only turn on if somebody is home at 5am as there's no sense starting coffee for an empty house. I also can control it with the Amazon Echo with "Alexa, turn on the Rocket". Unfortunately I can't say "light the Rocket" yet but I've filed a feature request :D
In this use case SmartThings will work fully local so it should avoid some of the cloud reliability problems people have experienced recently. You could do the same with several other hub or software options available as well as this is a very standard use case.
Good luck, and good coffee!
You should automate this more. https://www.amazon.com/dp/B005MMSTNG/ref=cm_sw_r_awd_EGLevb1DQ0E7Y
http://www.amazon.com/gp/product/B005MMSTNG/ref=oh_details_o04_s00_i00?ie=UTF8&amp;psc=1
http://www.amazon.com/gp/product/B00080G0BK/ref=oh_details_o04_s00_i03?ie=UTF8&amp;psc=1
http://www.amazon.com/gp/product/B001TH7GV4/ref=oh_details_o04_s00_i01?ie=UTF8&amp;psc=1
You are welcome. This is my setup
Tofu press!! Like this one . Works way better than paper towels with none of the waste.
Edit: scratch that first link the UK version is like £40!!! This one is more reasonably priced the only downside is that it presses less tofu at a time.
Get firmer tofu as mentioned, or even a tofu press. It will have with texture.
https://www.amazon.com/EZ-Tofu-Press-Removes-Texture/dp/B007LLGMG2/
https://www.amazon.ca/EZ-Tofu-Press-Removes-Texture/dp/B007LLGMG2
I use a tofu press similar to this and just let it drain in the sink, no paper towel required.
Get a tofu press: https://www.amazon.com/dp/B007LLGMG2/ref=asc_df_B007LLGMG25479197/?tag=hyprod-20&amp;creative=395033&amp;creativeASIN=B007LLGMG2&amp;linkCode=df0&amp;hvadid=193129986239&amp;hvpos=1o4&amp;hvnetw=g&amp;hvrand=4085549235352299980&amp;hvpone=&amp;hvptwo=&amp;hvqmt=&amp;hvdev=c&amp;hvdvcmdl=&amp;hvlocint=&amp;hvlocphy=9008149&amp;hvtargid=pla-309876282415
Save your towels, and gets all the water out in 15 minutes. Also cutting the tofu in half helps really get the water out of there while pressing. Freezing also helps the texture and absorbability of the tofu.
I have this one (or similar)
https://www.amazon.com/gp/aw/d/B007LLGMG2/ref=sxts_bia_sr_1?ie=UTF8&amp;qid=1496945690&amp;sr=1&amp;pf_rd_m=ATVPDKIKX0DER&amp;pf_rd_p=2973120562&amp;pd_rd_wg=9eOTk&amp;pf_rd_r=TYNA6KGVSJB69G27120H&amp;pf_rd_s=mobile-sx-top-slot&amp;pf_rd_t=9701&amp;pd_rd_i=B007LLGMG2&amp;pd_rd_w=FVqMB&amp;pf_rd_i=tofu+press&amp;pd_rd_r=8HGMCEVCS403AR4BR9D0&amp;pi=AC_SX236_SY340_QL65
After letting it hang for a while I stuck the whole thing in the fridge and left it a little longer.
What I got out of it is one of the firmest paneers I've made! I've always had a problem with homemade paneer crumbling. I still have to see how it holds up to cooking though.
And can't really take credit for the idea itself. I just tried my hand at making something [like what I saw for sale online.](http://cdn.onegreenplanet.org/wp-content/uploads/2010/10//2012/10/EZ-Tofu-Press.jpeg)
https://www.amazon.com/Spinning-Hat-Bottle-Opener-Multicolored/dp/B00BKQSL2C
http://www.amazon.com/Spinning-Hat-Bottle-Opener-Multicolored/dp/B00BKQSL2C
Am I the only one?
http://www.amazon.com/Spinning-Hat-Bottle-Opener-Multicolored/dp/B00BKQSL2C
Get an IR Thermometer so you can measure the surface temperature. The surface temperature can sometimes be surprisingly higher than the ambient air temperature.
I have an Oneida digital thermometer that I find indispensable, both for keeping tabs on the water temp for my yeast starter, as well as taking a final must temp reading, etc.
As much as I like it, i'm kinda dying to try out one of these bad boys.
I'd do it like this for 100ml
10g test 20g tren 20g mast
Displaced fluid: 9.43 + 18.18 + 15 (used .75 for mast displacement via google)
2ml BA
16 ml bb
60.61 ml from above
I'd make the rest like this
(39.39ml)80% EO + (39.39)20% oil if it doesn't mix completely
80% EO + 3-6% guaiacol (start with 3 add more if needed) + rest oil
Feel free to tell me if I'm wrong about anything cause I'm learning still :)
Also if you plan on using heat I'd get one of these to keep it Gucci for tren
Nubee Temperature Gun Non-contact Digital Laser Infrared IR Thermometer https://www.amazon.com/dp/B00CVHIJDK/ref=cm_sw_r_cp_api_SWlfzb838KAS7
something like this
This is why I got one of these
Chamber and pump - $235
Glass extract tube that holds 60 grams - $40 A larger tube may be necessary, I don't know how big your pants are but Amazon has tons of different sizes to choose from.
25 micron Mean Screenz - $20
Thermometer gun - $17
PTFE sheet to blast onto - $20
I use these rubber gaskets to attach my screens on and tighten a hose clamp over the gasket - $15 So the order will be glass tube, screen, gasket, hose clamp.
Presto griddle - $23
This gives you a total of $370 with plenty room for shipping, butane, and anything else you may need.
YES. Highly recommend this Golden Gate Grinder. $20 on Amazon and it’s the one I’ve used over the past year.
You don't need to spend a ton! This one is CLUTCH. Plus it's on Amazon. Mine has been heavily used, and is still in great shape. I totally recommend it! Happy kiefing!
Golden Gate Grinders 4-Piece Anodized Aluminum Herb Grinder with Pollen Catcher, Large (2.5-Inch), Black https://www.amazon.com/dp/B00GXSFB1Q/ref=cm_sw_r_cp_api_HsnNzbXZKVX4K
Golden Gate Grinder Herb Grinder 4-piece Anodized Aluminum, 2.5-Inch, Large, Black https://www.amazon.com/dp/B00GXSFB1Q/ref=cm_sw_r_other_awd_3vALwbNTSBQBS
That is the one I have, been using it for 6 months now and not an issue. Grinds very well and worked great for my flowermate. Feels well made and outperforms more expensive ones. Connections are nice and tight. Hit me up if you want more info.
Its a Golden Gate Grinder
https://smile.amazon.com/gp/product/B00GXSFB1Q/ref=oh_aui_search_detailpage?ie=UTF8&amp;psc=1
> you measure your water in grams?
Yep, why wouldn't you? Kitchen scales are accurate and cheap - they start at $10
For some ingredients (e.g. flour) weight is just more consistent than volume, and for some (e.g. honey or oil) pouring by weight into the mixing bowl is a lot less hassle and gunk than filling a measuring jug and then pouring that out.
Do whatever works for you. One tip is that a digital food scale will radically change your calorie counting experience (for the better). I weigh nearly everything instead of measuring it. Easier, faster, and nearly always more accurate than measuring. Here's a popular scale for $10: https://www.amazon.com/AmazonBasics-Digital-Kitchen-Batteries-Included/dp/B00V5IM5PY
I have the Amazon Basics scale. It's been very reliable, and costs $9.99. It comes with a battery which has been running without issues for almost a year. Seems like an obvious choice.
Buy one! They're so affordable, especially on sites like Amazon: https://www.amazon.com/dp/B00V5IM5PY/ref=cm_sw_r_cp_awdb_n7xnzbX914D88
Amazon basics
Most of our gifts were replacements or upgrades of things we already owned. A really cheap and awesome gift we got was this stainless steel scraper, which makes it so much easier to transfer food from a cutting board to a pot/pan. We also got a matching set of this luggage belt with a TSA lock--I actually gifted one to my husband years ago, but we used this as an opportunity to replace his now worn-down belt. We also replaced our kitchen scale with this Amazon Basics one, which works really well. Another Amazon Basics item we received was this paper shredder, which is a kickass workhorse of a machine.
One of the first gifts we got was a Corelle dish set that I LOVE--it's so much lighter and more durable than the stoneware set we were using. We also replaced our silverware set with an Oneida set that we both picked out, which was a very sweet and meaningful experience. We already have a nice Oneida silverware set, but it belonged to my husband's late mother, and he wanted to retire it so it wouldn't take any more wear &amp; tear.
Those are all gifts that were my hands-down favorite things we received. We were also able to buy two expensive items off our registry thanks to Amazon's completion discount. We purchased a Sonos soundbar and a Miele vacuum that were absolutely worth every penny we spent on them!
Macros should be measured by grams. That means a scale. I found one on Amazon for $10 ----> http://www.amazon.com/dp/B00V5IM5PY/?ref=spks_0_0_2246967542&amp;qid=1451199199&amp;pf_rd_p=2246967542&amp;pf_rd_m=ATVPDKIKX0DER&amp;pf_rd_t=301&amp;pf_rd_s=desktop-auto-sparkle&amp;pf_rd_r=0FCEZKENGMGMQQ8G7SCN&amp;pf_rd_i=food+scale
It would be worth saving up the $10 because without it you are only guessing. It might work, but it will probably leave you more frustrated than anything else when you hit stalls. Good luck to you! EDIT: What about hitting up a few thrift stores? Maybe, just maybe, they'll have a scale there with your name on it. :)
I’m about to buy a thermopro tp08. Friend has one, works great. It’s just Bluetooth though.
https://www.amazon.com/ThermoPro-TP-08-Wireless-Thermometer-Grilling/dp/B014DAVHSQ
I have this and it has served me well. Does what I need it to do without spending crazy money. The more important thing to have though is an instant read probe like this.
I love food!
The weirdest thing I like to eat is dry ramen noodles. Don't cook 'em. And apparently it's strange to put ketchup and butter into my mashed potatoes.
Pastasaurus!
For serving utensils:
Nothing can beat The Pastasaurus, although the circular saw pizza cutter is pretty nifty too.
For eating utensils, as a student I ate 99% of my food with chopsticks - the washing up was much faster.
if you need one for yourself
Here you go then, since you want one. I hope you have Amazon Prime shipping.
http://www.amazon.com/Fred-PSAUR-Pastasaurus/dp/B002L162HQ
Down below I see a Monkey Peeler and Piranha Cutter!
Nearly there $6.06 for this adorable adorable pasta scoop :)
*on my "wants" wishlist
The Cost is Correct!
Here is the green dinosaur pasta scoop. Enjoy!
I love this: Since it replaced my carabiner it works great and I always have it on me!
I just went to Tröegs on Saturday and got a Nugget Nectar bottle opener that works pretty good too!
This is my favorite keychain/ bottle opener. It has come in handy more times than I can say :) You are a good friend! HAPPY BIRTHDAY!!
Keyring
iPhone 5 leather wallet case - SPORT - Just got this one yesterday, nice construction, great feel, haven't quite broken it in yet though. It's a neat concept, the phone is magnetically attached to the wallet. I recommend you check it out!
You can buy one on Amazon.
http://www.amazon.com/Nite-Ize-SBO-03-01-S-Biner-Carabiner/dp/B0037H3EB0/ref=sr_1_11?ie=UTF8&amp;qid=1409746975&amp;sr=8-11&amp;keywords=Niteize
I had a Suck UK, but it broke :(
Now I have a S-Biner. Love it.
http://smile.amazon.com/Nite-Ize-SBO-03-01-S-Biner-Carabiner/dp/B0037H3EB0/
On this guy and in my bag. Being the guy with a bottle opener handy is a great life choice.
$10 is a little low for a multitool but this carabiner and this flashlight are in the price range and well worth the money. Throw them on some aircraft cable key rings and they should make great gifts.
Have you seen the S Binder Ahhh? I'm planning to order one soon. It looks pretty sweet.
Nite Ize S-biner Ahh
Leatherman Sidekick Carabiner
S Biner w/bottle opener.
https://www.amazon.com/Nite-Ize-S-Biner-Carabiner-Bottle/dp/B0037H3EB0/ref=sr_1_10?ie=UTF8&amp;qid=1503354950&amp;sr=8-10&amp;keywords=s+biner
been keeping my keys on this for years! sturdy, cheap and highly recommended.
http://www.amazon.com/Nite-Ize-SBO-03-01-S-Biner-Carabiner/dp/B0037H3EB0/ref=sr_1_1?ie=UTF8&amp;qid=1380912941&amp;sr=8-1&amp;keywords=s-biner+ahhh
Nice. I opted for this carabiner instead.
http://www.amazon.com/Nite-Ize-SBO-03-01-S-Biner-Carabiner/dp/B0037H3EB0/ref=sr_1_2?ie=UTF8&amp;qid=1348238174&amp;sr=8-2&amp;keywords=S-Biner+Ahh
or
https://bellsbeer.com/store/products/Bell%27s-Keychain%7B47%7DBottle-Opener-%252d-Black.html
When not at school, I also carry a Gen 4 Glock 23 in a White Hat Holsters Maxtuck.
I saw those, but didn't think they'd over enough room. I just ordered one of these hoping it does the trick what what I'm looking for.
I've got this Ozeri scale and it does the trick! It weighs up to 12 lbs and doesn't time out so quickly, which I like.
IMO.
Withings Scale is amazing, I like how I can keep myself accountable by just looking at my phone.
I own one of these for food. Cheap, effective and does the job. I believe I bought it for cheaper when Amazon had a deal. http://www.amazon.com/Ozeri-Digital-Kitchen-Capacity-Stylish/dp/B003E7AZQA/ref=sr_1_2?ie=UTF8&amp;qid=1407091485&amp;sr=8-2&amp;keywords=food+scale
>eating in excess of 4000 calories a day
What brand of food scale do you own? How frequently do you weigh and measure your food? What tools do you use to track calories? Do you keep a food journal (paper or online)?
I went from 125 lbs to 160 lbs at 5'9" by eating 3000 kcal per day every day once I actually started counting. 3000 kcal per day sucked to eat. I was literally drinking 24 oz peanut butter and nutella milk shakes 3 or 4 nights per week just to get my calories in. I would eat until I felt like I might throw up, wait twenty minutes, eat some more, and repeat until my 1800 kcal dinner was gone. I use this cheapass food scale from amazon to weigh things.
The chances of you eating 4000 kcal per day and failing to put on weight are zero unless you're like 7 feet tall, a competitive ironman athlete, or have a metabolism that falls so many standard deviations outside of the mean that you could be studied by a lab.
/r/gainit. Go there. Put on weight.
I'm into fitness and everybody I know uses a food scale that cost $12 and we've used them for years. I've had this for 4 years going strong.
Trying to estimate calories is always the downfall of people trying to lose (or gain) weight.
I would recommend getting a scale. You don't need anything fancy. I use this one myself.
http://www.amazon.com/gp/product/B003E7AZQA/ref=oh_aui_detailpage_o03_s00?ie=UTF8&amp;psc=1
Once you have a scale I would suggest using a chart like the following and then tweaking it for your own tastes.
http://www.blackbearcoffee.com/resources/83
depending on the size of the grind it may have an effect on how much coffee you use and the taste. This may just need trials since different coffee makers work better with different grind size.
The important thing I would say is enjoy how changing something like grind size or ratio can change the flavor profile and may bring out notes you didn't taste before.
Intermatic still makes old-fashioned mechanical electric outlet timers. They're no longer made in USA, but they are made in Mexico, and I've never had any problem with them.
Re: the crock pot, if you get a lightswitch timer it controls the flow of power and turns off your crock pot. I actually like it better than crockpots with timers because the 'keep warm' mode overcooks them.
When I had a home mining operation (with TOU pricing), I ran my antminer S1 off of a christmas light timer so that it only harvested that sweet sweet off-peak electricity.
Something like this would probably work if you're running the S9 off of 120v. You might be able to find a 240v alternative.
I have this light alarm clock and love it. It slowly ramps up the brightness until it's time for you to wake up. There are 20 levels of brightness and at level 20 it's RIDICULOUSLY bright. I purchased it for around $50 or so, I think there is a new model out and this one is no longer available.
I also have this outlet timer that I plug a coffee maker and small heater into. Wake up to a warm room and the smell of coffee every day! INTERNET OF THINGS!
They have been around forever. Well, not the digital ones. And, I really wouldn't call them smart. The smart ones are wifi enabled so you can turn them on/off while away from the house and what not.
A digital one.
A Mechanicall one.
This should work. Rated for up to 1750 Watts.
That's not much. They're plants that naturally grow in full sun. Put a plant light above them on a timer. 16 hours per day this time of year will have them growing like weeds.
Here's my setup in my office. The window is south-facing but as you can see is somewhat blocked by a big old wall, so I augment to the light supply for the plants with the light. It's hooked up to the timer I linked above and the plants seem pretty darn happy with it. The black thing attached to the side of the desk is my old phone, which works as an FTP camera that I use to make stop motion video of the plants as they grow.
A simpler method could be just put a real radio on a outdoor light timer similar to this http://www.amazon.com/gp/aw/d/B005MMSTNG/ref=mp_s_a_1_9/192-4860476-3947024?qid=1457225204&amp;sr=8-9&amp;pi=AC_SX236_SY340_QL65&amp;keywords=outdoor+timer
This would be better also since some online stations time out if inactive
Two things come to mind.
These have been around for ages. Otherwise simplest would be GE's new Link LED lights.
Just a note on buying plug-in timers... if you decide to go that route, be sure to buy an "appliance timer", which will be capable of handling the extra power draw of a crock-pot. An easy way to tell is an appliance timer will have a ground prong, while a lamp timer usually won't (assuming you're in a country like the US, where lots of plugs aren't grounded.)
I use this: https://smile.amazon.com/EZ-Tofu-Press-Removes-Texture/dp/B007LLGMG2/ref=sr_1_2?ie=UTF8&amp;qid=1469114470&amp;sr=8-2&amp;keywords=tofu+press
It has made my life so easy! I just turn it on its side and all of the water drains into the sink.
As far as a rubbery texture, I never freeze my tofu and I've never really experienced this. Keep experimenting! You'll find a good way to cook it.
this was one of the better purchases I've made over the years and it's only $20. No mounds of paper towels required. I tighten it down and walk away for a half hour and it gets damn near all the water out!
I have the EZ Tofu Press and swear by it. It's simple, cheap, and works amazingly. Seriously! Totally change your tofu experience forever for $20: http://www.amazon.com/EZ-Tofu-Press--Removes-Affordable/dp/B007LLGMG2/
(My favorite thing to do with this is press it with this, then cut into small cubes and basically use it as "paneer" in Indian dishes as is.)
I second this. Here's the link for it on Amazon. http://www.amazon.com/EZ-Tofu-Press-Removes-Affordable/dp/B007LLGMG2
Other ones are a lot more expensive, and this works great! Plus it doesn't have many pieces, so breaking really isn't an issue with some of the others that have springs and whatnot.
https://smile.amazon.com/EZ-Tofu-Press-Removes-Texture/dp/B007LLGMG2/ref=sr_1_4?crid=SEXLAMBA9Y9M&amp;keywords=tofu+press&amp;qid=1567539658&amp;s=gateway&amp;sprefix=tofu+press%2Caps%2C134&amp;sr=8-4
I love my tofu press. It was only $20 ish and I use it daily. I was tired of the piles of dirty towels so for me it was a good investment. Plus we go through tofu almost daily. I say if you use tofu a lot it is a worth it. Plus it's a lot easier than balancing lots of heavy items on top of your tofu.
http://www.amazon.com/EZ-Tofu-Press-Removes-Texture/dp/B007LLGMG2?ie=UTF8&amp;psc=1&amp;redirect=true&amp;ref_=oh_aui_detailpage_o02_s00
If you end up finding yourself making tofu often, literally my best kitchen purchase to date was this tofu press, makes my tofu prep a dream <3.
I like to put my tofu in flour and seasoning and pan fry it, or if I'm feeling super fancy I'll just put it in a container with some teriyaki sauce and shit and place it in the fridge for like 15 minutes so it absorbs that flavor too.
If you are interested in incorporating more tofu, I'd highly recommend getting a tofu press. Like this or this. It's laughable how expensive they are but if you are the slightest bit handy, you could definitely make one. They save SO many paper towels and are just all around super effective at making tofu far easier to cook.
Edit to add: if you're not handy, something like the ones I linked really are worth the splurge if you eat a lot of tofu and can feasibly afford one.
I have had this one for 3 years:
https://www.amazon.com/EZ-Tofu-Press-Removes-Texture/dp/B007LLGMG2/ref=sr_1_1?ie=UTF8&amp;qid=1498322407&amp;sr=8-1&amp;keywords=ez+tofu+press
It goes in the dishwasher every time and it still works good as new. It doesn't take up too much space and it's totally worth it if you cook with tofu regularly.
There’s tofu presses you can buy online as well. Amazon will have one for around $22 I think. tofu press I use this one and it’s great. Cuts down on paper towel waste as well.
I recommend getting a tofu press like this. I tried the precarious "stack books and pans on top of it" thing but that was way too frustrating. This press is cheap and simple and you can really get the water out this way!
I place the tofu into a shallow pan to catch the water, place a cutting board on top of the tofu and a couple of heavy cans on top of the cutting board. If you leave it for while, as the tofu compresses, you can add additional cans.
You can also buy many differently designed tofu presses. The type linked below is pretty common. The advantage is that you can gradually clamp it down to press out additional water.
https://www.amazon.com/dp/B007LLGMG2
My mom got me one a few years back and idk if it's this brand but design is identical with 2 3-pronged wing nuts. I honestly think it'll last forever as the 2 panels seem solid and no signs of rust on the bolts. Mostly hand washed but sometimes dishwasher. I recommend it and just use it over or in the sink and tighten it down a few times while prepping other parts of a meal:
EZ Tofu Press - Removes Water from Tofu for Better Flavor and Texture. https://www.amazon.com/dp/B007LLGMG2/ref=cm_sw_r_sms_apa_i_XHW0DbCJT8YXN
Lolz :) I got tired of using books so I gave in and bought an EZ Tofu Press for $20. I've found that it gets more of the water out of the blocks because you increase the tension with the knobs every couple minutes or so rather than trying to squish it all out at once. Anyway, just thought I'd share.
May your cookbooks be dry, and your paper towels plentiful
Here is a $20 tofu press on Amazon (with Prime Shipping) for anyone who needs one
Available at Amazon
Add one of these and you found yourself a new sport.
http://www.amazon.com/Spinning-Hat-Bottle-Opener-Multicolored/dp/B00BKQSL2C
https://np.reddit.com/r/shutupandtakemymoney/comments/3y0ebr/bottle_opener_cap_launcher/
http://www.amazon.com/Spinning-Hat-Bottle-Opener-Multicolored/dp/B00BKQSL2C
Beer Bottlecap Launcher For anyone that was curious where to buy one like myself
found it at amazon
https://amzn.com/B00BKQSL2C
Pair this with a Bottle cap opener/shooter, and games on!
http://amzn.com/B00BKQSL2C
Use a non-contact thermometer to check the temp of the ceiling radiator:
https://www.amazon.com/Nubee-Temperature-Non-contact-Infrared-Thermometer/dp/B00CVHIJDK
If it IS getting hot, then a reflective radiant barrier behind the pipes could send more heat towards you, and less into the ceiling. A simple fan blowing on the pipes could help, as well.
If it is not getting hot, then that should be addressed.
I have a similar one. It works very well.
Buy a small one, at walmart, for like 30-40 bucks. Use it outside. More expensive fryers are mostly for aesthetics and in my experience dont fry any better. You might however like name brand stuff that has your favorite "Kitchen aid" logo that you would like to match to the rest of your kitchen. If this is you, then spend the extra money if you want. I personally just want bang for the buck, and i don't leave my fryer out on my counter as a showpiece or anything. Others might tell you im full of shit and their $80 or $150 dollar fryer is much better, which is fine but unless you plan on frying a ton of stuff, and you need a ton of room to fry large batches of stuff, a small reasonably priced fryer will do just fine if you maintain it well and keep it clean. Here are some examples:
Reason? Well, a small fryer lets you fry in small batches. Unless you have a large family and need to fry a ton of stuff, this is the way to go. Sure, you might have larger temperature changes due to the size ( when you drop food in it drops the temp sometimes complicating or even ruining your cooking ) but the small size lets you change the oil easier, clean it easier, and store it easier.
Because lets face it, hopefully your not planning on eating a TON of fried food. Sometimes making some cheese sticks, jalapenos, mushrooms, french fries, wings, etc is great, but it shouldn't be a majority of your eating experience. Unless you don't care about personal health.
ProTip: use it outside. Reasoning: Your house will smell like a french fry. Plus, grease flies out of the fryer and gets on everything, and it will get on everything in your house. The stench will permeate your couch, carpets, clothes, and more. You will leave home to go to work, run errands, etc... and you'll come home to that nice, greasy egg roll smell as you open the front door.
Its not pleasant. I learned this, and started frying outside. I also got a small fryer that had great reviews and wasn't super expensive. The parts, except the heating element, are all dishwasher safe. Also you will save money by not buying, or buying INTO, the whole sealed fryer with carbon filter blah blah blah. If you plan on keeping a fryer that features that indoors, it'll still smell. You still have to open the fryer at some point while cooking, which again, makes your house smell. And I HATE that smell in my home. Ive had a $120 dollar fryer and it performed just like my $30 dollar model, just looked super snazzy which i don't give a flying f** about since its not a counter-top item that gets daily use in my household.
My .02 anyways. I hate the house smelling like a french fry, and a small fryer is easy to store in your garage, easy to clean and operate. Plus i have a small 2 year old daughter and since i only use it outside on the porch, shes never around it which minimizes any injuries ( that could be catastrophic... grease burns / fires are serious biz )
At the end of the day, a fryer is a simple device. Heating Element, temp knobs, bucket for grease, and a basket with a lid. There are more expensive options, but your paying for brand name, looks, and you might want to drop 75-100 bucks for one that has a digital readout that can* be more accurate.
I myself have a digital thermometer in my kitchen i use for steaks and such ( any good cook should have one imho ) but it also helps me verify temp. With that said, i have i think the $30 dollar model i posted and its temp control is spot on. If you do want a digital one, i personally would just get a non digital one, then invest in a thermometer since you can use it for SO many things, including your new deep fryer. I also have a "laser thermometer" that works as well and can be used again for many many things in your home.
http://www.amazon.com/Comark-Instrument-Digital-Thermometer-Accuracy/dp/B001U59MDA/ref=sr_1_1?s=home-garden&amp;ie=UTF8&amp;qid=1418957150&amp;sr=1-1&amp;keywords=comark+PDT300
I have both styles of thermometers, and i use my pen style a lot ( its like the bottom one, but mine is white and i got it at a local grocery store for about 10 bucks... has a hold button but is pretty much the same deal )
Hope I helped you. Good luck and be safe!
I've read that Kale is supposed to be used sparingly, it's not the bulk of her diet. I pick out the spinach and romaine from the spring mix. I am looking for endive, dandelion greens, and edible flowers now. I have a temperature gun for testing temperature.
I hope the infrared works fine, I wanted a bulb that would work at night in case the apartment gets cold. If needed I can switch that out though. I have a UV light also that is on for a 12hr cycle.
The middle of mine are a bit soft, but not unpleasantly so.
I use a pizza stone in the oven, and I pre-heat it till the stone gets to ~400F (takes like 40 minutes). I have an infrared thermometer I use to read the temp of the stone.
I'm assuming you're using a torch and a titanium domeless nail. The best and most precise way to take low temp dabs is to buy yourself an infrared thermometer and measure your temps that way.
(http://www.amazon.com/gp/aw/d/B00CVHIJDK/ref=mp_s_a_1_1?qid=1421443336&amp;sr=8-1&amp;dpPl=1&amp;dpID=51yFyraWgJL&amp;ref=plSrch&amp;pi=AC_SY200_QL40)
Another method (sighting) is just to heat up your nail to a slight red, then allow it to cool. This takes trial and error. Time how long it takes to cool (5, 10, 15 seconds) and then take your dab, cap it. Check if there's any oil left on your nail, if so then your nail is too cold and you should take your dab sooner. If you took your dab too soon, the you'll get a slight burn and diminished flavor in your dabs.
I find waiting 8-10 seconds after torching is the best for me, but everyone's nail is different.
I never tire of recommending this Golden gate Grinder The stars on amazon don't lie the thing is a beast. Chews through bud just like an my space case I had previous this one. Catches kief just the same kief production is huge! I lost mine recently and am choosing to go with this one again over space case or anything because the price beats any others by a mile and the quality is just the same.
100%. After owning MFLBs for years.. what I found to work the best is to get a large grinder and do the initial grind with it. You can fill the whole thing up as much as you want and leave it there. Eventually the first-ground herbs goes through the Finishing Grinder per new trench. The reason why I do this is because it allows me to pre-grind a lot because the Finishing Grinder can only take small amounts at a time.. but also this helps dry the herbs before you put it through the Finishing Grinder. Both the Box and the FG do better with dry herbs. This is what I use before putting it through the FG.. plenty of space, cheap, excellent quality for my purpose: http://www.amazon.com/Golden-Gate-Grinders-Ultimate-Anodized/dp/B00GXSFB1Q/ref=sr_1_3?ie=UTF8&amp;qid=1463520562&amp;sr=8-3&amp;keywords=golden+gate+grinder
I have a Space Case Titanium and the Golden Gate Grinder seems to do my "pre Finishing Grind" much more efficiently with a lot more space to store the herbs for drying purposes. The Space Case definitely does a better job at going for a finer grind but it doesn't match the FG on its own.
if you don’t have a budget, my most recent purchase has been this lil guy and i’ve had it for abt a month now, absolutely love it.
if you’re looking for something on the cheaper side, my last grinder was this and it treated me well for the year and a half that i had it.
Got this one recently and have been very impressed with it
what kind of grinder you have, if you have a shitty grinder, it will hinder your production greatly. I highly recommend this grinder over ANYTHING on the market http://www.amazon.com/Golden-Gate-Grinder-Anodized-Aluminum/dp/B00GXSFB1Q
Golden Gate.
Golden Gate Grinder
sitting on my favorite grinder!
http://www.amazon.com/Golden-Gate-Grinder-Anodized-Aluminum/dp/B00GXSFB1Q it's even on sale!
I've heard good things about that grinder so go for it. I have this one and it works great so it could be your choice between the two.
https://www.amazon.com/gp/product/B00GXSFB1Q/ref=oh_aui_detailpage_o03_s00?ie=UTF8&amp;psc=1
And yeah you can make joints as big or little as you want. Do not worry about excess room in a j, just twist it off and cut off the extra. 0.25 grams with low tolerance should get you pretty stoned especially if its good quality.
https://www.amazon.com/gp/product/B00GXSFB1Q/ref=oh_aui_detailpage_o01_s00?ie=UTF8&amp;psc=1
really really high quality, sharp heavy grinder. Has a really nice keef catcher too!
She's an awesome girl and definitely deserves it! You might have a favorite shop you like to hit up, but since I recently moved to this area I just ended up on Amazon and got this one.
the best grinder on the planet
I have this one and it's fine: https://www.amazon.com/AmazonBasics-Digital-Kitchen-Scale-Display/dp/B00V5IM5PY
I got this one for my snakes, it's good because if you put the bin on top of it before you turn it on, it'll start at 0 grams. I just have a small tub I use when I take them to the vet so I use that to put on the scale.
Yes, didn't realize how much I was overeating until I got one. I bought this one at Amazon for $9.99 and it switches between ounces, grams which is helpful with MFP.
http://www.amazon.com/AmazonBasics-Digital-Kitchen-Scale-Display/dp/B00V5IM5PY
I bought an Amazon Kitchen Scale and it's been a true lifesaver. For $10, you can't beat it. I use it for everything from portioning meats to weighing my Cheerios in the morning.
https://www.amazon.com/AmazonBasics-Digital-Kitchen-Scale-Display/dp/B00V5IM5PY
I use the amazonbasics one: https://www.amazon.com/AmazonBasics-Digital-Kitchen-Batteries-Included/dp/B00V5IM5PY
not a dumb question at all, i didn't even know it was a thing until i found this sub. this is a food scale: https://smile.amazon.com/dp/B00V5IM5PY/ref=sxts_sxwds-tsp_3?pf_rd_m=ATVPDKIKX0DER&amp;pf_rd_p=3007296082&amp;pd_rd_wg=P0Kcd&amp;pf_rd_r=RRT7AV9M9FZ0XNRAYK9X&amp;pf_rd_s=desktop-sx-top-slot&amp;pf_rd_t=301&amp;pd_rd_i=B00V5IM5PY&amp;pd_rd_w=x2s1w&amp;pf_rd_i=food+scale&amp;pd_rd_r=ARSH36Z39Z90ASMVGQD0&amp;ie=UTF8&amp;qid=1500429657&amp;sr=3
you use it to measure your food so that you can input it into MFP to count calories. lets say the packaging says 1 serving size of strawberries is 30 calories and next to that it says (100g). you put a bowl on the food scale, press a "TARE" function which takes away the weight of the bowl, and you put enough strawberries on the scale so that it reaches 100g. you just got the serving size. we recommend weighing raw meat as well, like raw chicken, before cooking it. the packaging may say 4oz is 140 calories, but when you weigh one of the chicken breasts the actual chicken breast ends up being actually 8oz so you're eating double and probably ruining your deficit. cooked chicken also weighs differently than raw chicken so it can change the calorie count if you're weighing the cooked chicken and not using the right MFP entries for it.
it's helpful because of how accurate it is. a lot of people weigh with measuring cups and spoons. these are wildly inaccurate because they're all made differently. a lot of people that come here with "why am i not losing weight?" posts usually aren't using a food scale. it takes a lot of the guessing work out of counting calories.
hopefully that helps. if you have any more questions feel free to ask! :) /r/loseit is really big on using food scales. i bought mine just to measure cheese every now and then and now i use it for everything that i eat.
The bottled product was called 2.0 when first released but with the advent of the various flavors, they seem to have dropped the numerical label on it. The powder is v1.8; in a recent AMA, they pretty strongly hinted a v1.9 was in the works, probably with added flavors.
The front of the bag makes clear that 1 bag == 2000cal. The back label spells out the nutrition details for a "meal" of 400cal == 87g.
For prep, simplest is to mix one bag in the official 2L pitcher, put in the fridge overnight, drink as required. You probably don't want all 2000cal in one day (if you are having breakfast elsewhere) so there would be some left over. Just pour it into a blender bottle and refrigerate. It keeps for several days.
Or if you want to mix a specific number of calories (e.g. 1300) then all you need is an inexpensive digital scale (similar available at walmart, target, etc). Put the pitcher with some water on the scale, zero it, then scoop in exactly how many grams you need for however many calories you want available for the next day.
Luckily we can have heavy whipping cream, and that creaminess is really wonderful in coffee. Assuming you have the calories for it.
There's other alternatives to sweets too, besides just using splenda there is also a brand called Walden Farms that makes very low/no calories, carbs, or sugar products. They have a marshmallow fluff and a caramel, it wouldn't suprise me if they have something chocolatey as well. I find them at Sprouts.
I do have a food scale! This one.
Grab a kitchen scale, perfect for this kind of stuff and its good to have a kitchen scale anyway.
Amazon has a cheapie that the reviews say is decent enough here
I have the Oklahoma Joe Highland and I like it. Fairly heavy construction for a low price. It weighs about 200lbs. It eats a lot of fuel but it is easy to maintain temperature and everything I have smoked on it has come out delicious. I generally have to feed it charcoal every 2-3 hours to keep it at temp so it requires some maintenance but not too much.
The only modifications I made to mine was some self stick seals for the doors and some food grade high temp sealant for the joints between the firebox and the barrel. Without those it leaked a lot of air/smoke.
I would also recommend a thermometer because the one built into the lid always reads 25-50 degrees hotter than the temperature at the grate where your food is. I use this one and it works great. Just glance at it every now and then to check if I need to add more fuel.
What thermometer is this and how much did it cost?
Found this on amazon, looks close if not the same:
https://www.amazon.com/ThermoPro-Wireless-Digital-Kitchen-Thermometer/dp/B014DAVHSQ
I bought this one. Not much frills, but it does everything I need for a great price.
ThermoPro TP-08 Wireless Remote Digital Cooking Meat Thermometer.
https://www.amazon.com/dp/B014DAVHSQ/ref=cm_sw_r_cp_apa_dVm3AbXZDXJ56
The thermometer makes a huge difference. A programmable meat thermometer is sooo great to have and they’re fairly inexpensive. Just set to alert you to the temp and you can be sure you won’t overcook it. Something like this is all you need: ThermoPro TP-08S Wireless Remote Digital Cooking Meat Thermometer Dual Probe for Grilling Smoker BBQ Food Thermometer - Monitors Food from 300 Feet Away https://www.amazon.com/dp/B014DAVHSQ/ref=cm_sw_r_cp_api_i_YVWZCbTKW68T5
If you have access to a stovetop, try searing the chicken on medium/med-high heat for 2 mins~ a side then transfer it to the oven for 10-15 mins til cooked through. The sear is delicious and really beats the pants off plain baked breasts. I suggest a meat thermometer to help with not drying the hell out of your dinner! You can go stupid simple or a little more complex. I have both of these thermometers and use them both often.
I also highly recommend this recipe for bone in chicken.. I've done legs, breasts and wings (on grill and the oven) and it comes out fantastic.
Wings are really cheap and are damned good. Chicken breasts get boring and expensive! Wings, I do at 425 degrees for 20 mins, flip them, then do 15 mins more. If you want a good buffalo wing recipe, these are great.
You can try different things for marinades/rubs. Lemon pepper, Tony Chachere's, Adobo (or just buy Goya brand...it's salty as hell. though), etc. Marinades are fun too. Salad dressings, bbq sauce, apricot preserves, Trader Joe's Soykiaki, and so on. Just remember that if there's a lot of sugar in them, you're probably going to have sticking/burning issues. Best bet is to cook the chicken to 5 mins before done and then brushing on bbq sauce/sticky marinade. Also, if there's any acid in your marinade (vinegar, citrus), don't marinate for more than a couple hours or the acid will "cook" the chicken. Poultry ceviche isn't good eats!
My diet is very protein heavy and I just can't make a decent steak to save my life. I get sick of eggs & tuna so I've made chicken LOTS of different ways and have changed it up a lot so I don't get bored. I hope this helps! Sorry it's long. heh
TL;DR -- Vary your seasonings, buy a thermometer and get a good sear. Links and suggestions provided.
I noticed that the Polder timer/thermometer was cheaper out of Amazon.ca for us Canadian shoppers.
http://www.amazon.ca/Polder-Original-Cooking-Timer-Thermometer/dp/B0000CF5MT/ref=sr_1_1?ie=UTF8&amp;qid=1332974970&amp;sr=8-1
I've never added the probiotics, and I've had it turn out fine. Choose the plain version of your favorite yogurt, and you'll make a yogurt that tastes similar - you'll be adopting the same culture mix. Try other yogurts if you don't like how your first batch turns out.
My technique for keeping it warm is to put the yogurt in mason jars in a cooler with a heating pad. I fill any unused space with more mason jars filled with hot water. I have a probe thermometer sticking in there to make sure it's staying at around 100 degrees.
Alton Brown did a good episode of Good Eats on yogurt, and he had some really good tips.
The Brewpal iPhone app.
Refractometer
Digital Thermometer w/ timer
Immersion Chiller
I generally just saute with a little olive oil or butter to get fried results that aren't completely dried out without all the oil.
If you really want to bake it instead, get yourself one of these - http://www.amazon.com/Polder-Original-Cooking-All-In-One-Thermometer/dp/B0000CF5MT/ref=lp_289810_1_1?s=kitchen&amp;ie=UTF8&amp;qid=1420663578&amp;sr=1-1 - you can set an alarm for it once the right temperature is reached. All you need to do is google what temp whatever cut of meat you're baking is safe to eat at and there you go. Just plug the thermometer into your meat and leave the other part hanging out of the oven door. Alton brown does it all the time :D
What I used this morning.
(https://www.seattlecoffeegear.com/pasquini-moka-espresso-grinder)
That's kind of tough because several things on your list could run you upwards of $100/each.
I'd definitely advise starting with the knife and spending money to get a high quality one. You should go test them in store because one of the most important things in a knife is balance and one that feels right in your hand.
After that I'd go: thermometer (I like this one, you don't need an expensive one for most things), whisk, paring knife, dutch oven, food processor (again, spend the money to get a good one), cutting board, bread knife, ramekins, prep bowls
I think you can definitely live without the digital scale (until you are really into baking breads you can wing it), mandoline (a good knife is easier 90% of the time), salad spinner, blowtorch, vegetable peeler (you can peel with a paring knife)
A couple of good places to start would be a restaurant supply (whisk, china, prep bowls), a discount store like TJ Maxx (dutch oven)
Good luck!!
You definitely should get an instant read thermometer. It's an absolute life saver.
You don't have to spend much for one either. My crappy non-instant read was overpriced at $10 from a grocery store but this is the one I should have/will get.
That's unfortunate.
If you end up needing a replacement, decent ones can be had inexpensively.
Or you can Splurge and get the ferrari of all probe thermometers.
I'm Canadian, so it's not really inexpensive. But thanks for the recommendation.
A few things from the top of my head that will hopefully be fresh advice:
Analyzing nocoffeesnob
The Benriner. Mind your fingers!
This mandolin is one of my necessities. It can be found at most asian grocery stores for like $7 your list of cooking needs pretty much fulfills everything. I have a rice/slow/pressure cooker too. I like making chachu and stu and other things like that, warm hearty foods to balance out the sterility of minimalism perfectly.
http://www.amazon.com/Benriner-Japanese-Mandoline-Slicer-Green/dp/B0000VZ57C/ref=sr_1_1?ie=UTF8&amp;qid=1421362167
Dont get an expensive one. This one is used in most restaurant kitchens from corner Thai places to fancy high end restaurants.
If you do Amazon, these are popular.
Benriner is the go-to Mandolin. I have one and love it.
I got one of these at a local kitchen supply store (for waaay more than Amazon charges, now that I look. Whoops).
Also as a PSA, if you don't already have one, get a kevlar glove so you don't cut your fingertips off (I would have cut myself a couple times on this project if I didn't have one, sliced through the nitrile gloves).
The mandoline is the right answer, though I would encourage anyone to try to use a good chef's knife. Thin slices, then fan them out on a cutting board & take thin strips off the thin slices. For the quantity a home cook needs, this is probably fine & the knife skills one gains are invaluable. Oh, heck..... just by the cheap Benriner mandoline. They are great for the money.
I've heard fantastic things about this one:
http://www.amazon.com/Benriner-BN1-Japanese-Mandoline-Slicer/dp/B0000VZ57C/ref=sr_1_9?ie=UTF8&amp;qid=1376333715&amp;sr=8-9&amp;keywords=mandoline+slicer
We bought a Veggeti and this exact Paderno stand-up spiralizer as gifts for my family. The Paderno was just magical: in goes a rutabaga, spin, spin, spin, out comes a pile of noodles. The Veggeti was returned less that 30 minutes after we'd managed to get the package open. It was just atrocious.
If you can't afford the counter space for a full sized machine, try a high quality mandoline slicer. I've heard rave reviews about the Benriner Japanese Mandoline Slicer.
No, collagen doesn't bind to fat. Once you strain it out, most of the fat will visibly float in minutes. Maybe there are fat chicken feet out there, but I've never seen them.
I wouldn't even bother counting this, personally.
If you run across those fat chicken feet, these fat separators are helpful.
2.5 lbs beef chuck
1 small onion roughly chopped
1 cup white mushrooms sliced
campbells slow cooker sauce - tavern pot roast
1 lbs mini red potatoes
(gravy not pictured)
It depends on the cut like segfaultxr7
said. Top/bottom round is very lean so there is very little, if any fat in the bag juices. Beef fat is solid and not always the best tasting when it's solid/semi solid.
You can always take bag juices from a fatty cut and either
If you get lumps trying to thicken the gravy, use cornstarch, not flour make sure you don't add it to the mixture directly but slowly add cold water the the cornstarch while stiring. It will make a thick paste, then a tick liquid you can stir to get all the lumps out of before you pour that into the juices. I use maybe 1/4 a cup of water and stir it in a small bowl with a chopstick or something.
Long and short is ... Invest in a fat separator.
I've seen people use milk frothing pitchers to pour, someone on /r/coffee posted this as a frugal alternative
http://www.amazon.com/OXO-Good-Grips-4-Cup-Separator/dp/B0002YTGIQ/ref=sr_1_1?ie=UTF8&amp;qid=1373495560&amp;sr=8-1&amp;keywords=fat+separator
There's also this kettle which is cheaper than the Harios and Bonavitas
http://homeloo.com/a/product/pour-over-coffee-kettle-1200ml/
Or this
http://www.amazon.com/Ounce-Gooseneck-Single-Serving-Teapot-Stainless/dp/B008JQ1LEG/ref=sr_1_1?s=kitchen&amp;ie=UTF8&amp;qid=1375912462&amp;sr=1-1&amp;keywords=small+teapot
The point is you don't need to get hung up on the word gooseneck, all it really is is a narrow spout that doesn't dump all the water at once and instead lets you control the flow. Someone said you could do something with a chopstick and a normal kettle but I forget how they did that
I almost always use foil pans. I have never noticed the difference in smoke penetration by using them. It always tastes the same and just as good. The main reasons I do it is for how easy it is when you "crutch", just put foil over the top. You can always unfoil a little early and put it back out in the open pit to dry out the bark a little after the foil. Because the braising does cause the bark to get moist.
I also do it for saving the drippings. Buy you a fat/juice separator like this:
http://www.amazon.com/gp/aw/d/B0002YTGIQ?pc_redir=1395397137&amp;robot_redir=1
Separate out the juice to add back to the pulled meat for moistness. Foil pans also make for easy cleanup. Give it a shot and see how you like it. You'll never know until you've tried it.
I use an oil separator pretty successfully on other recipes.
Nope, that's just pork shoulder. I typically pull the pork out of the liquid after about 8 hours then use a gravy separator to pour some of the braising liquid without the oil back into the crockpot.
Just in case you guys don't know, they have measuring spoons to help you decipher your great-grandma's handwritten recipe that uses measurements such as "pinch," or "dash."
https://www.amazon.com/Norpro-Stainless-Measuring-Spoons-smidgen/dp/B0009X1P9S
so, the dosing is tricky but it doesn't have to be perfect. 60-100mg is ideal depending on body weight, stim sensitivity, etc.
these little guys are perfect.
Try out a smidge sitting around the house and see how you feel. Adjust accordingly. Add a second smidge for gym time or if you're feeling ballsy, toss a pinch into your preworkout concoction. 1-2 200mg caffeine tablets to finish it off and prepare to leap buildings. If you like the tingle from Jack3d, you can get some Beta Alinine, but I don't find it purposeful beyond that neat little tingle feeling. Citruline Malate can be added for enhanced "pump", but again I don't find it necessary, when preloading on carbs can have the same effect.
Slurpee straw bro. That easy.
Or if you want to get exact, which you should:
Get a mg scale from Amazon for $20. http://www.amazon.com/Smart-Weigh-GEM20-Precision-Milligram/dp/B00ESHDGOI/ref=sr_1_1?ie=UTF8&amp;qid=1414190633&amp;sr=8-1&amp;keywords=milligram+scale
http://www.amazon.com/Norpro-3080-Stainless-Measuring-smidgen/dp/B0009X1P9S/ref=pd_bxgy_k_img_y
Edit: dafuq did I get down voted for?
I directly dry dose my 5.2 gallon with these.
$5 at Walmart, or my local grocery store (C-Town). $8 on amazon.
Another option that people love is the Imuza. Comes in 10CM and 12CM widths.
Years and years ago when I was a kid, bacon grease was strained in something that looked like this and used for all kinds of cooking examples here
Monoprice Titanium Stove 1.7oz $20
Stanco Grease Pot 3oz $10
4oz isobutane for stove 4oz $5
This works really well for meals that are simply boiling water and adding to dehydrated food.
If you get something like this it wont get rancid. Its the stuff in the grease that makes it go bad.
No. I've been using this pot over the flames of my Whisperlite twice a day for months and it's a total champ
http://www.amazon.com/Stanco-Non-Stick-Grease-Strainer-Black/dp/B000MVTIOQ
My Suggestions:
Response to your Questions:
Good luck! If I see a couple with a dog and a cloudburst I'll say hello!
If I can chime in on the cookware stuff. I agree with u/rusty075 about switching to aluminum as a good way to save weight.
Traildesigns has some pretty inexpensive aluminum cookware. Decent stuff for under thirty dollars.
Im playing around with the stanco grease pot that I read about on an ultralight forum. Its 9 dollars and seems to work just fine for boiling water.
Switching from aluminum might save you half a pound.
Re: Pots!
You should look into a "grease pot" from WalMart/Kmart. They're also offered on Amazon. They're super cheap ($10), super light (3.5oz w/ lid), and hold around 1.3 liters (just enough for 2 people if needed). You will need to buy some sort of "gripper" or pot lifter, but they're not expensive ($5-$15). If you wanted to save more weight/money, you could go without the pot gripper. There is also info on the internet (backpackinglight.com I think) on modifications you can do to the lid of the grease pot to shave weight further.
I was referring to a different grease pot of theirs:
http://www.amazon.com/Stanco-Non-Stick-Grease-Strainer-Black/dp/B000MVTIOQ/ref=sr_1_3?ie=UTF8&amp;qid=1427807151&amp;sr=8-3&amp;keywords=imusa+grease+pot
The one you have may be thick enough to be food grade, it does still look like non-anodized, which would explain the staining.
preface: After reviewing the proposal below, I personally think you'd be better off merely leaving stuff behind (including the camera, if you still feel heavy), not buying any of the purchase recommendations (other than maybe Stanco pot and Frogg Toggs), and just slowly upgrading slots to whatever your dream best-in-slot items are one at a time, starting with sleeping bag/quilt, tent, backpack. There's no shame in a 15lb lightweight baseweight. It's not that terrible if you make sure to not overfill water, food, and worn clothing. :)
that drops you to 15lb for upwards of $40 usd + s/h... the main points to attack after that (other than in worn gear/carried clothing) are thus the 3.4lb tent, and 4.1lb backpack. But, as the backpack is new... Hard to tell man. $90 could get you a 3lb tent, $200 a 2lb tent. You could try to go tarp + bivy/bug net or poncho tarp+bivy/bug net to cut out something like 3 lbs, but even then you would be a lb heavy.
boom, you're at around 11 lbs baseweight without touching the 4.1lb backpack, the 1.5lb camera, or going no-stove. Keep in mind that you got forced out of camping by "extreme weather" once already, so going to something that might only be warm enough down to 40 degrees isn't necessarily smart. If you were the reason you left, I'd say that you are not properly wearing your layers. 46 ounces of sleeping bag, 28 ounces of softshell jacket, 12 ounces of merino tshirts, 8 ounces of rain jacket, and 25 ounces of shorts/pants should be enough thickness and weight to go far below the temperatures you're claiming you will see (one reason i suggested leaving so much of it behind and replacing the bag). Could you elaborate on the extreme weather temperature so we have a metric for what threshold of safety to put you at?
Tough to say as there are so many little hacks. I like these three the most though:
http://www.amazon.com/Polder-Digital--Oven-Thermometer-Graphite/dp/B000P6FLOY/ref=sr_1_1?ie=UTF8&amp;qid=1313495188&amp;sr=8-1
I would recommend getting a probe thermometer. Like this guy: http://www.amazon.com/Polder-Digital--Oven-Thermometer-Graphite/dp/B000P6FLOY/ref=sr_1_1?ie=UTF8&amp;qid=1320817763&amp;sr=8-1
That way you know when it's cooked.
Here is a thermometer similar to the one I use for siphon brewing for $17. It won't work for home roasting. If you think you might get into that, you will need one that has a higher max temp (500 F+). I haven't bought one yet because I am considering a roast profiling setup which would port to my pc. This is a good grinder at $45. This is the kitchen scale I like for $50 but you might be able to get one for less. The scale only measures down to grams which works fine for this siphon at 40 oz. ($36) but for a smaller siphon you might need a scale that measures down to .1 grams. To summarize, you could get a decent set up for ~$120 or for a roast compatible thermometer ~$145. You will also want a wooden spoon for stirring the coffee in the siphon.
If you want a cheaper alternative, for baking at least, you can use a Polder digital thermometer. I use it a lot. It's not an instant-read thermometer like the thermapen, but it's really great to see the temp of your chicken/roast/meatloaf without ever opening the oven which you can't do with the thermapen.
This is the one that I use: http://www.amazon.com/Polder-Digital-In-Oven-Thermometer-Graphite/dp/B000P6FLOY
If you want examples on how I use it, I can type them up for you. Have fun with the cooking!
Another good way is to get a probe thermometer. Also, keep the fridge cold (38 degrees F or less...for the metrically-minded, 3.3 degrees C or less) and clean it with bleach or another disinfectant about every 2-3 months. Keep raw meat/poultry/fish separated from vegetables or fruit; otherwise, the vegetables or fruit could become contaminated. And never let tongs/a spatula/whatever that have touched raw meat/poultry/fish touch the finished meal. (Instead, get new ones.)
I've been using this Polder for ten years. It's worked flawlessly every time.
Their customer service is excellent, too. A year or so after I bought it, I lost the clip that comes with it so you can use it as a candy thermometer by attaching it to a pot on the stove. I sent them an email asking if I could purchase a replacement clip, and they sent me an entirely new thermometer. I kept the clip and gave the thermometer to a friend.
Thermopop
This bacon cure with the recipe tied to a mason jar filled with the cure.
Head lamp
Clam Shell Tongs
Roll of Heavy Duty Foil
Roll of Pink Paper
Spool of Butchers Twine
Polder wired probe thermometer
Instead of a basket throw everything on a decent sheet tray.
FWIW I've had excellent reliability and accuracy from my Polder food thermometer.
What are you using it for?
I have this probe thermometer and love it. I know it's not a traditional candy thermometer, but I use it for caramel and deep frying all the time and it's great. My favorite feature is that you can set the alarm to go off at a certain temperature, so you don't have to stand there watching it the whole time.
IR (laser) thermometers are fantastic, but not for candy cooking, as the steam throws off the reading. Digital is the way to go; I recommend one of these three: CDN, Maverick, Polder. I use the Polder and a refractometer.
Here's my 2 cents on preventing burnt meat. Get a food thermometer like this: http://www.amazon.com/Polder-Digital-In-Oven-Thermometer-Graphite/dp/B000P6FLOY/ref=sr_1_4?ie=UTF8&amp;qid=1374375316&amp;sr=8-4&amp;keywords=meat+thermometer. I highly suggest this for any beginner cook. It will help ensure you get the proper temperature for meat. My other advice, and it's a obvious statement, don't leave the meat alone.
I have this: https://www.amazon.com/gp/product/B000P6FLOY/ref=s9_acsd_al_bw_c_x_3_w
dome temp or grill temp to 225?
Got it, I have a little smokey joe and a random charbroil gas grill that I can probably use, thanks!
That's a small, centered-logo Griswold and is just sitting there waiting for me to clean it up. I picked it up for $8 and thought I'd clean it up and give to a friend. I need to restore it first but I haven't begun yet.
"Home is where the mom is" although the kitchen is my domain. And, yes, I 100% love my Dexter spatula.
Second. Get a Dexter Russel with a flat edge and rounded corners:
HIC Harold Import Co. 60106 Dexter-Russell Pancake Turner, Stainless Steel with Walnut Handle, 4 x 2-1/2", https://www.amazon.com/dp/B002CJNBTO/ref=cm_sw_r_cp_apa_i_x91jDbC49X8AR
I'll offer a tried and true alternative. A Dexter spatula. This thing is like a part of my skillets, I use it that much.
There are multiple sized Dexters. Get the one that is large enough for your skillet.
This is the most used one:
http://www.amazon.com/Dexter-Russell--2-5-Inch-Stainless-Walnut-Pancake/dp/B002CJNBTO
It slides under eggs easily, AND holds most of the egg on it when flipping. The same for pancackes. It's perfect.
I usually bake stuff first like bread, corn bread, dutch babies and so on. Also searing meat is good too especially if you're looking to darken up the seasoning. I hope you sprung for a good metal spatula too. Like this one here someone linked to in an old post. It will help slowly smooth out the bottom of your pan.
I have this one (Dexter, $15 on Amazon but totally worth it) and love it. Gets right in those rounded corners, sturdy and not too flexy, and the wood handle is very comfortable. It's all I use on my three cast irons, and it works phenomenally.
The idea here is that a steel spatula will, over time and repeated use, help scrape down the little "peaks" of iron that make the surface uneven—this, combined with filling the "valleys" with delicious polymerized fat, will eventually lead to a glassy, flat surface that requires only a tiny bit of oil to cook foods without sticking (a.k.a. a damned well-seasoned pan).
If anyone is interested in purchasing:
Dexter-Russell Pancake Turner,... https://www.amazon.com/dp/B002CJNBTO?ref=yo_pop_ma_swf
This Dexter is the only spat you will ever want for your cast iron.
Shell out for a good metal turner. Then put water in the pan, bring to a boil and run the turner across the bottom to pick up straw bits of food. Empty out the water and food bits, and wipe down and dry on the stove. Add a bit more fat if you want.
Of course!! I don't have any pictures handy at the moment and most of my stuff is currently in boxes, but here are some of the things I've bought:
I'm pretty sure everyone needs Fred Pastasaurus
Congrats on your new place!
A for freakin amusing as shit.
Adorable also works. I mean, it's a dinosaur kitchen tool. Cmon.
Awh, I love hobbitses! :)
My favorite birthday is probably the one I just had this year. It was on a Wednesday, but the following weekend my fiance took me to the zoo. And I hadn't been to the zoo since I was in elementary school, so it was SO MUCH FUN!! We saw giraffes and zebras and elephants and lions and ostriches and ocelots and fish and bears and birds and all kinds of fun stuff! Then we went to the gift shop and he got me a little stuffed giraffe that's super adorable. It was AWESOME and I loved it :)
Pastasaurus, RAWR!
Happy Birthday! And I'm not just saying that because it's the raffle phrase. I hope you have an EXCELLENT one hundred and eleventh birthday! :) Thanks for the contest!
For a culinary theme: Snoop Dogg's cookbook, a Pastasaurus and Bear claw oven mitts.
http://www.amazon.com/Fred-PSAUR-Pastasaurus/dp/B002L162HQ/ref=wl_it_dp_o_pd_nS_nC?ie=UTF8&amp;colid=1BHGEZL71IJA&amp;coliid=I38V1SUHJJCA6H
Who doesn't want a pastasaurus?? :D
I don't mean to sound like a salesman, but the ThermoPro was an easy choice for 45$ from Amazon. It's been great!
Smoker: Camp Chef Smoke Vault
Thermometer: ThermoPro TP-08
I kept water in the pan throughout the cooking. I have a dual probe thermometer so I had one in the thick, meaty part of the butt (not touching bone) and the other on the same rack as the butt but 5-6 inches away.
I had the butt positioned on the second highest rack. The recipe I followed didn't specify where it should be placed, but maybe that was an factor for the long smoke time?
I’ve been using this .
https://www.thermoworks.com/Thermapen-Mk4
It's worth the money, and I'd also suggest getting a cheaper prob-style for roasts like this, as having two is really helpful (especially where the probe ones typically have a temperature alarm)
I just bought this $18 one for all my holiday cooking and it's been working great
ThermoPro TP16 Large LCD Digital Cooking Kitchen Food Meat Thermometer for BBQ Grill Oven Smoker Built-in Clock Timer with Stainless Steel Probe https://www.amazon.com/dp/B017613C3C/ref=cm_sw_r_cp_api_-dEqybE7MZRB9
I preheat my cast iron to 475 in the oven for a good half hour - then bring it up to my stovetop. I keep it on a medium high heat on my stovetop - I have an electric stove and set it to setting 6 on a 1-10 scale.
But most importantly - pickup a meat thermometer: it takes the guessing work out. I got one on amazon for $17. Pull my steaks at 115 and let them rest for 10 mins and they always end up a perfect medium rare.
https://www.amazon.com/gp/product/B017613C3C/ref=oh_aui_search_detailpage?ie=UTF8&amp;psc=1
This! freaking awesome product. Also, I stop cooking the chicken right before it hits 165^(o)F. I put them in a bowl so they keep cooking for a bit.
You can pick up an oven probe thermometer for less than $20.
https://smile.amazon.com/gp/product/B017613C3C/ref=oh_aui_detailpage_o06_s00?ie=UTF8&amp;psc=1
You can set a temp alarm so you know when you've reached strike temp (or just below, if you want to nail accuracy), which I find very convenient.
My crappy stove/oven came with a thermometer, which disagrees with the dial by 40-75° (not even consistently). I don't know which or both is wrong though my money is on the oven.
Does anyone know if this kind of thermometer would accurately measure an oven if it's not stuffed into meat?
GDEALER DS1 Digital Pocket Kitchen Multifunction Food Scale for Bake Jewelry Weight, 0.001oz/0.01g 500g, Tare, Stainless Steel, 12710619mm, Silver https://www.amazon.com/dp/B01E6RE3A0/ref=cm_sw_r_cp_api_i_6XIoDb04AC71R
This isnt the exact scale but its similar. No timer but I use the coffee guru app
You’re gonna look weird weighing gear at the grocery store, so I’d really consider just buying your own.
For around $20 you can get a good set of scales. Below are what I use and they’ve been great. The luggage scale is good for large items like your bag, tent, and pack. The smaller one is adequate for everything else. The luggage scale is also nice for getting a final pack weight and comparing it to your lighter pack.
$13 scale - Digital Pocket Scale, 0.001oz/0.01g increments, up to 500g
$9 scale - Fishing / luggage Scale
https://www.amazon.com/GDEALER-Digital-Kitchen-0-001oz-Stainless/dp/B01E6RE3A0/ref=mp_s_a_1_3?keywords=.00+scale&amp;qid=1559174983&amp;s=gateway&amp;sr=8-3
I use this one because it has an accuracy of 0.01 grams: link
And then I also have this one for weighing things more than 500 grams: link
Enjoy the samples! Let us know which flavors you like best! :)
Most of them are pretty insanely accurate for the cost.
These are very popular when very small/accurate measurements are needed:
https://www.amazon.com/Diagtree-Milligram-Electronic-Weighing-Calibration/dp/B07CKG2DJN/ref=sr_1_9?keywords=scales+.001&qid=1570829507&sr=8-9
Or any variation of the above. There are a few different styles and hundreds of brand names slapped on these but they are pretty much all the same. I would recommend these if you think you may get into microdosing.
The ones below go to .01 instead of .001 but have a much larger surface for measuring so you don't have to have your shrooms in a container or on a plate like those above:
https://www.amazon.com/GDEALER-Digital-Kitchen-0-001oz-Stainless/dp/B01E6RE3A0/ref=sr_1_5?keywords=scales+.01&qid=1570829813&sr=8-5
this is the standard -
https://www.amazon.com/American-Weigh-Scales-LB-501-Digital/dp/B005UGBG20
Does up to 500 grams so plenty for most mixers,
This wil do the trick if you're on a budget:
https://www.amazon.com/GDEALER-Digital-Kitchen-0-001oz-Stainless/dp/B01E6RE3A0/ref=pd_sbs_79_img_1/141-3920562-3263221?_encoding=UTF8&pd_rd_i=B01E6RE3A0&pd_rd_r=b5a19e60-565b-42df-a4ef-791fb50ad983&pd_rd_w=zUs07&pd_rd_wg=d0GOB&pf_rd_p=5cfcfe89-300f-47d2-b1ad-a4e27203a02a&pf_rd_r=BQ3QCABE2TVMX1TR91EK&psc=1&refRID=BQ3QCABE2TVMX1TR91EK
I've been using this one for well over a year. No complaints. Make sure you keep fresh batteries.
https://www.amazon.com/GDEALER-Digital-Kitchen-0-001oz-Stainless/dp/B01E6RE3A0/ref=lp_678508011_1_18?s=kitchen&amp;ie=UTF8&amp;qid=1520100079&amp;sr=1-18
This is what I'm using. I'm quite happy with it.
Yeah I was meaning with the bottomless you have more room under the portafilter to fit a scale. I have this scale and a bottomless on my Gaggia Classic and it fits.
+1, pretty much what I got when I started.
Only thing I would add is a scale with 0.01 accuracy for measuring chems.
I use this one
I'm not sure how important precision accuracy is for mead making when dealing with yeast and nutrients, but starting off I'm not experienced enough to guesstimate a lot of it.
I love my mine. I use it for a lot of different things in the kitchen and whatnot. Have had it a few months and its doing great
https://www.amazon.com/gp/product/B01E6RE3A0/ref=s9_acsd_zwish_hd_bw_b1DNz_c_x_w?pf_rd_m=ATVPDKIKX0DER&amp;pf_rd_s=merchandised-search-12&amp;pf_rd_r=4V11VC0JWDC60VGZ3TAW&amp;pf_rd_t=101&amp;pf_rd_p=bd380752-4323-5a01-ba04-3968c699d898&amp;pf_rd_i=289787
something like 1000 almost 5 out of 5 stars, and classified as an amazon 'choice' item
Looks like a variant of this, which is a decent scale but doesn't have a built in timer.
The one I use is currently $12 on amazon. Here it is:
https://www.amazon.com/gp/product/B01E6RE3A0/ref=ppx_yo_dt_b_search_asin_title?ie=UTF8&amp;psc=1
https://www.amazon.com/dp/B01GEW27DA/ref=nav_shopall_1_k_ods_tab_an?th=1 The Fire 7 Tablet is 50 bucks!
You cannot; https://www.amazon.com/gp/help/customer/display.html?nodeId=201460820
it has to be a tablet/phone/mobile device unfortunately :/
I think tablet or android phone download for later and then mirror screen to TV is best option. They have cheap tablets, this'll prob work: https://www.amazon.com/dp/B01GEW27DA/ref=fs_ods_tab_an
You could get him the fire 7 tablet. It is $50 which is a little more than your budget but he could use it for ebooks as textbooks can get heavy and expensive, It would also be able to provide entertainment, and it could also be used for notes and other productive things that would help in college. https://www.amazon.com/dp/B01GEW27DA/ref=cm_sw_r_cp_apa_2KeVAb28V4S6H
Do you have board games or something you could play with your children that doesn't cost much?
Can you get cardboard boxes from some store that are big enough for your children to play in and pretend it is a car or ship or rocket or whatever?
I'm not saying be cheap, but be thrifty. Find a way to save money and keep your children happy with you. Even a card game of Go Fish or Crazy 8's would be fun. Checkers, Candy Land, The Game of Life, Monopoly, RIsk, and other games are fun as well.
If you have an Amazon tablet for them you can get the Amazon Underground store and Actually Free games for them to play on a tablet https://www.amazon.com/gp/feature.html?docId=1003016361
An Amazon KIndle Fire tablet can be cheaper than an Apple iPad. Look at this one for $50:
https://www.amazon.com/dp/B01GEW27DA/ref=fs_ods_tab_an
If you save up the money for it, and not use credit cards it would be a good deal. You can get Kindle children books for them to read as well.
There is a tablet for children for it costs more.
Good luck.
If you're ok with the selection in the Android/Kindle marketplace (doesn't have Agricola for example), the Kindle Fire 7'' is just $50. I've used it to play:
It's not a great tablet, but it can handle boardgame apps just fine.
Buy a nice thermometer like this if you don’t have one, two even. https://www.amazon.com/ThermoPro-TP-08S-Wireless-Thermometer-Grilling/dp/B014DAVHSQ?ref_=bl_dp_s_mw_8074453011
Make sure the heat shield is in the right position to get the best heat distribution and limit hot spots. A laser temp gun makes this easier.
Setup an ambient temp probe near the meat to monitor temperature. My grills internal sensor is not always accurate. So I’ll just manage the temp with a few extra probes I set up.
Low and slow and you’ll be fine. Don’t go off time, use a meat probe and cook until it reaches temp. I second amazingribs.com. A brisket will take awhile depending on size.
I have both the Maverick et-732 and the thermpro tp-08s and I prefer the thermpro.
Easier to set up and cheaper. I haven’t had any wild readings.
https://www.amazon.com/dp/B014DAVHSQ/ref=cm_sw_r_cp_api_UcOTBb8KGRXAB
$45 on amazon and it looks like there is an 8% coupon available right now.
https://www.amazon.com/dp/B014DAVHSQ/ref=cm_sw_r_cp_api_w8DTzbK1DB3B
I just got this remote thermometer and it is awesome.
Radio frequency. The range is usually 300ft line of sight. Or like half that if not.
https://www.amazon.com/ThermoPro-TP-08S-Wireless-Thermometer-Grilling/dp/B014DAVHSQ
The two devices are connected via radio signal. My smoker is in a spot of my backyard where the wifi is spotty/doesn't connect, and bluetooth would have no chance of staying connected to my phone when I'm inside.
Of course it's all preference. I like having the 2nd device with the temp in front of me at all times versus it being an app on my phone.
I have 2 of the therm pro wireless ones. Each one has 2 probes that I have placed around. I adjusted for the smoke today and its much better at least. Will need to keep practicing to dial in the temp settings on this thing.
The ribs turned out great. Flavor was perfect just cooked a little to fast so did get the clean bone pull.
This one: https://smile.amazon.com/ThermoPro-TP-08-Wireless-Thermometer-Grilling/dp/B014DAVHSQ/ref=sr_1_4?ie=UTF8&amp;qid=1527528095&amp;sr=8-4&amp;keywords=therm+pro
Get yourself these
ThermoPro TP-08 https://www.amazon.co.uk/dp/B014DAVHSQ/ref=cm_sw_r_cp_apa_i_E9taBbJQBG3Q4
Meathead: The Science of Great Barbecue and Grilling https://www.amazon.co.uk/dp/B01FX1AUNC/ref=cm_sw_r_cp_apa_i_G-taBbQDC8G73
And some lumpwood charcoal. I use this from b+q https://goo.gl/images/Q2VnFn its much better than briquettes. Got some briquettes from Aldi recently that were crap.
Have some of the coals lit and some next to them unlit so the fire can spread. Get the fire going hotter and use your air vents to bring temp down.
Bellows can help if fire needs to get hotter https://rover.ebay.com/rover/0/0/0?mpre=https%3A%2F%2Fwww.ebay.co.uk%2Fulk%2Fitm%2F123015384129
If you plan on doing any true, low'n'slow BBQ, I'd recommend a wireless, [dual-probe thermometer unit] (https://www.amazon.com/ThermoPro-TP-08-Wireless-Thermometer-Grilling/dp/B014DAVHSQ/ref=sr_1_1?ie=UTF8&amp;qid=1525888495&amp;sr=8-1&amp;keywords=dual+probe+thermometer&amp;dpID=51uS-%252BVKAfL&amp;preST=_SY300_QL70_&amp;dpSrc=srch). In my, opinion, these are essential. You can't trust the lid-top thermometer, and you need to know where your meat temp is at.
ThermoPro TP16 is the best I've ever owned.
I think s/he meant humidifier. With airflow, it might act like an evaporative cooler (swamp cooler.)
My idea is that I would freeze cans of water and put those in there... Probably just because I just made yogurt by putting a jar of boiling water in a cooler with my yogurt culture, to keep it hot enough. So I don't know if it would work the other way, but I'd get a space blanket (it's like 90+% hear reflective) and try it. You could control airflow using a space blanket.
Another thing I do, to keep the temp at 105, is use a remote thermometer so I'm not letting heat out by opening it too often. like this. https://www.amazon.com/dp/B017613C3C
Depends on the cut. But in general for steaks, reverse sear is the way to go.
https://www.seriouseats.com/2017/03/how-to-reverse-sear-best-way-to-cook-steak.html
You need a thermometer like this:
https://www.amazon.com/ThermoPro-TP-16-Thermometer-Stainless-Standard/dp/B017613C3C
I like the ones like this. They're nice as you can just stick the probe in your meat, put in the oven, and get an alert when it reaches the perfect temperature. I have one by a different brand that great for this as well as using it like a regular instant read thermometer.
i have a probe thermometer similar to this one
and the smoker has a built in meat probe that i can track/be alerted via bluetooth, or by a readout on the smoker.
thanks for helping me to sort all this out. this meat is mostly for me and a couple friends that understand its my first time, so if i screw up, i will still have hopefully learned something.
I use [one of these probes ](ThermoPro TP-16 Large LCD Digital Cooking Food Meat Thermometer for Smoker Oven Kitchen Candy BBQ Grill Thermometer Clock Timer with Stainless Steel Temperature Probe, Standard, Silver https://www.amazon.com/dp/B017613C3C/ref=cm_sw_r_cp_api_i_U-ECDbJSCB8HJ) and set it to ding at 118 if I’m looking for a rarer steak or 125 if I’m looking for more medium-rare. Works like a charm! I set my air fryer to 350 and flip it after 5-7 minutes, then I eat when it dings!
I bought a thermocouple for my multimeter.
If I didn't have the multimeter I'd have went with something like this.
Here This is the one I use. I had gotten a cheaper on originally with a silicone cover over the wire and it lasted for about a year before the wire started backing out of the probe and it wouldn’t read correctly. I’ve had this one since and it seems much sturdier.
https://www.amazon.com/dp/B017613C3C/ref=cm_sw_r_cp_api_pZ0rzbYDWKENS
A probe thermometer with a cord is fantastic for a newbie cook unsure about getting meat to the right temperature. You just stick it into the middle, set the timer to the temperature you want, and it beeps at you when it's done. No guesswork, no cutting it open to check, no dry overcooked meat.
You will need a meat thermometer to do this, but you should own one anyway for safely roasting things.
I’d go w/ something like this... much easier to work with
https://www.amazon.com/ThermoPro-TP-16-Thermometer-Stainless-Standard/dp/B017613C3C/ref=mp_s_a_1_3?keywords=remote+oven+thermometer&amp;qid=1557443792&amp;s=gateway&amp;sprefix=remote+oven&amp;sr=8-3&amp;utm_source=share&amp;utm_medium=ios_app
>You’ll know exactly when it’s done
Not really, though. A probe thermometer would do that job better-https://www.amazon.com/dp/B017613C3C/ref=sr_1_5?keywords=thermometer+with+probe&qid=1551351419&s=gateway&sr=8-5
Ah, alright! I think I'll just use my home oven then. This is probably a dumb question, but I heard that the digital oven thermometers (the ones with probes) are more accurate, but I'm not really sure how to use them. Do I put the probe in next to my sculpture, or do I need to insert it into the sculpture?
This is the kind I'm talking about: https://www.amazon.com/ThermoPro-TP-16-Thermometer-Stainless-Temperature/dp/B017613C3C/ref=sr_1_1?s=home-garden&amp;ie=UTF8&amp;qid=1537636872&amp;sr=1-1&amp;keywords=Digital+oven+thermometer&amp;dpID=41StbFDF60L&amp;preST=_SY300_QL70_&amp;dpSrc=srch
Get a new meat thermometer i use this https://www.amazon.com/dp/B017613C3C/ref=cm_sw_r_cp_apa_8gxVAbQGBP14A
Check the thickest part of the meat.
Next time use a probe thermometer that you can leave in the roast with the temp gauge outside like this
https://www.amazon.com/ThermoPro-TP-16-Thermometer-Stainless-Standard/dp/B017613C3C/ref=mp_s_a_1_3?adgrpid=56143345636&amp;gclid=Cj0KCQjw8svsBRDqARIsAHKVyqEc7A7Bx34kYrVG4mob9kO0stg7W9M4FRBCWuHwEReZBqdlkQtc9l8aAu5dEALw_wcB&amp;hvadid=274708372980&amp;hvdev=m&amp;hvlocphy=9003357&amp;hvnetw=g&amp;hvpos=1t1&amp;hvqmt=e&amp;hvrand=8239971173128604548&amp;hvtargid=kwd-6198397217&amp;hydadcr=14889_10218911&amp;keywords=probe+thermometer&amp;qid=1569928012&amp;s=gateway&amp;sr=8-3
They are pretty cheap and a great tool.
Dark meat should be cooked till it’s at 175° F internally, to insure its cooked thoroughly while remaining tender and juicy. For your oven temp, I’d go anywhere between 400° to 450°. If you have an instant read thermometer like this one then you can insert it into the drumsticks and set an alarm for the correct temp.
Don't remember which one since it's old but something like this should work for you. Don't get the cord wet as it will short out the probe. I kink the cable so that it won't drop into the liquid past the solid metal. It's not going to give give you the fractions of a degree but I figure just being able to generally track the temp throughout is good enough.
If you don't already have one, a leave-in meat thermometer: https://www.amazon.com/gp/product/B017613C3C/ref=oh_aui_search_detailpage?ie=UTF8&amp;psc=1
Looking on Amazon this guy may be the perfect balance of price and features.
I think short term damning me is fitting. Long term, you are welcome.
I have had this scale for a year with 0 issues. I definitely recommend it and it's less than $13. https://www.amazon.com/GDEALER-Digital-Kitchen-0-001oz-Stainless/dp/B01E6RE3A0/ref=mp_s_a_1_2?ie=UTF8&amp;qid=1540318990&amp;sr=8-2&amp;pi=AC_SX236_SY340_FMwebp_QL65&amp;keywords=gdealer+scale&amp;dpPl=1&amp;dpID=41RCSHRrJ4L&amp;ref=plSrch
GDEALER DS1 Digital Pocket Kitchen Multifunction Food Scale for Bake Jewelry Weight, 0.001oz/0.01g 500g, Tare, Stainless Steel, 12710619mm, Silver
https://www.amazon.com/dp/B01E6RE3A0/ref=cm_sw_r_cp_apa_i_MMj5Cb7CJ6TCP
Edit: It's great, especially for the price. Weighs quickly, and I confirmed the weight was perfect with known weight items (coins are an easy bet). No complaints.
Sounds like you're baking a lot. I would suggest a good scale. I just bought this one. I like it so far. It's big though.
I also bought this one that will measure to the
thousandthhundredth of a gram. This one may not be necessary, I'm just really anal and like to be exact with baking recipes that list weights in grams. Really gets me hot, if you know what mean.Edit: thousandth of an oz., hundredth of a gram.
I just got this one and I love it. It is small, but I can put my glass on it and add my Kratom per gram, then tare to clear and add next strain then keep going until I'm done blending. Measues to the 0.01 (hundreth) place. Has grams and ounces. $13
https://www.amazon.com/GDEALER-Digital-Kitchen-0-001oz-Stainless/dp/B01E6RE3A0/ref=mp_s_a_1_3?ie=UTF8&amp;qid=1539438918&amp;sr=8-3&amp;pi=AC_SX236_SY340_FMwebp_QL65&amp;keywords=GDEALER+Digital+Pocket+Kitchen+Scale&amp;dpPl=1&amp;dpID=41RCSHRrJ4L&amp;ref=plSrch
Thanks for your help. I really appreciate it.
Get a kitchen scale and weigh your container while you're squeezing into it.
I keep this scale at work for making coffee. May want to get one like this that has resolution down to tenths/hundredths of gram for that Mio application though.
I have this one, works well and it is cheap!
GDEALER Digital Pocket Kitchen Scale 0.001oz/0.01g 500g Kitchen Food Scale Jewelry Weight Compact Scale, Tare, Stainless Steel, Backlit Display https://www.amazon.com/dp/B01E6RE3A0/ref=cm_sw_r_cp_api_i_j2I-AbTB1358Y
Updated list of sale items, I will update this throughout the day:
Instant Read Digital thermometer for $19.99
1800-Watt Portable Induction Cooktop for 71.99
Digital Pocket Kitchen Scale for 13.99
[Pop-up Canopy] (http://amzn.to/2Bi53E0) for 191.73 - for those outdoor brewers
I have this one. I would buy ot again if i lost it or if it broke: https://www.amazon.com/gp/aw/d/B01E6RE3A0?psc=1&amp;ref=yo_pop_mb_yo_pop_mb_pd_t2
ya can. but i use this $12 jeweler's scale. So, really, unless you're gonna do MASSIVE mixing, why spend that much? I think that became the thing cos a lot of mixers got coin from amazon if people clicked their link back in the day and it became the thing. Good scale, don't get me wrong. BUT, if you're trying to get started more or less on the cheap...
But, if we ARE gonna do the obligatory link, use this one. Get you some free bottles, and a good description of how to mix by weight too. plus, use one of a million codes, such as diyordie and get 15% off.
&#x200B;
Can't beat that.
https://www.amazon.com/gp/aw/d/B01E6RE3A0/ref=mp_s_a_1_2?ie=UTF8&amp;qid=1492186983&amp;sr=8-2&amp;pi=AC_SX236_SY340_FMwebp_QL65&amp;keywords=01+gram+scale&amp;dpPl=1&amp;dpID=41uVbS2aWoL&amp;ref=plSrch
https://www.amazon.com/gp/aw/d/B01IXHSPDK/ref=mp_s_a_1_3?ie=UTF8&amp;qid=1492186983&amp;sr=8-3&amp;pi=AC_SX236_SY340_FMwebp_QL65&amp;keywords=01+gram+scale&amp;dpPl=1&amp;dpID=51S0esI%2BN9L&amp;ref=plSrch
My powerful yet stealthy touch screen sound system for about $500: An Amazon kindle running the Pandora app sits in a kitchen cabinet. Plugged into the audio out is a headphone to RCA adapter. That's plugged into a passive volume control mounted beneath the cabinet. The output drops down to the basement, where I have a signal detecting power amplifier. That amp drives four Polk in-ceiling speakers mounted in our open concept first floor.
I've read and watched a lot of reviews for the Amazon Fire tablets. Dirt cheap for the 7 incher with small memory but its very durable and should be enough for a toddler. Seriously, the 7 inch tablet is TOUGH!. Otherwise you could look into the bigger 8" and 10" Fire tablets too. Pretty good specs all around and should be more than enough for kids to play around with. I'd buy one for myself too if they were available where I am.
Yeah, Amazon will have some Fire Tablets that are like $50 soon. I would go with something like that, especially because it comes from a brand like Amazon that you know you can somewhat trust.
https://www.amazon.com/All-New-Amazon-Fire-7-Tablet/dp/B01GEW27DA/ref=sr_tr_sr_1?ie=UTF8&amp;qid=1495356160&amp;sr=8-1&amp;keywords=Amazon+Fire
I know its android based but you might want to try the new amazon fire 7. Its $50, however, im not to sure about the android L.
https://www.amazon.com/All-New-Tablet-Alexa-Display-Black/dp/B01GEW27DA/ref=sr_tr_1?ie=UTF8&amp;qid=1495038300&amp;sr=8-1&amp;keywords=fire+tablet#tech
https://www.amazon.com/All-New-Amazon-Fire-7-Tablet/dp/B01GEW27DA/ref=gw_sdw_pdt-1?_encoding=UTF8&amp;smid=ATVPDKIKX0DER&amp;pf_rd_m=ATVPDKIKX0DER&amp;pf_rd_s=&amp;pf_rd_r=1PDJ4PD749SGMQNE3B3F&amp;pf_rd_t=36701&amp;pf_rd_p=dc7239cd-34bd-4297-9844-312f3f29a6e8&amp;pf_rd_i=desktop&amp;th=1
apperantly only 30$. I bought it in €. just select with special offer, which means the lock screen is an advertisment, wich doesn't realy bother me personaly. The 8gb version is big enough for only summoners war, because you can use 7.6 gb of it for your own stuff, 400 mb are for the system
YO /u/glitchwabble the most expensive Kindle FIRE I can find from amazon warehouse is actually THIS That is a $49.99 tablet!
It's basically the same with Ads. But the homescreen on the Fire devices is different so they put more ads on it.
&#x200B;
Sounds like you probably want one of these: https://www.amazon.com/All-New-Amazon-Fire-7-Tablet/dp/B01GEW27DA/ref=sr_1_1?ie=UTF8&qid=1543410405&sr=8-1&keywords=kindle+fire+7
&#x200B;
Personally though, I would recommend just a regular Android tablet as you can just download the Kindle App on it, and you don't have to deal with Amazon's ads or shoddy hardware.
This isn't the answer you are looking for, but you might try listening to the Kindle version of the book using the Kindle Fire's text-to-speech capability.
Kindle version of Colombian Exchange by Alfred Crosby US $30.05
Text-to-speech is enabled in this book.
https://www.amazon.com/gp/product/B017S4QP7C/ref=dbs_a_def_rwt_hsch_vapi_tkin_p1_i0
If you don't have a Kindle Fire, this is the lowest price version. $49.99
https://www.amazon.com/dp/B01GEW27DA/ref=ods_cp_comp_aus
NOTE: In previous years this device has gone on sale for $29.99 during Thanksgiving Black Friday/Cyber Monday sales. If you are thinking of purchasing one, be on the lookout for sales next week.
Video on using Kindle Fire's text-to-speech function.
https://www.youtube.com/watch?v=e2a9GoQe8QY
The cheap versions of Amazon Fire tablets seem like the sweet spot to me e.g. https://www.amazon.com/All-New-Amazon-Fire-7-Tablet/dp/B01GEW27DA
I don't think you can realistically get anything cheaper without going for something used.
I'm assuming these are 7th gen? The one with the case is decent deal. The ones without not so much. Amazon is currently selling these new for $40, so for just $7 more you get no scratches and the full 1 year warranty.
Maybe, but how are they going to realistically compete? You can get a tablet for less than 100 dollars these days, and you can mount it anywhere on your dash for 10 more. I don't see any auto company making a better infotainment system than an android/ipad any time soon (and it certainly wouldn't be cheaper). They just haven't put the hours and money into development. If they paid for integration with those companies, now THAT would be very interesting.
Amazon already does this with their Kindle Fires.
https://www.amazon.com/dp/B01GEW27DA/ref=cm_sw_r_cp_apa_UesYzbZ17DPPG
Best Buy frequently has these on sale for about $30. For a functional, if barebones, tablet, that's basically unbeatable. You're stuck with Amazon's launcher, but most of its peculiarities can be turned off and it has native access to the Play store. And if you break it or lose it? Who cares. It cost less than a tank of gas; go buy another one.
For a reader app on both the Fire and my S7, I'm currently using Prestigio, but the ads are getting spammy, so looking for a better one.
It wasn't even a referral link, well maybe it was, but it wasn't my referral, I googled "Affordable tablets" and grabbed a link off a site, here's a non referral link
https://www.amazon.com/gp/product/B01GEW27DA/ref=s9_acss_bw_cg_tabcppt_md1_w?pf_rd_m=ATVPDKIKX0DER&amp;pf_rd_s=merchandised-search-3&amp;pf_rd_r=TJRQRCK0KJVY5EMHZG2X&amp;pf_rd_t=101&amp;pf_rd_p=113830ff-59b1-4973-8f4f-b77b309eb48b&amp;pf_rd_i=6669703011
Awh Bea,go to sleep.
Patasaurus love u long time
I wish you the best of luck tomorrow/later today with your lesson and test! Good luck <3
Mine is better.
T-REX
This
Behold, the PASTASAURUS.
Depends on the amount and type of egg I hunger for. Small egg spatulas for the two egg sandwich, a few larger ones to tame the scrambles and omelettes, and we'll not forget the Pastasaurus that lurks in wait of egg noodles. (ok, I lie. He's mostly for Fettuccine and spaghetti.).
I also have a potato masher, some whisks and whatever. They're all far less useful than the egg tools though. Mmmm...
You should have one of these
I don't need anything, so please gift someone else!
The carabiner is a Nite Ize carabiner with a bottle opener Link Here.
I have one and I love it. I use it to hold my keys and open beers and it works great for both!
Oh I'm totally with you on the jangling. My keyring is on this, which I clip on my belt loop in the 4:30 position, and tuck the keys into my back pocket.
Loving the comments!
The usual: microtowel, battery charger for phone or camera, ear plugs/ eye mask, maybe a phrase book
Not mentioned: carabiner that doubles as a bottle openerbottle opener
Possible alternative. Keys are too important to trust to bad carabiners.
a smaller carabiner...? They make them in all sizes, not just climbing size.
You could also do an s-biner:
http://www.amazon.com/Nite-Ize-SBO-03-01-S-Biner-Carabiner/dp/B0037H3EB0/ref=sr_1_23?ie=UTF8&amp;qid=1396377415&amp;sr=8-23
http://www.amazon.com/Nite-Ize-SB234-03-01-S-Biner-3-Pack/dp/B001HN6CW4/ref=pd_sim_hi_2?ie=UTF8&amp;refRID=0RB2RP7WS73A5PMA8ES0
It's the S-biner from Night Ize. Pretty handy keeper, and definitely doubles as a double sided bottle opener.
They got em cheap here on amazon.
Would this and a small knife (Spyderco Bug?) fit the bill? Too many tools (without one being pliers) and finding quality is hard.
Currently on summer break from University. Heres my pocket dump. It might seem like a lot but it fits my needs
My daily driver is a classic 71 ford Maverick so the leatherman and the inspection light (other than for all around handiness) come in handy for late night, unplanned, roadside maintenance. The Cheapo flip knife was an impulse buy at walmart... for 4 bucks id say it was worth it. I actually really like the blade shape and thickness of the knife overall.
I actually like the idea of this one but I'm reading it has a lot of QC issues. Plus, it's $36. I might just go with this instead.
They said they like beer so I ended up getting them an S-biner that doubles as a beer bottle opener, the SAS Survival Handbook, and the interesting 4-in-1 turn off wrench suggested by you shown here. I'm going to post an update when my match posts their gift to see what they thought.
$350 is a good chunk of change to spend.
As far as wallets go, I just use an old leather business card holder so I won't be much help there.
I did quite a bit of research before getting my knife—weight, size, blade type, the way it opened, etc—before landing on the Ontario Rat II. But now I want a Benchmade. And a Kershaw. And a CRKT.
As far as carabiners go, I've used all types, but am currently using—and liking—the S-biner with the bottle opener.
Once I got a pocket flashlight, I caught myself using it daily (at night). That particular pocket light has some relief cuts that make it "self-defensy".
I try to keep it simple and functional, but it's all about how you're going to use it. Hell, you could spend $300 on a knife, $20 on a light, put $10 in your pocket and call it a day.
It is pretty cool. Backup bottle opener too! http://www.amazon.com/SBO-03-01-S-Biner-Carabiner-Bottle-Opener/dp/B0037H3EB0
My carabiner broke a few weeks ago. A new one would be nice, and the added bonus of it being a double bottle opener will come in handy when around friends (I don't really drink, so meh for me, but others will appreciate that facet).
/thread
I recently purchased this Smart Weigh scale and love it. It's accurate, simple, and is slim and easy to store. I've been using this OXO kitchen scale for a couple years now and have zero complaints. It's kind of pricey (I found mine half price at an outlet store), but I've definitely gotten my money's worth out of it because I bake a lot (including breads) and it's never failed me. If you're looking for cheaper, my mom seems to get by just fine with this little guy. I wouldn't use it for big jobs or things that you need accuracy to the gram, but it works for casual use.
I have this scale.
I had a Fitbit One. It helped me be more active with walking, which my dog also loved. That led to me doing Couch to 5k. Eventually I sold the Fitbit and got a Garmin watch for running.
Do be skeptical. Get tools that you will use, otherwise it's definitely a waste. I didn't want a Fitbit wristband because I thought something on my wrist all the time would annoy me, and I only needed a pedometer. Get what works with your goals.
Not really, to be honest.
I have this one and have no complaints. It does grams, ounces, kilograms, and pounds.
https://www.amazon.com/Ozeri-Digital-Kitchen-Capacity-Stylish/dp/B003E7AZQA/ref=sr_1_17?ie=UTF8&amp;qid=1468866881&amp;sr=8-17&amp;keywords=food+scale
Because I dont want to spend over $25 for a scale.
But, I found one.
http://www.amazon.com/Ozeri-Digital-Kitchen-Capacity-Stylish/dp/B003E7AZQA/ref=lp_289787_1_2?s=kitchen&amp;ie=UTF8&amp;qid=1415806941&amp;sr=1-2
Hi! I'd just like to leave this here, this is my suggestion for a food scale! I personally use this one. It's cheap, easy to use, and accurate. Ozeri Pro Digital Kitchen Food Scale, 1g to 12 lbs Capacity, in Stylish Black https://www.amazon.com/dp/B003E7AZQA/ref=cm_sw_r_other_awd_c-H5wbFK5TQNC
Does what I need it to do and pretty affordable:
Ozeri Pro Digital Kitchen... https://www.amazon.com/dp/B003E7AZQA
I have this one. Works great.
I just use this cheap scale from amazon.
I didn't substitute anything but the website OP linked should have that kind of info.
If you're not measuring your sugar with a kitchen scale, that's a really cheap, easy way to prevent this exact problem. Here's a lot of different ones. I use this one, which is accurate to the .05oz. That's plenty for 5gal batches, but a little sketchy when you're down to 1G-2G.
That said, if you're already using a scale, I'm very sorry. I'm still having trouble dialing it in bottle-to-bottle myself, and a thorough mixing is somewhat difficult.
http://www.amazon.com/Ozeri-Digital-Kitchen-Capacity-Stylish/dp/B003E7AZQA/ref=sr_1_3?ie=UTF8&amp;qid=1377450313&amp;sr=8-3&amp;keywords=food+scale
-i have this one and love it!
I have an Ozeri as well. This one:
https://www.amazon.com/dp/B003E7AZQA
Been using it daily for six years in my kitchen. It's remarkably consistent. I can put an empty bowl on it that I weighed six years ago and it still shows exactly the same weight, to the gram.
When it gets gunked up because I spilled something on it, I just take out the batteries and submerge it in very hot water, slosh it around and work the buttons a few times, shake out the water and let it dry for a day or two. I've done that at least half a dozen times and it works like the day it was new.
I'm not sure how those compare. The only real factors you need to worry about are capacity and accuracy. For accuracy something that does 1g is fine, 0.1g is good for some things (modernist style stuff that uses all the fancy chemicals and what not) but 1g is more than plenty for most people. For capacity you want something that goes up to at least a kg or so. One like this is perfect.
Not hard to measure
Both my food and my thanks to
You if you buy this.
Ozeri Pro Digital Kitchen Food Scale, 1g to 12 lbs Capacity, in Stylish Black https://www.amazon.com/dp/B003E7AZQA/ref=cm_sw_r_awd_ayKdvb0SM5P1C
I have had this one about 8 months now, works pretty well and no issues. It doesn't take up much room either.
I think the two most important questions are: what are some coffees that you've had and like? What sort of work are you willing to put into it?
My personal recommendation would be to get a Baratza Encore grinder, a digital scale, a gooseneck kettle of some sort, a Chemex, and a French Press. All that should easily fit within your budget. And of all the accessories I have, on 90% of the days I don't use anything other than those. Well, and some coffee beans.
But that will take some work -- measuring, grinding, pouring, waiting, more pouring. It will make much better coffee than any automated machine, but maybe you don't care that much and it sounds like too much work. In that case, the Technivorm Moccamaster and Bonvavita 1900 TS are good options for automatic drip machines.
EDTIT: Sorry, I missed "automatic" in the text. I still don't think that will give you the best coffee, but if you're set on it, ignore everything I said except the Technivorm and Bonavita.
I love my food scale. My only problem with it is that the readout is upwards facing and gets covered by larger plates. Make sure you get one with an outward facing display, just to be safe.
Mine is far from unusable, mind you. It's just a little annoying having to interpret what it's trying to say at such a shallow angle. It's just a dingy LCD like on a cheap watch, so it's hard to read at an angle.
I have this one. You can get around the display placement issue if you weigh everything separately on a small plate, but I'd rather dump it all on one and tare between items.
Yeah I think those are two different ones. The Pronto is about a dollar cheaper and highly highly reviewed
https://www.amazon.com/gp/aw/d/B004164SRA/ref=mp_s_a_1_3?ie=UTF8&amp;qid=1506456853&amp;sr=8-3&amp;pi=AC_SX236_SY340_QL65&amp;keywords=ozeri+scale&amp;dpPl=1&amp;dpID=51E1WT7IpdL&amp;ref=plSrch
https://www.amazon.com/gp/aw/d/B003E7AZQA/ref=mp_s_a_1_4?ie=UTF8&amp;qid=1506456853&amp;sr=8-4&amp;pi=AC_SX236_SY340_QL65&amp;keywords=ozeri+scale&amp;dpPl=1&amp;dpID=51b18%2Bb1DFL&amp;ref=plSrch
I got this food scale, works great. http://www.amazon.com/gp/product/B003E7AZQA/ref=oh_aui_detailpage_o09_s00?ie=UTF8&amp;psc=1
Items I use all the time:
Tubberware
Rice cooker
Spiralizer
Immersion blender
Food processor
Slow cooker
The Twin Cities.
The timers are like these. http://www.amazon.com/Intermatic-TN311-Heavy-Grounded-Timer/dp/B005MMSTNG/ref=sr_1_2?ie=UTF8&amp;qid=1406033476&amp;sr=8-2&amp;keywords=timers
I don't know if they are available in AUS, but you could get an Access Point like the Ubiquity found here.
Power is sent through the network cable by an injector. Just use a light timer like this.
http://www.amazon.com/Intermatic-TN311-Heavy-Grounded-Timer/dp/B005MMSTNG/ref=pd_cp_hi_3/191-2033056-5552934
Get one of these. Set your pot to low then set the timer to turn on 6-7 hours before you get home.
You can also get timers to plug into your power source so it only comes on every other hour or however often you need it to (depending on how cold it is).
Or you can time it to pop on an hour before work I think if you have fancy ones. Make sure they can work in extreme cold.
My brother uses these non-digital ones and they work for him:
http://www.amazon.com/Intermatic-TN311-Heavy-Grounded-Timer/dp/B005MMSTNG/ref=sr_1_1?ie=UTF8&amp;qid=1409449629&amp;sr=8-1&amp;keywords=electric+timers
Edit: Also, buy the blue extension cords. They are the ones for cold weather.
Any basic Christmas light timer will do. You ought to be able to get them for $10, let alone ten pounds. This is the one I use:
https://www.amazon.com/Intermatic-TN311-Heavy-Grounded-Timer/dp/B005MMSTNG/ref=sr_1_5?s=hi&amp;ie=UTF8&amp;qid=1473883428&amp;sr=1-5&amp;keywords=light+timer
Worked great for years. Do pay extra to get a grounded three-prong version, not a cheap two-prong version. It's not worth the risk in your own home to not spend the extra couple bucks. I'm not sure that they even sell ungrounded versions in Britain, but just in case.
They're pretty cheap. Alternatively, you can buy one of these and use it with any coffee maker that requires electricity.
I've used this [model] (https://www.amazon.com/Intermatic-TN311-Heavy-Grounded-Timer/dp/B005MMSTNG/ref=sr_1_9?ie=UTF8&amp;qid=1496850877&amp;sr=8-9&amp;keywords=light+timer) for seven years, no problem. If you have multiple reptiles you can plug in a power strip and voilà!
The link you provided was broken for me. But I think you were trying to link to this timer.
I agree this is probably the best answer to OPs question even if it is not as sexy as a "smart device"
If you want different behavior on the weekends, you could always spend just a little more and get one like this with 7 day programmability.
For anyone having issues with charter, one of the easiest fixes is to just reboot your router and modem. (I know, I know, you've heard it before)
Buuuuut, I bought a wall timer, similar to one of these bad boys: https://www.amazon.com/Intermatic-TN311-Indoor-Decorations-Grounded/dp/B005MMSTNG/ref=sr_1_5?ie=UTF8&amp;qid=1536945255&amp;sr=8-5&amp;keywords=timers+for+electrical+outlets&amp;dpID=51mbESwQNrL&amp;preST=_SY300_QL70_&amp;dpSrc=srch
I have it set to kill power for the small increment (usually 10-15 min) at about 4:00 AM, i.e. when I should be asleep on any given day. I barely have connection issues anymore. It's a bit extreme, but for the 8-15 dollars to never worry about it, it's been a great use of my cash.
Here are some things that may or may not help you grow Wysteria:
Other than that, I don't do anything particularly special. I don't aerate or CO^2 inject. I used Excel once for algae, and it totally melted most of my plants, so I don't recommend it to anyone.
I should note that my tank is a 29 gal.
They're not that expensive. I use this one and it's only like $6. Mine looses time after a bit - I think it speeds up around 5 minutes a month but it's still working good and I've had it running 24/7 since last May.
Grant it, I don't use it for the phones - I have it set to a light for my leopard gecko. There's this more expensive one that you can set multiple times a day. I have one that looks like it but is much older but I can't seem to find it.
Then setup a timer like this https://www.amazon.com/Intermatic-TN311-Heavy-Grounded-Timer/dp/B005MMSTNG to do so at off hours just put the off and on right next to each other your router goes down for 1 minute and come back up.
Your other option is buy your own modem and router to stop using comcast's crappy equipment. That method also saves you $10 a month.
I'm a pretty heavy sleeper, snoozing through fire alarms, tornadoes, etc. I have finally found something that wakes me up.
I use one of those indoor appliance timers (something like this) on a bedside lamp. I have it timed so that a few minutes after my alarm clock starts going off, my lamp turns on. This woke me up at 5am yesterday to bike 100 miles!
After I've successfully woken up early every day for a week or two, I start getting tired and going to bed at a normal time each night, which in turn makes waking up easier.
KX? Also, sometimes you just have to try another OS (stick with same vintage/arch) to get other language options. For example: for 08R2, try 7x64 drivers when searching the support site.
Could also go low tech: http://www.amazon.com/gp/aw/d/B005MMSTNG?cache=13a91fec0b33c55a5393331bf14af847&amp;pi=AC_SX110_SY165_QL70&amp;qid=1408483971&amp;sr=8-10#ref=mp_s_a_1_10
I think it's low 60s? I used to run it for 30 min x 3 per day. I haven't used it in a month, I moved to a different model. I'm completely comfortable with that. I had ~15 Bovedas in there though.
A huge bag of KL in the back helped absorb excess condensation.
$10 shipped. http://www.amazon.com/gp/product/B005MMSTNG/ref=oh_details_o04_s00_i00?ie=UTF8&amp;psc=1
I've had two of these: http://www.amazon.com/gp/aw/d/B005MMSTNG/ref=pd_aw_sim_60_2?ie=UTF8&amp;dpID=51mbESwQNrL&amp;dpSrc=sims&amp;preST=_AC_UL130_SR130%2C130_&amp;refRID=1FJNNQ1T800W3VMKPD84
Had them for two grows and no problem at all, really nice because it's all mechanical so not much to go wrong.
Here is the mobile version of your link
For a walstad like I described, I originally just used a small ikea desk lamp. It was this one actually.
You can also buy a timer for the light, so you won't ever need to worry about missing a day. This is my favorite timer so far. They have cheaper ones that work great too.
You should never need to feed the walstad bowl I described. At most, you'd have to add a glass of water every few days. You'll never need to do a vacuuming session on it. Just topping off should be fine. I've got my walstad bowl I made forever ago, and it still looks awesome. I've borrowed its light for weeks at a time, so it sat in the dark, and it's fine. I top it off every few weeks when I realize its getting REALLY low.
Super low maintenance. Looks beautiful. Just buy a large glass bowl (a few gallons), miracle grow organic potting soil, gravel, the plants you choose, and a piece of driftwood to get started. If you want to add a lamp on a timer, it's an extra ~$30 probably. You'll need a small bottle of dechlorinator too, but you'll need like a drop of it per large glass of water for the most part. If you stay on top of just adding a half cup or so every day (assuming its a hot day), then you won't even need to bother with dechlorinator after the initial fill.
old reliable:
https://www.amazon.com/d/Kitchen-Timer/Intermatic-TN311-Indoor-Decorations-Grounded
Two things: Sleep Cycle app on my phone, and a timer that I plug my lamp into - I also point the arms/bulbs at my bed.
I set the app for a 15 min wake period, so I'm up anywhere between 5:45 and 6 am. When I attempt to snooze it in a haze, the lamp serves as a backup and it tends to snap me out of the "must go back to sleep" mode long enough to get with it & stand up before I have a chance to convince myself otherwise.
I work 3-midnight and using the above helped me reset my sleep schedule to going to bed right after work and waking up at 6 am to run (before, 6 am was when I usually went to bed).
My husband and I would squeeze the tofu with paper towels to get the liquid out. We decided to treat ourself for christmas and bought this tofu press the difference was amazing. Before when we would try to squeeze by hand the tofu would crumble as we cooked it after using the tofu press for about 15 min the tofu would cook crispy and not crumble while we stirred it in the pan. And use firm or extra firm like I see everyone else telling you to ;)
It’s surprisingly very easy to prepare at home. I enjoy it so much that I invested $20 into a tofu press, which makes the process even easier. Grill it, fry it, bake it, ... whatever. And you can marinate it with just about anything. With the water pressed out, it absorbs marinades very well.
For when you have a job and some income.
No problem! Once I figured out how to actually cook tofu, I ate it a lot more.
I do, but its mostly out of convenience. I just bought the $20 one from Amazon. I just set the tofu in it and put it sideways in the sink to let the water drain out (I usually cut it in half so its thinner and put that in). Previously, I had two cutting boards with some paper towels and dish rags and just squeezed it in there. It worked, but it generated more mess than I wanted to deal with.
Seitan is gonna look something like this: https://www.geniuskitchen.com/recipe/baked-seitan-log-448521
The basic idea is to get the balance of wet and dry ingredients. obviously your wheat gluten is core, but you can decide to add yeast if you'd like. If it's too wet, like you put in a bit too much water, or if it's not wet enough, you'll end up with either something too squishy/soggy or too dry and hard. It takes some practice haha! But mainly it's mixing your seitan with your dry ingredients, getting your wet ingredients (veg broth, soy sauce, oil), mixing them up and creating a little log that you wrap tightly in foil. It usually takes 1hr and 30 min to cook thouroughly at around 325 degrees.
If you want tofu with firmness and bite you need to not only buy extra firm tofu but also get yourself a tofu press https://www.amazon.com/EZ-Tofu-Press-Removes-Texture/dp/B007LLGMG2/ref=pd_lpo_vtph_79_bs_t_1?_encoding=UTF8&amp;psc=1&amp;refRID=Y4MPDVBB53D9KYQQDGYS . Some people also freeze the tofu after pressing to get the desired firmness but I have never tried it. But usually you take the block out and press it for maybe 15 min, every 5 mins or so coming back and tightening the clamp more until you get most of the water out. If you try and press it down all at once, you will end up breaking the block. Only after getting the water out do you cut it up. At this point you can choose to freeze it but I just eat it this way and it's usually fine for me.
For TVP you don't make it but you buy it. It's just vegetable protein that you can buy in a bag. Bob's red mill and other companies make it but the best experience I've had is with this one https://www.amazon.com/gp/product/B06XP68NLH/ref=ppx_yo_dt_b_asin_title_o00_s00?ie=UTF8&amp;psc=1 . It's a lot of tvp so beware. I usually use this for spaghetti balognese or making meatballs and maybe burgers. Just use it how you would use ground beef in any of your favorite recipes.
I don't have "real" recipes because I usually just use basic store bought pasta sauce or asian sauces. I get pretty simple with my cooking because it's hard enough as it is to eat healthy and I don't like spending more time than I need to. Hope this helps!
This is the press I have & it works great. Usually I press for about 30 minutes. I eat tofu 3-4 times a week. Once it's pressed it picks up other flavors easily. Dice & saute it with garlic, braggs aminos, onion, & leafy greens. Saute it with just salt & pepper, let it chill, use in a salad. Cut it into slabs & bake it with bbq sauce. Good stuff.
Worth every penny.
check out Amazon FR You can play darts with bottlecaps. Also, I want that beer poster now, preferably pocket friendly.
Bottle opener launcher
Spinning Hat Cap Zappa Bottle Opener https://www.amazon.com/dp/B00BKQSL2C/ref=cm_sw_r_cp_apa_i_8hn4BbT85V3AY
Shoots over 5 meters apparently.
http://www.amazon.co.uk/Spinning-Hat-Bottle-Opener-Multicolored/dp/B00BKQSL2C
http://www.amazon.com/dp/B00BKQSL2C/ref=cm_sw_su_dp have fun bud
http://www.amazon.com/gp/product/B00BKQSL2C?psc=1&amp;redirect=true&amp;ref_=ox_sc_act_title_1&amp;smid=A1JBE8EGAQWC2B
Personally I use an infrared thermometer like this one to measure my oil temperature to make sure it doesn't get too high.
Buy a laser (IR) thermometer to get some objective data. I use mine daily. It's invaluable for lots of common chores
http://www.amazon.com/Nubee%C2%AE-Temperature-Non-contact-Infrared-Thermometer/dp/B00CVHIJDK/ref=sr_1_2?ie=UTF8&amp;qid=1395321491&amp;sr=8-2&amp;keywords=laser+thermometer
Perhaps an infrared thermometer? I have never seen this used for brewing, and I'd be concerned with accuracy, but it's a relatively cheap option that you may want to look in to.
Edit: this one in particular claims to be up to 2% or 2°C off in either direction. It probably wouldn't be useful.
Really, any temp gun (I use IR guns) will work well, so just use whatever. Mine was a low cost one from amazon (I think I went with this one and look, it's on sale).
And the best solution to heat issues if you end up having them with UTH and don't want to remove it is to buffer with more materials. Obviously, the thicker the material the less heat conducive it is. Newspaper works well because it's easily replaced and insulates fairly well while still being hard to dig under. You can also use a felt type fabric (Zoo Med and Zilla sell "reptile carpet" but it's just felt) as it can be removed and washed and is thick enough to buffer heat.
That's really too bad I was interested to see some folks get this working. Something like this might have been helpful for you.
Nubee Temperature Gun Non-contact Digital Laser Infrared IR Thermometer
https://www.amazon.com/dp/B00CVHIJDK/ref=cm_sw_r_cp_apa_i_95lqDbPT49VRA
Yes, these are far more precise. You can get a very accurate reading of the surface tem0 so exactly what your leo will be touching. Very useful
https://www.amazon.com/dp/B00CVHIJDK/ref=asc_df_B00CVHIJDK5092658/?tag=hyprod-20&amp;creative=395033&amp;creativeASIN=B00CVHIJDK&amp;linkCode=df0&amp;hvadid=167130978684&amp;hvpos=1o12&amp;hvnetw=g&amp;hvrand=5427555998887861370&amp;hvpone=&amp;hvptwo=&amp;hvqmt=&amp;hvdev=m&amp;hvdvcmdl=&amp;hvlocint=&amp;hvlocphy=9030005&amp;hvtargid=pla-314644480709
If you're that concerned get one of these:
http://www.amazon.com/Nubee-Temperature-Non-contact-Infrared-Thermometer/dp/B00CVHIJDK/ref=sr_1_1?s=home-garden&amp;ie=UTF8&amp;qid=1418826347&amp;sr=1-1&amp;keywords=infrared+digital+thermometer
Or something similar.
I checked my duct work and most of it was the same ambient temperature as the attic itself. If it was badly insulated (and it was in a few spots) then it would register as cooler than nearby wood and such. Most of the attic was 125 degrees in August. A few bits of duct registered as 100 where the insulation was bad. The highest point of the attic was 145 degrees but that temperature was reached very suddenly. Most of the way up it was still 125.
if your heat is on and your house isn't retaining it, i would certainly double check the insulation.
buy this Nubee® Temperature Gun Non-contact Infrared Thermometer w/ Laser Sight it cost about $16 on amazon. with it you can track your heat loss.
I walked around my basement sealing up all the windows with Seal N Peel in a caulking gun...it's a removable silicon caulk, and i found a lot of GAPS between the cinderblocks where you could SEE outside. SO i filled them all up with Spray Foam Insulation.
The Infrared Thermometer will help you find drafts, you can even walk around outside and aim it at your windows and eaves and doors. (mind you the further you are away the less accurate)
I blocked off my entire second floor this winter because i need to reinsulate the back stairs. the 1st floor has old blow in insulation that has settled. so next year i will add more.
Those are just my 2 cents and you can find a lot of information on the subject online and I don't claim my way is better than someone else's.
Tempering with a kitchen oven or a toaster oven can be a bitch. Mine overshoots a lot, so I got a thermometer gun for $10 and I put the oven on bake with no convection and i wait that the temperature stabilizes a little and I keep an eye on the colour knife with a flashlight. I set my temperature at 175 on my toaster oven to give you an idea. I do 3 times 20 minutes and cool down to room temperature for my 1095 steel which should be about the steel that you are using. Tempering depends a lot on the thickness of the metal you're using.
Just a thing to keep in mind. Short blades are less likely to snap off than longer ones and therefore, they need less tempering. For my short blades I aim a temperature of 350-380 degrees (When the metal starts to turn straw yellow at the edges, i turn the toaster down a bit to not over shoot).
Here is just to give you an idea what I use to track the oven and knife temperature. http://www.amazon.com/Nubee-Temperature-Non-contact-Infrared-Thermometer/dp/B00CVHIJDK/ref=sr_1_1?ie=UTF8&amp;qid=1421003684&amp;sr=8-1&amp;keywords=thermometer+gun
I like the shape of the blade of your friction folder. I tried to make a folding knife, but I abandoned :P.
If it can help, I agree with you the thumb lever should be moved outwards and the edge shouldn't go past the pivot point. Try putting your knife on a sheet of paper, put a nail where the pivot hole is then draw the shape of your handle and interior cuts with dotted lines.
Happy Crafting!
Get an IR temp gun like one of these to check it before you place material on it.
Theres a guide on the sidebar to the right that should cover most of the basic care requirements. It will take him some time to get used to his new environment, so its ok if he seems extra skittish for a while and uninterested in food, just keep handling to a minimum for now. They can be very timid when they are still young too. They use their tail as a fat reserve and can go a while not eating. Generally a nice plump tail is a sign of good health and they will spend most of the day sleeping anyway.
Tiles are great flooring, safe and easy to clean. You dont need a thermometer stuck to the side of the tank as the floor temperature is more important than the air temperature. The floor temp needs to be around 90 F on one side and about 75-80 on the cooler side so they can regulate their body temp if the get too warm. Above 95 is too much. They need the 90 to be able to digest their food so it is important. Grab a cheap infared one like this to check your temps with. They are super cheap, more accurate than the pet store ones, and you can spot check temps around your tank instantly. It will make your life much easier.
A 10 gallon tank is ok for now, but a 20 gallon long will suit him much better as they can be pretty active at night and will appreciate the extra floor space to explore. It also helps in achieving a heat gradient which is hard to do with something as small as a 10 gallon.
Typically the best way to heat the tank is a heating pad under the tank controlled by a thermostat to keep it at a steady temp. The heat mat should cover about 1/3 the floor of the tank. This setup is usually simpler and cheaper than lights that the stores will try to sell, more reliable temperatures too. Heating lamps arent really necessary because they are not basking animals and prefer to hide all day then come out on the warm rocks at night, but they are ok to help give hem a day/night cycle if the room is dark and you can use a regular light bulb if its cold where you live to raise the temps just a little.
What are you feeding them? You did make sure to grab the proper calciumand multivitamins right?
Treat yourself: http://www.amazon.com/Nubee-Temperature-Non-contact-Infrared-Thermometer/dp/B00CVHIJDK
You could buy one of these babies and measure each panel before and after turning it on:
https://www.amazon.com/Nubee-Temperature-Non-contact-Infrared-Thermometer/dp/B00CVHIJDK
It’s even possible you could do that from the ground otherwise you’d have to climb up there.
Get some 190 proof Everclear / Golden Grain / Pure Grain Alcohol.
This stuff is made for human consumption, so I would use that. Then for bud, you would wash the herb a couple of times quickly in fresh alcohol.
Then you get a small cheap crockpot from Target for like $12 and use that to evap off the alcohol.
You still need to decarb the herb, so you can do that in two ways. Get a temperature gun from Amazon -- they are super useful. This one is less than $20 and should work fine.
Then you want to decarb the THC. Do this either before you wash the herb in alcohol or you can decarb the tincture after you have made it. You turn the crock pot on high and that will put it around 230 degrees f, and you decarb it for an hour or two. If you decarb the tincture after you have made it, then all the alcohol will evaporate and you will want to pour fresh alcohol into the crock pot.
Make sure to use the crock pot in a drafty place if you are evaporating off any alcohol -- you don't want a fire or explosion to happen, so you need fresh air.
THC dissolves very easily in alcohol, so making a tincture this way is easy and pretty fast, except for decarbing.
Order one of these, it should help you figure out when the pot is evenly hot. One sale now :)
This one. A lot of the reviews are complaining about the accuracy, but this is within a degree of two other thermometers that I use
I have no complaints about it at all. I've had it for a few years, I use it every day, I have never had to change the battery, and it's accurate. Probably the best $20 I have ever spent.
Damn, you went high-end. I bought this one: http://www.amazon.com/gp/product/B00CVHIJDK/ref=oh_aui_detailpage_o00_s00?ie=UTF8&amp;psc=1
Those dial thermometers are notoriously inaccurate. If her tank and/or basking spot is too hot or too cold, that could cause appetite issues and lethargic behavior. This infrared thermometer on sale right now (not sure for how long) at Amazon that is $11 (after applying the coupon code NGUN6OFF). Too bad there isn't free shipping, but maybe you've got Amazon Prime. :)
Looking back at your previous reply, it escaped my notice that the dial thermometer is reading 85-90 on the cool side of the tank. It's difficult to tell, but I think your tank might be too hot. You might try raising the basking bulb or using a lower wattage bulb and see if she improves.
How often are you bathing her or giving her water orally?
I get into decorating my tanks, but I am pretty boring with my backgrounds. I just get a desert scene aquarium background and tape it to corrugated cardboard (which helps insulate the tank, and presumably leads to slightly lower electricity bills for me). For a long time, I've wanted to make a cool background with ledges and caves.. If you are the DIY type, you might like this site and here is an inspirational thread.
I've heard great things about Golden Gate Grinders.
If you're willing to migrate to Amazon you might want to give Golden Gate Grinders a look. Bought the 2" for my first one and I think it's as nice as my buddy's Space Case.
Not sure what your price range is but I recently just bought one on amazon and it's great! 4pc with a great catch for kief. Larger than I thought. Great quality and grinds nice and fine.
Golden Gate Grinder - Amazon
https://www.amazon.com/Golden-Gate-Grinders-Anodized-Aluminum/dp/B00GXSFB1Q/ref=mp_s_a_1_3?ie=UTF8&amp;qid=1543601437&amp;sr=8-3&amp;pi=AC_SX236_SY340_FMwebp_QL65&amp;keywords=Golden+Gate+Grinders&amp;dpPl=1&amp;dpID=41dORnYMerL&amp;ref=plSrch
Using this for 2 months and it shreds a medium to coarse grind every time. Turn it over for fine grind.
This is the best rated, so the best bang for your buck http://www.amazon.com/Golden-Gate-Grinder-Anodized-Aluminum/dp/B00GXSFB1Q
Otherwise, Space Case and Santa Cruz Shredder are recognized as the best grinder brands.
I upgraded to this after using my chromium crusher into the ground. This one still feels great after 2 months of 1 oz a week
to card literally everyone who looked like they even might be under 35.
edit: my advice is to go through amazon. This is the exact one I purchased about 4 years ago and it still looks and works factory new
edit#2: if you are worried about someone seeing it come in the mail, you could always buy several other cheap items that you want along with it and get them all packaged together in 1 large box.
This one
It's $30 instead of $20, but when you consider how much value worth of product passes through it, it's worth it. Look how good the reviews are.
Golden Gate grinder
http://www.amazon.com/gp/aw/d/B00GXSFB1Q/ref=mp_s_a_1_14?qid=1417451022&amp;sr=8-14&amp;pi=AC_SX110_SY165_QL70 good deal on golden gate grinders
Do they even want shoes or a jacket?
Do you have their email address? What about a gift card to site like Grass City or Smoke Cartel?
Otherwise, you can't go wrong with a grinder. A lot of people don't want to spend money on one, but they totally appreciate using one once they have one. That one is an absolutely excellent one.
Here is the mobile version of your link
I got this one. It's been working for a year now.
Download Myfitnesspal, buy a food scale, COUNT YOUR CALORIES - literally cannot stress this enough.
Losing weight is incredibly simple - you just have to eat fewer calories than your body uses, and it will make up for the deficit by burning fat. It takes discipline to do this, but it's not conceptually difficult. You don't have to workout if you don't want to, just eat less. Good luck.
Edit: Also, don't tell people IRL that you're losing weight. Don't give yourself any satisfaction of telling them - that can trick your mind into thinking you're doing better than you are. Let the results speak for themselves.
Digital kitchen scale $9.99.
Amazon basics Food Scale
This one?
http://www.amazon.com/AmazonBasics-Digital-Kitchen-Scale-Display/dp/B00V5IM5PY/ref=zg_bs_678508011_7
I have my spool sitting on a 5 dollar lazy Susan which is on top of a 10 dollar digital scale.
Works good except you just have to lift the spool off the scale for a second to tare it.
I got this Amazon Basics one a while back and it's done great for me.
Before this I had one where the buttons were just spots you touched on the weigh surface, sometimes pressing them would cause the whole scale to lift up, you also had to flip it over switch between oz and g, I hated it, it eventually died as I was about to give it away. Unless you needs something super precise I don't see why the amazon basics one wouldn't do well, I use it for measuring coffee and for baking.
As others have said, the bag is still 2000 calories so if you mix an entire bag at a time, nothing has changed.
if you mix it as individual meals (which is what I do) and if you are anal about exact measurements, then get a scale. I own amazon's store-brand scale and it works great for measuring single servings. Its about $10.
this one works for me.
ive been using the amazon basics one for over a year and its held up well and is like $10 or something. If you decide on a different one make sure the buttons or touch pads arent built into the actual scale, it is nothing but a headache trying to tare it and the touch buttons usually suck.
https://www.amazon.com/AmazonBasics-Stainless-Digital-Batteries-Included/dp/B00V5IM5PY/ref=sr_1_1?ie=UTF8&amp;qid=1506441167&amp;sr=8-1&amp;keywords=amazon+basics+kitchen+scale
https://www.amazon.com/gp/aw/d/B00V5IM5PY/ref=sxts_1?ie=UTF8&amp;qid=1503954756&amp;sr=1&amp;pi=AC_SX236_SY340_QL65
We love this one! Works great and only $10.
https://www.amazon.com/gp/aw/d/B00V5IM5PY/ref=sxts_pb_pfw1?ie=UTF8&amp;qid=1478267655&amp;sr=1&amp;pi=AC_SX236_SY340_FMwebp_QL65
Looks like you also have this
Looks like the same specs, (heck the guts may come from the same Chinese factory).
It was actually just an ambient temperature probe. We just sat it right behind the ribs so that it would be close to what the temperature of the ribs cooked.
http://www.amazon.com/Famili-Wireless-Digital-Thermometer-Cooking/dp/B01CTZ17QO
That is the one I got. It appears to be a rebranding of this one.
http://www.amazon.com/ThermoPro-Wireless-Digital-Kitchen-Thermometer/dp/B014DAVHSQ
I have heard that this is also a good one
http://www.amazon.com/Maverick-732-Remote-Smoker-Thermometer/dp/B004IMA718
I didn't use the food thermometer because I wasn't really concerned with the temperature because I was able to keep it low enough on the grill to get a good smoke going. I kept it between 240 to 280 for most of the smoke.
I only had to use the bend test to figure out when they were done.
http://amazingribs.com/tips_and_technique/are_they_ready.html
Yep. This is the one I have https://www.amazon.com/ThermoPro-TP-08S-Wireless-Thermometer-Grilling/dp/B014DAVHSQ/
The older ThermoPro TP-08S is about $15 less than the TP20 and comes with an ambient heat probe with clip instead of two standard probes.
Anything like this works. do not wash the probe in a dishwasher, or soak in water, clean by hand.
https://www.amazon.com/Taylor-Digital-Cooking-Probe-Thermometer/dp/B00004XSC5/ref=sr_1_13?gclid=Cj0KCQjw_absBRD1ARIsAO4_D3tpSRCT7fe9Xc1KjO4E7kx1aBCAiombNRw1V8uRgLiFcWTRFdm0SeIaAhJCEALw_wcB&hvadid=241567707765&hvdev=c&hvlocphy=9030029&hvnetw=g&hvpos=1t1&hvqmt=e&hvrand=1892287846665362991&hvtargid=kwd-573895322&hydadcr=28576_10704709&keywords=digital+thermometers+with+probe&qid=1569379975&s=gateway&sr=8-13
Something like this will give you the best temperature, since it checks temperature at the grate, as well as the meat. If you do not smoke that much, you could buy a cheap oven thermometer and calibrate it in hot water and just set it on the grate.
https://www.amazon.com/ThermoPro-TP-08S-Wireless-Thermometer-Grilling/dp/B014DAVHSQ/ref=sr_1_14?crid=N6C4AIL1BP61&keywords=maverick+thermometer&qid=1569380102&s=gateway&sprefix=mavrick+them%2Caps%2C191&sr=8-14
Ok yeah, those aren't accurate at all. I bet you're fine and the readings are just off. Realistically, each grate is typically 10°-20° apart, just FYI.
Instant read thermometers are more for grilling. For smoking, you need something like this. One probe goes on the grate next to your food (smoke temp) and the other goes into the food. For ribs, you my use the smoke temp and bend test.
All that said, if you get a better reading and you're still way too hot (I highly, highly doubt it), the next step is to get lava rocks and place them under your coils. They will absorb much of the heat and level it out.
Lastly, if even that fails, you need a rheostat to lower your power, or use a really long extension cord so less juice makes it to your smoker in the first place.
I'm not sure it's really necessary... I have one of these I use when BBQing which I guess could work. Set a high and low temp alert and it will let you know if the sous vide has stopped.
ThermoPro TP-08 Digital Wireless Remote Meat Food Thermometer with Dual Probe for Kitchen Cooking, BBQ Smoker Grill Oven - Monitors Food Temperature From 300 Feet Away, Batteries Included https://www.amazon.co.uk/dp/B014DAVHSQ/ref=cm_sw_r_cp_api_i_lS3ZBb59TEG0Z
Needle probe
https://www.amazon.com/ThermoPro-TP-08S-Wireless-Thermometer-Grilling/dp/B014DAVHSQ/ref=mp_s_a_1_fkmr3_2?ie=UTF8&amp;qid=1538423301&amp;sr=8-2-fkmr3&amp;pi=AC_SX236_SY340_QL65&amp;keywords=needle+probe+remote+thermometer
Weatherstrip Foam Tape (any kind that is ok for marine use is ok in water)
https://www.amazon.com/Gourd-Elasticity-Adhesive-All-Climate-Weatherstrip/dp/B079NM8758/ref=mp_s_a_1_4?ie=UTF8&amp;qid=1538423423&amp;sr=8-4&amp;pi=AC_SX236_SY340_QL65&amp;keywords=weatherstrip+tape&amp;dpPl=1&amp;dpID=51TZsf6d9SL&amp;ref=plSrch
VacMaster Bulk Bags (split the order with a friend, haha!)
https://www.amazon.com/gp/aw/d/B00AZ7SPBO/ref=mp_s_a_1_43_a_it?ie=UTF8&amp;qid=1538423597&amp;sr=8-43&amp;keywords=vacuum+sealer+bags+bulk&amp;dpPl=1&amp;dpID=41naTidMejL&amp;ref=plSrch
I have had
http://www.amazon.com/Polder-Original-Cooking-All-In-One-Thermometer/dp/B0000CF5MT
for over a year now and it works great and also has a timer.
The Polder is a good quality tool, I've had this one for years.
http://www.amazon.com/Polder-Original-Cooking-All-In-One-Thermometer/dp/B0000CF5MT/
Do it oven first, then sear. That way there is no need to rest it afterwords as the oven evenly heats it and the moisture remains evenly distributed. That way your steak is the right doneness, but at the highest temperature so it's nice to eat. Get something like this so you can set an alarm for when it hits the temp you want it to be while it's in the oven. It seems that the consensus is 350f oven temp. If you're unsure about if your oven is getting the temp right, one of these will come in handy.
I have two of these: http://www.amazon.com/Polder-Original-Cooking-Timer-Thermometer/dp/B0000CF5MT/ref=sr_1_2?ie=UTF8&amp;qid=1422105644&amp;sr=8-2&amp;keywords=polder
Work perfectly and easy to operate. Oh, and they are magnetic so it's easy to just stick them to the side of something for storage.
This is kind of neat, but you can just get one of these for under $20, and it will beep at you when your ham is done. Bonus: this thing is designed to go in the oven so won't melt and poison you if the oven gets too hot.
The kind I used was a little white square with an LCD display, with a metal tip on a 3 foot metal cable. Cheap.
Like this, but you can find cheaper ones. The cable makes it easier to keep it in the pot, and handle: https://www.amazon.com/DIGITAL-IN-OVEN-THERM-TIMER/dp/B0000CF5MT
If you're going to make a habit of grilling and BBQ, it's good to have both an insta-read, and a "leave in" thermometer.
If you can't even get close enough to the meat to even take a temp with the insta-read, it's either an awfully short probe or you're grilling over very high heat. And it's not an exact science. Reward is correct when he says grills have hot-spots. Also the meat may not cook evenly given the fat content and distribution, any bone that may still be in it, or inconsistent thickness.
They are insanely cheap. $15 from Amazon. It can pay for itself in not ruining a single piece of meat. Bonus, they have alarms, so you can set it at the temp you want and cook undistracted.
Not sure if this meets your needs but I find this gadget quite handy when prepping veggies for certain dishes.
I have used the OXO mandoline at $50 and I never touch it, too bulky and a pain to wash buy this: http://www.amazon.com/Harold-Import-Company-BN1-Mandoline/dp/B0000VZ57C/ref=sr_1_1?ie=UTF8&amp;qid=1325311921&amp;sr=8-1
Benriner is what chefs use and what I use to use as a cook but also at home as well. At least this comes with the handguard which at work I never had (almost sliced off fingertips many times). Great for slicing tons of onions in a uniform width if you want to carmelize a ton at a time or necessary for getting super thing slices of a vegetable for making potato chips for example.
Has blades for julienne as well so you can then use it as is or for a faster and more consistent brunoise.
And you have money left over for something else too.
I have this one and love it
buy a Japanese mandoline it will help reduce teh cutting time in half . theres a small screw at the bottom to help you adjust to the thickness you want and slice away . (it also comes with different blade attachments if you wanna do small julienne etc
https://www.amazon.ca/Benriner-Japanese-Mandoline-Slicer-Green/dp/B0000VZ57C/ref=sr_1_3?ie=UTF8&amp;qid=1521339467&amp;sr=8-3&amp;keywords=mandoline
Here is the desktop version of your link
Non-mobile: these
^That's ^why ^I'm ^here, ^I ^don't ^judge ^you. ^PM ^/u/xl0 ^if ^I'm ^causing ^any ^trouble. ^WUT?
I'll have to disagree here. There are a number of low-price, simple mandolins that have excellent performance - without all the bells and whistles of the models you recommend.
For example - the model I use -Benriner Japanese Mandoline Slicer is razor sharp and gets good marks from Cooks Illustrated.
Cooking is a language, once you get your grammar straight, no matter what word you use, it will make sense. You realize every recipe is a variation of an other. Ofc you eventually have poets and diverse mindfuck but I don't care for them, it's just food, not a dildo.
So before looking for recipe, you have to talk the talk. Just like before eating paleo, it' better to understand the why's and the how's of nutrition (the FAQ here and the mark sisson blog were my go to at first, you don't really need much more to get the picture)
One day I shall put together a little imgur gallery about the basics of cooking (based on an culinary apprentice notebook I have) but in the meantime I tried to summarize it in this comment:
http://www.reddit.com/r/Parenting/comments/2b7ac3/z/cj2l4q0
I'd add to the list http://www.amazon.com/gp/aw/d/B0000VZ57C?pc_redir=1412263266&amp;robot_redir=1
I love slicing with a knife but the mandoline is the fastet way. Plus tiny sliced veggies cook faster. Mind your fingers though.
Butter and duck grease are great paleo ambassadors to reluctant newcomers. Everything taste better cooked in it.
At my shop we have two of these. They are used everyday and hold up amazingly so they would be perfectly fine for home use.
This is one thing about crockpot cooking that you just have to learn to work around. It's due to the nature of the slow cooker. Over the long cooking period, foods like meat and vegetables give off a lot of water. Since the slow cooker is a closed environment, that water has no place to go -- any that evaporates or boils off just condenses on the lid and drips back in. To my mind, you have three choices.
Try playing around with these methods. The last two add a bit more work, but I think that you'll find the results are well worth it.
It's from the meat. Many short rib recipes, and other stews as well, specify to make a day ahead of time and remove the solidified fat after refrigerating. Some thinner liquids can be defatted by using a purpose-built gadget like this fat separator.
I'll just leave this here:
http://www.amazon.com/Oxo-Good-Grips-Separator-4-Cup/dp/B0002YTGIQ
I figured these things were common knowledge, but I've had several people ask about what mine is and where I got it.
The spout of the separator takes liquid off the very bottom of the cup first. So I just pour until the fat reaches the bottom and then stop pouring.
I bought this:
http://www.amazon.com/OXO-Good-Grips-4-Cup-Separator/dp/B0002YTGIQ/ref=sr_1_1?ie=UTF8&amp;qid=1412607167&amp;sr=8-1&amp;keywords=stock+separator
this is the one I have
https://www.amazon.com/OXO-Good-Grips-4-Cup-Separator/dp/B0002YTGIQ/ref=sr_1_4?s=kitchen&amp;ie=UTF8&amp;qid=1542601139&amp;sr=1-4&amp;keywords=fat+separator
One of these guys!
If you don't feel like skimming, you can always invest in a fat separator. I don't use mine very often, but if you're roasting a huge turkey or a big pork roast or something it can be a really handy tool (especially if you like to save fat for cooking with later).
No problem. That's the "fine dining" version of gravy. You can also make a quick and dirty gravy in a matter of minutes, just using what's left in the bottom of a pan after you sautee or roast a piece of meat in it. Just deglaze the pan with water and bit of wine and pour the result into a gravy seperator. Pour off the liquid and set aside. Then, mix the fat (adding butter if necessary) with flour for a roux and use the liquid as a stock to complete. This makes awesome gravy if you roast a whole chicken in a stainless steel frying pan, especially if you sit the chicken on top of some carrot, onions, and celery, while roasting.
A fat separator is just a cup that you can pour all the rendered juices that collect in the bottom of the foil when you use a crutch. It will separate the tasty juices from the liquid fat. The benefit of this is that you won’t have all the fat harden up once you refrigerate the pork. It will help keep your pork feeling moist without feeling greasy. Taste great too.
Here is the one I use
I'm a baker by avocation. To bake, you must be precise. You can't just wing it and expect to get something edible. These days I weigh ingredients instead of measuring.
For all the precision of cocktails, it bothers me that we still use something as imprecise as a dash. Most of the recommendations I find online say a dash is 1/8 teaspoon (though there are a few who say it's 1/6 teaspoon). And for drops, I find anything from 3 to 8 drops.
Since I only mix drinks for myself and occasionally for a roommate who likes her gin and tonics, I'll just continue to mix the way I like them.
For the anal retentive there's always this.
Sometimes those little clip on LEDs don't cut it, I'd suggest going to Home depot and getting a pack of their Daylight CFLS and a metal clamp light fixture for it, you could use one or two depending on the length of the tank. Also if you want to go another cheap route get Osmocote+ plant fertilizer. They look like little yellow balls and just stick them in the substrate, good for root feeders like swords. But if you have a lot of stem plants that are column feeders (Lugwidia repens, cabomba, ect.) I'd suggest going the EI route and getting dry fertilizers. They're much cheaper in the long run compared to liquid ferts. You mix them yourself with these There is measuring conversion in the comments section.
I have a full bag of purigen IN my filter Used this one, then I had an old bag, cut it open, and dumped out its contents, and used THAT bag for the filtering through the pump. However, there would be no problems if you got a full bag, cut it open, and then had it go through the mesh and purigen media, just make sure to put a chip clip on it so it doesn't spill everywhere between water changes, and store it in your buckets.
I haven't had a problem with the PH bouncing up and down like PH down will do. The peat actually softens the water through the tannic acid it releases, and it stays there. And yes, I reuse the tights.
Edit: Added links
Edit2: I've hardly ever had luck with any vals, might I recommend Hygrophila Angustifolia? It grows like a weed in my tank!
Here you go
I can see how that is a problem. If it isn't a good topic for conversation, you can try being discreet about it. I put my vape and some mini test-tubes filled with ground CBD flower into a portable cigar case. (I have a couple of these from when I smoked cigars more often.)
When I don't want to explain to someone (like my kids) that I'm treating arthritis and workout pain rather than getting high, I'll just carry it with me to the bathroom and vape a little bit in there. I find that a bathroom fan is enough to get right of the smell as long as I'm relatively speedy about loading the vape. I also learned that I need to grind the flower in advance somewhere that smell isn't a problem. Grinding it up produces a strong weed smell, so I do that in the garage when the kids aren't home. (My dosage needs are so low that I only have to do it once per month or so.)
If that really isn't an option, you might want to try small amounts of oil from a couple of different vendors to see if one is more consistent for you. You can also try an e-juice version of the oil and a vape, which is a bit more discreet than a dry-herb vape.
&#x200B;
Edit:
I almost forgot - I dose it out using the "smidgen" spoon from this set.
I recently posted asking purple the same thing and he said up to a year if stored correctly (airtight container in freezer). Yep, that's exactly what I do. I purchased a set of these mini measuring spoons: https://www.amazon.com/Norpro-Stainless-Measuring-Spoons-smidgen/dp/B0009X1P9S/ and determine which spoon size matches the desired dose for each compound (weigh it out a couple times). Measure out a dose using said spoon and throw it back with some water in my mouth. Works great.
You just use the key as a kind of scoop from a bag so it is about how much would end up on the end.
If you are really intent on eyeballing your doses, you could get little spoons like this. Just measure how much is in the spoon when it's leveled off, then you will know how much (of that material) that spoon holds for future uses. One of the problems with eyeballing is that different materials (and different batches) will have different densities, so it really is safer to use a scale...
https://www.amazon.com/dp/B0009X1P9S/
I bought this small set of scoops years ago and it's completely changed my weed usage, amazingly convenient. It's so easy to work out a daily dose and then repeat it; works especially for vaporizers, where you would (hopefully) be using a finer grind.
Yeah and find what size scoop is gonna get you the weight you want these are what I got and they work ok. Obviously not the most precise way to go but should get you within 5 mg or so.
I bought mine here. https://www.amazon.com/gp/product/B0009X1P9S/ref=oh_aui_search_detailpage?ie=UTF8&amp;psc=1
I use this set of spoons. The drop spoon fits perfectly in size 00 capsules. Also, the drop spoon is suitably named.
http://www.amazon.com/gp/aw/d/B0009X1P9S/ref=pd_aw_sims_1?pi=SS115&amp;simLd=1
splenda and stevia products that measure the same as sugar are bulked up with maltodextrin, pure starch. a serving size is 1/2 a gram which means it can be rounded down to 0. That means a cup of splenda or stevia with maltodextrin in it has 24 carbs. for someone using a teaspoon here and there thats probably not a big deal, a teaspoon will have 1/2 a gram of carbs. I started drinking lemonade and tea by the gallon making it with splenda and that added up real fast, so I bought some pure sucralose. Sucralose is the actual sweetener in splenda without the maltodextrin, so instead of a cup of splenda with 24 carbs you use about 1/12 of a teaspoon to sweeten a gallon of lemonade. I bought this I got the 250 gram pack, its only about a cup, but its 600 times sweeter than sugar so its equivalent to about 330 lbs of sugar/splenda, so even a smaller package should last quite a while. it pairs well with these spoons its a set of tiny measuring spoons. drop= 1/64th tsp, smidgen= 1/32 tsp, pinch= 1/16 tsp, dash= 1/12 tsp, tad= 1/4 tsp, which works out roughly to the equivalent of 1/5 cup, 2/5 cup, 4/5 cup, 1 cup, and 3 1/8 cup of sweetener. you can also get pure stevia extract powder which is generally around 300 times sweeter than sugar, so about half as strong as sucralose, but it has a bit of a licorice taste. the sucralose tastes the same as splenda because it is the same sweetener, just no bulking agent to add carbs. I spent $39 on this 250 gram bag, sounds like a lot, but being the equivalent of 330 lbs of sweetener it works out to about $0.60 per 5lbs worth of sweetener, which is how much is in a standard bag of splenda.
http://greenleafaquariums.com/aquarium-fertilizers-supplements/micro-macro
And
http://www.amazon.com/gp/product/B0009X1P9S
You do not have to spend a lot. Here are some suggestions that I choose to use even though I could spend the money on more expensive gear.
Pack: Rent until you decide you want to do this a lot and have already bought the rest of your gear
Tent: rent it for this trip if you don't already have one. If you do, it's best to split it up, poles and fly for you and tent for him or vice versa
Sleeping bags, bring them if you have them or rent
Stove: http://www.amazon.com/Ultralight-Backpacking-Canister-Ignition-silvery/dp/B00ENDRORM/ref=sr_1_1?ie=UTF8&amp;qid=1396264963&amp;sr=8-1&amp;keywords=backpacking+stove Works just as well as the 50$ one.
Water filter: http://www.amazon.com/Sawyer-Products-SP128-Filtration-System/dp/B00FA2RLX2/ref=sr_1_1?ie=UTF8&amp;qid=1396265006&amp;sr=8-1&amp;keywords=sawyer+mini+water+filter cheap, durable, no moving parts to worry about and it's super light
Pot: A lot of people use this, but it might be a bit small for you depending on what kind of food you're going to cook but this works well for freezer bag meals http://www.amazon.com/Stanco-Non-Stick-Grease-Strainer-Black/dp/B000MVTIOQ/ref=sr_1_1?ie=UTF8&amp;qid=1396265044&amp;sr=8-1&amp;keywords=grease+can
Long Johns and other clothing: Walmart usually has decent options. Make sure that they are synthetic. You may find that you already have a few things if you look through your clothes at home. Depending how thick they are your snowboarding socks might make good hiking socks or if you have long underwear for snowboarding they would be useful camping.
What are you doing for shoes? Do not waste money on boots if you don't already have them. 90% of trails can be done in good running shoes and 95% of trails can be done in light hiking shoes.
Misc hints: For water bottles just re-use old gatorade bottles, those nalgenes are super heavy. Think about getting two hiking poles instead of just walking stick but this is a preference thing. Avoid cotton at all costs and have fun!
This. And they're on Amazon for the lazy (cheaper at Kmart) https://www.amazon.com/Stanco-Non-Stick-Grease-Strainer-Black/dp/B000MVTIOQ/ref=sr_1_1?ie=UTF8&amp;qid=1467355948&amp;sr=8-1&amp;keywords=stanco+grease+pot
Pulled this off my budget backpacking bookmarks list.
https://www.amazon.com/Stanco-GS1200-Non-Stick-Grease-Strainer/dp/B000MVTIOQ
http://www.amazon.com/Stanco-Non-Stick-Grease-Strainer-Black/dp/B000MVTIOQ/ref=sr_1_1?ie=UTF8&amp;qid=1458849793&amp;sr=8-1&amp;keywords=grease+pot
That is one and is very similar!
I am talking about this one though: https://www.amazon.com/Stanco-Non-Stick-Grease-Strainer-Black/dp/B000MVTIOQ/ref=pd_bxgy_79_img_3?_encoding=UTF8&amp;pd_rd_i=B000MVTIOQ&amp;pd_rd_r=AT2XE5G2MTQ6PBXB800J&amp;pd_rd_w=BOOJu&amp;pd_rd_wg=cHF91&amp;psc=1&amp;refRID=AT2XE5G2MTQ6PBXB800J
Haven't personally tried it but I've heard good things about this: http://www.amazon.com/Stanco-Non-Stick-Grease-Strainer-Black/dp/B000MVTIOQ
Unstrained bacon fat has more protein in it and protein loves to stick. These are nice for straining bacon fat.
I have used an alcohol stove for about 6 years and I love it. I use mine with an MSR Titan Kettle but it is about $50. A cheap option would be to use a grease pot. Loads of people swear by them. You can buy one at Walmart too. The Toaks titanium pot is around $30. People also use this mug to cook water in and claim it will boil 2 cups. Here is another grease pot that people use.
You can make a windscreen for it out of lightweight aluminum flashing or heavy duty cooking foil.
All you need is one of these nifty do-hickeys.
Brother, I bid you venture deep into the Amazon where exist perfect armaments to cook the Holy Bird.
A knife and deadly hook will be of aid.
Remember to reach 165 degrees of Fahrenheit at bare minimum to purge the agents of Broki from the flesh. His servant salmonella with it's punishing diarrhea and vomiting threatens to steal thy gains. Also, I think it is tastiest at 170°-180°.
375°F with a coating of regular olive oil followed by hearty spicing of oregano and rosemary is how I eat the Bird. Best cooked in a deep glass casserole dish where the chicken covers the whole bottom; it will soak in its own rich juices. 2.5-3lb (three large breasts) cooks in about 75 minutes.
> I've found that when I've used that procedure in the past, I've ended up with overcooked steak...
A digital probe thermometer is a godsend for this. I sear my steak for ~90-seconds per side in grapeseed oil, put a pat of Ghee onto the steak, and then toss the steak into my 250º oven for ~20-minutes with the probe thermometer set in it set to 145º.
Perfectly cooked, perfectly delicious steak.
Last year while I was driving I found myself thinking about things. Before I knew it I was wondering how would blind people know which side of the contact case to put their contacts into, like did it have a braille or what. Took me about 5 minutes to realize I was thinking about blind people wearing contacts. Then a few days later I was drying my hands on some paper towels and I thought...they really should make something that isn't disposable. I then chuckled to myself as I remembered about towels.
Luckily my brain is working again but I still catch moments where I wonder Why on earth did I do that?
This thermometer would be amazing to help me with the /r/52weeksofcooking challenges I've been doing this year!! I've needed one for awhile!
I started cooking mine based on temperature. Preheat oven, season, stick em in, set the temp alarm and walk away. The thermometer goes right in the oven in the chicken and my bird never turns out dry anymore. This is the one i have: http://www.amazon.com/Polder-Digital-In-Oven-Thermometer-Graphite/dp/B000P6FLOY/ref=sr_1_18?s=home-garden&amp;ie=UTF8&amp;qid=1372213088&amp;sr=1-18&amp;keywords=thermometer
Cook to 165--yum.
Buy a decent meat thermometer and dense cut of meat like a brisket, london broil, or pork loin. Salt the meat and put it in a pan. Stick in the meat thermometer and tightly cover the pan with foil. Cook on low heat until you just reach the medium rare temp for type of meat. Perfection.
I've read in one of Ed Rosenthal's books that baking is supposedly an effective way to kill the mold that's present on much cannabis. I actually recommend a higher temperature, though like 200^oF for 20 minutes or 220^o for 10-15 minutes, as this will kill the mold and promote decarboxylation. Use the thinnest surface possible, like very flat aluminum foil or a very clean and dry cookie sheet. Your product should be finely crumbled, like out of an herb grinder, and will eventually be pretty brown in color. Further, don't rely on your oven's thermostat. Get an inexpensive digital oven thermometer and standardize your oven a few times. Considering that you're getting within 30-50^oF of the vaporization point of everyone's favorite compound, you could accidentally burn off all the good stuff. Stock oven thermometers are notoriously inaccurate.
Lots of info in there!
Probe thermometer. Perfect roasts every time.
Yeah flat for sure then. You could always pull it out and then put it in the end as well just make sure you wear gloves.
You can also always buy something like this too (there are tons of different ones):
https://www.amazon.com/Polder-Digital-Oven-Thermometer-Resistant/dp/B000P6FLOY/ref=sr_1_3?keywords=meat+heat+probe&qid=1555355291&s=gateway&sr=8-3
I just bought this temperature probe and I love it. I can monitor my boil temp without getting up, set an alarm when the wort gets to a certain temperature, use the built-in timer for hop additions, and now I even have the probe inside my carboy, so I can get an accurate reading whenever I want.
Just curious, are those digital thermostats and would you recommend them?
I've been using this but it started getting a bit weird, recently. Looking to replace it.
Your pan is fine. You do probably want one of these. It's your new favorite spatula. You can scrape the hell out of the pan and you won't hurt it, and nothing you cook into it will hurt it either. Scrape it off and try again.
I just use a steel turner like a short order chef would use on a griddle:
https://www.amazon.com/Dexter-Russell-2-5-Inch-Stainless-Walnut-Pancake/dp/B002CJNBTO/ref=sr_1_11?ie=UTF8&amp;qid=1484421202&amp;sr=8-11&amp;keywords=steel+turner
Just scrub up all the stuck on stuff with the turner and toss.
Stainless steel spatula is perfectly fine to use on stainless steel pans and cast iron. If you want a fantastic spatula, I recommend this one. The rounded corners are particularly nice because they want scratch like pointed corners will.
I use this to cook and scrape it clean. My cast iron hasnt seen water unless I am using it to cook with for over a year. The spatualla being stainless also polishes the pan.
Yep, I use this:
HIC Harold Import Co. 60106 Dexter-Russell Pancake Turner, Stainless Steel with Walnut Handle 4 x 2-1/2" https://smile.amazon.com/dp/B002CJNBTO/ref=cm_sw_r_cp_apa_i_S0BUCbCBE1DTR
Lack of perfect uniformity isn't a problem, and it will even out through use. You don't need to use salt every time you clean it, I'd stick to just deglazing the pan with water after use and "scraping" with a stainless steel spatula. The salt isn't uniformly abrasive so it will create micro scratches that then need to be filled in with polymerized fats (scroll down about 80% of the page to the pics here). Using just the stainless steel spatula will give you a better surface over time since it will leave the fat/oil in the micro-grooves to polymerize and scrape off any high points. After that, just wipe with a paper towel and apply a light coat of oil and you're done.
Unless you've got years of crud stuck onto the pan (or it wasn't oiled and it got rusty) reseasoning isn't going to get you much. It forces you to remove any polymerization that has occurred and unless you've got an old Griswold or Wagner that was machined at the factory you're going to have a lot of irregularities to fill in before you're back to a truly non-stick surface.
I was a skeptic and my wife was even more of a skeptic, but cast iron has taken over most of our non-stick kitchen duty.
You can read and learn all sorts of things, but if you're going to do one thing to make your cast iron experience better, then you should buy this:
pancake flipper
it's changed the way i cook. you need a really thin, rigid, metal flipper. Eggs. Burgers. onions. fish. actual pancakes. my cast iron is my favorite kitchen pan. If you're thinking about it, try to grab a cheap one at a garage sale.
Do you mean this Walnut Spatula?
I personally believe crisco is the absolute best. For the price, consistency of the seasonings applied, and durability of said seasonings, nothing is better.
I have heard fantastic things about grapeseed, and have heard in more harsh, humid, salty, etc. Environments crisbees does well at staving off the rust. However, I haven't once felt the need to venture from the crisco route, its always treated me well and is a good medium to compare results to other users being its so easily available.
Also, I got a steel
fishpancake turner by advice of someone here when I first started using iron and it is my favorite cooking tool outside of my skillets. Ill link shortly.Older cast iron skillets. Wagner and Griswold and the ones to look for, but any U.S.A. made skillet that is machined smooth on the inside will do fine. Just learn to season it and take care of it so you can give it to your grandkids.
My personal skillet is older than my grandparents.
Edit: Use a steel spatula. I prefer this one:
http://www.amazon.com/gp/aw/d/B002CJNBTO?pc_redir=1397965051&amp;robot_redir=1
I thought it was crazy to spend money on a spatula, but then got this one and damn! totally different experience cleaning cast iron.
Also, pan cleaning aside, make sure you let them cook well after you first drop them in. I use medium/high heat on an electric top stove.
Secondly, use a flat metal spatula. I used to use a plastic one that was thick, so sliding it under the egg to flip never went well and I ended up with eggs that looked like yours. After getting a metal one, that problem is gone.
Someone posted a link to this one, which I purchased and really like: http://www.amazon.com/gp/product/B002CJNBTO/ref=oh_aui_detailpage_o03_s00?ie=UTF8&amp;psc=1
I love my steak to still be mooing! but when I am not allowed to eat a living cow, I prefer rare!
Please surprise me
No soup for you!
This is a cute pasta scooper thing. I want to take pictures of it attacking random things in the kitchen. Just thinking about it makes me happy lol.
This because spaghetti and dinosaurs.
drama llama! Thanks for the contest!!
Not that I've seen, but if you look at the "Customers Who Bought This Item Also Bought" section of his page you'll see they have other really cute kitchen utensil things :D
pastasorous or anything from fred
You actually don't want nearly as much forskolin as is in one of those. I emptied all the pills into the bottle and measure out about 80mg at a time, which is around 3.5mg forskolin. I make gelcaps out of it, but you can also put it in a small piece of toilet paper, put it in your mouth, and chug some water. It's called 'parachuting'. The artichoke, tyrosine, and theanine are all pretty small.
Some potentially helpful equipment:
American Weigh Gemini-20 Portable Milligram Scale, 20 by 0.001 G
Norpro 3080 Mini Measuring Spoons, 5 Piece Set
Cap-M-Quik capsule filler
I have one exactly like this, super for pancakes.
Get this ASAP. Best tool ever for cast iron.
Fred the pastasaurus
Not sure what to do with the remaining $18...
For anyone interested, the product is called the “Cap Zappa.”
https://www.amazon.com/Spinning-Hat-Zappa-Bottle-Opener/dp/B00BKQSL2C
And in Canada
> I don't actually have a kitchen scale
There's your problem. You absolutely cannot eyeball ingredients when you're making pizza. If you're going to have any kind of hope in making a consistent dough, you're going to need a scale.
I took a look at Amazon, and this one looks pretty solid:
https://www.amazon.com/dp/B00V5IM5PY/
It's kind of nice to have a detachable readout for working with wide bowls and pans, but, for the price, this is a winner, imo.
There's also this one on ebay:
http://www.ebay.com/itm/5Kg-x-1G-Digital-Kitchen-Scale-Diet-Food-Compact-Kitchen-Scale-10lb-x-0-04oz-/332308996453?h
It's shipped directly from China, which is probably a slight gamble, but the Amazon scales are all Chinese made as well.
This all being said, even with a scale, the recipe you're using has too much water- and way too little salt. Salt helps gluten develop, so the extremely low level of salt takes an already droopy dough and makes it even droopier.
Either fix the recipe (by adding less water and more salt) or use a better one. Also, the flour you're using isn't ideal. I think pillsbury is less expensive than King Arthur's bread flour, and also possibly a bit easier to find, but KABF has more protein and is better for pizza.
Hey, I made this calculator and am sorry to hear you aren't making the progress you'd like to see. It can be extremely frustrating trying to find the motivation when you aren't seeing the results.
Setting activity at sedentary will definitely work since it won't take your exercise calories into account however keep in mind you will be at a greater deficit than normal.
Instead what I would suggest is to take a closer look at the foods you are eating since most people never bother checking how many calories are in the foods they eat. Generally people don't need to do this but if you are stalling it's pretty helpful.
I did a quick mockup of the foods you listed and granted I don't have exact amounts but from those items and average portions I'm already getting higher numbers. Take a look here.
Looks like the optional protein shakes could be putting you over (assuming you use milk not water). Also, if you are adding any amount of oil/butter to your cooking that counts too!
So here's what I would do. If you haven't already then get everything down in a spreadsheet, copy calories off your food labels, and measure out all your portions using a food scale.
You don't have to do this forever but until you figure out which foods are holding you back you should keep at it. Good luck!
I was the same way for a long time, but I got one of these. So you brown on both sides in a skillet, about 4 minutes each side, put them in the oven at 350 with the probe. When it goes off, they're done.
I picked up a cheap scale and some calibration weights, but I don't think that's 100% necessary. I mix directly in the bottle.
edit: and also you'll need dripper caps if your flavors don't have them already.