(Part 4) Best crafts & sewing arts according to redditors
We found 14,171 Reddit comments discussing the best crafts & sewing arts. We ranked the 7,592 resulting products by number of redditors who mentioned them. Here are the products ranked 61-80. You can also go back to the previous section.


Based on the width of the '' '' '' spilled '' '' '' coffee, and the way it stays on nearly perfectly parallel tracks throughout the shape of the
'' '' '' stain '' '' ''
The fact that we have a deeper hue on the part of the '' '' '' stain '' '' '' near the pot, and a corresponding wide splotch, indicates the pressure on the beginning of a brush stroke. and then a lighter tail that breaks of into two parallel strokes, indicating OP quickly flicked up with the intention of making a steamy effect.
Based on the look of the mark I'd guess a flat or angular flat
In fact I would guess that you've been rough with your brushes. When you dry off a flat to aggressively you bend the bristles and sometimes a 'V' shape gets stuck in the brushes dry state. Which I'm guessing is what the brush you used to do this with looks like.
Here's a link to some new brushes, the one you used is clearly in need of replacement
and here's a guide on how to look after your brushes better
I'm gonna give this bullshit attempt at a post a 1/10 for effort. You'll have a more realistic fake stain if you blotch coffee with a paper towel and run the end between your finger tips to squeeze out actual liquid drops. The naturalization of your faked stain was the goal. You went over the top in your artistic efforts. Better luck next time though.
for the record, they do make self-adhesive googly eyes haha, then you don't need the double sided tape! we keep a stash at my work for general fun and merriment lol.
https://www.amazon.com/Creativity-Street-Wiggle-Multi-Pack-AC3437-02/dp/B000F8V66O
Exodus has color fluctuations between cards. Buy a loupe, it's $2.
I'll just leave this here. OP must do the rest.
Creativity Street Peel and Stick Wiggle Eyes Multi-Pack, 60 -Piece Pack (AC3437-02) https://www.amazon.com/dp/B000F8V66O/ref=cm_sw_r_cp_tai_MifTzbJ90T4CR
First off, Great work! As someone just starting you did really well!
As for things to look to do to improve that I noticed.
Warhammer TV is an excellent resource for figuring out how to do painting tecniques with a demonstration and walk through.
A lot of what I'm sharing with you I ignored for far too long. I can tell you the model I am painting now looks far better than the model I was painting a year ago.
This article is great inspiration for painters of any skill level.
Keep it up, keep improving, and if you learn something don't hesitate to share it and how it works for you.
I look forward to seeing your next model and/or squad you paint.
Machining the chocolate directly is going to involve a lot of complexity.
For starters, you'll have to make your whole machine food safe. That means it will need to be sanitizable and your cutting bits will have to not leave any hazardous chemicals or metals behind.
Beyond this, you now face the challenge that chocolate has an extremely low melting point and is therefore likely to melt rather than cut. When I've seen people machine chocolate its typically done in a freezer for this reason.
A simpler solution might be to machine something like jewlers wax into a positive of what you want your chocolate to look like. Then cast the wax in a food-safe silicone.
Once you have that the silicone mold should be able to safely cast the chocolate, and should be reusable to boot.
most definitely possible. you can either use an EF-E mount adapter like metabones or sigma, OR my preferred method to get the best quality (requires some DIY), is to get a set of these, lightly and i do mean LIGHTLY taper out the mount to the right shape of the lens mount. Tapping the end of the tool with one of these, for stubborn spots. Don't worry if you slip a bit and hit the sensor. Anything that shows up in your images, you can crop out in post.
Clean it up and polish it down with this. Best stuff in the business.
​
You'll be 🔪🔪☠KILLING IT 🔪🔪☠ in the photography game afterwards. All you pics will be 🔥🔥LIT🧯🧯!
light underneath, something wide like this. This is just the first one I found in a quick and dirty search, you can probably find cheaper. Other people have had success with a white towel in their lap with good lighting from above the work. Try the towel first of course, it's the cheapest. :)
I have this Very Big Sketchbook as my Book. I hot glued in scrapbook paper from michaels, those are like .87 cents. And I print off all my work (spells pictures rituals) because I’m not sitting here writing everything down when I’ve already made my documents look nice.
I like this method because I can tear the paper out and the scrapbook background may be damaged a little, but I can always glue something back over it and tada like new. Also, I’m the only one whose ever gonna see it so I do what I want.
Edit: I LOVED watching charmed and always wanted a Book as thick as theirs so I really love this sketchbook and it was only $27.
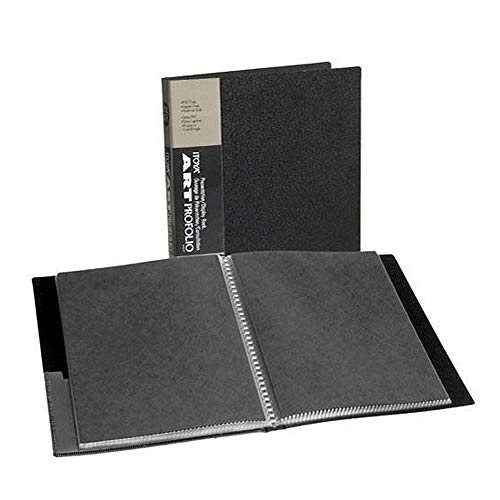
How large are your posters? If they aren't too big, I put mine into art portfolio books
ITOYA 18 inch x 24 inch Original Art Profolio Presentation Book/Portfolio- for Art, Photography, and Documents https://www.amazon.com/dp/B00009R8XD/ref=cm_sw_r_cp_apa_i_TUHWCbDEAYXVV
Amazon of course
https://www.amazon.com/gp/product/B000BQS3UW/ref=oh_aui_detailpage_o01_s00?ie=UTF8&psc=1
$90, just make sure to order a hose too (only airbrush i bought that didnt come with one). You can use a cheapy air compressor till you save for a good one.
Damn good airbrush. With Flo Improver i can run ANY paint through it, GW, P3, Vallejo, doesnt matter
My recommended buying list for a new painter is:
Tools
Sprays
○ Grey is standard, white if you're painting a majority of light colors, and black if the majority is dark.
Brushes
○ Round 0
○ Round 1
○ Round 2
All in all it should be around $60 USD for the tools and about $40 USD for the brushes. However, this list gives you every tool you will need to get started and to continue with the hobby.
This is just what I like to have on hand, this does not reflect the "perfect list". I hope it helps :)
I collect posters/prints. The ones that don't get framed and hung go into an itoya portfolio. Storing flat is key. Acid free.
http://www.amazon.com/gp/aw/d/B00009R8XD/ref=mp_s_a_1_1?qid=1451679183&sr=8-1&pi=SY200_QL40&keywords=itoya+art+portfolio+18+x+24&dpPl=1&dpID=51cN5cH2uXL&ref=plSrch
Just spend $3 on a jewelers loupe and keep it with your stuff. It costs less than a booster pack, and will actually show you if a card is fake, vs all the guesswork methods out there
http://www.amazon.com/Illuminated-Jewelers-Loupe-40x-25mm-Lighting/dp/B007GJJRZC/ref=sr_1_1?ie=UTF8&qid=1427823510&sr=8-1&keywords=jewelers+loupe
40x illuminated loupe for $3 with free shipping.
I used these to transfer the paint to the bottles
https://www.amazon.co.uk/dp/B075WR8BWV/ref=dp_prsubs_3
I used glass beads from eBay
https://www.ebay.co.uk/itm/100-Glass-Paint-Agitators-SPECIAL-OFFER-SALE-PRICE-citadel-vallejo-mixing-ball/163406170842?hash=item260bc44ada:g:RFIAAOSw2bRdokOJ
Flow aid
https://www.amazon.co.uk/gp/aw/d/B000KNPM46?psc=1&ref=ppx_pop_mob_b_asin_title
Best bottles are from warcolors
https://www.warcolours.com/index.php?route=product/product&path=68&product_id=66
Hope this helps
I used Tenacious Tape on a down jacket and its held up great.
http://www.amazon.com/Gear-Aid-Tenacious-Fabric-Repair/dp/B005BLQTEE
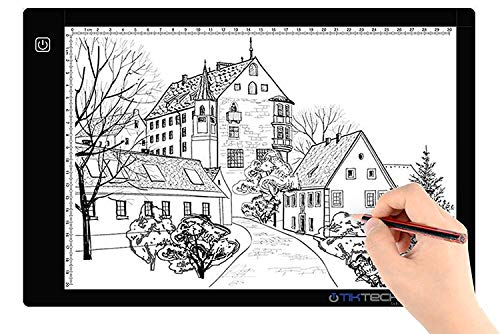
A lightbox. https://www.amazon.com/Tikteck-Ultra-thin-Brightness-Stencilling-X-rayViewing/dp/B01M26S3VY/ref=sr_1_6?ie=UTF8&qid=1548998299&sr=8-6&keywords=lightbox
Know nothing about the quality of the above one, just first one that came up.
Art portfolio
https://www.amazon.com/ITOYA-Presentation-Portfolio-Photography-Documents/dp/B00009R8XD
OHhhhhh there are a ton of things you could get your friend. Price is going to be the biggest thing.
Low end
Quality sketch books
http://www.amazon.com/Art-Alternatives-Sketches-Making-Hardcover/dp/B0025TZ30G/ref=pd_sim_201_64?ie=UTF8&dpID=41P-a-zm7QL&dpSrc=sims&preST=_AC_UL160_SR160%2C160_&refRID=0F10SP8YX71YXCMRXJG9
Micron Pens (LOVE THESE)
http://www.amazon.com/Sakura-30062-6-Piece-Pigma-Micron/dp/B0008G8G8Y/ref=pd_bxgy_201_img_3?ie=UTF8&refRID=0F10SP8YX71YXCMRXJG9
Mid-Range
Nice drafting table for illustrations
http://www.amazon.com/gp/product/B004N7AXF8/ref=s9_top_hd_bw_bFfK7_g196_i4?pf_rd_m=ATVPDKIKX0DER&pf_rd_s=merchandised-search-3&pf_rd_r=1RZ31XD1YQWR6679ZWZ7&pf_rd_t=101&pf_rd_p=e2586643-3e21-5a6c-aba3-4d8d6e8d97c8&pf_rd_i=3733771
Nice tracing table
http://www.amazon.com/Artograph-12-Inch-17-Inch-Light-Pad/dp/B003QMAUSQ/ref=sr_1_8?s=arts-crafts&ie=UTF8&qid=1463621722&sr=1-8&keywords=led+light+table&refinements=p_36%3A2638329011
Amazon gift cards for reference material. We look at a lot of stuff.
High end (sorry for the big jump in price just a suggestion)
Wacom tablet. This thing is sexy!!! I would love to have one of these myself.
http://www.wacom.com/en-us/products/pen-displays/cintiq-22-hd-touch
I'm going to throw this one in there anyways even though it's by far the most expensive thing here, but still. 27-inch iMac with Retina 5K display if you choose to go this way, I'm willing to help give you some specs that would help your friend out so they will be happy to be doing this forever and ever!
There are so many other options you could go with and if you choose to, your welcome to bounce ideas off me. The more special your piece I feel as though the more inspired your friend will be to be something big. I know I would!!
Good luck!!!
Tenacious Tape.
https://www.amazon.com/Gear-Aid-Tenacious-Fabric-Repair/dp/B005BLQTEE
This stuff is just shy of magic. I repaired a tear on my snowshoes and 3 trips later its still holding.
Put a piece of tenacious tape on both sides going 1" past the tear. It will hold forever.
I wouldn't get these. Grab a continuous roll of double sided velcro instead. Cut it to the exact length you need and there's no excess to wrap up. Also more durable.
You might be able to find it cheaper in a store.
https://www.amazon.com/VELCRO-Brand-ONE-WRAP-Double-Sided-Multi-Purpose/dp/B000078CUB
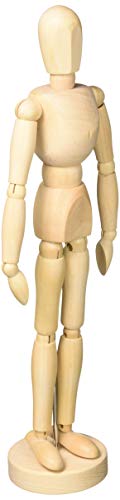
Your line work is actually not bad. But, mixing the cartoon features of the face with the realistic musculature of the body looks off to me.
You should get one of these to help you progress in body proportions.
>Constructive criticism for how I can improve my art is greatly appreciated :)
I think it's good, but it needs some technical love. Study anatomy, buy a mannequin for reference, get the details right - it looks to me like his left upper arm is about half as long as it should be, and that his neck isn't centered on his shoulders. Some of the coloring is throwing me off too, like there's shaded bits in his shoulder armor, head, gauntlets, yet other areas like his upper sleeve are just flat blocks of color? And I can't tell what's up with his lower half, like what's below that last maroon piece, and are there even legs there? Finally I don't think the detailed, almost airbrushed quality of the skybox is really working with the comic book/screenprint-style colorblocking of the main illo.
Most of my friends are full-time artists and I've written for Juxtapoz, Hi-Fructose, and have written a lot of art and design articles for automotive magazines. The number one thing most young artists get wrong is accuracy, like the anatomy issues I pointed out. You can do anything you want with a thing, that's what makes your art your own, but you have to first be able to render that thing correctly. Unless you're Picasso, but even he could do it if he'd wanted to.
So I'd pay more attention to style overall and make your choices cohesive, and I'd work harder on presenting living creatures more accurately. But do keep working, you have the talent to make good stuff. Go for it!
Using a reference will make you better at drawing creatively. Just don't use a photograph.
Seriously, set up a still life of any random crap you have. Toss your bath towel in a heap and draw that to study light and texture. Draw with your eyes closed or without lifting pencil from paper. Get people to pose for you or just sketch them when they're not paying attention. Draw self portraits.
Later on, when you decide you want to draw hobbits or unicorns or whatever, you'll have the mental reference you'll need. Plus mannequins are cheap.
Alvin Wooden Human Mannequin (Unisex) 12 Inches Tall https://www.amazon.com/dp/B001OBMZIE/ref=cm_sw_r_cp_apa_5vRWBb1ADA316
SECTION | CONTENT
:--|:--
Title | How To Make LEGO Gummy Candy!
Description | This simple recipe is great to do with the kids, and lets you pump out massive amounts of custom gummies, that are snack-able, and stackable as well! [✓] Lego Ice Molds: http://amzn.to/2cBCIRa [✓] SmoothSil Silicone: http://amzn.to/21k9Eex [✓] Karo Corn Syrup: http://amzn.to/2ctti67 [✓] Knox Gelatin: http://amzn.to/2chOEUL [✓] Blue Jell-O: http://amzn.to/2chPEYR Endcard Links: Batarang: https://goo.gl/ggrtBr Clothespin Gun: https://goo.gl/ZNMN6L Ninja Balls: http://bit.ly/SquishyNinjaBalls So...
Length | 0:06:19
****
^(I am a bot, this is an auto-generated reply | )^Info ^| ^Feedback ^| ^(Reply STOP to opt out permanently)
I use these and they're really good so far;
https://www.amazon.co.uk/dp/B010QLOJ3G/ref=pe_3187911_185740111_TE_item
OK you've inspired me. Just bought these http://www.amazon.com/Peel-Stick-Wiggle-Eye-Sheets/dp/B000F8V66O/ref=sr_1_6?ie=UTF8&qid=1368210896&sr=8-6&keywords=googly+eyes
you might benefit from one of those little wooden skeletons artists use. You can pose the figure and then orient it to see the perspective you want to paint from.
https://www.amazon.com/Alvin-Wooden-Mannequin-Unisex-Inches/dp/B001OBMZIE
I think you would just see a whole lot less of the legs period, at least from this vantage point.
Look through a jeweler's loupe or equivalent and look at the trichomes to look at when to harvest for your desired effect :-) check /r/microgrowery for more tips if google fails.
Well since I know you've got a KME I've got 2 approaches you can take with what you've already got.
1: Use the 100-1500 grit stones then use 3m wet/dry sandpapers up through 5k grit (you have to cut them to size and fold a bit over the corner of the stone to clamp them onto the stone itself) to refine the edge.
Then instead of strops you can use cardstock or characoal drawing paper with a heavy tooth to load inexpensive diamond compounds onto them.
[I honestly use these a lot and they work as well as anything]( https://www.amazon.com/Diamond-Lapping-Polishing-Compound-microns/dp/B00MALWGBI/ref=sr_1_6?keywords=diamond+lapping+paste&qid=1558986424&s=gateway&sr=8-6 )
This would give your viewers who want to invest SOME money in a great sharpening system but don't want to spend an additional 1000 bucks on gear or fancy angle correction tools. The sandpaper and paper for the strop compounds are so thin it (pretty much) doesn't matter and since the stones which come with the KME are all the same thickness (if you get the diamond ones) you'll be set using those as a backing for the sandpaper.
Now as far as fancier stones. You'll have to utilize angle correction tools but [here is a tremendous resource]( https://www.gritomatic.com/collections/kme-stones ) for stones for the KME system. Now the HARDEST natural ones "can" break down and refine vanadium carbides in steels but also can perform differently based on how much pressure is used. The Belgian coticule stones are also quite nice and less costly than some of the other natural stones.
Now on to actual sharpening stones themselves.... Wait for Vitrified Diamond Water Stones from PracticalSharpening.com or @karolis_griskevicius on IG if you want the next best thing there ever was in sharpening.
Otherwise the DMT Diasharp continuous diamond plates are a great choice for a low maintenance option. You can just splash them with some water with dawn dishsoap in it and go to town with them. Shapton glass stones are another nice option. Atoma plates are like the next step up from DMT.
For grits you really don't need a mega fine mirror edge to get an extremely fine edge. The different grit progressions and types of stones can yeild different types of edges.
For starting out I'd get a DMT/ Atoma Coarse, Fine and then go with one of [these CBN]( https://www.practicalsharpening.com/benchstones1/metallic-bonded-cbn-sharpening-bench-stones )stones to finish things off.
Keep in mind that most abrasives won't matter for even hard steels as long as they're fresh but Diamond stuff is the least PITA thing to use. Once you get to like 4000 grit or 5 ish microns you NEED to worry a bit more about carbide tearout and burnishing edges on the more crazy steels.
I'd try to go with (around, exact stuff isn't too big of a deal) something like 220-320 grit, 500-800 grit, then 3-5000 grit for stones. Then with the aforementioned strop pastes you will have 5, 3.5, 3, 2.5, 1.5, 1, .5, and .25 micron diamonds to work with.
https://www.tandyleather.com/en/ will have like half or quarter hides of vegetable tanned leather. Get some free paint stir sticks at your local hardware store for 5 gallon paint cans by lying and saying you bought some the other day (or just ask I dunno) and then wipe both the leather and sticks in alcohol. Once dry use permanent 2 side mounting tape to affix the stuff to one another in a stroppy type fashion. Then going from the finest strop compound to the least fine, rub them all into the leather strops. Wear gloves if you care to.
Save one strop with nothing on it, this will be the finishing strop.
https://www.amazon.com/Pencil-Holder-Executive-Fountain-Stylus/dp/B01FZ9Q5WW/
I bought this light table and the light can go through 5 pages of watercolor paper.
https://www.amazon.com/gp/aw/d/B01M26S3VY/ref=ya_aw_od_pi?ie=UTF8&psc=1
I normally have a sketch ready before hand but this will work well for you from my experience.
I use a couple methods:
I used double sided Velcro “tape” a few weeks ago. Wrapped it twice around my leg at different heights and it worked perfectly. Can get a roll of it for $6-$7 and it has a ton of other nice uses.
VELCRO Brand - ONE-WRAP Roll, Double-Sided, Self Gripping Multi-Purpose Hook and Loop Tape, Reusable, 12' x 3/4" Roll - Black https://www.amazon.com/dp/B000078CUB/
These profolios hold 48 posters! They fluctuate in price ($35-$52) on Amazon. $35 right now! Grab one! Get those things out of those tubes! Store under bed.
Itoya Profolio
Huge backpack and Itoya art portfolios if you get a lot of prints. Holds them flat. Don't have to worry about straightening them back out.
https://www.amazon.com/ITOYA-Presentation-Portfolio-Photography-Documents/dp/B00009R8XD/ref=sr_1_6?ie=UTF8&qid=1538402907&sr=8-6&keywords=art+portfolio+case+24+x+36
https://www.amazon.com/ITOYA-Presentation-Portfolio-Photography-Documents/dp/B00009R8XD/ref=sr_1_3?crid=3S2APQMW4F7IY&keywords=itoya+art+portfolio+18+x+24&qid=1555437393&s=gateway&sprefix=itoya+%2Caps%2C331&sr=8-3
Peel and Stick Googly Eyes
Of course :D
Inks are basically pigmented water, so they flow better then layer paint, while not pooling as much as washes. They're used in glazing, as you mentionned.
Glazing is a more advanced technique which is used to get really smooth transitions between colors. There was a post a while ago that really showcased what glazing does (see here). It's a very time consuming process, where you take a range of colors and go back and forth applying this layers of it to blend and smooth your colors.
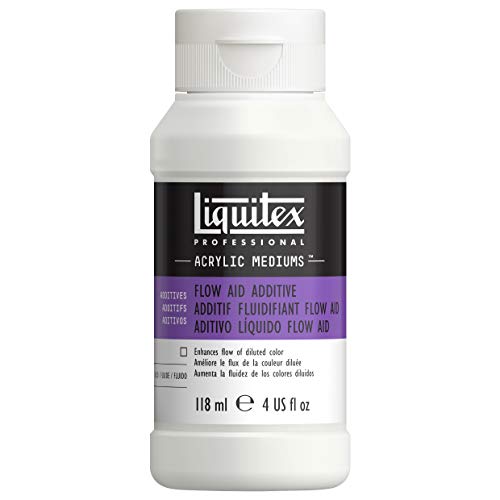
If you want to get into glazing, then you'll need to buy some retarder medium. It's a type of liquid that will slow down the drying process of your paint so you can take your time and mix it up on the model while it's wet to get those smooth blends. Someting like this should work. You add a tiny bit of it to your paint as your apply it.
The Master airbrush kit with a compressor is probably the entry level kit you'd want. The compressor with that kit is also known as the AS-186 compressor, and is quite a capable compressor.
The airbrush is probably nothing fancy, but a basic cheap airbrush is a good starter since you can learn how they work, how to maintain them, and most importantly not give a damn the first time you bend a needle.
Once you've got some practice under your belt, move up to a reputable artists airbrush since they are better made. You won't actually see much of a difference in the quality of the spray in a cheap airbrush to an expensive one, expensive ones typically have more options in components and are easier to source replacement parts for.
I moved up from a no-name ebay airbrush to an Iwata, and immediately bought the parts to change the Iwata airbrush to a 0.5mm needle instead of its stock 0.3mm.
To add to this, invest in a Drawing Mannequin. You can even get one for android. They will help you plan body poses and give you something to work off of.
Nice! If you'd like to take it further you should get him a mannequin. He can pose it and even though his style is very animated atm, it will help get him a good sense of proportions!
Thanks! It's the Alvin 18x24" self-healing: https://www.amazon.com/dp/B0025189VE/
http://www.amazon.com/gp/product/B0025189VE/ref=as_li_ss_tl?ie=UTF8&camp=1789&creative=390957&creativeASIN=B0025189VE&linkCode=as2&tag=goosgunblo-20
This isn't a journal but might still work, really big sketchbook I've been eyeballing.
Save your money. You need $20 more for a decent starter brush here, I wouldn’t buy one of these, I had one, made one model and sold it. In honesty I’d save up, double your money and buy either a kit like this compressor with tank with brush, or preferably just the compressor for $70 and a decent airbrush like the Iwata neo for $60.
A compressor with a tank means the compressor doesn’t run all the time so prolongs the compressor life itself. It has a decent water trap and regulator to adjust pressure.
A Neo is a superb brush for the money, cheap Chinese airbrushes have less accuracy, require deeper cleaner and can give a frustrating experience.
It’s often worth spending once and spending right in this field. Hence I suggest saving your money.
I bought the Master Deluxe Airbrush kit on Amazon (likely the one you saw), and everything /u/BigBraddWolfe said has been my exact experience.
I originally got mine for Gundam model kits, though the brush works fantastically for priming and base-coating miniatures as well. I would definitely recommend the Deluxe over the cheaper version, because the "extras" make all the difference.
The tank allows you a fair bit of continuous spray before the motor kicks in, and pretty much ensures you don't get any rattling or crazy pressure differences. It fills back up pretty quickly, so you won't spend more than a few seconds waiting on it if you choose to wait it out vs. continuing to spray. I'm pretty sure that the extra needles of various sizes, quick-disconnect, fancy hose, and moisture trap are a savings in this bundle when compared to upgrading an existing compressor. In any case, it's doubtful that I'll have to get another compressor in the future assuming this one continues to hold up. It does everything I could ask of it, in about the best way any compressor is going to. It gives me air steadily and for a long time, pressurized to a level I determine, keeps moisture out, and allows me to quickly connect and disconnect the brush.
That last point turns out to be quite the life-saver for the brush itself. It works fine, sprays well, and can go wider or tighter with the included needles. Where this thing may have a little more upkeep vs. an Iwata is in the clean-up between colors. I find myself breaking it down to clean the needle guard and do a "deep cleaning" just about every time I change colors. It just doesn't satisfy me to wash a bunch of cleaner through it and hope for the best. I would imagine an Iwata will create less buildup on the needle and in the guard, allowing you to clean it out a bit quicker. For me, it's not too much of a hassle because I just need to rinse the cup, slide the needle out, give it a wipe, remove and clean the guard, then stick everything back together. With the quick-disconnect I don't have to worry about my compressor's pressure, or the line, or any of that. I pop the brush off, do the quick cleaning, and it's all but spotless a minute later when I pop it back on and go back to spraying.
Even if you have no intention of using the included brush, you're probably still getting a decent compressor fully decked out at a steal. If you want to go and drop the remaining budget on a neo, by all means do so and you'll have a fantastic setup for airbrushing dolls and whatever other large surfaces you want to repaint. If you grab another quick-connect fitting (it seems like most of the hose fittings for compressors are standardized by one of a few manufacturers), then you could switch between them at will for different jobs. Use the basic Master one for priming or whatever rough jobs you need to crank out, and break out the neo for finer detail work.
Thoughts on the first Neo kit I found: it looks like the brush is better but I can't speak definitively on the compressor's workings. It may be quieter than mine, or it could be louder. It looks like the three settings on it are all you get, while I have a little gauge on mine to set my PSI to whatever I want (I typically use 20-25). It may seem like a small thing, but I think it's kind of nice that it has a little holder on it. It's a kind of profound terror to pick up the airbrush, fill it with paint, and realize you have nowhere to put it down when you suddenly need two hands again.
If you can afford the extra price then I'd go for the version with the tank (https://www.amazon.com/dp/B002KSQHB6/). It will allow the compressor to turn off when the tank is full, as well as reducing any potential concerns with air pulsation.
A lot of people seem to use cheap compressors like that (myself included), and I've seen them recommended pretty often.
I’m on my second master compressor. I upgraded last week to one with a tank. The master brand of compressors are decent for beginners.
I’m not a fan of the actual airbrush they come with and upgraded that early on.
I’m also not familiar with the paints listed in that link.
I second the suggestion to find one without the paints and pick up something from vallejo. Vallejo has two lines of air brush paint and both are decent. They offer different colors in each. You can also get citadel/games workshop brand air paint but I’m not a fan of the bottles they come in. Plus they tend to be more expensive.
While the accessories in the one you linked are nice to have, he can get away without having them. I mix my paints in the airbrush so I don’t need cups or mixing sticks. You could check out the one below which is the compressor with tank and a basic airbrush.
Master Airbrush Cool Runner II Dual Fan Air Tank Compressor System Kit with a Pro Set G222 Gravity Airbrush Kit with 3 Tips 0.2, 0.3 & 0.5 mm - Hose, Holder, How-to Guide - Hobby, Auto, Cake, Tattoo https://www.amazon.com/dp/B002KSQHB6/ref=cm_sw_r_cp_api_i_YWP3DbEJ9QG39
I recommend getting this to air in cleaning the airbrush.
4 SET Airbrush Spray Gun Wash Cleaning Tools Needle Nozzle Brush Glass Cleaning Pot Holder https://www.amazon.com/dp/B0154HN2NA/ref=cm_sw_r_cp_api_i_sYP3Db0DV1NXC
You could certainly patch it with nylon and some sewing skills, but I would probably use gear repair tape for something minor like that.
https://www.amazon.com/Gear-Aid-Tenacious-Fabric-Repair/dp/B005BLQTEE
Tenacious Tape is the industry standard for repairs in breathable fabric. Has worked well for me in the past, and unlike duct tape it is specifically made for use with technical fabrics.
I've used this one for three years and really like it. It's small, cheap, and has good magnification. It also comes with batteries for the built-in light.
I got mine on amazon too for around $2.5 with free shipping
https://www.amazon.com/gp/aw/d/B007GJJRZC/ref=ya_aw_oh_bia_dp?ie=UTF8&psc=1
It's probably not really 40x, but it definitely is better than when I was trying to details with my eyes alone. I got lasik, but it didn't make my vision THAT good haha
As /u/wenbobular said, you probably want food grade silicone. There are a few ways to go about making such a thing. If you're trying to make something like a jello mold, I'd invert the print and fill it with the silicone. If you want a press mold then the silicone would need to just be a thin coating on your plastic. That's going to be hard to achieve while keeping a sharp enough edge to cut your dough. Good luck!
I agree with /u/redsnappa127 . The materials that make up the clone willy kit are standard life-casting materials. Search for molding alginate on amazon. You can get a pound of alginate for $15 http://amzn.com/B007PULSRM or you get get 4lbs from Smooth-on which is the company that professional body casters use for $32: http://amzn.com/B000QCM27Q or from smooth-on: http://www.smooth-on.com/Life-Casting-Alja-/c3_1185/index.html?catdepth=1
Then you need a platinum cured silicone which is the more expensive part $38: http://amzn.com/B00EOA25X2 or www.smooth-on.com/Silicone-Rubber-an/c2_1115_1131/index.html?catdepth=1
SmoothSil 940 is platinum cured and food safe so it should be safe to make into a dildo.
You just need a molding container and that would be easy to make out of an old water bottle, the 1L smart water bottles would be good as they are decently sized and smooth sided.
7pcs 5 gram Diamond Lapping Paste Polishing Compound For Fine to Final Polishing, Grits 0.25 to 5.0 microns https://www.amazon.com/dp/B00MALWGBI/ref=cm_sw_r_cp_apa_XAK8BbAFSPB8T
[Kent lapping diamond compound, from amazon.] (https://www.amazon.com/Diamond-Lapping-Polishing-Compound-microns/dp/B00MALWGBI)
I actually just started getting into miniature painting a few weeks ago, and went the same route as you to start out with. I have very shaky hands, and I wasn't sure if I would even be able to do it so I went cheap at first. I picked up this brush set from Amazon. Then I bought some primer from Walmart, and bought the Army Painter Zombicide paint set since I have the game and figured even if I messed them up, I cold just slap some blood on those parts and they would looks ok (which was the case for a few).
I think the Wargame one would be a good starter set as well.
The primer I picked up is cheap and works great, but it takes a while to dry. Since I started, I picked up a couple of cans of Army Painter primer and that dries in a few minutes. If you don't mind waiting a day, then just use the cheap stuff. There may be other cheap ones that dry faster, but I can't speak to those.
Brushes
basic paint set
I ordered this back in February and have been using it ever since. The compressor has been pretty reliable, and it doesn't hurt to have 2 gravity-fed brushes in the kit for that price.
I probably sit down to use mine a couple of times a week with a few down weeks mixed in. I'd probably estimate that the compressor has probably logged a solid 55 to 70 hours of total work over the past 3 months between learning/practice, X-Wing Minis, Legion, and terrain making.
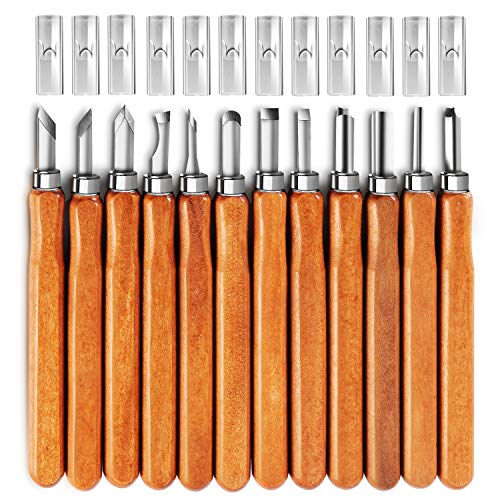
How about wood carving?
I haven’t been carving for long myself, but I recommend investing in a Mora Woodcarving 120 knife. Good for small jobs and is a really handy knife in general. Plus you can take it camping for random carving fun.
Next, maybe some cheap wood carving chisels. Link is here for a $15 set. They won’t be nearly as good as the expensive ones, but it’ll save you money if it’s something you want to just give woodcarving a go without a major investment. If you don’t like it, no biggie.
Worst thing I see with any hobby is people buying a bunch of expensive stuff they don’t end up using. The best thing i see is when hobbyists buy themselves a really good tool as a reward for sticking with it. Nothing makes you appreciate good equipment than making do with substandard stuff for a while :)
This piece was carved onto a bit of dry twig I found in the nearby park. I use old sun-bleached driftwood too, as it’s super soft. The best, and cheapest way to figure out the different properties of wood is to try out deadfall from local trees. That is until progressing to proper blocks of wood. I’m not there yet at all.
I’m sure some carving maestros will be able to make all sorts of better suggestions but this setup has worked for me so far.
Would love to see pics of any pieces you make, feel free to share!
Oh, and don’t forget: cut away from yourself. And keep a stack of bandaids handy ;)
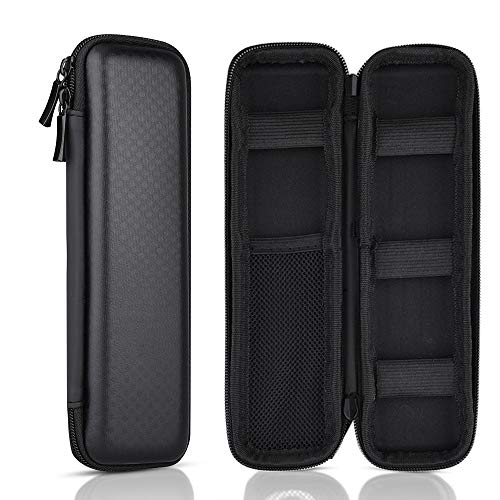
https://www.amazon.com/Pencil-Holder-Executive-Fountain-Stylus/dp/B01FZ9Q5WW/
KUUQA Black Hard Pencil Case EVA Hard Shell Pen Case Holder for Executive Fountain Pen and Stylus Touch Pen https://www.amazon.com/dp/B01FZ9Q5WW/ref=cm_sw_r_cp_apa_i_yNIGDbSRRFVJB
That's the one I got a few months ago and uses a pencil case. But I absolutely love it, and it would probably work for your needs too.
Same as what /u/kovard said, if you want, you can fit the pencils into a much smaller pouch like this one and save a good amount of space. Or just make rooms for more pencils and pens.
Still a complete preference thing though.
How's the Eco, does it feel smoother or scratchier than other pens?
i have the same one from amazon Kuuqa Black Hard Pencil Case EVA Hard Shell Pen Case Holder for Executive Fountain Pen and Stylus Touch Pen https://www.amazon.com/dp/B01FZ9Q5WW/ref=cm_sw_r_cp_api_i_PxN6AbBZHFGJ0
I got it on amazon, let me see if I can get a link. I will say there are a bunch of the same kinds posted around in the related items
Edit: the link for the light box I got
Scanning is costly, yeah. If you shoot a roll a week or more, it's a no-brainer, cause you'll make back your costs on what you save in paying for lab scans pretty quick. If you shoot less than that, "it depends".
If you're just shooting 35mm, a used Plustek is a great way to go, or even a new one if you want a warranty. If you also shoot medium format, I'd look for a used Epson V700 or higher; I wouldn't bother with the lower number Epson flatbeds; the resolution just isn't enough for me to make it worth the hassle of scanning.
If you already have a DSLR or other interchangeable lens camera, and especially if you already have a macro lens for it, you can also try DSLR scanning. Even if you don't have a camera, you can get set up for around $500-700 depending on what you need to buy. If I had to do it from scratch here's what I'd get.
So all in that's everything you need for DLSR scanning, and it comes to $707 plus the ongoing LR subscription. You could cut the cost a lot if you already own some of those things, or by using a cheaper 35mm holder than the Nikon ES-2, such as a 35mm-sized Digitaliza, or rigging up an older Nikon ES-1. You also don't need NLP and Lightroom; you could get away with free software like the GIMP. You might also be able to find a cheaper tripod at a yardsale or thrift store that will work fine, but they can be clunkier than modern ones.
All that is why people say "if you already have a camera" with DSLR scanning. Otherwise, why not just get a brand new Plustek 8100i AI for $490 and get about the same level of image quality for less money, or even less with a used model. So, it kind of depends on your personal situation.
-cable tray(s) $22 - perfect for screwing into a think desk like yours, power strips can live in here as well
-nylon/velcro ties $7 - possibly cheaper at your local hardware store
With kush white walls like that a lil cable management might improve how you feel walking in every day!
Nice setup. Foot warmer could use some RGB tho
USB docking station may help or any type of docking station
Little things can help like :
-cable length (use length you need not anything longer; especially for the permanent fixtures that won't require alot of moving)
-bundle the wires up. I'll provide some examples
1)https://www.amazon.com/Cable-Management-Sleeve-additional-velcro/dp/B01N3ZTRWH/ref=sr_1_7?s=office-products&ie=UTF8&qid=1501796199&sr=1-7&keywords=velcro+wire
2)https://www.amazon.com/VELCRO-Brand-ONE-WRAP-Double-Sided-Multi-Purpose/dp/B000078CUB/ref=sr_1_6?s=office-products&ie=UTF8&qid=1501796199&sr=1-6&keywords=velcro+wire
I found some really soft double sided Velcro from the craft store and it works really well with the sport sheet harness and my medium Nova as well as Peirce.
Edit: I believe it's this Velcro https://www.amazon.com/VELCRO-Brand-ONE-WRAP-Double-Sided-Multi-Purpose/dp/B000078CUB/
This is the piece you probably need less. Buy only this
https://www.amazon.com/gp/product/B0749JN5G7/
and some strips of double sided Velcro to make it thicker if needed.
https://www.amazon.com/VELCRO-Brand-ONE-WRAP-Double-Sided-Multi-Purpose/dp/B000078CUB/
​
use the 18mm as front cover (and a cut of 6mm for the nose)
Haha, it’s a “mounting system” that I’m actually super happy with!
Just two long pieces of Velcro strapping (about 1” wide) threaded over the desk frame but under the desk top. The Velcro overlaps itself around the bottom of the case, by about 18”. I also stuck a plastic door bumper between the case and the desk leg, to keep the case hanging more or less vertical.
It’s very very solid. Much more than I would have anticipated. I can hit the power button on the case without any movement at all.
Here is an Amazon link to the straps
Airbrush
Compressor
X-acto -Z series blades are great.
For sandpaper you can just buy some popsicle sticks and 400, 600, 1000 grain, and then a buffing pad from a nearby hobby store or something like walmart even, it's all the same honestly. The popsicle sticks you can wrap the paper over to give you something to rub it against easily. Just practice on some of the parts that come with a kit that don't get used so you aren't eating away too much plastic.
One teacher here does these pop-quiz questions and the table that gets the most correct get 1 wiggle eye for each person in the table. Kids here eat them up (not literally, thankfully.)
I got you fam
Hi!
Some things about me...
And I love RAOA because gifting and being gifted gives me something to look forward to. Life can be a little rough sometimes. Other than that, watching everyone interact and be nice to each other gives me some nice fuzzy feelings.
http://www.amazon.com/dp/B000F8V66O/ref=wl_it_dp_o_pC_nS_ttl?_encoding=UTF8&colid=2AN2PXRX4RL99&coliid=I3CDARR7I9YJ7J&psc=1
I would really love these googly eyes.
It's more of a DIY
https://www.amazon.com/Liquitex-Professional-Flow-Effects-Medium/dp/B000KNPM46/ref=asc_df_B000KNPM46/?tag=hyprod-20&linkCode=df0&hvadid=167130062341&hvpos=1o3&hvnetw=g&hvrand=17550406855758447522&hvpone=&hvptwo=&hvqmt=&hvdev=c&hvdvcmdl=&hvlocint=&hvlocphy=9033614&hvtargid=pla-83844654326&psc=1
I did not use a funnel. I did use some flow medium but only like 1-2mm to make it run smoother.
Vktech 50pcs 15ml Empty Plastic Squeezable Dropper Bottles Eye Liquid Dropper LDPE https://www.amazon.com/dp/B00D1GUAHS/ref=cm_sw_r_cp_apip_Ju5Jyd4sZrHKA
Liquitex Professional Flow Aid Effects Medium, 4-oz https://www.amazon.com/dp/B000KNPM46/ref=cm_sw_r_cp_apip_Eg3tMY5uA5Hla
Hey!
If you're using water, sometimes you gotta keep mixing it up so the pigment actually stays in the mixture. I recommend Lahmian medium, or Flow Aid for thinning down paints. Also try a wet palette!
To blend colours you want to glaze the highlights. You can do this by snagging a glazing medium, or just thin the shit out of your paint and go over the levels of highlight. Normally you'd want a mix of your darkest and lightest colour when doing this.
I try to paint the entire model, but don't bother with things that will never see the light of day. I paint for tabletop quality, so that's that.
If I'm disappointed I try again! That's why test models are important.
I prefer citadel over all. I use the citadel Colour app to help with the color choice and how to apply. I do use Vallejo when I need an air brush version of a color that Citadel doesn’t have or for priming.
I understand the stance you have on the pricing with citadel, but you can make that line of paint last longer.
Head to amazon and order these items
15ml dropper bottles
1ml needless syringe
flow aid
small stainless steel ball baring
By following the steps in this video on YouTube I was able to transfer all my base and layer paints to dropper bottles. Now I can limit how much paint I’m wasting to a minimum. Because like you said, they can be expensive
I'm partial to using Liquitex Airbrush Medium to thin acrylics - http://amzn.to/Ui4x1T. You can use water or alcohol or other thinners, but I actually have a much easier time with the medium. I'm pretty sure that it's because you're getting a better distribution of pigment particles. Also, with thinners it's possible to overthin to the point where the paint just doesn't want to do anything but bead on the surface. It's nearly impossible to do that with medium.
Just my 2 cents.
About two hours and only around 20 bucks! Here the the links to what I used.
https://www.amazon.com/gp/product/B000KNPM46/ref=oh_aui_detailpage_o00_s00?ie=UTF8&psc=1
https://www.amazon.com/gp/product/B007IK9M4K/ref=oh_aui_detailpage_o00_s00?ie=UTF8&psc=1
https://www.amazon.com/gp/product/B01COLW9IS/ref=oh_aui_detailpage_o00_s00?ie=UTF8&psc=1 (10ml bottles, good enough but next time I might spring for 30ml)
For the Model Color, use the Thinner Medium. You just need 1 or 2 drops of this thinner for a drop of Model Color. Too much will make your paint have a watery/runny consistency.
On the other hand, use the Airbrush Thinner for the Model Air. It works best with a Retarder Medium. Vallejo's air brush thinner is quite tricky to use though. You have to get the right paint to thinner ratio that will work best with your air brush. Try out different combinations on an old kit or a plastic sheet before painting your models.
EDIT: There's also an air brush flow improver from Vallejo.
To get the effect I mixed my white and blue 1:1 with THIS. Then painted it very thickly with white and dabbed blue dots into the white. Then with a ton of water I swirled as best I could, letting the pooling water do as much of the work as I could. I kind of made it up as I went...that youtube video looks like it might get overall better effects--I'm also not sure you need to use paint retarder, though it did keep it pretty thick so it didn't all just blend together. Definitely something I'd like to work with more!
I've never heard of a hardener for paint. I've heard of drying retarders to lengthen the amount of time you have to work with the wet paint, and I've heard of putting a glossy clear coat of varnish over the paint before doing a matte coat to protect the mini. I've also heard of 'ard coat, the glossy finish for metallics that GW produces.
Just did a quick search for paint hardener on google. Looks like it's mostly used in enamels to give a harder, glossy finish. Minis are mostly done in Acrylics, so I doubt they work well together.
If your already thinning it to that ratio I don't think you should go any further. Vallejo has there own brand of retardant specific to their paints.
https://www.amazon.ca/Vallejo-VJ70597-Retarder-17ml/dp/B000PH9JP0
See if retarder agents might help with that. http://www.amazon.com/Vallejo-VJ70597-Retarder-17ml/dp/B000PH9JP0
Its an endearing model because every modeler has one like it. Pretty good job for being a first kit!
As for airbrushes... I started with the super cheap Master brand airbrush. Later on I got a Japanese made Iwata. I can say that buying the Master airbrush + compressor is the perfect starter. This is a good example: https://www.amazon.com/Master-Performance-Airbrushing-Dual-Action-Airbrush/dp/B0017640RK/ref=sr_1_7?ie=UTF8&qid=1482902837&sr=8-7&keywords=airbrush+compressor+tank
You get an airbrush that will be a perfect starter and a good compressor that will last you into your next step up airbrush.
I recommend staying with acrylic paints-- just easier to work with.
For putty, to fill seams with, I also recommend Perfect Putty. It's water based so it's easy to clean up and work with. You put some on a tray and use a toothpick to apply to a gap or seam, then wipe excess off with brush or finger. After it dries you can use sandpaper or a wet cottonswab to remove excess.
https://www.amazon.com/DELUXE-MATERIALS-DLXBD044-Perfect-Plastic/dp/B0076LAVFK/ref=sr_1_2?ie=UTF8&qid=1482902965&sr=8-2&keywords=hobby+putty
What is your next kit?
I use a tablet with reference pictures, but another thing I have found useful is I have a "drawing model" doll - https://www.amazon.com/Alvin-Wooden-Mannequin-Unisex-Inches/dp/B001OBMZIE as an example - that i can pose and touch and then the model can see what I am talking about with a weird pose or look...
You could get one of those wooden human mannequins. Artsy people have those, right?
I like it! It has a few anatomy specific things though. You may want to spend more time looking at Jack's hands throughout the show. The show has a very simple-shape-y style and the hands are much easier than in other shows. Additionally, Jack looks thin but not small in the show because he has broad shoulders and a narrow waist. Your image seems to have his shoulders broad, but the pauldrons make it harder to see and he looks a bit disjointed, plus his waist is pretty wide. If you're going to be doing lots of art of people in the future, you may want to pick up something like this since human proportions are hard to draw on the best of days. One last thing, the feet are very small. They should be about as long as his forearms.
With all that out of the way, this is a very solid start, especially considering how hard it is to draw humans. Keep at it! You could end up a really great vector artist!
Don't bother. Unless you are trying, actually setting fire to a wooden countertop with a soldering iron is pretty damn hard. You would have to jam it into a heap of shavings to light a fire with it. If you really want to, you can get a mat like this.
Good observation. This seems to be a standard work matt for doing electronics stuff, I picked mine up at my local hobby shop. Maybe something like this is what your looking for?
I'm not really "experienced," but I've made a couple. As far as I know, the best way to figure out how much foamcore you'll need is to plan out your insert before you start. Draw out all the pieces (with measurements), then figure out how they'll be laid out on the size of foamcore you can get, then add some extra in case you screw up (which, if you're anything like me, you will... several times).
As for tools - a utility knife with replaceable blades (and a whole lot of replacement blades), a self-healing cutting mat, an adjustable square, a metal ruler, some good glue, and something to help hold everything together (pins and/or ratchet clamps) are all good things to have on hand.
This mainly because I used up every sketchbook I had from October 2015 to October of last year for my self imposed yearlong Inktober.
The company is called Oh Boy Artifacts and they’re not currently making any products. I found one similar here but I think it might be bigger than yours
I forgot about the epic adventure part until I had already drawn and uploaded the images, so if you could just imagine the two drawings together, maybe swimming in a fish tank full of outer space, or riding on the backs of eagles, that would be great. Heh.
Anitaxjffdskjarizard and 186394.
I will probably end up photoshopping these pictures onto an eagle once I get back from work. Or the fish tank thing. Because that sounds really neat.
Edit: I also forgot to link an art thingie from Amazon. Look at me go today! I have to do it when I get home from work though, 'cause I have to leave, like, this minute.
Edit again: Okay, art thingie. Wasn't sure if it had to be art supplies, or a piece of art to display, so I'll link one of each type of thing just to cover the bases.
Big ass damn sketchbook. The price is listed at $28, but there are offers for $19, which I dunno if that still qualifies. If it's null, just, like.. yell at me or something.
This is art. Stare at the art. You should now feel mentally reinvigorated. If you suspect staring at art has not provided the required intellectual sustenance, reflect briefly on this classical music.
Edit again again: Here you both are in a fish tank full of space.
http://www.amazon.com/gp/product/B0025TZ30G/ref=pd_lpo_sbs_dp_ss_1?pf_rd_p=1944687722&pf_rd_s=lpo-top-stripe-1&pf_rd_t=201&pf_rd_i=B000FWCQ78&pf_rd_m=ATVPDKIKX0DER&pf_rd_r=0YAA9ZE1DMG7NCNCCYJJ
I just bought one as a starting kit a few weeks ago. I bought the one with the compressor with attached air tank. So far it's worked great for me and it's eased me into airbrushing and airbrush maintenance without having to worry about spoiling it, because the airbrush itself is just 25 bucks or less. If you do buy it, before starting, make sure you apply thread seal tape on all male connectors, and also soak the little nozzle and small parts in a warm mix of dish soap and water.
Edit : here's the Amazon link. https://www.amazon.com/Master-Airbrush-Dual-Action-TC-20T-Compressor/dp/B002KSQHB6/ref=mp_s_a_1_5?ie=UTF8&qid=1549108384&sr=8-5&pi=AC_SX236_SY340_QL65&keywords=master+airbrush+with+air+compressor&dpPl=1&dpID=41nADShdRIL&ref=plSrch
If you live in the US, Masters Airbrushes are very affordable test beds for air brushing.
Master Airbrush Multi-purpose Gravity Feed Dual-action Airbrush Kit
With an Air Tank.
If you live in other countries, you can consider AS186. Almost the same compressor but 220V. You can get a Chinese airbrush for testing purposes.
If you like Aurbrushing, you can upgrade to more branded Airbrushes like Iwata and Badger while keeping the Compressor... Then use the budget airbrush for Priming and such.
I personally have the AS186 for a year and painted assortment of 15+ HGs and MGs with it. Used included China airbrush for a few kits before deciding to get a Sparmax Airbrush since I'm convinced I'll enjoy airbrushing
Branded Airbrush gives better control over the thickness of the line, better for pre-shading.
I've used this stuff to repair holes in my socks although a bit overkill, it works great. It should be perfect for pants!
I have a similar one to this. Does what I need for a casual such as myself. I don't deal with jewelry but sometimes engravings are microscopic and I break this out. Get one with an LED light, it's necessary sometimes
https://www.amazon.com/Illuminated-Jewelers-Loupe-40x-25mm-Lighting/dp/B007GJJRZC/ref=sr_1_4?ie=UTF8&qid=1465409007&sr=8-4&keywords=jewelry+loupe
In my experience those two finger turning adjustable types are garbage. They never last for very long and are dificult to manage.
I purchased these two years ago and it's all I've eve used.
[1] (https://www.amazon.com/KINGMAS-Pocket-Microscope-Jeweler-Magnifier/dp/B00AQAANDS/ref=pd_sim_200_2?_encoding=UTF8&psc=1&refRID=KEDEDRG711YM9A2DM25Y) 60x LED and adjustable. Is great for looking at trichomes.
2 40x fixed. Is great for everything else when you don't need to get as up close and personal.
No, you can't melt silicon. First it can handle ridiculous temperatures, second you'd just get a goopy mess.
You need something like this
ah good catch. Do you have a preferred brand of food safe silicon molding? I found this guy but that's it
Sorry I was unable to find a mold like that, the closest thing was a D20 icecube mold but even that is out of stock.
I did however find thisA kit to make your own
Here is a video on how to do it. You can also make a 1 part mold but that wont last nearly as long. and will look less nice. If you follow the edges of the dodecahedron for the mold haves you will have a near perfect result.
This is what Smooth On makes for that. It's suggested you pull a vacuum so I haven't tried it yet.
https://www.amazon.com/gp/product/B00EOA25X2/ref=ox_sc_saved_title_10?smid=A14PXI2GJIO87&psc=1
Nice post. I feel like this "abrasive paste effect" is the #1 thing new riders need to learn about bike maintenance:
1> you put grease on your chain
2> you go ride and the grease picks up bits of dirt and rock
3> the grease-paste starts grinding away the chain and chainrings, and those metal shavings get into the grease paste
4> now your grease is a paste of rock, dirt, and metal and its job is to wear down the edges of your chainrings, your chain pulleys, your chain pins, and everything else you pay to replace
If you don't think grease with sharp stuff inside it is an effective cutting tool, consider that they use it to POLISH BALL BEARINGS.
It's a process called "lapping", and they call it "polishing paste" : https://science.howstuffworks.com/transport/engines-equipment/question513.htm
Guess what's in it? Oil and rock: https://www.amazon.com/Diamond-Lapping-Polishing-Compound-microns/dp/B00MALWGBI
So the #1 thing you have to do when you buy a new bike is get that polishing paste off your drivetrain before you ride it again.
It's the difference between a 500 mile cassette and a 100 mile cassette.
I've yet to use it, but wax-based products that ball up around rock and fall off your chain are supposed to stop this effect. I just got my Boeshield T-9, excited to try it out.
The main problem people have sharpening premium steels, including myself when I first started, is not taking the time to create an apex and de-burr before moving up, you should be able to get a good edge with a 200 grit stone that can shave arm hairs, then de-burr by pulling through wood or lightly across the Stone and move on to the next grit, getting it sharp enough to shave arm hair at the end of each grit, stropping at the end should only be to give it that last little bit to make it better, it builds on an already existing sharpness and makes it better.
When it loses that super keen sharp edge, stropping gets that edge back to a similar keenness without removing too much metal, it's the cherry on top, not the ice cream
Go for [diamond lapping pastes](7pcs 5 gram Diamond Lapping Paste Polishing Compound For Fine to Final Polishing, Grits 0.25 to 5.0 microns https://www.amazon.com/dp/B00MALWGBI/ref=cm_sw_r_cp_apa_SMRAxbPCYBVVR) they work best on all types of high end steel since the diamond is harder than all the various carbides, and those particular ones have a much more consistent grit size than other compounds
you can try a diamond paste, you can get a set of polishing paste on amazon for cheap.
i haven't done this on a watch, but I have used it on many other things such as metal and plastics for my job. start off with maybe a coarser grit, 2.5 or so, and finish it with the 1/4 grit. Again, i haven't tried this, but from what i can see is you really have nothing to lose. you can use a cloth or your finger to start, or a dremel if you have one.
Thank you!
I've used the The Army Painter inks, I've got a kit on amazon
I made everything using those inks, washes and a regular miniature brush from this regular set
I've focused on having areas of high contrast to make the mini more interesting
​
I borrowed my Aunt's airbrush just to test it so I tried in the Bat, but since it's a cheap airbrush and sometimes it clogs I've only used to give a base coat of dark red, then I went back to the basic brush
​
Im glad you liked, it makes me happy :D
I'll save you $10 immediately: A cork, and bluetac. Now you don't need to spend 9.45 on a painting handle. You also probably don't need to be starting with wet palette. A 8 colour ink set is also probably overkill, stick to black and brown and be done with it.
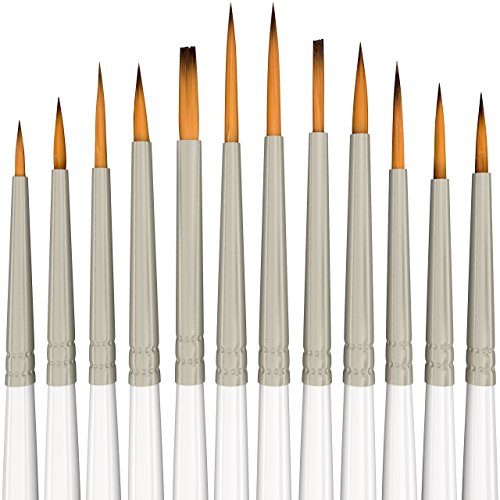
And I suggest swapping your brush set to this: https://www.amazon.com/MyArtscape-Detail-Paint-Brush-Set/dp/B010QLOJ3G
4 rounds, 4 liners, 2 flats.
I sincerely want to thank you for such a thorough reply! I would like to address some of your points so perhaps you can expand on them a little deeper when you have the time.
>You seem to have thinned your paints, so that's half the battle won right there. They look like they could be thinned a little bit more though, and perhaps load your brushes a little bit less.
>
I did thin the paints with small amounts of water as that seems to be the golden rule from having lurked on this sub for a few days before starting my painting, the difficulty I had this area was not really knowing how much/little to thin them and what the consistency was supposed to look like(admittedly I did not watch any youtube videos on the subject as I didnt even think about it).
>The most glaring issue I see is a lack of colour depth. Your shadows aren't particularly prominent or seem absent in some areas and there seems to be a complete lack of any highlights.
>
This was exactly what I was thinking when I was painting them and this stems from looking at the box art and thinking "wow these figures really "pop" the colors are not at all what I would expect a command team to have" and while I was painting I kept telling myself they needed to be brighter. As for shadows and highlights, I did apply nuln oil shader but I watered it down so much that it doesnt even look like its been applied. I was concerened it would make the minis too dark(i.e. the Domaru's shotgun). As for the highlights, One of the biggest issues/concepts I am having trouble wrapping my head around is the highlighting. I have watched a few videos of the procedure itself but I am having trouble mixing paint to brighten it up for highlights and then where the highlights should be applied.
> Your neatness and thoroughness are pretty good. Could use a little work but fine for a beginner.
>
Thanks! I was actually working with a set of brushes that were recommended to me that ended up being sub par in my opinion and lacked the very small brushes that were needed to get some of the very fine details. I have started to educate myself on quality brushes and the sizing numbers on what they mean.
As for the color "blocks" that had not occurred to me so thank you for pointing that out, I will definitely keep that in mind for when I start working on the next group of my army. I am not quite sure how to get those subdued shades that are present on the box art but more practice will definitely help. Thank you again for your reply!
This was perfect for me to get started:
https://www.amazon.com/PointZero-Airbrush-Dual-Action-Guns/dp/B010TQCOEE/ref=sr_1_1?keywords=POINTZERO&qid=1567225880&s=arts-crafts&sr=1-1
I have a similar one looks like just the name on the side is different
PointZero Airbrush Dual Action... https://www.amazon.com/dp/B010TQCOEE?ref=ppx_pop_mob_ap_share
Heres a link to the airbrush kit I started with. I got good results with the 2 gravity feed brushes it comes with. Im still using the air compressor with the Iwata brush I upgraded to:
https://www.amazon.com/PointZero-Airbrush-Dual-Action-Guns/dp/B010TQCOEE/ref=sr_1_6?s=arts-crafts&ie=UTF8&qid=1517488015&sr=1-6&keywords=airbrush+kit
Personally, I like Tamiya branded supplies. Their kits have great details and Ill also use their masking tape, primer, and paints. I like acrylic paint in general since its easy to clean i.e. wash everything out in the kitchen sink with water.
For clear coating, Ive used testors dullcote and glosscote and had good results over Tamiya paint except for when I spray too much at once with the rattle can. For that reason Im thinking of switching to Mr. Color super clear so I can use it with my airbrush and have more control and a finer mist.
I use Microset & Microsol with my decals
Vallejo acrylic putty is easy to use. Model Master cement (for thicker more viscous applications) and Tamiya extra thin cement for the fine detail work. Tamiya line accent color (black or brown) for my panel lining. I wipe it off with testors enamel thinner.
For weathering pigments, MIG products work well or you can DIY by scraping artist pastels and using the dust created.
Finally, most of my small tools (knife, chisel/scraper, tweezers) are branded "excel". I think that is just the brand my local hobby store happens to sell.
There are of course many more options for materials/supplies that work great for modelling but this is just a sampling of the brands that I use on my kits.
I just got one and the thing is a piece of junk. I returned it and got a whole set of three really high quality airguns and a compressor for about 80 bucks. Here is the link for it btw: https://www.amazon.com/PointZero-Airbrush-Dual-Action-Guns/dp/B010TQCOEE/ref=mp_s_a_1_3?ie=UTF8&qid=1536461562&sr=8-3&pi=AC_SX236_SY340_FMwebp_QL65&keywords=airbrush
Seriously considering getting an airbrush since brush painting is my least favorite part of modeling lol. I have a large stand up compressor but it doesn't have a moisture trap. Price wise to get everything I need to use my current compressor I could get this set for a little less money. I'd get a better brush down the road if I I liked airbrushing but would this be a decent starting set or should I just save up a little more and hope I enjoy it lol.
https://www.amazon.com/gp/aw/d/B010TQCOEE/ref=mp_s_a_1_11?ie=UTF8&qid=1486139264&sr=8-11&pi=AC_SX236_SY340_FMwebp_QL65&keywords=airbrush
I'm not sure if it's the same knife set your talking about, but this set came up once and whoever bought it said it was junk. I'd always be leary if the exact same knife set was pictures under different brand names like this one is.
If you're on Facebook, join some carving groups and lurk. The ones that come up most frequently in the group I'm in are Mora or Morakniv, Opinel, and several smaller knife makers. There are others, but Moras always come up.
What are you interested in carving specifically?
E: Check out spoon carving, Greenwood working and sloyd on Facebook. Lots of equipment talk, projects, and inspiration. A lot of the members are in Europe/Eurasia and they are extremely gifted people.
это basswood (я так понимаю липа).
это фактически моя первая "серьезная" работа по дереву (легко убедиться, нагуглив "резьба по дереву домовой" и сравнив:) ), так что я наверняка что-то делала неоптимально. много времени ушло чтобы срезать лишние куски с бруса и получить примерные очертания, т.к. срезаешь ножичком по чуть-чуть. А сама резьба и детализация заняли ну часов 6 может. Сверху лак.
​
из инструментов у меня обычный набор для начинающих, вот такой. Хотя реально там 3-4 разных ножа использовалось.
Do people's backpacks really not have a pencil holder? Even my climbing bag has a place where you could at least sort of organize pens and pencils, and when I'm in a tree writing to me is about as useful as a DVD rewinder.
I don't know, I guess I don't understand pencil cases. If you don't have a backpack and want something slim then there's stuff like this and if you're going to carry a lot then there are bigger ones. I guess I just like to have a place for things, more than just "here's a sack full of stuff I use".
KUUQA Black Hard Pencil Case EVA Hard Shell Pen Case Holder for Executive Fountain Pen and Stylus Touch Pen https://www.amazon.com/dp/B01FZ9Q5WW/ref=cm_sw_r_cp_api_i_VK.ADb18QNCDX
I like it so far, it may be a little small for some collections, but it’s a good size for everyday carry
Kuuqa Black Hard Pencil Case EVA Hard Shell Pen Case Holder for Executive Fountain Pen and Stylus Touch Pen https://www.amazon.com/dp/B01FZ9Q5WW/ref=cm_sw_r_cp_apa_O41PzbAYMM8VR
I use https://www.amazon.com/VELCRO-Brand-ONE-WRAP-Double-Sided-Multi-Purpose/dp/B000078CUB for cable management and something like https://www.amazon.com/PERFECT-VISION-MOUNTING-SATELLITE-CT7BLK-MH/dp/B00XUYJZBI depending on the location.
I used to zip tie all the things, but hated having to cut a bunch just to add or remove a cable.
https://www.amazon.com/VELCRO-Brand-ONE-WRAP-Double-Sided-Multi-Purpose/dp/B000078CUB
I use the DAS that i had for the vive, ordered the 3d printed pieces to hook the pimax to it. Pimax face foam felt good but need the HMD around an inch or two more from my face. Used double sided velcro in between the face foam and HMD and it looks like it just might be enough.
https://www.amazon.com/dp/B000078CUB
If you are worried about tying knots (be safe! Have a knife to get out of it quick if needed), try Velcro straps. They work with just one wrap, no knowledge of knots needed, and easy to get someone out. They are also easy to buy at a local hardware store.
I find the upside-down, shin-mounted controller method the most natural for foot tracking too. I've had good luck with one inch velcro one-wrap. One strip between the trigger and closest sensor, and one higher up the leg/controller.
The Vive wand naturally wants to settle off the actual bone of the shin towards the outside of the leg and foot. This position also seems to be a little less prone to occlusion issues.
I'm going to pick up a pair of the flipsteady VCM1 controller mounts a user posted below since they look nice and sturdy.
Official lighthouse-enabled foot-tracking is probably on the way, but it's nice to experiment until then!
i'm confused. you need a portfolio for 1 print, or many prints. if they are 18x24 or smaller, this is the standard portfolio:
http://www.amazon.com/Itoya-Profolio-Storage-Display-Portfolio/dp/B00009R8XD/ref=sr_1_1?ie=UTF8&qid=1463415013&sr=8-1&keywords=18x24+portfolio
http://www.amazon.com/Itoya-Profolio-Storage-Display-Portfolio/dp/B00009R8XD
That and a the big portfolio folder for the overflow is great. This is the one I use. I have ~70 of them framed on the walls and another 30 or so in this.
https://www.amazon.com/gp/product/B00009R8XD/ref=ppx_yo_dt_b_search_asin_title?ie=UTF8&psc=1
you need one of these!
I only have so much space on my walls, I have about 25 frames posters up at a time and once I have to switch any out they go into this art portfolio I bought on Amazon. I'll have to buy another one after probably one more year of shows.
Looking for opinion on an airbrush to buy narrowed it down to these three.
Iwata HP-CS
Iwata Revolution CR
Paasche TG-3F
So, I saved up some money and have a break from school finally coming up. I see that alot of the badgers are decently priced (i think im going to stay away from the iwata as they are generally over 100). But is there a certain badger that you recommend? the one you originally linked seems like a good one, but is there any details with these other ones that you may have dealt with?
1)
2)
3)
[4)](http://www.amazon.com/Badger-Air-Brush-200-10-Gravity-Airbrush/dp/B003970D3U/ref=sr_1_31?ie=UTF8&qid=1456908816&sr=8-31&keywords=gravity+feed+airbrush
)
5)
Im sorry for sending a bunch of links, but i'd thought id ask and see what you may say :D
The Iwata Revolution is always on sale on Amazon. For $100, this airbrush is amazing. It's what I use day to day.
Further, you could go with the Iwata NEO. I've heard great things about this airbrush, though I've never used it. It's also on sale.
I bought one very similar to yours (the $50 version I believe). It broke on the second day of use :/
I think you would be much better off getting this one or this one. I have the Iwata Eclipse now, and it's good.
This is my setup, I'm happy with it.
https://www.amazon.com/Iwata-Medea-Revolution-Action-Large-Gravity/dp/B000BQS3UWhttps://www.amazon.com/Paasche-D500SR-Compressor-Regulator-Moisture/dp/B000BR2HOO
Additionally, a decent airbrush that is a little cheaper.https://www.amazon.com/NEO-Gravity-Feed-Action-Airbrush/dp/B004INERK4Something to keep in mind, is that the NEO is NOT made by Iwata. It's a Chinese airbrush with their name on it. But I've heard it's quite decent. Here's a video on it, and it's got a great video for learning to clean your airbrush in the description. https://www.youtube.com/watch?v=q8YKUA2SGzU
What about the Iwata Revolution. Seems to be halfway there is terms of price, but unlike NEO is actually manufactured in Japan (supposedly higher quality). That's what I as a beginner bought and I love it.
I have that Master Airbrush kit. You get what you pay for. It worked alright for a couple uses then crapped out on me. The compressor is still kicking though and I currently use it to power my Iwata Revolution, which has taken a couple months of heavy use like a champion so far.
Save your money you are like $100 bucks off getting a decent set up.
Edit: Let me elaborate on my reasons a little bit.
You want an air compressor with a tank and an automatic on/off switch.
This will keep your airbrush from getting pulsating air and the on/off switch will extend the life of your compressor (so will the tank as it isn't running all the time). Some added bonuses is being able to work without a lot of noise.
There are some cheap ones you can buy on amazon. ( TheTC-40T and the Master Tank Compressor)
Airbrushes are tricky. but you still can get soem good ones under $100. Like the Badger Krome RK-1, Badger 105 Patriot, Iwata Neo (Not made by Iwata but supported by them), and Iwata Revolution
http://www.amazon.com/gp/product/B000BQS3UW?psc=1&redirect=true&ref_=oh_aui_detailpage_o03_s00
I just bought this, and it's great for me. It has a .5mm tip which would probably be considered large - they're usually .3mm. That big honkin' tip means I can blow any paint through it with little or no thinning.
I also bought the Master starter kit for like $70 that comes with a working compressor and crappy airbrush. Honestly, if it could blow the glittery createx crap that I use it would have been perfectly OK for gunpla. My plan is to use this compressor until it burns up (reviews say it will). http://www.amazon.com/gp/product/B001TO578Q?psc=1&redirect=true&ref_=oh_aui_search_detailpage
Thanks for the info!
So now I'm look at the Iwata Revolution and TC-40T. Do you have any other recommendations for tanked compressors? How do you refill the airtank?
https://www.amazon.com/gp/product/B000BQS3UW/ref=ox_sc_act_title_1?smid=ACD4013XBS5C9&psc=1
https://www.amazon.com/gp/product/B00WBT7PTW/ref=ox_sc_act_title_2?smid=A23ADOZFIJNPFB&psc=1
You can trust me, I have [peel and stick googly eyes] (http://www.amazon.com/Peel-Stick-Wiggle-Eye-Sheets/dp/B000F8V66O/ref=wl_it_dp_o_pd_nS_nC?ie=UTF8&colid=8MQV9QDIDXV3&coliid=I1OT8LWIY47VG4) on my wishlist. I'll use them for sticking to everything and making the world a sillier place.
Seriously, though. I've had these on my wishlist for a long time and my plan has been to put them on a few robots we have at my work (I'm a research scientist). I promise to post video of them in action if I win!
128
These are things I bought that work great.
First, the stands;
https://www.amazon.com/gp/product/B003PEUA30/ref=oh_aui_detailpage_o01_s00?ie=UTF8&psc=1
Then the adaptor;
https://www.amazon.com/gp/product/B00X5QO3B8/ref=oh_aui_detailpage_o01_s00?ie=UTF8&psc=1
And finally the finishing touch for the headpiece;
https://www.amazon.com/gp/product/B000F8V66O/ref=oh_aui_detailpage_o07_s00?ie=UTF8&psc=1
That's everything you need. But yeah, get them high up, pointing down a bit, and make sure on sturdy flooring so as you're jumping around they don't carry the vibration over and judder.
http://www.amazon.com/gp/aw/d/B000F8V66O?cache=faa4de1ec5dce58f3e533641d9b80480&pi=SY200_QL40&qid=1405642276&sr=8-3#ref=mp_s_a_1_3
http://www.amazon.com/gp/aw/d/B00H9BEC8E?cache=faa4de1ec5dce58f3e533641d9b80480&pi=SY200_QL40&qid=1405642331&sr=8-1#ref=mp_s_a_1_1
http://www.amazon.com/gp/aw/d/B001QTXKB0?cache=faa4de1ec5dce58f3e533641d9b80480&pi=SY200_QL40&qid=1405642475&sr=8-1#ref=mp_s_a_1_1
You want to use flow aid to thin paints. This will dilute the color without thinning the paint.
To tell the truth, you'll want both as flow aid will make paint more glossy. You can either add matte medium or varnish it with matte finish to counteract.
It's probably the same thing, but the one I bought was: Flow Aid
Add a few drops of this to your paint
Iwata Revolution, Vallejo Paints. I have this exact problem. And I am just now heading out to the local hobby store to pickup some redarder if they have it in stock.
I will report back how that goes.
You need some of this.
https://www.amazon.com/Vallejo-Airbrush-Improver-200ml-Paint/dp/B00QD780G0/ref=sr_1_1?ie=UTF8&qid=1482515101&sr=8-1&keywords=vallejo+airbrush
Then maybe add a few drops of retarder...
https://www.amazon.com/Vallejo-VJ70597-Acrylic-Paint-Retarder/dp/B000PH9JP0/ref=sr_1_1?ie=UTF8&qid=1482515136&sr=8-1&keywords=vallejo+retarder
You're fine using brush on primers. I used some Vallejo primer after seeing your brush on post and liked it as well. On the topic of paint drying on the tip, Vallejo (and many others) have a product called acrylic retarder which specifically is made to extend drying time. People mainly use it to do wet blending. But it could help you as well. You'll want to start very small (like 20:1 or 10:1 water:retarding agent) and test it out to see how much is needed.
An example of what I'm referring to.
Vallejo Acrylic Paint, Retarder https://www.amazon.com/dp/B000PH9JP0/ref=cm_sw_r_cp_apa_3f3GzbXDFMQM7
Looking at the photos, I'd say that you need to thin your paints a little bit more on the GW figures. Two or more coats may be required to get full coverage, but your results will look smoother.
How's the humidity where you live? We're moving into the summer months and that can affect how quickly paint dries. If it's drying too quickly, it may pick up some extra brush strokes. And if that is the case, you can either thin it farther or add some retarder medium to your stand water. I use Vallejo's. A wet palette can also help.
Master Performance G22 Airbrushing System Kit with Master TC-20T Compressor with Air Tank, Air Hose & G22 Dual-Action Gravity Feed Airbrush https://www.amazon.com/dp/B0017640RK/ref=cm_sw_r_cp_api_jUvhAb1FG863K
It's that I also have cleaning fluid, thinning stuff, and a pot/stand. But that's pretty much it.
Master Performance G22 Airbrushing System Kit with Master TC-20T Compressor with Air Tank, Air Hose & G22 Dual-Action Gravity Feed Airbrush https://www.amazon.com/dp/B0017640RK/ref=cm_sw_r_cp_apa_AjwYAbM7FK796
this is what I started with, its a good deal not the best airbrush. I've since upgraded to a badger, but tge compressor still works 5 years later
Was this the kit?
https://www.amazon.com/Master-Performance-Airbrushing-Dual-Action-Airbrush/dp/B0017640RK/ref=sr_1_16?keywords=master+compressor&qid=1550267610&s=gateway&sr=8-16
I have this kit (more or less) https://www.amazon.com/Master-Performance-Airbrushing-Dual-Action-Airbrush/dp/B0017640RK
Definitely that compressor, and some similar Master branded airbrush. I'm lazy and inevitably end up fucking up the cleaning every few months and need to replace it, but at $26 it's not that big a deal. For a long time I just sprayed into a cardboard box near a window with a fan running, recently switched to one of the master branded spraybooths and while nicer, it's far from required.
The big issue with that compressor is that it is tankless so it is unlikely to give a good consistent flow of air. If you can I would save up a bit extra and get a compressor with a tank like this one. While it is a bit bigger it isn't that big being about the size of two 2-liter bottles staked on their side and is pretty easy to store.
I personally purchased a version of this kit a couple years back and while I have moved on to a better airbrush, I still use that same compressor.
This one and the one that comes with the air tank are on my amazon wishlist and I'm watching a ton of videos to make sure it will be a good fit for me.
Airtank airbrush
I use Master Airbrush stuff. I never used the super expensive airbrushes or whatever, and I don't plan on doing so when i can get a everything I need for a complete airbrushing solution for the price of just one airbrush.
I currently use this: https://www.amazon.com/Master-Airbrush-Multi-purpose-Professional-Airbrushing/dp/B006HJCP8S/ref=sr_1_9?ie=UTF8&qid=1478092330&sr=8-9&keywords=airbrush
However I wish I had gotten one with an airtank and not just a compressor, as the compressor is always running when I'm actually brushing.
I would recommend going with this:
https://www.amazon.com/gp/product/B0017640RK/ref=pd_sbs_201_3?ie=UTF8&pd_rd_i=B0017640RK&pd_rd_r=CS5PGKKXM5455B94V0DA&pd_rd_w=LpOU8&pd_rd_wg=rukUc&psc=1&refRID=CS5PGKKXM5455B94V0DA
It's the same as I am currently using, but comes with an airtank (And that's the lowest price I've seen for it).
If that is a little steep to jump in with, I started with this months ago:
https://www.amazon.com/Master-Airbrush-MAS-KIT-VC16-B22-Compressor/dp/B00BF0MW9G/ref=sr_1_1?ie=UTF8&qid=1478092330&sr=8-1&keywords=airbrush
And it has everything you need (minus paint) to get started, It's a great kit to get started, but the lack of a PSI gauge will limit you fairly quickly. And if you upgrade, the airbrush can still be kept moving forward.
I have a Master setup (mine came with different needles though,) and the brush is certainly decent for a beginner. However, I would recommend a combo with a compressor that has a tank (like this: http://amzn.to/2sTb0WB). Tanks help regulate the pressure and won't constantly run, like a tankless setup.
As for cleaning, like Jacers said, water is usually enough. You may want to pick up some airbrush cleaner to run through after a session, just to be thorough.
I second the Badger Krome series. I just started airbrushing as well and decided to purchase the Badger RK-1 Krome airbrush and it's been working great. A decent compressor for a decent price is the Master Airbrush Compressor. I have the one with the water trap but not tank (an oversight on my part), but even without the tank, it has a shutoff feature whenever you hit the set PSI. This is the one with the water trap and air tank: https://www.amazon.com/gp/aw/d/B0017640RK?psc=1
This is the thing I was talking about
If you can, buy yourself one of these, and some water based clay to get a hang on anatomy and positioning. Good luck!
No ar15 pics? Hows that tekmat, is it basically just typical mousepad material?
I use one of these: http://www.amazon.com/Alvin-Professional-Cutting-Green-Black/dp/B0025189VE/ref=sr_1_3?ie=UTF8&qid=1393819838&sr=8-3&keywords=alvin+cutting+mat
Looks like a cutting mat. Think this is it!
I agree with mr.godonut here. Also using a cutting mat has helped me.
Yeah, definitely. I got the Alvin 24"x18" mat and it's $17.66 and Amazon prime. I saw u/pexon had a huge one when he sent me photos of some cable ideas and thought it was perfect for keyboard stuff.
Buy a cutting mat mate:
http://www.amazon.com/gp/product/B0025189VE/ref=as_li_ss_tl?ie=UTF8&camp=1789&creative=390957&creativeASIN=B0025189VE&linkCode=as2&tag=goosgunblo-20
It'll stop your mother/girlfriend/wife from violently murdering you in your sleep for ruining a table.
Here's what I bought, comes in larger sizes as well. I soldered on it but its designed for cutting, if you were sloppy enough it might mar the surface.
Nice! It is all about starting slow and steady with a little bit of a hodgepodge of things for students to try. At our space we started seeing how much our students were not interested in electronics/robotics/high-tech stuff and were leaning towards design, art, and fabrication. So then we started investing resources and people in that direction. My absolute favorite thing we did was buy a MASSIVE sketchbook that became the community sketchbook for anyone to just draw, paint, or whatever they wanted in it. Filled it up in a little over a year and it is totally amazing.
https://www.amazon.com/Art-Alternatives-Hardcover-Sketchbook-Giant-Sketchbook-600/dp/B0025TZ30G/ref=sr_1_7?ie=UTF8&qid=1536696244&sr=8-7&keywords=sketchbook+hard
Oh and I'm getting these
http://www.amazon.com/Sketches-Making-Giant-Hardcover-Sketch/dp/B0025TZ30G/ref=sr_1_2?s=arts-crafts&ie=UTF8&qid=1418088587&sr=1-2
http://www.amazon.com/Sakura-Pigma-Sensei-Manga-Drawing/dp/B001463RWW/ref=sr_1_6?s=arts-crafts&ie=UTF8&qid=1418088761&sr=1-6
Thankfully my birthday is this saturday and christmas is coming up too, so I should get enough money to buy all of these.
Its hefty for sure. Traveling with this thing is going to be challenging although the 75 lbs (110 gsm) is the paper weight not the shipping weight.
Looks like amazon.uk has an option Big Book
Hope that Helps!
Got a cheap one: https://www.amazon.com/dp/B002KSQHB6/ref=cm_sw_r_other_apa_i_5M-GDbKX1X3P9. Works fine for me, but I'm still pretty new to it. Nice for priming (with the 0.5 tip) and basecoating at least.
I prefer this one. I recently upgraded my compressor to this one from the 80 USD one and do not regret it.
Oh great wizards of plastic! Newb airbrushing question. I am stuck on trying to decide which is more worth it for gunpla. I have found these two are decently off, but one comes with a few extras. I just do not know if the extras are needed for the extra price. Here are exhibit a and exhibit b. What do you lot think?
I got this one off Amazon: Gravity Feed Multi-Purpose Airbrushing System Kit with a Pro Set G222 Master Airbrush with 3 Nozzle Sets (0.2, 0.3 & 0.5mm Needles, Fluid Tips and Air Caps) - Powerful Compressor with Air Storage Tank https://www.amazon.com/dp/B002KSQHB6/ref=cm_sw_r_cp_api_i_ES-QCbZCKBJE9
Worked really well, glad I got the one with the tank!
its a master. i bought the kit off amazon ,
its this set
https://www.amazon.com/gp/product/B002KSQHB6/ref=ppx_yo_dt_b_asin_title_o08_s00?ie=UTF8&psc=1
https://www.amazon.com/gp/product/B002KSQHB6/ref=oh_aui_detailpage_o03_s00?ie=UTF8&psc=1#customerReviews
This is the model I use! I'm not sure where you're located -- but I use the Master Airbrush G222 and my airbrush is dual action
How does it compare to Tenacious Tape? https://www.amazon.com/Gear-Aid-Tenacious-Fabric-Repair/dp/B005BLQTEE
The problem is the water. They aren't meant to be filled with water. Otherwise, you would use something like this https://www.amazon.com/Gear-Aid-Tenacious-Repair-Fabric/dp/B005BLQTEE
Tenacious Tape may work well for this repair.
Also, do you find that your heels are slipping when you run? There has to be a reason for the premature material failure...
I was recommended this stuff https://www.amazon.co.uk/McNett-Tenacious-Tape-Fabric-Repair/dp/B005BLQTEE/ref=pd_lpo_200_bs_tr_t_2?_encoding=UTF8&refRID=JE4Y4RXE3TRKTR73BV46 by Mark from IR -- apparently it's pretty bomber.
This may be an easy fix for you.
https://www.amazon.com/Gear-Aid-Tenacious-Fabric-Repair/dp/B005BLQTEE/ref=pd_lpo_200_bs_t_2?_encoding=UTF8&refRID=WD6WP7TXEVH39VR0D4WA
http://www.amazon.com/Illuminated-Jewelers-Loupe-40x-25mm-Lighting/dp/B007GJJRZC for those interested.
Poppy seeds
A jeweler's loupe for admiring your dank weed
There are some videos on r/lsd, I think, of someone who combined these two trip toys. It ends up looking pretty cool. http://www.amazon.com/Creative-Motion-12665-1-Laser-Sphere/dp/B003150CFO // https://www.amazon.com/dp/B009S3IBI8/ref=cm_sw_r_cp_awd_jq4xwbNWTAEY9
1500 lady bugs
Edit: here's a video of those two projectors together https://youtu.be/1LSuhEAC3u0
This looks right to me. The corners look more real than most of the fakes i see imo. For more information on some fakes check out my post here. It needs some damn upvotes though for awareness ha
http://www.reddit.com/r/magicTCG/comments/30a4xa/what_are_all_of_the_different_fakes_you_all_are/
but ya, definitely get a loupe like this one which also works well for the light test
http://www.amazon.com/Illuminated-Jewelers-Loupe-40x-25mm-Lighting/dp/B007GJJRZC/ref=sr_1_3?ie=UTF8&qid=1427465874&sr=8-3&keywords=jewelers+loupe+led
This 40x Loupe from Amazon does a fine job. I chose it because it had a really big lens (25mm), two bright white LED lights, and enough magnification (40x) to really see the tricones. I hold it up to my iphone camera lens and easily get enough detail to tell me everything I need to know. Oh yea, it's dirt cheap too - about two fiddy. Here is a sample image taken today.
Has anyone tried to use silicone rubber to fix this? Would probably require someone making a mold from an intact Pebble 2 out of Sugru or a 3D printer then pouring the silicone rubber material into the mold. The only thing is that I'm not sure how you could 'glue' the new buttons onto the side of the watch. Here's the link to the silicone material: https://smile.amazon.com/dp/B00EOA25X2/
Just bought it for myself on my wicked edge. In case anybody wants a link here it is
I haven't been able to find out what material the lens itself is made of. But they seem to be convensional lens material such as you'd find in eyeglasses (although far thicker (14mm I believe) and convex.
You'll need something reasonably abrasive to remove those scratches. You could start with toothpaste (the whitening paste stuff, not the gel) as a cheap initial test. And lots of buffing.
I guess you could move on to more abrasive stuff. One thing to possibly consider is Diamond Paste. It comes in different levels, just as sandpaper does. You start with the thicker stuff buff it in and move down to the lowest micro thickness, Now, this might be a little bit OTT (this stuff is used by jewelers to remove scratches from incredibly scratch-resistant sapphire crystals on things like Rolex watches and the like and they'd buff out the scratches with a Dremel or a different electric polishing tool or similar) but with enough care and attention it would certainly remove the scratches. But you'd have to know what you're doing. Basically, you're removing layers of the lens so it's actively damaging the lens.
Start with the toothpaste option. See if that makes any difference.
Thanks I'll try these things. I have a couple of questions:
How should I clean it with a toothbrush? The watch looks gold, some people say on the website to clean watches with white toothpaste and a toothbrush - do I have to worry about it being "gold" on the outside (maybe somehow gold can get damaged with certain chemicals)
I'm not so sure about what to do with polishing the glass. I found a paste on amazon. It seems with some googling that I'll need some sort of mechanical polisher to polish the glass.
Here's the paste I found:
https://www.amazon.com/Diamond-Lapping-Polishing-Compound-microns/dp/B00MALWGBI
My AR9 did this until I dremelled a feed ramp at the 6 oclock position and then polished it out with some 60000grit nanodiamond compound. Now it's got a mirror finish, and no more feed problems, even with widemouth 147gr HPs. I don't know why AR9 barrels don't have more pronounced feedramps.
Here is the original ballistic advantage profile. Other manufacturers use this profile too, here's Spinta Precision. I found my 147grs were hitting the barrel face at 6oclock, there's a lip there on AR barrels that is usually a ramp in 9mm handguns. I corrected this by starting with 200 grit sandpaper cut in to a small strip and taped to a Sharpie. I spent about a half hour going through a bunch of strips to get my initial groove going, paying careful attention to work the grit on the lip and not the chamber. Afterwards, I used a dremel tool with felt polishing cones and lapping compound to smooth out the sandpaper's work. Here is my end result.
Testors Matte spray, I assume? You said I should do matte followed by gloss, but I read that I should do gloss (for durability) followed by matte (for non-shiny appearance). Which is best?
I may have to go with Vallejo paints if I can find them, as they're frequently recommended and come in droppers (which I think will be less fuss).
I read that cheap brushes will be more frustrating than they are worth, and since my free time is scarce, I planned on using nicer brushes. What would you recommend for a cheap brush set that's not a pain in the ass? Something like [this on Amazon, $15] (https://www.amazon.com/Detail-Paint-Brush-Set-Watercolor/dp/B010QLOJ3G)?
I'll post it here, so others can see.
Paint: Miniature Painting Kit with Bonus... https://www.amazon.com/dp/B01MTXRUUT?ref=yo_pop_ma_swf
Brushes: MyArtscape Detail Paint Brush Set -... https://www.amazon.com/dp/B010QLOJ3G?ref=yo_pop_ma_swf
Printer: Monoprice Mini Delta 3D Printer With... https://www.amazon.com/dp/B07CJQ3D6L?ref=yo_pop_ma_swf
Thanks for the recommendations
After finding no hobby store with paint near me, I finally pulled the trigger on $22 red spray primer, $39 paint set, and $14 brushes on Amazon. Thankful that this game is so cheap at $75 because the paints really kicked it up!
I looked at a lot of reviews, if anyone is curious:
https://www.amazon.com/gp/product/B010QLOJ3G/ref=oh_aui_detailpage_o00_s00?ie=UTF8&psc=1
https://www.amazon.com/gp/product/B01AC4LATI/ref=oh_aui_detailpage_o01_s00?ie=UTF8&psc=1
https://www.amazon.com/gp/product/B004EKCOE2/ref=oh_aui_detailpage_o00_s00?ie=UTF8&psc=1
Looking to get my first air-brush kit so I can start to do proper paint jobs. I found this on Amazon and was wondering if the community thought this would be a good starter kit?
https://www.amazon.com/dp/B010TQCOEE
I found a kit on amazon for around 80 bucks. It came with a compressor and three types of airbrushes.
PointZero Airbrush Dual Action Airbrush Kit with 3 Guns https://www.amazon.com/dp/B010TQCOEE/ref=cm_sw_r_cp_apip_8mMivZb67PArw
It's not top quality, but I've been happy with it, and it comes with a DVD that has tons of useful info for a beginner on it.
What are your thoughts on something like this? https://www.amazon.com/dp/B010TQCOEE/ref=cm_sw_r_cp_ep_dp_Pc.LzbPHQ3Z47
Thinking for a beginner to get their feet wet, and have a few junk(?) brushes to learn on so you don't have to worry about totally screwing up one of the $100+ airbrushes?
Is this a good set up sir? PointZero Airbrush Dual Action Airbrush Kit with 3 Guns https://www.amazon.com/dp/B010TQCOEE/ref=cm_sw_r_cp_apa_i_frLPCb08VJ4FC
Hey man, I've been using the air compressor from this for over a year and it performs admirably: https://www.amazon.com/gp/product/B010TQCOEE/ref=ppx_yo_dt_b_asin_title_o07_s01?ie=UTF8&psc=1
​
Only downside is that it's slightly noisy but It has an adjustable pressure and works very well for the price. I personally use a PSI of 30 or so but if you wanna be a cowboy and use 50 you certainly can.
https://www.amazon.com/Gimars-Carbon-Steel-Carving-Tools/dp/B01FGZIVD6/ref=zg_bs_8090896011_1?_encoding=UTF8&psc=1&refRID=WM76TCS0NX15BPYE7770
Ideally you need something like this: http://www.essdee.co/products.aspx?cat=sets
But ordinary knife or "wood carving kit" like this: https://www.amazon.com/Gimars-12-Set-SK5-Vegetables/dp/B01FGZIVD6/ref=zg_bs_8090896011_1?_encoding=UTF8&psc=1&refRID=NMAH7T3D173073ENXREP would be ok.
Some tools will need sharpening, but most of what I've used, even cheap ones, were "make one wrong move and cut your finger" sharp from the box.
"for rubber, small pumpkin, Soap, Vegetables and more "
In order of purchase, here's where I started:
BeaverCraft Carving knife
Strop
Detail knives
Flexcut Cutting knife
Flexcut Detail knife
Mora 106 carving knife (upgrade from the beavercraft)
I started in November last year after getting some wood carving gifts for my birthday. I had never even attempted it before, but I've now found a life long passion hobby. Below are the links to all of the things I was given for my birthday. It's not fancy at all, but it's also enough of a good investment that you can tell if carving is for you without breaking the bank. In all it's around $30. Also, https://bit.ly/2JPID0Z. This article has information on understanding wood grain, something that is insanely important to making the right cuts. The important thing I've found is when you are making your cut, make them small and shallow. Even if you're looking to remove a lot of wood. You will end up digging in too deep and ripping an irrecoverable chunk out of your block if you're too heavy handed with it. Just go with the flow and take your time. But, most important of all...post everything you make here. This community is so friendly, honest and helpful you only stand to improve by sharing your progress!
https://amzn.to/2JS2DjC - Wood Carving tools
https://amzn.to/2qAG364 - Basswood mixed size bag
https://amzn.to/2H7TPYY - 20 minute Whittling Projects book.
P.S Good luck if you do take it up! Go create!
They're small enough that you could put them next to some pens in your bag and they wouldn't even notice. But I don't even bother. I keep my battery and like four or five different carts in a little zip up case and just toss that into my bag. The only time I haven't is when I go through OKC. But I've never been hassled otherwise.
I have that exact case, its actually in stock.
Link: https://www.amazon.com/Pencil-Holder-Executive-Fountain-Stylus/dp/B01FZ9Q5WW
Tikteck A4 Ultra-thin Portable LED Light Box Tracer USB Power Cable Dimmable Brightness LED Artcraft Tracing Light Box Light Pad for Artists Drawing Sketching Animation Stencilling X-rayViewing https://www.amazon.com/dp/B01M26S3VY/ref=cm_sw_r_other_apa_i_t5j7CbVYHR58V
Got something like this for my classroom.
I also said that you could "get away without the extra torso", so save yourself the re-draw if you're happy with it, just work on the arms.
I know that it's a couple extra bucks, but some tracing paper and/or a light box might really help with revisions. You can get them at any art store.
https://www.amazon.com/Artists-Tracing-Sheets-Translucent-Sketching-Lightweight/dp/B0788K7D3K/ref=sr_1_13?ie=UTF8&qid=1525955462&sr=8-13&keywords=tracing+paper
https://www.amazon.com/Ultra-thin-Brightness-Sketching-Stencilling-X-rayViewing/dp/B01M26S3VY/ref=pd_sim_229_4?_encoding=UTF8&pd_rd_i=B01M26S3VY&pd_rd_r=45M3ZZWCPYYH9E7AWSEC&pd_rd_w=ZPgFf&pd_rd_wg=UYM5X&psc=1&refRID=45M3ZZWCPYYH9E7AWSEC
I recommend this https://www.amazon.com/gp/product/B01M26S3VY/ref=oh_aui_detailpage_o09_s00?ie=UTF8&psc=1
I bought it for class and has been working great for me.
Thanks for the suggestions! She actually got a disappearing ink pen recently and was pretty pumped about it. I don't think she has a magnetic needle holder, so I'll look into that!
I was also thinking a light box, she mentioned she wanted one but I don't know if there are any differences based on the material being traced. This was the model I had in mind: https://www.amazon.com/gp/product/B01M26S3VY/ref=crt_ewc_title_huc_1?ie=UTF8&psc=1&smid=A21H40ERIBU45K
Gore-Tex should work, I used one on a pair on snowboarding pants about 8 years ago and the patch is still holding strong through 5 or 6 washings. I don't see why it wouldn't work on a sleeping pad. I actually carry one in my repair kit out on the trail for a sleeping pad or rain jacket/pants haven't used it yet on those items but I know it worked damn well on my pants.
EDIT: Hmm, I think the gore-tex I linked and the Tenacious Tape are the same thing just under different names?
They look the same and both are made by gear aid, the gore-tex package says "Tenacious Tape". Now I'm curious, might have to do some tests.