(Part 2) Best power & hand tools according to redditors
We found 31,293 Reddit comments discussing the best power & hand tools. We ranked the 12,060 resulting products by number of redditors who mentioned them. Here are the products ranked 21-40. You can also go back to the previous section.

![Gerber EAB Lite Pocket Knife [31-000345],White](https://m.media-amazon.com/images/I/31bWx-pet3L.jpg)


In case you haven’t bought it yet.
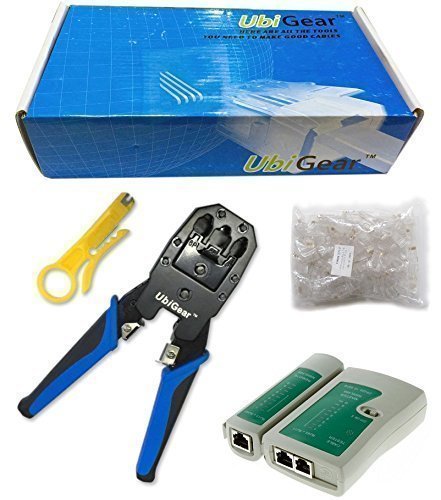
Read through the links before you add anything to your cart, the tools at the top are what I personally use and can vouch for, the tools at the bottom are in kits and case save you some money if you only do this once in a while but I can't vouch for the quality. I'm also assuming you own a wire stripper.
Crimping tool(17$):
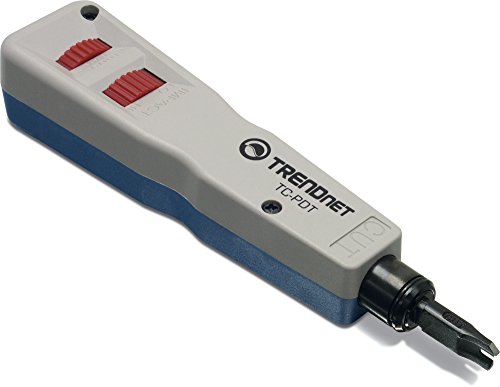
TRENDnet 8P/RJ-45 and 6P/RJ-12, RJ-11 Crimp, Cut, and Strip Tool, TC-CT68 https://www.amazon.com/dp/B0000AZK4G/ref=cm_sw_r_cp_apa_piZVAbZZVWPM7
Has a built in perfect cut wire strippers
Connectors(9$):
Cybertech Cat6, Cat5e RJ-45 8P8C Ethernet Modular Crimp Connectors Plugs Pack of 100 https://www.amazon.com/dp/B00LG6DQUI/ref=cm_sw_r_cp_apa_YiZVAb72959BY
Cat5e Cable(25$) (200ft, pre-made but you can clip and make your own out of it)
200FT Feet CAT5 Cat5e Ethernet Patch Cable - RJ45 Computer Networking Wire Cord (White) https://www.amazon.com/dp/B071XBHM6Y/ref=cm_sw_r_cp_apa_RkZVAbZ8D2F00
The cable is actually not that good of a deal because you can get 1000ft for 50$ without any ends, but I was aiming for sub 50$.
Total cost: 51$
Additional extras I'd recommend:
Cable tester(8$) tests if the cables and connections you made are good. A great investment for beginners and pros)
Zoostliss Network Cable Tester RJ45 RJ11 RJ12 UTP LAN Cable Tester Networking Tool https://www.amazon.com/dp/B06XZYXN63/ref=cm_sw_r_cp_apa_tnZVAb616Y59H
Cable boots(6$) protect your cable ends from having the tips broken and looks cleaner IMO
uxcell 100 Pcs Soft Plastic Ethernet RJ45 Cable Connector Boots Cover https://www.amazon.com/dp/B00K82RNX2/ref=cm_sw_r_cp_apa_qoZVAb54MHXCJ
They also have combo kits like this that exist, I can't speak to their quality but the tools are simple tools so this may save you some scratch
>UbiGear Cable Tester +Crimp Crimper +100 RJ45 CAT5 CAT5e Connector Plug Network Tool Kits (Crimper315) https://www.amazon.com/dp/B008UY5WL0/ref=cm_sw_r_cp_apa_hqZVAb8RM9GVK
Has the tester and everything, includes a wire stripper which is nice
>Maxmoral 7 in 1 Cable Tester + Crimp Crimper + Wire Stripper + 50 RJ45 CAT5 CAT5e Connector Plug + 100 Cable Ties + 100 Cable Cord Holder Clips + 2 Ethernet Connector Network Tool Kits https://www.amazon.com/dp/B01J7S5X6Q/ref=cm_sw_r_cp_apa_VrZVAb10QP91E
Same deal, has boots though.
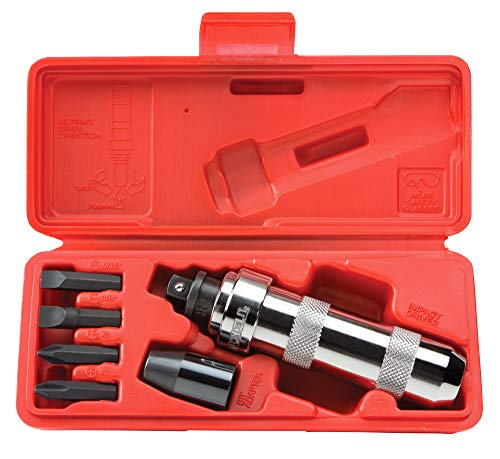
Impact screwdriver. Note: I'm thinking the one that you hit with a sledge, not the one you'd use to install drywall screws or something..
This is one of many examples. Be aware that they can also usually be used for TIGHTENING, so make sure it's set right before whacking it.
https://smile.amazon.com/TEKTON-2905-8-Inch-Manual-7-Piece/dp/B000NPPATS/ref=sr_1_3?crid=3Q0ZTN8MJTHOX&keywords=impact+screwdriver&qid=1558795291&s=gateway&sprefix=Impact+sc%2Caps%2C148&sr=8-3
Also comes in handy for removing Honda brake rotor screws!
>So I've given up and have booked it in to the workshop, but I just hate how I cant seem to accomplish the simplest of mechanical tasks, I'm really just venting here. fuck my useless mechanical ability, I just ruin things like screw heads when I try >:( >:(
Few pointers from a guy whose been wrenching for a long time:
So what do you do?
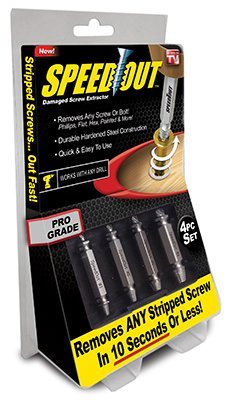
For those soft screws that love to strip: You use an impact screwdriver to break it loose and/or a good creeping lubricant to break the rust (PB blaster, Kroil).
Once you munge a screw up badly, you will need an extractor set. I recommend you learn this skill by deliberately ruining a few screws that yo have screwed into a board and use the set to get them out.
Here is one example of an extractor kit:
http://www.amazon.com/SpeedOut-Damaged-Screw-Extractor-Bolt/dp/B00IRL3WP4/ref=sr_1_1?ie=UTF8&qid=1414453572&sr=8-1&keywords=screw+extractor
My advice to you:
EDIT: Thanks for the gold, whoever sent that. Totally unnecessary but I appreciate it and gold helps reddit avoid selling out completely to advertisers. Cheers!
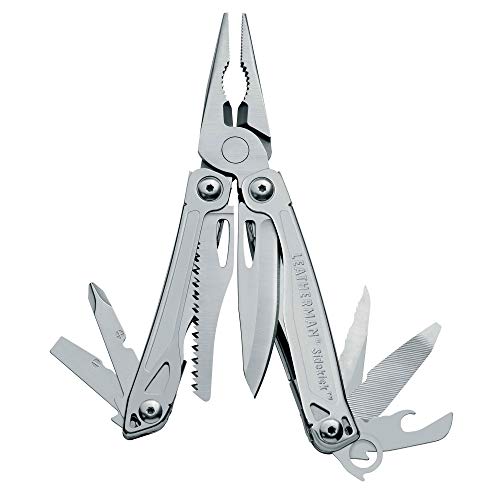
[Just get a Leatherman and be prepared for anything] (http://www.amazon.com/Leatherman-831429-Sidekick-Multi-Tool/dp/B005DI2QTC/ref=sr_1_3?s=power-hand-tools&ie=UTF8&qid=1450973126&sr=1-3&keywords=leatherman)
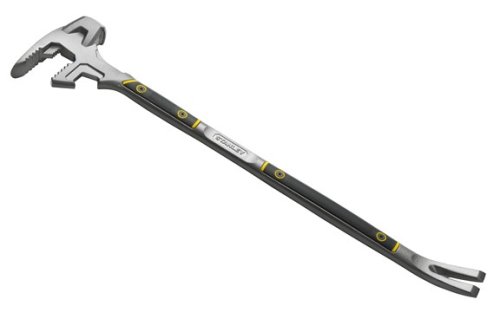
Have you bought a crowbar yet? If not may I suggest the Stanley FatMax Xtreme 55-120 FuBar III - yours for only $79.90, a saving of 9 cents on the recommended retail price - and this item ships for FREE with Super Saver Shipping.
You never know when it may come in useful...
It you are mechanically inclined, brakes are an easy way to save money. Watch a video for your specific car before attempting though. Some times that rotor is held on with the rusted phillips screw from hell, and you don't want to attempt removing that without the right impact tool.
>He mentioned that your armies go obsolete like every 2 years! Is this true?
No, not really. New rules will come out every few years, which may force you to alter the roster of models and wargear you’re fielding, but models are almost never written out of the game.
>Should they just start with A Start Collecting Pack?
Yes. Start Collecting packs are fantastic.
>This pack would be a 500pt or 1000pt?
Start Collecting packs are closer to 500 points. There isn’t an exact point number because you can change the number of models in a squad or give them different wargear.
>Co worker also suggested taking them both to GW to see if they can even get their head around playing the game as the rule book is pretty intense…
Yeah, going to a game shop and having someone experienced walk you through the game is a pretty good way to get a handle on the basic rules. GW shops love new people, although they tend to be very pushy salesmen.
>Or should they get a Rule book to read. Then their codex. One wants Necrons the other Dark Eldar. And then decide on a 1000pt army and start buying/building/painting etc?
I’d say see if a game shop can give them a demo first before you commit to models and books. This stuff is expensive.
Don’t worry about what a 1000 point army is. It takes time to get there. I say…
(Also don't let them buy new boxes unless the ones they have are already built.)
Good luck!
You want multifunction? Stanley (the tool company) makes a line called "FUBAR". Crowbar meets sledgehammer. http://www.amazon.com/Stanley-FatMax-Xtreme-55-120-FuBar/dp/B000VSSG3O/ref=sr_1_2?ie=UTF8&qid=1344489238&sr=8-2&keywords=Stanley+fubar
Awesome name too.
Words to get killed by.
Seriously...
"Organize before they rise" - Being prepared is one thing, but organizing some sort of zombie-fighting, apocalypse-surviving group of people are only going to make you seem like a bunch of idiots. Not to mention you'll most likely worry your life away about something that will never happen. It's better to just be prepared for any kind of natural disaster/civil uprising... that way you've pretty much got everything covered.
"They have no fear, why should you?" - Because if you aren't scared of an undead horde of flesh eating zombies that want nothing more than to tear you limb from limb and eat you alive... then you've got a serious mental disability and you probably won't last long.
"Use your head, cut off theirs." - Except that a decapitated zombie head is still dangerous if you are talking about Romero zeds or even Brooks zeds. Better to crush the skull and/or destroy the brain. And better to use something that has a better-than-arms-reach length.
"Blades don't need reloading." - True. But they do need sharpening. Better to save your blade for when you actually need to cut something and bash in their brains with something that is designed to do a lot of smashing, such as a good long framing hammer, war-hammer or a mace. These things exist and are MUCH easier to find than Brooks' mythical "Monk's Spade". Besides, it takes almost no training whatsoever to swing a hammer/mace type bludgeoning weapon.
"Ideal protection, tight clothes, short hair." - Only really works if they actually get their hands on you. For that matter, a leather jumpsuit and a helmet would serve you better. They can chew on the leather while you bash their brains in.
"Get up the staircase, then destroy it." - Seriously, this is one of the most idiotic things I've ever read. First of all, do you have any idea how incredibly hard it would be to destroy a staircase in most modern homes or apartments? Impossible. And even if you could, then you are trapped upstairs waiting to die of hunger or dehydration? Might as well lock yourself in the tool shed or jump off a bridge. The best way to get away from the unstoppable hordes of the living-dead is to KEEP MOVING. No "fortress" is ever safe, especially from Romero-type zeds because anyone in your group that dies will come back as a zed... then you are trapped inside your "fortress" with one.
"Get out of the car, get onto a bike." - This may work for a congested city area, but once out of the city, I'd much rather be in a large truck... with maybe a bike rack on top. Like I said, you're gonna want to keep moving and getting away is your best option. Unless you bike on a constant basis, You're gonna get tired as hell after a few miles, then you are gonna have to stop to catch your breath and drink lots of water. Not that great of a scenario in any kind of populated area.
"Keep moving, keep low, keep quiet, keep alert." - This is the first thing he's said that's made any sense to me.
"No place is safe, only safer." - Again, this is actually good advice. As I said above, No "fortress" is 100% safe in a Romero-style zombie situation.They will eventually find you because they NEVER stop. And if someone in your group dies. They're a potential zed.
"The zombies may be gone, but the threat lives on." - True. Especially in a Romero-type zed situation. Nobody knows what causes it, but anyone who dies from then on becomes a zombie. Friend, family member or not. It never ends as far as I've ever seen.
If you want a weapon that is perfect for cracking skulls, but is still a wonderfully handy tool at the same time... pick yourself up one or two of THESE... and a box of nails. That way you have a formattable weapon and a great tool for either getting into places or boarding them up for defense if you need to. They also make a smaller one, which is easier to handle. And a longer one, which has a better reach and greater leverage. I have used all three for demolition work and I can attest to their brutality.
And if anyone ever finds a "Monk's Spade" and a Shaolin monk that will train you in it's use , let me know.
I used to carry a multi-tool in school and used it quite regularly. I pulled splinters, scraped dried glue and gum from desks, tightened eyeglass screws, pried open battery compartments, fixed wobbly tables, opened cartons of paper that were wrapped with heavy plastic strapping...
I use my Leatherman just about every day, and I go through a utility blade on my Gerber EAB every other week.
I don't think it's reasonable to prohibit students from carrying a tool with a nail file, tweezers, multiple screwdrivers, scissors, pliers, wire cutters, can opener or a saw, simply because that tool also has a piece of metal honed to a fine edge.
For anyone over the age of 8, knife bans are utterly ridiculous.
Go to your local hardware store and buy a screw extractor kit or a left hand drill bit, they're cheap and easy to use(i'll put an example at the end of the comment) punch the screw um the middle and with the extractor kit(instructions should be included) or with a left hand drill bit just drill ir out, it should come right of, i used the following kit to remove a broken crankshaft pullei bolt with success:
https://www.amazon.com/Ontel-SpeedOut-Damaged-Screw-Extractor/dp/B00IRL3WP4/ref=mp_s_a_1_8?keywords=screw+extractor+kit&qid=1574073325&sprefix=screw+extracto+kit&sr=8-8
If you have any other questions, ask, im here to help.
I know it's a little late now, but for future reference these work amazingly well: https://www.amazon.com/Ontel-SpeedOut-Damaged-Screw-Extractor/dp/B00IRL3WP4
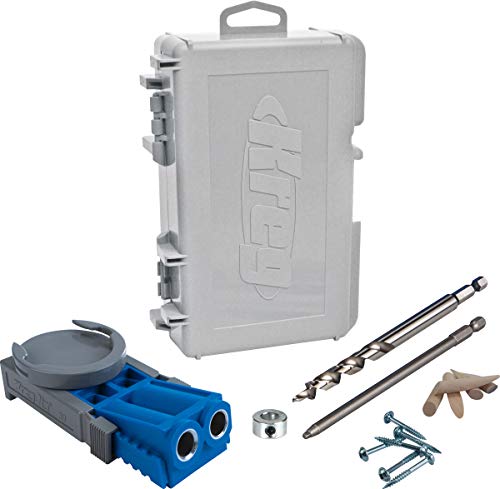
Woodworking - the barrier to entry can be intimidating at times but in reality you can build a good amount of projects with a saw and some screws. Lots of people make impressive things using just a Kreg Jig and Skilsaw
don't worry dude, the other 99'11" of this line is still good, no need to rip it out
Something like this https://www.amazon.com/UbiGear-Crimper-Connector-Network-Crimper315/dp/B008UY5WL0/ref=sr_1_3?ie=UTF8&qid=1518894673&sr=8-3&keywords=ethernet+kit&dpID=51DjZejC9oL&preST=_SY300_QL70_&dpSrc=srch should have everything you need for under $15 - will sort you out perfectly.
It took me about 20 minutes to learn to use the tools, and now whenever I need a short cable I can just make one. Boot split and frayed? Who cares, I'll just replace that bad boy, no throwing out the entire run for me. Drilling through a wall to feed a cable outdoors, how will the plug fit? No problem. So convenient as a future-proof ability to have under your belt.
Unsurprisingly, excellent instructions for dummies like me are incredibly prolific on the internet, including lots of great YT videos
As others have mentioned the interference from multiple unshielded cables right next to each other will be slowing your entire network down right now (loads of dropped packets and failed attempts), so I agree this is more /r/techsupportgore than MacGyver. Fix this right and everything will be significantly less laggy, plus you only gotta buy cheap tools once and then you're set to be able to make incredibly low price Ethernet lines wherever you live for the rest of your life
well, rj45 plugs and a crimping tool.
something like this.
Do check the outlets if they have been wired properly. Mostly they are color coded and should be either in A or B variable. Wikipedia has a list of how they should be put into the connector.
After that connect everything to a switch and it should all work automagically. But this entire setup seriously looks like someone wanted to link multiple phones to one number so I will say you need to check every last wallmount to see if and how they are wired.
Even if it's something basic, you'd be surprised how useful it comes in.
I keep one of these on my keychain at all times.
Fat wrench is the best thing ever. Amazon
If you enjoyed the process of making this and see real value in the higher quality results compared to buying flatpack particleboard furniture...
For you next one you night consider buying specialty plywood that comes with a nice hardwood veneer on one side (oak, maple, walnut, cherry, etc). You could also buy a cheap pockethole jig and build a hardwood face frame for the front (for fun). But as long as it's not getting really beat on, the veneer edge banding lasts pretty well.
Typical Gig Bag:
https://imgur.com/a/MfXGy
These are small, cheap(ish) products with a lifetime guarantee and a good track record:
Merkur Safety Razor, $20
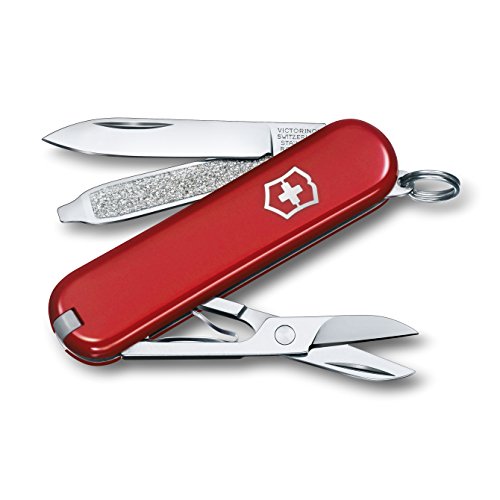
Victorinox Swiss Army Knife, $13.39
Leatherman Multi Tools, $20-Infinity
Darn Tough Socks, ~$20
Saddleback Leather Wallets, $40-infinity
Buck 110 Hunter, $30
That... That's actually kind of terrifying.
I'd suggest going into the Apple store to see if they'll do anything. They have been known to replace computers out of warranty. Just tell them what you told us and hope for the best, I guess.
If that doesn't work out, you need to decide wether or not you should replace it with something else. This could be based on the specs of your computer. Does it run slow? Is it not doing what you need it to do?
If you're not happy with its performance anymore, I'd suggest going to a MacBook Air if you want to go portable. But if you just need it to work as a media center PC like your current MacBook is, just get a Mac Mini.
If you just want to replace the battery, check Amazon or your local hardware store. They're likely to have the screwdriver you're looking for. As to size, you'd be looking at a Tri-wing Y1, according to this article. The battery can be found all over the internet from plenty of reputable sources.
There is a sleazy furniture donation place around the corner from me. People are constantly dumping the furniture that they won't take in the dumpster behind my apartment. I bought this bad boy and go to fucking town on that shit when I'm stressed out. It will absolutely melt a coffee table.
I just pulled out a tiled floor in my kitchen last night. I got lucky because they stapled down a 1/4" sheet of plywood and tiled to that as opposed to nailed/screwed down concrete board. All I had to do was get my FuBar under the plywood and all of the tiles popped easily.
The real bitch with tile removal is carrying it all out to the dumpster and the chips/shrapnel. $1 psf is a bargain for the demo price. For a project as big as yours, it's something to seriously consider paying for.
This is a pretty popular one. I don’t have it but I’ve heard it works real well.
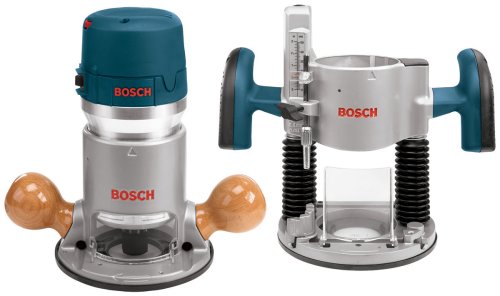
Bosch 1617EVSPK 12 Amp 2-1/4-Horsepower Plunge and Fixed Base Variable Speed Router Kit with 1/4-Inch and 1/2-Inch Collets https://www.amazon.com/dp/B00005RHPD/ref=cm_sw_r_cp_api_sFIhAbT4DKK1X
Study ohm's law and battery safety. If used improperly, mech mods can become a pipebomb.
That being said, here's a list of stuff you should get.
Can't really tell from this picture, but alot of times, it looks like ethernet, but it ends up not being terminated correctly, or setup for something like voice only or some other non-standard thing.
If it were me, I'd make a small investment in the following;
If you are lucky, whomever setup that panel wired it correctly, and the runs will test out. If you are not lucky, you'll need to take the next step and fix it yourself. This will require some more stuff;
There are many tutorials on the web on how to terminate Ethernet - essentially, you're going to need to make sure that the wires are terminated properly on the punch panel (in your living room) to the specifics on the keystone jack at the far end. Most likely, the jack at the far end looks something like this - https://www.amazon.com/Generic-Keystone-Ethernet-Compatible-Connector/dp/B014RAT7ZC/ref=sr_1_6?s=electronics&ie=UTF8&qid=1504982947&sr=1-6&keywords=keystone+jack
If you get the connectivity right, and that cable has all the pairs (8), you should be able to connect, and be on the road.
Not sure where you are located, but usually Fry's or MicroCenter is a good place to source these tools.
Holler back if you need more info.
Table, chairs, box of pens, box of sharpies: ~$200 from staples, free delivery, your ass will thank you.
http://www.staples.com/Sudden-Solutions-6-Standard-Grade-Resin-Folding-Banquet-Table/product_749944
http://www.staples.com/Staples-Steel-Folding-Chair-Black-with-Luxura-Seat-4-Pack/product_886001
Amazon:
A fist-full of the cheap $1 philips and flathead screw drivers from home depot.
Monoprice: Pigtail adapters for your PDU's to go from c14 to 5-15R. Almost every electronic device these days is universal power (90-240v, 50/60hz.) The notable exception is your driver charger. Never order fewer than 5 of anything. 10 for ethernet cables. On that note, order 2x 50' ethernet cables, and 10 of every other length and color you might need. Some long micro usb cables for phone charging. $100 extremely well spent.
http://www.monoprice.com/products/product.asp?c_id=102&cp_id=10228&cs_id=1022804&p_id=1302&seq=1&format=2
Pole-style crash cart. Your own crash cart is worth its weight in gold, and one you can't leave shit on is worth another weight in gold because it cannot get messy and junked up. $350? I forget.
All in all $1500 worth of stuff you will see once a year at best. However your on-site techs will never spend much if any time rooting around for tools. Do not travel with this stuff, buy one kit per colo site.
Also never let anyone tell you square-holed racks are bad. Order 1000 extra fasteners and nuts. This is on top of whatever you need to mount the stuff you know about. Only ever order one type. Throw away any fastener kits which come with your equipment because they might be slightly different. Remember 1000 fasteners is only 125 rack units assuming top, bottom, front, back, left, right. It's fewer still if you put in the center locking one. Have them toss in a cage nut tool, or learn to use a small flathead. Blood for the datacenter gods. Eventually you get extremely good at them and will stop cutting yourself.
Now off the reservation: Wifi router (buffalo) $80 prime, network printer (Brother, use the wired connection) $125 prime, ream of paper ($10, prime or staples).
http://www.amazon.com/SpeedOut-Damaged-Screw-Extractor-Bolt/dp/B00IRL3WP4
GC here who specializes in decks/rails.
First, get yourself this Pocket Hole Jig (this things is worth every freaking penny), and get some blue kreg 2-1/2" pocket screws from home depot/lowes.
Then add one more layer to your current picture. So you should have 2x4 on bottom, then 1x2, then pickets, 1x2, 2x4 on top, then optional 2x6 for something a little nicer. Doing it this way allows you to place the bottom 2x4 first, then assemble the pickets/1x2s as one unit that you can place on top of 2x4, with final 2x4 on top. Use the pocket hole jig on the ends of the 2xs to attach to posts. this will create an amazingly strong railing. attach pickets to 1x2s using 3 or more 15/16 guage trim nails.
Pic 1
Pic 2
Pic 3
If you zoom in on pic 2 enough on the top, you can see the pocket holes. I filled these in with plastic plugs made by kreg, if its being painted, you could also use their pine ones which make an almost invisible seam.
Also, I HIGHLY recommend using KDAT (Kiln Dried After Treatment) wood. if you don't, the wood will expand/contract after installation causing all of your joints to come undone. its also paint ready as soon as youre done. no need to wait until it dries. Find a specialty retailer for good woods, I'm particular to Madison Woods, pricey, but worth it.
I would suggest a FUBAR
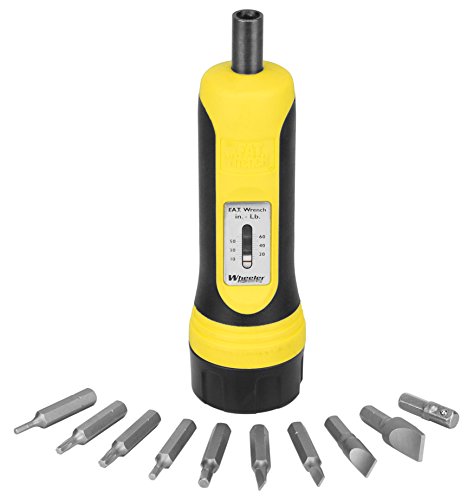
I would suggest investing in a wheeler FAT wrench so you know you are not over torquing your bolts. I have never broken any torx keys with using loctite.
Edit: Wheeler
Seriously you've never seen one of these?
http://www.amazon.com/Victorinox-Swiss-Classic-Pocket-Knife/dp/B00004YVB2/ref=sr_1_4?ie=UTF8&qid=1334995197&sr=8-4
Every job I've had has been blue collar, or at least a mix of field and office work. Currently, I'm a woodworker, so I'm sure you can imagine how often things like splinters are a thing. I first started carrying the emergency knife when I worked at a climbing wall. It was there to cut a harness or potentially even a rope in the event of extreme emergency, but it was/is also good to have in case of a car accident or something (window breaker and seat belt cutter). I'm thankful that I've never had to use it. And that's what a lot of my gear is for. Things I want to have ready to use, while hoping I never do.
Emergency knife This isn't the one I actually have, but it's similar enough. You can find this same design in a multitude of places, at all different price points.
Normal use I also have a cheap little $6 Ozark Trail one that I've used for around 12 years or so. Long as you care for your knife, it will last and serve you well. You don't have to have a top-of-the-line one. I do greatly prefer the single-hand operation ones, though. They have the little pin near the base of the blade so that you can just slide it open with your thumb. And I usually prefer the liner lock, which allows you to unlock the blade with your thumb, and close it with your forefinger. With enough regular use, it all becomes one swift motion that you don't even think about
Swiss army knife I was gifted mine and likely wouldn't have bought it on my own, but I found myself very appreciative of it and think it's worth the money. If mine gets lost, broken, or whatever, I'll likely buy a replacement.
Bonus! Gerber multitool This has been on my key ring for 6 years. I use it almost daily, and think it is probably one of the best EDC purchases I have ever made.
I have 7 routers at last count... but, if I only had one router in my shop, it would not be a compact router. It would be this one.
Most compact routers (including the Dewalt) only support a 1/4" collet. Bits with a 1/2" base are more common, and (generally) more durable.
This means that when you start collecting router bits, you will be forced to get all 1/4" base bits.
Once you go and get a big router that has 1/2" collet, then you will need to use an adapter to use your 1/4" bits. Not a huge deal, but, sincerely a pain in the ass.
These won't do well for big bits (for example, using a 1/2" straight cut bit to create a dado in hardwood - this thing would struggle)
I have a compact router (Bosch) that I only use for edge band trimming, and round-over duties.
I like it because it is light and I can run it easily with one hand.
You can spend WAY less. For one, buy tools as you need them, not all at once. To address some of your tools, here is my input. For reference, I am a homeowner and hobbyist woodworker, not a pro.
Table Saw: That Jet is overpriced for what you get. If you want to spend that much, get a SawStop, if you want a comparable saw to the Jet for significantly less, look at the Grizzly G0771z. I have the older revision of this saw(g0771) and love it. https://www.grizzly.com/products/Grizzly-10-Hybrid-Table-Saw-with-T-Shaped-Fence/G0771Z
Miter Saw: Ditch it. Anything you can do on it you can do on the table saw. Certain things are a bit easier on the miter saw like cutting molding, so if it is something you insist on, get a cheap one. You'll be surprised how little you use it.
Drill press: Can't beat free.
Router: Save yourself significant money but buying the Bosch 1617EVSPK. It is a combo plunge and fixed router(interchangeable bases) and is widely regarded as one of the best routers you can buy. https://www.amazon.com/Bosch-Combination-Horsepower-Variable-1617EVSPK/dp/B00005RHPD
Router Table: That one is nice, but there are cheaper options, such as build your own with MDF or look for used on Craigslist. This is a nice one, but expensive.
Modular Table Base: Not sure what you have in mind, but if you can build it definitely do so.
Jet Clamps: Nothing wrong with those, but they are expensive and probably more than you need. Have a harbor freight near you? Their clamps are cheap and decent enough. For more heavy duty applications, get some pipe clamps.
Dewalt Planer: If you have a need for a planer, yes this is the one to get.
Delta Jointer: Don't bother. You probably don't have a need for a jointer right off the bat and when you do, don't bother with the tabletop models. They are very limited with what you can get straight due to the short beds. Get a floor standing one with long beds. 6 inch wide if you must, 8 inch if you have the means.
Jet dust collector: This is another area where Harbor Freight shines. Jet is overpriced. The HF 2 HP is a great buy, make sure to use a 20% off coupon. https://www.harborfreight.com/70-gal-2-hp-heavy-duty-high-flow-high-capacity-dust-collector-61790.html
Band Saw: Don't bother with a 10 inch, it will be seriously limited. With the money you are saving on the other tools above, up your budget and get a Laguna 14|12 or 14bx. If that is too much, look for an older used 14 inch delta. Those old ones require a bit of cleanup but are built like tanks and will last you forever. No matter which saw you get, throw out the blade that comes with it and buy a good one. The Highland Woodworking Woodslicer blades are nice value for the price: https://www.highlandwoodworking.com/woodslicer-resaw-bandsaw-blades.aspx
Nail Guns: Do you really need a nailgun? And if you do, does it really need to be cordless? How much do you plan on using it. A combo kit with a compressor can be had for less than the price of one of the battery operated ones.
Paint Sprayer: How much do you plan on painting? A good roller is a lot cheaper if this is a one and done kind of thing.
Good luck and if you have any more questions I'll be happy to answer whatever I can.
My recommended buying list for a new painter is:
Tools
Sprays
○ Grey is standard, white if you're painting a majority of light colors, and black if the majority is dark.
Brushes
○ Round 0
○ Round 1
○ Round 2
All in all it should be around $60 USD for the tools and about $40 USD for the brushes. However, this list gives you every tool you will need to get started and to continue with the hobby.
This is just what I like to have on hand, this does not reflect the "perfect list". I hope it helps :)
Leatherman Style cs without a doubt got mine in January use daily and the scissors are so versatile and still super sharp have cut my fingernails, wire, plastic and anything have tried and only $16.79 on amazon.
http://www.leatherman.com/product/Style_CS --------
http://www.amazon.com/Leatherman-831207-Clip-On-Multi-Tool-Scissors/dp/B0032XVNMQ
I would recommend a flashlight, and small multitool.
Flashlight
I would recommend the Fenix E05 | [Amazon Link] $20.13 for a very small light.
Multitool
The Leatherman Style | [Amazon Link] $16.79 is my most used item on my keychain because of the great scissors and minimal toolset. It has none of the tools I don't ever use. If you're looking for a more versitile toolset, look through the remainder of Leatherman's great micro-multi-tool lineup. Try to stay away from Gerber products if at all possible.
Flash-Drive
A flash-drive can be useful as well, but it's hard to find one that is both small and durable. I did a lot of research on which option to buy for quite a while. The grail of USB flash drives is the PQI Tiffy because of its incredible speed and durable housing. Unfortunately, it is nearly impossible to find for sale, and it's also super expensive. I went for the Kingston Datatraveler | [Amazon Link] $10.40, and it's working very well for me.
Fire
I've rarely needed one, but many folks want to carry a fire-starter with them, and there are some small options for your keychain. The Exotac NanoStriker $23.50 is a ferrocerium-based striker, and the True Utility FireStash [Amazon Link] $16.23 is a simple, tiny lighter.
Suspension
Finally, it's nice to have your keys hanging in a comfortable place in your pocket, and not in a bunched-up heap at the bottom. Definitly consider grabbing a P-7 suspension clip $12+shipping. I waited a while to pull the trigger on mine, but I don't regret it.
Another option would be the Obstructures Pry/Open tool $32. It serves as a pry-bar, which you don't yet understand how much you might use after you start carrying one.
Additional Information
Here's my setup today.
Here is a great post by /u/goretsky about where to buy one-handed multi-tools like Atwood, etc.
---------------------
P.S. It's great to have a color-scheme for your keychain. It looks fantastic.
Why not buy the right tools and do a proper job?
Bonus: New tools
clockwise from top left:
Bosch 1617 evspk is a solid choice
we use the Fubar hammer from stanley in the fire co. very good for opening walls/removing walls.
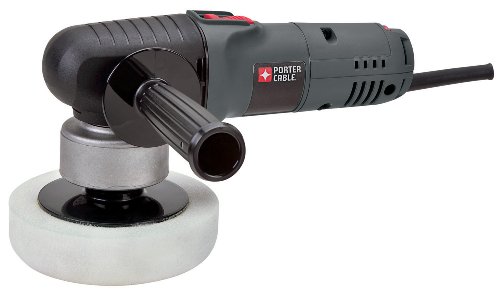
Avoid those cheap buffers and get yourself a Dual Action Polisher from a reputable brand. DA polishers are much safer on your car's clear coat and are user-friendly.
Griot's Garage 6" orbital polisher is a popular choice and will last forever.
Porter Cable makes a good polisher although it's not as powerful as Griot's and heavier.
MaxShine Shinemaster M8S is a great budget choice. I personally use this one and love it.
You can get a smaller version of the Kreg jig for $40. http://www.amazon.com/Kreg-R3-Pocket-Hole-System/dp/B000J43A7W/ref=pd_cp_hi_2
Takes a little more finagling, but I've used mine a ton. Once you've gone pocket screw, you don't really ever want to go back - it is so easy!
I'm getting this for my sister when she moves out because a bat just isn't good enough. Also it has some utility elsewhere.
Couldn't see safety glasses. If that is drywall wear some goram glasses. That shit will scratch your corneas.
Also get this. It doubles as a zombie defence weapon. https://www.amazon.com/gp/aw/d/B000VSSG3O/ref=pd_aw_fbt_469_img_2?ie=UTF8&psc=1&refRID=DDNRB1A1PP6RT5P0Z44X
Just a simple setup would be, in no particular order:
 
 
That's what i can think of off the top of my head, you probably won't need all of that if you only plan on building a lower first. It'll be useful down the line to get most of those tools, but i'd go with first:
If you have Amazon Prime, there's quite a bit of stuff you can get on there, it's where i got most of my tools.
 
^Edit: ^Formatting.
This might be excessive, but I wanted to be thorough so you can see what all is out there. I am having trouble thinking of anything that the following tools can't do, in terms of AR building and maintenance. This is basically my setup at home, though some.of the brands and whatnot are different.
I am operating under the assumption that you already have some basic hand tools in addition to the torque wrench.
The only things you absolutely need are roll pin punches and an armorer's wrench and some basic hand tools like Allen wrenches, screwdrivers, needlenose pliers and so on. The rest just expedite the process and help solve weird issues that may come up.
Wheeler Engineering Roll Pin Starter Punch Set https://www.amazon.com/dp/B01B3NWBVI/ref=cm_sw_r_cp_apa_QJZDAb1ZFBQ80
Wheeler Roll Pin Punch Set https://www.amazon.com/dp/B00EE6GHVW/ref=cm_sw_r_cp_apa_4JZDAbV5YGA8M
Wheeler Hammer and Punch Set In Plastic Case https://www.amazon.com/dp/B004SY07HU/ref=cm_sw_r_cp_apa_FNZDAb1Y74EF0
Geissele Automatics 10-169 AR15/M4 Reaction Rod https://www.amazon.com/dp/B01EY6WFAI/ref=cm_sw_r_cp_apa_hOZDAbD3JHBAE
Aeroshell 33ms / MIL-G-21164D / MIL-SPEC Barrel Nut Thread Grease + 1/2oz can https://www.amazon.com/dp/B01BJ3HE0K/ref=cm_sw_r_cp_apa_4OZDAbQGRYJJ2
TEKTON Long Arm Ball End Hex Key Wrench Set, Inch/Metric, 26-Piece | 25282 https://www.amazon.com/dp/B00I5THF4W/ref=cm_sw_r_cp_apa_PPZDAbQ05H680
TEKTON Long Arm Star Key Wrench Set, T10-T50, 9-Piece | 25291 https://www.amazon.com/dp/B00I5THF9M/ref=cm_sw_r_cp_apa_cQZDAbRX59VNW
IRWIN Tools Multi-Purpose Bench Vise, 5-Inch (4935505) https://www.amazon.com/dp/B009TOCZEC/ref=cm_sw_r_cp_apa_1QZDAbT8R47J0
Yost UP-360 Universal 6 Inch Prism Style Jaw Cover https://www.amazon.com/dp/B01EVQH42U/ref=cm_sw_r_cp_apa_aRZDAbRHAV73E
Real Avid Gun Tool Pro - for Modern Sporting Rifles https://www.amazon.com/dp/B00IMHX5KA/ref=cm_sw_r_cp_apa_bUZDAbEB87JFB
Wheeler Firearms Accurizing Torque Wrench https://www.amazon.com/dp/B0012AXR4S/ref=cm_sw_r_cp_apa_xWZDAb1SRYD6D
Wheeler Professional Gunsmithing Screwdriver Set (43-Piece) https://www.amazon.com/dp/B00HTN4EWG/ref=cm_sw_r_cp_apa_HXZDAbQX5BEWF
TacWater USA AR15/M4/M16 Tools Multi-Purpose Tool Set (W) https://www.amazon.com/dp/B079H5WWZ3/ref=cm_sw_r_cp_apa_GYZDAbRGY3CNH
Takedown Pivot PIN Tool set 223 556 6.8 SPC 300 AAC https://www.amazon.com/dp/B017OUSJFQ/ref=cm_sw_r_cp_apa_V.ZDAbSHZPEG5
Magpul Bev Block https://www.midwayusa.com/product/1015877615/magpul-bev-block-ar-15-action-block
[Victorinox Swiss Army Classic] (https://www.amazon.com/dp/B00004YVB2/ref=cm_sw_r_cp_apa_-Nw.BbK33CE2Q)
Just put it on your keys and be thankful
Gerber Shard
If opening bottles is a thing you need it for over a knife, which was not the case for me, I got rid of this tool as well.
Simple but it works
This is what I carry now, after ditching my shard as well because there's plenty of ways to open bottles and tweezers are crazy useful.
grab this one and all your concerns will be addressed. it has both fixed and plunge bases. 1/4 and 1/2 collets. plenty of power, and since the bases are removable it mounts great in a router lift or a non-lift table. The fixed base is even designed to work as a mini-lift, allowing adjustments through the table. I own three of these and love them.
edit: it also has quite a few available attachments, like dust collection, edge guides, etc. it's a great starter router and a great forever router, IMO.
Gerber EAB Lite
Incase anybody was wondering here is what I am carrying:
Speck Iphone case/wallet holds 4 cards + 1 bill.
32gb Sandisk USB Drive
Leatherman Style CS
I don't know if that screw would be too small for this tool but I have used it for stripped screws and it works well.
​
https://www.amazon.com/Ontel-SpeedOut-Damaged-Screw-Extractor/dp/B00IRL3WP4
Firstly, sorry about your holiday.
Secondly, I've done this a few times now. Make sure that you double your downtime from what you are planning. Unless all the equipment is brand new, something WILL go wrong.
If any equipment is in with screws have a set of EasyOuts, they will save a ton of time if there are stripped screws.
I pre-label everything (cables, switches, machines) and then create a spreadsheet with each cable ID and associated switch/machine port IDs. This gets documentation out of the way and my focus is solely on racking and cabling.
This is a huge undertaking; make sure that you take the time to plan first, then execute. If you don't you're asking for trouble.
It's the Classic SD. Probably the most commonly carried SAK, and for good reason. I admit I like the Rambler (same tool with a bottle opener/small magnetic ph screwdriver added) a bit better.
That Makita one is OK but this bosch one is the router you want. It has more power, a plunge base, and both a 1/4 and a 1/2 inch chuck. It has all the power you should ever need and it is variable speed.
I'll probably get run out of town for saying it, but, if you're going to do more of this kind of a project, get yourself one of these or one of these.
No pocket screws aren't as strong as joinery, but for these kind of projects they're fast and work well enough and they'll last longer than the plates/L brackets you used.
You need to invest in a Kreg Jig and fix that jenky-ass book shelf! :P
Invest into a Impact Driver.
Seriously these things are awesome. Your local hardware store should have them.
Other than that try a little heat around them. Stick a screw driver on it and bang the end while trying to twist.
if all fails you most likely have to Drill them out.
Congratulations!
Anyway, I hope this helps. I'll check back in a little bit (studying for finals right now) if I think of anything else.
I'm not knocking the goal, all goals are ultimately arbitrary. What I'm saying is you should not put your goal on a pedestal. If you want to shoot at 1k, get your dope and scope and go shoot at 1k now. Shorter distances are good for practice when you can't get to the big range. Your goal of a ~1moa cold-bore shot is entirely reachable and will mostly depend on your wind-reading and reloading skills.
If you want, you can install your new optic yourself with a set of $10 levels and a $50 wrench. It's not rocket surgery.
Personally, I think break-in has a bigger effect on velocity than accuracy. I've never noticed any velocity effects but some other people have reported faster velocities after a few hundred rounds.
Okay. First off, I'm a newb so take my advice with a grain of salt.
Basic detailing goes like this
You can google / youtube for detailed instructions on each step.
I use a Porter Cable for application / removal
For polishing, it can be a multiple levels of polish. Think of polish as a really fine sand paper in a liquid. Wipe immediately any that you get on plastic / rubber.
They make different applicator pads and compound for different levels.
They make buff pads for removing wax
For black plastic /rubber you can use [Mother's Back to Black](http://www.amazon.com/MOTHERS-6112--Black-
Plastic-Restorer/dp/B00GZLMEN4/ref=sr_1_2?ie=UTF8&qid=1417395899&sr=8-2&keywords=back+to+black)
Buy a shitload of microfiber towels.
You can get 99% of what you need at Autozone. Once you start getting professional, then maybe you need to go online to get the good stuff. I don't know.
What you can do is experiment. Wash / Dry / Clay only the hood. Then use painter's tape and divide the hood into four sections. Experiment with the different levels of polish in each quadrant so you can see the different. Experiment with different application removal styles etc until you're happy with the results then repeat on the whole car.
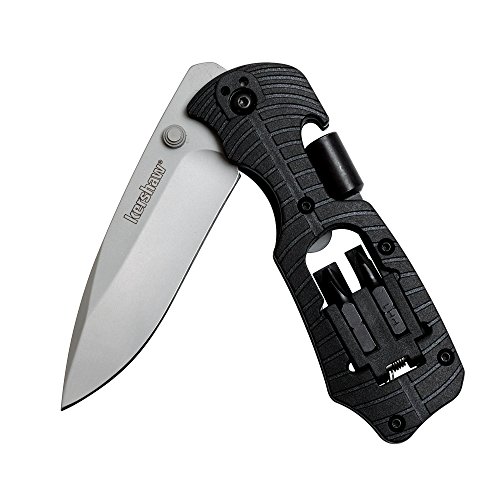
Kershaw 1920 Select Fire Multi-Tool https://www.amazon.com/dp/B002IVPKOU/ref=cm_sw_r_cp_apip_OJb9PFDifaKs4
Try this Kershaw for $30. Might look cheaply but this is my favorite knife. Comes in handy more than you might expect.
Paying someone to run Ethernet is a huge waste of money. Even with buying all the tools and supplies yourself you will save lots of money.
In your situation I would go up into the attic then run down into the walls to your wall jacks.
Stuff you'll need: (not including drywall saw and gang boxes/gang frames to mount the wall jacks)
http://www.amazon.com/UbiGear-Crimper-Connector-Network- Crimper315/dp/B008UY5WL0/ref=sr_1_2?s=electronics&ie=UTF8&qid=1457464334&sr=1-2&keywords=rj45
http://www.amazon.com/C2G-Cables-Go-19958-Steel/dp/B0017RAHSA /ref=sr_1_2?s=electronics&ie=UTF8&qid=1457464421&sr=1-2&keywords=wire+fish
http://www.cablingplus.com/t/networking/jacks-and-connectors/cat5e-keystone-jacks-25-packs
http://www.cablingplus.com/t/networking/wall-plates/classic-keystones- wall-plates
http://www.amazon.com/Cable-Matters-Punch-Down-Impact-Blade/dp/B0072K1QHM/ref=sr_1_1?ie=UTF8&qid=1457464708&sr=8-1-spons&keywords=110+punch+down&psc=1
http://www.amazon.com/Cat5e-Ethernet-Cat-5e-VIVO-CABLE-V001/dp/B0092TG310/ref=sr_1_5?s=electronics&ie=UTF8&qid=1457464781&sr=1-5&keywords=cat5
For around $165.00 you'll have everything you need. Less if you need less than 1000' of cable.
It's true that the cable I listed is not plenum rated but you're not going to be in the attic if your house is on fire anyway. I wouldn't worry about it or waste the money on it.
I've installed hundreds of miles of cat5 in my earlier career before switching to sysadmin stuff.
I highly suggest a hand packer. You'll need a jack capable of lifting your trailer (I highly suggest a bottle jack), and stands to support it while your wheels are off. You'll need a 1-1/2 socket (I won't use a wrench on the castle nut), cotter pins if that's what your axle uses. You won't know until you take it apart so just buy a kit since they're cheap and you can use them if/when you need to work on your awning anyway. I use water pump pliers to remove the dust cap without damaging it. You'll need a seal puller. Breaker bar, torque wrench, and sockets to fit your lug nuts. Brake clean, I use varsol to clean everything but the drum. Varsol and cast iron don't mix. I'll clean everything after the varsol with brake clean because it evaporates. You'll need high temperature high pressure grease and new seals (if you bring your make and rating of axle to a dealer they can hook you up).
Jack up the trailer, take off the wheels, pop off the dust cap, take off the cotter pin or other retainer, remove the nut, washer, outer bearing, remove the drum, remove the seal, remove the inner bearing. Clean the bearings with varsol, clean everything with brake clean, blow everything with compressed air to evaporate the brake clean, pack new grease into the bearings, coat the axle spindle with grease, coat the bearing races with grease, reassemble.
The correct torque on the axle nut is 50ft/lbs while spinning the wheel to set the bearings, then loosen and retighten to finger tight.
Kershaw Select Fire (1920); Multifunction Pocketknife with 3.4-Inch 8Cr13MoV Stainless Steel Blade, Black Glass-Filled Nylon Handle, 1/4-Inch Hex Drive, 2 Flathead Bits and 2 Crosshead Bits; 5 oz. https://www.amazon.com/dp/B002IVPKOU/ref=cm_sw_r_cp_apa_O25KBb33EFJJB
If you are OK with buying brand new, a few popular options here are some suggestions with Amazon (USA) links:
There are many other popular "solid state" keychain tools like the Shard out there, but I did not want to list out many of those.
http://www.amazon.com/Leatherman-831207-Style-Multi-Tool-Scissors/dp/B0032XVNMQ/
All around great little thing to keep in your coin/watch pocket.
Apple iPhone 6
Nite Ize Locking S-biner
Big Skinny Compact Sports Bi-Fold Wallet
Moleskine Cahier Pocket
Zebra F-701
Leatherman Sidekick
Johnny Cupcake hankekchief
I was just looking at a 3piece craftsman prybar set at the store which was on sale for $30some odd dollars. It was down from $40something odd dollars.
Started looking online and ran into this 3 piece pry bar. Look familiar?
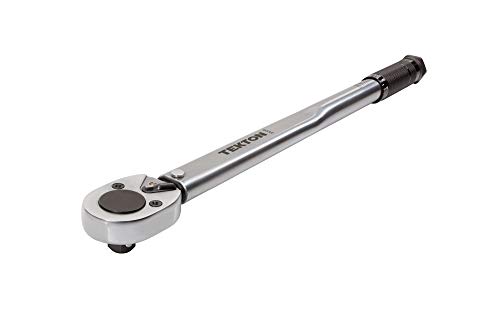
Same thing is going on with this tekton torque wrench i found its twin here
That's a fine recommendation. I don't agree - but it's valuable for OP to see different approaches from different redditors.
My whole point is to not spend the extra money on accessories like this.
I'm a big fan of 'buy once, cry once' - but for some people it's valuable to go low budget at first. Especially with accessories like this. As I gained experience - I learned that cheaper/smaller knifes were better for me. So, for example, the 'better' knives I invested in previously now sit in a drawer unused.
Choosing which gear to buy high quality first is complicated. Different ways to approach for sure. I'm recommending to focus on the 'big 4' first, not the accessories.
​
For example - I carry these as my knife and flashlight often:
Phone: iPhone 5c + cheap Spigen case
Watch: Seiko SKX007 + Super Oyster II Bracelet
Wallet: Radix One
Keychain: Remove Before Flight tag, Sandisk Ultra Fit, Dollar Store Carabiner
Keychain Multitool: Victorinox Classic OR Leatherman Micra
Multitool: Leatherman Skeletool
Flashlight: Streamlight Microstream
Pen: Fisher Space Pen OR Modded Zebra 701
Yoyo: The Sage (for now)
First post, any questions or suggestions please feel free. Thanks guys!
JessEm Rout-R-Lift II
http://www.jessemdirect.com/Rout_R_Lift_II_p/02310c.htm?1=1&CartID=0
Bosch 1617
https://www.amazon.com/Bosch-1617EVSPK-4-Horsepower-Variable-Collets/dp/B00005RHPD
I may upgrade the router later if I need to. I just happened to have this one.
I can't tell for sure from the photos, but that cable is probably at least CAT5e or better, which is just fine for 1GB ethernet in the house.
You need to cut off the phone jacks and install CAT5e or better RJ-45 jacks with a punch down tool. Do this conversion at every place where you want network. Then in the basement you need to punch down the other end of each cable separately to a CAT5e or better patch panel. Then you need to run short CAT5e or better patch cords from the patch panel to an Ethernet switch. Finally you need to connect your router to the switch, either directly, or through one of the network jacks you installed in the house.
Like any hobby the initial cost to start will always be high. You may be tempted to buy cheaper tools but whats the point if you plan on building Gunpla for a while and will end up replacing them. If you only want to build 1-2 kits then you can get away with 2 dollar clippers and a box cutter but it won't give you good results.
Despite the cost these are still the tools I recommend that EVERY Gunpla owner who doesn't plan on painting their kits purchase
A) Tamiya 74035 Sharp pointed side cutters, worth every penny
B) Xuron 410 Side Cutters, very durable at an affordable cost
C) X-Acto X3000, Comfort rubber grip, comes with 2 blades
D) 3 Fine tipped Gundam Markers, Black, Grey and Brown
E) Krylon Acrylic Flat Coat, large can for only $5-6
And that's it.
2)Use the Tamiya cutters to cut the remaining nub, with practice you can get it practically flush to the part.
3)Clean up the nub with a hobby knife. You don't need sandpaper or a file if you did the steps above correctly and the flat coat will mask any scratches.
4)Use the Gundam markers for lining
6)Finally finish with a top coat
Total cost with amazon prime is $65. Yes the Initial cost is high but the tools above will last you for 20+ kits (you will need to buy more blades and flat coat). If you really can't afford that you can save up for the Tamiya sharp pointed side cutters and use the Xurons in the mean time (you will have more work to do).
So $38-65 initial investment to me is really not that expensive
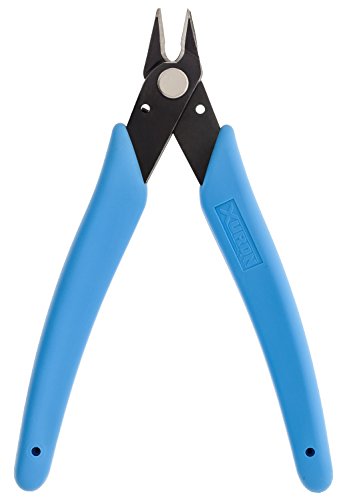
I would get a pair of flush clippers
https://www.amazon.com/Xuron-410-Micro-Shear-Flush-Cutter/dp/B000IBOOWQ/ref=sr_1_12?keywords=flush+clippers&qid=1556217849&s=gateway&sr=8-12
It isn't necessary, but torque wrenches are very useful and versatile tools for cars, motorcycles, lawnmowers, and guns.
Basically, if you like toys, get a torque wrench. They don't have to be expensive.
I was on tour a year ago and brought my bike to this one-man bike/ski shop and he managed to strip both of my XTR crank pinch bolts just like yours. Had to bring it to another shop and they drilled out the head on one of the bolts and that was enough to ease tension pull it off. Finally got around to removing those stuck bolt pieces yesterday with this screw extractor set, which worked really pretty well.
Anyways, the key to using the larger wrenches with higher torques and small bolts is to use one hand to hold it steady in place at the pivot so that there's no chance of misalignment.
And yes, Shimano sells bolts just for your crank. Assuming you have 105 5800 cranks, the shimano part number is Y1GS21000
Oddly enough, the bolt is not available on the bike shop distribution companies, nor anywhere else online (in the US). The only place I could find it is in this ebay listing from the UK: https://www.ebay.com/itm/Shimano-HollowTech-II-Crank-Arm-Pinch-Clamp-Bolt-105-Tiagra-XT-SLX-Deore-/191815279489
However, I'm 99% sure this one would also work fine http://www.jensonusa.com/Shimano-Hollowtech-II-Pinch-Bolt-Single-For-Hollowtech-Ii-Crankarms
You could probably also get a generic bolt to work -- it's an M6 bolt and it's 21mm in length (as long as the head fits in the slots).
This style of screw extractor has worked well for me in the past: https://www.amazon.com/Ontel-SpeedOut-Damaged-Screw-Extractor/dp/B00IRL3WP4/
Alright... ignoring the fact that your asking how to install gears implies heavily that you don't know the first step... OR the first thing. Here's the basic run down. I'm not going to go into detail on torque specs, or specific procedure... i'd be here all night on a how-to that most people don't give two shits about. I'm also doing this ONLY for the 8.25. DANA 44's are too rare in stock, and DANA 35's don't deserve to be rebuilt.
Tools needed:
Parts needed:
On a 8.25...
Go for a drive. If everything was done right, you should now have more power, and no rear end noise. if you do... you need to take the rear apart again, and reset the gears to clear the noise.
I'm sure i forgot something, like thrust washers. Don't crucify me for it. If you want a REAL guide, you need to do more research.
https://www.amazon.com/gp/product/B00C5ZL0RU/
I like this one, as you end up with more stuff in the 10-150lb range than you do the 25-225 lb range.
To mention some other homebrewing supplies and tools that haven't come up here:
Get one of these or a similar model at your local parts store.
https://www.amazon.com/TEKTON-2905-8-Inch-Manual-7-Piece/dp/B000NPPATS/ref=mp_s_a_1_3
You hit it with a hammer and the internal mechanism turns the screw at the same time.
3 things happen. The hammer blow causes sever vibration which lets the threads break loose. The impact keeps the bit firmly in the screw. The turning motion backs it out.
Anybody talking about any other method is wrong.
I would recommend this tool.
Have you tried an impact driver?
https://www.amazon.com/gp/aw/d/B000NPPATS/ref=mp_s_a_1_4?ie=UTF8&qid=1484171834&sr=1-4&pi=AC_SX236_SY340_FMwebp_QL65&dpPl=1&dpID=51Lgq16i3YL&ref=plSrch
These things are life savers.
> Get yourself a prybar (Like This but better ).
If one really felt the need for a prybar, I'd go with a proper breaching tool like any of these
At 8lbs and change though it's not something you just want to be toting around in your bag.
A sillcock key (you've seen what these are used on if you've ever got bored in a drive-thru line) might be handy too as a last resort for water /u/Practical_Citizen
" If I wanted an accursed 10/22, would it be better to start with a receiver rather than a rifle? "
Depends on how difficult your DM wants to make it to remove the curse. Is it the backbone of their campaign, or is it a hilarious rolling a 1 on your Dex save?
It only does 1d6 damage, but there's 25 rounds in that magazine.
Cheapest way to get some accurizing, buy a +1 Torque screwdriver for 41silver from the Amazonians, it will last you a lifetime of gun ownership. Also, throw out your barrel band, it's decorative and does harm accuracy if it touches the barrel.
​
Seriously though, the receiver, bolt, and frankly MANY other parts do nothing to improve the accuracy of the gun.
Accuracy is many factors, but the biggest lens to view parts with is about "consistency".
Bad scope the doesn't hold zero. Loose rings. Loose rail. Loose barrel. Loose attachment to stock all would obviously harm accuracy.
Ammo: number one is the primer. The better the primer, the better the ammo can be. Eley is famous for primer. Powder load consistency, lead consistency and eccentricity, all of which result is a chonometer measurement that's as tight a bell-curve as possible.
Adjustable Objective scopes let you remove parallax at varying ranges, Simmons 22 Mag AO is a cheap, GREAT for the money scope for Appleseed events. No parallax, consistent aim.
Cheek riser: consistency.
Trigger: You can shoot a 5 lb trigger accurately, it's just harder to pull, easier to engage flinchy muscles like your deltoids and upper arm.
Shorter chamber lets the bullet engage the lands and grooves sooner. Consistency.
11 degree match crown disturbs the bullet less.
Glass bed prevents rattling around in the stock. Consistency.
Just speaking from experience man, was having so many issues with my AK scope until I saw someone on here recommend it, no issues since.
This is the one I picked up https://smile.amazon.com/gp/product/B0012AXR4S/ref=oh_aui_search_detailpage?ie=UTF8&psc=1
Seemed to work well enough.
Actually, this is just from a wash and Chemical Guys Blacklight
About a month ago I did a full detail which included:
All applied with a Porter Cable DA polisher and some high quality Micro Fiber towels
Play around with it. I found FL studio pretty intuitive. Theres a number of good "FL Studio for beginner" videos on youtube. The way i learned things was by googling for an answer after 5 or 10 minutes of fiddling around with no luck...couldn't figure out the most efficient way to sample? I'd just youtue "how to sample in FL Studio" and i've been using said method since then.
I'm pretty sure there is a $200-$300 version of FL studio that has most of what i you use/will use.
I've only ever mixed in FL studio, imo, my tracks come out well enough that they don't require mastering.
You either need Jam origin or a decent mic to record guitar. I had a friend use a vocal mic and play his acoustic guitar into the mic. He sound proofed the area and made sure the apartment was quiet. Again, jam origin works.
Estimating all costs, you'd could get everything you need for $350 maybe? FL Studio, a basic sound interface (Basic as in this, used Akai MPK, and either a decent small pair of studio monitors or studio headphones (The $30 AKGs from Guitar Center will work for now_
The 3 things you need are:
That's pretty much it. If you want to dive in really deep I have a massive post that lists other tools and touches on a lot of customization that people have done. But none of that's mandatory, you can very easily forge ahead with just the 3 tools I linked above.
No, it's a jig for creating pocket holes. I own it, and it works really great. Lets you put in hidden screws that pull pieces together just about anywhere.
http://www.amazon.com/Kreg-R3-Pocket-Hole-System/dp/B000J43A7W/ref=sr_1_3?ie=UTF8&qid=1396413078&sr=8-3&keywords=kreg+jig
It really depends on what you want to start building? Any ideas of what your first 5 projects are? For woodworking, I'd get the following.
a) Circular saw. It will make fast work of cutting sheet goods, it's possible to rip boards with decent accuracy, and you can cross cut as well. Super versatile because you can make several jigs and use different blades for hardwoods, plywoods, and even tile. For light, occasional work, you won't notice a difference between a $50 Skil model and a $120 DeWALT model. Just don't drop it.
b) Jig saw. You can also cut plywood and hardwoods with a jig saw, but the results will not be as good. The benefit of a jig saw is that you can make circular (or any shape really) cuts. You can make a low more artsy stuff with a jig saw.
http://www.amazon.com/PORTER-CABLE-PCCK602L2-Lithium-Tool-Combo/dp/B00CM7Z2KW/
I'd suggest a a drill and impact driver set. You can get away with just a drill and use it to drive screws as well. However, with the combo sets, I was able to pick up an impact driver and a flashlight with a carrying case that uses the same batteries for about $20 more than just a drill and 2 batteries alone. The impact driver will allow you to drive 3-1/2" screws into studs like butter.
http://www.amazon.com/Kreg-R3-Pocket-Hole-System/dp/B000J43A7W
This bad boy has made furniture makers out of many that wouldn't be able to in the past. You'll need a good clamp to use with it. Just search YouTube for videos about building stuff. Ana White uses pocket holes on every thing and she makes decent stuff.
"A woodworker never has enough clamps." Everyone knows this.
http://www.amazon.com/Jorgensen-3724-HD-24-Inch-Heavy-Duty-Steel/dp/B00005R1HY
http://www.amazon.com/Irwin-Quick-Grip-Clamp-Set/dp/B00A9KMARW/
I have 6 of the 24" clamps, 8 of the Irwin Quick Grip clamps, and a handful of spring clamps. I've been able to build just about anything with that many clamps... but I've wanted more. If you use the pocket hole system, you'll want to clamp pieces together before you drive the screws.
I went to a Habitat for Humanity ReStore and picked up an old particle board desk that is about 300 lbs for $20. That's what I use. Otherwise, you can build one from 2x4s with the tools above and build your skills.
Squares, Drill bits, Driver bits....
I usually pick up something new for every project I start.
That's about $500 worth of tools and is the barest of bare bones I'd suggest someone to start with if they want to build bookshelves etc. The most important thing you can have is knowledge and YouTube/Reddit is the best place to get it if you don't have a woodworker to physically teach you.
I have a 2008 BMW 335i. It has the N54 twin turbo 3.0L engine. I bought the car with 51k miles almost 5 years ago. It now has around 88k. Here's a rough list of what I've done so far:
In general, I will say that I've managed to DIY just about everything on this car, with the exception of the air conditioner evaporator. That I had done at my local A/C shop, but I've since seen someone on the e90 forums do it themselves.
I have had to buy quite a few tools and accessories along the way: a battery trickle-charger for the water pump bleed process, media blaster for the carbon cleaning, torx and e-torx bits/sockets, steering hub spreader for shocks (forgot this in the list above), impact hammer thing for brake rotors, extended low-profile jack, and so on and so on.
The most frustrating thing though was getting the BMW software to work. It's necessary for registering a new battery (so that it charges properly), or for installing new fuel injectors (they have individual flow rates and tolerances).
OH. I almost forgot. The waste gates on my turbos are rattling, and I'm out of warranty, so I'm looking at ~$1500-$2000 for new turbos some time this year. After that, it'll be new front wheel bearings. As soon as things stop breaking, I'll maybe have some time for upgrades and/or tune. =)
I should add, that the only reason I am even willing to do this stuff is because my wife and I commute to work together, so my car can be in pieces for weeks at a time if it needs to. Were that to change, I'd probably have to ditch this car for something more reliable.
Edit: After I finish all of the above, I'm going to polish and seal my headlights. I pretty much have to do this, since I'm sure as shit not going to pay $1k per light. >8|
I kind of got off topic. You asked about the feasibility of maintaining a car like this on your own. It's definitely possible, but it helps to know what you can expect down the road.
I’d use a hand impact driver. ( and I have various air tools). They are about the only things that work on slotted screws like that. https://www.amazon.ca/TEKTON-2905-8-Inch-Manual-7-Piece/dp/B000NPPATS/ref=asc_df_B000NPPATS/?tag=googlemobshop-20&linkCode=df0&hvadid=292995173425&hvpos=1o2&hvnetw=g&hvrand=4683897586214222232&hvpone=&hvptwo=&hvqmt=&hvdev=m&hvdvcmdl=&hvlocint=&hvlocphy=9001423&hvtargid=pla-420785539586&psc=1
Edit( the force of hitting it with a hammer helps to drive it out)
I'd hit it with the penetrating oil (not sure what kroil is) a couple times waiting a few minutes in between to give it time to work.
Grab one of these as well. Is the old style impact driver. You whack the end with a hammer which is what turns the mechanism. It can go left or right so make sure you have it set to the correct one.
https://www.amazon.com/TEKTON-2905-8-Inch-Manual-7-Piece/dp/B000NPPATS/ref=mp_s_a_1_8?keywords=impact+driver&qid=1550950294&s=gateway&sr=8-8
If those are standard size screws, you can change to Allen screws which can be easier to remove. Just make sure you don't over torque. And consider putting a little anti seize on there when installing.
An impact driver alone is probably adequate. But as raoulduke25 points out, unlikely a drunk chav is stumbling about armed with one of those.
Yes. You definitely should make sure you mount everything with the correct torque. I recommend the Wheeler Fat Wrench for installing scopes, mounts, etc.
Bruh, for $40-50, why don't you just buy a new one.
I think the answer here may depend on what he wants to do with it. If it's for hunting the answer will be different than if it's for long-range target shooting. I'm going to assume that since you're posting here you're already pretty sure that it's for long range shooting rather than hunting.
Since I don't know how much you know about guns in general I'm going to write it all out assuming nothing, and then you can skip parts that you know. Likewise, in the future, someone who does know nothing might find this and find it useful. I'm writing this because I don't want you to think that I'm being condescending - I'm not trying to be - I just don't know what you already know.
Firstly, he's never going to complain about ammunition. To know which kind of ammunition to buy, take a photo of the writing on the barrel - it'll look something like this. What you're looking for is the part that's not describing the company that made it, or the patents that describe it. Take a photo of that on your phone. In the example photo is says ".300 WIN. MAG". .300 Win Mag is the cartridge that the rifle is chambered in - nothing else will shoot safely out of it, so it's very important to buy the right one. It may not begin with ".3" - it may begin with .2 or be something metric based like 6.5mm something or 7mm something. When it comes time to buy, use an ammunition search engine like AmmoSeek and find the longest match you can for the kind of ammunition. There's a lot of .300 <something> available, but the one that matches the most text is overwhelmingly likely to be correct. The rifle you're buying for will have some match in the list, unless it's custom and weird. If you're not certain that you've found the match then swing by any gun store with the photo and you can confirm with them. They'll likely ask you whether it's for hunting or range or target use. The difference there is in the bullet - hunting bullets peel outwards like a banana and stop in meat to transfer the most energy from the bullet to the animal, so that the animal doesn't get a chance to feel pain. Range/target bullets are designed to fly extremely predictably, but little care is given to what happens when it meets something. There is a third use case - if they ask you whether it's for "defense" or similar then either they don't know enough or they're being patronizing and assuming that you don't know anything. The next choice is the weight of the bullet. Lighter bullets fly faster, but can be blown around by the wind a bit more. The right choice here is "whatever he's already using". If you ever see any of the boxes of ammunition in the house, take photos of all sides of the box on your phone, and then later delete all the ones that don't tell you the weight. Chances are that the information will be on the end flaps that open, and what you're looking for is a number followed by either the word "grains" or its abbreviation "gr". Just for interest there's 437 grains in 1 ounce, and 15 grains in 1 gram. Chances are the number will be in the 70 to 300 range. When you buy, try to buy closest to what you took a photo of. Exact number doesn't matter, but close is good - if he's shooting .308 Win and you see a box of 167 grain bullets, then buying .308 Win with 168 grain bullets is fine (cartridge is correct, and bullet weight is close). Buying .308 Win with 175 grain bullets is okay (cartridge is right, bullet weight is a a little way off), but buying .308 Norma Mag with 168 grain bullets is wrong because the cartridge is wrong.
So, that's "how to find and choose ammo" covered. You can pad the purchase with ammunition to get to a target value.
Next, accessories - there are some accessories that depend on the specifics of the rifle - whether it's long action (LA) or short action (SA) or Magnum. These basically refer to how long the cartridge is. Armed with the knowledge of which cartridge the gun is chambered for, you stand a reasonable chance of finding out which is it by going to Magpul's page about their polymer magazines, and picking the "Remington 700" from the "Platforms" menu. This brings back some magazines. Click on each and scroll down to "Features" - the first line there has a list of example popular cartridges that fit. Make a note of which magazine it is - the length of the action is in the name. If none of them mention the cartridge, then you can also start googling for the cartridge name along with "short action" and "long action" and see what comes back. Chances are it's either pretty definitive, or people asking why you can't put short action cartridges in long action magazines.
Things that have already been mentioned are bipods, triggers and cases. None of these are bad choices, but they're worth a little time listening for, in case he expresses a preference for anything. For example, nobody thinks that buying a Harris bipod is a bad idea, but there are other less well-known choices that he may have decided to look in to - for example, I've got an Atlas bipod. In order to buy the right thing, you'll need to know how it connects to the rifle. A bipod will connect somewhere near the front, on the underside, not touching the barrel. Chances are that there's either a sling stud or a piece of Picatinny rail there, with the sling stud being much more likely. The bipod should connect to that, but since there are choices then you should pick the one that matches what's on the rifle.
With regards to triggers, there are two well-known names - Timney and Jewell (who apparently don't have a website that Google knows about). Both are great. Both require installation in the same manner - undo the two screws holding the rifle into the stock, use a small hammer and punch to a tap a couple of pins out, put the new trigger unit in place, and then tap the screws back in to place, and put screw the rifle back in to the stock. This sounds easy, but there is opportunity to screw up - the trigger has parts that are only held in by the other parts of the rifle, and the screws have to be done up to a specific tightness. If you don't think the person you're buying for would be happy doing that work, then you can pay your local gun store to do it for you for about an hour of their time. Be aware that both Timney and Jewell make triggers for other guns, too.
Someone mentioned magazines - also a great choice, if the rifle can take them. On the underside of the rifle just in front of the trigger guard will be either a plate, or a hole. If it's a hole, then it takes magazines. If it's a plate then it doesn't, yet. If you want to buy magazines, it's probably best to stick with what he's already got. You'll need to know whether you're dealing with short action, long action or magnum, and the instructions for that are above.
Now, if he doesn't have a hole for a magazine in the rifle, that's actually a thing that can be changed with two screws. That said, these are the same two screws that need tightening to a specific tightness. Remington made a few major families of the 700 rifle - the ADL, BDL and CDL. I have no idea what they stand for (if anything). The important thing here is that the ADL isn't made anymore and the BDL and CDL have the plate as part of the trigger guard that covers the hole where the magazine would go. To be more complete, it does cover a magazine, but it's internal to the rifle and you can't just swap it for a fresh, full magazine when it's empty. It's called a blind magazine. The part we're going to replace this with is called "bottom metal", because it's the piece of metal at the bottom of the rifle. Yep, that's how imaginative we are at naming things. There are two main shapes that this bottom metal comes in - BDL and M5. BDL is a straight swap with what's already there. M5 is bigger, and requires machining out some of the stock to make room for it. The process is called "inletting". Your local gunsmith would do this from a template with a router. You'll also need to know whether you're buying for a short action rifle or a long action rifle. A good brand name here is "Pacific Tool and Gauge", or Magpul (pick Remington 700 from the "Platforms" list) but there are quite a lot of choices.
Another choice might be a shooting rest bag. I don't use one, so I don't have good advice here.
Another good choice might be tools for him to make changes he wants to make to his rifle. The best advice I'd give for this one is a FAT Wrench. It's a screwdriver that stops at a tightness that you set. That's how you make sure that the screws are at the right tightness, and with long-range stuff, everything needs to be the right tightness.
Finally - where the heck do you buy from? The big names to buy from are Brownells and MidwayUSA. They both mark the outside of their boxes, though, so it's worth considering having them deliver to your office or to a friend, so that you can repackage before bringing it inside your home to avoid suspicion.
One last thing - if you do have any questions about this you can send me a private message and I'll ask for photos of the whole gun and the information about the cartridge and I'll be happy to help.
https://www.amazon.com/PORTER-CABLE-7424XP-6-Inch-Variable-Speed-Polisher/dp/B002654I46 is a great starter and fairly capable, I still use mine for personal and some jobs.
If you are looking for an audio only media center, take a look at Volumio or Pi MusicBox, or maybe Rune Audio.
If you are going to use HDMI for Audio, you are good. If you you want to use the 1/8 inch audio out, it's time to look at a separate DAC. This one is my favorite.
I had some issues with people being shocked when I was a lot younger (early 20's) after I'd pull out a 3-4" blade from my pocket to cut something that needed it (Box, string, meal, packaging, etc.), but I've become a bit more aware of my surroundings since then and tend to opt for a smaller blade (my SAK on my keys) when I think someone might freak out about it.
FWIW though, I have since pulled my normal EDC blade when shopping or out and about though with no reaction by bystanders whatsoever. I use my primary EDC knife whenever I need to for whatever task is at hand. It may help that I'm a bit older now, or it may have become a more accepted thing since I've been around. Heck, maybe all of the people I know just expect me to have one now. Maybe it's because my EDC blade is no longer black. Dunno.
I just realized that the flashlight is the only thing that hasn't changed since I started carrying tools when I was ~17... It's like my Hobbes :3
Bosch 1617 Fixed and plunge base kit or the Dewalt 618 Combo kit
I own them both (and 9 other routers) and they're both solid and versatile kits:
But I'd go with the Bosch because it's currently on sale. I'm not really a fan of the fixed bases knobs though.
And if you've never used one, please read up on safe practices and avoid climb cutting.
Honestly, this question can be asked about any tool. Should a hobbyist buy cheap tools just to get started or spend more on quality tools, but buy fewer of them at first?
For the most part, I'm in the "buy quality tools" camp. I started out on the cheap tools (Skil, Ryobi, etc) and they made a lot of tasks harder than they needed to be. That is, a skilled craftsman could have gotten quality results from those tools but I certainly couldn't. I found that the quality of my work jumped dramatically when I switched to precision tools.
Now... in your case, none of three routers that you're referencing would be in the cheap crap territory, as far as I'm concerned. You'll do fine with any of them.
Some thoughts, though:
The Bosch 1617EVSPK is often considered the gold standard for mid sized routers. Many many woodworkers have that one and love it. You will absolutely not regret getting it.
The DeWalt DW618PK is a direct competitor to the Bosch and holds its own very well. Lots of very satisfied users of that model, too. Another that you'll definitely love.
The Hitachi models... are almost surely worth getting as well. I'll be honest, though -- they aren't talked about as much as either the Bosch or DeWalt.
One final thought: Depending on how you'll use a router, you might consider a "trim" router like the DeWalt DWP611PK. I've found that one to be notably easier to handle than my mid sized and it has handled everything I've thrown at it with aplomb. Really, the only downside is that it can only accept 1/4" shanks and most of my bits are 1/2". If I had more 1/4" bits then I'll likely use the DWP611PK almost exclusively when not on the router table.
I agree with the other poster. A router would be great. I'm also beginning at this, and I have a miter saw, table saw, trim router, and circular saw. While the miter saw is fast and easy for crosscuts, it only does crosscuts. A table saw will do crosscuts and rip cuts. The only place where a table saw sucks at crosscuts is long lumber.
A router, however, can be used for edge profiles, dados, slots, rabbets, mortises, etc. A table saw can do dados and rabbets.... But if the board is too long, it can't do dados, and rabbets might be unruly. The only power tool you have that can do mortises is a drill, but even that would be better with a drill press.
I suggest a router. The Bosch 161EVSPK is highly recommended and can be used for basically anything you would throw at it as a new woodworker. It comes in at 220$ but includes both the plunge base and the fixed base. The fixed base can easily be installed in a router table (either shop made or purchased) and you can do depth adjustment from above the table.
I use these. I got them at a local hardware store for $6. I like them because I can grip against the wire when I wrap and can pinch the coil against the screwdriver.
This is everything I Use.
I bought these hoping they would do the trick. http://www.amazon.com/gp/aw/d/B00009OYGV/ref=mp_s_a_1_1?qid=1421534510&amp;sr=8-1&amp;dpPl=1&amp;dpID=41PADNxaDfL&amp;ref=plSrch&amp;pi=AC_SY200_QL40
Cat 6 is perfectly fine, as it can support up to 10Gb, so its pretty future proofed as 1Gb is still the standard. We won't see 10Gb becoming the norm for a while.
As far as cable, I usually get it from Monoprice, or sometimes from amazon. I just bought a 1000ft spool of Cat6 for like $65
If you are putting drops in each room, its probably best to put in wall plates, and punch down the cable to a jack. You'll need a Punchdown Tool for this.
I'd highly recommend running all the cables to a patch panel. Ideally have them run to the same location as your modem and other networking equipment. You'd use the same punch down tool here as well.
If you need to terminate any cables to a normal Ethernet connector, it isn't difficult, but it is a bit tedious. The first one you do will take you a bit to do, but once you get the hang of it, each one will become a little quicker. you can watch a youtube video on how to do it.
You'll need a Crimping tool to crimp the ends on.
I have yet to find a punch down tool that's too cheaply made.
This is the one I had at my last job.
Get yourself a punch down tool as it will make the wiring process much easier, also make sure the data cable is anchored somewhere in the box so it's not pulled free from those crimp connections.
Something like this: http://www.amazon.com/TRENDnet-Punch-Krone-Blade-TC-PDT/dp/B0000AZK4D
Plastic is fairly soft. As long as you're not trying to cut too close to the model anything with a sharp edge will work. Just make sure the blades are thin enough to work in between pieces. I'm using a Xuron.
You need a USB phono preamp. It's a box on which you can plug your turntable. You then plug that box on your computer via USB and it will show up as an audio interface / sound card.
Example.
I don't think you'll need any software (unless you want to record).
Neat, thanks for the link. Out of curiosity, why something like that instead of, say, a Gerber EAB Lite?
Also, while I'm here, a tool that seems close to OP's that I recently came across is Ron's Utility Knife from Screwpop. Thinking of picking one of those up.
A small multi-tool like the Leatherman CS replacing a utility knife.
I also think we (this sub) overlook the utility of smartphone apps. This demographic (reddit) is reasonably likely to have a smartphone and I know that I use useful things every day like:
Pocket
CRADaR
RadarNow!
to simplify my life and protect myself. I sure could use some recommendations from folks like you about apps I haven't heard of.
Maybe just get Leatherman Wave? and kill two birds with one stone? It'll also have a bunch of other little awesome tools that are soooo handy... my two cents... it wouldn't be nice on your keys though... that would be a pocket kinda thing. look into the Leatherman Style CS
http://www.amazon.com/Leatherman-831207-Clip-On-Multi-Tool-Scissors/dp/B0032XVNMQ
Probably not what you want to hear, but you'll probably need to get a new stickbox (desoldering the old one, soldering a new one). It's a straight forward process and hard to mess up, but the cost can be a big factor if you don't already own the equipment.
Video for reference.
Other option would be to just buy another controller off Ebay, open that controller and swap the guts with your old controller.
You can find a bunch of results for analog stick boxes on Ebay.
Best of luck!
Ok I got ya on this. I recently had all three bolts on my oil filter cover snap in the casing while I was working on it. (p.s if that ever happens to you, do not torque them to 7 ft/lbs as stated in the manual, just tighten to snug)
The reason this happens is that Honda cheaped out on screws, I guess in the event that those break before more important parts do. It's scary but not the end of the world
First thing I would always recommend is either downloading a factory service manual if you can find one. As well as BUY A HAYNES / CLYMER MANUAL. It will save you in the future.
a quick google turns up this, tada:
https://thumpertalk.com/forums/topic/610432-xr650l-owners-manual-inside/
and heres the clymer link to buy one:
https://www.amazon.com/Honda-XR600R-1991-2000-XR650L-1993-2012/dp/1620921537/ref=sr_1_1?gclid=EAIaIQobChMI-Nv0_9vm4wIVhRx9Ch1KeQ5-EAAYAiAAEgLtS_D_BwE&hvadid=177528169391&hvdev=c&hvlocphy=9032056&hvnetw=g&hvpos=1t2&hvqmt=e&hvrand=6356380794860257313&hvtargid=kwd-10840489131&hydadcr=6586_9585033&keywords=clymer+xr650l&qid=1564835915&s=gateway&sr=8-1
So back to these screws. you need to extract em. good news is they are soft and easy to extract. use a speed out kit : https://www.amazon.com/Ontel-SpeedOut-Damaged-Screw-Extractor/dp/B00IRL3WP4/ref=sr_1_3?crid=2BIIO15IIO5JY&keywords=screw+extractor&qid=1564835981&s=gateway&sprefix=screw+ex%2Caps%2C203&sr=8-3
Basically what you are gonna do is use one side of the bit to drill a cone shaped hole in the top if the screw, then take it out, flip it around, and use the other side to SLOWLY extract it. Boom, easy and out. just go slow and don't rush it. you will thank yourself.
If you do mess up the threads, consider installing a helicoil so it can easily be saved in the future.
Next you need to find the screw. Your amazing new manual will have the parts diagrams all in it, so start there. If you just can't be bothered to read, we have the glorious internet! Hondapartshoues, Babbits online, and many others will help you find the size.
Look how easy it is! Here is the diagram for the screw in question:
https://www.babbittsonline.com/oemparts/a/hon/5054117cf870021c54bee45d/handle-switch-cable
It is a m5x16 panhead screw. I personally would go down to your local ace, and get the same size screw in a harder material. Either 10.9 or stainless, or even chromey bois as they will have it all. But if you just must must must have OEM, order it from that site. I am guilty of this sometimes even though it is so much more expensive.
Anywho good luck! hope this helps.
Anywho good luck!
I just got a relatively nice 1/2" Tekton torque wrench for $37. They have a longer one that goes up to 250 ft-lb for $54. I'm not saying it's the best, but it's solidly middle-of-the-road and way better than HF.
Torque wrenches are precision equipment and should be treated as such. Don't apply more than 150 ft-lb in the reverse direction (i.e. dont use it as a breaker bar). For the models that have to be stored with the torque set at the lowest setting... make sure you do that.
Then why not do that?
Here you go $38
I've been very happy with my Bosch. Part of the reason I bought it too is because another base can be bought for $50 that has a long hex key for raising and lowering from a table top. I haven't build the extension for my table saw yet, but can't see it giving me any issues mounted that way.
The PC that the other two mentioned here seems nice also though. I've just never had good luck with PC, or Dewalt for that matter. I guess it's a preference though.
http://www.amazon.com/Bosch-1617EVSPK-4-Horsepower-Variable-Collets/dp/B00005RHPD
This is in my amazon shopping cart.
http://www.amazon.com/gp/product/B00005RHPD/ref=ox_sc_sfl_title_1?ie=UTF8&amp;psc=1&amp;smid=ATVPDKIKX0DER
Bosch 1617EVSPK 12 Amp 2-1/4-Horsepower Plunge and Fixed Base Variable Speed Router Kit with 1/4-Inch and 1/2-Inch Collets
Get a Patch Panel, a Punch Down tool, a ethernet crimper, some ethernet ends (i prefer the EZ, but they are pricy), and a network tester. All that for $70 and you can terminate and troubleshoot all the cables you desire!
My personal kit is a little more expensive, but really the only thing I wouldn't trade for a cheaper tool is the tester. Crimper, Punchdown, Tester.
Ok, I see this is a bit touchy lol. But it's definitely worth investing in some form of set of tools eventually. Start small. A pair of cutters like this will do wonders in the beginning. A little sandpaper, you can get from the dollar store if you want. And a marker, if you really want to stay cheap with it, you can use a crayola marker and wipe away excess with a tissue or q-tip.
I want to share my hobby with someone who wants to get started, but remember, it is a hobby and it is still a model. It's part of what makes the experience awesome. You can start small and always revisit a kit if you want to make it look better. You don't need the marker or pen, but it does add a new dimension to the kit. An X-acto is recommended, but not required. The motor control happens with time and patience.
But I digress, just remember, this is a model. Like any other model, you can make it look amazing, but you need to also put forth the effort. Good luck on your kit and remember, it's about having fun lol. Or else why do it in the first place?
These are way better - the exact pair I have had for the past four years or so. They're pretty small so they can get into tight places, also don't take up as much room in the tool box.
Side cutters / nippers / these things to cut the parts off of the runners: Link
One of the most essential gunpla tools. You have an Xacto knife to trim off the remaining plastic after you cut it off and you have a file to sand off that little nub that's left over.
While not essential I would recommend getting some fine grit sandpapers. I built my RG RX-78 with no paint and only using fine grit sandpaper and polishing sandpaper (max is 2000 grit) and it looks pretty good.
If you're looking to do a straight build, all you need are the knife, a file, and side cutters.
Various tutorials are available on this website; I've included the one about welding parts together that would be most relevant to a beginner:
http://www.scalemodelguide.com/construction/techniques/how-to-glue-parts-together/
Model Recommendations:
Airfix Zero, or a Spitfire Mk.22.
They both are new tool kits, cheap, should fit well, and have simple paint schemes. I have built the Mk.22 and the Spitfire PR XIX below; both fit very well and require minimal filling.
Don't pick camo paint jobs; pick something simple thats one to three colors with straight lines for color demarcations.
http://www.amazon.com/Airfix-A02017-Supermarine-Spitfire-Military/dp/B0021L9BNI/ref=sr_1_1?ie=UTF8&amp;qid=1394416699&amp;sr=8-1&amp;keywords=spitfire+PRXIX
http://www.amazon.com/Airfix-A01005-Mitsubishi-Model-Building/dp/B0055ANHD2/ref=sr_1_1?ie=UTF8&amp;qid=1394416717&amp;sr=8-1&amp;keywords=airfix+zero
Basic materials:
X-acto knife
Brushable paint, e.g. like Model Master Acrylic.
Wide, medium, and fine detail brush (I recommend golden talkon brushes you get at art stores for quite cheap) Like say, 1/4 inch wide brush, a smaller brush, and then a fine detail brush, maybe 1/0 or 5/0 brush for fine detail work. (The total of that shouldn't come out to more than 10 dollars at most.)
Liquid cement:(See tutorial here)
https://www.youtube.com/watch?v=U2clHW2UN0w
The idea is to weld it together with the solvent and then shave off the excess so you don't need to fill the seams.
Decal setting solution (a simple bottle of microsol will generally be adequate)
Tweezers.
A spray can of primer (it can be like krylon, probably).
If you're wanting to get fancy, a sprue cutter:
http://www.amazon.com/Xuron-170-II-Micro-Shear-Flush-Cutter/dp/B000IBSFAI/ref=sr_1_1?ie=UTF8&amp;qid=1394416917&amp;sr=8-1&amp;keywords=sprue+cutter
Other tips:
Brushes that come in "starter packs" generally suck, as does the paint.
PS: Don't buy "packages" of tools offered by model retailers until you google the price of each component separately. Those tool packages are often made of cheap junk that are lumped together and then sold at a premium.
The bare minimum (assuming you don't have a good, SHARP pocketknife) is liquid cement, and then a starter kit that includes paint, and three paintbrushes (of the widths I mentioned), and wet and dry sandpaper from the hardware store (try for 800 grit or higher).
Oh. And patience. Lots of it.
I spent $40 on a pocket hole jig specifically for this project. It was more expensive than I wanted, but in the end, I think it was worth it for the results it provided.
It sets you up to drill the pocket holes at the right angle, at the right depth, for whatever thickness wood you're working on
There are a couple ways to do this.
If you want to do it quickly and don't really care about how the details look, get a Kreg jig (I use this one) and put it together with pocket holes.
If you want something that looks nicer than pocket holes, use a sliding dovetail for the top joint and a lock rabbet for the bottom.
Are you going to put a back and/or a face frame on this? As it appears now, you're not going to have a very strong piece. Adding either or both would add strength.
For that last part, they make the hand impact drivers that does exactly this.
https://www.amazon.com/dp/B000NPPATS/ref=cm_sw_r_cp_apa_i_s1QPCbJW6THVR
There's a flat driver in that set, slot it into the slot, get a good grip, and hit it with a hammer. It simultaneously impact the bolt to break the rust while at the same time turn the bolt out.
Go for the 30 inch model for even more fun.
This will bring you in under $500. You get a first focal plane mil/mil scope with adjustable power with plenty of internal adjustment to dial your elevation.
Porter Cable 7424XP can be found at Amazon and I would highly recommend the following Junkman videos specific to that DA Polisher. Also he states some supplies to go along with the polisher to help with your shopping list for your brother.
PC7424: https://www.amazon.com/dp/B002654I46
Videos: http://youtu.be/KP-eAddv2sk
PORTER-CABLE 7424XP 6-Inch Variable-Speed Polisher 119.99 over at Amazon. It's the most/best rated.
PORTER-CABLE 7424XP 6-Inch Variable-Speed Polisher
https://smile.amazon.com/dp/B002654I46/ref=cm_sw_r_cp_apa_i_KspZCbNJV560D
a basic walkthrough of the steps involved are as follows:
Yes, that should work, but I would highly recommend a different Behringer, the UFO202. It has the phono preamp, as well as a DAC for stereo input, and stereo output, and a headphone amplifier. I have been using an earlier version since the Pi 1B days.
Just plug the turntable into it, and it's USB into the Pi.
Gerber EAB Lite Pocket Knife [31-000345] https://www.amazon.com/dp/B002RILCLY/ref=cm_sw_r_cp_api_i_7BO3CbPR52HHW
Your gonna have to learn to use a knife eventually in life. It's not more dangerous then a steak knife. a small cheap one will work fine
http://amzn.com/B002RILCLY
There are so many knives and pocket tools, and what you like depends on how you're going to use it and what your general aesthetic is.
Trimming nails? Opening envelopes? Tightening screws? Cutting wire? Peeling oranges? Fending off wolverines?
Wood? Steel? Plastic?
Tell us what you want to use it for, and what material you prefer.
Here are a few of my favorites:
Great combination of tools, including good phillips:
https://www.amazon.com/Victorinox-Swiss-Rambler-Pocket-Knife/dp/B000FNFXQS
Great wire clippers/strippers; good other tools:
https://www.amazon.com/Leatherman-Squirt®-Es4-Multi-Tool-Blue/dp/B0032Y4ITU
Classic three blade wood:
https://www.amazon.com/Buck-Knives-0371BRS-Stockman-Woodgrain/dp/B000EHYZNC
Classic metal:
https://www.amazon.com/Kershaw-1600-Chive/dp/B0009VC9RW
Great small tool with a clip and good scissors:
https://www.amazon.com/Leatherman-Style®-Multi-Tool-Stainless-Steel/dp/B0032XVNMQ
I tend to believe anything more than a scratch and your best bet is to improvise something (duck tape and a shirt/buff/whatever) and get out of the woods ASAP. Basically the wound is nothing or it's time to go home. That being said, you should take what is comfortable for you.
As far as knife vs multi tool, that's a decision that's going to come down to where you are getting the most utility. Personally I would rather have a small scissors than a big knife, and I carry a Leatherman Style CS as it's main tool is a scissors, but it still has a small knife and tweezers and it's only a few ounces.
Mostly it comes down to what do you need to feel safe, but it's going to be different for everyone. I tend to cut out anything that I won't need. That's not to say you aren't going to have a few comfort items, but balance everything with your distance to safety. Then make sure you file a trip plan with someone, worse comes to worse and someone knows your path and how long you've been out.
I have one of these. It is a fantastic thing to have always on you.
Leatherman sidekick is a great multitool. $45.
For just a knife the Spyderco Tenacious is a fantastic folder for the price at $35.
Cable tester, RJ-45 crimper, jacket stripper, and 100 RJ-45 terminators:: $14
250 ft pull box, cat 5e cable: $21.50
Just make sure you get the color order right when crimping the modules onto the end of the cable. Getting the pattern right is not optional; just any old pattern won't do, even if they match on both ends. (Yes, really. It has to do with the way the wires are twisted internally, and avoiding "crosstalk" from one wire to another inside the cable.)
There should probably be a handy guide printed on the crimper itself, but if not, it goes like this: with the pins of the RJ-45 facing up and the retaining clip facing down, and the open end of the RJ-45 facing you, from left to right: white-orange, orange, white-green, blue, white-blue, green, white-brown, brown.
https://www.handymanhowto.com/wp-content/uploads/2015/08/TIA-EIA-568B-Ethernet-RJ45-Plug-Wiring-Diagram.png
You will screw up quite a few of these, most likely. Don't sweat it, that kit comes with 100 of 'em. Just make sure you cut your cable a few feet long to start with, and if it doesn't test out right, clip off the end you feel the least good about, crimp another one on, and test again. Still doesn't test out right? Then go clip the OTHER end off, crimp a new one on THERE, and try again.
You get the hang of it pretty quick.
You're also going to need a router/switch to stick where all those runs terminate.
You can buy the tools to do this yourself for pretty cheap and you'll use them in the future. Example: http://www.amazon.com/UbiGear-Tester-Crimper-Connector-Network/dp/B008UY5WL0/ref=sr_1_2?ie=UTF8&amp;qid=1450368467&amp;sr=8-2
If you can match colors you can terminate network cables.
Here's a cheap kit with everything you need
http://www.amazon.com/Wild-us-Tester-Crimper-Connector-Network/dp/B008UY5WL0/ref=sr_1_2?ie=UTF8&amp;qid=1425623073&amp;sr=8-2&amp;keywords=rj45+crimper
If you have patience and a steady hand, I'd say try to repair it. You can likely find the parts you need on Amazon and tutorial videos online. I've had to repair the R-button and control stick on my 3DS on two separate occasions. It was easier to do than I expected and, overall, much less expensive than getting a new system. The only other thing you would need is a precision screwdriver kit. I purchased this one for the job.
If you buy from PSA, I'd recommend using a pre-paid credit card, as they've had site security issues in the past.
I think by "80% lower" you may have been thinking of a stripped lower, where all you have is the aluminum lower, with none of the controls installed. A stripped lower is s great place to start! YouTube has a bunch of easy how-to videos. I recommend /u/nsz85 videos, which I used for my first build.
Some other things you'll want to have handy:
Vice Block for Lower
Vice Block for Upper
Roll pin starter kit
Rubber Mallet
Torque Wrench
These are the basics, and once you buy them, you'll never have to buy them again for future builds. There's other tools out there to consider, but get you started.
Best of luck!
EDIT: shit, how could I forget the AR Wrench!
The 222 does DSP effects. I wouldn't bother.
Look at the UF0202 for vinyls if you need a pre-amp.
Here are a few to consider:
BEHRINGER MICROPHONO PP400 http://amzn.com/B000H2BC4E
BEHRINGER U-PHONO UFO202 http://amzn.com/B002GHBYZ0
Pro-Ject Audio - Phono Box MM http://amzn.com/B000YEK1AQ
Little Bear Tube valve Phono Turntable RIAA MM Preamp preamplifier amplifier Ver2.2 http://amzn.com/B00H0FIGUO
If we are talking about EDC on your person... you may find that a Kershaw Select Fire is a "good enough" compromise between a Leatherman and repair kit.
It has a standard 1/4" bit driver, and has built-in slots to store four bits of your choosing. That makes it easy to mix and match any bits you want, and you can replace them for cheap at the hardware store rather than buy expensive replacement bits for a Leatherman.
The ifixit kits are cool, I have one... but it isn't something I would carry around in my pants all of the time.
Honestly how does a person even convey the sheer ability of Knipex pliers wrenches? I can never work without them now. I have the 6/7 1/4/10" and love them all. I think I am going to get another 6" for the glove box. I ran across this the other day, have not bought it yet but I thought I would share: https://www.amazon.com/dp/B002IVPKOU/?coliid=I2DBWNRFFC16BG&colid=1STK45ZF72T31&psc=1&ref_=lv_ov_lig_dp_it
Kershaw Select Fire. Man, does it come in handy.
I have a Kershaw is the most useful knife I owne. I'd take it over my leatherman surge, Victorinox tinker, or Sog power assist. Not for wilderness stuff but for stuff I do every day (mostly taking apart computers) and the blade is decent steel and long enough to be useful. I recently used it to help butcher a pig and I was able to do lots of skinning and cut through the sternum with the knife. I had to sharpen it after cutting the bone and it's a pain to clean but if I could only have one knife for the rest of my life it would be my Kershaw.
[This (Keshaw select Fire)] (https://www.amazon.com/dp/B002IVPKOU/ref=cm_sw_r_cp_apa_.6azybTTQWBH1) has easily been the most useful knife I've owned. The blade itself is good, not great, but certainly good enough for everyday tasks. With typical knives I found myself using the blade to do things that I should have just gone and grabbed a screwdriver for and would end up chipping the edge.
However if you just want something with a good blade I'd recommend [Kershaw Leek] (https://www.amazon.com/dp/B0009VC9Y0/ref=cm_sw_r_cp_apa_SlbzybWEZ68XA)
Kershaw Select Fire: http://www.amazon.com/gp/aw/d/B002IVPKOU/ref=mp_s_a_1_8?qid=1416936726&amp;sr=8-8&amp;pi=AC_SX110_SY165_QL70#
Gerber EAB Lite Pocket Knife [31-000345] https://www.amazon.com/dp/B002RILCLY/ref=cm_sw_r_sms_apa_QONGyb66VMDM2
Pretty sure this is not a pocket knife, but a utility knife. The kind that you can replace the blade on. Locking mechanism is likely on the other side. Link of example below
https://www.amazon.com/Gerber-Lite-Pocket-Knife-31-000345/dp/B002RILCLY/ref=sr_1_3?ie=UTF8&amp;qid=1485374864&amp;sr=8-3&amp;keywords=utility+knife
best bang for the buck. seriously
If you were to pick up all the pencils in my work area it would most likely be about 60.
I have 15 tape measures spanning from 6 feet to 36 feet.
The only thing I keep on me is this box cutter for marking. I have 3 of them but sometimes I have 7 since I loose and find them so often.
Almost forgot I have a couple dozen rulers
Top to Bottom, Left to Right...
My current backpack is falling apart, so a new one would be pretty awesome.
C'mon...gimme. You look fantastic today, I wish I could be as devilishly good looking as you!
I also could use a multitool. My Swiss Army knife is too big to carry around practically. And having a multitool is always useful.
The style is fantastic. I've carried the Style CS for 2 years now with no complaints. I would recommend the Style CS because it has scissors and a small knife instead of pliers. The scissors are sturdy and sharp, has tweezers, bottle opener, and of course the knife and file. If you want a great tool that lives on your keychain and is barely noticeable get the Style. If you want more tools and don't mind another thing in your pocket get the Squirt.
I have the Leatherman Style CS . It has lived on my keychain for 2 years now, definitely will be replaced if it fails or is lost.
Leatherman Skeletool is a great item, which you should be able to get in that range. I got the upgraded Skeletool CX for under that from r/knife_swap.
If you want smaller try the Leatherman Style or Gerber Dime . The Style comes with scissor main tool or pliers.
Full size I’d suggest the Leatherman Wingman .
I gave this to my BF for his birthday and he was so proud and happy about it, but TSA took it away. =O
It's true, I'm in love! (Just not with TSA.) =P
I'm gonna copy and paste my comment from a similar post. I didn't add something like a 110 block to the list cause at that point I feel it's a bit ridiculous.
As an 06 (low voltage technician) this hurts me to see x.x there are other options for repair that would be much better than this current set up. Here's a few methods;
(https://www.homedepot.com/p/Ideal-Yellow-IDC-Connectors-25-per-Pack-85-950/100036034)
basically you put both ends of the cut cable inside color for color then use pliers to push the yellow button down. If you're able to trim the cable a bit then you could maintain the twist going into these connecters (the twist is important) and it'll be a fairly solid splice. I believe their also gel filled so the copper won't tarnish. It has some protection.
This method would add solid connections all the way through. Even though you experience a little loss at each jack, it would probably be negligible for home use. You'd just terminate the two Jack's and plug them in to one another.
One Cat5e jack and an Rj45 crimper tool that comes with Rj45 connectors (Ethernet plug ins) and a 4 pair tester you could use to verify you punched it all down correctly. The idea here is you'd plug the cable with the Rj45 termination directly into the Cat5e jack. It's similar to the last method, youll just have one connection instead of two.
Spend any more than that and you're better off just replacing the cable all together.
Keep in mind, I don't do these quick fixes professionally unless it's a matter of safety (a customer that deals with life safety calls, etc) and need to be up while replacing their data drop. The most ideal method would be to replace the cable entirely, but any of thes could work fine. Also leaves less of a headache for the next guy.
I don't ever make enough custom cables to bother with much more than the standard cheapo. The mechanics of crimping are pretty simple. Find a brand name tool with a life time warrenty or just buy a couple $8 cheapos.
https://www.amazon.com/UbiGear-Crimper-Connector-Network-Crimper315/dp/B008UY5WL0/ref=sr_1_2?ie=UTF8&amp;qid=1487354206&amp;sr=8-2&amp;keywords=cat6+crimper That little yellow tool or something like it is the deal breaker for me when working on ethernet. (I assume we are talking ethernet.)
Thanks for explaining. 1000ft of cat5e, a bag of connectors (and covers) plus the crimping tool and tester
Here are the links for exactly what I bought.
SolidLink CAT5e 1000ft Premium... https://www.amazon.com/dp/B019POIH2E?ref=ppx_pop_mob_ap_share
UbiGear Cable Tester +Crimp... https://www.amazon.com/dp/B008UY5WL0?ref=ppx_pop_mob_ap_share
Three Pack of Your Cable Store 15... https://www.amazon.com/dp/B01LYLGWSY?ref=ppx_pop_mob_ap_share
Man, Amazon does not make it easy to search your order history. At least not when you order as much as I do. But I found it:
http://smile.amazon.com/dp/B008UY5WL0
Bought this set years ago and it's covered pretty much every small electronic device I've had to work on.
Has TR6-TR9, TR15 along with small Phillips, Tri-wing (Nintendo), and Pentalobe (iPhone) bits.
https://www.amazon.com/TEKTON-2830-Everybit-Precision-Electronic/dp/B009MKGRQA/
Harbor Freight on North Cunnigham in Urbana usually has this set in stock, and it includes a P5.
The ECE Supply Center (https://my.ece.illinois.edu/storeroom/catalog.asp) looks like it probably has a set or two that has a P5, but I don't know if it'd be open on Labor Day or not.
Sold out, Amazon is an option - anyone find anything else? A kit with all this stuff would be nice but Amazon is only showing me T9 rather than the TR9 when it comes to the kits they sell
Edit: bought this bad boy
I have this set. Great little set.
I am still waiting on my kit but I like you did some research and was told to make sure you have a 4mm hex bit along with the proper size screw driver. This is the tool kit that was recommended:
https://www.amazon.com/gp/product/B009MKGRQA/ref=oh_aui_detailpage_o01_s00?ie=UTF8&amp;psc=1
Just did this myself.
A couple tips.
Here's the clear shell: https://smile.amazon.com/gp/product/B075JJ2KH5
Get this screwdriver kit: https://smile.amazon.com/gp/product/B009MKGRQA
Precision tweezers also help a lot.
You'll need 3 bits out of that kid and the little plastic tool that comes with it.
That's it!
These are just suggestions, I'm sure there are cheaper or better quality alternatives to these, but it's a good start.
Also, you're a cool brother.
I have some pretty severe OCD when it comes to my EDC. Haven't lost anything major but I have gone through about a dozen Victorinox Swiss Army Classic and every time I lose/have confiscated/misplace/break/wear out one I have to get another one immediately.
Get one of these!
Hey OP depending on how much cash you got/What you want to make I can recommend you get this router here.
https://www.amazon.com/Bosch-1617EVSPK-4-Horsepower-Variable-Collets/dp/B00005RHPD/ref=sr_1_1?s=hi&amp;ie=UTF8&amp;qid=1484624879&amp;sr=1-1&amp;keywords=bosch+router
It has sufficient power to handle most bits and has a super convenient height adjustment that can be used over the table with a hex key. It also comes with two bases (plunge and fixed) so you can just yank it out whenever you need it and not have to unscrew it.
Now if you want something that will handle anything you throw at it you can get one of those 3 1/4 HP monsters which will handle every massive 3 1/2 inch raised panel bits with ease.
Some good routers are:
https://www.amazon.com/Triton-TRA001-Precision-Plunge-Router/dp/B00779ND0Q/ref=sr_1_4?s=hi&amp;ie=UTF8&amp;qid=1484625229&amp;sr=1-4&amp;keywords=triton+router
https://www.amazon.com/PORTER-CABLE-7518-Speedmatic-5-Speed-Router/dp/B0000222V3/ref=sr_1_1?s=hi&amp;ie=UTF8&amp;qid=1484625371&amp;sr=1-1&amp;keywords=porter+cable+3+hp
OR if you got the cash you can buy Festools best router:
https://www.amazon.com/Festool-574354-EB-Router-2200-Watts/dp/B0079XHISS/ref=sr_1_2?s=hi&amp;ie=UTF8&amp;qid=1484625654&amp;sr=1-2&amp;keywords=festool+router
As far as insert plates are concerned Kreg makes the for several routers our you can get them from the manufactures of the router themselves.
$50 off the Bosch Router combo kit is tempting
https://www.amazon.com/Bosch-Combination-Horsepower-Variable-1617EVSPK/dp/B00005RHPD/ref=lp_19471440011_1_15?s=hi&amp;ie=UTF8&amp;qid=1563205989&amp;sr=1-15
Bosch 1617 Router, $167 after discount
It's a great router, one of the best you can buy for handheld work. Regular price is $219, I think this is the cheapest I've ever seen this router.
Assuming you are starting from the ground up and need everything, it's going to be tight and you'll have to skimp in some places, but this is exactly what I would do. The grand total here is $5005.00 and that includes shipping on the big ticket items which is a few hundred dollars.
Table saw and related stuff:
[Grizzly G0715xp] (http://www.grizzly.com/products/10-Hybrid-Table-Saw-with-Riving-Knife-Polar-Bear-Series-/G0715P)
Freud Premier Fusion
[Freud SD208] (http://www.amazon.com/Freud-SD208-8-Inch-Professional-Dado/dp/B0000223O9/ref=sr_1_1?ie=UTF8&amp;qid=1395407011&amp;sr=8-1&amp;keywords=freud+sd208)
Gr Ripper 3d advanced (awesome on the router table too
Make your own ZCI's
Table Saw Total - $1,142
Jointer
Grizzly G0654 6" jointer (sell this on craigslist when you can upgrade to the 8". They hold their value really well and sell fast)
Jointer total $534.00
Planer
Dewalt DW734 - $399.99 most places. The 735 is nice, but not that much nicer. If I were to upgrade beyond the 734, I'd go for a 15" stationary unit.
Miter saw
Definitely go craigslist on this one. These things are a dime a dozen there. You can get a sliding 12" Dewalt/Makita/Ridgid, etc for around 250.00 to 300.00 Also pick up a decent Irwin Marples or Diablo blade
SCMS total - ~320.00
Bandsaw:
Craftsman BAS350. I own this. It's the SAME EXACT saw as the Rikon 10-321, just 200.00 cheaper. 8" resaw capacity and no stupid riser blocks to fuck up the geometry of your saw and make tensioning a nightmare.
Bandsaw Total - 620.00 with the Rikon resaw fence (bolt on) and a few timberwolf blades
Harbor Freight 2hp Dust collector, a lot of hoses, blast gates, and material to mod it to a 2 stage cyclone - 400.00
Router(s)
Bosch 1617 with both plunge and fixed bases
MLCS 15 bit set. Not the best, but better than absolutely anything else in this price range. Replace bits with Whiteside or Amanna when you have the cash.
Router and bits total 200.00
Also make your own table and fence to fill the empty space in your table saw.
Sanding
{Milwaukee 6021-21 Random Orbit Sander. Best ROS on the market until you go Festool/Ceros
Some klingspor abrasives in different grits
Shop vac bucket max and a 5gal bucket - perfect for sanders
Ridgid oscilating spindle sander. This is a tool I could definitely not live without after owning.
Sanding total - $320.00
Drill Press
Porter cable floor press
Also get the Porter Cable Forstner bit set and some decent brad points/twists)
Drill Press/bits total - ~$420.00
Clamps
Jorgensen Cabinet Master 4pc Set and various other bar clamps. The Pittsburgh ones from HF are pretty good
Clamps total ~ $250.00
Misc stuff
Woodriver bench chisels.
A vintage stanley block plane, and a jack plane
some plywood/melamine, and cheap hardwood and hardware to make a cross cut sled, router table/fence. drill press table, a workable bench/outfeed table and a grizzly woodworking end vise
Misc total - ~400.00
a set of veritas joinery saws
bosch router kit
Get a portable router like this one, and build a router sled. That'll get you almost all of the way there.
For that price, you can get the Bosch, which I think is a better deal. It's the router I have, and I've been quite happy with it. That said, a router is a router in many cases. I think the Bosch is a better deal as you get the fixed base that you can put in a router table and use the plunge base for all your handheld uses.
Greetings all!
My main suggestion to anyone wanting to get into vaping it is to skip the ego-starter kits, MVP2 (cheapish Vv or Vw boxes), non-rebuildable tanks (Protanks, Nautilus) and just drive right into the mechanical mod / box mod world. I say this because the vaping experience is so much better with rebuildables. I went with the all of the above, and I personally wished that someone would’ve told me to just dive right in, because all that stuff is sitting around not being used. The people that I’ve talked to are typically hesitant to do so because of the coil building, but there are so many YouTube tutorials, suggestions and information on /r/RBA and /r/electronic_cigarette that it’s much easier than it seems. Anyway, if I were to start all over again, these are the things which I’d buy.
Must Haves
These are the things which I consider essential to starting off the on the right foot. I’ve purchased a lot of things, and these are the things which I suggest to my friends. Most of the links are from Amazon, because it’s what I’ve primarily used.
Battery - Sony VTC5
http://www.eciggity.com/2-pc-sony-18650vtc5-2600mah-30a-battery/
These are pretty much the standard when it comes to “safe” batteries. They’re affordable, good amp limit and have been recommended many times. If you purchase from the link above, they also give you a plastic carrying case!
Charger - Nitecore i2 or Nitecore i4
http://www.amazon.com/Nitecore-IntelliCharger-i4-Battery-Charger/dp/B005UAI372/ref=sr_1_1?ie=UTF8&amp;qid=1404287334&amp;sr=8-1&amp;keywords=nitecore
Affordable, reliable and these won’t “overcharge” your batteries. The difference between the i2 and i4 is the amount of batteries they can charge at a single time. They also have a new fancier one out, called the Digicharger D2 and Digicharger D4. Those are nice because it has a LCD panel that displays a lot more information than the i2 and i4. I personally use an just an i2.
Mechanical Mod - Stingray
http://www.vaperoyalty.com/hcigar-stingray-mod-stainless-steel/
Now, 90% of what is suggested for an actual mechanical mod is going to be of personal taste. The Stingray is the “older brother” of the Nemesis. This is what I purchased when I first started out vaping. The unit is very easy to break apart, clean, has a locking ring, has a floating 510 connection and venting holes in case of a battery leak. Almost everyone I know has a Stingray.
Rebuildable Dripping Atomizer - Magma by Infinite
http://101vape.com/rebuildable-atomizers-tanks/309-magma-atomizer-clone-by-infinite.html
One of the best purchases I’ve made. The juice wells are very deep compared to everything else on the market (that doesn’t have a tank system). Threads are nice, easy to build on, post holes are large and the air-flow is easy to manipulate. You can run this on a single coil or a dual coil. Blows almost all the other RDAs I have out of the water. This is my main RDA.
Organic Cotton - Maxim Hygiene Products Organic Cotton Balls
http://www.amazon.com/Organic-Cotton-Balls-Triple-count/dp/B00E8T2X36/ref=sr_1_3?ie=UTF8&amp;qid=1404288337&amp;sr=8-3&amp;keywords=organic+cotton
I suggest using un-bleached, organic cotton. Some people take it one step further by washing them, I think thats taking it a bit far and I don’t do it. You can pick them up from any convenience store or supermarket (CVS, Walgreens, Target, Whole Foods), a 100 count will last you AGES.
Kanthal - AWG A1 26 Gauge
http://www.amazon.com/Kanthal-Gauge-100ft-0-40386-Resistance/dp/B00HALND7Y/ref=sr_1_1?ie=UTF8&amp;qid=1404288659&amp;sr=8-1&amp;keywords=kanthal+26
I like to use 26g kanthal wire for my dual coil builds. 26g is a bit thicker than what a lot of people suggest (28g), but for me, because it’s thicker, it’s easier to work with.
Screwdrivers - Stanley 6 Piece Screwdriver set
http://www.amazon.com/gp/product/B00009OYGV/ref=oh_details_o05_s01_i02?ie=UTF8&amp;psc=1
The screwdrivers which come with your RDAs are short, small and crappy. I like these screw drivers because they come in a variety of sizes and you do not need to mess with a drill-bit. What I really like about these, is at the end of the drill bit is a small little ledge (can’t think of a better word), where you can push your coil and scrunch it up a bit.
Ohm meter / Multimeter - Any generic ohm reader or Innova 3300
http://101vape.com/meters/170-ohms-meter.html
http://www.amazon.com/gp/product/B001O1X65A/ref=oh_details_o02_s01_i01?ie=UTF8&amp;psc=1
You can use a multimeter to do basically the same thing as an ohm reader. The multimeter has an added benefit of being able to read the volts are your battery as well. I have both, but I prefer to use a “regular” ohm reader. This video below can teach you how to use a multimeter for that purpose.
https://www.youtube.com/watch?v=wgXAmPBAO5g&amp;index=2&amp;list=LLU7AM2JUxXCrj4TSCDQDffw
Optional items
Things that I’ve purchased that you can probably substitute with something in your house. They’re nice to have, most people have these, but I decided to link these anyway, because I didn’t have some stuff (my scissors were too large).
Scissors - Generic surgical scissors
http://www.amazon.com/Amercian-Diagnostic-Corporation-3425-Stainless/dp/B000GHIUR2/ref=sr_1_5?ie=UTF8&amp;qid=1404289491&amp;sr=8-5&amp;keywords=surgical+scissors
To cut your cotton. Small, sharp and gets the job done.
Tweezers - Ceramic tweezers
http://www.fasttech.com/products/0/10007588/1655800-heat-resistant-stainless-steel-tweezers-for-e
Allows you to hold your coil together and torch them without heating up the tweezers.
Wire cutters - Hakko CHP-170
http://www.amazon.com/gp/product/B00FZPDG1K/ref=oh_details_o03_s00_i02?ie=UTF8&amp;psc=1
For cutting your kanthal off that spool!
Atomizer holder - Plano 23630-01
http://www.amazon.com/Plano-23630-01-Stowaway-Adjustable-Dividers/dp/B000E3FKVC/ref=sr_1_4?ie=UTF8&amp;qid=1404289861&amp;sr=8-4&amp;keywords=plano
You’re gonna buy a bunch of atomizers. Everyone buys a bunch. You’re not going to be able to help yourself. I use this plastic case to keep everything neat and separated.
Building deck - Tenderfoot Stands
https://www.facebook.com/tenderfoot.stands?fref=ts
You don’t need this. But it makes building RDAs easier. You can also place your juice filled RDAs on here.
Torch - Mini Jet Flame 503
http://www.amazon.com/gp/product/B007A9YSPW/ref=oh_details_o00_s00_i00?ie=UTF8&amp;psc=1
This will help you get those coils nice and tight, without having to fire off your mechanical mod.
Battery Case - Bluecell
http://www.amazon.com/gp/product/B007Q6PJO8/ref=oh_details_o03_s00_i00?ie=UTF8&amp;psc=1
If you don’t buy the batteries from the link above, you’re gonna want a battery case. Do not keep your batteries loose in your pocket or floating around your bag. They can come in contact with something metal and potentially damage the battery.
Here is the desktop version of your link
A good set of small screwdrivers, some sort of wire cutters, cotton, and a good pair of tweezers (preferably with ceramic tips)
I got these ones and they are great. They have from 1 - 3mm drill bits and then two Phillips ones for screwing your posts down.
Nice rubberised grips that help you keep tight hold. I'm ashamed to say I saw them on a rip video.
http://www.amazon.co.uk/gp/aw/d/B00009OYGV
First of all, does the wall plate in your office have just 1 phone line? 2 or all 4?
All 4 would be ideal, but you need at least 2 for this to work because Ethernet needs at least 2 pairs of wires.
Also if you only have 2 pairs of wires then you'll only get 100Mbit Ethernet. Gigabit Ethernet requires all 4 pairs.
This job would be made easier with a Tone & Probe kit (also known as a Toner). Simply plug the tone generator into the phone jack in your office, then go down to the basement with the probe and use it to identify the correct pair of wires.
Once you identify the pair of wires, you're going to have to remove all 4 pairs of wires (BlueWhite/Blue, OrangeWhite/Orange, GreenWhite/Green, BrownWhite/Brown) from the patch panel (the thing you showed in the picture)
It looks like you've got plenty of wire there to work with. Instead of crimping an RJ-45 plug directly on to the wire (and definitely DO NOT just twist the wires together), I would recommend punching the wire down to a surface-mount RJ-45 jack like this one.
You'll need a punchdown tool like this
As far as the jack in the office, You'll need to replace that too. You'll probably need to replace the wall plate as well.
Edit to make more clear
Only IF you have only 2 pairs of wires in the office
Then punching down the RJ45 jacks is a bit trickier. You still follow the [TIA-568B standard] (http://www.ertyu.org/steven_nikkel/ethernetcables.html) but you leave the Blue and Brown wires out (Pins 4,5,7 and 8).
It's going to be a bit confusing because the colors of the wires won't necessarily match the chart. Just make sure that you punch down each end of the cable the same way. Remember, you'll only be punching down pins 1,2,3 and 6.
Hope that helps. Good luck! :)
Damn I didn't see the second and third pictures duh! So if you use that panel I showed you from amazon (or one like it, there's a lot of wires there) this may be a better choice.
https://www.amazon.com/TRENDnet-Unshielded-Wallmount-Compatible-TC-P24C6/dp/B0000AZK72/ref=sr_1_7?keywords=patch+panel+wall+mount&amp;qid=1550278079&amp;s=gateway&amp;sr=8-7
This panel will work with cat5 or cat6, I can't tell what type of wiring you have there but you'll need that
You'll also need some way to mount it on the wall, I used one of these:
https://www.amazon.com/Tripp-Lite-Hinged-Bracket-N060-004/dp/B000E887XU/ref=sr_1_4?keywords=patch+panel+wall+mount&amp;qid=1550278079&amp;s=gateway&amp;sr=8-4
Now with the patch panel, you don't need to put ends on the wire. You use a punch down tool and they go into little clip type things. It makes more sense if you look at the pictures. Here is a punch down tool:
https://www.amazon.com/TRENDnet-Punch-Krone-Blade-TC-PDT/dp/B0000AZK4D/ref=sr_1_5?keywords=punch+down+tool&amp;qid=1550278185&amp;s=gateway&amp;sr=8-5
you're gonna need some patch cables to run from the patch panel to a switch. You're also gonna need a switch down there to connect all the ethernet cables together.
To mount the switch, you're gonna need a rack mount (to look the nicest, and a 19" rack switch).
A nice mount I used is this: https://www.amazon.com/NavePoint-Vertical-Mountable-Server-Hardware/dp/B01M151AOJ/ref=sr_1_4?keywords=vertical+rack+mount&amp;qid=1550278400&amp;s=gateway&amp;sr=8-4
and then a switch, something like this (which I picked more or less at random) https://www.amazon.com/Linksys-LGS124-Rackmount-Unmanaged-Enclosure/dp/B00H1OQBLA/ref=sr_1_3?keywords=rack+mount+switch&amp;qid=1550278467&amp;s=gateway&amp;sr=8-3 will do the job quite well. It's a gigabit unamanaged switch. You can spend a lot more if you want to, but this will probably do the job.
So from there, you need a cable from switch to that box in the first picture with the ethernet ports on the back.
That will give you wired internet in the whole house. Adding access points from there is trivial.
I know it's a lot of information, feel free to ask anything.
Edit: That verizon box in picture 3 looks like it might be more than just a modem, it might be a modem/router. If that's the case you can plug that into the switch. But if it's just a modem, that won't work even tho the ethernet port will physically connect. The best way to tell is that if it only has one ethernet port, then it's just a modem, if it has more than 1 then it's a modem/router.
I agree, build you own kit. Below is my take. Know that some of those tools are not for every day use in networking, but who can resist getting more tools? Also, if you get all of these I realize it will be over $200. So, just use this list as a guide not a definitive list.
BAGS
ETHERNET TOOLS
SCREWDRIVERS
PLIERS and WRENCHES
POWER
MISC
SUPPLIES
I'm really sorry you've lost your fingers. That's so horrible. I myself work in a shop using powertools on a daily basis so I know the risk and how easily it can happen, it's one of my greatest fears and I wouldn't wish it on anyone. I hope you're coping alright all things considered.
There are definitely resources out there for you and people who can help. Here is one, I know there are more out there. I think there's one in particular I couldn't find.
Here's a list of a bunch of .stl databases.
Here's another list.
There's probably some overlap in those but that should help. I googled 'list of 3d model repositories' to find those, you may find more with similar searches like '.stl databases'. Add 'medical' or 'prosthetic' in there too, combine them and you should find some helpful search results.
There are also places online you can pay people to print stuff for you. But honestly if you find a model that you think works for your hand situation, please pm me! I would love to print it for you and send it to you probono if you want something from asap until you can print your own (I imagine you probably will have alterations you'd like after the 1st attempt) after you've figured out your printer. I'd be happy to help you get started as well if you have any questions at all. I have gone through the initial learning curve myself for about 2 years now so I know what you're in for challenge-wise. Check out the r/3dprinting subreddit, there's a lot of helpful folks over there, there also might be a specific subreddit for your exact printer. Yep, just checked, I believe it's r/MPselectMiniOwners. I've also gotten lots of help from 3dprinting discord channels (namely '3dprinters') Discord is a chat server program incase you're unaware.
Tools and materials wise, you will need only a few basic hand tools and filament. PLA will probably do just fine for your situation (you can use more durable filament later, PLA is just the easiest to work with and best for prototypes. Hand tools that I use are a metal spatula like these, and a pair of snips like these. I also regularly use 99% (highest % is best) isopropyl alcohol to clean my printbed surface. Also get a nice gluestick to help print adhesion to the printbed surface if you run into adhesion issues. That's about it, I have other tools and stuff I use but those are my most frequently used. You might want to get a decent set of hex head wrenches these are the ones I use, they work a lot better than allen 'L' style hex wrenches for working on your machine. That's assuming your machine uses hex head nuts though.
Also, Fusion 360 is the program I'd recommend looking into if you're trying to do your own modelling. It's actually pretty easy to learn, I used a site called udemy.com which offers cheap lessons (~$10 a course sometimes cheaper) that are very helpful. Fusion 360 is free for hobbyists.
Seriously though, please don't hesitate to pm me, I'd love to help you out if you're interested in that. :)
My gf found a pair of those Fiskars scissors at one of the crafty stores around here. Changed my wick trimming life.
One other thing that changed my rebuilding life that you're missing in your list, however. Flush cutters.
http://www.amazon.com/BeadSmith-410-Micro-Shear-Flush-Cutter/dp/B000IBOOWQ
Probably flush cutters like these and a set of files to smooth the cut areas are your best option.
I just started after 20+ years, literally got my stuff yesterday in the mail. I decided to go warhammer 40k, space wolves.
I read alot before I made any decision, these two links helped me a bit:
http://www.reddit.com/r/warhammerFAQ/comments/1nzxps/the_definitive_guide_to_getting_started_in/
http://www.reddit.com/r/warhammerFAQ/comments/1nzzag/the_definitive_guide_to_getting_started_in/
From a painting perspective I started with these:
http://www.reddit.com/r/warhammerFAQ/comments/msf23/guide_to_painting_warhammer_models_part_i/
http://www.reddit.com/r/warhammerFAQ/comments/mtz5u/guide_to_painting_warhammer_models_part_ii/
I also watched a TON of painting tutorials and product reviews on youtube.
That being said, here's what i've got so far:
Brushes:
Windsor and Newton Series 7 size 00, 0, 1
Army painter wargamer regiment - for base coating stuff
Paints/Modeling Materials:
I went with citadel b/c Im following the codex color scheme. GW has paint bundles for the type of army you are building. Many others use Vallejo and reaper paints as well.
Green stuff/liquid green stuff - I need to buy this to fill in some gaps I have in my models.
Tools:
Xacto knife and blades
Micro clippers - http://www.amazon.com/Xuron-410-Micro-Shear-Flush-Cutter/dp/B000IBOOWQ/ref=sr_1_3?ie=UTF8&amp;qid=1427198666&amp;sr=8-3&amp;keywords=micro+clippers
There are many other tools you can get, depends on how far you want to go. Hopefully it helps.
On the miniatures wargame? video games? or lore?
I'm going to assume the miniatures tabletop wargame since that's the main focus of this sub...
There are many ways to enjoy the hobby. That's probably the most important thing to realize at first. For most people Warhammer is a hobby, not just a game you pickup and play. There are a few board game like games in the warhammer pantheon that are less of a full blown hobby, but still require some model building before play. For the most part Warhammer (or tabletop wargaming in general) becomes a full on hobby that takes a good amount of free time. That's the point of a hobby really, to enjoy your free time doing something other than just mindlessly watching TV.
First thing to do is decide which of the many Warhammer games you want to play. For you, this is likely easy, as you have a friend trying to get you into it.
After that, you'll want to decide on a faction to play within the game you friend is playing. Examples are Space Marines, Daemons, Orks... To decide you'll want to look at the model ranges and read a little of the lore/story behind them. Pick whichever one calls to you, whichever seem "cool."
Once you've decided on a faction, you'll start small. Assembling and painting a single box to see if this is enjoyable for you. Pickup either a single starter box that includes your faction or a "Start Collecting Box".
Startup costs are not insignificant as there are tools and supplies you'll need. But once you are going the main supplies you'll need are expanding your paint collection and replacing brushes.
Blackspray primer to prepare the models for painting. Inexpensive Rustoleum or Krylon from a hardware store/walmart works well for your first set of models. Stick to White or Light Grey if you plan to use the new easy to use Citadel "Contrast" paints. Don't forget a mask to protect you a bit from the fumes of spraying the primer and later the varnish......
If you are less into the hobby idea, but still want to play some tabletop games with Warhammer miniatures, look at the Warhammer Underworlds line. it plays like a mix of miniatures game, deck building, and boardgame. But the models are already pre-colored plastics and push to fit, so no glues or paints needed to play. Just clippers.
http://www.amazon.com/Xuron-170-II-Micro-Shear-Flush-Cutter/dp/B000IBSFAI
Best side cutters money can buy, IMO. I used to work at a plastic injection molding company as a machine operator and these blue-handled Xuron cutters were the standard tool for cutting and trimming parts fresh out of the press.
Well, if you can use the lab and it has a scope in it then you just scored big time.
As far as $100. I would get:
(amazon links for convenience, use any supplier you wish)
EDIT: Light bulb socket, 100W + 60W real light bulbs (not the hippy engery saving kind), electrical outlet - these are for making a dim bulb tester.
All I can think of right now.
I'm surprised no one has mentioned WinPE... Go find a guide on how to create a bootable WinPE 3.0 image with all the tools. It's immensely useful for changing boot partitions (bcdboot.exe) and capturing images (imagex.exe).
Also snips/shears. Like these ones:http://www.amazon.com/Xuron-170-II-Micro-Shear-Flush-Cutter/dp/B000IBSFAI/ref=sr_1_8?ie=UTF8&amp;qid=1323835862&amp;sr=8-8
I think you're going in too heavy with that paint set but it's up to you. I certainly have never bought a paint set. With the majority of kits you'll be making will probably use four or five paints per model when you start out, most of the time washes account for the most colour. Army painter make some really nice brushes/sets also paints, they are really good but half of those paints you may never use.
I research the kit I'm making, acquire the relevant paints, usually either vallejo, mig, ak or Tamiya. I have a real mix. This way I don't have any redundant paint, in the long run it's probably more expensive than just buying a set, but I can certainly say i've got no paint that i've never used.
For washes, I'd just get some oil paints, like winsor newton, some odourless turpentine. Once again, this is cheap, buy three or four colours and a pot of turps, a cheap brush a palette and you can make any colour you want. Some places like this do 4 for 3, the small tubes will last you years and years. There are some great videos on youtube for making washes with oil paints. I'd just get burnt umber, burnt sienna, maybe a green, blue, yellow and black.
You need a gloss clear coat, something like Mr Topcoat gloss is great, its acrylic so if you use enamel/oil paint washes over the top it won't ruin your base coat, and then finish the model with a matte or satin coat.
Take a step back, find a kit you want to make, see what paints you need. Get a brush set, get a can of spray primer, personally I'd use Tamiya's fine spray primer, it's cheap and really fine. Be very careful not to flood a model's detail though.
I'd go with a cheap pair of Xuron's, I started using them for my 3dprinter and now use them for modelling too, they're so cheap and sharp, the pair i've had now for well over a year and still work great. I use to treat cutters as expendable items but these seem to have stayed sharp the longest.
Either Tamiya thin or Mr's is fine, I use Tamiya as have done for years and never had any issues with it.
If you've saved some money with not buying a paint set then think about getting some decal setting solution like microscales set and sol.
I'd also recommend using companies like emodel, hannants, or a local hobbyshop. We have some great resources in the UK for scale modelling and often you'll find free shipping and cheaper stuff than on amazon at a lhs or an online reseller.
Edit, I should add, get a good hobby knife, Xacto or similar with replaceable blades. A set of fine needle files is useful as is either sanding foam, sanding sticks, sand paper of various grades.
Snag a SpeedOut kit off amazon or your local tool place
In my experience, 85% of "gunsmiths" are FUDDs. I've had some who refused to remove the pin & weld on a *stripped* barrel (it was not even connected to an upper, even though that wouldn't have made a difference because the lower is serialized/the firearm) because it would have violated the NFA. And he was extremely popular in the area and a complete koala-dick prick.
Meanwhile, I know a guy who supposedly took an AK to have the barrel chopped when it was still connected to the serialized receiver... and technically that'd make the gunsmith the maker and not the dude who had done the Form 1.
I know it's not what you're looking to do, but I strongly suggest you treat yourself to some self-education and invest in a torque wrench ( https://www.amazon.com/gp/product/B00C5ZL0RU/ref=ppx_yo_dt_b_search_asin_title?ie=UTF8&psc=1 ) and also a do-all tapco wrench (yes Tapco, but the wrench is GTG: https://www.brownells.com/gunsmith-tools-supplies/rifle-tools/wrenches/ar-15-m16-armorer-s-tool-prod54530.aspx Sadly, amazon doesn't have it atm). With these two things, you will be able to master your upper receiver/barrel group life.
Then, YouTube has all the videos you need on replacing the barrel https://www.youtube.com/watch?v=1NjNEQr4lCM&list=PLmovdvtE7X-iTinH_f2fTsVW6CWYMPcln&index=4&t=0s It's very much not that difficult.
It's worth it, I promise. You'll pay that much anyways just for one barrel change. And you can do it yourself, for the first time, in just 2 hours to account for the hemming/hawwing. Afterwards, with experience, it takes ~20min (removing the handguard, replacing, etc.).
It's not difficult, you just need the tools to pull your current handguard off and remove the barrel nut (because most handguards comes with their own proprietary barrel nut). Then you'll thread on your new barrel nut, tighten it down to roughly 30ftlbs, install the new handguard, and you're done.
You'll probably need an AR15 armorers wrench, anti-seize/grease of some sort (I like Loctite Anti-Seize, but some people have heartburns over what to use. Something is better than nothing), and a torque wrench. And probably also another inch-lb torque wrench.
As for the quality of the handguard, I've never used that one, so I can't speak for it.
I have removed many of those types of hex heads. You need to go to a hardware store and purchase a drill bit called an ez-out. Here is what they look like
Torque wrench
Socket set
Hex sockets
1/2 inch Ratchet
1/4 inch Ratchet
Combo wrench set
Calipers
Chain tool
Pretty close to everything you'll ever need to work on a bike, besides specialty tools. Buy or borrow other stuff when the issue comes up! You can do it!!
Edit: Added calipers.
It's good to have for a lot of jobs. I have this one, works great.
https://www.amazon.com/gp/product/B00C5ZL0RU/ref=oh_aui_search_detailpage?ie=UTF8&amp;psc=1
You're really going to want rotary tool like a dremel. Power drills don't spin fast enough to make good use of the bits.
You can also use a pair of flush cutters to snip those off. You specifically want flush cutters, may be labled as flush side cutters, and not regular side cutters. They cut lower than the regular ones and fit into the space better.
The tool should be available at any craft store for <$15. Do not cut axles with the flush cutters as the metal is much harder than the base metal an can damage the tool.
The metal on the base is rather soft so these work fairly well. It take some finese to do it with out having to clean anything up though.
At the time I thought this was an "experimental" cabinet. I had never built a cabinet with drawers before. I used the cheapest slides available, these things.
Don't do what I did. It's not a good place to save money. Instead, spend a little more and get some sexy ball-bearing ones.
My drawers open and close fine, but they have a cheap feel to them, and I suspect that they won't work as well in the long run. Additionally, they were a massive pain in the ass to get adjusted correctly.
Also, I used 3/4" (ish) pine ply because I couldn't find maple at my local home depot, but doing it again I'd look harder and use maple. Again, I wanted to use the cheap stuff because this was my first cabinet, but it was a silly place to save money.
The sweat that goes into making your own cabinet, even a cheap one, is well worth spending a little more on better materials.
That being said, I'm proud of mine. Which reminds me-- I should probably empty them out and put a few more coats of poly on there.
All of the cuts were made with my Festool track saw (it would have been easier with a table saw, but I don't own one) and the "handle" holes were drilled with a forstner bit and the joinery was done with the Kreg Jr. pocket jig and screws.
It probably would have gone just as well with a nail gun and glue, if you don't mind putting a little putty in the nail holes.
EDIT: I just posted a gallery of my process pics. It's not super comprehensive, but I'll be happy to explain anything that doesn't make sense.
The other commenter is right on - this is the Jon Sine Desk.
A few things I’d note:
Hope this helps. Happy to help with any additional questions you might have as you get into it. The project was a lot of work but has a very rewarding end result :-)
Here are things from my wishlist (past and present)
Wera Screwdrivers
https://smile.amazon.com/dp/B0085NTQJK/
Oscillating blade set:
https://smile.amazon.com/dp/B0109SELWA/
Clamp multimeter:
https://smile.amazon.com/dp/B00NWGZ4XC/
Kreg Jig Jr.:
https://smile.amazon.com/dp/B000J43A7W/
Angled Long Nose Pliers:
https://smile.amazon.com/dp/B00N3VSS4S/
Groove Lock Pliers:
https://smile.amazon.com/dp/B000FK1R0W/
11 ft wifi endoscope:
https://smile.amazon.com/dp/B01MYTHWK4/
non contact voltage tester:
https://smile.amazon.com/dp/B001UAHZAM/
claw nail puller:
https://smile.amazon.com/dp/B0015YPJMY/
Workmate portable work bench:
https://smile.amazon.com/dp/B000077CQ0/
Cable snake fish tape:
https://smile.amazon.com/dp/B000BP7WBO/
9 Outlet metal power bar:
https://smile.amazon.com/dp/B00F8ZQY5M/
Spade drill bit set:
https://smile.amazon.com/dp/B00099E7WE/
36" bubble level:
https://smile.amazon.com/dp/B000UKMWMO/
Neat! I already have a Kreg R3 Jr. but now I wanna print this just to have another one!
Impact driver?
https://www.amazon.com/TEKTON-2905-8-Inch-Manual-7-Piece/dp/B000NPPATS
Impact screw driver, it's a tool you put a bit in (i.e Phillips or torx in BMW's case) set the direction, and give it a whack with a hammer. 99% of the time the rotor carrier screw comes loose. Here's one on Amazon
Big tip - only cars with wheel studs (Germans and now FCA vehicles) need the screw re-installed.
Domestic and Japanese using wheel nuts, use the screw to hold the rotor in place while the vehicle is being built, (so a rotor doesn't fall off the car and hit a factory worker) apart from that it doesn't really serve a purpose.
You can get away without using it on the German cars too, but you have to make sure if the bolt snapped that it's flush with the hub.
It's really annoying trying to get the stud through the wheel then the rotor and then to the hub with out the screw holding the rotor in place.
You need one of these: https://www.amazon.ca/dp/B000NPPATS/ref=cm_sw_r_cp_awdb_t1_MbX3Bb9Y8YFD0
May be too late now that you've drilled it, but for next time these are magical.
TEKTON 2905 3/8-Inch Drive Manual Hand Impact Driver Set, 7-Piece https://www.amazon.com/dp/B000NPPATS/ref=cm_sw_r_cp_apa_i_rp.ZDb3MSFFNV
I picked up this on sale on day. Still use the big one from this set more often than anything else, but it is fun to have.
Fuck lock picks.
one of these or this, and a bolt cutter and you're set.
This oughta do the trick.
Go on Amazon and get the Wheeler torque wrench.
Wheeler Firearms Accurizing Torque Wrench https://www.amazon.com/dp/B0012AXR4S/ref=cm_sw_r_cp_api_BJXJAbTNBDGD1
Good reviews on this one for $50.
Yes, it will xome in handy. Get yourself one of these or better yet the whole kit that comes with lapping bars and everything.
this is the norm. Good reviews too, or you could go crazy.
Oh damn, I'd honestly shy away from using loctite on mounts. Look into a torque wrench and once you're at spec you won't need loctite. I've got this one and have mounted about a dozen scopes with it: http://www.amazon.com/Wheeler-Firearms-Accurizing-Torque-Wrench/dp/B0012AXR4S
Thanks, clear lower gets a lot of questions at the range.
I have been looking at this one: http://www.amazon.com/PORTER-CABLE-7424XP-6-Inch-Variable-Speed-Polisher/dp/B002654I46/ref=sr_1_8?ie=UTF8&amp;qid=1370906261&amp;sr=8-8&amp;keywords=buffer
Mostly because there is one at a local pawn shop for cheap. Anyone else have one that can verify that it's good stuff? Or should I spend the extra coin and get the same setup OP bought?
In my opinion, if this is your first polisher and you're not a seasoned professional, I would not recommend it.
Look for the Griots Garage 6in dual action polisher or the Porter Cable 7424xp 6in dual action. Both can be had for nearly as cheap. I kept the GG polisher in my Amazon waitlist because it goes on sale from time to time for $155'ish which is a steal.
Griot's Garage 10813LNGCRD 6-Inch Random Orbital Polisher with 25-Feet Cord https://www.amazon.ca/dp/B009UKUURO/ref=cm_sw_r_cp_apa_DKqxzbQJ5NVFQ
PORTER-CABLE 7424XP 6-Inch Variable-Speed Polisher https://www.amazon.ca/dp/B002654I46/ref=cm_sw_r_cp_apa_6Jqxzb3VNSE56
Also, check out the wikilinks in the sidebar for recommended products - http://www.reddit.com/r/AutoDetailing/wiki/index
This is what I have. It works awesome. You will need a velcro backing plate and the pads to go with it.
So for example, my setup was the porter cable polisher, the Meguiar's 105 & 205 polishes, a 6in. velcro backing plate, orange pads used with the 105, and white pads used with the 205 polish.
I started with the orange pads and the 105 to "cut" the paint. Just to get all those deeps swirls out. This will leave micro swirls, which is why you have to follow up with the 205 and white pads. You could probably skip the 105 step all together and just use either the white pads or black pads. (that is if you don't have really bad swirls) I would probably try to black pads first as they would be the safest and less abrasive.
So here's how I would do it with your car if you just want to try and get minor swirls out. I would 2 bucket wash, dry, and then clay. I would then tape off all your trim (if you plan on doing the whole car) as getting polish stuck between trim or on trim is a PITA. I would just worry about trim that is close to paint. Prep work will take time, but you won't have to slow down when polishing each panel. So once your trim is taped off it's time to get to work. Decide which panel you want to start with. Apply 3-5 drops of 205 polish to the black pad, have some water (preferably distilled) in a spray bottle and mist the pad. Go over to the panel and stick the pad against the panel to spread out the polish. You should have a couple spots where there's 3-5 drops of polish on the panel now. Bring the polisher up to speed, (I usually do a middle speed) and start working the polish into the panel going back and forth in a sweeping motion. Once you have thoroughly gone over the panel, carefully turn off your polisher without lifting off. If you lift off you will get polish EVERYWHERE. Now wipe it dry with a soft microfiber towel. I purchased brand new microfiber towels (basically the softest ones too) from The Rag Company. You want to remove ALL polish residue from the panel as soon as possible. Do not move onto the next panel without doing this. This will also give you an opportunity to check your work. Use a bright light to see if you can spot anymore swirls. You shouldn't see any.
I am by no means a professional, I have only done this once on my own personal vehicle. I believe I got pretty good results. Take my advice with a grain of salt. I just watched Youtube videos to learn what I know. I hope this helps! Don't be too worried or nervous. It's pretty easy and was pretty fun. But I won't lie, because I went over my car twice, my arms were killing me by the end of the day. I could barely finish the last panel (it was on the side) because my arms just wanted to give out. It was hard work, but so so worth it!
It should also go without saying, but be sure to either do this in a garage or in complete spot. You want the paint to be cool and you don't want the polish to dry on the panel. Also you don't want to have any dust blow on your paint or settle. Basically you want your paint as clean as possible before you go to town with your polisher.
Wow. I should get into paint correction. <$250 for all the tools and polish and waxes. As a car guy, I don't mind waxing my car every 6 months (or 4 months if you're in the frigid north or are anal). I also feel it's foolish to drop $2k-4k on these nano-quartz-bullshit schemes that a lot of car guys swear by nowadays. If you want to drop $4k on paint protection, go for it, but I can get a full window-out repaint for the same price!
Here's what I learned:
Buy the equipment:
https://www.amazon.com/PORTER-CABLE-7424XP-6-Inch-Variable-Speed-Polisher/dp/B002654I46
https://www.amazon.com/Dual-Action-Hook-Flexible-Backing-Plate/dp/B0008G1RDK
https://www.costco.com/Kirkland-Signature-Microfiber-Towel-Case%2C-324-count.product.100341124.html
https://www.amazon.com/Collinite-Liquid-Insulator-Wax-845/dp/B000JK2D06
http://www.autogeek.net/lake-country-beveled-pad-kit.html (MIN: 2 orange, 2 white, 1 black, 1 blue -- I prefer doubling this order; Autogeek almost always has 10-25% off coupons on their mailing list)
You will also need an extension wire with the appropriate gauge (too thin/cheap cables might cause you to burn your Porter Cable motor!)
Buy the compounds (start with UC; if swirls aren't getting cut, move up to 50%/50% UC and 105 on the pads; finish with 205 regardless):
https://www.amazon.com/Meguiars-G17216-Ultimate-Compound-15-2/dp/B001O7PNNM (medium aggressive)
https://www.amazon.com/Meguiars-Mirror-Glaze-Ultra-Cut-Compound/dp/B003LMGDHI (most aggressive)
https://www.amazon.com/Meguiars-Mirror-Glaze-Finishing-Polish/dp/B001O7PNXC
Wash your car with this, and the two-bucket method:
https://www.amazon.com/Meguiars-G7164-Class-Shampoo-Conditioner/dp/B0009IQXFO
https://www.amazon.com/Zwipes-Chenille-Microfiber-Premium-Scratch-Free/dp/B002J7KCOG
Claybar the car:
https://www.amazon.com/YGDZ-Quality-Detailing-Claybar-Shipping/dp/B01MF4BVVS
It took me about 5-6 relaxed hours on a Sunday with a few beers for the full correction. Now I simply top up the wax every few months (and that only takes 30 min).
The thing is, once you do the full correction and get rid of all your swirls and scuffs and whatever clearcoat damage (wash + claybar + M105/UC + M205 + wax), then you don't have to do the FULL correction ever again.
Ever again meaning, if you wash the car properly thereafter with the two-bucket method. You'll simply need to top up the wax once it stops beading -- the wax will protect the clearcoat from damage and swirls.
My wax lasted 6+ months being daily driven in the California sun with three coats of Collinite 845 -- I assume if yours will see more snow and ice and rain, perhaps it'll only last 3-4 months. But since a bottle costs <$20 and you'll get at least 36+ layers out of it, I always recommend this versus the "nano coatings" that people are shelling out $2-4k for.
Here's the Collinite fanboy thread:
https://www.autogeekonline.net/forum/how-articles/40243-collinite-845-definitive-how-guide-legendary-wax.html
Any other questions, feel free to ask. Good luck!
I am not quite ready to start polishing... but looks like getting 'em for $100 would save about $17-20. (Amazon)
How difficult is it to return an item or exchange or deal with Customer Service if you take part in a group buy?
Hey /r/audiophile! Three questions for you today.
I have seen the Behringer UCA202 recommended on here a few times for a DAC, but I am considering the UFO202 instead because I want to also be able to record vinyl to my computer. Is this the right choice? Will I still be able to use the UFO202 as a DAC for playback?
Also, if I plug a 3.5mm to RCA cable from the headphone jack of my computer to the AUX input of a receiver (Yamaha CR-450), will I get any additional benefit from adding a DAC, or does the receiver serve as a DAC?
3rd question: If I were to use that same 3.5mm to RCA cable to go from the headphone jack of the UCA/UFO202 to the receiver, would that be just as good as getting an RCA-RCA cable, or would that throw away some or all of the benefit of the DAC in the first place?
Thanks!
What do you need USB in for? There is no such thing as a "small" receiver. There are slimmer receivers but they are still long devices. The art phono plus has usb to connect to your computer but I'm not sure it's what you're after. A similar device is the behringer uphono if you want to buy a seperate phono preamp.
For an amp you can get a very small 2 channel amp like an smsl. If you want small you will have to sacrifice a lot of features. Receivers have sooo many features at the cost of size. They are really the only option if you want all-in-one.
EDIT: the black smsl is sold out but there are other colors available if you are trying to buy right away.
http://www.amazon.com/Xuron-170-II-Micro-Shear-Flush-Cutter/dp/B000IBSFAI
Those are what I use to trim my leads when I build my 454.
https://www.amazon.ca/Xuron-170-II-Micro-Shear-Flush-Cutter/dp/B000IBSFAI/ref=asc_df_B000IBSFAI/?tag=googlemobshop-20&amp;linkCode=df0&amp;hvadid=292954691968&amp;hvpos=1o1&amp;hvnetw=g&amp;hvrand=13078948668856573607&amp;hvpone=&amp;hvptwo=&amp;hvqmt=&amp;hvdev=m&amp;hvdvcmdl=&amp;hvlocint=&amp;hvlocphy=9000821&amp;hvtargid=pla-435531736464&amp;psc=1
Here's a big fat messy shopping list I made for someone a while ago. You might find it useful too.
http://www.amazon.com/Quickshade-Ink-Warpaints-Army-Painter/dp/B00HC8D80W
Amazon.com: Quickshade Ink Set Warpaints Army Painter
http://www.amazon.com/Pacer-Technology-Zap-Zap-Adhesives/dp/B00SXJJ2QI
Amazon.com: Pacer Technology (Zap) Pacer Technology (Zap) Zap-A-Gap Adhesives, 1 oz
http://www.amazon.com/General-Pencil-Company-Masters-Preserver/dp/B0009RRT9Y
Amazon.com : General Pencil Company The Masters Brush Cleaner & Preserver 2.5 0z. : Brush Soap
http://www.amazon.com/Army-Painter-Wargame-Starter-Paint/dp/B01BJ55UDQ
Buy Army Painter Wargame Starter Paint Set - PLUS Promo Undead figure
http://www.amazon.com/280715-American-Accents-Primer-12-Ounce/dp/B00KZ6LLZW?
Buy Rust Oleum 280715 American Accents Ultra Cover 2X Spray Paint, White Primer, 12-Ounce
http://www.amazon.com/TEKTON-6655-Needle-File-10-Piece/dp/B000NPUKYS?
TEKTON 6655 Needle File Set, 10-Piece
http://www.amazon.com/Xacto-X3311-Precision-Knife-Blades/dp/B0000DD1N4?
Buy Xacto X3311 N0. 1 Precision Knife With 5 No. 11 Blades
http://www.amazon.com/Most-Wanted-Wargamer-Set/dp/B007H4YR8S
Amazon.com: 1 X Most Wanted Wargamer Brush Set
http://www.amazon.com/Xuron-170-II-Micro-Shear-Flush-Cutter/dp/B000IBSFAI
Xuron 170-II Micro-Shear Flush Cutter: Wire Cutters
http://www.amazon.com/Milliput-Standard-2-Part-Hardening-Yellow/dp/B011BO9R5W
Amazon.com: 2 X Milliput Standard 2-Part Self Hardening Putty, Yellow/Grey
Edit: Of, and I used this guide for making my Thinner. http://www.reapermini.com/Thecraft/15 But I'm going to experiment more, because this is not perfect.
It looks like people have mostly got you started here in terms of supplies. In terms of tools though, this is what I keep in my rebuilding stuff (linking to Amazon just because its easier):
Other generic stuff:
You can now get flush cutters in blue too!
Yeah, I bought these:
https://www.amazon.com/gp/product/B000IBSFAI/ref=ppx_yo_dt_b_search_asin_title?ie=UTF8&psc=1
They work perfectly. It just takes a few seconds per switch. I'll clip the pins in a paper bag so they don't go flying when they're cut.
I'm in about the same situation as you. I'm making really small/simple stuff right now. ex, a planter box outside, a super simple and plain book case. Thus far, the most useful thing I've found is a Kreg Pocket hole jig. it's like $20-40 and it makes joining lumber at right angles soooo much easier. Dowel joints and biscuits are a pain and I'm in the same situation as you as far as buying a router and table or a table saw. Plus I'm in an apartment so space is a huge issue and storing a table based tool is just not feasible.
https://www.amazon.com/Kreg-R3-Pocket-Hole-System/dp/B000J43A7W/ref=sr_1_1?ie=UTF8&amp;qid=1465410628&amp;sr=8-1&amp;keywords=Kreg
Check out a pocket jig kit. They are about $40 on Amazonhttps://www.amazon.com/Kreg-R3-Pocket-Hole-System/dp/B000J43A7W?th=1&psc=1
Add a drill, some wood glue, and a few clamps and you can build a nice flat desk that shouldn't buckle or warp. bottem of my desk.
Good luck
Kreg pocket screws would work: http://www.amazon.com/Kreg-R3-Pocket-Hole-System/dp/B000J43A7W/ref=sr_1_1?ie=UTF8&amp;qid=1419825381&amp;sr=8-1&amp;keywords=kreg+pocket
Or you could drill holes from the outside of the frame and countersink screws in that way.
Circular saw and a Kreg jig will go a long way to help her make a bookcase.
hey OP, i'll try to answer a few questions for you if i can. i've got a handful of years of experience building custom cabinets, but am no doubt not the foremost on education in this field :)
working with wood is a lot different than working with steel, but it shares some common similarities, as i am sure you know already :)
in all simplicity there are 4 main components of a cabinet, i will use the following as reference in my reply:
a) the main cabinet or box.
b) the face frame
c) the back
d) any removable shelves/doors/etc
1) joinery
when building cabinets, etc i always start with the box
tools required: router, straight cut bit at T" or in this case 3/4", clamps, straight-edge, wood glue, compressor and brad nailer
most material used in cabinetry is usually 3/4" thick, so T=3/4"
once you have all your box material cut to size (there is an easier step you can do, i'll explain in a bit), you'll want to mark all side pieces at proper measurements of non-removable shelves at top of shelf - T. (this usually consist of a top and bottle, but in your multiple cases you'll have a few boxes with hard-fastened shelves in between)
the next step is cutting groves into your side panels for the non-removable shelves to set it.
set your free hand router up so it's cutting 1/2 the depth of T, in this case it will be 3/8". find out how far it is from the fence to the edge of your bit, practicing on a piece of scrap wouldn't hurt.
run the router along the fence cutting groves in each location.
you probably don't want the bottom of the cabinet to hit the floor, i always raise my bottoms so the bottom shelf is flush with the top of the face frame, so make sure to measure twice! :)
anyways once you've done this, you'll have a nice grove to fit your cross-shelves into
glue and nail accordingly.
as far as the intermediate up and down structures, such as the middle in http://i.imgur.com/TG9hwh.png?1, you don't require such groves.
ok moving right along, let's jump to face frame joining
tools required: miter saw, screw gun, pocket hole jig, wood glue, clamps
after you've got your box, you'll be ready to build your face frame
since you don't have a ton of money (who does?) to buy an expensive face frame joiner, Kreg has a nice pocket hole jig which i've used regularly for a while now. http://www.amazon.com/Kreg-R3-Pocket-Hole-System/dp/B000J43A7W
cut and rip your face frame components to size, turn over and clamp the jig, drill your pocket holes.. once this is done for the outer-frame, clamp and screw them together using wood glue and some pocket hole screws, kreg provides a few in the kit to get started, and Lowe's will well the kit and the screws you'll need to complete your project.
once you've done the outer frame, move into the inner frame, etc and rinse & repeat.
it's best to do this on a flat level surface you can clamp the two pieces down so they won't move, but don't worry if you're a fraction off from being flush and sticking up a hair, you can fill that with putty and sand down to flush later.
once you've built your face frame and cabinet boxes, you're now ready to glue and nail them together.
2) what wood to use.
a) for cabinet boxes and shelves
if you're going to stain it, you can probably find a decent price on red oak at your local lumber yard, this should range from $40 to $50 a sheet, depending on area
if you're going to paint it or just don't care if you stain it and doesn't have to look fabulous, you can use a cheaper paint-grade Birch plywood, often available from $20 to $40 per sheet and location
b) face frame wood you can use some select grade pine (usually stains and works well even with red oak plywood, of if you find it cheap enough (improbable) some red oak which is usually really pricey)
3) structure
if you groove the main non-removable shelves like i suggested, you won't have a problem.
if this unit were being mounted to the wall you could add some extra "nailers" but that won't be necessary in your situation
i think i've gone over the basic questions you've asked so far. if i've missed something and if you have any questions on anything feel free to ask so i can elaborate more.
it's a really interesting project you have and i'm sure you'll have fun with it.
once again, feel free to reply to me and i will answer as best i can :)
EDIT: oops, i forgot to mention the backs :)
when you're routing the groves in for your shelves, you'll want to provide a grove for the back material as well.
this isn'tnecessary, but it will provide a clean look when viewing the finished piece from the side, as you won't see the 1/4" back material.
a simple 3/8" grove 3/16" deep the length of the sides will suffice
when you mount the back, you can use 1" or less brad nails or a pneumatic stapler if you have one available.
and mount the back BEFORE you mount the front face, frame, as mounting the back is a sure way to square up the unit
you'll mount 1 side first, then 1 bottom to square.
All the boards on the top look mis aligned. It looks like just used one screw from the top so they will all turn (and always keep turning is my guess...unless they are glued, but then they are glued crooked :) )
I came to say invest in a pocket jig
It would have helped in a lot of places on this project, and this model has a countersink height (which many people have mentioned)
the legs are joined to the "apron" pieces with pocket hole screws. then there are pocket holes facing up in the apron pieces to attach the table top from underneath. A pocket hole jig is typically required to drill the holes for these types of joints; it's very easy to use, and leaves you with no visible fasteners.
The better/proper way to join the legs to the apron pieces would be using dowels or mortise and tenon joints.
A carving knife set, bar clamps, or this http://www.amazon.com/gp/aw/d/B000J43A7W?cache=ab9e4531951c0e925f4c7a03a9e4acea&amp;pi=SX200_QL40&amp;qid=1411439736&amp;sr=8-2#ref=mp_s_a_1_2
Totally worth the money:
A drill that will actually drill holes. I bought a POS drill (50 bucks) and it had no power to it. I finally dropped 250 on this and well worth every penny:http://www.amazon.com/gp/product/B00DG7SYYI
If you're doing any type of wood working and you want to join peices of wood securely and have it look nice look into the Kreg Pocket Hole Jig:
http://www.amazon.com/gp/product/B000J43A7W
I also purchased this guy to help clean up the massive extension cable that I have in my garage. Totally worth it as well:
http://www.amazon.com/gp/product/B00005A1K1
Also invest in a good pair of safety glasses and dust mask.
... nope...
An impact driver imparts not only a rotational force but additionally a linear force along the axis of rotation of the fastener. You're just hitting a wrench with a hammer.
This is what a manual, or as you said "analog", impact driver looks like
Edit: I'm full of shit don't listen to me
If you can find someone with one of these, they will work.
For oil change, a standard socket set, a drain pan and maybe an oil filter wrench is all you really need.
Depending on what you’re doing with your carbs, you might invest in an impact hammer set like this one: TEKTON 2905 3/8-Inch Drive Manual Hand Impact Driver Set, 7-Piece https://www.amazon.com/dp/B000NPPATS/ref=cm_sw_r_cp_api_i_8VjCCbNQD190X. This will prevent stripping the screws during disassembly.
You might also want to do a valve check which will require some feeler gauges. If you wanna cheap out on a valve adjustment, you can use some sand paper to bring your shims into spec. Otherwise you’re gonna need to buy some replacement shims.
this is what i am going to use.
Don't be afraid to dream a little bigger.
The ban hammer is ready.
>If it doesn't move and it should, use WD-40
Or a FUBAR deconstruction tool.
I like my Stanley FatMax Xtreme FuBar III
Someone mentioned making a bug out bag to me and I started an amazon wishlist just to keep track of it. At first it was MREs, water, firestarters paracord etc. Then knives. Then various machetes. Then I got on a khukri kick. Eventually I was looking at things like this monstrosity thinking it would be PERFECT for scrounging in the suburbs.
If you can't quite decide between a hammer or a crowbar you could always go with a fubar. been a depot goon for a while, and always wanted to grab it for the outbreak.
There's so many designs, it kinda depends what you are using it for. Something like a Fatmax FuBar is nice because the lumber grabber lets you pry on the board itself instead of between the board and something else. If you are just looking for a big ass crowbar, just wrap the shaft of the dewalt you have with some grip tape.
Demoing a whole structure like that, I'd probably be using a recip saw/ circ saw to chop it up into manageable chunks instead of trying to deconstruct it board by board.
You need in-lbs.
https://www.amazon.com/Wheeler-Firearms-Accurizing-Torque-Wrench/dp/B0012AXR4S
Use Vortex rings. I have them on my Ruger American and they are amazing. I can't remember which model they are but /u/vortexoptics can chime in. I use the ones that have size screws. I got my torque wrench on Amazon for like $45 from wheeler. Here it is.
I'm gonna poke around vortex website and see if I can find the rings for you. This is they. They are not the best thing Votex offers and I can't even find them on their website anymore hence why I had to hunt down amazon. These things work though. They aren't as good as some of my other rings but you can't beat the quality for the price.
Savage 10 in .223 Remington
Vortex Diamondback HP 4-16x42
LaRue Tactical Ultra-Low Mount Rings
OR
Vortex precision matched 30mm rings
Also buy this wrench https://www.amazon.com/Wheeler-Firearms-Accurizing-Torque-Wrench/dp/B0012AXR4S
It will help you out a ton.
In the spirit of staying buget, you could get a budget bipod that works fine too: http://www.amazon.com/Hunting-Adjustable-Spring-Return-Sniper/dp/B00U27O9TY/ref=sr_1_2?ie=UTF8&amp;qid=1463606745&amp;sr=8-2&amp;keywords=swivel+bipod
The primary arms 4-14 is great. I'd choose the R-Grid over the mil-dot.
http://www.primaryarms.com/pa4-14xffp-r-grid/p/kt-pa4-14xffp-r-grid/
I'd just pair that scope with the accompanying primary arms low rings too.
Get a fat wrench:
http://www.amazon.com/Wheeler-Firearms-Accurizing-Torque-Wrench/dp/B0012AXR4S
So you can torque everything to spec including the top rail to action and action screws (action to bottom metal).
Might consider a muzzle brake, rear bag and stock pack too, but see first how your face is sitting on the rifle.
You should be able to lay down on the rifle, close your eyes and basically go to sleep, and then open them and still have a great sight picture. So your 'resting' position on the stock should put you in line with the scope.
Others will chime in with great budget options for break, stock pack, and rear bag. I just always get triad tactical things for my rifles.
Most scope rings/bases use 15-30 in-lbs. I'd highly recommend this one:
Wheeler Firearms Accurizing Torque Wrench https://www.amazon.com/dp/B0012AXR4S/ref=cm_sw_r_cp_apa_eBqpxbSC2XE5G
This is the one that most people end up buying. I've had it for a couple years, 5 stars! It comes with all the bits you'll need.
If you want a torque wrench/screw driver for scope mounting or other light smithing work Wheeler makes a good one.
If you want to build an AR on your own (grown man legos ftw) I suggest you build one. You can build a quality AR on the cheap. There is a barrier to entry from the tools you will need but from there on out you can use those tools for multiple builds. At a minimum you will need:
---
As for AR parts you can go pretty basic with an Anderson lower (~$45 not including paperwork). Or you can get a "better" lower that has build in ambi mag release, that tab that prevents rattling (can't remember what it's called atm), etc. The lower will last you through multiple builds. I'm still rocking the Anderson lower on this ~$4,500 build so it's definitely versatile.
From there you can also go basic with the upper, where I suggest an Aero Precision (~$65). From there you'll need a BCG, barrel, handguard, buffer tube (technical term is receiver extension), stock, pistol grip, trigger, and lower and uppers parts kits.
If you want something you can just go and shoot and don't care to modify, then buy a pre-built AR. If you want to build one to custom fit your needs then I suggest you put down the money on the tools. Best part about the tools is that you can fix and replace most issues that comes up with your or your friends ARs.
Also don't forget to buy some liquid blue and aluminium black just in case.
Your torque wrench cannot possibly do inch pounds unless you have a really specialized torque wrench.
Unfortunately if you set your torque wrench to 25, you set it to foot pounds which means it applied 300 inch pounds of force.
Edit: This is what you need to do inch pounds. Wheeler Torque Screwdriver
This is what I use to install scopes. (Amazon link)
The documentation that came with the scope and the rings should have the appropriate torque, or you can almost certainly find it online. $43 is a decent investment to keep from cranking down too much and stripping the screws or, worse, distorting the scope tube or too little and having a wobbly scope.
Sounds like you need a torque wrench made for small arms.
That "DA" is not something I would use.
Check out one of these DA Polishers:
Harbor Freight DA
Griots Garage DA
Porter Cable DA
Meguiars DA
http://www.amazon.com/PORTER-CABLE-7424XP-6-Inch-Variable-Speed-Polisher/dp/B002654I46
I would get this porter cable or if you are looking for a cheaper approach maybe the Harbor Freight Dual Action.
If you want that particular DA I would buy it off amazon its 117.99 with free shipping (click add to cart to see the price)
http://www.amazon.com/PORTER-CABLE-7424XP-6-Inch-Variable-Speed-Polisher/dp/B002654I46/ref=lh_ni_t?ie=UTF8&amp;psc=1&amp;smid=ATVPDKIKX0DER
then, since you're kinda new to machine finishing I would go with a microfiber pad and something less aggressive like megs microfiber formula
http://www.detailersdomain.com/Meguiars-DA-Microfiber-Compound-D300-16-oz_p_552.html
You can totally DIY paint correct with a dual action polisher.
Here’s a straightforward shopping list and guide. This will knock out most if not all of your swirl marks.
Shopping List:
Machine Polisher - PORTER-CABLE Variable Speed Polisher, 6-Inch (7424XP) https://www.amazon.com/dp/B002654I46/ref=cm_sw_r_cp_api_i_l7SADbKPP1Q6Q
Backing Pad - Astro 4607 5" PU Velcro Backing Pad https://www.amazon.com/dp/B003CH3Z8W/ref=cm_sw_r_cp_api_i_T7SADbZ187WK1
Bugging Pads - Chemical Guys HEX_3KIT_5 5.5" Buffing Pad Sampler Kit (4 Items), 16. Fluid_Ounces, 4 Pack https://www.amazon.com/dp/B01J588UNG/ref=cm_sw_r_cp_api_i_d9SADb8WF470V
Compound - Meguiar's G17220 Ultimate Compound, 20 oz https://www.amazon.com/dp/B06W5HCZ9M/ref=cm_sw_r_cp_api_i_M9SADb0ADEMZJ
Finishing Polish - Meguiar's M20532 Mirror Glaze Ultra Finishing Polish, 32 Fluid Ounces, 1 Pack https://www.amazon.com/dp/B001O7PNXC/ref=cm_sw_r_cp_api_i_i-SADbWXADMQT
Wax - Your preference
Here’s the guide:
1 – Tool Prep
Set aside the dual-action polisher, backing pad, and foam pads. Remove the included backing plate that’s already attached to the Porter Cable polisher, use the included wrench. Re-attached using the Astro pad, secure tightly.
2 – Wash
Wash your car by hand, preferably using the two-bucket method. Afterward, move the car into your garage or shaded area. You’ll want to be out of direct sunlight, keeping the paint as cool as possible.
3 – Clay Bar
Clay bar the entire car. Make sure to wipe down the finish afterward, keeping it as clean as possible.
4 – Compound Buffing
Grab your machine polisher, the Ultimate Compound, and the orange pad. Attach the pad to the polisher using the velcro backing, make sure it’s centered. Prime the pad by dabbing 8-10 dime-sized amounts across the surface. Start working one section at a time, around 2 x 2 feet. Before you turn on the polisher, press the pad against the paint. Compound polish should be soaked within the pad, along with the paint. Press the pad against the surface, set to speed setting 2-3, and begin spreading the compound around in quick passes. Then, turn it up to 5-6 and let the fun begin. Use overlapping, slow passes. Once you’re done, wide the area clean with a microfiber towel.
5 – Inspection
Check out your results of the first section. Go over the area again if most of the swirl marks aren’t gone. If the swirls are gone, but a light haze is present, don’t worry. The finishing polish will take care of it.
6 – Polish Buffing
Use the M205 Finishing Polish with the white pad. Follow the same steps from before. Prime the pad and rub it against the paint before turning on the polisher. Use a max speed of 3-4 with medium pressure. The Finishing Polish will take care of the rest of the haze and micro scratches. Once you’re finished with the first section, wipe clean.
7 – Inspection
Again, check out the results of the M205 Finishing Polish. It’s doubtful you’ll need more than one application, but double-check all the same. If it’s looking great, move on and finish the rest of your car.
8 – Wax
Your paint is looking great. The swirl marks are gone, leaving a bright clean finish. Apply the wax using the black foam pad. Use very light pressure, letting the pad float along with the paint. You’re just coating your car’s finish, that’s all. Wipe clean with a microfiber towel.
Depends on the depth. If they're just light scratches across the clearcoat then it can be fixed with DA machine polishing, but if its really gouged into the paint then you can only just improve it at the most.
For fixing light scratches, for example using on my BRZ, I use a Porter Cable / Meguiar's G100 DA (dual-action) polisher with the DA Microfiber correction system with the 5 inch microfiber cutting disks. I use Meguiar's ultimate compound with the DA on areas were im just fixing light cobwebbing since it's lighter. Then follow up with a full wax. The two links provided below should cover it:
DA Polisher: https://www.amazon.com/PORTER-CABLE-7424XP-6-Inch-Variable-Speed-Polisher/dp/B002654I46/ref=pd_bxgy_263_img_2?ie=UTF8&amp;psc=1&amp;refRID=T5NAEKBRAPWN6WM9HT26
Kit: https://www.amazon.com/Meguiars-DMCKIT6-Microfiber-Correction-System/dp/B004VFWUXK
The kit includes everything including the backing plate to fit the Porter Cable polisher. Only things missing from the kit needed are microfiber towels.
I would buy this DA:
http://www.amazon.com/PORTER-CABLE-7424XP-6-Inch-Variable-Speed-Polisher/dp/B002654I46/ref=sr_1_1?ie=UTF8&amp;qid=1407291588&amp;sr=8-1&amp;keywords=porter+cable+7424+xp
This backing plate:
http://www.amazon.com/Astro-Pneumatic-4607-Velcro-Backing/dp/B003CH3Z8W/ref=pd_bxgy_hi_img_y
3 of these:
http://www.amazon.com/Chemical-Guys-BUFX_102HEX5-Hex-Logic-Medium-Heavy/dp/B0040MI9H0/ref=pd_sim_hi_6?ie=UTF8&amp;refRID=0NJJRSFYV45X3EWAS3NA
2 of these:
http://www.amazon.com/Chemical-Guys-BUFX_104HEX5-Hex-Logic-Light-Medium/dp/B0041MVQ4M/ref=pd_sim_auto_1?ie=UTF8&amp;refRID=11TRQVZC789CNJ8EXED1
1 of these:
http://www.amazon.com/Chemical-Guys-BUFX_106HEX5-Hex-Logic-Finishing/dp/B0042TTIYO/ref=pd_sim_auto_2?ie=UTF8&amp;refRID=08HEKJEWM7H5NRFGAQNH
Pretty sure they are all compatible with the backing plate.
Harbor freight is definitely cheaper, but for ease of use and reliability, you can't go wrong with the PC7424.
The actual tool I used was Porter Cable's DA Polisher
With that I did:
If you go this route, you'll also need a [hook&loop attachment]
(https://smile.amazon.com/gp/product/B00BQVF8J0/ref=oh_aui_detailpage_o07_s00?ie=UTF8&amp;psc=1) for the polisher. I did a lot of research before landing on what would get me good results with very minimal time. I did the whole thing in about 4 hours, after not having done anything but a normal wash for 3.5 years. about 9 months later, I'm ready for (need) another detailing.
If going to this amount of effort you can just use automotive polishing compound (bar keepers friend paste would probably be pretty close) and a wax/polishing machine. It will remove the buildup and then you can apply a coat of wax or Rain-X and you can do it inside your bathroom as long as you put a board to support the glass.
Take both doors out and lean a couple of 2x4 in your shower from the back wall to the front lip and then lean the glass against them. liberally apply polishing compound or barkeepers mix to the glass and then use the buffer ON A LOW SPEED - high speed will just make the paste fly everywhere.
I was about to do this to mine again but will try a couple of the 'easy' remedies mentioned above first.
Automotive detailers use this method on windshield of cars to remove buildup and grime and they look brand new after. I bought the Porter Cable 7424XP Polisher/Sander to polish/wax a black car that I owned and the paint was very neglected from sitting outside the past 15 years. After using a buffing compound the paint looked absolutely perfect. I used a polishing compound on the windshield and all of the scratches from the wipers and road grit were gone. The car was pristine - unfortunately I did this to sell it faster instead of to keep :-(
Edit: Your picture just loaded for me, you could probably do this while the door is closed and without removing the glass. If you open the door for better access while doing it be sure to put up a plastic sheet to keep it from spraying everywhere.
I never took a class, just watch a lot of videos. If you do decide to get a polisher, mare sure its a DA polisher. The one I use is proven to not burn the paint. At lease if you don't hold it down in one section for 20 minutes lol. It is the Porter Cable 7424 xp. I attach a 6 inch backing plate to it and use it with some of Meguiar's Polishing pads. Here is a link if you want to learn more: http://www.amazon.com/gp/product/B002654I46/ref=as_li_qf_sp_asin_tl?ie=UTF8&amp;camp=1789&amp;creative=9325&amp;creativeASIN=B002654I46&amp;linkCode=as2&amp;tag=perfautodet0a-20
Now that I think about it, Chemical Guys also sell like a complete kit that looks like a reasonable price. Here is a link: http://www.amazon.com/gp/product/B003UW1IQU/ref=as_li_qf_sp_asin_tl?ie=UTF8&amp;camp=1789&amp;creative=9325&amp;creativeASIN=B003UW1IQU&amp;linkCode=as2&amp;tag=perfautodet0a-20
I actually got mines from a local store and got rip off. This old lady sold it to me for 180 with pads only... bummer.
I think all you really need to do is clean the area well, clay it, mask it, and start with your polisher depending on the condition of the clear coat. edit: I can't spell lol
I use an app called Radiofonic, but any internet radio app or even Safari works fine. I’ll let you know when I get a Tutorial together. This is the preamp I’m using: BEHRINGER U-PHONO UFO202 https://www.amazon.com/dp/B002GHBYZ0/ref=cm_sw_r_cp_api_KN9RBbD4TJ0MK
Nice man, both your kits are pretty solid. I'm at work so I can't be as thorough as I would like but here are a few ideas that stood out.
1/8" Pad: Drop it, cut two panels off your zlite to use as the frame and then just pull them out the pack to use at night to sleep. I did this all summer with my KS50 and it worked great. You'll need to cut a little bit off the width for it to fit, but it's minimal and not noticeable when sleeping.
Headlamps: There are much lighter headlamp options and many prefer flashlights for night hiking to bring the light closer to waist level and elongate the shadows. You can also clip them to a brim of a hat for hands free use around camp. A little thrunite ti3 would be a good bet if you don't plan on much night hiking, or a Nitecore Tip 2017 for night hiking.
Knife: The Victorinox Classic SD only weighs 22grams or if all you need is a knife check out Spyderco Ladybug at 16grams. Avoid amazon for the ladybug, there are counterfeits going around i hear.
FAK: You could likely pair this down, mine only weighs 1.5oz
Houdini P/O: Seems unnecessary with the versalite? But I've never worn the Nano-Air Light Hoody, is the idea that the houdini would provide a breathable wind barrier when used in combination? I know this is a common strategy with fleece.
Kahtoola Micro Spikes: If we end up needing them this year I'm going to try Snowline Chainsen Light. Quite a bit lighter than microspikes.
On a side note, when do you start?I'm heading out on May 18th. Edit: Nevermind...somehow missed this in your post...maybe I'll see you all in Oregon or Washington! I'm targeting a late August finish.https://www.amazon.com/Victorinox-Swiss-Classic-Pocket-Knife/dp/B00004YVB2/ref=sr_1_2?ie=UTF8&amp;qid=1485888088&amp;sr=8-2&amp;keywords=swiss+army+knife
IMO, it's worth investing $12 in a Swiss Army knife. The one you chose looks to me like it'll break fairly easily, but I haven't used exactly that one so I can't be sure.
I dunno if that's all the food you're taking, but you might consider adding some variety. I'd get pretty sick of that diet after a day of it, but maybe you're not so picky.
I'd be interested to hear how that pack holds up! The gear snob in me says there's gotta be a reason why good packs cost $250, but the starving college student in me is more willing to compromise.
I"m assuming that you will be going soon, say the next month or so, time of year counts, but I'll assume it's soon.
Your tent is a little "meh." it'll work but it might not last so long; especially take core of the poles, they beak easily. Also the cheapo tent stakes that come with the tent are going to bend and you will curse them every time you set up your tent. Pick up some like these and they will serve you well. (Personally I hate using tents; they are hassles to set up and take down, and generally not pleasant to sleep in. If you can help it try sleeping under the stars and see if that suits you.)
You might find your sleeping bag to be a bit chilly, I'd recommend a 20 degree bag with a hood. I know it won't get that cold but the degree ratings are quite exaggerated so 20 degrees is really more suitable for 50 degrees. If you don't want to spend more money on a bag, make sure you have warm clothes and a good fitting beanie.
Air mattresses are fine, just take care to feel out for thorns or anything that might puncture it. Also you might want a blanket or something in between you and the mattress because it will suck out the heat from underneath you if you don't have some insulation.
You should have a tarp or footprint to put your tent on to protect it and the air mattress from punctures, it's worth it. The tarp you have should be fine (maybe doubled over if its thin), but a footprint will be more convenient.
For $15 that stove is a great deal, buy it if it still works fine. It runs off of white gas AKA "camp fuel", which you can find at many grocery stores, gas stations, any place with a sporting goods section, and many stores near popular camping areas. Finding white gas is not really an issue.
Don't buy matches, just get 2 or 3 Bic lighters. Really you should learn to make a fire using only your lighter, make that your goal each night. In a pinch my favorite fire starter is one you can make at home before your trip. Get an old egg carton and stuff each cup with cotton balls or dryer lint. then pour melted candle wax into each cup until about 90% full. Let the carton harden then pack it away. To use it rip off one cup and light the cardboard edge, you will have a strong flame for about 15 minutes.
Don't buy a filter. Water will be easy to come by at most campsites, but not all of them have a tap so make sure to bring along a few extra gallons just in case.
Lanterns produce almost no usable light, save your money and stick with the headlamp. Also that headlamp is excellent I highly recommend it. Protip: leave it around your neck like a necklace when you sleep then it's easy to find in the middle of the night.
I have a lot of experience with wilderness medicine and those pre-made kits are mostly worthless, you are much better off making your own kit.
I Recommend:
Chair looks comfy, get one you like with at least 1 cupholder
A good knife makes a great survival tool and is just generally a useful item, check here every few days for a good deal on high quality knives. Multi tools are great to have around camp but an inexpensive set of tools would be much better for your situation. If you want a true multi-tool this one is good quality and a fair price.
I still play with toys. Different toys, though. More expensive, heavier, higher age rating.
Bought this a few days ago:
https://www.amazon.com/Bosch-1617EVSPK-4-Horsepower-Variable-Collets/dp/B00005RHPD
If the EVS goes out, the router runs at max speed. Which can still be used but scares the crap out of me for slightly larger bits. The best tried and true router is the porter cable here
If you don't need anything that powerful, this one works well also.
Mid power range, this works okay as well.
There are a few other options available. If you want to move it between a pantorouter and table, these will work well. If you want to use it for router table only, triton is a much better choice due to the built in router lift and above table bit change.
Looking at this one on Amazon - http://www.amazon.com/Bosch-1617EVSPK-4-Horsepower-Variable-Collets/dp/B00005RHPD/ref=sr_1_cc_1?s=aps&amp;ie=UTF8&amp;qid=1463398215&amp;sr=1-1-catcorr&amp;keywords=router+combo.
I had no idea they were quite this pricy for a good one. My budget doesn't really have $200 in it right now. I may have to get this project to the point where it's done except the routing and then re-evaluate where I am financially.
Also picked up the Bosch 1617EVSPK kit and have been very happy with it. Only used the fixed base mounted to a router table so far, and has performed nicely. As me again in a week and I will let you know how the plunger base performed.
In woodworking I stay away/give away anything craftsman before it hurts you or ruins your project.
A router is very versatile. This is a tool you don't want to cheat yourself. You will want one that can plunge as well.
There is no need to put money into a router table if you don't have money. I built mine out of mdf, and when I got money spent some on a better top.
Bosch is typically my go to brand. I went with them here as well. And have been very happy. Power is up to you. I went mid range and it has been just fine. A little Bulky for fine stuff (if handheld) but can tackle the bigger projects. this is the one I have and would recommend.
http://www.amazon.com/Bosch-1617EVSPK-4-Horsepower-Variable-Collets/dp/B00005RHPD
Edit: as much as I hate Dewalt s terrible, terrible customer service if you found theirs for a good deal I have used it as well and is good.
A bit over $150 (currently 189 less 25 for the holiday promotion), but if he needs a good router I've loved this set. Tons of things that you can use a router for in the shop and this one has lots of accessories that cheaper ones lack like edge guides and dust collection.
https://www.amazon.com/Bosch-1617EVSPK-4-Horsepower-Variable-Collets/dp/B00005RHPD
In that case, you really should look at either the Rigid 4512 or the Delta 36-725 (either runs $500-600 at HD or lowes). That $200 kobalt saw is not going to serve you very well. I wrote up https://www.reddit.com/r/woodworking/comments/3j4zl9/intro_to_tablesaws/ to help out folks looking for a table saw. Craigslist can take some time- even if there's nothing now, you may well be able to find a deal if you can wait a while. Set up an automated search that emails you when it finds new matches.
As far as a router goes, I'd recommend http://www.amazon.com/Bosch-1617EVSPK-4-Horsepower-Variable-Collets/dp/B00005RHPD over the one you linked, for very similar money.
So full price, the Craftsman is roughly equivalent to this Bosch. How do these two actually stack up and is the Bosch worth the premium over the Craftsman even at the sale price?
EDIT: Just noticed the lack of a built-in dust collection system on the Bosch. Looks like this kit would solve that issue for another $40.
Also, any recommendation on good value bits?
My 618 has been great, and the D-handle option makes it even more useful. The alternative is the Bosch 1617EVSPK, which is also well regarded.
You can watch like 6 videos and know how to build a computer. Once you know what fits where, it's like putting together legos. These screwdrivers make everything way easier too.
You'll want some precision wire cutters, not sure if thats included with the pliers you listed.
Once you get tired of dealing with the piece of shit coil jig you can pick up some precision screw drivers like
http://www.amazon.com/Stanley-66-052-6-Piece-Precision-Screwdriver/dp/B00009OYGV/
or even the all metal ones that have more options for smaller coils
This and my hands make a pretty solid wrapping kit
SECTION | CONTENT
:--|:--
Title | Vaping Coil Winding Jig Tool
Description | Fasttech Vaping Coil Winding Jig Tool for Rebuildable Atomizers https://www.fasttech.com/p/1926001 stainless steel / 1.5mm + 2.0mm + 2.5mm + 3.0mm + 3.5mm sections SKU 1926001
Length | 0:01:17
SECTION | CONTENT
:--|:--
Title | UD Coil Jig V3 - Demonstration
Description | UD Coil Jig V3 http://www.vapetime.co.uk This is a quick demonstration of the Coil Jig V3 by Youde Technology. For more information please visit: http://www.vapetime.co.uk/ud-coil-jig-v3/ If you have any questions please do not hesitate to call, contact us or leave a comment. We are always happy to help :)
Length | 0:04:00
SECTION | CONTENT
:--|:--
Title | Quick and Effective coil build for RDA atomizers
Description | ::EDIT:: It's a good idea to check your resistance ( ohms ) BEFORE you attempt to glow and fiddle with your coils. The resistance will change as your coils get more even. So check before, then check again after. Thanks. Hey everyone! If i'm being 100% honest. I mostly shot this video for my brother who recently got into the world of rebuilding. He was really struggling with it. Rebuilding has become such second nature to me that I often forget how it feels to be building for the first time and that sense of frustration that sets in quickly. So hopefully some other people will find this video helpful. Rebuilding honestly just takes practice and patience. ANYONE can do a solid simple build that will produce both great flavor and large clouds ( if you want ) The build in this video came out to 0.3ohms, which will work great on a mech mod, or on a higher wattage regulated device like the Sigelei 150w or iStick 50w I used 24g Kanthal, 6 wraps around a 2.5mm screwdriver. Below I have links to most everything I used in this video. Including some "beginner friendly" RDA atomizers. Precision screw drivers http://www.amazon.com/Stanley-66-052-6-Piece-Precision-Screwdriver/dp/B00009OYGV/ref=sr_1_1?ie=UTF8&amp;qid=1435336275&amp;sr=8-1&amp;keywords=precision+screwdriver+set&amp;pebp=1435336344707&amp;perid=1M11EBNKQ3Z63A7B0VQ8 Wire Clippers http://www.amazon.com/Hakko-CHP-170-Stand-off-Construction-21-Degree/dp/B00FZPDG1K/ref=sr_1_1?ie=UTF8&amp;qid=1435336368&amp;sr=8-1&amp;keywords=Wire+Clippers 24g Kanthal http://www.amazon.com/Genuine-Lightning-Vapes-Kanthal-Resistance/dp/B00JWYIHLY/ref=sr_1_1?ie=UTF8&amp;qid=1435336391&amp;sr=8-1&amp;keywords=Kanthal&amp;pebp=1435336399204&amp;perid=0Q2SHF5N87Q64YJT5F9E Organic Japanese Cotton http://www.amazon.com/Japanese-Organic-Cotton-Organic-unbleached-Largest/dp/B00P219C5Q Unfortunately the VapeKit has been discontinued. They are doing a V2 kit, but in the meantime check this one out http://www.coil-master.net/product/diy-kit Some good RDA's for new builders IMO Mutation X V4 http://www.vapordna.com/Project-Sub-Ohm-Designed-Mutation-X-V4-RDA-p/psmxv4.htm The Mako http://www.beyondvape.com/store/import-cat-c-1_2/beyond-vape-mako-rda-p-1927.html The IMP http://www.empiremods.com/product_p/youdimp.htm Thanks so much for watching everyone! hope this is helpful. Feel free to follow me on Instagram http://instagram.com/grimmgreen/ Twitter https://twitter.com/GrimmGreen Facebook https://www.facebook.com/GrimmGreen Also please remember that unless you make it so I can reply to you. I will be un-able to reply to your comments.
Length | 0:22:32
****
^(I am a bot, this is an auto-generated reply | )^Info ^| ^Feedback ^| ^(Reply STOP to opt out permanently)
Here is the screen you need ($53). Here is a precision screwdriver set you can use ($4). Here is video showing you how to fix it.
Do it yourself, and save $100 or so.
Youtube I guess. Here's some info about rebuilding in general, feel free to skip what you already know. Make sure you get an ohm reader first thing. You can buy wire and an ohm reader at lightningvapes.com with coupon code LV20 for 20% off. I think most people recommend 26g wire. I went with 24 and it's awesome for subohming, if you're planning to build higher, 28g would be the best. I'm not sure how well 30g will work out but the link below will let you know!
Also check out this website: http://steam-engine.org/coil.asp
On there you input your gauge wire, single/dual/etc coil, your target resistance and what the diameter of your coil is (you'll know this by which drill bit you wrap your wire around. It'll tell you how many wraps to do to get the resistance you want. After you build you'll want to throw the atty on the ohm reader to check for shorts (it won't show a regular reading if it's shorting) and also to check if you're near what your target resistance was. Don't be worried if it's not exact, the 510 ohm reader boxes aren't known for accuracy. If you're within 0.05 ohms you're good. Also some people like to build on their ohm reader, it's nice.
As far as other tools for rebuilding. I would recommend this screwdriver set: http://www.amazon.com/Stanley-66-052-6-Piece-Precision-Screwdriver/dp/B00009OYGV/ref=sr_1_2?s=hi&amp;ie=UTF8&amp;qid=1420044741&amp;sr=1-2&amp;keywords=stanley+6+piece+precision+screwdriver+set
It's great, I use it everytime I touch my mod for maintenance. Not sure what other people use but since I got that I never looked for anything else! The bits are awesome for wrapping coils around and the phillips will fit your post screws for sure.
That's about all you need really. Other than wire cutters and pliers/tweezers. You can get these awesome ceramic tipped tweezers from that first site. The ceramic won't get hot so you can squeeze your coils tighter with them while the coils are hot.
As far as preventing shorts, well I've never had a short so I can only tell you what I do. Don't let your coils' excess legs be hanging out and flying around all willy-nilly. Cut them nice and close and if you can't get close enough, bend them upward. That's about it as far as I know.
Let me know if you have any questions, sorry I couldn't teach you to build!
28g is good to start with. You'll also need something to wrap your coils on. These screwdrivers are a popular choice. You can also use the little blue screwdriver that will come with your magma. SteamEngine is your friend for coil wrapping.
Pro tip: throw out the pre-made wick and coils that come with your RDA, because they're crap. Keep the extra screws, O - rings and screwdriver, just in case.
Size 0 Phillips, 1.4mm slotted. Here is the kit on Amazon; http://www.amazon.com/Stanley-66-052-6-Piece-Precision-Screwdriver/dp/B00009OYGV/
They're usually called "precision screwdrivers." Something like this: http://www.amazon.com/Stanley-66-052-6-Piece-Precision-Screwdriver/dp/B00009OYGV
http://www.amazon.com/gp/aw/d/B00009OYGV?pc_redir=1411139902&amp;robot_redir=1
there's the link to the one I have
1 - They make a lot of variations of this:
http://www.homedepot.com/p/Vanco-1-Gang-3-4-in-x-1-1-2-in-Hole-Hinged-Wall-Plate-for-Cable-White-120617X/205359407
https://www.amazon.com/Datacomm-Electronics-45-0008-WH-Recessed-Voltage/dp/B00390IT7O/ref=sr_1_8?s=audio-video-accessories&amp;ie=UTF8&amp;qid=1484761144&amp;sr=1-8
Just do a search for "data wall plate" or "Multimedia wall plate"
2 - Not sure what you are talking about. Do you mean where your ethernet terminates and the networking gear will be? They make network boxes, but if space is no objection I prefer racks.
3 - Definitely punchdown. You don't need a different punchdown for cat 5 vs 6. There are 2 primary punchdown types (110 and krone). If you get the below punch down tool, you'll be able to use either punch down panel type. 6 is a little more annoying to punch down because it has the extra insulator in it, otherwise it's all about punch types.
https://www.amazon.com/TRENDnet-Punch-Krone-Blade-TC-PDT/dp/B0000AZK4D/ref=sr_1_1?s=electronics&amp;ie=UTF8&amp;qid=1484761269&amp;sr=1-1&amp;keywords=punch+down+tool
What's the extra PITA? I did a few drops of CAT6 in my house and it's not that difficult. All are successful in one try.
This is what I use:
https://www.amazon.com/TRENDnet-Punch-Krone-Blade-TC-PDT/dp/B0000AZK4D/ref=sr_1_4?ie=UTF8&amp;qid=1472754190&amp;sr=8-4&amp;keywords=punch+down+impact+tool
Requires quite a bit of force but when it makes that slot machine sound, it works.
Other useful things:
If you used the plastic tool that came with the jacks, they suck. Push and wiggle (parallel to the groove) to get the connections to terminate; but be careful not to cut the wires inside the jack - as opposed to just the excess.
Or make your life easier. Though if it's one-time it may not be worth it. Note how the blade is only on one side with that.
As u/manarius5 point out the cat-5 cable is setup as phone; and you will need to change it over to network.
Best option is to get a patch panel, a punch down tool, jacks, 2x WAP; maybe this one. You might or might not need a switch, you might also want to consider going with POE to power the WAP. You would also want to get some cat-5 jumpers.
Please make sure your parents are not using POTS( plain old telephone); if they are, you can still do this, but would need to proceed with caution. Install new wall jacks, install new punch down block down stairs; when punching down, follow the color coding for A or B, dosn't matter which, just keep it the same on both sides. Move Comcast modem next to the location in your pictures. Setup the WAPs on either side of your house, plug the Roku in hard wire. This setup would use 3 ports on the Comcast modem/router, so no switch needed.
If your parents are still using the phone, only move the jacks to network that you are going to use.
A more advance solution would be to go with a wall mounted rack, Ubiquiti equipment for router, switching and WAPS, buy a cable modem and return the Comcast unit.
Well I'll be the first one to give you generic information that you could have found with the search function.
You just do the needful.
https://www.amazon.com/dp/032194318X/ref=wl_it_dp_o_pC_nS_ttl?_encoding=UTF8&amp;colid=3IXCECMPTZ0C5&amp;coliid=IJFXHOHENJ2FH
https://www.amazon.com/dp/0321492668/ref=wl_it_dp_o_pC_nS_ttl?_encoding=UTF8&amp;colid=3IXCECMPTZ0C5&amp;coliid=I3J2AR8V86JZMD
https://www.amazon.com/dp/0596007833/ref=wl_it_dp_o_pC_nS_ttl?_encoding=UTF8&amp;colid=3IXCECMPTZ0C5&amp;coliid=I2OPTI4J0S4UG2
Good screwdriver set.
https://www.ifixit.com/Store/Tools/64-Bit-Driver-Kit/IF145-299
A network tone tester in case you need to map out your network and document everything. Also functions as a basic cable tester.
https://www.amazon.com/Fluke-Networks-MT-8200-60-KIT-IntelliTone-Toner/dp/B00N2S6RPY/ref=sr_1_5?ie=UTF8&amp;qid=1473701817&amp;sr=8-5&amp;keywords=fluke+networks+tester
A punch down tool.
https://www.amazon.com/TRENDnet-Punch-Krone-Blade-TC-PDT/dp/B0000AZK4D/ref=sr_1_1?ie=UTF8&amp;qid=1473702091&amp;sr=8-1&amp;keywords=punchdown
An ethernet crimper.
https://www.amazon.com/TRENDnet-RJ-45-RJ-12-RJ-11-TC-CT68/dp/B0000AZK4G/ref=sr_1_1?ie=UTF8&amp;qid=1473702137&amp;sr=8-1&amp;keywords=ethernet+crimper
A quick cable stripper.
https://www.amazon.com/Monoprice-Stripper-Cutter-Cables-107051/dp/B0069LRBU6/ref=sr_1_3?ie=UTF8&amp;qid=1473702190&amp;sr=8-3&amp;keywords=ethernet+stripper
A usb hard drive dock.
https://www.amazon.com/Sabrent-External-Duplicator-Function-EC-HDD2/dp/B00IKC14OG/ref=sr_1_2?ie=UTF8&amp;qid=1473702021&amp;sr=8-2&amp;keywords=usb+hard+drive+dock
A notebook.
https://www.amazon.com/Rhodia-Meeting-Book-Made-France/dp/B001DCDSW6/ref=sr_1_1?ie=UTF8&amp;qid=1473702220&amp;sr=8-1&amp;keywords=rhodia+meeting+book
Your necessities may vary, this applies to more of a one-man shop, and there's plenty of other things you'll want to get that I don't have listed here depending on your job.
I dunno how much you should get paid.
Just FYI, it's just an Ethernet jack. There's no such thing as an Ethernet splitter, because Ethernet uses point-to-point links only. The thing to use when you have one Ethernet connection and need more is a switch.
That looks to be a standard punch-down Ethernet jack. Get a punch-down tool. Remove the cover from the jack. The jack will have labels indicating which wire goes where for the A and B wiring schemes, note which was used. Pull the wires out. Move the cable to its new location. Trim the wires back a little so you aren't punching down the same bit of wire a second time. Put the wires in the jack's slots according to the same wiring scheme you noted earlier, and punch them down. If the tool has a cutoff blade, make sure it's facing away from the center of the jack so you're not cutting off wire you just punched down.
Also, the tech did a HORRIBLE job of terminating it. A properly punched jack should have the cable looking like this witht he cable entering from the back center of the jack and the individual wires being as short as possible.
And disregarding the horrible job he did of it, installing a jack is absolutely the right way to do this and certainly does not make him an idiot. The alternative would be to crimp a RJ45 plug onto it, which is much worse. The plug wouldn't fit through the hole either, can't be reused if you cut it off, and is much harder to install properly than a jack.
Also, keep the tool. Being able to run and terminate your own Ethernet is always a good thing. You've probably got quite a few devices that stay put (i.e. game consoles) that are on Wi-Fi but could and should be on Ethernet instead.
Here's what I have found handy around the house:
I think the odds of me crimping RJ11/RJ12 are pretty slim, so I don't worry about that ability.
All you need is a (cheap) punch down tool and some sort of a patch panel. It's really not that hard. If you have to pull any insulation back you might want to use a stripper. But you can probably just get away with small dykes. Just try and keep the twist as close to the punch down as you can---but it doesn't have to be perfect to work.
Also, there are two wiring standards 568A and 568B. They have to match on each end so you might want to pull one of your wall jacks to see how it is wired. Just Google for a wiring diagram to see the difference. Or your jack and panel might actually have both color coded on them and you can see which way they did the jacks.
I aways have used the B standard. IIRC the A standard provided backward compatibility with old AT&T standards. But if your jacks are A I would not change them to B.
This is a selection of what I keep in my tech go-bag. You'll build your kit as you learn and build experience, or realize you could have helped a customer out of a jam quicker if you had that tool with you.
Various extra parts I've accumulated over the years like screws, ATX Molex Power to SATA Power Adapters, ATX Molex Y splitters, SATA cables etc..
Good luck and some tools overlap like multi tools and pliers so if budget is low, go with the tool that covers the most jobs.
Edit: I noticed your bag is kind of expensive compared to something like a Dewalt tool bag. I use a plain Dewalt bag which is not as cool as the one in the link, but it's just as tough. This might be a good and less expensive consideration for you if you don't require the look of a briefcase for your tool bag.
Edit 2: You may want to mark your tools with a wrap of some crazy bright color electrical tape to be able to recognize them when they walk away.
Do you live anywhere near Phoenix?
If not they are not difficult. The ends are just keystone Cat(x) jacks that go into a wall plate.
You might borrow or buy a punch tool to make the connection.
I had Cat6 run in my house a few years ago and had the electrician run one end into a closet and leave them unterminated. I patched them to this patch panel myself (even though I have nearly no electrical or wiring experience) using this punch down tool. It's a bit time consuming, but not hard at all. You can wall mount or rack mount (this is what I did) the patch panel then run short cat6 patch cables from the patch panel to your switch. If you do it yourself, be sure the electrician leaves a few extra feet on the unterminated end in the closet, just to give you some flexibility, and that he or she lets you know which standard was used on the terminated ends (since there's an A and a B standard and you'll have to know which to use on the patch panel).
If you are running CAT cable around the house, you will probably want to run all the cable to a common point where they can connect to your patch panel, switch(es), servers/NAS and routers. Most people locate this place out of the way in a basement, to hide the clutter.
If you are running CAT cable you should really use CAT6A which is certified for 10G speed. CAT6 is not a standard. CAT6A is. I used shielded CAT6A. You should buy a spool of solid CAT6A wire that you can cut to specific lengths.One end gets wired to a keystone jack that is usually mounted in the wall of where you need to connect something. The other end is wired to the patch panel. The patch panel has normal jacks that you would use with regular premade patch cables to connect to switches which then connect to the server/NAS/router, etc.
Examples and tools needed:
CAT6A structure cable: https://www.firefold.com/064-series-cat6a-shielded-cable
Patch Panel: https://www.amazon.com/gp/product/B00AQL46TY/ref=oh_aui_detailpage_o06_s01?ie=UTF8&amp;psc=1
Small Rack to hold patch panel and switches (servers would need bigger rack):https://www.amazon.com/gp/product/B000VDPBXM/ref=oh_aui_detailpage_o06_s00?ie=UTF8&amp;psc=1
keystone jacks: https://www.amazon.com/gp/product/B00CLVAJCK/ref=oh_aui_detailpage_o06_s03?ie=UTF8&amp;psc=1
Wall plate mounting bracket: https://www.amazon.com/gp/product/B003JQL0S8/ref=oh_aui_detailpage_o05_s00?ie=UTF8&amp;psc=1
Keytone wall plate cover: https://www.amazon.com/gp/product/B0072JVUPG/ref=oh_aui_detailpage_o06_s02?ie=UTF8&amp;psc=1
Tools:
Punch down tool:https://www.amazon.com/gp/product/B0000AZK4D/ref=oh_aui_detailpage_o06_s02?ie=UTF8&amp;psc=1
LAN Cable tester: https://www.amazon.com/gp/product/B00OUFX38W/ref=oh_aui_detailpage_o06_s02?ie=UTF8&amp;psc=1
Flush cutters. This pair and this pair are the industry standard workhorse. Absolutely essential tools.
PanaVise clamps are a must have. This one and this one are my favorites.
A manually operated solder sucker will be an important buy as well.
You should only cut zip ties with flush cutters. http://www.amazon.com/Xuron-410-Micro-Shear-Flush-Cutter/dp/B000IBOOWQ
Otherwise cut the sharp part off with a knife.
I use flush cutters to snip the parts out of the sheets for the most part. Here is an example.
For bending tabs I use a precision plier set and sometimes small tweezers.
Xuron makes a set of plastic nippers that are more than acceptable for beginners and will last you until you decide to upgrade.
https://www.amazon.com/dp/B000IBOOWQ/ref=cm_sw_r_cp_api_mAKQyb4XASNKF
So ideally you go to a local hobby store and look at what models they have, then pick one you like and within your price range. You can start off with 1/144 scale HGs (High Scale), but I am a firm believer that if you can follow instructions, you can start at any scale and any grade. I am a sucker for kits with cool box arts (like the MG Shin Musha). Get a pair of side cutters to help with [piece from tree removal] (http://www.ghostofzeon.com/diy/assembly/removingparts.html). Obviously, shop around to get a good price. There are a wealth of useful links and threads on right hand column under "Current Events" (not sure why it is under current events...) Other model kits include [Zoids] (https://www.amazon.com/Zoids-Japanese-Kotobukiya-Model-RZ041/dp/B003UTUEVI/ref=sr_1_1?s=toys-and-games&amp;ie=UTF8&amp;qid=1481057397&amp;sr=1-1&amp;keywords=zoids), Evangelion, and even [Batman] (https://www.amazon.com/SpruKits-DC-Comics-Batman-Arkham/dp/B00L5KKUR2/ref=sr_1_3?s=toys-and-games&amp;ie=UTF8&amp;qid=1481057500&amp;sr=1-3&amp;keywords=batman+model). There are also like tanks and planes and battleships...
Ah, okay. Still, super glue isn't a bad option for plastic.
Oh! The one other optional thing I forgot would be some kind of epoxy putty. It comes in strips of two colors, which you knead together to activate it so it will eventually harden. It's used to fill in gaps where you fit together pieces that don't fit together quite right (or imperfections in the model). The most common is "green stuff" made by GW (though I've seen other brands). Again, totally optional, but you can keep it in mind if you have a model that didn't come together quite right and you'd really rather fix it than let it be.
The way you thin your paint isn't the thing that's going to clog your brushes. Much more important is how you use and maintain the brush. Try not to get the paint deep down into the ferrule (the part where the bristles meet the handle), like by pushing the brush down hard onto the palette or model. Also, be sure to clean your brushes when you're done! A little soap and water is plenty. Some people occasionally use conditioner (it is hair, after all). I use this. It's great because you can soap up the brush after you get the paint out of it, reshape the point, and let it dry. It helps keep the brush in the right shape.
As for clippers, I just picked up the ones my local hobby shop had in stock. Xuron. They've worked great, and cut through plastic and metal nice and neat. Again, one of those things that are nice to have but not strictly necessary. You could also probably use something cheaper, as long as you don't try to get too precise (which might go off and scratch the model). Most board game minis won't have any use for them, but they'd be handy for something that comes on sprues like KDM.
And I'm glad to help! Let me know if you have any more questions. You can also go to /r/minipainting for more.
You can use either type of switch.
That being said, I'd recommend that you use plate-mount switches. Many people do use PCB-mount switches, but they're not really necessary since the switches fit quite snugly into the plate, and the plate is made of beefy stainless steel. Besides, if you use the PCB-mount switches, you'll have a bugger of a time getting them to sit flush on the PCB since those leg holes are smaller than the legs themselves.
One thing to note: if you've bought Zealios for your planck, I highly recommend clipping those legs for best results. You can use a pair of flush cutters to clip those things off quite nicely. (This is what I use on my Zealios.)
EDIT: Re-read your question. Hope this is a better answer.
This is a very useful tool and will significantly cut down the work time you spent. However, I think that this will serve you better in the long run as it will contain a lot of the basic tools that you will need for this hobby.
No offense, but your title implies nail clippers are the #1 way to remove nubs for model kits, when they are definitely not. As someone who used nail clippers to remove nubs since building Tomy Zoids in the early 2000s for over 15 kits, I had become experienced (and tired) with them.
They leave terrible gash marks, are uncomfortable to use after working on a kit for hours at a time, cannot reach into odd spaces which you mentioned, and can get dull after a short while if you work on kits occasionally as well as clip your nasty-ass nails.
Maybe you have fancy nail clippers that are comfortable, are extremely sharp, and cheap, but I imagine most people have ordinary dull nail clippers meant solely for cutting nails.
These side cutters have been with me since I started the hobby last year. I've been through 9 kits in varying grade and they haven't stopped being a good tool. I've also used them for cutting brass rods, paper clips, wood, etc.
If you really really prefer them over proper cutters then I can't be one to judge, but in the long run a good pair of nippers will be your best friend (along with your hobby knife)
I don't think the phono pre amp will help for your particular use case, while you may need a pre amp, its not going to help with the mixing of sounds. If I understand correctly you want computer sounds mixed with the vinyl player output. Some have recommended a line mixer which I'm sure is a valid option however it is another thing cluttering up the desk. Something most people don't consider is that windows has a way to do this natively. If you were to hook up your record player via usb (if it has it) or through a phono USB interface like that you can listen to that recording device, mixing it in with windows sounds.
The new X version Audio-Technica AT-LP60X is on sale for $69. The only upgrade for it is from the stock conical to elliptical LP Gear CFN3600LE stylus $29.
Behringer Headphone Amp is a cheap option to use for earbuds. Or Behringer U-Phono adds a USB output.
If you only have a small room, PreSonus Eris E3.5 $99 speakers have a headphone jack or look for larger speakers for a medium size room or larger.
Better headphone amps start around $100.
Better turntables with adjustable tracking force and a better cartridge:
I use this one by behringer which is nice because it has a built-in phono pre-amp so you can also use it to record vinyl to mp3.
Just make sure you have it going through a mixer with a pre-amp to bring the phono up to line level. Alternatively, something like this might be useful if you don't have anything else with a pre-amp.
For those interested in doing this, but don't have the equipment, here are several audio interfaces for capturing vinyl to digital:
The Behringer UCA202 would be good for setups with an external preamp, output through the monitor function (tape out) of a receiver with built-in phono preamp, or a turntable with a built-in preamp.
The UFO202 has a built-in phono preamp and would be good for connecting the turntable directly to the computer -- no external preamp or receiver needed. The ART USB Phono Plus would be the same, except you will get a definite upgrade in clarity and presentation with it's phono preamp.
All of these interfaces max out at 16 bit / 48 kHz, so they are not high-res (24 bit / 88.2 kHz or higher), but they are going to capture at CD or better quality, which should be fine in most instances.
I don’t recommend this. Unlike the line-in that used to exist on previous models, you would be recoding to a monophonic input and totally trash the sound quality.
The best solution would be to pickup something a little more costly, but could actually preserve the remaining quality of the cassettes.
https://www.amazon.com/dp/B002GHBYZ0/ref=cm_sw_r_sms_c_api_i_QNS-AbVSPPWG1
Steel pegboard with slots and holes is pretty awesome for storage. You can put shelves, bins, and hooks on it to hold just about anything, and it's easy to rearrange things when your storage needs change.
Also, tape.
Also, if you don't have an EDC multi-tool already, the Kershaw Select-fire 1920 is pretty awesome for tech work. It's not the kind of multi-tool that has a bunch of little crappy tools. It just has 1 pretty good knife and one pretty good screw driver. Unlike most multi-tools though, the screw driver is center aligned and uses standard hex bits, four of which can be stored in the tool itself. It's been worth every penny.
http://www.amazon.com/gp/product/B002IVPKOU/ref=oh_aui_detailpage_o01_s00?ie=UTF8&amp;psc=1
http://www.amazon.com/Flashlight-Torch-Adjustable-Focus-Light/dp/B006E0QAFY/ref=sr_1_2?ie=UTF8&amp;qid=1408984916&amp;sr=8-2&amp;keywords=flashlight
2 pens and a notepad
In no particular order:
Headphones: Airpods (https://www.amazon.com/Apple-MMEF2AM-AirPods-Wireless-Bluetooth/dp/B01MQWUXZS/ref=sr_1_3?ie=UTF8&qid=1539218047&sr=8-3&keywords=airpods0
Keys: Nothing special on there except for a Tile Mate and Kershaw Cinder (https://www.amazon.com/Kershaw-1025X-Multifunction-Performance-Stonewashed/dp/B01BAJK7DE/ref=sr_1_1?ie=UTF8&qid=1539217909&sr=8-1&keywords=kershaw+cinder)
Watch: G-Shock (https://www.amazon.com/gp/product/B01GR7MG9C/ref=oh_aui_detailpage_o08_s00?ie=UTF8&psc=1)
Wallet: Andar Baron (https://www.amazon.com/Andar-Leather-Minimalist-Blocking-Bi-Fold/dp/B01F4KDQGA/ref=sr_1_2_sspa?s=apparel&ie=UTF8&qid=1539218111&sr=1-2-spons&nodeID=7141123011&psd=1&keywords=andar+wallet&psc=1)
Paracord Bracelet: No link, got it a gun show last weekend
Flashlight: Olight I3T EOS (https://www.amazon.com/gp/product/B07DLRK7Q5/ref=oh_aui_detailpage_o05_s00?ie=UTF8&psc=1)
Pen: Pokka Pen (https://pokkapens.com/pages/produkts)
E-Cig: Aspire Breeze 2.
Knife: Kershaw Select Fire (https://www.amazon.com/gp/product/B002IVPKOU/ref=oh_aui_detailpage_o04_s00?ie=UTF8&psc=1) or Leatherman Skeletool (https://www.rei.com/product/123035/leatherman-skeletool-topo-multi-tool) depending on which one I think looks better that day
Firearm: Sig Sauer P320 compact with a subcompact frame on it and a Pyntek Compact IWB Holster (https://pyntek.com/products/compact)
Belt: Trayvax Cinch (https://www.trayvax.com/collections/gear-1/products/cinch-belt)
Water Bottle: Yeti Rambler (https://www.amazon.com/YETI-Rambler-Stainless-Vacuum-Insulated/dp/B01ADWO0E6/ref=sr_1_4?ie=UTF8&qid=1539218323&sr=8-4&keywords=yeti+water+bottle)
29 bucks on Amazon
Kershaw Select Fire (1920); Multifunction Pocketknife https://smile.amazon.com/dp/B002IVPKOU/ref=cm_sw_r_cp_apa_i_5L00Cb3YQDX52
Sister in-law expressed interest in this when I showed: https://www.amazon.com/dp/B078K28DGG/ref=cm_sw_r_other_apa_i_X5JRDb8AB9HHA
Cheap EDC with incredibly bright flashlight. I'm not a huge fan of the bulk and height of the body where the light and fire starter are housed.
I personally keep putting this one back in my pocket and is most common EDC https://www.amazon.com/dp/B002IVPKOU/ref=cm_sw_r_other_apa_i_D8JRDbXJ0313J
Being a Kershaw, warn them on closing. Sliced my finger within 3 mins of unboxing... The driver and screwdriver heads are solid and don't fall out line cheaper versions. Just love having a very sharp blade with screwdriver handy
Here is a pocket knife/ but driver. Did you decide yet? https://www.amazon.com/dp/B002IVPKOU/ref=cm_sw_r_cp_awdb_kOfWzbRAWNX87
I've never heard of or seen an assisted opening knife with a screwdriver. Kershaw has the Select Fire which is an inexpensive manual open knife with a few screwdriver bits.
I'd personally suggest getting something like the Piranha tool and carrying a Kershaw Speedsafe knife.
I would like to suggest something different. Instead of a full multi-tool, you might like the Kershaw Select Fire.
It has decent steel, and comes with a small and large bit for both flat head (good for picking ice without damaging blade), and phillips (good for adjusting bindings etc.).
I used to carry the Ken Onion by Kershaw, but I think I'm going to get one of these as a Christmas present to myself, because that looks awesome. A little too thick but ultimately incredibly useful.
For the price, I would recommend the Kershaw Select Fire - not only does it sport a pretty rugged, sharp blade, but it has a built-in screwdriver set. I use this thing a few times a week and love it.
Industrial mechanic/electrician here. This is probably the most used tool in my arsenal.
I have the Compact Milwaukee and am not a fan; the blade comes loose all the time, especially when doing things like cutting drywall or removing wire insulation. I have used the Fastback Milwaukee though with good results, it’s just a lot bigger and doesn’t feel as good in the hands. I’ve owned 1 of the Compact, 0 of the Fastback.
The Klein pocket knife looking one is garbage for doing actual work with. I’ve owned 1 of these.
I have a SOG Flash 2 w/ serrations that I love but it’s my EDC and doesn’t live in my tool bag. Super sharp and the serrations slice though sheathing like hot butter. I’ve owned 4 of these.
I have a smaller one, a skelotonized Gerber w/ Lenox blades that I love as well. That one does live in my tool bag and is used all the time. The Lenox gold blades are amazing. I’ve owned 1 of these.
Milwaukee Compact
Milwaukee Fastback
Klein Electricians Knife
Sog Flash II
Gerber EAB Lite
The EAB Lite might be what you're looking for, it's very reasonably priced and allows you to use common utility razor blades that can be easily switched.
I find making the cables to be the nicest looking.
I find the tool kit, cable cutter, knife and combs to be necessary. However you could use scissors instead of the knife and cutter, go without the combs, and use paper clips and small screwdrivers instead of the tool kit.
The paracord has a million options and is very cheap. Buy too much.
If you're really careful, you don't need heatshrink. However if you need it, it's really cheap.
gerber EAB ( $9 )
Nitecore TIP ($29)
ROCO minimal wallet ($15)
Chapstick ($2)
Earplugs ($7)
Pen ($40)
This looks over-budget, but I bought most of the above on sale. Great thread, I added a few things to my wishlist, that's why I'm posting, to keep this going!
I'll have to go with Gerber folding utility knife, this small as possible kind:
http://www.amazon.com/Gerber-31-000345-E-A-B-Pocket-Knife/dp/B002RILCLY/ref=pd_sim_sbs_hi_23
The one I have is slightly different with G10 handle, but they don't make it anymore... but I don't think it matters. Couple nice things about this: It is just so small/light and the clip works very well. I can kinda put it near the top of my pocket and I never know its there. And more importantly it takes normal razor blades, so I can buy a 50 pack and every other week or so put in a new blade. This is a huge both because I always have a super sharp blade that makes cutting thing so enjoyable, and because unlike having a fancy knife, I don't worry about treating the blade like crap. I don't care if it dulls. I've got some nice knives and used to carry one all the time but I was so careful with them.
I've had this box cutter/ knife for a few years and it has held up very well. Gerber has a lifetime warranty that I will probably never have to use. I've owned many pocket knives but this one is hard to beat for quality. Best part about it is that it's under $8 on Amazon with Free Prime shipping.
https://www.amazon.com/Gerber-Lite-Pocket-Knife-31-000345/dp/B002RILCLY
It's not quite the same but I have something like the Gerber EAB for a small carry and love it. Uses a utility knife blade tho. https://www.amazon.com/Gerber-Lite-Pocket-Knife-31-000345/dp/B002RILCLY/ref=sr_1_4?keywords=gerber+folding+knife&qid=1571754968&sr=8-4
I tried this one, and had to ditch it after a few days. I kept it clipped in my front pocket, and any time I would bend at the hip, or squat, the tip on the but end would poke right into me. Had to take it out of my pocket when I drove. Albeit, I'm real skinny. I loved the action, but I can't carry it. I keep it in my toolbag now.
I've since replaced it with this Gerber. It doesn't hold any blades, and I had to loosen the pivot to be able to flip it open one handed, but the size is awesome. You can use a coin to loosen the blade when you do need to replace it.
You might be interested in something like the Gerber EAB or Gerber EAB Lite for that utility blade. Both are pretty nice. Ironically, the EAB is lighter than the EAB Lite.
Thank you. Nothing fancy, just a utility knife. I just used the tiles to trace the pattern that I needed and to make sure everything fit. Cuts were made in 2 to 3 passes, the first just barely breaking through the surface to make sure the shape was right.
http://www.amazon.com/gp/product/B002RILCLY
Here ya go. Opens one handed and locks. Has a clip and can be used as a money clip if you don't want to clip it on your pocket. The blade is replaceable and technically is just a box cutter, so it shouldn't cause too much of a fuss if it's seen. Also, you never have to sharpen it, just pop out the blade and replace! I have one and carry it frequently.
its actually this one i used to carry it and they are awesome.
Leatherman style CS is what I carry. Fairly solid and very light weight. They also make the style ps which has pliers and the style, which is an even smaller tool. Also as others suggest, the squirt ps4 seems like a solid choice.
Leatheman Style CS has excellent scissors and a very good blade for it's size(1.6in blade). It is basically a step up for the SAK classic. Better scissors, blade, and tweezers. Loose the toothpick and gain a bottle opener. Can be found for around $20. It won't replace an actual knife in most peoples EDC, but for many it could.
If it isn't enought knife then look into a value dedicated knife like an opinel no.6 as well if you want more knife.
Not sure that this is low profile, but I've been eyeing the Leatherman Style CS recently (so I don't have firsthand experience with it): https://www.amazon.com/dp/B0032XVNMQ/ref=cm_sw_r_cp_apa_fp-DAbW7AP9PD
If he had been carrying a Swiss Army knife that's probably the style he prefers, Opinel makes single bladed knives that open in the same way his old SAK did, and leatherman makes amazing multitools, I would recommend checking all these brands out.
Opinel knives are usually extremely cheap and run about 20$/£, their most popular knife is the No. 8 for about 12$/£, it comes in other colors and wood types as well. No. 8 is a bigger model and it might be a little bulky for someone use to a SAK, the small the number in the name ex. No. 7, No.6, get smaller as their number designation does. I have the No. 8 Trekking knife in slate and its a pretty great knife for its price (18$/£).
If he likes Swill Army Knives, there are quite a few more options to look at, they can get a little pricey for their size at times, I own the Tinker, this was my first knife and I have found that looking at the tools on these knives would behoove you. I do not need an awl in the knife I carry every day for instance. There are many many options to chose from, and through a little sifting you may find one that you feel suits him best. Victorinox (the brand that makes swiss army knives) also makes knives that are a little closer to the opinels I mentioned earlier, a few of their models (like this one) are simply one or two blades. I would look into local laws however, I know some places do not allow blades that can be opened with one hand like the one I linked you to.
Leatherman makes wonderful multitools and a few pocket knives. Nearly everything they make have blades that lock as a safety feature, although very few can be flicked open, so I would check the specifics of this law, I doubt a multi-tool is illegal. This is the Micra, it appears to be a smaller version of a leatherman I own that I cannot find on their site. This one has a blade that opens in a way that is legal for sure, its blade does not lock either. If you find that some locking blades are allowed, the Skeletool is a favorite of mine, it may look a little outlandish but it has always had the best combination of essential tools out of any of my multi-tools, and it is one of my favorites. The Style is a smaller version with slightly different tools ( I don't think it has screwdrivers), but it's blade does not lock. The skeletool is about 70$/£ I think, and their smaller tools like the micra and style are under 30$/£, this brand has quite a bit more I didn't touch on, if you think he would like something like this I would check out site, I hope you find something that works, I know I'm always thrilled when my girlfriend gets me a new knife.
I've been eyeing those AirConsoles for a while. A good flashlight is great. That screwdriver someone mentioned was cool.
I have this one and like it a lot.
Folks have mentioned the smaller Leatherman tools here. I liked this one so much, I bought one for both of my key rings.
This is a fun idea.
Assuming you carry a separate knife:
Gerber Shard - $6.82
Fenix E01 - $12.73
Total: $19.55
The Shard does so much for so little, and the Fenix is a very reliable, functional flashlight (with the added bonus of using easy-to-replace AAA batteries).
Assuming you don't carry a separate knife:
Leatherman Style CS - $16.79
Generic button cell light - $3-$4 at Walmart or wherever
Total: $20.79 (assuming the $4 price on the button light, it's a little over, but you can probably find one for $3 if you look)
OR
Victorinox Rally - $11.60
LRI Photon II - $8.27
Total: $19.87
This kinda depends on your needs. The Style functions better as a knife than the Rally (in my opinion), and offers essentially the same tools plus a great pair of scissors. But in return, you sacrifice a little in terms of your light. Personally I'd opt for the Style + generic.
I had the same issue and switched to Leatherman CS: http://www.amazon.com/Leatherman-831207-Clip-On-Multi-Tool-Scissors/dp/B0032XVNMQ/ref=sr_1_1?ie=UTF8&amp;qid=1375145170&amp;sr=8-1&amp;keywords=leatherman+style+cs
> Multi-tool always seem too heavy for what they offer
That's not heavy if you ask me. I think the Style is perfect for every-day on-person EDC, and the Skeletool for either on-person or in an EDC bag. The Skeletool is missing some features compared to a full-up Charge TTi (8 ounces) or similar, but for an EDC, it's better than not carrrying a multitool at all.
https://www.amazon.com/gp/product/B000EDPT9K/ref=oh_aui_search_detailpage?ie=UTF8&amp;psc=1
or
https://www.amazon.com/Leatherman-Sidekick-Multi-Tool-Stainless-Sheath/dp/B005DI2QTC/ref=sr_1_5?s=hi&amp;ie=UTF8&amp;qid=1511230425&amp;sr=1-5&amp;keywords=leatherman
Leatherman Sidekick is just over $20 on Amazon right now; typically $40.
Highly recommend Unifi AP's with a mikrotik controller. Even better if you can leave an old laptop on site for managing the unifi stuff remotely.
A single unifi outdoor model might be a good place to start, then it doesn't need to be located inside the tenants premises-- no one wants to have a tech banging around in their attic to re-align the antenna. They are also very impressive with better range than the enterprise or long range hockey puck units.
Adding additional units if necessary (and the software will be able to tell you unlike other brands/models) is a cinch, the controller software sets them up so that the network is seamless and centrally controllable.
A mikrotik rb2011 would be a good choice for a router. It has 10 ethernet ports which is formidable, and it has lots of horsepower so that you can implement content blocking if necessary to preserver the quality of the network.
http://www.amazon.com/Mikrotik-RB2011L-IN-10-Ethernet-Ports/dp/B008GZ7NEC/ref=sr_1_4?s=electronics&amp;ie=UTF8&amp;qid=1405127763&amp;sr=1-4&amp;keywords=rb2011
http://www.amazon.com/Ubiquiti-UniFI-Outdoor-Access-802-11bgn/dp/B0066DV06I/ref=sr_1_1?s=electronics&amp;ie=UTF8&amp;qid=1405127813&amp;sr=1-1&amp;keywords=unifi+outdoor
Don't forget CAT5e, RJ-45 connectors, and a crimping tool if you don't have them already:
http://www.amazon.com/Cat5e-Ethernet-Cable-500ft-Cat-5e/dp/B0092THNDW/ref=sr_1_1?ie=UTF8&amp;qid=1405127939&amp;sr=8-1&amp;keywords=cat5e
http://www.amazon.com/Cable-Tester-Crimper-Connector-Network/dp/B008UY5WL0/ref=sr_1_1?ie=UTF8&amp;qid=1405127990&amp;sr=8-1&amp;keywords=rj-45+crimpers
These should work...not high quality, but will get the job done.
https://www.amazon.com/UbiGear-Crimper-Connector-Network-Crimper315/dp/B008UY5WL0/ref=sr_1_2?ie=UTF8&amp;qid=1468289842&amp;sr=8-2&amp;keywords=cat5+crimper
It's easier than it looks...just take your time and use scissors to cut the ends of the Cat5 straight. A few YouTube videos and you'll be a pro in no time.
You might be able to call up some cabling companies in your area and tell them you just need the cat5 cable terminated. Not sure how much they'll charge you... but it's probably more expensive than just buying the crimper and doing it yourself (it's not really that hard).
https://www.amazon.com/UbiGear-Crimper-Connector-Network-Crimper315/dp/B008UY5WL0/ref=sr_1_1?s=pc&amp;ie=UTF8&amp;qid=1473190092&amp;sr=1-1&amp;keywords=cat5+crimper
I can almost guarantee this is cable-related, especially given the intermittent nature of the issue. First, make sure the cable isn't loose, and try to push the cables into the connectors a bit. If this doesn't fix your issue, you will need to fix the cable.
A cat5 cable is comprised of four twisted pairs, a total of 8 little
wires. Somewhere in those 20m, one of those wires is cut or damaged.
It is most likely to be at the tip where the RJ45 connector (clear piece) attaches, and if the cable is run through the floors, you better hope this is the case.
Figure out what order the cables go into the connector by looking at them. They are identified with pairs of colours, as shown here
The connector will most likely look like this
Notice that there are two distinct standards. It's important that you use the same standard when re-crimping the cables on both ends.
You can simply cut about 10cm off each end, and obtain a crimper tool to reattach new connectors.
To use the crimper, insert the ends of the cables into the slots in the "empty" connectors, and then press down with the crimper to lock them into place. It's not very difficult, but you need to decide if it's worth your time and effort.
If the break in the cable is in the middle (unlikely, but possible) you're looking at ripping out the cable and running a whole new one. I don't know how exactly the cable is run, if it comes through a plate in the wall, or if it's just a cat5 cable shoved through a hole drilled in the wall, but either way replacing it is going to be pretty expensive unless you do it yourself. I would personally recommend doing this professionally, and getting two "plugs" installed in the walls.
edit: If you know any computer geeks who might know how to do this, or who already have a crimper, invite them over for a beer or something it'll take them 5 minutes
edit2: If you live in Montreal i have the day off and like beer
http://www.amazon.com/Wild-us-Tester-Crimper-Connector-Network/dp/B008UY5WL0
http://www.amazon.com/Cat5e-Ethernet-Cable-000ft-Cat-5e/dp/B0092TG310/ref=sr_1_2?s=electronics&amp;ie=UTF8&amp;qid=1416346085&amp;sr=1-2&amp;keywords=ethernet+1000ft
http://derose.net/steve/guides/wiring/cat5split.png
> landline
> im older
lol
anyways, what you want is an ethernet switch. (with Gigabit speed preferably) you don't necessarily need new RJ45 cables unless your existing ones are damaged or you don't have enough. it might be worth the cost to get a crimping toolkit and spend the time to make 1 cable into 4 shorter cables that go to a switch, so you don't have to buy more cable for each device.
here's a listing for an 8 port gigabit switch that should work
existing combo modem/router/switch/AP boxes can be configured as a wireless access point/switch.
information on how to use a second router as an access point/switch
here's that crimping kit I was talking about
You can crimp ethernet cables quite easily - just need the end pieces and a crimp tool (this kit is GREAT)
Power cables can also be done but are a bit easier then Ethernet or telephone cables as they are just a positive/negative/ground wire into an end....pretty straight forward but I advise getting a cord that is already destroyed and working on it first...duh :P should just be copper inside colored tubes that goes to a specific end...typically red is power spot / grey or black is negative / and a completely different color is for ground - but that is a guess on my part as I've not taken one apart in forever as it is cheaper and faster to just get a different/new one.
Telephone cables are basically the same as Ethernet, just need to know the wire pin layout <-- that link is both RJ11 telephone and RJ45 ethernet layouts and its the same process (obviously need telephone ends to crimp onto it - that link has 50 to a bag).
Most cables are straight forward ESPECIALLY with the internet having the answer to cable layouts and everything :)
EDIT - once you do an ethernet cable crimp job everything else becomes very easy haha.
you can get a [kit] (https://www.amazon.com/gp/product/B008UY5WL0/ref=oh_aui_detailpage_o01_s00?ie=UTF8&amp;psc=1)
for pretty cheap and I got over 700' of cable for $20 on craigslist.
I just got this, that look ok? And the 1000M lights up, so yea I'm betting it's his wiring....
So that pic doesn't do the the other two cables justice but neither have lights on their ports. So is it possible both of those were meant for phone connectivity and I need to hook up the two detached white wires to get data on my bedroom ports?
First i'd snag this, every dude needs a good set of tools anyway
https://www.amazon.com/gp/product/B009MKGRQA/ref=oh_aui_search_detailpage?ie=UTF8&amp;psc=1
with that you can unscrew the bottom case and then just aircan everything/ look at the vents to see if there is lint.
WARRNING*** Air cans are an endothermic liquid reaction. Dont be an idiot and point the can upside down as then you'd just be spraying subzero liquid all over your computer.
When you shoot compressed air at the fan/ vents you'll usually see a cloud of dust if its been a few months.
https://www.amazon.com/Dust-Off-Compressed-Gas-Duster-Pack/dp/B00DZYEXPQ/ref=sr_1_1?s=electronics&amp;ie=UTF8&amp;qid=1474916670&amp;sr=1-1&amp;keywords=air+can
This is your laptop https://linustechtips.com/main/uploads/monthly_2016_04/Dell-XPS-15-9550-Disassembly-1.jpg.19236a764c57f928c6aefa7ca5b8b72f.jpg
Air can everything, why not, but focus on the fans/ the vents leading out of the fans. and scoop out any visable lint. also dont aircan the fans into them spinning craizly that's a good way to fuck up the fans because you can actually spin them up to some crazy rpms if you go full retard.
Just a suggestion, [this:] (https://www.amazon.com/TEKTON-2830-Precision-Electronic-27-Piece/dp/B009MKGRQA/ref=sr_1_6?s=videogames&amp;ie=UTF8&amp;qid=1468693084&amp;sr=8-6&amp;keywords=tekton+tools) is a good investment. I've used it for smartphones, laptops, DSLR cameras, Xbox remotes, and more, but like others are saying, on ebay you might get lucky and find a listing with a screw driver included, or just flat out find it cheaper.
This kit comes with lots of tips, extenders, a case, and another tool which I haven't found a use for yet, all for $11. You might even be able to find it cheaper somewhere else!
I believe that the newer models uses a pentalobe 1 head, and yeah you can just screw them back in.
I would recommend buying this
I bought this tekton screwdriver kit and it's worked beautifully for everything I've needed so far. If you ever need more, the iFixit Mako is worth every penny.
This is what I used along with a set of tweezers and a magnet to magnetize the bits, I'm sure they have sets that aren't that much more expensive with both included.
TEKTON 2830 Everybit (TM) Precision Bit and Driver Kit for Electronic and Precision Devices, 27-Piece https://www.amazon.com/dp/B009MKGRQA/
http://www.amazon.com/TEKTON-2830-Everybit-Electronics-Precision/dp/B009MKGRQA
I've got this one.
Best? Probably not. We've been firm believers in the Husky ones where I used to work: http://www.homedepot.com/p/Husky-8-in-1-Precision-Slotted-and-Philips-Screwdriver-Set-71281H/204664388
I used to take laptops apart for hours every day, it always seemed to do me well. I slighly preferred their older style (looked like this)
Basically they work well until they get lost, and they're cheap enough to just repurchase.
I also used this at another job: http://www.amazon.com/dp/B009MKGRQA
Not amazing quality, but I liked the selection of bits. Also cheap.
You won’t need that.
Also tons of kits, all over the price range. Here is an example.
TEKTON 2830 Everybit (TM)... https://www.amazon.com/dp/B009MKGRQA?ref=ppx_pop_mob_ap_share
Will most likely only need one.
Should get this little guy though, super handy.
Buy this: http://www.amazon.com/gp/product/B009MKGRQA/ref=oh_aui_detailpage_o04_s00?ie=UTF8&amp;psc=1#
Just bought this set to use to install some SSDs in my MBPs works great and cheap.
http://www.amazon.com/gp/product/B009MKGRQA/ref=oh_aui_detailpage_o04_s00?ie=UTF8&amp;psc=1
I got this one: http://amzn.com/B009MKGRQA
Now I can open up my knives as well as my Apple electronics.
I can't help you on the chain rivet tool
In terms of a ratchet kit - since the rear axle nut needs to be torqued down pretty heavy, you'll want a decent torque wrench that can comfortably hit the spec on the rear axle nut. Do you know lb ft your rear axle nut needs to be torqued to? I'd suggest getting a torque wrench that does 15-150 ft lbs something like this , as most axle nuts need somewhere in the 75-110 ft lbs. Then, at the least you need a socket that 1) matches the drive size on your torque wrench (likely .5 inch) and 2) the axle nut size (can vary a lot. mines 27mm, some are 24mm, recommend checking service manual and/or google). You'd be even better off for doing other work to just get an impact socket set, should be able to find something decent for ~$20 on harbor freight, and then a cheap ratchet (for when you just need to loosen things up or other various tinkering activities)
I like the Tekton torque wrenches, have 2 sizes and never had an issue. In terms of sockets, anything not made out of chinesium is fine (Harbor freight set has been good for me)
Buy a torque wrench. They're important to have and not terribly expensive either. This one has worked great for me. $35.
https://www.amazon.com/TEKTON-24335-2-Inch-ft-lb-13-6-203-5/dp/B00C5ZL0RU/ref=sr_1_3?s=power-hand-tools&amp;ie=UTF8&amp;qid=1524178399&amp;sr=1-3&amp;keywords=torque+wrench+1%2F2+inch+drive
>Okay wow much more expensive than oil bought at the auto store, but I think I’ll take your advice and spring for it.
Oh I forgot - if you do, Omaha is a partner of this subreddit. If you use the code RedditDucati at checkout, you get 5% off and free shipping. It is more expensive than generic oil or whatever, but this is the oil they use from the factory, as well as a factory filter, the o-rings and washers and wrench you need, etc.
Ideally, you should also have a torque wrench to re-torque the drain plug and filter (you don't have to use one, but it's a good idea and I'm really anal about stuff like this). I use a Tekton one from Amazon. (I also have a smaller one that I use for lower torque stuff.)
>I can’t seem to get the free play in a place where the clutch fully engages yet lets me find neutral.. Perhaps I wore the clutch too much or maybe even with the recommended spacing my cable is too long after putting lower handlebars on.. although tension is tension so I’m not sure how much extra length should matter.
Tension is tension, you're correct. If you replaced the bars, though, you do need to make sure that the cable is routed in a way that it isn't binding up anywhere. This means no sharp bends or turns or twists, especially right near where it connects to the lever mechanism. I've seen people with swapped bars who end up putting a lot of pressure on the cable right there with how it's routed and that makes the cable not slide freely.
>As far as the oil thing goes, I thought paying the extra fees and going through a dealer would make buying used safer but aside from that I don’t know how one buys a used bike while making sure there’s nothing wrong under the hood.. is there any way to ensure against buying a bike with a problem like oil consumption or leaking?
It's tough, because it can get expensive. You can do things like leakdown tests and compression tests to see how well the cylinders and pistons are mated, but that's not cheap, especially on a bike like a Duc where getting to that rear cylinder head is a pain in the ass.
Honestly, it's entirely possible that your bike isn't eating oil, and that it just got underfilled when you bought it. I would do the oil change and get it so you know that the oil level is right. Then ride it for a while (like weeks / months) and keep an eye on the oil level. It shouldn't change.
You should get a tekton torque wrench. Mine has stayed true for a few years and it goes up to 150 ft/lbs. Cheap too.
I got a tekton one for about $40 on Amazon, it doesn't have to be high dollar as the torque range is huge. I built my dad's without one and just went to the next gas tube spot past "tight" never had any issues and that thing shoots. That method wouldn't work so well for the aero Handguards that have 4 spots for the gas tube and a set of shims though so I got one for a friend's build.
TEKTON 24335 1/2-Inch Drive Click Torque Wrench (10-150 ft.-lb./13.6-203.5 Nm)
https://www.amazon.com/dp/B00C5ZL0RU/ref=cm_sw_r_cp_apa_LNTWAbP1FXQPT
TEKTON 24335 1/2-Inch Drive Click Torque Wrench (10-150 ft.-lb./13.6-203.5 Nm) https://www.amazon.com/dp/B00C5ZL0RU/ref=cm_sw_r_cp_api_pz2izbFQR4974
I bought this guy off Amazon and I've been very pleased with it.
These work as a last resort providing the head is large enough. Pivot screws are usually plenty big enough.
If you have an electric drill, these work better than cutting slots in screws
https://www.amazon.com/Ontel-SpeedOut-Damaged-Screw-Extractor/dp/B00IRL3WP4?ref_=fsclp_pl_dp_5
OP: you need to get your hands on a screw/bolt extractor kit. Most hardware stores sell them (or Amazon). Everyone should have one of these kits, they can be a life saver.
If you happen to have a dremel around, you could also try to cut a slot so you can use a flat-head screwdriver (have done this successfully several times).
[Haven't seen them mentioned yet but these things will save you from many fucks.] (https://www.amazon.com/dp/B00IRL3WP4/ref=cm_sw_r_awd_WAeuub0TTK73R)
Totally man. I don't mind paying for good tools, but after a certain point you just get diminishing returns. The truck guys might make sense for someone who makes a living from their tools and, for some reason, can't drive to a store or wait 2 days for a replacement in the mail, but for anything else there's good tools to be found for reasonable cost.
For example, I love my Tekton 1/2" torque wrench. Thing is sturdy as hell, comes in a nice case, will do anything from 10ftlbs to 150ftlbs, and is only $40. It was the first tool I got from them, and I've been so impressed that nearly all of the hand tools I've purchased sense have been Tekton, if they make the tool in question.
I do occasionally end up at HF if I really need the thing same-day, or don't expect to use it more than a few times a year, but for the basics it's hard to beat Tekton in my experience. Hell, just the other day, I needed a T8 Securty Torx bit, so I ordered this thing and it's way better made than I expected it to be.
Reading back over this, I sound like a corporate shill, but I've found it hard to beat Tekton's intersection of price, quality, and Prime shipping.
My best recommendation... [linked below] The teeth grab in a counter clockwise direction and could give you the leverage you need to get the threaded piece out
Ontel SpeedOut Damaged Screw Extractor & Bolt Extractor Set https://www.amazon.com/dp/B00IRL3WP4/ref=cm_sw_r_wa_apa_i_quqIDbX33B1DA
I don't have experience using this kind of tool, but you could try these stripped screw removers:
http://www.amazon.com/Alden-8440P-Grabit-Damaged-Extractor/dp/B001A4CWHO/ref=sr_1_1?ie=UTF8&amp;qid=1410556525&amp;sr=8-1&amp;keywords=STRIPPED+SCREW+REMOVER
Home Depot carries another brand called SpeedOut, but the reviews for that one do not look good:
http://www.amazon.com/SpeedOut-Damaged-Screw-Extractor-Bolt/dp/B00IRL3WP4/ref=sr_1_2?ie=UTF8&amp;qid=1410556525&amp;sr=8-2&amp;keywords=STRIPPED+SCREW+REMOVER
I used a torque wrench for the barrel nut on my AR15.
Something like this: http://www.amazon.com/gp/aw/d/B00C5ZL0RU/ref=mp_s_a_1_1?qid=1451251714&amp;sr=8-1&amp;pi=SX200_QL40&amp;keywords=torque+wrench&amp;dpPl=1&amp;dpID=31migy44iyL&amp;ref=plSrch
That is a torque wrench and what I think of when I hear that term, which is why I was confused about this product being called a torque wrench.
You could try a flat head that is the width of the widest part of that hole. You could also try a screw removal bit such as this one: Ontel SpeedOut Damaged Screw Extractor & Bolt Extractor Set https://www.amazon.com/dp/B00IRL3WP4/ref=cm_sw_r_cp_api_-XdGAb8WRRP78
Third option could be to take a Dremel and cut at flat-head slot in the top. Good luck not damaging the laptop tho
You need to buy a torque wrench.
I own this one.
https://www.amazon.com/TEKTON-Torque-10-150-Lb-13-6-203-5-24335/dp/B00C5ZL0RU
There are also 'bits' you can buy for a drill that run in reverse and 'bits' into the bolt in order to grip better and torque it out. Similar to this https://www.amazon.ca/SpeedOut-Damaged-Screw-Extractor-Bolt/dp/B00IRL3WP4
Time to buy a set of EZ out s
SpeedOut Damaged Screw Extractor & Bolt Extractor Set https://www.amazon.com/dp/B00IRL3WP4/ref=cm_sw_r_cp_api_8xmxxb6TY2MJM
Designed to run in a drill in reverse. Grabs in and backs it out.
I've seen the rubber band trick on just about every "picture list of life hacks." I've tried it about four times and have never been able to make it work.
In my experience the only things that work are using a dremel to carve out a new groove, getting a pair of pliers and turning the screen or, if you can't get to the screw with pliers, use a screw extractor, like this: https://www.amazon.com/SpeedOut-Damaged-Screw-Extractor-Bolt/dp/B00IRL3WP4/ref=zg_bs_2225074011_1
I've used these extractors on a drill http://amzn.to/1CVA7aq - they work perfectly, I just don't know if they're going to be too big to fit in that hole.
good idea for "to change flat tire". in the shop today, I want to use my hand tool to loose that lug nuts to make sure it's smooth, that piss off the boss, he asked me to get lost. I should come up with a reasoning of "just in case I need to change flat tire".
>remove them often enough
do you remove them every 3 months or 6 months? I usually didn't touch it if there is need to, such as to change a flat tire.
> Torque it down, dry
you dry the lug nuts before put it on? May I know what's the purpose?
Thank you for your recommendation of the 3 tools, do you think these 3 looks Ok:
https://www.amazon.com/gp/product/B00C5ZL0RU/ref=s9_acsd_top_hd_bw_b2Lfk_c_x_1_w?pf_rd_m=ATVPDKIKX0DER&amp;pf_rd_s=merchandised-search-3&amp;pf_rd_r=CWTA8X0BR49HVQ186Y8Y&amp;pf_rd_t=101&amp;pf_rd_p=365b646d-0ab5-53c3-9063-fe500e13a356&amp;pf_rd_i=559968
http://www.sears.com/craftsman-1-2-in-drive-quick-release-teardrop-ratchet/p-00944809000P
https://www.amazon.com/TEKTON-15356-2-Inch-24-Inch-Breaker/dp/B00MWVAUT6
Thank you!
They make tools like this to remove stripped screws. You could try putting a little oil or WD-40 on the threads which should make it easier to remove.
For future reference, it's always best to put a little light grease on steel screws to avoid stripping the aluminum.
I just go to Autozone and use "rent a tool" to borrow their breaker bars, torque wrench. They charge your credit card and give you 90 days to return it in same working condition. Having said that I know youtube channel "Chris Fix" recommended one of amazon's best selling torque wrenches for weekend garage diy'ers... here's the link
https://amzn.com/B00C5ZL0RU
Snag this set
https://www.amazon.com/SpeedOut-Damaged-Screw-Extractor-Bolt/dp/B00IRL3WP4
Iv used this kit probably a hundred times, never snapped one bit. If it did snap, then you'd hav fresh grade 8 steel to weld on to. In all hon sty, I bought this exact set from walmart for $5.99, if it didn't work I wasn't out any real money. I was pleasantly surprised when it worked the first time, and the many times after that were just icing on the cake
Use the heat gun as suggested, and either this or this from your local big box hardware store.
The last line was confusing.
I'm overseas so I don't really know any place but as somebody who dealt and still deals with fucked up screws, read this.
What kind of device do you have? If the screw is small, then I'd recommend a speedout tool https://www.amazon.com/SpeedOut-Damaged-Screw-Extractor-Bolt/dp/B00IRL3WP4
Or you put a piece of rubber over the head and push down with a screwdriver then unscrew. You wanna keep a constant downward pressure while unscrewing.
If your "device" is big enough to withstand a stronger force and the screw head is big enough, use a Johnson bar.
Lastly, my favorite one, make the screw head a flat head. Make a groove on the head to fit your flat head and that should do the trick.
Or you can say fuck it and drill the crap out of the screw until it's reduced to shavings
no, no torque wrench in the kit, but I probably wouldn't want a "kit" torque wrench. This kit just gives you basically every and any size socket you will ever need, plus a lot of wrenches, a screw driver with changeable bits, and a few other things. I got this one on Amazon, I've cranked on it up to 140 lbs on my Toro zero degree mower and it's great.
Just get a torque wrench and whatever socket fits your lug nuts. Look up what your car is supposed to have and just leave the wrench set to that.
Check it up every few months, only takes like 10 seconds to do and doesn't need any special skill to accomplish. If you can use a screwdriver you can use a torque wrench, just makes a loud click when it hits the setting. Sure beats going to a tire place every time you need to do that.
Not sure how far down that is, but if you have a drill, you can purchase "easy-outs". In order to use one, you take a drill bit slightly smaller than the easy out, drill a hole into the screw you are trying to get out, then use the easy out to extract.
Easy outs are essentially reverse threaded bits that bore into the screw and then, when it reaches the bottom of the hole you pre-drilled, turns the screw out.
A set like this can be found for cheap at your local hardware store
This.
I use this trick all the time, it's so simple and yet awesome. And when that fails I use this.
Something like this will work way better.
https://www.amazon.com/Ontel-SpeedOut-Damaged-Screw-Extractor/dp/B00IRL3WP4?ref_=fsclp_pl_dp_5
You could try to use stripped screw extractor.
Worked for me with some screws.
Now if you want to get it fixed professionally, by all means do so. But I wouldn't let lack of a torque wrench hold you back. This 1/2" drive one is only $40. I'm sure it's not the world's greatest torque wrench, but Tekton has a decent reputation. Harbor freight sells a 1/4" drive for $10 (after coupon, ~$20 otherwise).
You can rent a lot of specialty tools for bearings, etc from part stores like Autozone or Orielly's. I haven't seen anything saying they rent torque wrenches, but I'd give them a call at least.
I use Grabit for work but these will work as well. You can also get one from any hardware store, lowes/home depot.
I use these things all the time at work and they are very helpful timesavers
Spent my first several weeks working GA as, basically, a panel bitch. Combined with time in the USAF where power tools were not allowed and coin-slot screws were commonplace, I have an extremely well-exercised skillset in removing stuck screws.
Screwgun, using snap-on bit, won't get it out? Use the ratcheting screwdriver with those biting bits - you can get more direct force on it.
Ratcheting screwdriver with biting bit won't get it out? Oh, it's gonna come out, I'm not asking. Get the speed handle with almost-new bit, with a little valve-lapping compound on the tip. Put a lot of pressure downwards towards the screw, and first try the pop method - give the handle some pops. That doesn't work? Grab a rag, fold it up, and use your whole body to put maximum force on that little screw, and slow turn it. If you feel it start to slip? Stop. It's time to stop playing. Get the SpeedOut.
Drill out that head. Flip around, use the right-angle screwdriver (sometimes also called a Yankee, whatever works) to put a lot of pressure and slooooowly bite that sucker into that new hole. Continue with slow, even pressure to get the screw to break. That's not working? Okay, you've got a special snowflake, this fixes 95% of stuck screws.
Left-hand drill bit, waaaaaaaay down deep in the screw, and the pointy-type easy out you usually get from snap-on with the T handle. Drill clean thru the screw if you gotta, get MAXIMUM PENETRATION. Turn that sucker out, slow stead pressure to get it to break.
Still not working? Holy fuck. Use a bigger left-hand drill bit, and use the wrench-type easy out that is usually for bolts. Put some valve lapping compound on there for good measure, just to be sure.
That's not working? Fuck it. It ain't coming out. Drill the whole thing out, you're gonna need to rivet in a new nutplate. If it's not countersunk, drill it out like a rivet. If it is countersunk, well shit. You can try to drill it like a rivet, or you can match the hole and take the nutplate and all with it.
If that somehow fails, you're replacing significant levels of sheetmetal.
good call given the spec for my rims is 120 Nm +/- 10. Given that i think I may order the 1/2 one and get a 1/2 to 3/8 reducer and deal with the bulk when I'm under the car doing an oil change. By that time i may invest in a 3/8 or 1/4. Had to add in I'm so excited to order my Rhino Ramps instead of jacking up my car I'm like a kid in a candy store lol
Victorinox classic swiss army knife is only $16. Weighs 3 oz less than the knife on the list and includes scissors, which are infinitely better for first aid than a knife.
-Basic safety glasses
-FourSevens Mini ML-X
-Rite in the Rain Notebook
-Basic wallet
-Spyderco Kiwi3
-Leatherman Wave
-Victorinox Classic
-Nexus 4
-Eklind folding allen keys
-Snap-On 3/8" wrench
-Ti Click Classic pen
-Chris Reeve Sebenza 25
This has come in handy more times than I can recall.
I couldn't have said it better myself. I would like to add on to what he said about the knife. When I was in high school (a public school in California) I carried a small swiss army knife like this during the day and a cheap Jeep knife that i left in my car during school. if you buy a knife, for a first EDC just get a $15-$20 knife. upgrade when you find it necessary
It's hard to go wrong with a Victorinox Classic, or a Day Packer for even more minimalism.
I have a SAK Classic SD on my keychain, but if you are looking for just a knife, the SRM 605 is hard to beat. It has a good liner lock, and for a very small knife, provides a solid grip. Don't let the low price disturb you - it is just a very good deal.
I use a knife like this one. I have never needed a larger blade for anything. The scissors and tweezers have saved my trip on several occasions. (One time my friend did not trim his toe nails before the hike. We finished the first day and his feet were killing him. After trimming his toenails with the scissors he was fine for the rest of the hike.)
This is literally the reasons why I have this swiss army knife on my key chain. Bonus that scissors are one of the most useful tools.
https://www.amazon.com/Victorinox-Swiss-Classic-Pocket-Knife/dp/B00004YVB2/ref=sr_1_1_sspa?keywords=swiss+army+knife&qid=1558022683&s=gateway&sr=8-1-spons&psc=1
Good question! I was thinking about the same thing today. I've had one of these for years. I'm definitely looking for a newer option.
I generally have either a SAK classic or a leatherman squirt on my keychain, both are tiny, useful and in no way can be mistaken for a weapon and they suit my everyday cutting needs. The other SAK I might take if I need it is a SAK tinker, I like SAK's as they don't look threatening when you use them and they are good pocketknives.
You just have to be smart about what you're carrying and if you don't have a legitimate reason to carry one then don't.
Top Row:
-2004 Jeep TJ Rubicon key with a SAK Classic SD on a carabiner clipped to my beltloop
-New Addition Thrunite TN12 (2016) Warm clipped on my front left pocket
-New Addition Fisher Bullet Space Pen with clip thrown in or clipped to my front right pocket
-New Addition Benchmade Minigrip black and combo edge blade clipped to my front right pocket (rotates with Spyderco)
-New Addition Spyderco SS Delica 4 with combo edge this is clipped in my right front pocket (roatates with Benchmade)
-Yeti Rambler 18oz. SS this is almost always nearby with ice cold water in it
Bottom Row:
-New Addition Magpul iPhone 7 Case my jet black iPhone 7 is always in my front left pocket, cannot reccommend this case enough
-Field Notes Black Ice this is in my back right pocket
-Matte Green Zippo Lighter I don't smoke but I know people that do and it's always handy to have a lighter, when carried it's thrown in my front right pocket
-Old Geoffrey Beene Wallet sorry it's the closest thing I came across. This lives in my back right pocket
Items for outside the classroom
Biggest thing to carry is a bottle opener
Cheap Keychain Bottle Opener
You don't want some expensive bottle opener because you'll be passing it around alot and you might forget to ask for it back
BIC Lighter
Kershaw Cinder
BUT preferably swiss army knife classic
SAK Classic
or the rally with a bottle opener
SAK Rally
you sacrifice scissors for bottle opener
wallet
dont get a bifold wallet those are out of style no (no offense to anyone who still carries them) but a simple slim card holder is alot better and sleek
Things you need in the classroom
Best Red Pens a must for note taking
I wouldn't get the blue one uniball because its a dark blue almost black
So get these instead
BIC blue pen
Most "EDC" notebooks are expensive and offer very little sheets of paper. You could use one as an assignment pad but something with acutal dates is better so once you get your syllabus you can right down all the assignments during the first week.
Note books I would just go to walmart. You can get five subject notebooks for $2 now during their back to school special. Where ever you buy notebooks take advantage and buy for the spring semester because prices are only this cheap in aug/september.
Not your usual edc recommendations but I wasn't rolling in dough early on in my college career and rather let people borrow a cheap pen and let them keep it then stress about getting my pen back when I let the next person borrow it to sign in.
your edc should be what you like to carry and use
sure do homs. i got this bad boy wid me at all time.
I'd get a Classic SD Swiss Army Knife and a Spyderco Pocket Stone. With that you'd be set for many years.
I use these all the time:
http://www.amazon.com/Victorinox-Swiss-Classic-Pocket-Knife/dp/B00004YVB2/ref=sr_1_1?ie=UTF8&amp;qid=1426191481&amp;sr=8-1&amp;keywords=pocket+swiss+army+knife
http://www.amazon.com/Streamlight-73001-Miniature-Keychain-Flashlight/dp/B0011UIPIW/ref=sr_1_4?ie=UTF8&amp;qid=1426191502&amp;sr=8-4&amp;keywords=keychain+led+light
Yes. DeWalt makes very nice routers and this is a very reasonable mid-size model. I'm going to give two other recommendations, though.
For mid-sized routers, you can't go wrong with the Bosh 1617EVSPK. It is a solid workhorse and wins more than a few comparison tests: http://www.amazon.com/Bosch-1617EVSPK-4-Horsepower-Variable-Collets/dp/B00005RHPD/
Honestly, though, I'd skip a mid-size router if I was getting my first router. The new compacts are extremely versatile and I find myself reaching for mine most of the time. It's gotten to the point that I use my router table for router table type stuff and my compact for everything else. My mid-size just sits there, except for rare occasions.
The best compact router I've found is the DeWalt DWP611PK. I've had it for about a year and it's been my go-to router ever since: http://www.amazon.com/gp/product/B0049ZFUK2/
Porter cable is quite nice, would also recommend checking out Bosch: http://www.amazon.com/Bosch-1617EVSPK-4-Horsepower-Variable-Collets/dp/B00005RHPD/ref=sr_1_1?ie=UTF8&amp;qid=1371188943&amp;sr=8-1&amp;keywords=bosch+router
I did something similiar on my Rigid 3650 as far as the router table goes. My recommendation would be not to cheap out on the mounting plate - I ended up going with a plastic mounting plate off amazon that has been terrible. Looking into either the JessEm or Woodpeckers plates myself.
this
For about $200, the 1617 evspk is a great set up
Is this bosch still a good first router to buy?
https://www.amazon.com/dp/B00005RHPD/ref=cm_sw_r_cp_awdb_t1_7HYYDbYR4SAEE
Thanks! Any links or suggestions on a router table set up that would be better suited for trim molding?
How about this? https://www.amazon.com/dp/B00005RHPD/ref=cm_sw_r_cp_api_i_FP5TDbH7A1RC5
This comes with 2 choices. Comes with a plunger and fixed option, but for twice the money it can come with a table. Is the table necessary or would I be better off skipping it and just saving the money?
As someone about to take out some material with a forstner and then take the rest out/smooth it out with a router that I have never used before, I'm now slightly terrified to tackle this project. Before I head into this I figured I would ask a couple questions.
I have a template that I purchased along with the bowl bit. It sounds like one of the issues was that the bearing was not fully on the piece of wood? If I make sure the bearing isn't partially above the template when I start should that be okay? Not sure if I explained that well or am fully understanding the part where you mentioned "mistake number one".
When the bearing was riding up the spiraling lip of the forstner bit remnants, is that something I can avoid by starting the bearing on the template and smoothing everything below before plunging the router a little deeper? For this project I will need to use a collett extension to get the router bit deep enough so it will eventually have to go below the template and ride along the work piece.
Any other tips you can give me before I head in would be great! This is a 2.5 HP Bosch plunge/fixed base router. This one to be exact - http://www.amazon.com/Bosch-1617EVSPK-4-Horsepower-Variable-Collets/dp/B00005RHPD - Would it be smart to start on a lower speed? Or would a higher speed be smarter to make sure it doesn't snag on the hard wood? I'm using a combination of maple/walnut glued together.
Bosch makes a nice router kit that accepts 1/4" and 1/2" shank bits and comes with a fixed base and plunge base, all in a nice case. I got mine for just under $200 and have since spent an additional $45 for a table insert for my main powered workbench. You can also find refurbs for $150ish.
Bosch 12 Amp 2-1/4 Combination Horsepower Plunge and Fixed Base Variable Speed Router Kit 1617EVSPK with 1/4-Inch and 1/2-Inch Collets https://www.amazon.com/dp/B00005RHPD/ref=cm_sw_r_cp_apa_i_YxXbBbAQJ61KP
Hey thanks for the message. The main reason I was looking at the smaller dewalt was due to savings on cash. I think if I was in the $200+ range I'd go for this Bosch It's only $3 more and has 0.5 more HP.
Edit: typo
Check out some of these videos:
https://www.youtube.com/results?search_query=build+your+first+coil
I order my wire on Amazon, and its like $8 for 100ft of your choice in gauges, $12 or so for a bag of Japanese Organic Cotton, maybe another $15-$20 for wire cutters/tweezers, and $18 for a Coil Master jig if you want to use them. Oh, and don't forget anything your atty might need like a Phillips screwdriver (though even though they're crappy, pretty much every atty comes with a tool for it). All in all you're probably looking at around $40 up front, but you'll have about a years supply of cotton at least, and even rebuilding a lot to test things enough wire to last a couple months or so.
Here's some of the stuff you'll want to look for (don't have to use these ones specifically of course):
https://www.amazon.com/100ft-Kanthal-Resistance-Gauge-Lengths/dp/B00MW4O0WG/
https://www.amazon.com/Koh-Gen-Do-Organic-Cotton/dp/B00NU3H3KE/
https://www.amazon.com/Hakko-CHP-170-Stand-off-Construction-21-Degree/dp/B017ODDPNO
https://www.amazon.com/Authentic-InnoVaper-Precision-Ceramic-Tweezers/dp/B00TI6M3WK
https://www.amazon.com/Stanley-66-052-6-Piece-Precision-Screwdriver/dp/B00009OYGV
The only tools that I had available when I built my PC was a six-piece Stanley set. Luckily for me, building a PC doesn't require much more than a screwdriver. As such, the most useful and only tool for me when building my PC was a precision screwdriver.
Due to the fact that my PC is still very new, I have not yet experienced any need to maintain anything.
I bought a set at my local hardware store. They're the doitbest brand precision screwdrivers. http://www.amazon.com/5-Piece-Best-Precision-Screwdriver-SCREWDRIVER/dp/B000HE89Z2
They've been great for the past few years I've had them. The star versions of those aren't so hot though.. I've ruined 2 of the T5 drivers working on firearms and RC cars. The rest of them have stood up to some pretty serious abuse though.
I've had these before, but they are kind of small to hold onto when turning larger screws: http://www.amazon.com/Stanley-66-052-6-Piece-Precision-Screwdriver/dp/B00009OYGV/ref=sr_1_2?s=hi&amp;ie=UTF8&amp;qid=1393730634&amp;sr=1-2&amp;keywords=Precision+Screwdriver
They work fine though IME.
If you want to buy the best you can get, Klein tools makes a mighty fine set of screwdrivers. They're pretty expensive though. http://www.amazon.com/Klein-85614-Piece-Electronic-Screwdriver/dp/B0076RWZMQ/ref=sr_1_37?s=hi&amp;ie=UTF8&amp;qid=1393730830&amp;sr=1-37&amp;keywords=Precision+Screwdriver
Thanks for the suggestion, but I was already looking at this.
I just ordered some temco 28 gauge kanthal from amazon. I've been using this to wrap with. I dont have any drill bits at the moment.
https://www.amazon.com/dp/B00009OYGV/ref=cm_sw_r_udp_awd_5wjYtb0V52W8FXG7
So, $35 for that one, or you can get this for 1/10th the price.
http://www.amazon.com/Stanley-66-052-6-Piece-Precision-Screwdriver/dp/B00009OYGV
Because the handles are plastic you can even heat up a pin and set it into the handle to hold your wire better while you wrap.
My apologies, It was 9 wraps and it turns out that my screwdriver is in fact a 0pt. (Assumed it was 3/32.)
Trying to figure out what the actual diameter is but I'm having a bit of trouble.
It's out of this set of Stanley screwdrivers if it helps.
http://www.amazon.com/Stanley-66-052-6-Piece-Precision-Screwdriver/dp/B00009OYGV
Do you wrap them around something? And torching the kanthal will help if you find it to be particularly springy. Here is a coil wrapping calculator that will tell you how many wraps you need to reach your desired resistance based on your kanthal gauge and the size of whatever you are wrapping around.
I would suggest investing in a set of screwdrivers like these to wrap on. They are super cheap and wrapping with them is super easy.
I used a 2mm screwdriver. I have a set like this one.
The necessities are:
I'd recommend 26, 28, and 0.8x0.1 ribbon to start. That gives you a lot of options for building. You'll notice the first two links are add-on items on Amazon, so you'll have to buy $25 worth of wire, wire cutters, tweezers, or just add it to some other amazon order you're making.
I know I'm not adding much in the way of telling you what to use (mostly because I feel like the other replies have done a stellar job at doing just that), but when you do go to look for a set of screwdrivers to build with, this is what most people use:
http://www.amazon.com/Stanley-66-052-6-Piece-Precision-Screwdriver/dp/B00009OYGV
to piggy back: The Stanley Precision Screwdriver Set for wrapping the coils. amazon has them and target sells them as well if you don't want to order them.
Or maybe the stanley screwdriver set?
Something like this?
https://www.amazon.ca/gp/aw/d/B00009OYGV/ref=mp_s_a_1_4?ie=UTF8&amp;qid=1491577769&amp;sr=8-4&amp;pi=AC_SX236_SY340_QL65&amp;keywords=precision+screwdriver+set&amp;dpPl=1&amp;dpID=41josrE03YL&amp;ref=plSrch
Yeah I was going to go with the EK Vardar fans, I'm looking to keeps temps as low as possible mostly, but less sound would be nice as well. Would the EK Vardar 1450rpm pair well with a EK PE rad?
If you don't mind waiting fast tech is great heres a great rda and good mod for $15
http://www.fasttech.com/products/0/10012340/2088800-tugboat-styled-18650-mechanical-mod-w-rda-atomizer
Also grab an ohm reader there as well for $5
http://www.fasttech.com/products/0/10010372/1897900-atomizer-resistance-tester-ohm-meter
Here's some kanthal I suggest 26 gauge 25 feet Is about $4
http://lightning-vapes.theshoppad.com/#/product/kanthal-a1-resistance-wire
Also pick up a battery for about $8 or two for $14 (worth having a backup battery) use the coupon "lv15" for 15% off
http://lightning-vapes.theshoppad.com/#/product/samsung-inr-18650-25r-battery
I'd suggest this charger for $12
http://www.amazon.com/gp/aw/d/B0096U26QQ/ref=mp_s_a_1_1?qid=1421740585&amp;sr=8-1&amp;pi=AC_SY200_QL40&amp;dpPl=1&amp;dpID=41E7nbJ5btL&amp;ref=plSrch
And these screwdrivers if your local dollar store doesn't have it for $4
http://www.amazon.com/gp/aw/ol/B00009OYGV/ref=mw_dp_olp?ie=UTF8&amp;condition=all
Roughly under $50 for a good setup in my opinion
26ga kanthal
Cotton
Screwdriver set
Ohm reader
Velocity clone by tobecco
Pliers
That's about $60 bucks after shipping, and gets you pretty much everything you need.
You can opt for higher quality things. There's some great coil jig sets out there for about $15, which basically make coils for you. Theres higher quality cotton, better kanthal but this is a good basic setup. It's what I use, at least.
You'll see a lot of people vouching for the velocity clone, its a great RDA with a lot of room to build on.
As far as what mod you want? That's tough. That's a whole other conversation. I can tell you what I use, and what I like about them, though.
I use a Sigelli 150 TC, it's a dual 18650 box mod with temp control, I have two Samsung 25r's that have been "married" since I got them, and live in my mod. My Velocity usually sits on top of it. I use this set up at home, and try new builds on it.
My on the go set up is a Smok xcube mini box mod single 18650, with a royal hunter mini on top. I make sure to build around .3 to .4 on this set up, and stay in a safe range for the single battery. Using an online ohms law calculator, I'm vaping a .38 build at 40 watts. Which is drawing 10a from my battery that's rated for 20a.
Network Tech here..
This is the tool to properly punch down those wires into the white block (known as a keystone RJ45 jack)
If you're only doing one though, you can punch the cables into the grooves with a pair of tweezers or a small screw driver (gently!) and trim the wires flush with the side of the block with a sharp utility knife.
TRENDnet Punch Down Tool with 110 and Krone Blade TC-PDT https://www.amazon.com/dp/B0000AZK4D/ref=cm_sw_r_cp_api_LAJYAbB8B0HVF
This is what I have.
>Personally, i'd opt for this instead of that tp-link plastic one. It's a few bucks more, but has a great track record.
http://www.amazon.com/Netgear-GS105NA-Prosafe-5-Port-Gigabit/dp/B0000BVYT3/ref=sr_1_3?s=electronics&amp;ie=UTF8&amp;qid=1459347764&amp;sr=1-3&amp;keywords=5+port+gigabit
Same guts? I picked the plastic... cus Im cheap but mostly because I think the front ports look sloppy in a HT cabinet or on a desk.
>The CMR looks good, though monoprice wire is cheaper for the same quality (spend some of that difference on the metal 5 port gige switch I pointed out above):
http://www.amazon.com/Monoprice-1000-Feet-500Mhz-Copper-Ethernet/dp/B008I8AJIY/ref=sr_1_1?s=pc&amp;ie=UTF8&amp;qid=1459347852&amp;sr=1-1&amp;keywords=monoprice+cat+6+cmr
Thanks! swapped for monoprice
>I would also recommend against crimping your own cables. Solid core is not meant for crimping.
ok then, I really wasn't looking forward to crimping a dozen cable but I felt like Ill have so much cat6 it would be a waste not to make my own.
>Get this punchdown tool, it has both 110 and krohn. A lot of punchdowns are universal, and with those, the krohn works better.
http://www.amazon.com/TRENDnet-Punch-Krone-Blade-TC-PDT/dp/B0000AZK4D/ref=sr_1_1?s=pc&amp;ie=UTF8&amp;qid=1459348192&amp;sr=1-1&amp;keywords=trendnet+punch+down+tool
So what your saying is most of these keytones labeled 110 will except a krohn style punch? Id like minimize my cost and the 110/66 punch I linked is basically in my hands, its still worth going with this other tool?
So should I bother with the crimper/rj45 ends at all? Just buy a pack of 3ft patch cables and be done with it?
>Source: I built this and wired my house to 1GigE
https://imgur.com/9vhZYS1
nice rack (giggity)
You need a punch tool. It's likely that the jacks are fine, but the push tool isn't doing a good enough job.
This is the one I have at home:
https://www.amazon.com/dp/B0000AZK4D/ref=cm_sw_em_r_mt_dp_U_yac5Cb49KNM3H
&#x200B;
A good punch tool serves two purposes:
&#x200B;
By pushing the wire all the way down in the the connector, it's forcing the V-shaped metal blades to bite into the wire. It doesn't look like the push tool you're using is pushing it enough to bite into the wire.
Crap! Just bought pretty much the same items (different brands) less than 24 hrs ago on Amazon.
Product|Price|
:---------|---------:|
TRENDnet 8P/RJ-45 and 6P/RJ-12, RJ-11 Crimp, Cut, and Strip Tool, TC-CT68|$14.35
Network Cable Tester|$4.17
TRENDnet Punch Down Tool with 110 and Krone Blade TC-PDT|$20.34
CableWholesale CNE16127 RJ45 CAT-5 E Crimp Connector Solid|$4.55
C2G / Cables to Go 27352 Cat5E UTP Solid PVC CMR-Rated Cable, Grey (1000 Feet/304.8 Meters)|$99.85
Used CAT5E since CAT6 would be overkill for my needs and the budget is always tight.
I have no experience with some of these specific items but I wouldn't hesitate to buy them from what I've seen:
The cable:
https://www.amazon.com/Outdoor-Shielded-Waterproof-Ethernet-trueCABLE/dp/B01JAVN1C8/
The "ends" -- these are keystone jacks. You could put RJ45 plugs on, but I think keystone jacks are more forgiving, plus it's more flexible since you can plug a patch cable into this. Also, putting RJ45 ends on this direct bury cable will be tricky since it will have thicker shielding.
https://www.amazon.com/10-Pack-Cat6-Keystone-Jack-Compatible/dp/B07JRD69V6
The punchdown tool -- you could get by with a cheaper/simpler one like this -- you'll probably want this for stripping the jacket (it does both), though a razor blade will work too:
https://www.amazon.com/Mini-Wire-Stripper-Rj45-Cat5-Cable/dp/B07MQB7STL/
This is kind of a basic middle of the road example of a proper punchdown tool, though the previous one is fine for a small amount of work.
https://www.amazon.com/TRENDnet-Storage-Interchangeable-Reversible-TC-PDT/dp/B0000AZK4D/
Once punched down, you can plug those keystone jacks into wall plates like these:
https://www.amazon.com/Cable-Matters-10-Pack-Profile-Keystone/dp/B074HGPH18
Or surface mount boxes:
https://www.amazon.com/Monoprice-2-Port-Surface-Mount-107089/dp/B0069MDB9U/
You could even find a small patch panel.
Each cable is for each room would this work You need to cut off the phone jacks and install CAT5e or better RJ-45 jacks with a punch down tool. Do this conversion at every place where you want network. Then in the basement you need to punch down the other end of each cable separately to a CAT5e or better patch panel. Then you need to run short CAT5e or better patch cords from the patch panel to an Ethernet switch. Finally you need to connect your router to the switch, either directly, or through one of the network jacks you installed in the house.
I had the same exact question for DIY subreddit a few months ago looking to do the same thing as you. Forget about the patch panel and the big box stores. Don't spend a ton of money. You are just wiring a couple rooms. You can get everything off Amazon or ebay for cheap. If you don't care about phone service then just cut the cables and crimp on new. Then plug all the crimped ends into a switch. No need for a panel. You can get a tester for cheap at amazon:
http://www.amazon.com/HDE-HDE-H11-Network-Cable-Tester/dp/B000P1OA1O/ref=sr_1_2?ie=UTF8&amp;qid=1346567376&amp;sr=8-2&amp;keywords=network+cable+tester
I bought and used that one and it worked great. Probably not the best out there, but for a one time simple project to get a few rooms online it is more than enough.
The only thing to spend some money on is the punch down tool (Although doesn't look like you may need one based on your wall jacks). The ones that come free with other stuff are useless and will waste your time and wiring. This one worked well for me:
http://www.amazon.com/TRENDnet-Punch-Krone-Blade-TC-PDT/dp/B0000AZK4D/ref=sr_1_1?s=electronics&amp;ie=UTF8&amp;qid=1346567733&amp;sr=1-1&amp;keywords=TRENDnet+Punch+Down+Tool+with+110+and+Krone+Blade+TC-PDT
Crimping is easy as hell if you use connectors like this:
http://www.amazon.com/gp/product/B0009JCVI6/ref=oh_details_o03_s00_i00
The crimping tool by the same brand actually cuts the excess wiring while you crimp. I did about 10 crimps and all worked perfect the first time. I bought a EZ RJ-45 $60 crimp tool from someone on ebay. Then sold it for the same amount two weeks later when I finished using it.
So according to that picture, if they wired it according to the color coding, it's 568A, so if you were to wire it up yourself, make sure the OnQ side is 568A as well to save yourself 50% of the work. But all depends if they did the blue, orange, green, brown pairs accordingly, which I'd assume they would to make their life easier.
If you were to get an 8 port Cat5E patch panel, you're going to need a punchdown tool in order to get the wires hooked up to said patch panel. It isn't hard by any means, and there are tons of videos on Youtube about terminating ethernet cables into rj45 jacks as well as onto patch panels. It isn't rocket science by any means, and depending on your comfort level and if you want to buy what you'd need (watch youtube videos first, maybe you'll find terminating rj45's directly to plug into your switch to be your cup of tea), that might be a MUCH cheaper route than getting someone out there to do it. Maybe you have a friend that can assist, if they are into networking.
But absolutely, Cat5E is Cat5E, be it used for POTS (telephone) or home networking, it's the same media, just how it's terminated on both ends is what matters.
Here is an example of an 8 port Cat5E patch panel. It has color codings for 568A and 568B (in your pic above, 568A per the wall plate, if wired correctly):
https://www.amazon.com/dp/B01LVZVUBO
Punch Down Tool w/ cutter (be careful when using that you pay attention which end the blade is so you don't cut the wrong side of the punch!):
https://www.amazon.com/dp/B0000AZK4D
https://www.amazon.com/dp/B01E58M5EG
This is just to hopefully give you an idea of what to search on Youtube for information. Glad to help, just research and research before tackling it yourself, but this isn't something that is going to be super difficult, but also don't want to see someone charge you $500 to do this job!
Good luck, and it's always fun to learn a new skill!
Is the original coax is going through a hole in the drywall or an actual wall plate?
You could get a
punch down tool
(1) keystone jack wall plate
(1) cat5e/cat6 RJ45 punch down keystone jack
(1) cat5e/cat6 RJ45 punch down surface mount box
The setup would be to make a run of your Ethernet cable (solid core) between the ONT and router. Terminate the Cat 6 in the basement with the surface mount box and attach a patch cable between it and the ONT. For the router side you would do the same except using a wall plate instead. If no wall plate then you could get two of the surface mount boxes.
You can get single pieces of what I linked at most home stores or places like Micro Center, etc.
Don't buy wire cutters. What you want are flush cutters; Xuron 410 Micro-Shear Flush Cutter https://www.amazon.com/dp/B000IBOOWQ/ref=cm_sw_r_cp_api_UGAEybYWNV2D7
Just use something like this it should be fine - https://www.amazon.com/Xuron-410-Micro-Shear-Flush-Cutter/dp/B000IBOOWQ
For me the benefit of better plant health with more ventilation is cheap compared to the price of a pot :)
Yep, that's gonna be a pain to cut without a laser, water jet, or edm. Dremel is probably your best bet, the nibblers won't be fine enough. If the sheet is thin enough you might be able to use clippers. Maybe something like https://www.amazon.com/Xuron-410-Micro-Shear-Flush-Cutter/dp/B000IBOOWQ? I've never tried.
Edit: at .008" you can definitely get away with the flush cutters. Heck, you might be able to get away with nail
clippers.
Next time get some flush cutters to trim the zip ties. Smooth cut every time if you do it right.
I think its way better than the xuron and tamiya ones that I own these two:
xuron
tamiya
Please don't feel intimidated. I'm getting into gunpla again after like 10 years myself. The only intimidating thing is getting the equipment needed and knowing some tips on how not to screw some little things up. I personally use these clippers and I also use an xacto hobby knife with #17 blades. Just go slow and cut the pieces from the mold with the clippers leaving some leftover plastic that you can take off with the hobby knife. All those kits you mentioned sound good in terms of starting out. Any newer HG kit for that matter is probably a good start. You might want to look into getting some ultra fine tipped Gundam Markers for panel lining too. Have fun!
If you want something better than a pair of fingernail clippers.
I bought a pair of these microshears. Best tool for the job.
For cutters, I use these: Xuron Side Cutters. I also use an xacto-branded hobby knife. I'll use 2-3 blades on a HG kit, and probably double that on an MG. You can never have too many blades.
I have some sand paper (800, 1000, 2000 grit), but I rarely use it unless I paint.
Have you tried using a pair of flush cutters? They have a narrower jaw point and are mainly designed to cut copper with. http://www.amazon.com/Xuron-410-Micro-Shear-Flush-Cutter/dp/B000IBOOWQ
Something like those
I would go with http://www.amazon.com/Xuron-170-II-Micro-Shear-Flush-Cutter/dp/B000IBSFAI/ref=sr_1_1?ie=UTF8&amp;qid=1370150182&amp;sr=8-1&amp;keywords=xuron or http://www.amazon.com/Xuron-410-Micro-Shear-Flush-Cutter/dp/B000IBOOWQ/ref=sr_1_3?ie=UTF8&amp;qid=1370150182&amp;sr=8-3&amp;keywords=xuron I personally use the latter of the two.
Something something Kingdom Death...
Of the three I don't think any can compare to GW, especially considering GW uses plastic almost exclusively. Infinity makes some nice models but I was never a fan of painting pewter.
You'll pretty much always have to clean mold lines and fill gaps though. Even GW and KD, both do amazing work in plastic, have mold lines that should be cleared and gaps filled.
Make sure you're using the correct tool for clipping. You'll want a flush cutter like this:
https://www.amazon.com/Xuron-410-Micro-Shear-Flush-Cutter/dp/B000IBOOWQ/ref=pd_sbs_21_1?_encoding=UTF8&amp;pd_rd_i=B000IBOOWQ&amp;pd_rd_r=5KJZ0XRMB3R7355FNZAN&amp;pd_rd_w=blY62&amp;pd_rd_wg=jYgcH&amp;psc=1&amp;refRID=5KJZ0XRMB3R7355FNZAN
It sounds like, for your uses, you want precision pliers such as those made by Lindstrom or Xuron and not so much Klein or Channellock (who make tools for tradesmen).
Cut with these
Sand with this
Fill in stressed plastic with these
That's great to hear! I guess if I'm not happy with the result, I could always go back and fix it. Although Would it be better to go with another 00 then rather than a RG? Considering this would be my first time that is?
Also I was planning on buying the ones the guide linked to on Amazon:
Xuron 410 Micro-Shear Flush Cutter https://www.amazon.com/dp/B000IBOOWQ/ref=cm_sw_r_cp_api_WjCIzb3B9QYHJ
How do you think this set compares to the Tamiya one?
I noticed in the pics of that set that it included a Xuron cutter. Would I get a better cutter with this particular Xuron cutter than the generic one included in the set?
I also have this for a pen knife and this for a file set picked out so I would have 3 main tools (cutter, pen knife, and a file set) for $22.14 total all with 2-day Prime shipping available (so I won't have to stare at an unopened box of Freedom 2.0 for a month waiting for deliveries from Japan).
Would I be missing something crucial if I went with just 3 individual tools above and are there better options for the money (that I won't have to wait a month for)? Any input on all this would be greatly appreciated.
I have a pair of these and they're amazing.
You will need "side cutters".
Lots of us would recommend:
http://www.amazon.com/Xuron-170-II-Micro-Shear-Flush-Cutter/dp/B000IBSFAI/ref=sr_1_1?ie=UTF8&amp;qid=1381645308&amp;sr=8-1&amp;keywords=xuron+side+cutters
or
http://www.amazon.com/Xuron-410-Micro-Shear-Flush-Cutter/dp/B000IBOOWQ/ref=sr_1_2?ie=UTF8&amp;qid=1381645308&amp;sr=8-2&amp;keywords=xuron+side+cutters
To start off with. Then you can upgrade, if you want to, to heavy duty cutters later on.
To the right on the subreddit, check the useful links for... useful links!
I like these kind of flush cutters personally, they have a really nice and fine nippers that can get in there and cut plastic in little corners.
^ I started about a week ago and this is where I started.
His recommendations are solid and all of the tools are amazing so far.
Only thing I switched out was the snipperz because I had heard that these last longer(?) but I have never used any others so I wouldn't know.
4 Kits in and still going strong.
you can probably find the wire cutters at walmart too, I think I bought a pack that had a mix of pliers and other things with the clippers. These were recommended on some thread a while back.
Amazon Link
The exacto knife doesn't matter, you'll be using it to cut off excess sprue and scrape mold lines off so if its smaller that'd be best, maybe like pencil size. Mine has some ridges on the handle that doubles as a file too.
Flush cutters. They're also the best for cutting the tail off zip ties and not leaving a sharp edge. I've used these for years.
Xuron 170-II Micro-Shear Flush Cutter https://www.amazon.com/dp/B000IBSFAI/ref=cm_sw_r_cp_apa_i_v2PxDb635JSYY
Another old guy tip -- use flush cutters (http://www.amazon.com/Xuron-170-II-Micro-Shear-Flush-Cutter/dp/B000IBSFAI/ref=sr_1_1?ie=UTF8&amp;qid=1395328103&amp;sr=8-1&amp;keywords=flush+cutter) on your ties so you don't have all those sharp, shred your hands, edges.
It's this tooless wiring cap type of jack, like this: the third picture. I installed a couple of them just this last summer and now they don't seem to be available pretty much everywhere anymore. I found that they are easier to get loose connections on than punch-down patch panels, but I believe I came up with a best practice for them. I suggest you re-terminate to your standard TIA-EIA 568 A or B and use a needle-nose pliers to really get the conductors firmly into their grooves in the connector with a gentle pull. Then after turning the twist part of the wiring cap making sure it is fully turned and cannot turn any more use a flush cutter to trim the excess wire extruding past the edges flush so it's less likely to have connectivity issues from physical contact.
Welcome to the hobby.
Let me make some tool/resource suggestions for you.
Resources:
Gunpla TV if you're just starting out in the hobby this should be your go to resource. www.hobbylink.tv/category/gunplatv
For your advanced tips and tutorials check out Hux's tutorial collection here. http://www.reddit.com/r/Gunpla/comments/kzg5v/the_big_list_of_gunpla_tutorials_resources_100/
Tools:
These are the tools I use.
Side cutters
http://www.amazon.com/Xuron-170-II-Micro-Shear-Flush-Cutter/dp/B000IBSFAI/ref=sr_1_1?ie=UTF8&amp;qid=1320331584&amp;sr=8-1
Sanding Pads (fine and extra fine)
http://www.amazon.com/3M-916DCNA-Contour-Surface-Sanding/dp/B00004Z49L/ref=sr_1_2?s=hi&amp;ie=UTF8&amp;qid=1320331548&amp;sr=1-2
X-acto knife
http://www.amazon.com/Xacto-X3601-Precision-Knife-Safety/dp/B00009R8JZ/ref=sr_1_3?ie=UTF8&amp;qid=1320331502&amp;sr=8-3
Painting:
If you're just stating out, hand brush and try rattle cans. Check out the tutorials for specifics.
If I think of any others, I'll add them, but that's a good start from me.
I've seen tiny cutters that allow you to cut flush with plastic. Cheap solution to that problem, I'd think.
Flush Cut Wire Cutters
Miniture Multi-drive Set
Battery Cases Never transport cells naked, especially near change/keys.
Also, I would highly suggest getting 9 batteries, I keep one set on the charger, one in the mod and one in the cases fully charged as a backup. I picked up those cases, specifically sol I could color code my battery sets, helps keep them together.
If you don't want to mess with building your own coils, I've recently started using these pre-built coils and I absolutely love em. I'd built a few claptons on my own, but frankly it was a lot more time than I wanted to mess with sometimes. They are pretty decent quality, they are all machine built so they are perfectly uniform and they make a quick coil change reletively painless.
For cutting I use flush cutters, something like this.
I've found split ring pliers to be really useful for digging in there to get things really tight at the end. (I originally got them for actually attaching split rings (aka keyrings) and I actually really like these for making keyrings and attaching charms and such
I'm not sure how to help with the knots coming undone. Are you finishing the ends before you start? Your description of the problem there is a little unclear as I'm not sure if you're talking about the cord fraying (in which case always start with nice clean-melted ends), or if the knot itself is coming untied (a more technical issue that could just need adjustments to the way you hold it and how much initial tightening needs done).
Looks like a solid start to me! I would recommend not fully assembling your models before you paint them, some places can be hard to reach when fully assembled.
Necessary Hobby Items
If you have a local hobby store you can get everything you need there.
If you have the internet you can get what you need on Amazon.
You have the internet.
Gluing plastic models. You want this stuff. It's the same stuff as Citadel plastic cement.
https://www.amazon.com/Testors-3509C-Plastic-Cement-Value/dp/B00JDMWVSU/ref=sr_1_1?ie=UTF8&amp;qid=1481560583
That glue permanently welds plastic parts together. If you don't want a permanent bond then use CA glue or "superglue" that every hardware store has.
You'll also need sprue clippers:
https://www.amazon.com/Xuron-170-II-Micro-Shear-Flush-Cutter/dp/B000IBSFAI/ref=sr_1_2?s=hi&amp;ie=UTF8&amp;qid=1481560725
And a hobby knife, you mentioned x-acto so you know where to get that.
You are correct, it is cheaper not to buy these things from GW.
If you want the real deal, they are Xuron 170-II micro-shear flush cutters.
I use these as well as and the larger 2175 set for bigger things. Note - these are only good for soft metals (copper, tin, lead) not steel. My son was nice enough to make one pair a set of wire strippers when he tried to cut some steel wire once. :-(
Xuron 170-II Micro-Shear Flush Cutter
Doubles as a hangnail remover in a pinch, and vaping toe jam sounds like a bad idea. :)
You mean these?
http://imgur.com/gallery/Jmu5C
Those are some binding/terminal blocks I made awhile back for testing speakers/drivers, etc. I can plug in cables with banana plugs on them, and clip on to the terminals to test different drivers, etc.
There's some led tape/strip lighting under the top most shelf, and a clamp on adjustable led light with magnifying glass built in. I can swing it in when I need, and out of the way otherwise.
I think the magnifying lamp is this one: https://amzn.com/B00UW2IRJ2
The diagonal flush cutters are:
https://amzn.com/B000IBSFAI
and the small nose pliers are:
https://amzn.com/B0006N73BU
The little parts boxes are from a Bosch organizer:
https://amzn.com/B00BD5G6X6
There's cheaper options, but I had the organizer and extra bins so I used those.
Fire extinguisher is a Kidde ~3lb standard fire extinguisher. An absolute must imo.
The drawers are great, when I'm properly using them I can keep the desk clutter free.
Generally when I'm working on a project, if it's going to take longer than an hour or so, I put all the parts needed into bins, organize/label all the components. Then get started on the build. I have a small whiteboard to the left of the desk that I can pin up schematics, and take any quick notes while I'm cussing myself for forgetting something obvious.
http://www.amazon.com/Kreg-R3-Pocket-Hole-System/dp/B000J43A7W/ref=wl_it_dp_o_pC_nS_nC?ie=UTF8&amp;colid=11849T9OC3D6G&amp;coliid=IUHIVR4L8ZJCO
The easy but expensive way is to use a bracket like this. Expensive not only because you have to buy one for each joint, but it also doubles the number of fasteners you need. And since you're being wise and using stainless steel fasteners only on your cedar fence, that cost adds up.
Cheaper would be to drill pocket holes into the end of each rail. Put the pocket holes in the face side that will be covered up by the pickets. This does two things: the pocket screw is angled into the meat of the post rather than the side and here you can get away with using cheaper coated screws because they'll be somewhat protected by the picket and if they do bleed, the picket will be in front anyway. Plus it's a much cleaner look.
I like the Kreg K3 for basic homeowner tasks. It's especially great for this because it's easy to move it to the long rails. Pair it with a cheap face clamp and you're set. Throw a little polyurethane construction adhesive in the joint (mostly to keep the water out).
This is how I built my fence. 3 years later and the rails are as tight as ever. I have every confidence that they'll make it to 15 years just fine. Or, rather, if something breaks on this fence, it won't be the rails.
You could use wood glue and pocket holes for extra strength on the corner along with the metal brackets.
Kreg R3 Jr. Pocket Hole Jig System https://www.amazon.ca/dp/B000J43A7W/ref=cm_sw_r_cp_apa_i_mG9iDbCNN2HRF
Something like this?
Wow! Thanks for an awesome reply. Unfortunately I'm not in a position where I can spend much money so I'll have to see if I can find some flea markets near me to buy some stuff at. All this stuff is great info that I need to look at better when I have time where I don't need to be asleep. But while I'm here I want to ask you one thing: What do you think of the Kreg jig? I'm using it to hold on the back of some floating nightstands and also used it heavily on my desk, although on my desk they aren't really load bearing whereas on the nightstands all the weight is going through that backplate first.
Thanks again for the awesome reply :)
I'm in the same boat. Apparently Lowe's has sales all the time on the Kreg jig.
The Kreg R3 Jr. seems to be the best option for broke asses like myself. It will probably be what I purchase to finish some of the projects I have around the house.
Take your pick:
Home Depot
Lowes
Amazon
I used this system - http://smile.amazon.com/Kreg-R3-Pocket-Hole-System/dp/B000J43A7W/ref=lp_552488_1_2?s=power-hand-tools&amp;ie=UTF8&amp;qid=1422105125&amp;sr=1-2.
I really liked it as it also allows you to set your depth and distance and just go - all of my pocket holes were made in one sitting. I used it with an Irwin 6" Clamp (http://smile.amazon.com/IRWIN-Tools-QUICK-GRIP-6-inch-546ZR/dp/B00002244S/ref=pd_sim_hi_1?ie=UTF8&amp;refRID=0BGS8N79X833JZTM4W81)
Kreg Pocket Jig is a little guide that lets you drill and secure a board to another board using pocket screws. This means that if you have two sides of an arcade cabinet, in your awesome arcade shape, you'll be able to affix boards to the inside face of the sides easily. So basically you'll be able to easily and sturdily connect your two sides together, making your frame.
Text will not do the job here, you should look up Kreg Jig on youtube and watch it in action, it will be worth a thousand words.
My assumption is you're going to make shaped sides from plywood (with a jigsaw or similar), then connect them with trusses, using pocket screws, then cover the trusses with plywood. That will give you your cabinet, though the screen and electronics mounting won't be trivial, and I (unfortunately!) can't help you with the electronics.
I strongly suggest looking into the Pocket Screw jig systems. There are many jigs available from makers like Kraig (expensive) to Harbor Freight. (cheap but functional if you are careful) Amazing for both carcass and face frames. Lost of videos on the Tube about this.
Built custom oak cabinets in a professional shop for several years and we used a Kraig Jig. The sweet thing is that once you glue up and screw down the joint, you can take the clamps off and use them on the next setup.
(Links for example only - NOT affiliate) https://www.youtube.com/watch?v=jvzaGtMsQyY
https://www.amazon.com/Kreg-R3-Pocket-Hole-System/dp/B000J43A7W/ref=sr_1_3?ie=UTF8&amp;qid=1482774269&amp;sr=8-3&amp;keywords=pocket+hole+jig+kreg
+1 for pocket holes.
http://www.amazon.com/Kreg-R3-Pocket-Hole-System/dp/B000J43A7W/ref=sr_1_1?ie=UTF8&amp;qid=1449595585&amp;sr=8-1&amp;keywords=kreg+jr
Hey man, looks way better than anything I could build at 15. But since you're asking for some constructive criticism, I'll give a few suggestions.
The one thing I really don't like is the screws on the bottom legs. There are lots of different ways to do this, with varying levels of difficulty.
First would be just counter sinking the screw then filling the hole with wooden buttons. You can pick up a usable set of counter sink bits at harbor freight for $7
Second might be pocket holes. You can get a jig for ~40 bucks. Honestly, this might not be the best option for you. For the price, you could get a lot of other more useful tools.
Third might be a [mortise and tenon joint] (https://www.youtube.com/watch?v=aBodzmUGtdw&amp;t=3s). You can make these by hand with a decent hand saw and some chisels, and square. But it its very hard to do without a vise, which is pricey. Also takes a bit more effort and skill. You can also make them with power tools.
You could have made the cutouts for the seat slats a little cleaner. If you get a combo square and chisels. You don't need fancy chisels. These are decent starter chisels if you learn [how to sharpen] (https://www.youtube.com/watch?v=Ki8tt-VjwqI).
Amazing work sir! It turned out fantastic.
EDIT: Check out the Kreg Jig . $40 and well with it! Also on Amazon.
The casual user can get by just fine with the $40 Kreg pocket hole jig. I do a decent amount of woodworking and it works well.
http://www.amazon.com/gp/aw/d/B000J43A7W/ref=mp_s_a_1_1?qid=1458056617&amp;sr=8-1&amp;pi=SX200_QL40&amp;keywords=kreg+jig&amp;dpPl=1&amp;dpID=41auGxMjmXL&amp;ref=plSrch
They might like something like this:
http://www.amazon.com/gp/aw/d/B000J43A7W/ref=redir_mdp_mobile/186-2134268-4492466
Not to mention if you're going to be working on a bike being able to remove stupid JIS or Phillips screws without stripping them is invaluable. Buy this and move on with your life. JIS tip not included.
You can find one of these at most auto parts stores.
TEKTON 2905 3/8-Inch Drive Manual Hand Impact Driver Set, 7-Piece https://www.amazon.com/dp/B000NPPATS/ref=cm_sw_r_cp_api_kdr2AbZP86E84
Need a hammer and just be carful. If this doesn’t work you’ll need to drill out the screws. I have ideas about that but try this tool first.
These do a great job also until the head is fully rounded out
TEKTON 2905 3/8-Inch Drive Manual Hand Impact Driver Set, 7-Piece https://www.amazon.com/dp/B000NPPATS/ref=cm_sw_r_cp_api_i_b0OkDbAQAGG1H
You need an impact driver,
TEKTON 2905 3/8-Inch Drive Manual Hand Impact Driver Set, 7-Piece https://www.amazon.com/dp/B000NPPATS/ref=cm_sw_r_fm_apa_i_VVNsDbWB1P6WT
Some like this are cheap, nicer ones are out there but if you only need it once it might not be worth it.
I have had to use one on my first bikes brake reservoir, and 3 of my friends... they come in handy.
https://www.amazon.com/TEKTON-2905-8-Inch-Manual-7-Piece/dp/B000NPPATS/ref=sr_1_1?ie=UTF8&amp;qid=1511535850&amp;sr=8-1&amp;keywords=manual+impact
Get a manual impact for that. Every hit on it turns the driver, so you have maximum force on each turn.
/u/dhroknoobx
Get you an impact screwdriver. https://www.amazon.com/TEKTON-2905-8-Inch-Manual-7-Piece/dp/B000NPPATS/
And you absolutely need one of these!
TEKTON 2905 3/8-Inch Drive Manual Hand Impact Driver Set, 7-Piece https://www.amazon.com/dp/B000NPPATS/ref=cm_sw_r_cp_apa_i_BpUDDbSQB0RGV
Impact Screwdriver
> As an aside, just bite the bullet and drill those damn screws out.
If the heads haven't been ruined yet, on a 2010 they should come out pretty easily with an impact screwdriver, which you can sometimes rent from auto parts stores.
The hollow sound definitely makes me think there's either a dented dust shield or a piece of debris stuck between the shield and rotor. However, I had a grinding noise sort of like this once that turned out to be one of the pad clips having slightly cracked and warped such that it could rub the rotor under braking.
You could try buying an impact driver and using that, which could deliver more torque to the screw than you can with just a regular screw driver.
This is what I mean
There is a manual impact driver that will work better than any electric driver. You basically put it on the screw then hit it with a hammer (preferably a dead blow hammer for best results) and it will literally break any screw loose, I’ve used one for many years in the navy on gun mounts when the screws were seized in place due to the rust.
The benefits are that it won’t strip the screws out and it’s cheap enough that you can pick it for about $20 or less at places like harbor freight.
The down side is that it can be hard to use sometimes when in a tight spot while trying to hit the head and it’s not as fast as an electric impact.
If I were you I would use the manual impact to break them loose then use the electric impact to speed up the removal. Here’s a amazon link so you can see what it looks like TEKTON 2905 3/8-Inch Drive Manual Hand Impact Driver Set, 7-Piece https://www.amazon.com/dp/B000NPPATS/ref=cm_sw_r_cp_api_i_pxIZDbMCYSWGE
I can't tell if you have room, but if you do, I'd try one of these along with a hammer.
https://www.amazon.com/TEKTON-2905-8-Inch-Manual-7-Piece/dp/B000NPPATS/ref=asc_df_B000NPPATS/?tag=hyprod-20&amp;linkCode=df0&amp;hvadid=312003160272&amp;hvpos=1o1&amp;hvnetw=g&amp;hvrand=12452659071865179839&amp;hvpone=&amp;hvptwo=&amp;hvqmt=&amp;hvdev=c&amp;hvdvcmdl=&amp;hvlocint=&amp;hvlocphy=9016344&amp;hvtargid=pla-420785539586&amp;psc=1
This thing is more of what i'm talking about.
amazon
Start with tons of lube(I like Kroil and LiquidWrench), then use an impact driver with the correct size bit.
You might want to consider, depending on how tough the thing you're working on is, a manual impact driver.
Alright, no offense to the first commenter but we need to clearly define what we are talking about.
There isn't an "impact driver drill" I believe your talking about something like this that is a cordless electric 1/4" impact driver. It accepts 1/4" hex driver bits notice the special cut out at the base of the bit, that's what keeps it from falling out. It functions like a drill/driver until it encounters sufficient resistance then it impacts, giving increased torque(rotational force), it does not produce a hammering force(along the axis of the bit).
Now this is an impact wrench it too functions like a drill/driver until it meets resistance then it impacts adding rotational force but not hammer force. What are the differences between this and the driver we looked at earlier? First is obviously size, the wrench is bigger, and stronger, and heavier. But that's not what makes it a different tool, what makes it different is the tip, it's a square, like for putting sockets on, in this case 1/2" sockets but they make 3/8", 1/4", 3/4" and much larger!
So could you use the first tool in place of the much larger second tool? Yes! Use one of these adapters
Here's the problem tho, the first tool, the driver, makes at most 117 ft-lbs, and I believe that's stretching, the second tool, the wrench, makes 700 ft-lbs. To remove a rusty, crusty, stubborn lugnut you will need the bigger badder tool, sometimes it still won't be enough, and you'll need a breaker bar with a cheater pipe.
Now what the other commenter mentioned, the hammering force, that can be made with a few different tools. Let's start with the handheld impact driver yes it's confusing, two different tools, both called impact drivers, but this one we'll call the handheld, you hold it with one hand, and hammer it with a hammer. It has a cam mechanism that takes some of that axial force and imparts a slight (like 1/16 of a turn) rotation. It's good for stuck screws especially Phillips heads.
Another, more common tool is the hammer drill it is essentially a drill, it grips with three jaws onto the same bits as our first impact driver, or onto completely round bits, like your common drill bits but when you engage the hammer mechanism it will push its chuck forward and back rapidly, and the pressure you apply to the back of the drill hammers the bit into the material your drilling, useful for concrete/masonary work. But for real drilling power into concrete you want an SDS rotary hammer drill this bad boy only accepts SDS bits, provides it's own rotary and axial forces and will drill thru reinforced concrete like non reinforced butter.
Ok I think that about covers it, if anyone would like to add on I'd appreciate it. And remember:
Always use the right tool for the job, a hammer is the right tool for every job, and every tool can be used as a hammer!
Obviously that was sarcasm.
Crowbar or Fubar https://www.amazon.com/Stanley-FatMax-Xtreme-55-120-FuBar/dp/B000VSSG3O/ref=pd_sim_469_1?ie=UTF8&amp;pd_rd_i=B000VSSG3O&amp;pd_rd_r=X69KMMQWF4GRZSJBXCSY&amp;pd_rd_w=iQFXY&amp;pd_rd_wg=4ITIQ&amp;psc=1&amp;refRID=X69KMMQWF4GRZSJBXCSY
There are tools specifically made for destruction. http://www.amazon.com/Stanley-FatMax-Xtreme-55-120-FuBar/dp/B000VSSG3O/ref=pd_bxgy_hi_img_c
if you're going to use a hammer, i'd suggest a framing hammer over a ball peen, which has 2 faces, a 'half ball' and a 'flat'. the framing hammer also has a claw, designed to pull nails, but would work well when you want to penetrate a skull...
http://www.amazon.com/Stanley-51-168-24-Ounce-AntiVibe-Framing/dp/B000I1KH90/ref=sr_1_16?ie=UTF8&amp;s=hi&amp;qid=1251936764&amp;sr=8-16
one tool that's always mentioned is the crowbar, something that i'm not a fan of. have you ever tried to strike something with one? the grip is tenuous at best and would be horrible covered in gore. if the only choice i had was a crowbar, this would be my pick...
http://www.amazon.com/Stanley-FatMax-Xtreme-55-120-FuBar/dp/B000VSSG3O/ref=sr_1_3?ie=UTF8&amp;s=hi&amp;qid=1251937333&amp;sr=1-3
Had to Google that one. That thing is a brute! I think that would be too heavy for my 140lb frame, and I'd be concerned about those spikey bits getting caught up in zombies, brush, and buildings.
Though you did remind me of the FuBar Forcible Entry Tool, I think that's my ideal zombie weapon. Heck, it even comes in an 18" version in case you think you'll get pinched in tight quarters.
how's about we all post one BIFL item that we own FUBAR is mine
Sometimes you need a little persuasion.
It's not like the State Department has been doing nothing all this time.
My ultimate recommendation is Stanley FatMax Fubar III:
http://www.amazon.com/Stanley-FatMax-Xtreme-55-120-FuBar/dp/B000VSSG3O/ref=sr_1_1?ie=UTF8&amp;qid=1416358868&amp;sr=8-1&amp;keywords=Stanley+Fatmax+Fubar
Something that would be better at destroying brains. Baseball bats are too blunt force and need to crush skulls - requiring multiple hits per zombie. I want something that will pierce and destroy brains with single hits if possible.
I would start with a rock hammer because I have one on hand and it is light and compact enough that I can carry a spare if one gets stuck in a skull.
A rock pick would be on my scavenge list because it has a little more reach and can also serve extra functions: pry bar, digging, push off/hold back.
Both of those tools happen to be widely available near me. If they weren't, I'd start with claw hammers. A hardware store would probably have a FuBar, I would have Halligan tools on my scavenge list.
Any melee weapon I would add grip tape and have a backup.
I disagree with WindowShoppingMyLife, reach IS important. You're in trouble if zombies start grabbing you, so being able to kill zombies 24" before they can grab you (25" rock pick) is superior to being able to kill zombies 10" before they can grab you (12" hammer), especially if there is more than one zombie.
THIS
I have a Fubar3 it's bigger. I like to call the one you linked "son of Fubar"
Stanley FatMax Xtreme 55-120 FuBar III
I'd say the huge version of the FATMAX fubar. The thing is a monster! http://www.amazon.com/Stanley-FatMax-Xtreme-55-120-FuBar/dp/B000VSSG3O
http://www.amazon.com/Stanley-55-099-FatMax-Functional-Utility/dp/B000FCGS0Y/ref=sr_1_2?ie=UTF8&amp;qid=1367860480&amp;sr=8-2&amp;keywords=fat+max
http://www.amazon.com/Stanley-FatMax-Xtreme-55-120-FuBar/dp/B000VSSG3O/ref=sr_1_9?ie=UTF8&amp;qid=1367860480&amp;sr=8-9&amp;keywords=fat+max
Great weapons, and great tools to have around. The smaller one would probably be best, lighter and shorter so you don't get tired swinging it, and can use it in close quarters.
Here is the mobile version of your link
FUBAR III
I prefer the FUBAR III:
http://amzn.com/B000VSSG3O
Get something like this https://www.amazon.com/Wheeler-Firearms-Accurizing-Torque-Wrench/dp/B0012AXR4S
Tourqe it down to spec and do like ppl say. Go from one side to the other. Right tool and technique will get you a correct mount and no chance of squeezing the tube due to excessive force. If your not sure of the needed force something like the tool i linked will give you piece of mind. And i can recommend buying lapping equipment.
Save the money you would have spent on a gunsmith and buy a $50 torque wrench.
Depending on the rings you buy, you may need blue loctite. Before you tighten anything, close your eyes and find your natural cheek weld. Open your eyes and move the scope forward or back to suit. Level the scope. You can use bubbles, but I find squaring a flat surface on the bottom of the scope to the rail is more foolproof. Use torque wrench to tighten everything following instructions that come with the rings.
Something like this is still a hand tool, but with no actual numbers in the manual you have to find out all needed torques by yourself.
Awesome and congrats!
As far as how it sits it was just temporarily mounted.
The case I thought I had which was large enough for this was not, so I had to disassemble it.
I plan to order one of these, while browsing this sub reddit
Wheeler torque wrench
https://www.amazon.com/Wheeler-Firearms-Accurizing-Torque-Wrench/dp/B0012AXR4S
There's the analog version from Amazon. I have one, I like it, it seems to work well. I don't have anything to test it against, so I don't know if the torque it puts out is accurate, or if it's the best of the best, but it's good enough for me.
I have one of these for basic gunsmithing and scope mounting: http://www.amazon.ca/Wheeler-Firearms-Accurizing-Torque-Wrench/dp/B0012AXR4S
Torque can be set up to 65in/lbs, accepts standard 1/4 bits and has an adapter for 1/4" sockets. No more stripped holes for me.
Do you have an Inch/lb wrench?
Wheeler sells a "Fat Wrench" amazing... A MUST HAVE
http://www.amazon.com/Wheeler-Firearms-Accurizing-Torque-Wrench/dp/B0012AXR4S
The right tool for the job.
I would ask a buddy if he has a torque wrench or screw driver in lb/in. If not, here's one I'm probably going to buy. It's best to eliminate as much as you can with the hardware. If everything is to spec, you've at least eliminated your rig. There could be a little bit of cant in your reticle. I'd also read this article to make sure you've eliminated cant in your reticle to the best of your abilities.
Howto post pics to reddit can be found here.
Not really
google the torque specs. Buy a torque driver. You will use it all the time.
&#x200B;
https://www.amazon.com/Wheeler-Accurizing-Measurement-Gunsmithing-Maintenance/dp/B0012AXR4S/ref=sr_1_3?keywords=torque+driver&qid=1555630412&s=gateway&sr=8-3
Done right the MOS system is solid. There are a few things to know, though:
The only reasons I see to have a Glock milled these days is if you want irons forward, are using an oddball optic or are already having mill work done.
Here is the cheaper analog version
https://www.amazon.com/Wheeler-Firearms-Accurizing-Torque-Wrench/dp/B0012AXR4S/ref=sr_1_1?ie=UTF8&amp;qid=1520352426&amp;sr=8-1&amp;keywords=fat+wrench
Here is the digital version that I bought.
https://www.amazon.com/Wheeler-710909-Digital-Firearms-Accurizing/dp/B01B3NW5TG/ref=sr_1_2?ie=UTF8&amp;qid=1520352426&amp;sr=8-2&amp;keywords=fat+wrench
loctite blue and aeroshell 33ms for the barrel install, also great for installing a freefloat handguard and scope mounts. https://www.amazon.com/gp/product/B0012AXR4S/ref=oh_aui_detailpage_o06_s01?ie=UTF8&amp;psc=1
Ive found luck with this punch set, although the 3/32 did bend a smidge when I was pounding the hell out of it when pinning my gas block. also a rollpin starter punch set is a nice addition.
https://www.amazon.com/Fixxxer-Hollow-Stainless-Steel-Starter/dp/B0191RFK4I/ref=sr_1_4?s=sporting-goods&amp;ie=UTF8&amp;qid=1480117372&amp;sr=1-4&amp;keywords=starter+punch+set
https://www.amazon.com/gp/product/B012TKY0VI/ref=oh_aui_detailpage_o06_s01?ie=UTF8&amp;psc=1
I can't say with any certainty but it wouldn't surprise me if many electricians don't use torque tools.
I'm not a pro but I got me one of these "firearms" torque screwdrivers because I like to do it as correctly as possible.
Failing that I'd say that it's probably better to over-tighten than to under-tighten, so long as you don't strip or break the threads.
Just an FYI, you can get the 7424X for $119.99 off Amazon.
Is that $199 in US dollars? If so the same polisher is on [Amazon] (http://www.amazon.com/PORTER-CABLE-7424XP-6-Inch-Variable-Speed-Polisher/dp/B002654I46?ie=UTF8&amp;keywords=porter%20cable%207424xp&amp;qid=1465491315&amp;ref_=sr_1_1&amp;sr=8-1) for $120
PORTER-CABLE 7424XP 6-Inch Variable-Speed Polisher
https://www.amazon.com/PORTER-CABLE-7424XP-6-Inch-Variable-Speed-Polisher/dp/B002654I46
While I don't have that specific new one, I do own the previous generation.
It's an average tool. It's a little louder than other ones I have used, nor does it have the same amount of power output.
If you can spare an extra $40, I'd personally recommend this:
https://www.amazon.com/PORTER-CABLE-7424XP-6-Inch-Variable-Speed-Polisher/dp/B002654I46
Buy a Porter Cable 7424XP buffer and some cutting compound and polishing compound and buff it out after a good clay barring.
Hello every one, my questions seem like they're fairly simple so I'll get right to the point.
I'm trying to figure out if my car needs compound or if it just needs to be polished/waxed. The car is white so it was kind of hard to get a picture of the swirls. Here is a picture. The whole car is like this.
I'm also planning on buying this polisher. And I'm not really sure which brand of pads I should get for it for compounding (if needed), polishing and waxing.
I've never polished a car before so I'd like to practice on my old car then move on to my dads newer car which is a red 2011 ford focus, then move up to a grey 2016 ford escape, just thought I'd let you know.
The Porter Cable 2474XP is a good one for around $120. https://www.amazon.com/PORTER-CABLE-7424XP-6-Inch-Variable-Speed-Polisher/dp/B002654I46
I am very OCD about my car and its paint. I also live in an apartment complex with no hose, no covered parking and lots of shitty parkers. I recommend hitting up r/autodetailing and checking out their wiki.
&#x200B;
As for my own cirumstances, I don't have a clear bra or ceramic coats as I prioritize paying my student loans to hundred to thousands of dollards of paint protection. However, I clean my car using AMMO Frothe, and do paint correction every so often as needed with a DA, Maguiars 205 and 105, and some Chemical Guys orange and white pads. I used Wolfgang Gloss 3.0 sealant on my car before winter and every month during the warmer months. If the car needs it, I'll do a gentle clay application before sealing.
&#x200B;
Edit: This is the DA I use, but I recommend getting a separate velcro backing plate to mount reusable pads. Full disclosure, my gf works for the corporate parent company of Porter-Cable, and I got the thing dirt cheap.
A glaze would certainly cover up imperfections but it won't last too long. What country are you in? Can you do shipping through Amazon? If so I would recommend this, if price and shipping isn't too crazy. https://www.amazon.com/dp/B002654I46/ref=cm_sw_r_cp_awdb_y6buzb0CTB6TD
Then check out the chemical guys pads on Amazon as well. If you cant get good shipping via Amazon then I'm sorry, I wish I knew more to be of help! But good luck!
Definitely check out r/AutoDetailing,
But some quick tips, make sure you get a dual action orbital polisher, not a normal rotary polisher. It's pretty easy to mess up your paint with a normal one if you're not well practiced, but DA polishers are pretty easy to use as long as you pay attention to what you're doing. There's also random orbit polishers, but those don't generally provide enough power to do any serious paint correction...
&#x200B;
Examples:
Rotary polisher (hard to use): https://www.amazon.com/POLISHFLEX-Compact-Variable-Rotary-Polisher/dp/B004XAN4M4/ref=sr_1_12?keywords=rotary+polisher&qid=1551213120&s=gateway&sr=8-12
&#x200B;
Random orbit polisher (no power):
https://www.amazon.com/DECKER-WP900-6-Inch-Random-Polisher/dp/B000077CPT/ref=sr_1_10?keywords=rotary+polisher&qid=1551213120&s=gateway&sr=8-10
&#x200B;
Dual Action polisher (what you probably want...):
https://www.amazon.com/PORTER-CABLE-7424XP-6-Inch-Variable-Speed-Polisher/dp/B002654I46/ref=sr_1_7?keywords=rotary+polisher&qid=1551213120&s=gateway&sr=8-7
I recently bought this polisher (http://www.amazon.ca/dp/B002654I46/ref=pe_386430_121528420_TE_dp_1) and I see that it says it is a 6 inch polisher. Does that mean I need to buy 6 inch pads? Also, do I need to buy a specific type of backing plate? Do I even need to buy a backing plate?
Porter Cable on Amazon is only $96 bucks IF you go to checkout
PORTER-CABLE 7424XP 6-Inch Variable-Speed Polisher https://www.amazon.com/dp/B002654I46/ref=cm_sw_r_cp_awd_8mJxwbHAWDFER
If you have a dual action polisher (e.g. Harbor Freight or Porter Cable 7424 ), then it's definitely worth it to polish. By hand...well, if you've got about a week's worth of time and patience maybe.
If you don't want to make the investment in a dual action polisher or don't want to spend a long time polishing by hand, a wax may be the way to go. Most waxes will temporarily "fill" the tiny scratches, rendering them smoother, harder to see and ultimately making your car shinier. It will only last as long as the wax is on the paint though, which may be anywhere from a couple weeks to 2 or 3 months.
Because polish is a fine abrasive, yes, you can polish your car too often. Your car only has so much paint, and polish works by sanding off a very fine layer to smooth the paint out. As you can imagine, eventually it's possible to sand through the entire clear coat, especially with a heavier cutting compound. The less clear coat you have on your car, the less UV protection it has as well, so it will naturally degrade faster if you don't protect it (which is why applying a protective layer of wax, sealant or ceramic coating is essential after polishing).
It's a buffer like this one http://www.amazon.com/gp/aw/d/B002654I46/ref=mp_s_a_1_2?qid=1459442970&amp;sr=8-2&amp;pi=SX200_QL40&amp;keywords=porter+cable&amp;dpPl=1&amp;dpID=41RnkPdvCuL&amp;ref=plSrch
This was polished (heavy cut then light cut) then waxed using a Porter Cable.
7" front lift and 5.5" rear progressive leafs + 1" block. It was super dangerous on stock leafs with TWO stacks 3" blocks.
Although on earlier MacBook Pros the audio jack had both output and input contacts, on the 2018 (which I own) it is only listed as a "headphone jack" and not under inputs. I thought I might have read that they changed this at some point. So I have some doubts as to whether you can get audio in through the headphone jack.
If you find a cable that makes it work as an input, then I am wrong about that. But there are other things to consider.
Traditional turntables output an RIAA signal which is not suitable for normal line input. Those require a "phono preamp" to transform the signal into line level for Line In ports on audio equipment (and for Macs that have a real Line In). But if you have a turntable with a built-in phono preamp or already connected one, ignore this paragraph. If you need one, they are relatively inexpensive.
If you find out that you can't use the headphone jack as an input, your other option is to use a USB audio interface. This would have analog audio jacks for the incoming signal, and a USB port to connect to a USB port on your Mac. It would show up as an input source in your Mac Sound system preference pane. While there are many USB audio interfaces out there, if you need a phono preamp make sure that is included.
If you realize you need a USB audio interface, this is an example of what I mean and it's less than $30. I do not know how good that one is becaue I have a different brand that cost about the same price, but the reviews are positive.
As far as software, GarageBand should be able to do it, if you want something more focused, Audacity is free and widely used for these types of conversions.
Or use one of these $30 devices and you'll also be able to record playback to your PC via USB.
https://www.amazon.com/Behringer-UFO202-BEHRINGER-U-PHONO/dp/B002GHBYZ0/ref=sr_1_1?ie=UTF8&amp;qid=1468898427&amp;sr=8-1&amp;keywords=behringer+u-phono+ufo202
Super cheap and versatile. This is not for audiphiles!
Are you just playing a few songs for the wedding and want the cool factor? If so, sure, get the portable player. One or 2 plays of your records isn't going to hurt them. If you mean you plan to have the reception music DJ'd old school with vinyl, I think you're really going to want some kind of traditional setup with 2 decks and someone to manage them. You absolutely do not want your friends messing around with the equipment and your records. Without 2 decks you'll have big gaps in the music.
Or, save the $80, get one of these for $30 and start ripping your vinyl now. Put the Crosley on display and play a few of the special dances on it, but then shut it down and switch to your ripped collection and other digital music.
http://www.amazon.com/Behringer-UFO202-Audio-Interface/dp/B002GHBYZ0/ref=sr_1_1
I'm thinking it's doable for around $1,000. Thanks for asking /r/ZeosPantera!
----
What about using basically a karaoke system? Would that work for my needs? It's not going to be the high quality kind of thing you guys normally talk about here, but it may fit what we want.
If so, the best seem to be the Roland B-55 (Amazon link) or the Hisonic PA-687S. They only support two wireless mics at a time, but I could probably make that work. The key reason why I like them is because they support line out. Which I could then plug into a computer via an adapter (like the Behringer UFO202 Audio Interface). I honestly don't know if this would actually work though.
Could I use a mic/amp and audio interface setup like this as audio for software like Skype? I just don't want to spend this much money and find it doesn't work.
^Edit: ^Added ^the ^second ^amp/speaker ^option
My gut reaction is that it's an issue with your stereo and not with using the headphone jack itself, but it's difficult to say based on your comments. Have you tried plugging another source (ipod) into your stereo? Is the auto quality the same?
If you think it is the audio output out of the computer you can try a cheap external sound card like this.
I'm a bit surprised to find that something like that exists on amazon.co.uk here but it's a bit out of your budget.
Instead, you might look at this separate headphone amp and connect it to this phono preamp.
Finally, you could see if the Behringer UFO202 can be used for playback in addition to recording which is it's primary function. The headphone output on it is pretty sub-par on low impedance headphones.
The Q2N can function as a 720p USB webcam, though it's quite wide-angle (like a go-pro) so it would need to be closer than you'd think to get a good shot.
Your budget really is too low for anything other than webcams really, though you can get some pretty decent webcams for that price.
Hve a look at the Logitech C920. You'd have enough left over for a USB audio interface so you could run an output from the desk into your streaming package.
The thing is though, webcams don't have zoom. The zoom/pan that is done by software is simply blowing up the image so you're not gaining any detail, so things will just look blurrier when you zoom in.
Ideally, you'll need to reduce the distance between the camera and the stage somehow. You could, for example, suspend the camera from the ceiling, or mount it on a desk at the front of the bar?
However, if you're streaming at 720p or lower resolution, then you could potentially zoom in on the video in your streaming package without losing quality (don't use the webcam software, use something like OBS).
The Zoom Q2N would work as it can function as a USB webcam, but it's got a go-pro like wide-angle lens on it so it would need to be even closer than a normal webcam.
Really to pull this project off well, you'd need to spend at least a few more hundred dollars. A consumer camcorder like a Canon Vixia, plus a HDMI capture device like a Blackmagic Web Presenter would be the ideal budget setup.
Of course. OP can go cheap and get a Behringer U-Phono. Won't record hi-res, but can do 16/44, which is plenty.
http://www.amazon.com/Behringer-UFO202-BEHRINGER-U-PHONO/dp/B002GHBYZ0/ref=pd_sim_267_6?ie=UTF8&amp;dpID=41MOgnznR%2BL&amp;dpSrc=sims&amp;preST=_AC_UL160_SR160%2C160_&amp;refRID=1PKPY1C6X97XKX7RG62X
Yes, you will need a mixer of some kind. A USB mixer will be your audio interface.
If your turntable doesn't have a preamp, you will need one. I have been using one of THESE for years and it's great. You can use either the analog outputs into your mixer or connect it directly to a USB port on your computer to bypass the mixer.
Are the Cassette and Turntable separate device, and I mean separate from the amp? If they are you might have a better chance with Behringer USB Interfaces. Behringer makes one that is specifically for turntables.
Let me see if I can find it -
https://www.amazon.com/Behringer-UFO202-BEHRINGER-U-PHONO/dp/B002GHBYZ0/
It has a switch so you could use LINE for the Cassette and PHONO for the Turntable.
The Scarlette 2i2 would only work if you have standard Line Level inputs to the device, either Unbalanced (RCA) or Balanced (XLR).
If the Cassette and Turntable are built into the unit, then you are somewhat screwed, but there are some devices that can drop Speaker Level down to Line Level.
Let's see if I can find some of those -
https://www.amazon.com/Mr-Ho-2-Channel-Converter-Adjustable/dp/B07BBM1M5Z/
https://www.amazon.com/Massive-Audio-Hi-Low-Speaker-Converter/dp/B0045F1F0U/
https://www.amazon.com/Kicker-KISLOC-2-Channel-Speaker-Converter/dp/B00I4EF1BC/
https://www.amazon.com/s/ref=nb_sb_noss_1?url=search-alias%3Daps&amp;field-keywords=speaker+level+to+line+level+converter&amp;rh=i%3Aaps%2Ck%3Aspeaker+level+to+line+level+converter
u/housecat420 I dunno if you're still looking for an answer to this, but roughly seconding the answer above. I'm running my turntable into this Behringer USB/Audio interface with phono preamp, into a USB OTG cable with power, into an old Android (in this case a OnePlus One) running AirAudio. The phone isn't fully rooted, just developer options set to allow AirAudio root access. AirAudio source set to mic like u/goodhur mentioned. Works really well so far.
Another thought I just had, if you connect the bx5 to you computer, you could use one of these: http://www.amazon.com/Behringer-UFO202-BEHRINGER-U-PHONO/dp/B002GHBYZ0 to playback records. That may be your cheapest option.
You can connect the ground wire to any casing screw. You will need a pre amp if your stereo does not have a phono input. You can connect to your computer using a usb audio interface. Something like this has both things you are looking for. I don't have any personal experience with this particular item. You can also find seperate phono pre amp and usb interfaces.
Edit: In the case where your receiver does not have a phono input and you are adding a pre amp, connect the turntable ground to the pre amp. There will be a connector screw.
All you need is a [Behringer UFO202] (http://www.amazon.com/Behringer-UFO202-BEHRINGER-U-PHONO/dp/B002GHBYZ0)
Behringer UFO202 is only $40 but honestly it's a piece of junk.
302USB for $50 might be a little better. Never used it so I couldn't tell you.
This Lexicon Alpha unit for $60 looks decent for the price. Has balanced TRS outputs as well as a couple of inputs. Again, never used it so not sure how good it is.
Here's the thing, you bought a great pair of studio monitors, but any of these three options will likely output less than the potential quality of those Rokits. I really recommend spending the extra money on something comparable to the Audiobox I mentioned in my first comment to get the most out of your investment. If not, that third link would be my next choice. TRS will provide better quality than an RCA connection, hands down.
To find more options, just look up "audio interface." Add "usb", "firewire" etc to get more specific results based on your setup.
I would think you would have noticeably better sound with a $35 Behringer dac. UCA202 I think it is. Or if you got this one instead you wouldn't need a preamp to play a turntable as it works as a phono preamp as well. Cheap and probably not a long term solution but great while your broke.
If you aren't aware, that is sarcasm.
I would avoid getting a usb turntable as most of them are shit. Instead, I'd try to find a nice used turntable, receiver, and something like this. What is your local craigslist?
You can replace the preamp + RasPi set up with one of these if you want USB audio. I assume it should be relatively close quality-wise since it's by the same manufacturer as the preamp at a similar price point.
As for the turntable, just scour Ebay and Craigslist for deals. /r/vinyl and other audiophile forums have a lot of reviews of older turntables so you can at least get an idea of the quality. Ideally if you can see the turntable in person you should try it out and see if you like how it sounds before you buy it.
Just bear in mind that (just like cars) your setup will only be as good as its worst component.
http://www.amazon.it/gp/product/B002GHBYZ0?psc=1&amp;redirect=true&amp;ref_=ox_sc_act_title_1&amp;smid=A3JULAK39SLJ94
Ho visto che mi serve questo, ma se la rileva come scheda audio non mi conviene prenderla esterna per poi attaccarci il giradischi?
Sono confusissimo
Kershaw Select Fire. It's my EDC. It's a folder knife first and foremost, with a flip-out 1/4" bit driver, and the capacity to carry four 1/4" bits. When you flip the screwdriver part out, it also exposes a bottle cap opener, which is a nice touch. Mine has the half-serrated blade. Most of the ones I see don't have the serrations.
It comes with two each standard and philips drive in anodized black, however I replaced two of them with bits that I find myself needing frequently (An allen driver that fits almost everything on my bicycle, and a T25 security Torx, because I find myself needing a T25 for some strange reason or another, very frequently (servers at work, my big ham radio at home).
The pocket clip can be mounted left or right, but due to the screwdriver bit holders, you're limited to "tip down" configuration. Not my usual mode, but in the 3 years I've had this trusty thing on me, it's come to not bother me much. Highly recommended for anyone whose main multi-tool needs are a great blade and some real, usable screwdrivers.
Hello, fellow IT guy. I love this knife myself, have you ever seen it?
EDIT: There's also a serrated version, which is what I have, but I can't seem to find it on Amazon at the moment.
I really like the Kershaw with a screwdriver built in. Can't remember the name of it, but it has a bottle opener and 4 bits for the screwdriver.
Edit: here it is: Kershaw 1920 Select Fire Multi-Tool https://www.amazon.com/dp/B002IVPKOU/ref=cm_sw_r_cp_apa_0QNMxbMZQY1CA
/u/redh4re asked for a list of all the items:
[Kershaw 1920 Select Fire Multi Tool] (http://www.amazon.com/Kershaw-1920-Select-Fire-Multi-Tool/dp/B002IVPKOU)
Maui Jim Polarized sunglasses
Standard bi-fold leather wallet
Survival Straps Para-cord keychain with Wounded Warrior Project dogtag
Survival Straps Para-cord bracelet with Wounded Warrior Project logo dogtag
Otterbox for iPhone 5 (used phone to take picture)
Men's Drive from Citizen Eco-Drive AR 2.0 Chronograph Watch
I think it's a Kershaw Select Fire
Kershaw Select Fire knife
if its the kind of sysadmin who actually has to do some of everything, including hardware, i am in love with this thing:
https://smile.amazon.com/Kershaw-1920-Select-Fire-Multi-Tool/dp/B002IVPKOU/ref=sr_1_1?ie=UTF8&amp;qid=1496869018&amp;sr=8-1&amp;keywords=kershaw+screwdriver+knife
its a screw driver knife with a really sturdy screwdriver. its on the bulky side, and i dont have a need for it anymore but it use to be my EDC when i had to deal with this, that and hardware too.
Yes, that's exactly what I was thinking for the wire. And the eyeglasses kit could come in handy at other times when you need a small screwdriver set. Along those lines, I have one more suggestion. I've been carrying the Kershaw Select Fire for my EDC lately. It's a tiny bit more bulky than most of my other pocket knives, but it has a bit driver and holds 4 bits. Comes with 2 types of Phillips and standard, but you could really put in any bits. That thing comes in handy more often than not! I think it would really round out your repair carry.
Kershaw Select Fire (1920); Multifunction Pocketknife with 3.4-Inch 8Cr13MoV Stainless Steel Blade, Black Glass-Filled Nylon Handle, 1/4-Inch Hex Drive, 2 Flathead Bits and 2 Crosshead Bits; 5 oz. https://www.amazon.com/dp/B002IVPKOU/ref=cm_sw_r_cp_apa_Eo2KBbXB7ZA5H
I carry both. I carry my knife everywhere. I can't carry my gun at work, but I still carry the knife. I'm not really supposed to, but it's a knife/screwdriver combo so I convince myself it's a multitool instead of a knife.
Another option is the Kershaw Select Fire.
The Get-a-way driver is a great keychain to carry. Also the Kershaw 1920 is an awesome multi tool knife.
My boss gave us some of these kershaws and I like them, it's a decent knife with a nifty 1/4 nutdriver and some screwdriver attachments. I lost the one he gave everyone and just bought a new one on amazon.
Panther Vision Hat
Cheap sunglasses from Zenni Optical
Casio CA53W
Gerber EAB Lite
Leatherman Wingman
Snap-On "Magic" Pliers
Kangertech EVOD E-Cig w/ upgraded battery
Wallet
Zebra F-701
http://www.amazon.com/Gerber-31-000345-E-A-B-Pocket-Knife/dp/B002RILCLY/ref=sr_1_2?ie=UTF8&amp;qid=1396204876&amp;sr=8-2&amp;keywords=gerber+razor+knife
Small, simple, effective.
http://www.amazon.com/Gerber-31-000345-E-A-B-Pocket-Knife/dp/B002RILCLY/ref=sr_1_7?ie=UTF8&amp;qid=1395800134&amp;sr=8-7&amp;keywords=gerber+knife
Gerber EAB & 250 blades (5x 50 packs) Irwin Industrial Tools Bi-Metal Blue Utility Blade, 50-Pack
I can open boxes for the rest of my life!
For an EDC: 2x Spyderco Delica 4
Gerber eab https://www.amazon.com/Gerber-Lite-Pocket-Knife-31-000345/dp/B002RILCLY
I just got one of these and love it: https://www.amazon.com/dp/B002RILCLY/ref=sr_ph_1?ie=UTF8&amp;qid=1466747281&amp;sr=sr-1&amp;keywords=knife
To date its my most used knife ever and ive had it all of a week. When the blade is replaceable, theres really no fucks to give about using it whenever a knife could be useful.
hope it helps, fellow "better not use my nice knife to open that x" brother.
my favorite box cutter & super cheap if you lose it!
gerber
https://www.amazon.com/Gerber-Lite-Pocket-Knife-31-000345/dp/B002RILCLY
Even cheaper on Amazon. I really like this knife. Carry it ever day.
I got the "Going on a fancy date" version.
This one right here[Gerber $7 locking folder](Gerber EAB Lite Pocket Knife [31-000345] https://www.amazon.com/dp/B002RILCLY/ref=cm_sw_r_cp_apa_1Gr0BbWJEZJCF)https://i.imgur.com/Xff0gTK.jpg
Razer blade knife like this: Gerber EAB Lite Pocket Knife [31-000345] https://www.amazon.com/dp/B002RILCLY/ref=cm_sw_r_cp_taa_7hJyCbKENYE5Z
I have always has a knife but I found I was reluctant to use it sometimes as it would really dull the edge to open boxes. The cheap and easily replaceable blade frees me to use it whenever I like without worry.
I carry a Gerber EAB everywhere with me. If I forget I have it and I'm about to get on a plane, I just unscrew the blade and throw it away!
Gerber EAB Lite Pocket Knife [31-000345] https://www.amazon.com/dp/B002RILCLY/ref=cm_sw_r_cp_awd_3lgFwbSWVB17F
I usually have my multitool with me, but I always have my knife with me. Cheap little handle that fits a utility knife blade in it, best pocket knife I ever had and super cheap if you lose it. Usually grab a pack of 50 blades every 6mo at a hardware store and swap them out every few days. (the clip is worthless, I just snap it off... but the actual knife is great)
If you just want the cutting advantages of a ceramic blade, why not get something like the Gerber EAB Lite and put ceramic utility blades in there?
I love using my utility knife to sharpen my pencils. Inexpensive, easy to carry and you can buy a pack of 50 for 10 bucks.I just got this bad boy and it's working out pretty great.
Leatherman Style CS
http://www.amazon.com/Leatherman-831207-Style-Multi-Tool-Scissors/dp/B0032XVNMQ
Best $15 I ever spent... I sort of feel "naked" without mine on my keychain now. It's super small, but yes... he's totally right...
You need this.
Knife opens without opening the whole thing and you also have decent scissors!
One that I recently bought was the Leatherman CS, it has the same tools as the little SD victorinox but I like the design and feel a little more. Leatherman has the Skeletool as well if you're interested in something bigger.
On a classier side I really liked my Buck Chairman. It's only knives, no tools but it's a quality product.
Personally I always carry my Victorinox one handed Trekker in my pocket and my SOG Trident in my backpack just for good measure.
Victorinox Swiss Army One-Hand Trekker Lockblade Pocket Knife (Black) https://www.amazon.com/dp/B000687B44/ref=cm_sw_r_awd_tv7Iub1MPW1PS
Leatherman 831207 Style CS Clip-On Multi-Tool with Scissors https://www.amazon.com/dp/B0032XVNMQ/ref=cm_sw_r_awd_LJ7Iub1STMMN2
Buck Chairman Series Cadet Comfort Craft TM Knife (Rosewood, 3 1/4-Inch) https://www.amazon.com/dp/B002NLIA4C/ref=cm_sw_r_awd_YL7Iub0XCV0VB
SOG Specialty Knives & Tools TF1-CP Trident Knife with Partially Serrated Assisted Folding 3.75-Inch Steel Blade and GRN Handle, Black TiNi Finish https://www.amazon.com/dp/B000PIE2I8/ref=cm_sw_r_awd_2Q7Iub16JNT0K
I have the Leatherman CS and it fucking rules. It's ridibulously tiny and light, it has a quick-release carabiner clip, scissors, blade, tweezers, and a file that doubles as a small screwdriver. I use the scissors all the time and 've never needed anything other than those basic tools.
A keychain multitool?
http://www.amazon.com/o/ASIN/B0032XVNMQ/?tag=dp-us-20
http://www.amazon.com/o/ASIN/B0007UQ1DS/?tag=dp-us-20
I prefer the ones with scissors, but they also have similar models with pliers.
Carry a knife. Doesn't have to be a huge Crocodile Dundee size one. Something like the Leatherman Style CS is perfect.
Ah! See, I had already been looking at the Leatherman 831207 Style CS, but that one looks much more functional.
They're nice but different builds are for different users. You might not use the scissors at all, but someone else might need them as the main use like these. I use the pliers more often than scissors as well, but like I said choose the right ones for you.
Scissors are the killer feature. You can cut blister packs and wire tires with an open blade, but it is way more dangerous and has less control than scissors. I've had a Leatherman Micra for years and really have never had to use the knife blade. Scissors covered it.
http://amzn.com/B0032XVNMQ
Leatherman recently came out with the sidekick and wingman multitools which are much more reasonably priced.
I've been looking for a multitool to replace the Miss Army I was gifted as a teenager so many years ago. This looks nice, though admittedly I'm very attracted by the fact that I can hook it onto a carabiner for my purse. No belt clips here!
This would be TBH. Leatherman - Sidekick Multi-Tool, Stainless Steel with Nylon Sheath https://www.amazon.com/dp/B005DI2QTC/ref=cm_sw_r_cp_api_CKuczbH5A0PFC
https://www.amazon.com/Leatherman-Sidekick/dp/B005DI2QTC/?tag=parametrek-20 Thanks :)
Thanks! This is "streets ahead" of you.
https://www.amazon.com/dp/B005DI2QTC/ref=cm_sw_r_cp_apa_jdtczb3ZMBYGG
Is my account old enough to enter?
It's utterly boring and predictable, but I like this Leatherman Sidekick:
https://www.amazon.com/Leatherman-Sidekick/dp/B005DI2QTC/?tag=parametrek-20
Thanks for the giveaway.
What the hell, why not.
https://www.amazon.com/Leatherman-Sidekick/dp/B005DI2QTC/?tag=parametrek-20
Thanks!
Leatherman - Sidekick Multi-Tool, Stainless Steel with Nylon Sheath https://www.amazon.com/dp/B005DI2QTC/ref=cm_sw_r_cp_apa_jdtczb3ZMBYGG
Thanks for doing this giveaway, I'm in.
Leatherman
I'm in. Thank you.
https://www.amazon.com/Leatherman-Sidekick-Multi-Tool-Stainless-Sheath/dp/B005DI2QTC/ref=sr_1_4?s=power-hand-tools&amp;ie=UTF8&amp;qid=1493777113&amp;sr=1-4&amp;keywords=Leatherman
Thanks so much! Amazing giveaway. https://www.amazon.com/Leatherman-Sidekick/dp/B005DI2QTC/?tag=parametrek-20
I use a simple lockblade Kershaw Skyline for most tasks. For utility, I'll bring a Leatherman Juice or a Leatherman Sidekick when backpacking.
A 2.5" to 3" blade is optimal for general utility (processing food, cutting cordage, roasting sticks, carving, etc). Processing wood is better done with a saw or hatchet.
No need for a toothpick or a large "survival knife"
I usually prefer folding knives since they are more compact unless I have a specific task that requires a specific tool.
Why wouldn't you have a knife?
[Leatherman Sidekick for $25 on Amazon](
http://www.amazon.com/dp/B005DI2QTC/?tag=gizmodoamzn-20&amp;ascsubtag=[t|link[p|1646773823[a|B005DI2QTC[au|5856732741879800112)
First, you're damn awesome for hosting this, THANK YOU /u/parametrek <3
Kind of torn between the sidekick and the SAK ranger, one is more pocket friendly, but the sidekick has pliers which it seems I'm always hunting down for a while when I need a pair. Then on the SAK, I just miss my old little one and that has most of the things the leatherman does...bah, decisions.
Go with the Leatherman https://www.amazon.com/Leatherman-Sidekick/dp/B005DI2QTC/?tag=parametrek-20https://www.amazon.com/Leatherman-Sidekick/dp/B005DI2QTC/?tag=parametrek-20
Unless you can give a reason for going with the SAK Ranger aside from more easily pocketed?
Lets give this a shot!
https://www.amazon.com/Leatherman-Sidekick/dp/B005DI2QTC/?tag=parametrek-20
I'm in!
https://www.amazon.com/dp/B005DI2QTC/ref=cm_sw_r_cp_apa_jdtczb3ZMBYGG
First of all: I need 61 comment karma. Would be nice if you could help me!
A Sidekick would be great.
https://www.amazon.com/Leatherman-Sidekick/dp/B005DI2QTC/?tag=parametrek-20
By the way: I realy like the parametrek search. The kind of searching is much better than the one from eBay or Amazon.
Edit: Only 56 comment karma missing. You are awesome!
Thanks for the giveaway 👌
https://www.amazon.com/Leatherman-Sidekick/dp/B005DI2QTC/?tag=parametrek-20
What a great thing to do! Thanks for all the effort you put in to helping people find great tools.
I would love this:
https://www.amazon.com/Leatherman-Sidekick-Multi-Tool-Stainless-Sheath/dp/B005DI2QTC/ref=sr_1_4?s=power-hand-tools&amp;ie=UTF8&amp;qid=1493777113&amp;sr=1-4&amp;keywords=Leatherman
Good luck to everyone!
You're so generous for doing this! I've always wanted a nice multitool but I don't generally have a huge amount to spend on knives and cool gear like this. I really hope I can win! I would love to put a leatherman into my daily carry.
Thanks again and good luck with your website! It seems to be pretty well set up.
I would love this one!
https://www.amazon.com/Leatherman-Sidekick/dp/B005DI2QTC/?tag=parametrek-20
Leatherman Please! Thanks for the Giveaway!
https://www.amazon.com/Leatherman-Sidekick-Multi-Tool-Stainless-Sheath/dp/B005DI2QTC/ref=sr_1_4?s=power-hand-tools&amp;ie=UTF8&amp;qid=1493777113&amp;sr=1-4&amp;keywords=Leatherman
https://www.amazon.com/Leatherman-Sidekick/dp/B005DI2QTC/?tag=parametrek-20
https://www.amazon.com/Leatherman-Sidekick/dp/B005DI2QTC/?tag=parametrek-20
in it to win it!!!
Cool databases by the way, is there a way we can donate?
Leatherman - Sidekick Multi-Tool, Stainless Steel with Nylon Sheath https://www.amazon.com/dp/B005DI2QTC/ref=cm_sw_r_cp_api_X4vczbCE0PRK3
Can never have too many leathermans!
Awesome of you to do a giveaway
http://www.amazon.com/Leatherman-Sidekick/dp/B005DI2QTC/?tag=parametrek-20
Congrats on your new site! Search feature is pretty killer, very nice way to sort. I had no idea there were that many options for multi tools.
I recognize your name from lurking and occasionally posting in /r/flashlights. Keep it up!
In Please! This is my choice thank you!
Thank you kind sir!
https://www.amazon.com/Leatherman-Sidekick-Multi-Tool-Stainless-Sheath/dp/B005DI2QTC/ref=sr_1_4?s=power-hand-tools&amp;ie=UTF8&amp;qid=1493777113&amp;sr=1-4&amp;keywords=Leatherman
bbq set with golf club theme
Star Wars themed tie
Funny wireless speaker
Multi tools are useful to keep around
If he likes tacos and hosting
More hosting fun
I'm in
https://www.amazon.com/gp/aw/d/B005DI2QTC/ref=mp_s_a_1_3?ie=UTF8&amp;qid=1493805251&amp;sr=8-3&amp;pi=AC_SX236_SY340_QL65&amp;keywords=multitool+leatherman&amp;dpPl=1&amp;dpID=41WUxy-mQ3L&amp;ref=plSrch
In for this one: https://www.amazon.com/gp/aw/d/B005DI2QTC/
All the cat5 cables ive seen have 4 pairs; blue, brown, green and orange/red and a striped counterpart. In the image posted it looks like the colors are still there, they just went with different patterns and shades.
So im seeing the orange one come out of the wall, and it LOOKS like its going into the third block from the left, but i notice its actually connected to the second from the left, so its matched with the solid orange. The fourth from the left appears to be the solid greens, as i can also see the third block contains the striped greens (as well as some of the leftover from the wall cable). And of course the far right block houses the orange striped wires. So it looks like someone was bridging the orange and green pairs, but the green striped line is broken or cut on purpose.
So like i said before if it was coming from the phone line we would only need 2 to get data to the modem, but as this is coming from a router, itll need most, if not all, of the 8 wires connected. There is a guide to wiring all this up and it goes by color of the wires, but thats just a guide and may not always be the case in how it was actually wired up.
This is how a standard ethernet cable is hooked up
Also cat 5e is just a cat5 cable that can handle more data and is better shielded so thats a non issue.
So long story short, its looks like all of them need to be hooked back up. All the suggestion in my first post should still be valid and if i were doing it i would probably run a whole new cat5 cable from the router to the pc. Failing being able to do that, i would trim up the cables in your pic, crimp new heads on following the diagram color chart, and patch them together with a female-to-female rj45 patch socket. Failing ability to do that, i would solder each wire to the other and shrink tube the joint. And lastly i would resort to twisting them together with electrical tape, or using a wire block like in your pic to join them and throw the whole thing in an enclosure like a plastic bag or something lol. Basically anything to get those wires touching and not falling apart will net some degree of success.
You'll need:
Edge trimmers
Cat5 head crimper
F2F rj45 coupler
Cat5 heads
Something similar to this 8 wire bus bar will work, but smaller would be better
And thats about it, depending on how you decide to go about the repair. Also no problem at all. shoot me another message if anything else pops up and ill help however i can.
There's this RJ45 cable tester that's a part of this kit (crazy how popular this model is), if you don't have one and if you just moved in, you might find it useful to double check to make sure the cabling is "correct", and that all 4 pairs/8 wires are actually working.
https://www.amazon.com/UbiGear-Crimper-Connector-Network-Crimper315/dp/B008UY5WL0
IMO you just need a box cutter and wire cutters.
It would also be handy to have a cable tester.
Edit:
>I definitely can't afford them
I call shinannegans. Cheap af
While you could put a keystone on the other end and then use a short Cat6 cable to connect to the AP, I'd recommend doing it this way instead:
https://www.amazon.com/UbiGear-Crimper-Connector-Network-Crimper315/dp/B008UY5WL0/ref=sr_1_4?ie=UTF8&amp;qid=1522779845&amp;sr=8-4&amp;keywords=rj45+crimper&amp;dpID=51DjZejC9oL&amp;preST=_SY300_QL70_&amp;dpSrc=srch
https://www.youtube.com/watch?v=ysYLdFxNVuc
If you want to take it off you have to cut the old one and put on a new one..
it can be done..
Thought a crimp tool does not cost that much and they will come in handy one you have one.. No more will you be forced to use whatever length you buy..
I recommend this one: https://www.amazon.com/ECore-Cables-93-100-018-Professional-Crimping/dp/B01LX16ZCH
Or you can get this little kit for the sameish price which is adequate..
https://www.amazon.com/UbiGear-Crimper-Connector-Network-Crimper315/dp/B008UY5WL0
IF you are truly cheap LOL - You can cut the cable with about 6 to 10 inches from the end and then cut the rest of the cable to length THEN cut the rest of the cable to the length you want and strip both ends and splice all 8 wires back together (but THIS is NOT recommended LMAO)
UbiGear Cable Tester +Crimp Crimper... https://www.amazon.com/dp/B008UY5WL0?ref=yo_pop_ma_swf
It comes with the crimper tool the cable tester the RJ45 connectors all for $15.
I used this when I ran CAT5e for my Security Cameras and I had to make sure the cable still worked after pulling through the run and the cable tester worked great. Just plug in a short CAT6 cable in each room and attach the cable tester then go to your utility room and hook up the other end of the tester until it passes, label and move on.
UbiGear Cable Tester +Crimp Crimper +100 RJ45 CAT5 CAT5e Connector Plug Network Tool Kits (Crimper315)
by UbiGear®
Learn more: https://www.amazon.com/dp/B008UY5WL0/ref=cm\_sw\_em\_r\_mt\_dp\_U\_7efzCbDCN9H6S
If you can build a pc you can run some cat5e cable where ever you live. People say im just renting and I can't put holes in the wall and all other kinds of things. You can run it along the base boards using cable clamps or do any number of things to make it work. Just get some cable https://www.amazon.com/dp/B0092TG310/ref=cm_sw_r_cp_dp_T1_haCnzb6BHCV61 and here's everything else you need including the tool https://www.amazon.com/dp/B008UY5WL0/ref=cm_sw_r_cp_dp_T1_DdCnzbFAGCRX7 so for about $50 you can run as much cable as you need. I would run one line to your gaming room and use a Gigabit Ethernet switch for everything in the room. A real gamer never uses wifi because they know about networking.
You can get an ethernet crimper and some RJ45 ends for very cheap online, there's a ton of guides on the internet on how to properly terminate cat5/6 cable, no point getting a shop etc to cut a cable when you need to size it for your needs in the room really :)
EDIT: here you go - linky
I have everything in my media center. The biggest thing I did to clean it up was custom cut-to-length ethernet cables. You can get the tools to do it yourself quite inexpensively, it's easy to learn, and it makes a big difference. Plus, then you'll get the itch and re-wire everything in your house.
&#x200B;
Unfortunately a lot of the power cables are non-standard so it's harder to get different lengths. I have a cable management box that I shove a power strip and all the power plugs into, and then velcro all the cables into a bundle to run to the hubs.
&#x200B;
Quick Guide on custom cables:
https://www.youtube.com/watch?v=zX17FF47deI
&#x200B;
Toolkit on Amazon:
https://www.amazon.com/UbiGear-Crimper-Connector-Network-Crimper315/dp/B008UY5WL0/ref=sr_1_3?ie=UTF8&qid=1541653653&sr=8-3&keywords=ethernet+crimp+tool
(Note: This only includes cable ends, but you can do what I do and cut up the longer cables you already have to make shorter cables, instead of buying cable stock... until you need more)
&#x200B;
Cable Management Box:
https://www.amazon.com/Management-Organizer-Storage-Holder-Computer/dp/B074T8BBGV/ref=sr_1_3?ie=UTF8&qid=1541653791&sr=8-3&keywords=power+strip+box
&#x200B;
UbiGear Cable Tester +Crimp Crimper +100 RJ45 CAT5 CAT5e Connector Plug Network Tool Kits
I'm sure sure what you mean. Are you using keystone jacks, or just making your own male connectors with a crimper?
You need four connected wires in total, because if you have something like 6 functional wires in there instead of 8, your network equipment might try to negotiate at gigabit, and it won't work. Whereas if you have 4 wires at positions 1,2,3,6, it'll go straight to 100mbps, afaik.
Edit: If you were using a pre-terminated cable that you are now modifying, you'll need buy a crimper.
http://www.amazon.com/dp/B00004RGYL/
http://www.amazon.com/gp/product/B008UY5WL0
I've personally used the following kits:
Kit Option 1
Kit Option 2
Both are great. The second kit adds a few tools for mobile device repair/fat finger support.
Yup, I just replaced it and its been working fine ever since. There are various youtube videos on replacing the power supply, its easy. You'll need a TR8 screwdriver. I bought a set that costs around 15$ CAD. Power supply cost about 55$.
&#x200B;
https://www.amazon.ca/TEKTON-2830-Everybit-Precision-Electronic/dp/B009MKGRQA/ref=sr_1_7?crid=3I5S4DKEMKDAF&keywords=tekton+screwdriver+set&qid=1566453570&s=gateway&sprefix=tekton+sc%2Caps%2C153&sr=8-7
&#x200B;
https://www.amazon.ca/ADP-240CR-Replacement-Playstation-CUH-1100A-CUH-1115A/dp/B07GYJWXZ7/ref=sr_1_3?crid=2CIXD4AMOGG25&keywords=ps4+power+supply&qid=1566453593&s=gateway&sprefix=ps4+power+supply%2Caps%2C134&sr=8-3
There are tons of guides and videos on youtube to help you out. Its not complicated. There are around 7 screws(4 on the back of the PS4 and 3 holding the power supply in) you gotta take out. Unplug it and pull it straight out while trying not to bend the prongs. Pop your new power supply and screw everything back up. Took me about 10 minutes. I hope that fixes your issue because if it doesn't, then it might be the logic board and you might need professional help.
In other words, if you've mastered the tool, you probably own it. If you can't be arsed to spend $11.11 on this and wait two days, then I wouldn't recommend you go "exploring". If you have done the basic research, you can't be kept out of anything. It isn't cryptography, for fuck's sake; it's a somewhat uncommon screw, the bits for which are easily available.
Here are some links for the product in the above comment for different countries:
Link: this
|Country|Link|
|:-----------|:------------|
|UK|amazon.co.uk|
|Canada|amazon.ca|
This bot is currently in testing so let me know what you think by voting (or commenting).
Get this. It has everything you need to fix and assemble most 3D printers.
TEKTON 2830 Precision Bit and Driver Kit for Electronic and Precision Devices, 27-Piece https://www.amazon.com/dp/B009MKGRQA/ref=cm_sw_r_other_apa_npFlxbKGM4BG9
That SONOXY is probably fine, sorry I missed it on your list.
For precision something like this https://www.amazon.com/gp/product/B009MKGRQA/ref=s9_dcacsd_bhz_bw_c_x_1
or if you are cheap https://www.amazon.com/dp/B014X1KMWW?psc=1
for normal size screw driver, because I accidentally leave mine places all the time, I just get a cheap basic one. Used to get nice $30 ones but I just lose too many. I've never purchased tools from amazon either and not used to USD so kind of tough. As long as it has philips and flat head, square or whatever it's call you are a good. Any will have those.
I bought this set years ago - Tekton 2830 - and it's my go-to for all small electronics.
It has the PH00 you need for the DS4 and also the TR9 bit if you would ever want/need to fully open up your PS4.
Also has a bunch of special bits that are needed for iPhones, Wiis, Xboxes, and pretty much any other small electronics.
I bought this for fixing up Gamecube controllers because it has 2 triwing tips plus all kinds of other screwdriver heads - and the screwdriver handle is hollow with a cap so you can store the screws in there while you work. Highly recommend.
You'll need to go to a micro center or specialty computer store to get the screwdrivers, since they won't be available at a regular hardware store. You'll need a small phillips head for the back case and a star bit for the hard drive.
The difficult one is the tri-wing screwdriver that you need for the battery. This is a pretty cheap set that should cover all of the bits you will need
Hope this helps!
If you don't already have a set, you could try something like this maybe? I have the larger set (Seems pricey compared to the CDN price) which I am going to use to mount my block.
https://www.amazon.co.uk/TEKTON-2830-Everybit-Precision-Electronic/dp/B009MKGRQA/ref=sr_1_1?ie=UTF8&amp;qid=1496867590&amp;sr=8-1&amp;keywords=tekton+everybit
I bought this one off amazon a little while ago and it works wonders for me. It has T-1 through T-10 which will cover all the hardware you're going to encounter. Plus it's cheap
if you're talking about the rubber on the joystick, you find find replacement joysticks on amazon: http://www.amazon.com/Gamecube-Replacement-Analog-Yellow-Replaces-Controller/dp/B004H7P0B6/ref=sr_1_1?ie=UTF8&amp;qid=1421534140&amp;sr=8-1&amp;keywords=gamecube+joystick However, in order to open the controller, you need a tri-wing screwdriver: http://www.amazon.com/Tri-wing-Screwdriver-Nintendo-Gamecube-Gameboy/dp/B000S6AG9G/ref=sr_1_1?ie=UTF8&amp;qid=1421534165&amp;sr=8-1&amp;keywords=triwing+screwdriver Although, I would recommend not getting if from this seller (Just wanted to show the type of screwdriver needed). While it is cheap, a lot of people have waited 6+ weeks for it and nothing from the seller (me included). I would recommend buying this handy tool kit: http://www.amazon.com/TEKTON-2830-Everybit-Electronics-Precision/dp/B009MKGRQA/ref=sr_1_2?ie=UTF8&amp;qid=1421534165&amp;sr=8-2&amp;keywords=triwing+screwdriver replacing the joystick isn't that hard, everything fits into place
It depends on the quality. I have a couple sets from Wiha ranging from $15-50, but you certainly don't need to buy ones that nice. I bought a couple of these sets to give to people last year. I kept one for myself and it is percectly fine.
I have liked this Tekton 27 piece set for a while. I mostly like it because it comes with both size pentalobe bits, if you're doing any apple repair stuff. It comes as part of their 135 piece set too, which I think is a good deal. Reach isn't very long is the only real downside.
I have a MBP 2009, and i just replaced my battery: No bullshit, easiest thing i've ever done.
I bought this THIS Battery from Amazon and THIS toolkit for the Y-1 screwdriver (side note: you need this screwdriver; i opened up my MPB and saw the screws holding the battery in place and said "WTF IS THAT?" Checked Lowe's, Home Depot, and Radio Shack…none of them had it).
Take the plate off of your MPB, unscrew the two Y-1 screws, disconnect the battery cord (do not pull it out; there's a tab where in connects to the motherboard?…push it), plug in your new battery, screw it back in, put your cover back on, and BAM.
That was three weeks ago…no problems since.
Make sure you ground yourself first.
A new screen and back cover would be $68 from eBay, I just replaced the battery in mine and it's awesome, went from around 4 hrs of screen on time to 8 hrs. You can get a new screen and frame from eBay here for $57.66, and you can get a new back cover from $10.33-$19.51 (depending on color) here is Metallic Red, Black, and here's Ballistic Nylon Black, and Blue. I'm also assuming that you haven't replaced your battery either so here's the battery from Amazon for $12.98 if you want that too. If you don't have small screwdrivers/bits then you'll need to buy a cheap "mobile" work kit, I used this one from Texton for $9.24. It might seem easier to just buy a new phone, but there's nothing that really compares to the Turbo, I would also watch this video from JerryRigEverything on repairing the device before purchasing anything. The fact that the screen comes with the frame will make replacing the screen easier and you won't have to worry about applying adhesive or removing the frame from the old display, and there's a lot of adhesive holding the back cover on, when I replaced the battery I removed all of it and nothing is shaking around or loose. So for a new screen, frame, back cover, battery, and tools, it would be $90.21.
Depends on the tools you have. If you have all the tools and fixtures it is a total cake walk to build an upper around a barrel. If you don't have the tools/fixtures, you will struggle.
You can get a Magpul BEV block, armorer's wrench and a torque wrench for all under $100 and are worth their weight if you get into more serious AR building.
alot of this is dependent on your model, but to give you a rough idea...
the most important tool you can own is a copy of the Factory Service Manual for your car, it can make fixing any part of the car 10x easier, and gives you torque specs for almost everything so you dont wreck your car. Subaru uses aluminum engine blocks, and over torquing will strip the threads from the block, or if you're really unlucky you can crack the block or head leaving you with a 3,300lb paperweight.
99% of fasteners are Metric, common sizes are 8, 10, 12, 14, and 17mm. there are also some 19, 21, and 23mm but they're less common. If you do any engine work you'll want a 14mm 12-point to remove the head bolts. If you need to split your short block, those are 12mm 12-point i think...
changing the engine oil will require a normal 17mm socket, but if you feel like changing manual transmission or rear diff oil you'll need a Torx T70 bit. (im doing mine this weekend) thats about $10 on amazon
If you plan on doing any engine/timing belt work, consider getting a set of cam/crank pulley tools. they're specific to Subaru and its nearly impossible to get the timing belt pulley's and harmonic balancer torqued correctly without them. There are a few different tools for different pulleys, each is about $50. you can find them here and on amazon.
I'm not sure about older models, but the fuel line that connects to the intake manifold on my subie has a quick-disconnect that requires a special tool to remove, you can remove the fuel line in other locations, but its nearly always a pain in the ass to get it back on and will risk damaging a hose. this is only really needed if you think you'll ever remove the intake manifold or plan to pull the engine at any point.
Other than that...
Breaker bars are great, especially for head bolts, brakes, and oil drain plugs
Feeler Gauges for checking tolerances
If you jack up the car, throw some jack stands under there for redundancy so if your jack slips, you aren't killed (this happens, alot.)
a compressor, impact wrench, blowgun, air ratchet, and some impact sockets can be infinitely useful, but know when to use them and when not to use them.
a good set of torque wrenches is always good, the torque specs on subarus are anywhere from 3.6ft/lbs to something like 136 ft/lbs. Amazon has some pretty good ones which cover this range... i bought this, this and this
im sure i can come up with more, if i do i'll add them as an edit. If you can give me an idea of what you plan on doing maintainance-wise, maybe we can give you an idea on what you'll need/expect
You are getting horrible advice and this thread is complete shit. Here is exactly what you need:
Vice.
Upper Vice Block.
Torque Wrench 1/2”.
Anti-Seize Grease.
Blue Loctite.
Punch Set.
Torx & Allen Set.
The reason people are recommending an armorers wrench is for the muzzle break install. Every armorers wrench has a slot designed for installing one. This isn’t mandatory because you can use a regular wrench but you might as well get one because you will need one to build a lower when installing the castle nut.
I bought this torque wrench for $40. It's been working fine so far. $22 on this vice. I picked up a BEV Block at GT's I think.
It's not amazing or anything, but I've been able to do everything I've needed to up to this point.
Just get a torque wrench. Most people dont bother and just use a normal wrench to reef on their lugs and that's bad for them. Your lugs should be around 80 ft lbs, just google 'em.
That's so much more work than cutting it and crimping on a new end... crimper kits are actually pretty cheap.
A coax line would not work, because it cannot be used in place if an Ethernet line. A cable modem (which is the only device that will except a Coax, requires a CMTS (Cable Modem Termination System) in order for it to function. CMTS's are thousands of dollars. You could use an Ethernet over power, which is the power line adapter you are talking about. The only issue, an especially with old houses, the wiring is done in sections. Which is why you have circuit breakers for turning off parts of the house, without needing to turn the whole house off. In other words, you wont be successful with the Power Line Adapter, because your room is most likely in a different section of the house, than the modem. Also, appliances that use large amounts of energy, such as washers, dryers, microwaves and fridges can cause your latency to spike up into the 4000ms (You can see how Ethernet over Power didn't really catch on).
Your best option, is buying a 350 ft of CAT 5 Cable, and fishing it up to your room. This will require Crimpers and CAT 5 ender and cable tester. This will cost you about $50 dollars, and it's really easy to do. Here is a Guide
Edit: Never heard of MoCA adapter's apparently that works too
I can find this https://www.amazon.ca/TEKTON-2830-Everybit-Precision-Electronic/dp/B009MKGRQA/ref=s9_simh_gw_g469_i2_r?pf_rd_m=A3DWYIK6Y9EEQB&amp;pf_rd_s=&amp;pf_rd_r=Y7SAJN4RS2ECV8VFAKNY&amp;pf_rd_t=36701&amp;pf_rd_p=b06971ce-9992-44c1-9ee0-eb9792e71b5e&amp;pf_rd_i=desktop but it seems to be same bits
http://www.amazon.com/Stanley-66-052-6-Piece-Precision-Screwdriver/dp/B00009OYGV
While you can get good punches with those, you need to make sure your keystone is on a good solid surface, and press down cleanly and smoothly; make sure not to "rock" the tool from side to side as it might crimp or otherwise damage the wire. (A keystone "stand" might help) Your keystone should also have come with a protector which you should use immediately as it helps seat the wire as well.
If you expect to do this regularly, the investment in a real 110 punch-down tool is worth it. I'm a huge fan of the comfort-grip Fluke, but there are many other brands which will do just as good of a job for a quarter of the price (they're just not as comfortable or feature-packed).
https://smile.amazon.com/dp/B000FGWPK2/
Fluke Comfort Punch: $70
https://smile.amazon.com/dp/B0000AZK4D/
TrendNet 110 Punch: $17
https://smile.amazon.com/dp/B008NXK3NU/
Keystone Stand: $6
IMO a 110/66 punch-down tool is the only cabling tool a networker still needs in her bag.
the small one of these might work:
http://www.amazon.com/SpeedOut-Damaged-Screw-Extractor-Bolt/dp/B00IRL3WP4/ref=sr_1_1?ie=UTF8&amp;qid=1426164320&amp;sr=8-1&amp;keywords=stripped+screw+extractor
personal fix is a pair of wire nippers like these https://www.amazon.com/Xuron-170-II-Micro-Shear-Flush-Cutter/dp/B000IBSFAI
And some needle nose pliers to grab the then nipped nail and pull.
This is why I drive a Jeep with steel bumpers and carry one of these:
https://www.amazon.com/dp/B000VSSG3O?ref=ppx_pop_mob_ap_share
This polisher? I remember reading some time ago that there was some mod people were doing with this one and the power switch or something and that the newer model wasn't able to do this?
Also, because it has variable speed - what is a good speed to work with?
I found this and this. Any input on these?
I carry a geber e.a.b. http://www.amazon.com/Gerber-31-000345-E-A-B-Pocket-Knife/dp/B002RILCLY/ref=pd_sim_hi_2
It's small, light, always sharp, and you can easily remove the clip.
Dont buy a harbor freight torque wrench. I bet your hand is more accurate. Seriously, HF stuff is just a waste of money.
If you want to own one, spend a little bit more and have some patience. This one will do and its only $40.
If you dont want to spend $40, go to Autozone and rent one for free. You pay them the price of the wrench and then bring it back in 48 hours for a full refund. It a program they started to stop people from buying and returning tools all the time and its great. I think O'Riley has something similar too.
SpeedOut Damaged Screw Extractor & Bolt Extractor Set https://www.amazon.com/dp/B00IRL3WP4/ref=cm_sw_r_awd_9a3Dub1RZ8KAW
Try using an impact driver, something like this:
https://www.amazon.com/dp/B000NPPATS/ref=cm_sw_r_cp_api_i_qzCBDb9KRYWE8